Straightening Procedure
Body straightening can be complicated usually requiring use of special equipment. Only trained technicians should straighten the body.
Completely analyze the situation before taking any steps to repair the body. Knowing the cause of the problem will help you determine the correct sequence of repair steps.
Reverse the flow of damaging forces. In many cases, this requires that you apply pressure from different directions at the same time.
Use controlled heat carefully. Too much or too little heat can be a major source of trouble.
The following procedures are recommended:
- Heat the area that you will stretch in order to straighten the frame.
- Heat the area after you exert sufficient pressure to cause a slight checking or silvery cracks to appear on the surface of the metal. Gradually increase the pressure while heating.
- Do not heat more than 606°C (1200°F). A red glow means that the material is overheated. Overheating causes distortion, stretching and a change in the characteristics of the metal.

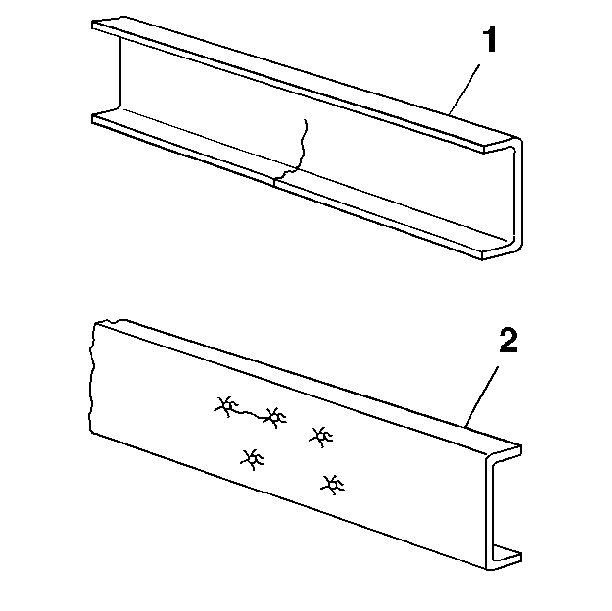
You can see two common types of cracks here.The straight crack usually travels from the edge of a flange, across the flange, through the web section of a rail, and through the other flange. The straight crack results from:
- High concentrations of stress in small areas of the frame
- Excessive bending movement
- Torsional loading
The sunburst crack radiates from a hole in the web section of a rail or a crossmember. High loads at a loose mounting bracket or a crossmember cause the sunburst crack.
If both the rail and reinforcement are cracked in a particular area of the frame, repair them separately. Flanges must react independently in order to prevent localized stress.
Use a copper spacer between the flanges of cracked base rail flanges and reinforcement flanges.
Repair the crossmember mounting flange crack in the same manner as the side rail crack. But you should build up weld bead to provide a good, smooth radius. Replace a badly damaged crossmember.
You may have to align the frame and level the rails before you repair the frame.
Follow these steps to repair a crack:
- Remove any equipment that hinders access to the crack.
- Find the extreme end of the crack and drill a 6 mm (0.25 inch) hole.
- Open up 2 mm (1/16 inch) at the bottom of the crack in order to allow good penetration of the weld. (You may use a hacksaw blade.)
- Repair with the proper electrode and welding techniques.
- Grind the weld smooth on the inside and outside of the rail or crossmember. Be very careful to eliminate weld buildup or notches on the edge of the flange.
"V" grind the entire length of the crack, from the starting point to the 6 mm (0.2 inch) hole at the extreme end.
Welding Procedure
Improper welding techniques cause many weld and frame failures. This information points out potentially troublesome areas and offers some general guidelines for successful frame welding.
Most failures occur at the end of the weld, in areas of the frame that are under high stress. You can reduce failures by making a hole or a slot in the part to be attached. Then, using a fillet, weld around a slot or a plug weld. Do not leave a notch at the end of a weld.
Overwelding can be harmful, especially in an area of the frame that has high concentrations of stress.
You may weld small cracks in a crossmember.
Follow these tips when welding:
- The frame is covered with a protective wax coating. Use a wire
brush to remove the wax before welding. When you finish welding, re-coat the
area with the new wax.
Notice: Use the correct fastener in the correct location. Replacement fasteners must be the correct part number for that application. Fasteners requiring replacement or fasteners requiring the use of thread locking compound or sealant are identified in the service procedure. Do not use paints, lubricants, or corrosion inhibitors on fasteners or fastener joint surfaces unless specified. These coatings affect fastener torque and joint clamping force and may damage the fastener. Use the correct tightening sequence and specifications when installing fasteners in order to avoid damage to parts and systems.
in General Information. - Test pattern.
- Do not use oxyacetylene welding equipment.
- Whenever possible, use smaller diameter electrodes and make several passes. This is better than using a large-diameter electrode and making fewer passes.
- Use only as much heat as needed to give good penetration.
- Make sure the weld is free from craters and undercuts.
- Make sure you remove the scale from each successive pass.
- When repairing a crack, grind the surface of the weld flush with the parent material.
- Do not weld across the flanges when mounting accessories.
- Do not weld within 19 mm (¾ inch) of a flange when mounting accessories.
- Do not weld up to the edge of a part being welded to a frame. Leave 6 mm (0.25 inch) between the end of the weld and the edge of the part.
- Do not weld cast brackets to the frame.
- Do not weld together the flanges of cracked reinforcements and base rails.
- Connect the welding machine ground cables as close as possible to the working area. Do not attach the ground cable to the engine.
- Disconnect the vehicle battery.
- Keep the welding cables away from the vehicle wiring. Avoid direct contact between the welding cables and any part of the vehicle.
