- CAUTION: Remove any buildup of corrosion
on the wheel mounting surface by scraping and wire brushing before reinstalling
the wheels. Installing the wheels with poor metal-to-metal contact at the
mounting surfaces can cause lug nuts to loosen. This can lead to a wheel coming
off while the vehicle is moving, causing loss of control and possible personal
injury.
NOTICE: A torque wrench or J 39544 must be used to ensure that
the wheel nut (lug nuts) are tightened to specification. Never
use lubricants or penetrating fluids on the wheel stud, the nuts, or the mounting
surfaces as this can raise the actual torque reading on the torque wrench.
Wheel nuts (lug nuts), studs and mounting surfaces must be clean and dry.
Failure to follow these instructions can result in wheel, nut and/or stud
damage.
NOTICE: Refer to Fastener Tightening Notice.
- Install the steel front wheels.
| 2.1. | Slide the front wheel over the studs. Take care not to damage
the stud threads. |
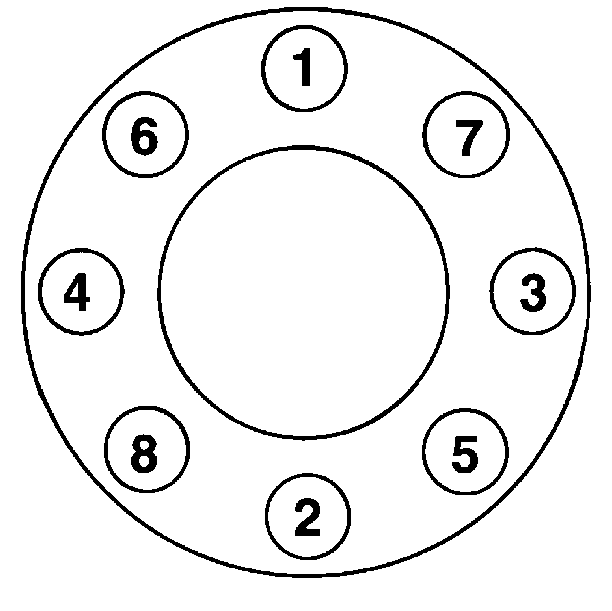
| 2.2. | Snug up the nuts in sequence. Do not tighten them fully until
all the nuts have been seated. |

- Install the aluminum front wheels.
| 3.1. | Slide the front wheel over the studs. Take care not to damage
the stud threads. |
| 3.2. | Lubricate the two piece cone lock cap nuts between the cap nut
and the washer with SAE 30W oil in order to minimize corrosion between the
mating surfaces. |
| 3.3. | Snug up the nut in sequence. Do not tighten them fully until all
the nuts have been seated. |

- Install the dual steel rear wheels.
| 4.1. | Slide the inner wheel over the studs. Take care not to damage
the stud threads. |
| 4.2. | Align the vent holes for valve access. Slide the outer wheel over
the studs. Take care not to damage the stud threads. |
| 4.3. | Snug the lug nuts in sequence. Do not tighten them fully until
all the nuts have been seated. |
- Install the aluminum rear wheels.
| 5.1. | Slide the steel inner wheel over the studs. Take care not to damage
the stud threads. |
| 5.2. | Align the vent holes. Slide the aluminum outer wheel over the
studs. Take care not to damage the stud threads. |
Tighten
Tighten the lug nuts on steel wheels to 529-678 N·m
(390-500 lb ft) in sequence.
Tighten
Tighten the lug nuts on aluminum wheels to 542-678 N·m
(400-500 lb ft) in sequence. Do not overtighten.
| | Important: After the first 80 to 160 km (50 to 100 miles) of operation, recheck
the tightness and retighten if necessary.
Maintain the nut tightness at the recommended level through the planned
periodic checks.
Calibrate air wrenches periodically for proper torque output.
Use a torque wrench in order to check air wrench output.
|
- Measure the lateral runout. Refer to Wheel Runout Specifications.


