CAMPAIGN: FRT. SHOCK ABSORBER UPPER MOUNTING BOLT

MODELS: 1985 P35 MODEL LIGHT DUTY TRUCKS EQUIPPED WITH RPO FS3, 5,000 LB I-BEAM FRONT AXLE
General Motors has determined that some 1985 P35 Model Light Duty Trucks equipped with RPO FS3, 5,000 lb. I-beam front axle, may experience the front upper shock absorber mounting bolt pulling through the frame on one or both sides. To prevent the possibility of this condition occurring, involved vehicles must have the front shock absorbers replaced and the frame rails inspected for cracks that necessitates frame rail repairs.
VEHICLES INVOLVED
Involved are certain 1985 P35 Model Light Duty Trucks equipped with RPO FS3 I-beam front axle. The vehicles involved were built within the following VIN breakpoints:
Plant From Through ------ ---- ------- Detroit SOP F3510492
The specific vehicles involved in this campaign have been identified by Vehicle Identification Number Computer Listings. These listings are furnished to all involved dealers with the campaign bulletin.
DEALER CAMPAIGN RESPONSIBILITY
Dealers are to service all vehicles subject to this campaign at no charge to owners, regardless of mileage, age of vehicle, or ownership, from this time forward.
Whenever a vehicle subject to this campaign is taken into your new or used vehicle inventory, or it is in your dealership for service in the future, you should take the steps necessary to be sure the campaign correction has been made before reselling or releasing the vehicle.
Owners of vehicles recently sold from your new vehicle inventory are to be contacted by the dealer, and arrangements made to make the required modification according to instructions contained in this bulletin.
If no owner's name and address were available to GMC Truck at the time of campaign initiation, the dealer will determine the owner's name and address from the dealership sales records. Please provide this information directly on the second copy of the listing next to the applicable VIN, so that our records may be updated and the appropriate modification mailed to the owner. This second copy should then be submitted to the address listed below in the previously supplied yellow campaign envelopes.
GMC Truck General Motors Corporation 101 Union Street Plymouth, Michigan 48170
OWNER NOTIFICATION
Owners will be notified of this campaign on their vehicles by GMC Truck (see copy of Owner Letter included with this bulletin). A listing of owner names and addresses has been furnished to the involved dealers to enable dealers to follow up with owners involved in this campaign. This listing may contain owner names and addresses obtained from state motor vehicle registration records. The use of such motor vehicle registration data for any other purpose is a violation of law in several states. Accordingly, you are urged to limit the use of this listing to this campaign.
RECOMMENDED TOOLS
Not all units involved in this campaign will require frame rail repair. However, for those that do, repairs will be greatly eased with the use of the following tools:
Die grinders and discs, Figure No. 1 - A, B, & C Die grinder arbor, Figure No. 1 - F 1/8" x 3" cutoff disc, Figure No. 1 - D 16mm Reamer, Figure No. 1 - E Body grinder and discs 4-6" C-clamps, 2 Required Mig welder - 75% Argon, 25% C02 or 100% C02 Shielding Gas E7OS3 wire 0.035" or 0.045" diameter Necessary to use to check for cracks: Dye penetrant - Magnaflux, Pynaflux, Welco (Dye Penetrant manufacturer) - To be obtained from local welding supphers. Necessary to use for welding of frame: Copper Plate - 1 -1 /2" x 6" x 3/8"
SERVICE PROCEDURE
1. Jack and support front end of the vehicle. 2. Remove front wheel. 3. Remove the inner fender skirt if equipped. 4. Remove the existing front shock absorber. Discard shock and attaching hardware. 5. Inspect the inboard and outboard sides of the frame rail for fuel and brake lines, and electrical wiring. Reposition away from work area as necessary.
Frame Rail Inspection
6. Remove paint off the frame rail at the shock absorber mounting hole using a grinder. The cleaned area should be approximately four inches in diameter.
7. Inspect the frame rail and the shock absorber mounting hole for hole elongation and cracks. The hole diameter should not exceed 16mm.
8. Inspect the frame rail for cracks using a dye penetrant. Carefully follow the instructions supplied by the manufacturer for safe and correct use of the product.
Frame Rail Repair
9. If the hole diameter is less than or equal to 16mm and no cracks are detected using the dye penetrant, ream out the hole using a 16mm reamer. Do not substitute a 5/8" reamer. Proceed to Step 27.
If the hole is elongated or cracks are detected, proceed to the following steps:
10. Clamp two pieces of flat or square stock to the top of the frame rail just above the shock mounting hole. The edges of the stock must hang over the outside surface of the rail. This will be used as a guide when making a template.
11. Make a template out of clear plastic. Place an edge of the plastic against the stock which is clamped to the top of the rail and mark the shock mounting hole and two other reference holes using a grease pencil. Also mark the plastic to distinguish top from bottom.
12. Disconnect the battery ground cable(s).
If the hole is elongated but no cracks appear proceed to Step 16.
Crack Repair
13. Identify the end of each crack and center punch 1/16" past its end.
14. Drill a 15/64" (6mm) hole through the frame rail at center punch locations.
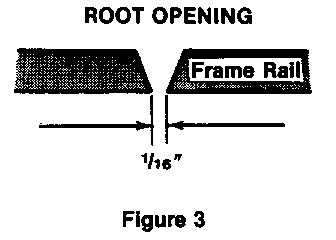
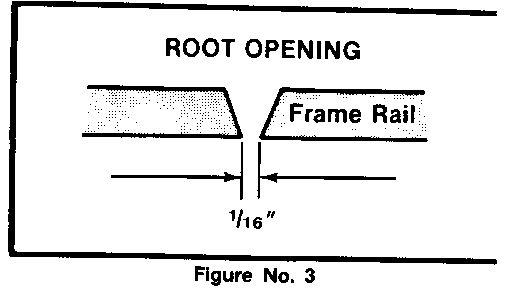
15. Use a die grinder and cutoff disc to cut a 6D degree 'V' notch through frame between the drilled holes and the shock mounting hole The root opening should be 1/16" minimum. See Figure No. 3.
16. Back up the area to be welded with 3/8" or 1/2" thick copper plate. The plate should be shimmed 0.030 inches from the inside of the rail and held in place with the two C- clamps. Shimming ensures that the weld metal goes past the back edge of the frame and full weld fusion is obtained on the back side.
NOTE: A copper backing plate is used because it will not fuse with the frame during the welding process. It will be removed when welding is completed.
17. Fill hole and/or cracks completely with E7OS3 wire using a mig welder. At least two weld passes should be made. Start at the outer end of the crack(s) and weld towards the center hole. This will prevent cracks from widening due to heat generated during welding. When cracks are filled, weld the center hole.
18. Inspect for voids and low spots and reweld as necessary.
19. Remove the copper plate.
20. Grind both sides of the frame smooth using appropriate grinders and reinspect for voids. Reweld as necessary. Make sure that the inner rail crack edges are burnt in for 100% weld penetration.
21. Grind an area approximately 1-1/2" in diameter as flat as possible where the new mounting hole is to be drilled. The repair area should be smooth after grinding to match the rest of the rail. This also includes the inside of the rail.
22. Set up the template as outlined in Steps 10 & 11 and center punch the shock mounting hole.
23. Drill a 15/64" (6mm) hole.
24. Redrill using a 7/16" (11 mm) drill bit.
25. Ream out the hole using a 16mm reamer. Do not substitute a 5/8" reamer. Inspect the inner edge of the hole for voids. Reweld, grind and drill if necessary.
26. Paint the frame rail as required to prevent corrosion using a flat black paint.
Shock Absorber Installation
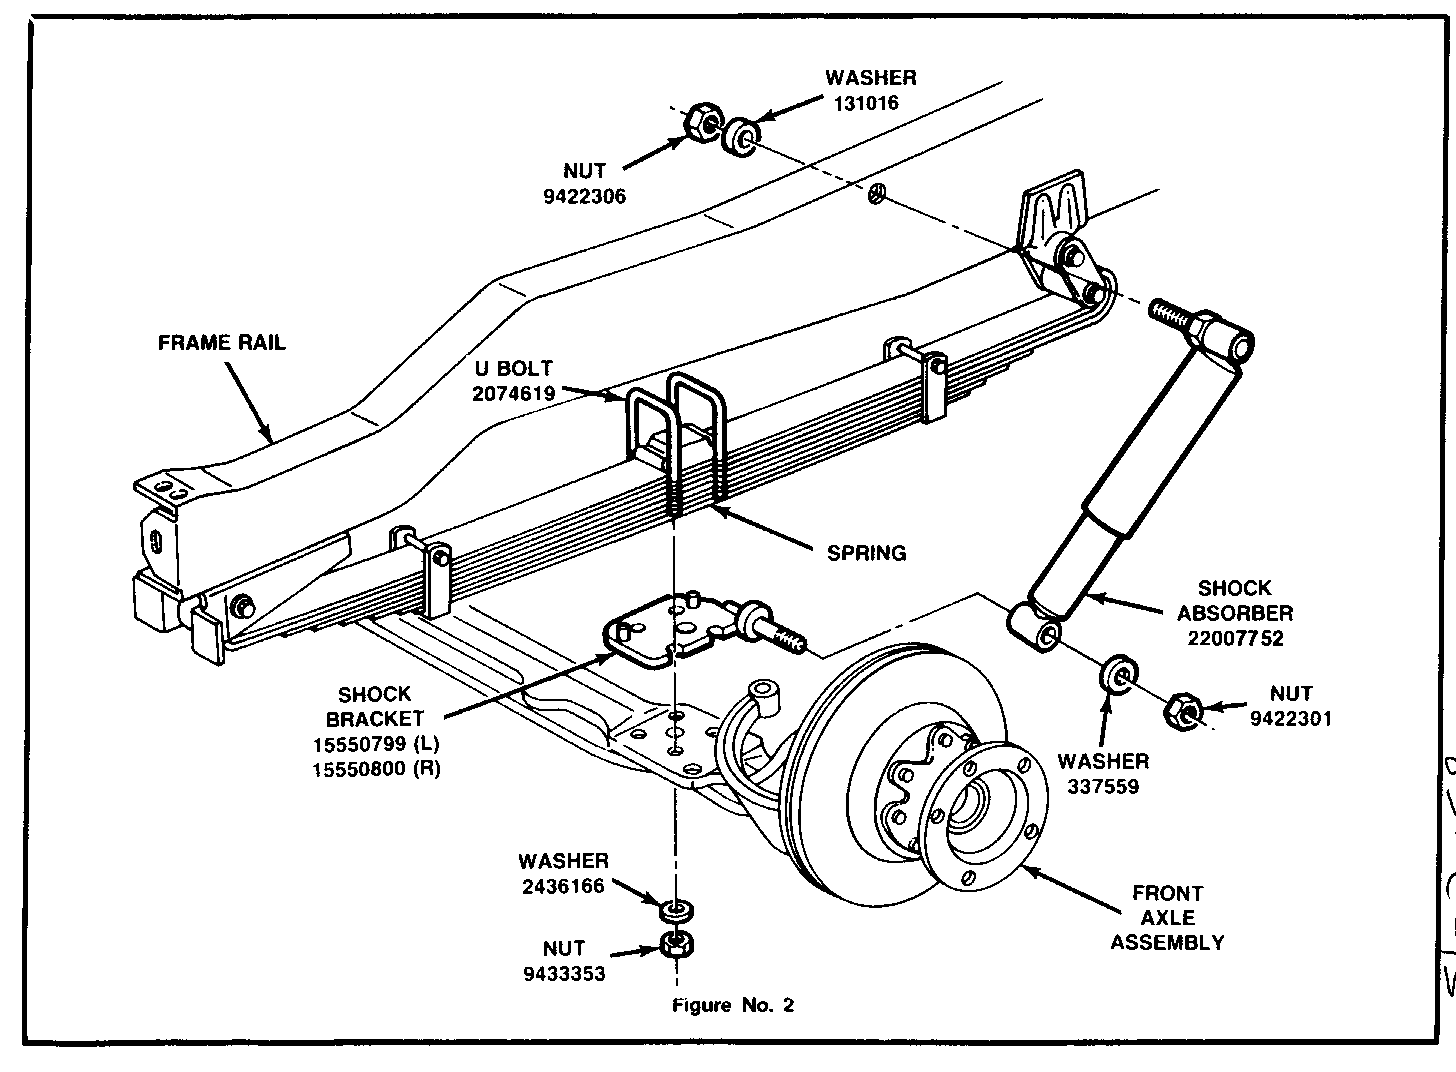
27. Remove the two front spring to axle u-bolts. Discard bolts, nuts, and washers, Figure No.2.
28. Remove and discard the lower shock absorber bracket, Figure No. 2.
29. Install new lower shock bracket and secure using new fasteners. Torque nuts on u-bolts to 110 Nm (80 ft-lbs), Figure No. 2.
30. Install new shock absorber on lower bracket and in upper mounting hole in the frame rail. The shock absorber pin is tapered at its base. The shock will not fit flush with the frame rail. Torque upper retaining nut to 110 Nm (80 ft-lbs) and the lower retaining nut to 50 Nm (40 ft-lbs).
31. Replace inner fender if equipped.
32. Replace front wheel.
33. Lower vehicle.
34. Repeat entire procedure on opposite side of vehicle.
35. Reconnect negative battery cable(s).
PARTS INFORMATION
Parts are to be obtained from the Warehousing & Distribution Division of General Motors (WDDGM). To ensure that these parts will be obtained as soon as possible, they should be ordered from WDDGM on a C.I.O. order with no special instruction code, but order under an advise code (2).
Part Number Description Quantity ------ ----------- -------- 15550797 Kit 1
One Kit Required Per Vehicle Involved
Kit Contents:
15550798 Instructions 1 131016 Washer - Shock Mtg Upper 2 9422306 Nut - Shock Mtg Upper 2 15550799 Bracket Asm - LH 1 15550800 Bracket Asm - RH 1 22007752 Shock Absorber Asm 2 2074619 U-Bolt 4 9433353 Nut - U-Bolt 8 2436166 Washer - U-Bolt 8 9422301 Nut - Shock Mtg Lower 2 337559 Washer - Shock Mtg Lower 2
Copper Plate (1-1/2" x 6" x 3/8") will be shipped to involved dealers by GMC Truck.
WARRANTY INFORMATION
Labor Operation Net** Trouble Number Description Time* Amount Code ------ ----------- ----- ------ ---- V3110 Inspect vehicle, test for cracks, install new 3.1 Hr $6.75 96 shock absorbers and new lower shock absorber mounting brackets
V3111 Inspect vehicle, test for cracks, weld and 4.0 Hr $6.75 96 redrill one upper shock absorber bolt hole, install new shock absorbers and new lower shock absorber mounting brackets
V3112 Inspect vehicle, test for cracks, weld and 4.8 Hr $6.75 96 redrill two upper shock absorber bolt holes, install new shock absorbers and new lower shock absorber mounting brackets
V3113 Inspect vehicle, test for cracks, repair 4.2 Hr $6.75 96 cracks, weld and redrill upper shock absorber bolt hole (one side), install new shock absorbers and new lower shock absorber mounting brackets
Labor Operation Net** Trouble Number Description Time* Amount Code ------ ----------- ---- ------ ---- V3114 Inspect vehicle, test for cracks, repair 5.3 Hr $6.75 96 cracks, weld and redrill upper shock absorber bolt holes (two sides), install new shock absorbers and new lower shock absorber mounting brackets
Labor Operation Net** Trouble Number Description Time* Amount Code ------ ----------- ---- ------ ---- V3115 Inspect vehicle, test for cracks, weld and 5.1 Hr $6.75 96 redrill one upper shock absorber bolt hole (one side). Repair frame cracks, weld and redrill upper shock absorber bolt hole (opposite side). Install new shock absorbers and new lower shock absorber mounting brackets
* For dealer to receive Administrative Time Allowance associated with this campaign, add 0.1 hrs. to the Labor Operation Time Allowance.
** This amount is to be entered in the net item amount on the Warranty Claim. It includes credit for dye check material and any additional material that may have been required to complete this campaign.
CAMPAIGN IDENTIFICATION LABEL
Each vehicle modified in accordance with the instructions outlined in this product campaign bulletin will require a "Campaign Identification Label". Each label provides a space to include the five (5) digit Dealer Code of the dealer performing the campaign service. This information may be inserted with a typewriter or ballpoint pen.
Each "Campaign Identification Label" is to be located on the radiator core support in an area which will be visible when the vehicle is brought in for periodic servicing by the owner.
Apply "Campaign Identification Label" only on a clean dry surface.
ADMINISTRATIVE PROCEDURE
Procedures covering this campaign are outlined in Section V of your dealership's "GMC Truck Claims Processing Manual" #SD8519.
Dear GMC Truck Owner:
General Motors has determined that your 1985 GMC P35 Model Light Duty Truck, equipped with an I-beam front axle, may experience the upper shock absorber mounting bolt pulling through the frame rail on one or both sides.
To prevent the possibility of this condition occurring on your vehicle, please contact your GMC Truck dealer on or after May 30, 1986 in order to arrange an appointment to have the frame rails inspected and, if necessary, repaired. New shock absorbers will be installed. The inspection and necessary corrections will be completed at no charge.
Instructions for making this correction have been sent to your GMC Truck dealer. The time needed to correct your vehicle will be from 3 hours to 5-1/2 hours, depending on the work necessary to complete the job.
The enclosed owner reply card identifies your vehicle. Presentation of this card to your dealer will assist in making the necessary correction in the shortest possible time. If you have sold or traded your vehicle, please let us know by completing the postage paid owner reply card and returning it to us.
We are sorry to cause you this inconvenience; however, we have taken this action in the interest of your continued satisfaction with our products.
General Motors bulletins are intended for use by professional technicians, not a "do-it-yourselfer". They are written to inform those technicians of conditions that may occur on some vehicles, or to provide information that could assist in the proper service of a vehicle. Properly trained technicians have the equipment, tools, safety instructions and know-how to do a job properly and safely. If a condition is described, do not assume that the bulletin applies to your vehicle, or that your vehicle will have that condition. See a General Motors dealer servicing your brand of General Motors vehicle for information on whether your vehicle may benefit from the information.
