CAMPAIGN: FUEL SYSTEM COMPLIANCE

NOTE: GM OF CANADA CAMPAIGN 96078 IS LOCATED BELOW THE U.S. VERSION
FMVSS NON-COMPLIANCE CAMPAIGN
SUBJECT: FUEL SYSTEM COMPLIANCE -------------------------------
MODELS: 1993-1996 CHEVROLET AND GMC P3"62 G/P CUTAWAY CHASSIS ----------------------------------------------------- UPFITTED AS SCHOOL BUSES ------------------------
The Highway Safety Act, as amended, provides that each vehicle which is subject to a recall campaign of this type must be adequately repaired within a reasonable time after the customer has tendered it for repair. A failure to repair within sixty (60) days after tender of a vehicle is prima facie evidence of failure to repair within a reasonable time.
If the condition is not adequately repaired within a reasonable time, the customer may be entitied to an identical or reasonably equivalent vehicle at no charge or to a refund of the purchase price less a reasonable allowance for depreciation.
To avoid having to provide these burdensome remedies, every effort must be made to promptly schedule an appointment with each customer and to repair their vehicle as soon as possible. As you will see in reading the attached copy of the divisional letter that is being sent to customers, the customers are being instructed to contact the appropriate Customer Assistance Center if their dealer does not remedy the condition within five (5) days of the mutually agreed upon service date. If the condition is not remedied within a reasonable time, they are instructed on how to contact the National Highway Traffic Safety Administration.
DEFECT INVOLVED
General Motors has decided that certain 1993-1996 P3"62 G/P Cutaway Chassis upfitted school bus model vehicles may fail to conform to Federal Motor Vehicle Safety Standard (FMVSS) 301, "Fuel System Integrity. These vehicles may exceed the fuel spillage requirements when tested to the requirements of (FMVSS) 301. Additionally, some body builders' methods for attaching the school bus body to the chassis may allow fuel fill and/or vent hose separation under certain collision conditions. If an ignition source was present, fuel leakage resulting from this condition could result in post-crash fire.
To prevent the possibility of this condition occurring, dealers are to install new shielding for the fuel tank, new fill pipe and vent tube hoses; and if required, add additional attachments to secure the school bus body to the chassis (see applicable body builder instructions at the back of this bulletin).
VEHICLES INVOLVED
Involved are certain 1993-1996 P3**62 G/P Cutaway chassis upfitted as a school bus and built within the following VIN breakpoints:
PLANT YEAR DIVISION MODEL PLANT CODE FROM THROUGH --------- --------- ----- ------- ----- ---- ------- 1993-1996 Chevrolet P3 Detroit "3" SOP EOP 1993-1996 GMC P3 Detroit "3" SOP EOP
NOTICE: Dealers should confirm vehicle eligibility through VISS (Vehicle Information Service System) or ServiceNet (GMC only) prior to beginning campaign repairs. [Not all vehicles within the above breakpoints may be involved]
Depending on the bus body manufacturer, the service procedure may involve installing the fuel tank shield only or may also require modification of the body attachment to the frame. Below is a matrix of the necessary procedures.
Body Not Fuel Tank Body Builder Involved Shield Attachment
Bluebird x Carpenter x x Thomas Built x x U.S. Bus x Other If Req'd (see Inspection Proc.)
Involved vehicles have been identified by Vehicle Identification Number. Computer listings containing the complete Vehicle Identification Number, customer name and address data have been prepared, and are being furnished to involved dealers with the campaign bulletin. The customer name and address data furnished will enable dealers to follow-up with customers involved in this campaign. Any dealer not receiving a computer listing with the campaign bulletin has no involved vehicles currently assigned.
These dealer listings may contain customer names and addresses obtained from State Motor Vehicle Registration Records. The use of such motor vehicle registration data for any other purpose is a violation of law in several states. Accordingly, you are urged to limit the use of this listing to the follow-up necessary to complete this campaign.
PARTS INFORMATION
Fuel Tank Shield Kits required to complete this campaign are to be obtained from General Motors Service Parts Operations (GMSPO). Please refer to your "involved vehicles listing" prior to ordering requirements. Normal orders should be placed on a DRO = Daily Replenishment Order. An emergency requirement should be ordered on a CSO = Customer Special Order.
Notice: There are only 664 vehicles nation-wide that are involved in this campaign and parts are limited. DO NOT ORDER THESE KITS UNTIL THE CUSTOMER HAS CONTACTED YOU TO SCHEDULE AN APPOINTMENT FOR THIS CAMPAIGN. DO NOT ORDER THESE KITS FOR USE AS SHELF STOCK.
Part Quality Number Description Vehicle -------- ------------------------------------ ------- 15154448 Fuel Tank Shield Kit (Includes Hoses) 1
The following Body Attachment Kits should be ordered directly from the Body Builder. DO NOT ORDER BODY ATTACHMENT KITS FROM GMSPO.
Part Quality Number Description Vehicle ----------- --------------------------------------- ------- 260141 * Body Attachment Kit For Carpenter Bus 1 8059-1243** Body Attachment Kit For Thomas Built Bus 1
* Attachment Kits for this campaign are to be obtained at no charge directly from Carpenter by calling Tonya Williams at (317) 965-4132 or Steve Williams at (317) 965-4131.
** Attachment Kits for this campaign are to be obtained at no charge directly from Thomas Built. Copy and complete the form attached to the Thomas Built Procedure (at the back of this bulletin) and fax to 1-800-619-2699.
CUSTOMER NOTIFICATION
Customers will be notified of this campaign on their vehicles by General Motors (see copy of typical customer letter included with this bulletin - actual divisional letter may vary slightly).
DEALER CAMPAIGN RESPONSIBILITY
All unsold new vehicles in dealers' possession and subject to this campaign must be held and inspected/repaired per the service procedure of this campaign bulletin before customers take possession of these vehicles.
Dealers are to service all vehicles subject to this campaign at no charge to customers, regardless of mileage, age of vehicle, or ownership, from this time forward.
Customers who have recently purchased vehicles sold from your vehicle inventory, and for which there is no customer information indicated on the dealer listing, are to be contacted by the dealer. Arrangements are to be made to make the required correction according to the instructions contained in this bulletin. This could be done by mailing to such customers a copy of the appropriate divisional customer letter accompanying this bulletin. Campaign follow-up cards should not be used for this purpose, since the customer may not as yet have received the notification letter.
In summary, whenever a vehicle subject to this campaign enters your vehicle inventory, or is in your dealership for service in the future, please take the steps necessary to be sure the campaign correction has been made before selling or releasing the vehicle.
This bulletin is notice to you that the new motor vehicles included in this campaign may not comply with the standard identified above. Under 41 U.S.C. section 30112 of the Highway Safety Act as amended, it is illegal for a dealer to sell a new motor vehicle which the dealer knows does not comply with an applicable Federal Motor Vehicle Safety Standard. As a consequence, if you sell any of these motor vehicles without first performing the campaign correction, your dealership may be subject to a civil penalty up to $1,000 for each such sale.
SERVICE PROCEDURE
REQUIRED PROCEDURES:
Body Not Fuel Tank Body Builder Involved Shield Attachment ------------ -------- --------- ---------- Bluebird x Carpenter x x Thomas Built x x U.S. Bus x Other If Req'd (See Inspection Proc.)
INSPECTION PROCEDURE:
1. Determine that chassis has been upfitted and certified as a school bus.
If the chassis has not been upfitted as a school bus or is upfitted with a Bluebird school bus body, no further action is required. Install GM Identification Label.
If the chassis has been upfitted with a school bus body by U.S. Bus, it will require the Fuel Tank Shield Procedure only.
If the chassis has been upfitted with a school bus body by Carpenter or Thomas Built, it will require the "Fuel Tank Shield Procedure" and the "Body To Frame Attachment Procedure" provided by the respective body builder (at the back of this bulletin).
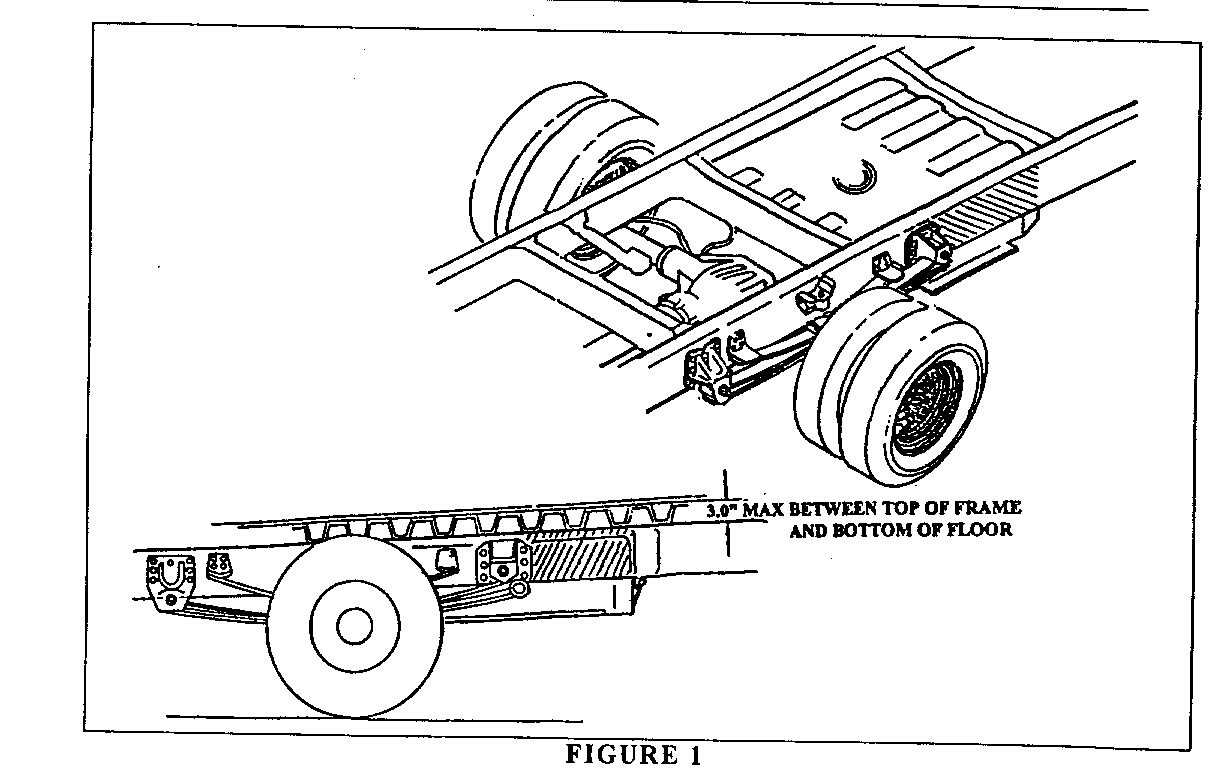
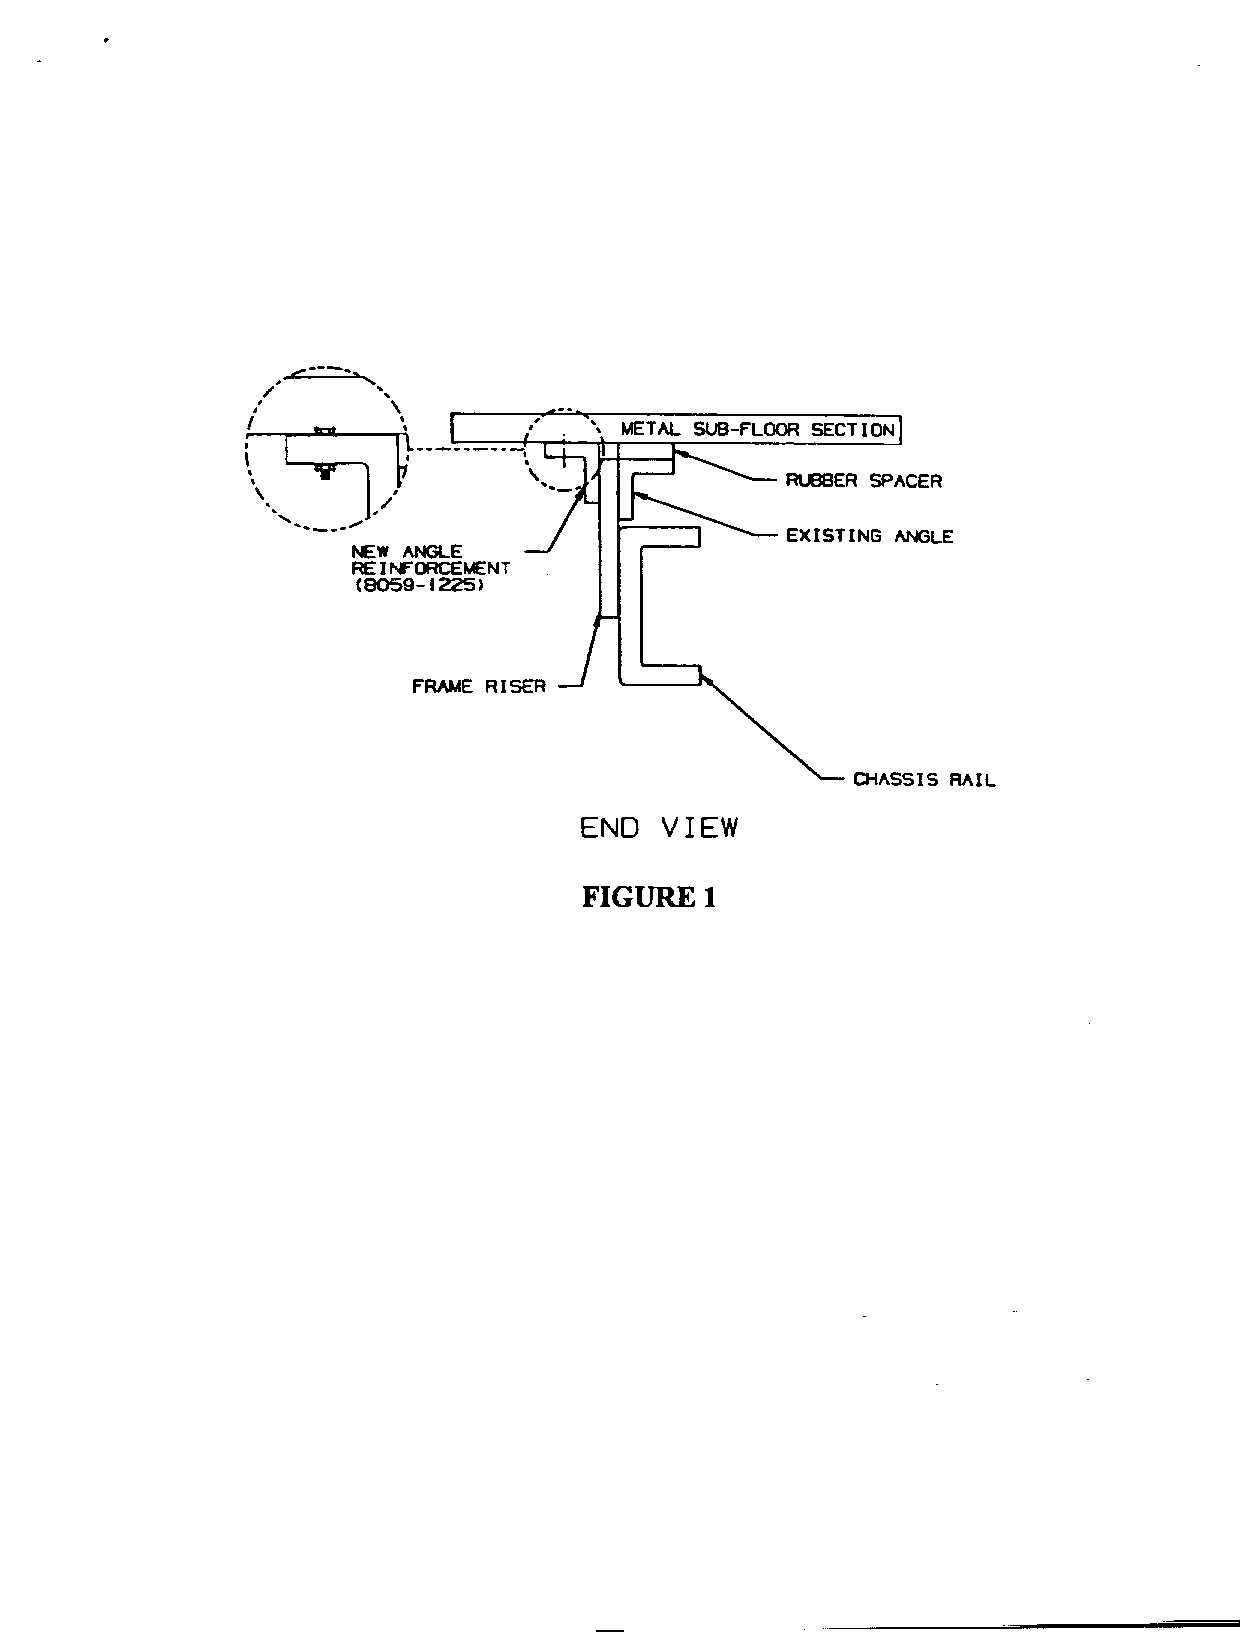
If the chassis has been upfitted with a school bus body by a manufacturer other than those mentioned above, inspect the vehicle floor height. Measure the dimension from the bottom surface of the body floor to the top of the frame (Figure 1).
- If the measurement between the frame and floor is 3 inches or less, no further action is required. Install GM Campaign Identification Label.
- If the measurement is greater than 3 inches, use the "Fuel Tank Shield Procedure" listed below.
FUEL TANK SHIELD PROCEDURE:
1. Position vehicle over suitable hoist. DO NOT raise vehicle at this time.
2. Disconnect the negative battery cable.
3. Remove the fuel filler cap.
4. Remove the fuel through the filler tube using an OSHA approved pump.
CAUTION:
Have a dry chemical with a Class B rating fire extinguisher in the work area. Never drain or store gasoline in an open container due to the possibility of personal injury from fire or explosion.
5. Raise vehicle. When lifting a P3 model with a frame type hoist, the rear hoist pads should be positioned under the frame and inboard of the rear spring front hangers.
CAUTION:
To help avoid personal injury when a vehicle is on a hoist, provide additional support for the vehicle at both ends. Safety stands must be of adequate strength to support vehicle weight. This will reduce the possibility of the vehicle failing off the hoist. Follow all safety precautions.
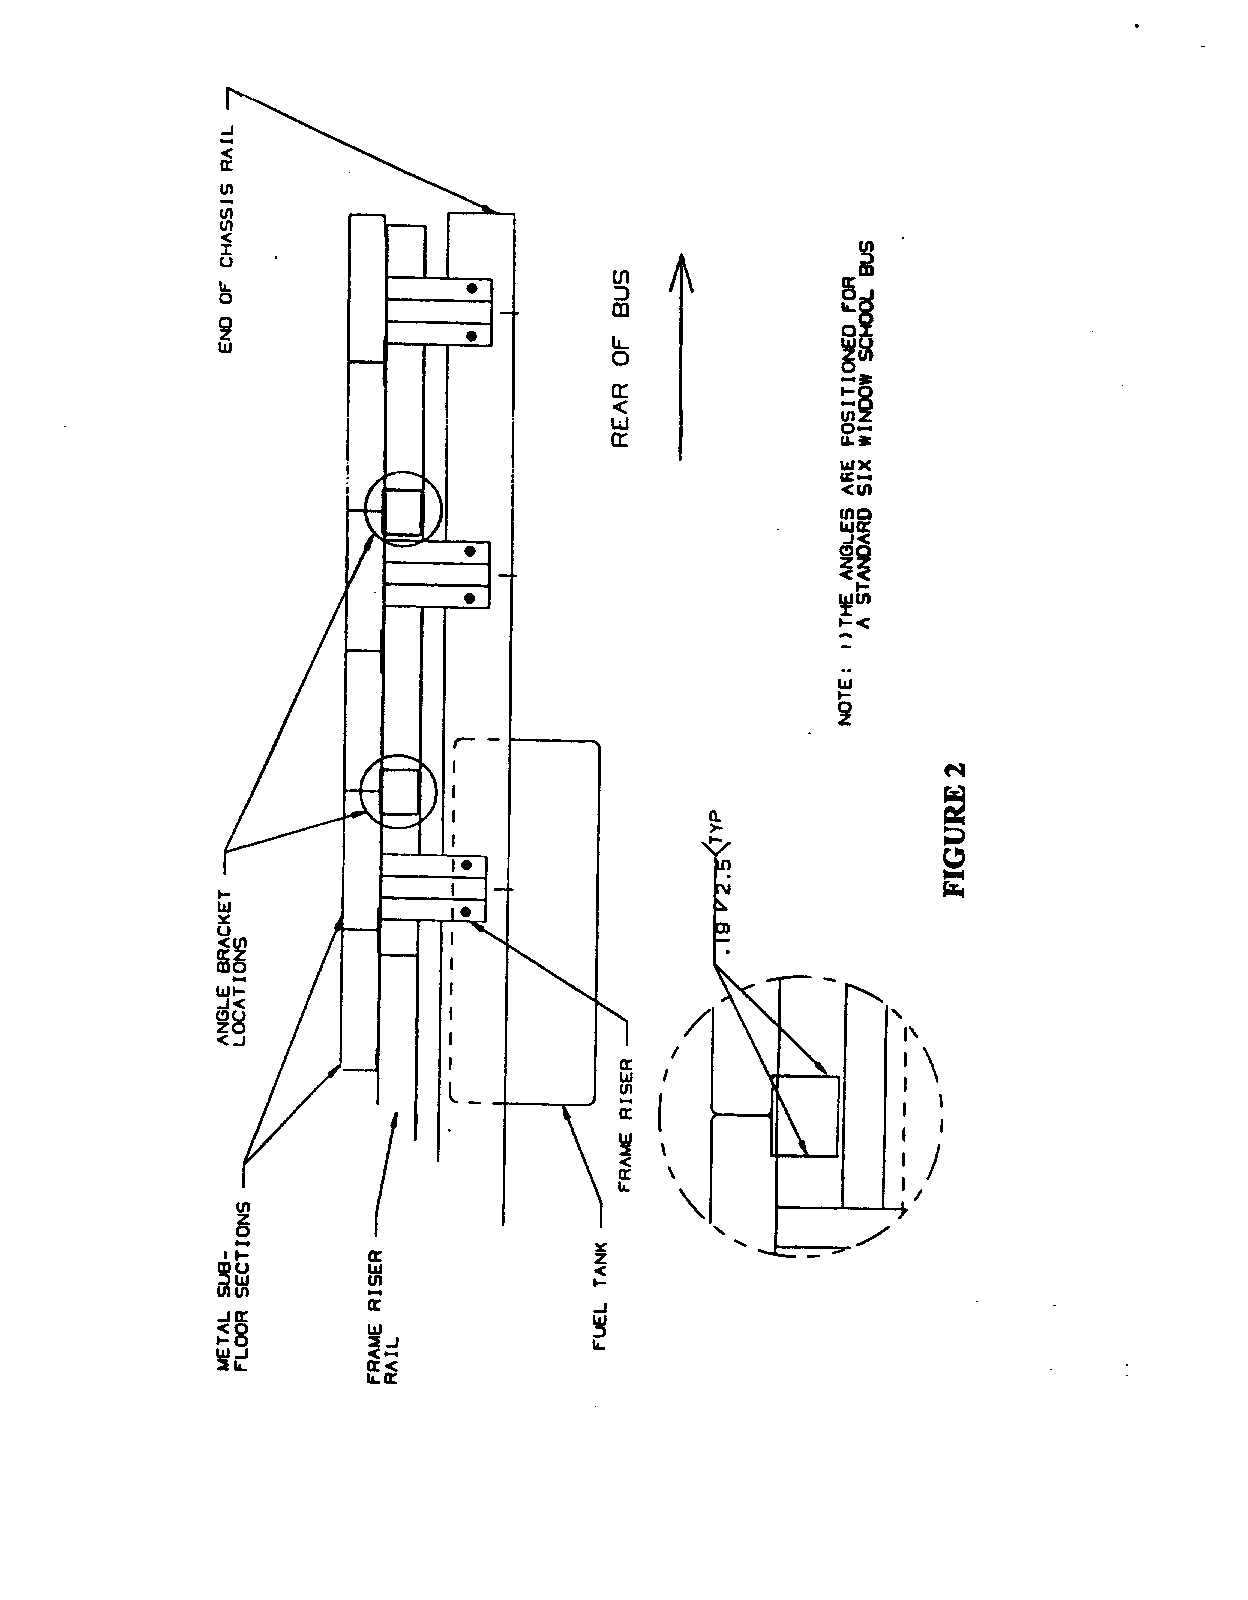
6. Remove and discard the fuel tank filler pipe and hose assembly (Figure 2, Item 1).
7. Remove and discard the fuel tank vent pipe and hose assembly (Figure 2, Item 2).
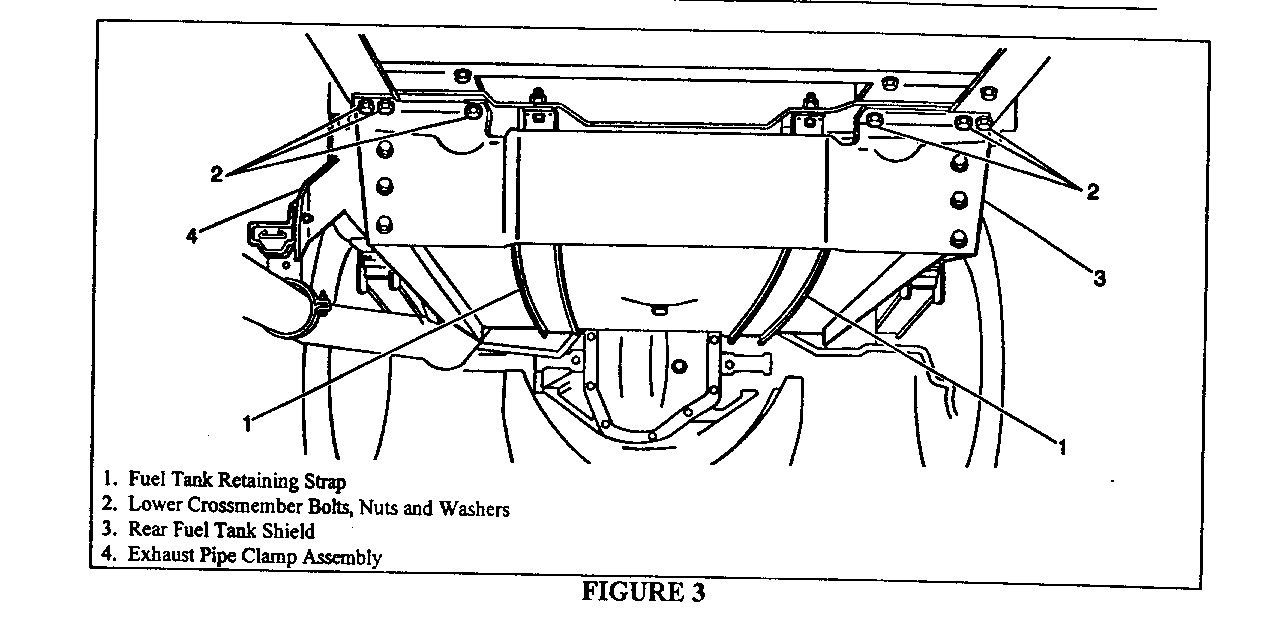
8. Support the fuel tank with an appropriate jack. Disconnect the fuel tank retaining straps (Figure 3, Item 1) from the rear fuel tank crossmember, retain the fasteners, lower the tank just far enough to obtain access to the fuel lines. It is not necessary to remove the retaining straps fasteners located at the front of the fuel tank.
NOTICE: If retainer bolts require replacement, use PIN 9441618 or equivalent.
9. Disconnect the two fuel lines and one vapor line from the fuel pump/sending unit located on top of the fuel tank.
NOTICE: Place proper absorbent material on the floor to soak up any fuel spillage.
10. Disconnect the fuel pump/sending unit electrical connector from the wiring harness.
11. With assistance, lower the fuel tank and place it on the floor away from the vehicle.
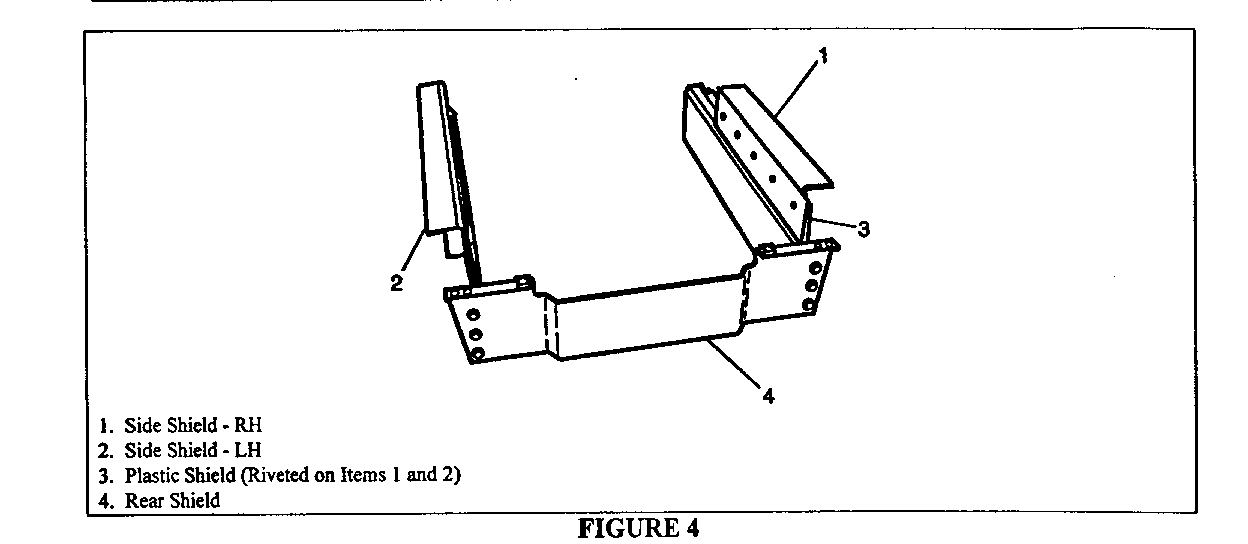
12. Remove and discard the existing fuel tank side shields and fasteners.
CAUTION:
After removing the first fastening bolt from the side shield, secure the flange of the shield to the frame to prevent the possibility of personal injury if a shield were to fall.
CAUTION:
Exhaust pipe may be hot. Allow to cool prior to working in this area.
13. If the bus is a Carpenter, Thomas Built, or non-specified that requires the body attachment to the chassis, proceed to appropriate body builder instructions at the back of this bulletin.
If the bus is a U.S. Bus, or non-specified that does not require the Body Attachment Procedure, proceed to step 14.
14. Remove and discard six lower crossmember bolts, nuts and washers (Figure 3, Item 2).
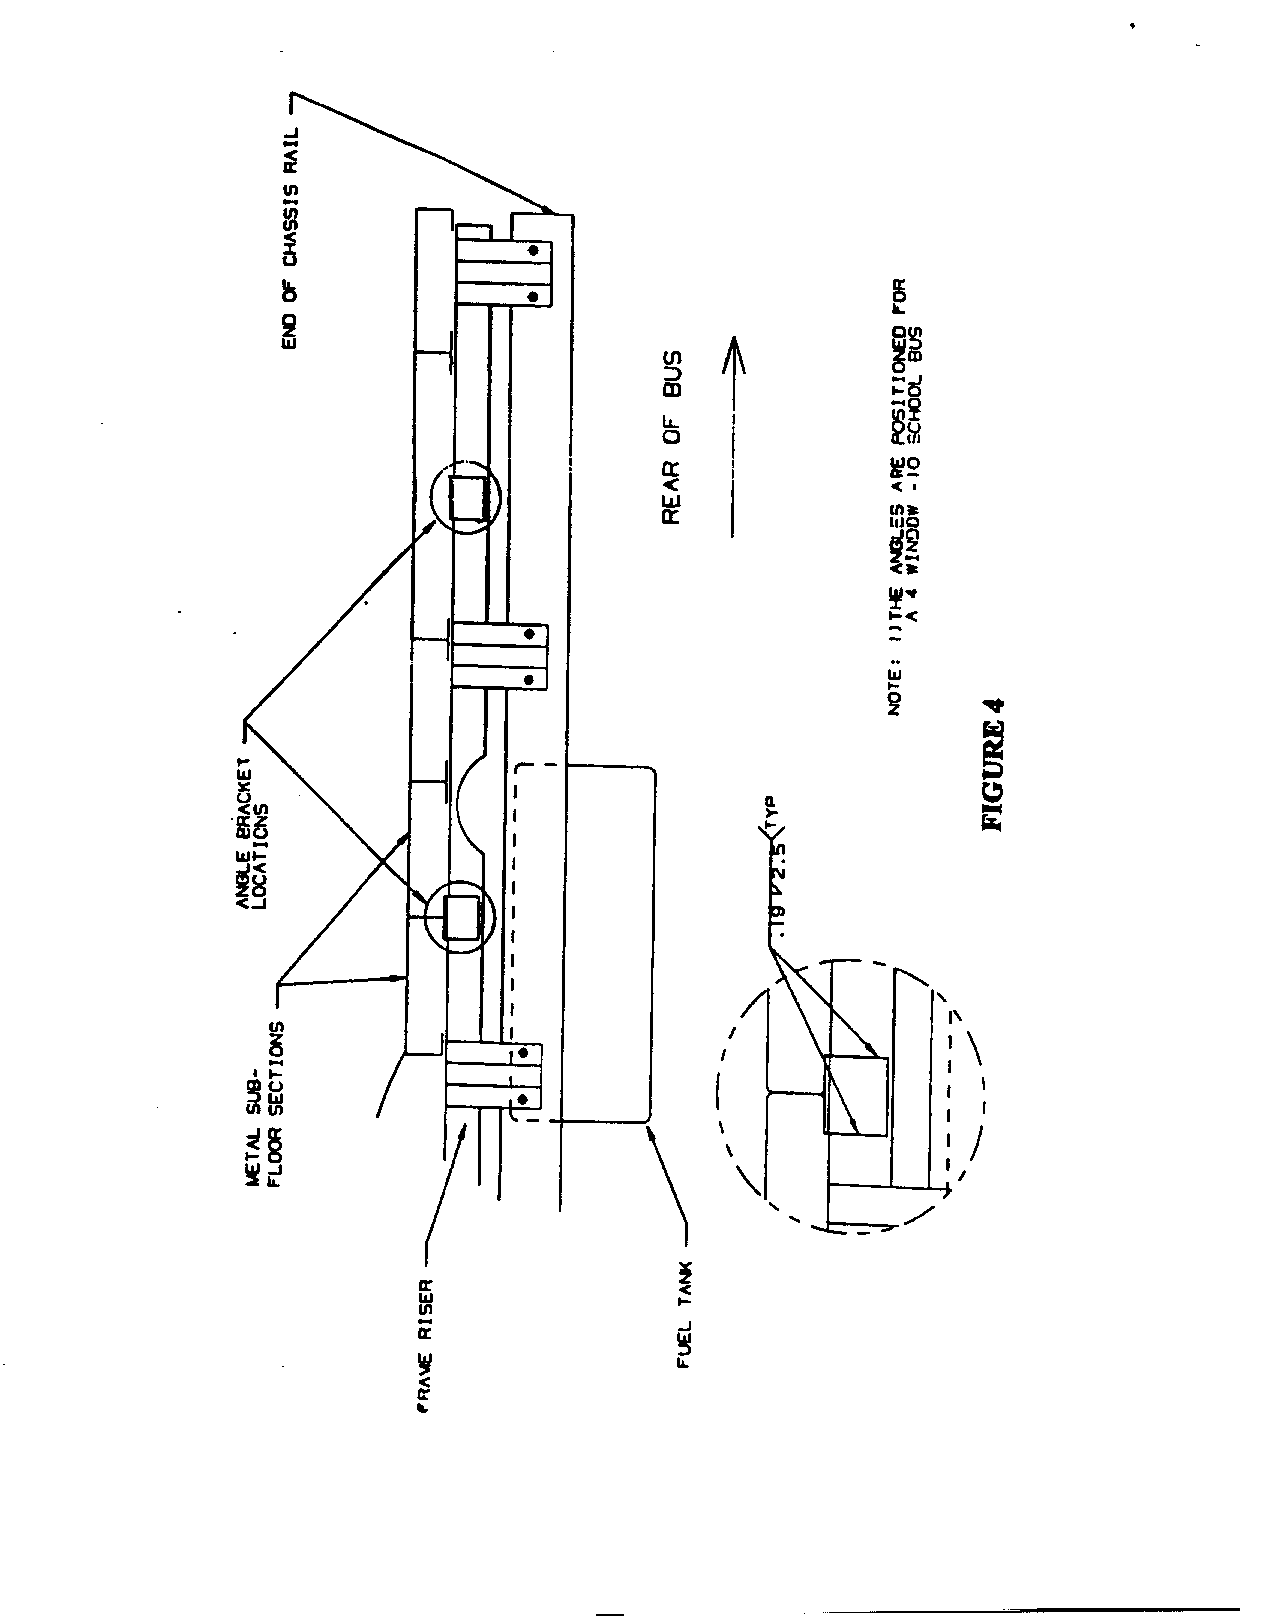
15. Install the new side fuel tank shield assemblies to the frame (Figure 4, Items 1 and 2). The side shield assemblies can be identified by the plastic guard (Figure 4, Item '3) that is riveted along the top of the metal shield. When installing the shields, the plastic guards should face the fuel tank. The lower flange of each side shield assembly lays on top of the frame rail lower flange. Use existing attachment holes in the frame. Torque the fastener nuts to 40 Nm (30 lb ft).
16. If the vehicle is equipped with air conditioning, loosen (cut tie straps and loosen clamps) the A/C lines located along the frame from the rear of the vehicle to the rear axle.
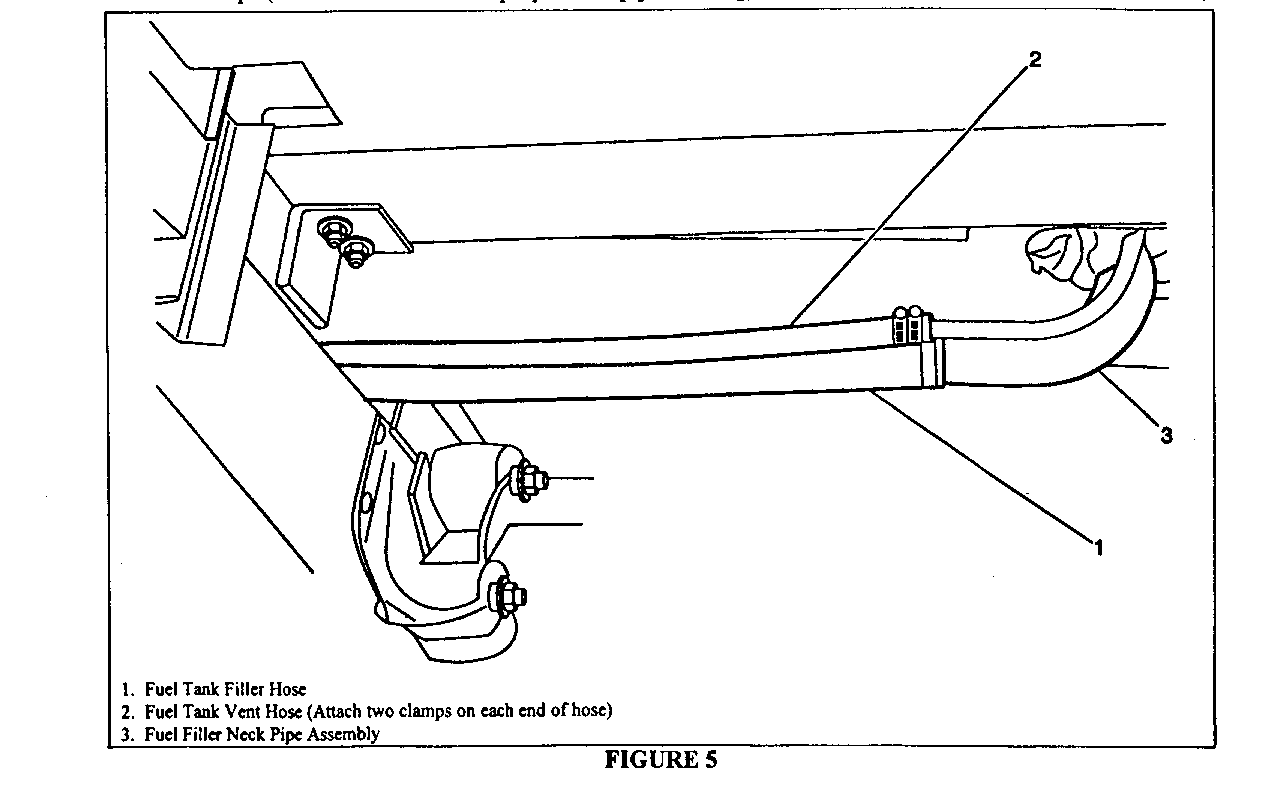
17. Install one end of a new fuel tank filler hose to the fuel tank using one clamp (Figure 5, Item 1) (see kit instructions for proper clamp positioning).
18. Install one end of a new fuel tank vent hose to the fuel tank (Figure 5, Item 2). Attach using two clamps (see kit instructions for proper clamp positioning).
19. Position and support the fuel tank under the vehicle. Reconnect the fuel lines and vapor line to the fuel pump/sending unit.
20. Reconnect the fuel pump/sending unit electrical connector to the wiring harness. Listen for the connector to securely snap into place.
21. Reinstall the fuel tank. Reconnect the retaining straps (Figure 3, Item 1). Tighten the strap nuts to 35 Nm (26 lb ft).
22. Install the fuel tank filler hose, using one clamp, and the vent hose, using two clamps, to the fuel filler neck pipe assembly (Figure 5) (see kit instructions for proper clamp positioning).
23. Install new rear fuel tank shield (Figure 4, Item 4) to the lower crossmember using six Grade 8 7/16"-14 x 1-3/4" bolts and six washers and to ends of side shields using six Grade 8 7/16"-14 x 1-3/8" bolts. Torque all twelve bolts to 60 Nm. (44 lb ft).
24. If the vehicle is equipped with air conditioning, reattach the A/C lines to the frame and resecure the lines to the bumper brace as original.
25. Inspect the A/C lines at the rear axle to ensure the lines are not contacting the exhaust pipe. If required, adjust the exhaust clamp to provide clearance (Figure 3, Item 4).
26. Inspect for exhaust pipe contact to the front LH corner of the fuel tank side shield. Adjust the exhaust clamp, if necessary, to provide clearance (Figure 3, Item 4).
27. Lower the vehicle. Replace removed fuel. Reinstall the fuel cap.
28. Reconnect the negative battery cable.
29. Install the GM Campaign Identification Label.
CAMPAIGN IDENTIFICATION LABEL
Each vehicle corrected in accordance with the instructions outlined in this Product Campaign Bulletin will require a "Campaign Identification Label". Each label provides a space to include the campaign number and the five (5) digit dealer code of the dealer performing the campaign service. This information may be inserted with a typewriter or a ball point pen.
Each "Campaign Identification Label" is to be located on the radiator core support in an area which will be visible when the vehicle is brought in by the customer for periodic servicing. When installing the Campaign Identification Label, be sure to install the clear protective covering. Additional Campaign Identification Labels can be obtained from VISPAC Incorporated by calling 1-800-269-5100 (Monday-Friday, 8:00 a.m. to 4:30 p.m. EST). Ask for Item Number S-1015 when ordering.
Apply the "Campaign Identification Label" only on a clean, dry surface.
CLAIM INFORMATION
Submit a Product Campaign Claim with the information indicated below:
* PART FAILED PARTS LABOR LABOR NET REPAIR COUNT PART NO. ALLOW CC-FC 0P HOURS ITEM PERFORMED Inspect Only - No --- --- --- MA-96 V9991 0.2 --- Further Action Required
Inspect & Install 1 --- ** MA-96 V9992 3.0 --- Fuel Tank Shield Kit - Without Air Conditioning
Inspect & Install 1 --- ** MA-96 V9993 3.2 --- Fuel Tank Shield Kit - With Air Conditioning
Inspect & Install 1 --- ** MA-96 V9994 4.0 *** Fuel Tank Shield Kit, Attach Body To Carpenter Chassis - Without Air Conditioning
Inspect & Install 1 --- ** MA-96 V9995 4.2 *** Fuel Tank Shield Kit, Attach Body To Carpenter Chassis - With Air Conditioning
Inspect & Install 1 --- ** MA-96 V9996 3.8 *** Fuel Tank Shield Kit, Attach Body To Thomas Built Chassis - Without Air Conditioning
Inspect & Install 1 --- ** MA-96 V9997 4.0 *** Fuel Tank Shield Kit, Attach Body To Thomas Built Chassis - With Air Conditioning
* For Campaign Administrative Allowance, add 0.1 hours to the "Labor Hours.
** The "Parts Allowance" should be the sum total of the current GMSPO Dealer Net price plus 30% for 1993 vehicles and 40% 1994 through 1996 vehicles for the fuel tank shield kit needed to complete the repair.
*** The amount identified in the "Net Item" column should represent t e 30% or 40%, whichever is applicable, for parts that are furnished by the body builder (see table below).
BODY 1993 1994-1996 BUILDER VEHICLES VEHICLES ------------ -------- --------- Carpenter $2.99 $3.99 Thomas Built $2.56 3.41
Refer to the General Motors Corporation Claims Processing Manual for details on Product Campaign Claim Submission.
December, 1996
Dear Chevrolet/GMC Customer:
This notice is sent to you in accordance with the requirements of the National Traffic and Motor Vehicle Safety Act.
Reason For This Recall: General Motors has decided that certain 1993-1996 P3"62 G/P Cutaway Chassis upfitted as a school bus, may fail to conform to Federal Motor Vehicle Safety Standard (FMVSS) 301, "Fuel System Integrity. These vehicles may exceed the fuel spillage requirements when tested to the requirements of (FMVSS) 301. Additionally, some body builders methods for attaching the school bus body to the chassis may allow fuel fill and/or vent hose separation under certain collision conditions. If an ignition source was present, fuel leakage resulting from this-condition could result in post-crash fire.
If your vehicle is not a school bus, you are not involved in this campaign. Please complete the enclosed reply card and return it to Chevrolet/GMC. This will remove your vehicle from this recall campaign.
What Will Be Done: To prevent the possibility of this condition occurring, dealers are to install new shielding for the fuel tank, new fill pipe and vent hoses; and if required, add additional attachments to secure the school bus body to the chassis. This service will be performed for you at no charge.
How Long Will The Repair Take? The length of time required to perform this inspection and/or service correction is approximately 15 minutes for the inspection, and if required, up to 4 hours and 15 minutes for the service correction. Additional time may be required to schedule and process your vehicle. If your dealer has a large number of vehicles awaiting service, this additional time may be significant. Please ask your dealer if you wish to know how much additional time will be needed.
Contacting Your Dealer: Please contact your dealer as soon as possible to arrange a service date. Parts are available and instructions for making this correction have been sent to your dealer. Please ask your dealer if you wish to know how much time will be needed to schedule, process and repair your vehicle. Your Chevrolet/GMC dealer is best equipped to obtain parts and provide services to correct your vehicle as promptly as possible. Should your dealer be unable to schedule a service date within a reasonable time, you should contact the appropriate Customer Assistance/Relations Center at the listed number below:
1993-1996 P3 CARPENTER BUS BODY TO FRAME ATTACHMENT SERVICE PROCEDURE (TO BE PERFORMED IN CONJ-UNCTION WITH GM RECALL 96078)
CAUTION:
DO NOT USE OXYACETYLENE WELDING EQUIPMENT.
CAUTION:
DO NOT GET THE WELDING CABLES NEAR THE VEHICLE WIRING. AVOID DIRECT CONTACT BETWEEN THE WELDING CABLES AND ANY PART OF THE VEHICLE.
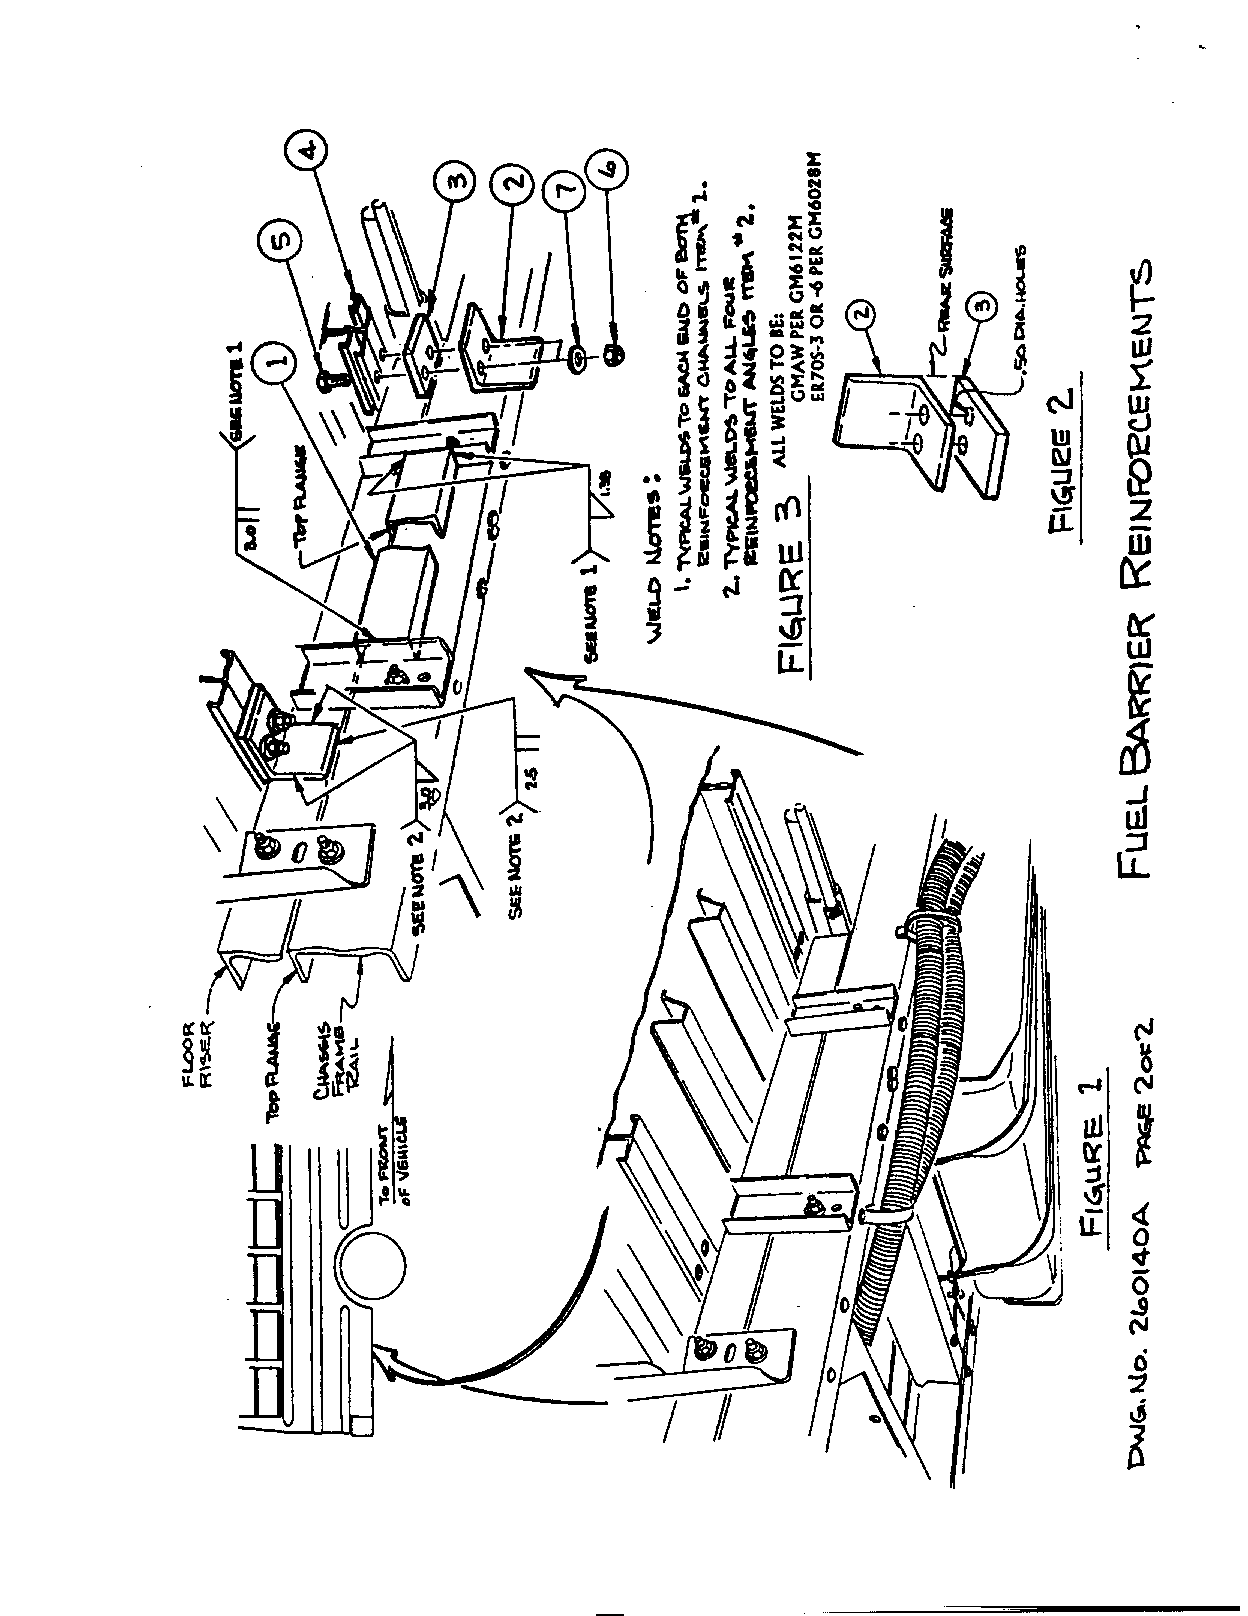
1. Position a reinforcement angle (Fig. 2, Item 2) over a rubber mounting pad, align the rear surface of the angle with one edge of the rubber mounting pad (Fig. 2, Item 3). Using the holes in the reinforcement angle as a guide, drill two 1/2" diameter holes through each of the four rubber mounting pads (Fig. 2, Item 3 ) prior to installation on the vehicle.
2. Examine the locations of the reinforcement channel and angles (Fig. 3, Items 1 and 2). Parts will be installed on both the RH and LH side of the vehicle. To ensure proper penetration of welds, use a grinder with an abrasive disc to remove any concentration of paint and/or undercoating from areas welding is required.
3. Position the top flange of the reinforcement channel (Fig. 3, Item 1) so it is flush with the top flange of the chassis frame rail. Tack weld into place.
4. Using either Mig or Tig type welding, weld both ends of the reinforcement channel to the existing vertical channels (Fig. 3, Weld Note 1).
5. Install reinforcement angles (Fig. 2, Item 2), mounting pad (Item 3), and floor to chassis channel (Item 4) using two bolts, nuts and washers per angle. DO NOT TIGHTEN THE NUTS. Position the reinforcement angles (Item 2) against the floor riser. Tack weld.
6. Using either Mig or Tig type welding, weld into place (Fig. 2, Weld Notes Number 2).
7. Torque the nuts to 45-55 Lb. Ft. (61-75 N.m).
8. When finished, recoat the area with primer paint to protect weld surfaces from corrosion using GM P/N 12346225 or equivalent.
9. Return to step 14 of the GM Campaign Bulletin.
1993-1996 P3 THOMAS BUILT BUS BODY TO FRAME ATTACHMENT SERVICE PROCEDURE (TO BE PERFORMED IN CONJUNCTION WITH GM RECALL 96078)
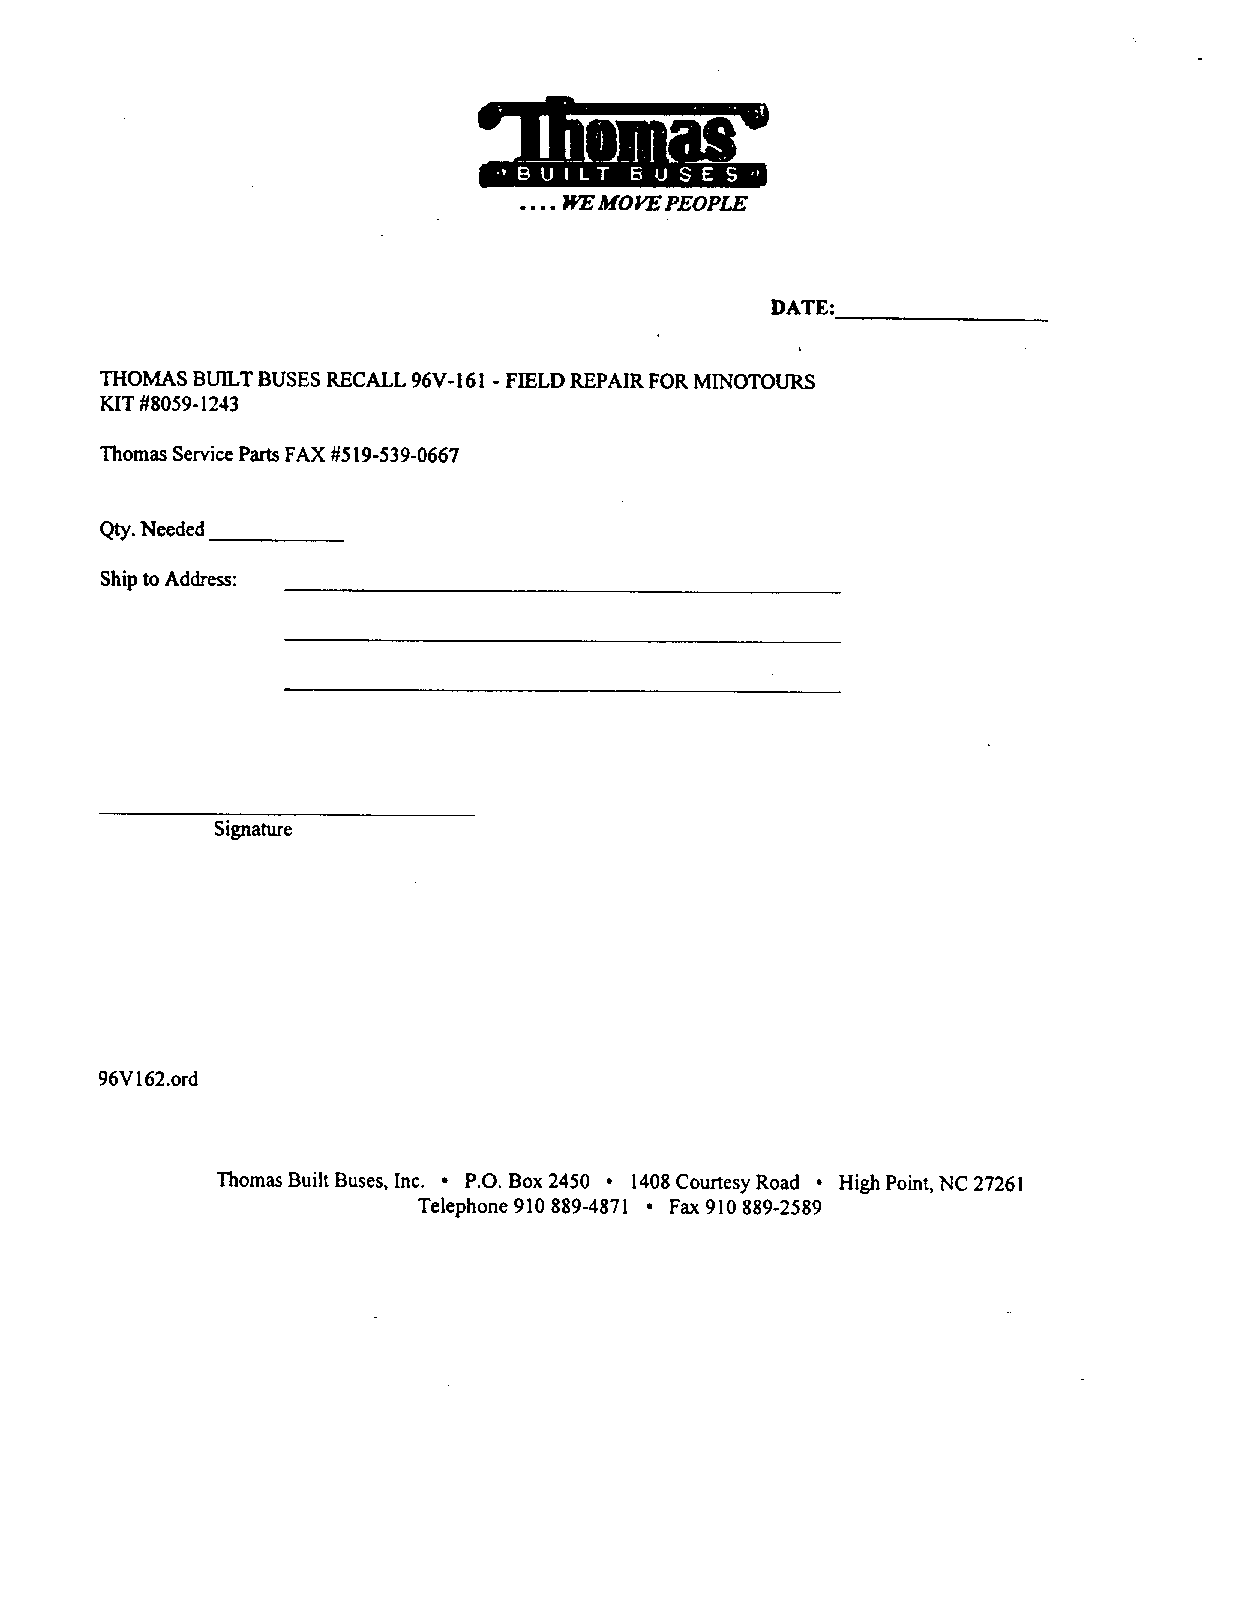
To order body attachment kits, copy and complete attached form and fax to 1-800-619-2699.
Installation inquiry questions, contact Mr. Steve Groat at Thomas Built Bus Company at (519)@539-1225m extension 239.
CAUTION:
DO NOT USE OXYACETYLENE WELDING EQUIPMENT.
CAUTION:
DO NOT GET THE WELDING CABLES NEAR THE VEHICLE WIRING. AVOID DIRECT CONTACT BETWEEN THE WELDING CABLES AND ANY PART OF THE VEHICLE.
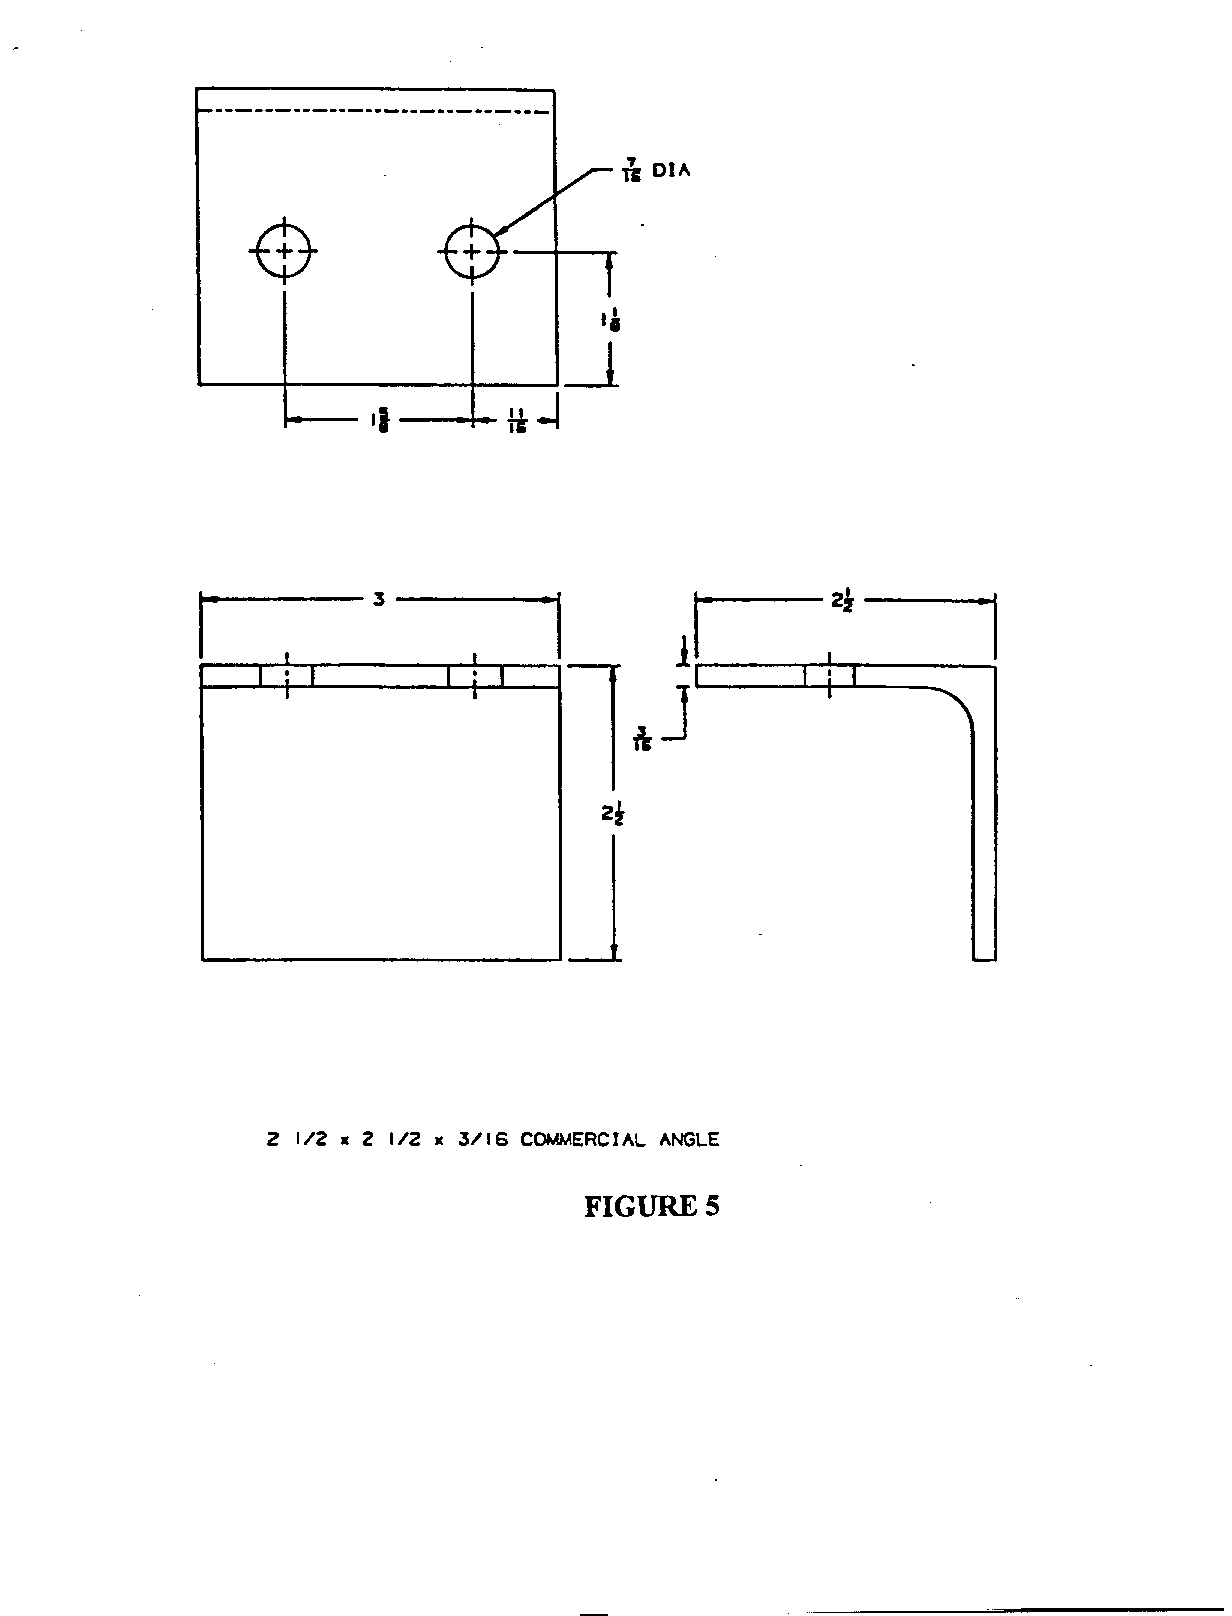
1 .Depending on the fuel tank location, determine the installation location of the new reinforcement angle brackets, according to the installation drawings (Figures 2 through 4).
2. The new angle brackets (two per side) will be installed on both the RH and LH side of the vehicle. To ensure proper penetration of welds, use a grinder with an abrasive disc to remove any concentration of paint and/or undercoating from areas where welding is required.
3. Use the holes in the reinforcement angle as a template and drill a total of eight (8) 7/16" diameter holes through the lower flange of the metal sub-floor section (two holes per angle).
4. Install reinforcement angles (Figure 1), to the metal sub-floor T-section using two bolts, nuts and washers per angle. Mount with the bolt head in the sub-floor section and the nut and washer on the angle bracket. DO NOT TIGHTEN THE NUTS.
5. Using either Mig or Tig type welding, stick weld the new angle down each side. Weld to the existing mount.
6. Torque the nuts to 30-42 Ft Lbs. (42-58 Nm.).
7. When finished, recoat the area with primer paint to protect weld surfaces from corrosion using GM P/N 12346225 or equivalent.
8. Return to step 14 of the GM Campaign Bulletin
** CANADIAN VERSION **
CMVSS NON-COMPLIANCE CAMIPAIGN
SUBJECT: CAMPAIGN 96078 - FUEL SYSTEM COMPLLANCE ---------------------------------------
MODELS: 1993-1994-1995-1996 CHEVROLET AND GMC P3**62 G/P CUTAWAY -------------------------------------------------------- CHASSIS UPFITTED AS SCHOOL BUSES --------------------------------
DEFECT INVOLVED
General Motors of Canada Limited has decided that certain 1993-1994-1995-1996 P3**62 G/P Cutaway Chassis upfitted school bus model vehicles may fail to conform to Canada Motor Vehicle Safety Standard (CMVSS) 301, "Fuel System Integrity." These vehicles may exceed the fuel spillage requirements when tested to the requirements of (CWSS) 301. Additionally, some body builders' methods for attaching the school bus body to the chassis may allow fuel fill and/or vent hose separation under certain collision conditions. If an ignition source was present, fuel leakage resulting from this condition could result in a post-crash fire.
To prevent the possibility of this condition occurring, dealers are to install new shielding for the fuel tank, new fill pipe and vent tube hoses; and if required, add additional attachments to secure the school bus body to the chassis (see attached applicable body builder instructions).
VEHICLES INVOLVED
Involved are the following sixteen (16) 1993-1994-1995-1996 P3**62 G/P Cutaway Chassis upfitted school bus model vehicles:
VIN VIN
IGDKH32K9P3500406 IGDKH32K3P3501471 IGDKH32KOP3500407 IGDKH32K9P3501488 IGDKH32K5P3500418 IGDKH32K6R3501807 IGDKH32K3P3500420 IGDKH32K2S3500109 IGDKH32K5P3500421 IGDKH32K8S3500115 IGDKH32K9P3500423 IGDKH32K6S3500128 IGDKH32KSP3501438 IGDKH32K2P3501462 IGDKH32K7P3501456 IGDKH32K3R3500257
REQUIRED PROCEDURE:
Body Builder Not Involved Fuel Tank Shield Body Attachment
Bluebird X Carpenter X X Thomas X X U.S. Bus X Other If Required (see Inspection Procedure)
Involved vehicles have been identified by Vehicle Identification Number. Computer listings containing the complete Vehicle Identification Number, customer name and address data have been prepared, and are being furnished to involved dealers with the campaign bulletin. The customer name and address data furnished will enable dealers to follow-up with customers involved in this campaign. Any dealer not receiving a computer listing with the campaign bulletin has no involved vehicles currently assigned.
PARTS INFORMATION
Fuel Tank Shield Kits required to complete this campaign are to be obtained from General Motors Service Parts Operations (GMSPO). Please refer to your "involved vehicles listing" prior to ordering requirements.
NOTICE: There are only 664 vehicles nation-wide that are involved in this campaign and parts are limited. DO NOT ORDER THESE KITS UNTIL THE CUSTOMIER HAS CONTACTED YOU TO SCHEDULE AN APPOINTMENT FOR THIS CAMIPAIGN. DO NOT ORDER THESE KITS FOR USE AS SHELF STOCK.
Quantity/ Part Number Description Vehicle ----------- ------------------------------------- --------- 15154448 Fuel Tank Shield Kit (Includes Hoses) 1
The following Body Attachment Kits should be ordered directly from the Body Builder. DO NOT ORDER BODY ATTACHMENT KITS FROM GMSPO.
Quantity/ Part Number Description Vehicle ----------- ------------------------------------- --------- 260141* Body Attachment Kit For Carpenter Bus 1 8059-1243** Body Attachment Kit For Thomas Built Bus 1
* Attachment Kits for this campaign are to be obtained at no charge directly from Carpenter by calling Tonya Williams at (317) 965-4132 or Steve Williams at (317) 965-4131.
** Attachment Kits for this campaign are to be obtained at no charge directly from Thomas Built. Copy and complete the form attached to the Thomas Built Procedure (at the back of this bulletin) and fax to 519-539-0667 - Attention: Mr. Bob Ottaway.
CUSTOMER NOTIFICATION
All customers of record at the time of campaign release are shown on the attached computer listing and have been notified by first class mail from General Motors (see copy of customer letter included with this bulletin). The listings provided are for campaign activity only and should not be used for any other purpose.
DEALER CAMPAIGN RESPONSIBILITY
All unsold new vehicles in dealer's possession and subject to this campaign must be held and inspected/repaired per the service procedure of this carnpaign bulletin before customers take possession of these vehicles.
Dealers are to service all vehicles subject to this campaign at no charge to customers, regardless of mileage, age of vehicle, or ownership, from this time forward.
Customers who have recently purchased vehicles sold from your vehicle inventory, and for which there is no customer information indicated on the dealer listing, are to be contacted by the dealer. Arrangements are to be made to make the required correction according to the instructions contained in this bulletin. This could be done by mailing to such customers a copy of the appropriate customer letter accompanying this bulletin.
In summary, whenever a vehicle subject to this campaign enters your vehicle inventory, or is in your dealership for service in the future, you must take the steps necessary to be sure the campaign correction has been made before seeing or releasing the vehicle.
SERVICE PROCEDURE
REQUIRED PROCEDURES:
Body Builder Not Involved Fuel Tank Shield Body Attachment
Bluebird X Carpenter X X Thomas Built X X U.S. Bus X Other If Required (see Inspection Procedure)
INSPECTION PROCEDURE:
1. Determine that chassis has been upfitted and certified as a school bus.
If the chassis has been upfitted with a school bus body by U.S. Bus, it will require the "Fuel Tank Shield Procedure" only.
If the chassis has been upfitted with a school bus body by Carpenter or Thomas Built, it will require the "Fuel Tank Shield Procedure" and the "Body To Fraine Attachment Procedure" provided by the respective body builder (at the back of this bulletin).
If the chassis has not been upfitted as a school bus or is upfitted with a Bluebird school bus body, no further action is required. Install Campaign Identification Label.
If the chassis has been upfitted with a school bus body by Carpenter, Thomas, or U.S. Body, use the "Fuel Tank Shield Procedure" listed in the following page.
If the chassis has been upfitted with a school bus body by a manufacturer other than those mentioned above, inspect the vehicle floor height. Measure the dimension from the bottom surface of the body floor to the top of the frame (Figure 1).
- If the floor height between the frame and floor is 3 'inches or less, no further action is required. Install Campaign Identification Label.
- If the floor height is greater than 3 inches, use the "Fuel Tank Shield Procedure" listed in the following page.
FUEL TANK SHIELD PROCEDURE:
1. Position vehicle over suitable hoist. DO NOT raise vehicle at this time.
2. Disconnect the negative battery cable.
3. Remove the fuel filler cap.
4. Remove the fuel through the filler tube using an OSHA approved pump.
CAUTION:
Have a dry chemical with a Class B rating fire extinguisher in the work area. Never drain or store gasoline in an open container due to the possibility of personal injury from fire or explosion.
5. Raise vehicle. When lifting a P3 model with a frame type hoist, the rear hoist pads should be positioned under the frame and inboard of the rear spring front hangers.
CAUTION:
To help avoid personal injury when a vehicle is on a hoist, provide additional support for the vehicle at both ends. Safety stands must be of adequate strength to support vehicle weight. This will reduce the possibility of the vehicle failing off the hoist. Follow an safety precautions.
6. Remove and discard the fuel tank filler pipe and hose assembly (Figure 2, Item 1).
7. Remove and discard the fuel tank vent pipe and hose assembly (Figure 2, Item 2).
8. Support the fuel tank with an appropriate jack. Disconnect the fuel tank retaining straps (Figure 3, Item 1) from the rear fuel tank crossmember, retain the fasteners, lower the tank just far enough to obtain access to the fuel lines. It is not necessary to remove the retaining strap fasteners located at the front of the fuel tank.
NOTICE: If retainer bolts require replacement, use P/N 9441618 or equivalent.
9. Disconnect the two fuel lines and one vapour line from the fuel pump/sending unit located on top of the fuel tank.
NOTICE: Place proper absorbent material on the floor to soak up any fuel spillage.
10. Disconnect the fuel pump/sending unit electrical connector from the wiring harness.
11. With assistance, lower the fuel tank and place it on the floor away from the vehicle.
12. Remove and discard the existing fuel tank side shields and fasteners.
CAUTION:
After removing the first fastening bolt from the side shield, secure the flange of the shield to the frame to prevent the possibility of personal injury if a shield were to fan.
CAUTION:
Exhaust pipe may be hot. Allow to cool prior to working in this area.
13. If the bus is a Carpenter, Thomas, or non-specified that requires the body attachment to the chassis, proceed to appropriate body builder instructions attached to this bulletin. If the bus is a U.S. Bus, or non-specified that does not require the body attachment to the chassis, proceed to step 14.
14. Remove and discard six lower crossmember bolts, nuts and washers (Figure 3, Item 2).
15. Install the new side fuel tank shield assemblies to the frame (Figure 4, Items I and 2). The side shield assemblies can be identified by the plastic guard (Figure 4, Item 3) that is riveted along the top of the metal shield. When installing the shields, the plastic guards should face the fuel tank. The lower flange of each side shield assembly lays on top of the frame rail lower flange. Use existing attachment holes in the frame. Torque the fastener nuts to 40 N.m (30 lb. ft.).
16. If the vehicle is equipped with air conditioning, loosen (cut tie straps and loosen clamps) the A/C lines located along the frame from the rear of the vehicle to the rear axle.
17. Install one end of a new fuel tank filler hose to the fuel tank using one clamp (Figure 2, Item 1) (see kit instructions for proper clamp positioning).
18. Install one end of a new fuel tank vent hose to the fuel tank (Figure 5, Item 2). Attach using two clamps (see kit instructions for proper clamp positioning).
19. Position and support the fuel tank under the vehicle. Reconnect the fuel lines and vapour line to the fuel pump/sending unit.
20. Reconnect the fuel pump/sending unit electrical connector to the wiring harness. Listen for the connector to securely snap into place.
21. Reinstall the fuel tank. Reconnect the retaining straps (Figure 3, Item 1). Tighten the strap nuts to 35 Nm (26 lb. fL).
22. Install the fuel tank filler hose, using one clamp, and the vent hose, using two clamps, to the fuel filler neck pipe assembly (Figure 5) (see kit instructions for proper clamp positioning).
23. Install new rear fuel tank shield (Figure 4, Item 4) to the lower crossmember using six Grade 8 7/16"-14 x 1-3/4" bolts and six washers and to ends of side shields using six Grade 8 7/16"-14 x 1-3/8" bolts. Torque all twelve bolts to 60 N.m (44 lb. ft.).
24. If the vehicle is equipped with air conditioning, reattach the A/C lines to the frame and resecure the lines to the bumper brace as original.
25. Inspect the A/C lines at the rear axle to ensure the lines are not contacting the exhaust pipe. If required, adjust the exhaust clamp to provide clearance (Figure 3, Item 4).
26. Inspect for exhaust pipe contact to the front LH comer of the fuel tank side shield. Adjust the exhaust clamp, if necessary, to provide clearance (Figure 3, Item 4).
27. Lower the vehicle. Replace removed fuel. Reinstall the fuel cap.
28. Reconnect the negative battery cable.
29. Install Campaign Identification Label.
CAMPAIGN IDENTIFICATION LABEL
Each vehicle corrected in accordance with the instructions outlined in this Product Campaign Bulletin will require a "Campaign Identification Label." Each label provides a space to include the campaign number and the five (5) digit dealer code of the dealer performing the campaign service. This information may be inserted with a typewriter or a ball point pen.
Each "Campaign Identification Label" is to be located on the radiator core support in an area which will be visible when the vehicle is brought into the dealership for periodic servicing. Additional Campaign Identirication Labels can be obtained from DGN by calling 1-800-668-5539 (Monday-Friday, 8:00 a.m. to 5:00 p.m. EST). Ask for Item Number GMP 91 when ordering.
Apply the "Campaign Identification Label" only on a clean, dry surface.
CLAIM INFORMATION
Submit a Product Campaign Claim with the information indicated below:
* REPAIR PERFORMIED PART FAILED PARTS LABOUR LABOUR NET COUNT PART NO. ALLOW CC-FC 0P HOURS ITEM ----------------------- ----- -------- ----- ----- ------ ------ ---- Inspect Only - No - - - MA-96 V9991 0.2 - Further Action Required
Inspect & Install Fuel 1 - ** MA-96 V9992 3.0 - Tank Shield Kit - Without Air Conditioning
Inspect & Install Fuel 1 - ** MA-96 V9993 3.2 - Tank Shield Kit - With Air Conditioning
Inspect & Install Fuel 1 - ** MA-96 V9994 4.0 *** Tank Shield lot, Attach Body to Carpenter Chassis -Without Air Conditioning
Inspect & Install Fuel 1 - ** MA-96 V9995 4.2 *** Tank Shield Kit Attach Body to Carpenter Chassis - With Air Condidoning
Inspect & Install Fuel 1 - ** MA-96 V9996 3.8 *** Tank Shield Kit Attach Body to Thomas Chassis - Without Air Conditioning
Inspect & Install Fuel 1 - ** MA-96 V9997 4.0 *** Tank Shield Kit, Attach Body to Thomas Chassis - With Air Conditioning
* For Campaign Administrative Allowance, add 0.1 hours to the "Labour Hours".
** The 'Parts Allowance" should be the sum total of the current GMSPO Dealer Net price plus 30% for 1993 vehicles and 40% 1994 through 1996 vehicles for the fuel tank shield kit needed to complete the repair.
*** The amount identified in the "Net Item" column should represent the 30% or 40%, whichever is applicable, for parts that are furnished by the body builder (see table below).
BODY BUILDER 1993 VEHICLES 1994-1996 VEHICLES ------------- ------------- ------------------ Carpenter $2.99 $3.99 Thomas $3.50 $4.75
Refer to the General Motors Claims Processing Manual for details on Product Campaign Claim Submission.
1993-1996 P3 THOMAS BUELT BUS BODY TO FRAME ATTACHMENT SERVICE PROCEDURE
(TO BE PERFORMED IN CONJUNCTION WITH GM RECALL XXXXX)
To order body attachment kits, copy and complete attached form and fax to (519) 539-0067 - Attention: Mr. Bob Ottaway
CAUTION:
DO NOT USE OXYACETYLENE WELDING EQUIPMENT.
CAUTION:
DO NOT GET THE WELDING CABLES NEAR THE VEHICLE WIRING. AVOID DIRECT CONTACT BETWEEN THE WELDING CABLES AND ANY PART OF THE VEHICLE.
1. Depending on the fuel tank location, determine the installation location of the new reinforcement angle brackets, according to the installation drawings (Figures 2 through 4).
2. The new angle brackets (two per side) will be installed on both the RH and LH side of the vehicle. To ensure proper penetration of welds, use a grinder with an abrasive disc to remove any concentration of paint and/or undercoating from areas where welding is required.
3. Use the holes in the reinforcement angle as a template and drill a total of eight (8) 7/16" diameter holes through the lower flange of the metal sub-floor section (two holes per angle) (Figure 5).
4. Install reinforcement angles (Figure 1), to the metal sub-floor T-section using two bolts, nuts and washers per angle. Mount with the bolt head in the sub-floor section and the nut and washer on the angle bracket. DO NOT TIGHTEN THE NUTS.
5. Using either Mig or Tig type welding, stick weld the new angle down each side. Weld to the existing mount.
6. Torque the nuts to 3042 Ft Lbs. (42-58 Nm.).
7. When finished, recoat the area with primer paint to protect weld surfaces from corrosion using GM PN 12346225 or equivalent.
8. Return to step 14 of the GM Campaign Bulletin.
1993-1996 P3 CARPENTER BUS BODY TO FRAME ATTACHMIENT SERVICE PROCEDURE
(TO BE PERFORMED IN CONJUNCTION WITH GM RECALL XXXXX)
CAUTION:
DO NOT USE OXYACETYLENE WELDING EQUIPMENT.
CAUTION:
DO NOT GET THE WELDING CABLES NEAR THE VEHICLE WIRING. AVOID DIRECT CONTACT BETWEEN THE WELDING CABLES AND ANY PART OF THE VEHICLE.
1. Position a reinforcement angle (Fig. 2, Item 2) over a rubber mounting pad, align the rear surface of the angle with one edge of the rubber mounting pad (Fig. 2, Item 3). Using the holes in the reinforcement angle as a guide, drill two 1/2" diameter holes through each of the four rubber mounting pads (Fig. 2, Item 3 ) prior to installation on the vehicle.
2. Examine the locations of the reinforcement channel and angles (Fig. 3, Items I and 2). Parts will be installed on both the RH and LH side of the vehicle. To insure proper penetration of welds, use a grinder with an abrasive disc to remove any concentration of paint and/or undercoating from areas welding is required.
3. Position the top flange of the reinforcement channel (Fig. 3, Item 1) so it is flush with the top flange of the chassis frame rail. Tack weld into place.
4. Using either Mig or Tig type welding, weld both ends of the reinforcement channel to the existing vertical channels (Fig. 3, Weld Note 1).
5. Install reinforcement angles (Fig. 2, Item 2), mounting pad item 3), and floor to chassis channel (Item 4) using two bolts, nuts and washers per angle. DO NOT TIGHTEN THE NUTS. Position the reinforcement angles (Item 2) against the floor riser. Tack weld.
6. Using either Mig or Tig type welding, weld into place (Fig. 2, Weld Notcs Number 2).
7. Torque the nuts to 45-55 Lb. Ft. (61-75 N.m).
8. When finished, recoat the area with Permatex(t heavy duty rubberized undercoating to protect weld surfaces from corrosion (rubberized undercoating can be obtained locally or from Kem Krest at 1-800-955-8591). Prime and paint added reinforcements.
9. Return to step 15 of the GM Campaign Bulletin.
January 1997
Dear General Motors Customer:
General Motors of Canada Limited has decided that certain 1993-1994-1995-1996 P3**62 G/P Cutaway Chassis upfitted school bus model vehicles may fail to conform to Canada Motor Vehicle Safety Standard (CMVSS) 301, "Fuel System Integrity." These vehicles may exceed the fuel spillage requirements when tested to the requirements of (CMVSS) 301. Additionally, some body builders' methods for attaching the school bus body to the chassis may allow fuel fill and/or vent hose separation under certain collision conditions. If an ignition source was present, fuel leakage resulting from this condition could result in a post-crash fire.
If your vehicle is not a school bus, you are not involved in this campaign. Please call our Customer Communication Centre at 1-800-263-3777 (English) or 1-800-263-7854 (French).. This will remove your vehicle from this recraft campaign.
To prevent the possibility of this condition occurring, your GM dealer will install new shielding for the fuel tank, new fill pipe and vent tube hoses; and if required, add additional attachments to secure the school bus body to the chassis.
This service will be provided for you at no charge.
Please contact your GM dealer as soon as possible to arrange a service date.
If parts are required, ask your dealer for details regarding their availability. If parts are not in stock, they can be ordered before scheduling your service date.
This letter identifies your vehicle. Presentation of this letter to your dealer will assist their Service personnel in completing the necessary correction to your vehicle in the shortest possible time.
We are sorry to cause you this inconvenience; however, we have taken this action in the interest of your continued satisfaction Aith our products.
Customer Support Department General Motors of Canada Limited
96078
JL

General Motors bulletins are intended for use by professional technicians, not a "do-it-yourselfer". They are written to inform those technicians of conditions that may occur on some vehicles, or to provide information that could assist in the proper service of a vehicle. Properly trained technicians have the equipment, tools, safety instructions and know-how to do a job properly and safely. If a condition is described, do not assume that the bulletin applies to your vehicle, or that your vehicle will have that condition. See a General Motors dealer servicing your brand of General Motors vehicle for information on whether your vehicle may benefit from the information.
