Backlash Adjustment 8.6 Inch Axle
Tools Required
| • | J 25588
Side Bearing Shim Installer |

- Install the
J 25025-1
and the
J 8001
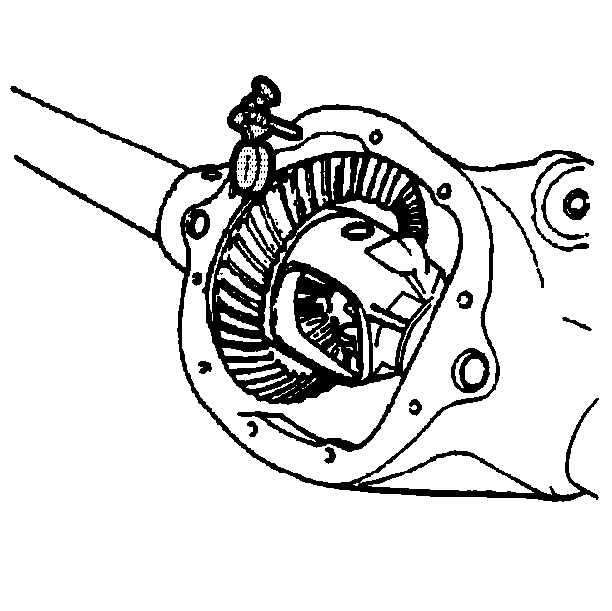
to the axle housing as shown.
- Place the indicator stem of the
J 8001-3
at the heel end of a gear tooth.
- Set the
J 8001-3
so that the stem is aligned with the gear rotation and perpendicular to the tooth angle.
- Preload the dial of the
J 8001-3
.
Align the needle and the dial face of the
J 8001-3
to ZERO.
- While holding the drive pinion stationary, move the ring gear back and forth.
Measure and record the backlash.
- Repeat the measuring procedure at eight points around the ring gear.
Specification
The difference between the backlash at all of the measuring points should not vary by more than 0.05 mm (0.002 in).
- If the difference between the backlash at all of the measuring points varies by more than 0.05 mm (0.002 in), inspect for the following conditions:
| • | A distorted case flange |
- If the difference between all the measuring points is within specifications, the backlash at the minimum lash point measured should be:
Specification
The backlash between the ring gear and the drive pinion should be between 0.08-0.25 mm (0.003-0.010 in) with a preferred backlash of 0.13-0.18 mm (0.005-0.007 in).
Important:
| • | Do not use the original cast iron production shims to adjust the backlash. Use service shims and spacers instead. |
| • | Adjust the thickness of the shim pack on each side of the differential in equal amounts. This will maintain the correct axle side bearing preload. |
| • | Moving 0.05 mm (0.002 in) of shim thickness from one side of the differential to the other will change the backlash adjustment approximately 0.03 mm (0.001 in). |
- If the backlash is too small, increase the backlash using the following procedure:
| 9.1. | Remove the bearing cap bolts and the bearing caps. |
Mark the bearing caps left or right.
| 9.2. | Remove the differential case assembly with the bearing cups and the shims. |
Mark the bearing cups and the shims left or right.
| 9.3. | Measure the thickness of left side shim pack. |
Measure the production shim or the shim and service spacer in 3 locations.
Measure each shim separately.
| 9.4. | Calculate the average of the 3 measurements for each shim. |
Add the average of each of the shim measurements together.
Record the measurement. This is the thickness for the left side shim pack.
| 9.5. | Assemble a new left side shim pack by decreasing the appropriate amount of thickness from the original left side shim pack. If the original shim is cast iron production shim, assemble the shim pack using a service spacer and service shims. For example,
to increase the backlash by 0.05 mm (0.002 in), remove 0.10 mm (0.004 in) of thickness from the left side shim pack. |
| 9.6. | Measure the thickness of right side shim pack. |
Measure the shim or the shim and service spacer in 3 locations.
Measure each shim separately.
| 9.7. | Calculate the average of the 3 measurements for each shim. |
Add the average of each of the shim measurements together.
Record the measurement. This is the thickness for the right side shim pack.
| 9.8. | Assemble a new right side shim pack by increasing the appropriate amount of thickness to the original right side shim pack. If the original shim is cast iron production shim, assemble the shim pack using a service spacer and service shims. For example,
to increase the backlash by 0.05 mm (0.002 in), add 0.10 mm (0.004 in) of thickness to the right side shim pack. |
- If the backlash is too large, decrease the backlash using the following procedure:
| 10.1. | Remove the bearing cap bolts and the bearing caps. |
Mark the bearing caps left or right.
| 10.2. | Remove the differential case assembly with the bearing cups and the shims. |
Mark the bearing cups and the shims left or right.
| 10.3. | Measure the thickness of left side shim pack. |
Measure the production shim or the shim and service spacer in 3 locations.
Measure each shim separately.
| 10.4. | Calculate the average of the 3 measurements for each shim. |
Add the average of each of the shim measurements together.
Record the measurement. This is the thickness for the left side shim pack.
| 10.5. | Assemble a new left side shim pack by increasing the appropriate amount of thickness to the original left side shim pack. If the original shim is cast iron production shim, assemble the shim pack using a service spacer and service shims. For example,
to increase the backlash by 0.05 mm (0.002 in), add 0.10 mm (0.004 in) of thickness to the left side shim pack. |
| 10.6. | Measure the thickness of right side shim pack. |
Measure the shim or the shim and service spacer in 3 locations.
Measure each shim separately.
| 10.7. | Calculate the average of the 3 measurements for each shim. |
Add the average of each of the shim measurements together.
Record the measurement. This is the thickness for the right side shim pack.
| 10.8. | Assemble a new right side shim pack by decreasing the appropriate amount of thickness to the original right side shim pack. If the original shim is cast iron production shim, assemble the shim pack using a service spacer and service shims. For example,
to decrease the backlash by 0.05 mm (0.002 in), remove 0.10 mm (0.004 in) of thickness to the right side shim pack. |
- Install the differential case assembly with the bearing cups.
- Install the left side service spacer between the axle housing and the differential case.
- Install the right side service spacer between the axle housing and the differential case.

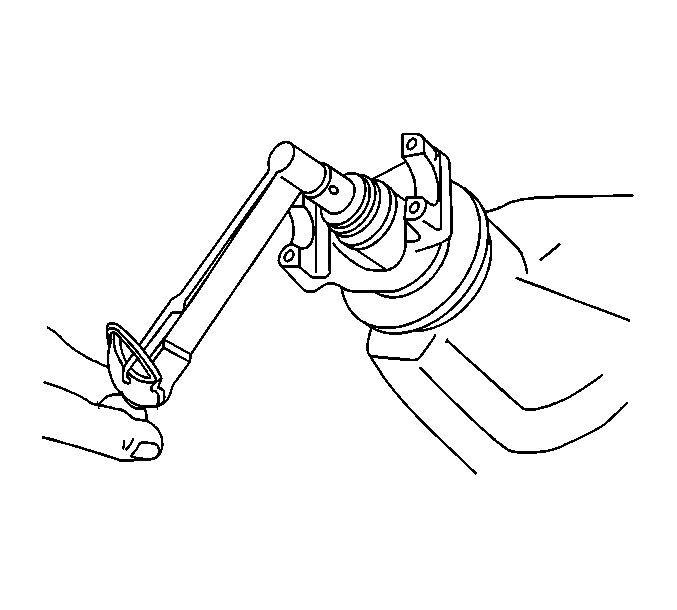
- Install the left side service shim or shims using the
J 25588
, if necessary.
The service shim or shims must be installed between the service spacer and the differential bearing cup.
- Install the right side service shim or shims using the
J 25588
, if necessary.
The service shim or shims must be installed between the service spacer and the differential bearing cup.
Notice: Refer to Fastener Notice in the Preface section.
- Install the bearing caps and bolts.
Tighten
Tighten the bolts to 75 N·m (55 lb ft).
- Recheck the backlash and adjust, if necessary.
- Once backlash is correct, perform a gear tooth contact pattern check in order to ensure proper alignment between the ring and pinion gears. Refer to
Gear Tooth Contact Pattern Inspection.
Backlash Adjustment 9.5 LD Axle
Tools Required
| • | J 24429
Side Bearing
Backlash Spanner |
Important:
| • | Ensure that the side bearing surfaces in the axle housing are clean and
free of burrs. If the original bearings are to be reused, the original bearing cups
must also be used. |
| • | The differential side bearings must be initially preloaded in order to
determine the backlash of the gear set. After the backlash is set, the final bearing
preload is set. |

- Measure the rotating torque of the drive
pinion and differential assembly using an inch-pound torque wrench.
Specification
The rotating torque of the drive pinion and differential assembly should be
3.4-6.2 N·m (30-55 lb in) for new bearings
or 2.8-5.1 N·m ( 25-45 lb in) for used bearings.
- If the rotating torque is too low, tighten the differential bearing adjuster
nut in 1 slot increments until the specified rotating torque is obtained.
- If the rotating torque is too high, loosen the differential bearing adjuster
nut in 1 slot increments until the specified rotating torque is obtained.
- If the specification for the rotating torque of the drive pinion and differential
assembly cannot be obtained by adjusting the differential bearing adjuster nut, remove
the differential assembly, measure the rotating torque of the drive pinion and adjust
as necessary. Refer to
Differential Replacement
and
Drive Pinion Bearings Replacement
.

- Install
the
J 25025-1
and the
J 8001-3
to the axle housing as shown.
- Place the indicator stem of the
J 8001-3
at the heel end of a gear tooth.
- Set the
J 8001-3
so
that the stem is aligned with the gear rotation and perpendicular to the tooth angle.
- Preload the dial of the
J 8001-3
approximately ¾ of a turn.
Align the needle and the dial face of the
J 8001-3
to ZERO.
- While holding the drive pinion stationary, move the ring gear back and
forth.
Measure and record the backlash.
- Repeat the measuring procedure at eight points around the ring gear.
Specification
The difference between the backlash at all of the measuring points should not
vary by more than 0.05 mm (0.002 in).
- If the difference between the backlash at all of the measuring points
varies by more than 0.05 mm (0.002 in), inspect for the following conditions:
| • | A distorted case flange |
- If the difference between all the measuring points is within specifications,
the backlash at the minimum lash point measured should be:
Specification
The backlash between the ring gear and the drive pinion should be between 0.08-0.25 mm
(0.003-0.010 in) with a preferred backlash of 0.13-0.18 mm
(0.005-0.007 in).
Important: Increasing or decreasing the shim thickness by 0.05 mm (0.002 in)
will change the backlash adjustment approximately 0.03 mm (0.001 in).
- If the backlash is not within specifications, adjust the backlash by performing
the following procedure:
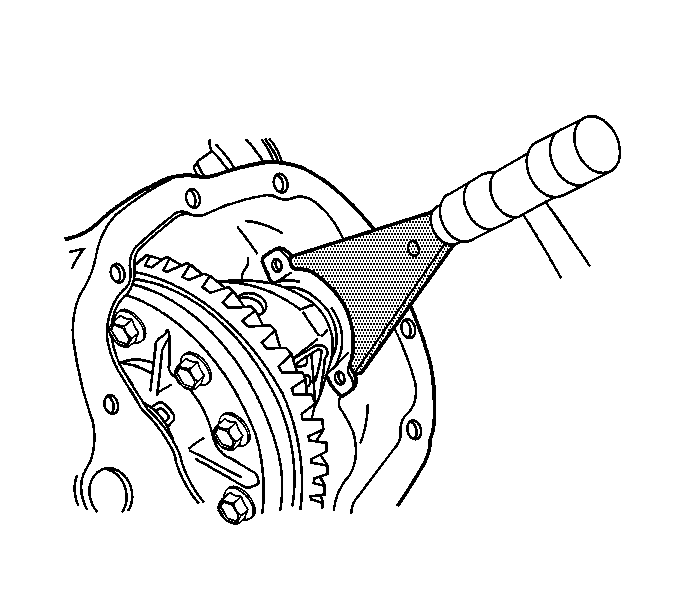
| 13.1. | Remove the differential bearing adjuster nut retainer bolt. |
| 13.2. | Remove the differential bearing adjuster nut retainer. |
| 13.3. | Loosen the bearing cap bolts. |
Do not remove the bearing cap bolts.
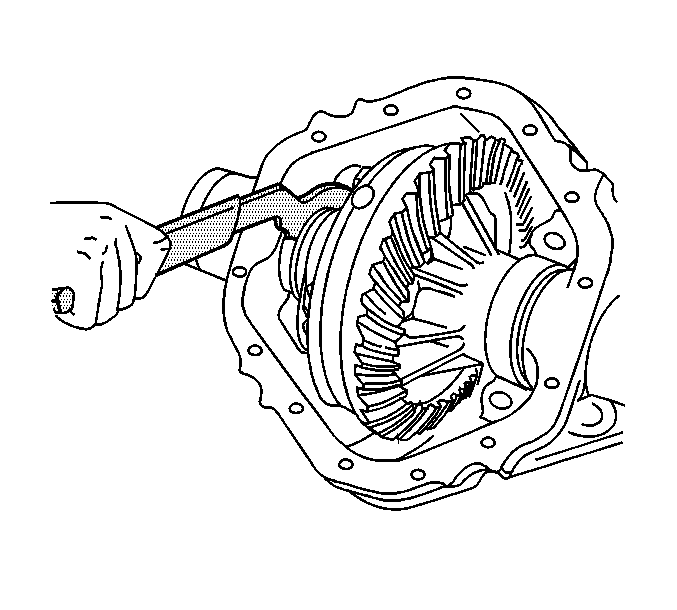
| 13.4. | Loosen the differential bearing adjuster nut using the
J 24429
. |
| 13.5. | Remove the differential side bearing shim. |
| 13.6. | Measure the thickness of the shim. |
Measure the shim in 3 locations.
| 13.7. | Calculate the average of the 3 measurements. |
Record the measurement.
| 13.8. | If the backlash is too small, select a smaller shim than the one that
was removed. For example, to increase the backlash by 0.05 mm (0.002 in),
select a shim that is 0.10 mm (0.004 in) thinner than the shim that
was removed. |
| 13.9. | If the backlash is too large, select a larger shim than the one that was
removed. For example, to increase the backlash by 0.05 mm (0.002 in),
select a shim that is 0.10 mm (0.004 in) thicker than the shim that
was removed. |
- Tighten the differential bearing adjuster nut using the
J 24429
until the differential bearing adjuster nut
is seated against the bearing cup .
- Once the differential bearing adjuster is seated against the differential
bearing, tighten the differential bearing adjuster nut using the
J 24429
the following additional amounts:
Tighten
| • | For used bearings, tighten the differential bearing adjuster nut an additional
2 slots. |
| • | For new bearings, tighten the differential bearing adjuster nut an additional
3 slots. |
- Tighten the differential bearing cap bolts.
Tighten
Tighten the bearing cap bolts to 85 N·m (63 lb ft).
- Recheck the backlash following the steps above to verify that the backlash
is within specifications.
- Install the differential bearing adjuster nut retainer.
- Install the differential bearing adjuster nut retainer bolt.
Tighten
Tighten the differential bearing adjuster nut retainer nut bolt to 26 N·m
(19 lb ft).
- Measure the drive pinion and differential case side bearing preload and
adjust, if necessary following the steps above.
- Once the backlash and bearing preload is correct, perform a gear tooth
contact pattern check in order to ensure proper alignment between the ring and pinion
gears. Refer to
Gear Tooth Contact Pattern Inspection
.
Backlash Adjustment 10.5, 11.5 Inch Axles
Tools Required
| • | J 24429
Side Bearing Backlash Spanner |
Important:
| • | Ensure that the side bearing surfaces in the axle housing are clean and free of burrs. If the original bearings are to be reused, the original bearing cups must also be used. |
| • | The differential side bearings must be initially preloaded in order to determine the backlash of the gear set. After the backlash is set, the final bearing preload is set. |

- Measure the rotating torque of the drive pinion and differential assembly using an inch-pound torque
wrench.
Specification
The rotating torque of the drive pinion and differential assembly should be 3.4-6.2 N·m (30-55 lb in) for new bearings or 2.8-5.1 N·m ( 25-45 lb in)
for used bearings.
- If the rotating torque is too low, tighten the differential bearing adjuster nuts in 1 slot increments until the specified rotating torque is obtained.
- If the rotating torque is too high, loosen the differential bearing adjuster nuts in 1 slot increments until the specified rotating torque is obtained.
- If the specification for the rotating torque of the drive pinion and differential assembly cannot be obtained by adjusting the differential bearing adjuster nut, remove the differential assembly, measure the rotating torque of the drive pinion and
adjust as necessary. Refer to
Differential Replacement
and
Drive Pinion Bearings Replacement
.

- Install the
J 25025-1
and the
J 8001
to the axle housing as shown.
- Place the indicator stem of the
J 8001-3
at the heel end of a gear tooth.
- Set the
J 8001-3
so that the stem is aligned with the gear rotation and perpendicular to the tooth angle.
- Preload the dial of the
J 8001-3
.
Align the needle and the dial face of the
J 8001-3
to ZERO.
- While holding the drive pinion stationary, move the ring gear back and forth.
Measure and record the backlash.
- Repeat the measuring procedure at eight points around the ring gear.
Specification
The difference between the backlash at all of the measuring points should not vary by more than 0.05 mm (0.002 in).
- If the difference between the backlash at all of the measuring points varies by more than 0.05 mm (0.002 in), inspect for the following conditions:
| • | A distorted case flange |
- If the difference between all the measuring points is within specifications, the backlash at the minimum lash point measured should be:
Specification
The backlash between the ring gear and the drive pinion should be between 0.08-0.25 mm (0.003-0.010 in) with a preferred backlash of 0.13-0.18 mm (0.005-0.007 in).

- If the backlash is not within specifications, adjust the backlash by performing
the following steps:
| 13.1. | Remove the differential bearing adjuster nut retainers bolts. |
| 13.2. | Remove the differential bearing adjuster nut retainers. |
| 13.3. | Remove the bearing cap bolts. |
| 13.4. | Remove the bearing caps. Mark the bearing caps left and right. |
| 13.5. | If the backlash is too small, increase the backlash by turning the left differential bearing adjuster in one slot and the right differential bearing adjuster out one slot using the
J 24429
until
the correct backlash is obtained. |
| 13.6. | If the backlash is too large, decrease the backlash by turning the right differential bearing adjuster in one slot and the left differential bearing adjuster out one slot using the
J 24429
until
the correct backlash is obtained. |
- Install the bearing caps.
Notice: Refer to Fastener Notice in the Preface section.
- Install the bearing cap bolts.
Tighten
| • | Tighten the bearing cap bolts to 185 N·m (136 lb ft) (10.5 inch axle). |
| • | Tighten the bearing cap bolts to 207 N·m (153 lb ft) (11.5 inch axle). |
- Recheck the backlash following the steps above to verify that the backlash is within specifications.
- Install the differential bearing adjuster nut retainers.
- Install the differential bearing adjuster nut retainer bolts.
Tighten
Tighten the differential bearing adjuster nut retainer nut bolts to 27 N·m (20 lb ft).
- Measure the drive pinion and differential case side bearing preload and adjust, if necessary following the steps above.
- Once the backlash and bearing preload is correct, perform a gear tooth contact pattern check in order to ensure proper alignment between the ring and pinion gears. Refer to
Gear Tooth Contact Pattern Inspection
.


