For 1990-2009 cars only
The booster battery and the discharged battery should be treated carefully when using jumper cables. Follow the procedure exactly. Do not cause sparks.
Notice: Push starting the vehicle can, under some conditions, cause damage to the catalytic converter and an automatic transmission.
This vehicle has a 12 Volt, negative ground electrical system. Make sure the vehicle or equipment being used to jump start the engine is also 12 Volt, negative ground. Use of any other type of system will damage the vehicle's electrical components.- Position the vehicle with the booster (charged) battery so that the jumper cables will reach.
- Place an automatic transmission in PARK.
- Place the shift lever of a manual transmission in NEUTRAL.
- Set the parking brake.
- Block the wheels.
- Turn off all electrical loads that are not needed (leave the hazard flashers ON).
- Turn OFF the ignition switch.
- Check the built-in battery hydrometer of the discharged battery.
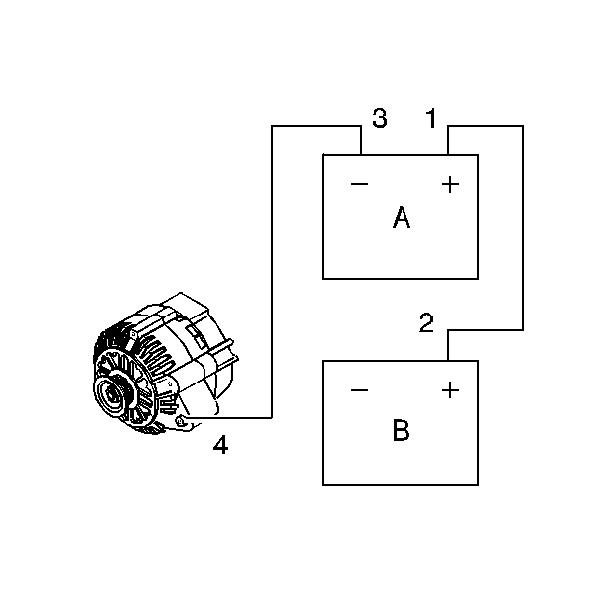
- Attach the end of one jumper cable to the positive terminal of the booster battery (A1). (A) is the booster battery, (B) is the discharged battery.
- Attach the other end of the same cable to the positive terminal of the discharged battery (B2). (A) is the booster battery, (B) is the discharged battery.
- Attach one end of the remaining jumper cable to the negative terminal of the booster battery (A 3).
- The final connection (4) is made to a solid engine Ground (such as the A/C compressor bracket or the generator mounting bracket), at least 450 mm (18 in) from the discharged battery (B).
- Start the engine of the vehicle that is providing the boost.
- Crank the engine of the vehicle with the discharged battery.
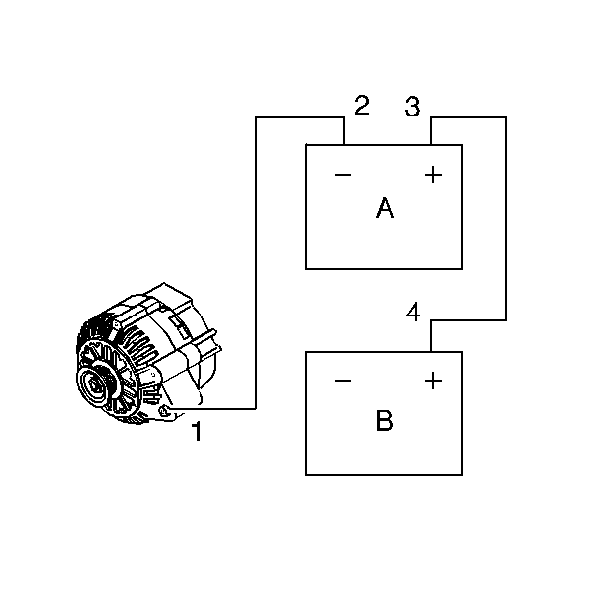
- The negative jumper cable must be disconnected from the vehicle that was boosted, first (4). (A) is the booster battery, (B) is the discharged battery.
- Remove the other end of the negative jumper cable from the booster battery (A 2).
- Remove the positive jumper cable from the booster battery (A 3).
- Remove the positive jumper cable from the other battery (B 4).
| • | Do not let the two vehicles touch. |
| • | Make sure that the jumper cables do not have loose ends, or missing insulation. |
If the hydrometer is clear or light yellow, do not jump (charge) the battery. Replace the battery.

A spark could ignite an accumulation of hydrogen gas from the discharged battery.

Do not let the cable end touch any metal (until after the other cable end is disconnected).
