Shock Absorber Replacement RWD-All Except C3500HD
Removal Procedure
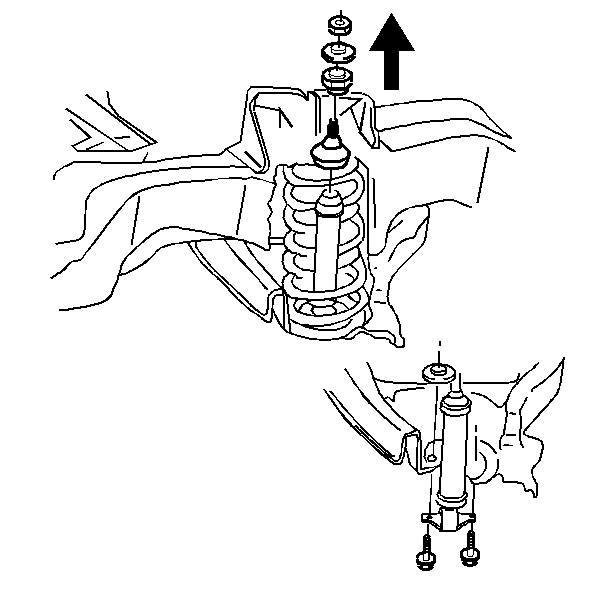
- Raise the vehicle. Support the vehicle with safety stands.
- Remove the nut. Hold the shock absorber stem with a wrench while backing the nut off.
- Remove the retainer.
- Remove the grommet.
- Remove the bolts.
Notice: The front shock absorbers of the vehicle are multifunctional. In addition to contributing to a smooth ride they also provide the only stop to the front suspension when fully extended. Therefore, when servicing the shock absorber, service replacement shock absorbers must be equivalent to original shock absorbers in both extended length and strength. Use of shocks not complying to original equipment or strength could result in suspension over-travel or shock breakage. Suspension over-travel may result in suspension component breakage.

| 5.1. | Pull the shock absorber out of the spring from below. |
| 5.2. | The lower grommet and the retainer are on the stem. |
Installation Procedure
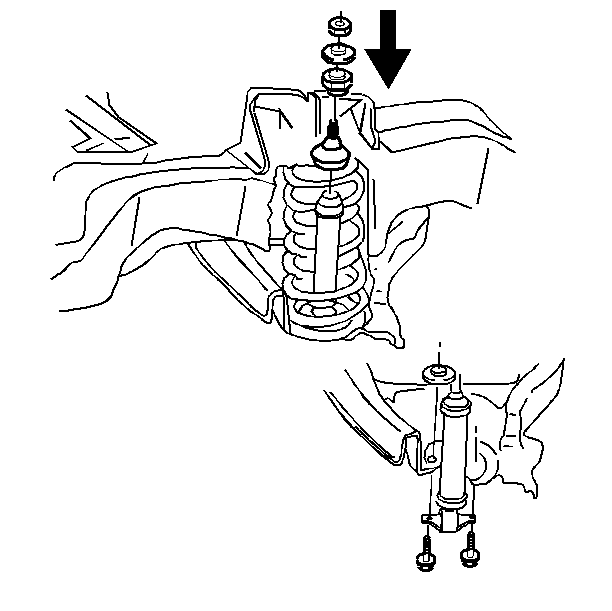
- Install the retainer and the grommet on the stem. Fully extend the stem.
- Install the shock absorber up through the lower control arm and the spring. Insert the stem end through the hole in the upper control arm frame bracket.
- Install the grommet to the stem.
- Install the retainer to the stem.
- Install the nut.
- Install the bolts through the pivot holes to the lower control arm holes.
- Lower the vehicle.

Notice: Use the correct fastener in the correct location. Replacement fasteners must be the correct part number for that application. Fasteners requiring replacement or fasteners requiring the use of thread locking compound or sealant are identified in the service procedure. Do not use paints, lubricants, or corrosion inhibitors on fasteners or fastener joint surfaces unless specified. These coatings affect fastener torque and joint clamping force and may damage the fastener. Use the correct tightening sequence and specifications when installing fasteners in order to avoid damage to parts and systems.
Tighten
Tighten the nut to 11 N·m (100 lb in), while
holding the stem with a wrench.
Tighten
Tighten the bolts to 27 N·m (20 lb ft).
Shock Absorber Replacement 4WD
Removal Procedure
- Raise the vehicle on a hoist.
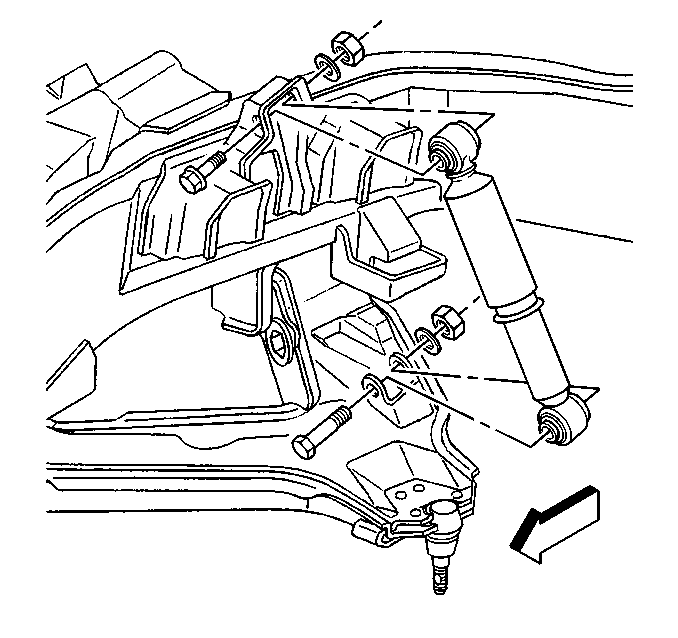
- Remove the lower nut, the washer, and the bolt. Collapse the shock absorber.
- Remove the upper nut, the washer, and the bolt.
- Remove the shock absorber.
Notice: Original equipment shock absorbers serve additionally as suspension drop cutoffs. Replacement shock absorbers must have a built in suspension cutoff feature and must not be longer than original shocks when they are fully extended or serious vehicle or component damage could result.

Installation Procedure
- Install the shock absorber to the bracket.
- Install the bolts. Fit the bolts in the direction shown.
- Install the new nuts and the washers to the bolts.
- Lower the vehicle.

Notice: Use the correct fastener in the correct location. Replacement fasteners must be the correct part number for that application. Fasteners requiring replacement or fasteners requiring the use of thread locking compound or sealant are identified in the service procedure. Do not use paints, lubricants, or corrosion inhibitors on fasteners or fastener joint surfaces unless specified. These coatings affect fastener torque and joint clamping force and may damage the fastener. Use the correct tightening sequence and specifications when installing fasteners in order to avoid damage to parts and systems.
Tighten
Tighten the upper and the lower nut to 90 N·m (66 lb ft).
Shock Absorber Replacement RWD-C3500HD
Removal Procedure
- Raise the vehicle. Support the vehicle with suitable safety stands.
- Remove the tire and wheel assembly. Refer to Wheel Removal in Tires and Wheels.
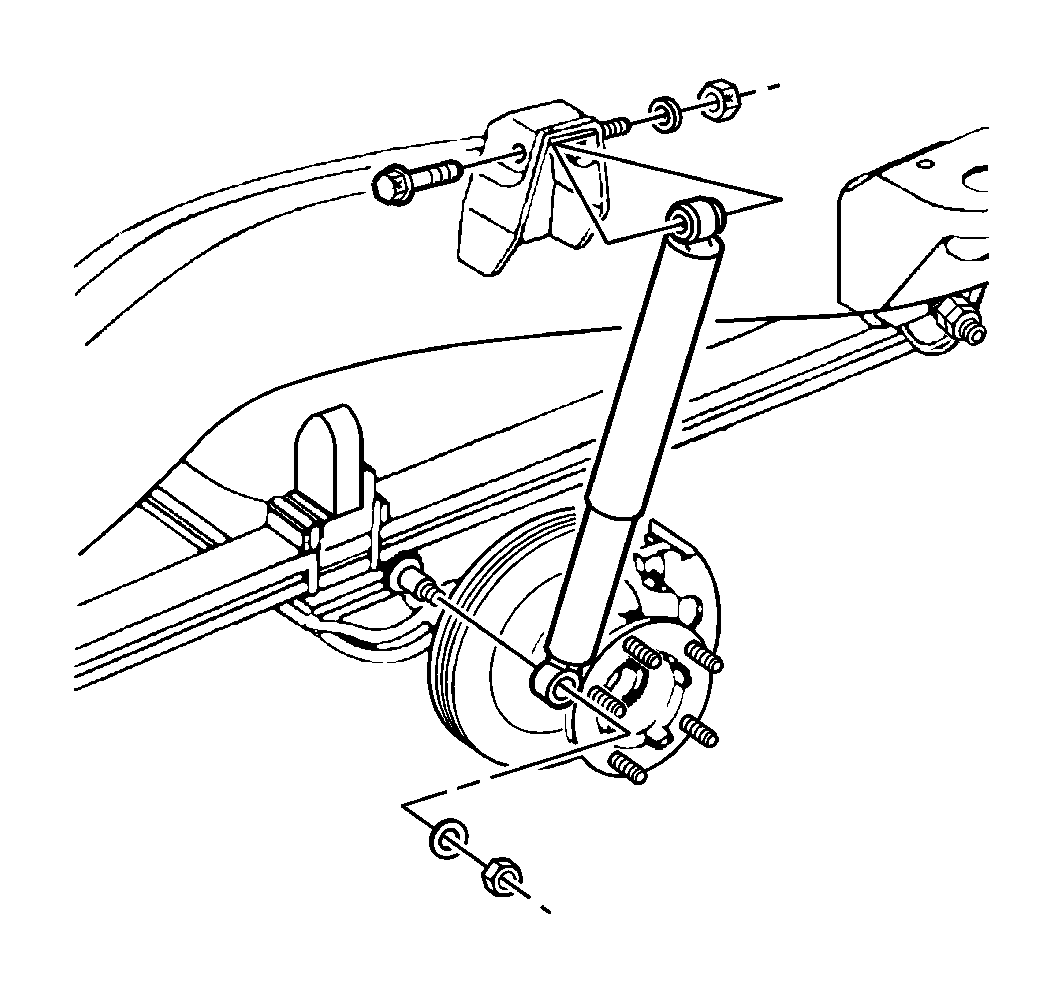
- Remove the nut and the washer.
- Remove the shock absorber from the leaf spring spacer.
- Remove the nut, the washer, and the bolt.
- Remove the shock absorber from the frame.
- Inspect the shock absorbers for damage and leakage.

Installation Procedure
- Install the shock absorber to the frame. Insert the bolt through the upper shock bracket and the shock absorber.
- Install the washer and the nut. Do not tighten.
- Install the shock absorber to the leaf spring spacer. Position the lower shock mount onto the stud.
- Install the washer and the nut.
- Install the tire and wheel assembly. Refer to Wheel Installation in Tires and Wheels.
- Lower the vehicle.

Notice: Use the correct fastener in the correct location. Replacement fasteners must be the correct part number for that application. Fasteners requiring replacement or fasteners requiring the use of thread locking compound or sealant are identified in the service procedure. Do not use paints, lubricants, or corrosion inhibitors on fasteners or fastener joint surfaces unless specified. These coatings affect fastener torque and joint clamping force and may damage the fastener. Use the correct tightening sequence and specifications when installing fasteners in order to avoid damage to parts and systems.
Tighten
| • | Tighten the upper nut to 185 N·m (136 lb ft). |
| • | Tighten the lower nut to 50 N·m (37 lb ft). |
