Caution: Do not attempt to move vehicle with drive axle(s) removed from wheel bearing. Wheel(s) could fall off, dropping vehicle to the ground and causing personal injury or damage to the vehicle.
Tools Required
J 36605 Front Knuckle Seal Installer
Removal Procedure
- Raise and support the vehicle. Refer to Lifting and Jacking the Vehicle in General Information.
- Remove the wheel and tire assembly.
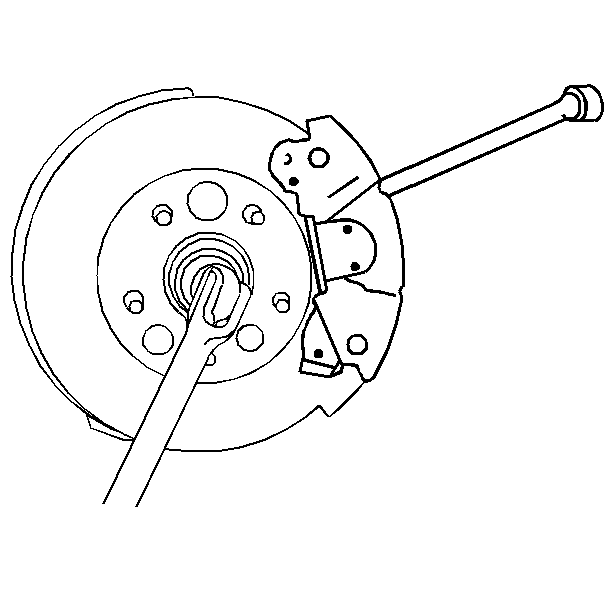
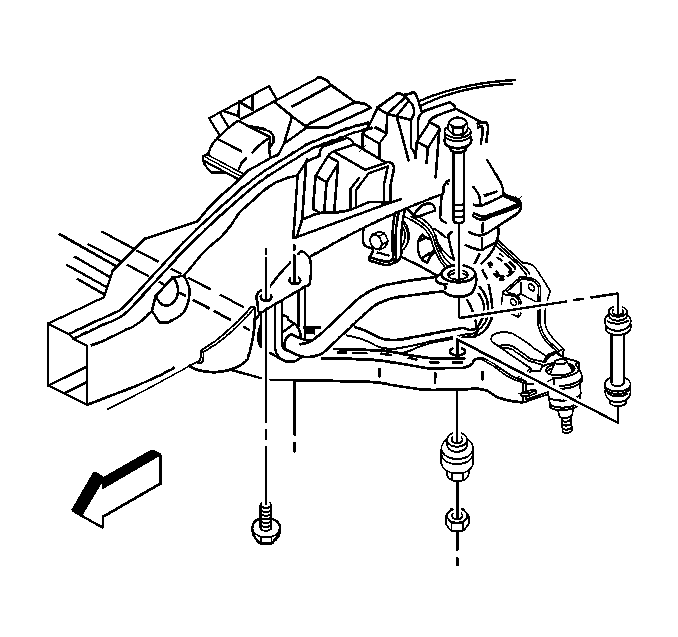
- Insert a drift or large screwdriver through the brake caliper into one of the brake rotor vanes in order to prevent the wheel drive shaft from turning.
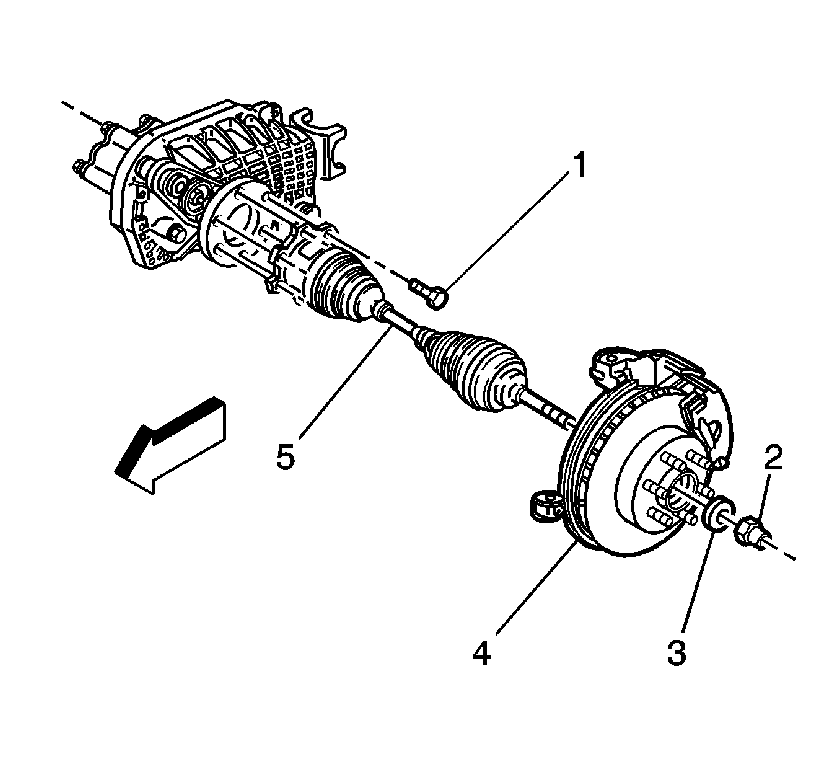
- Remove the wheel drive shaft nut (2) and washer (3).
- Loosen, but do not remove, the 6 bolts (1) securing the inboard C/V joint drive flange to the output shaft companion flange.
- Remove the drift.
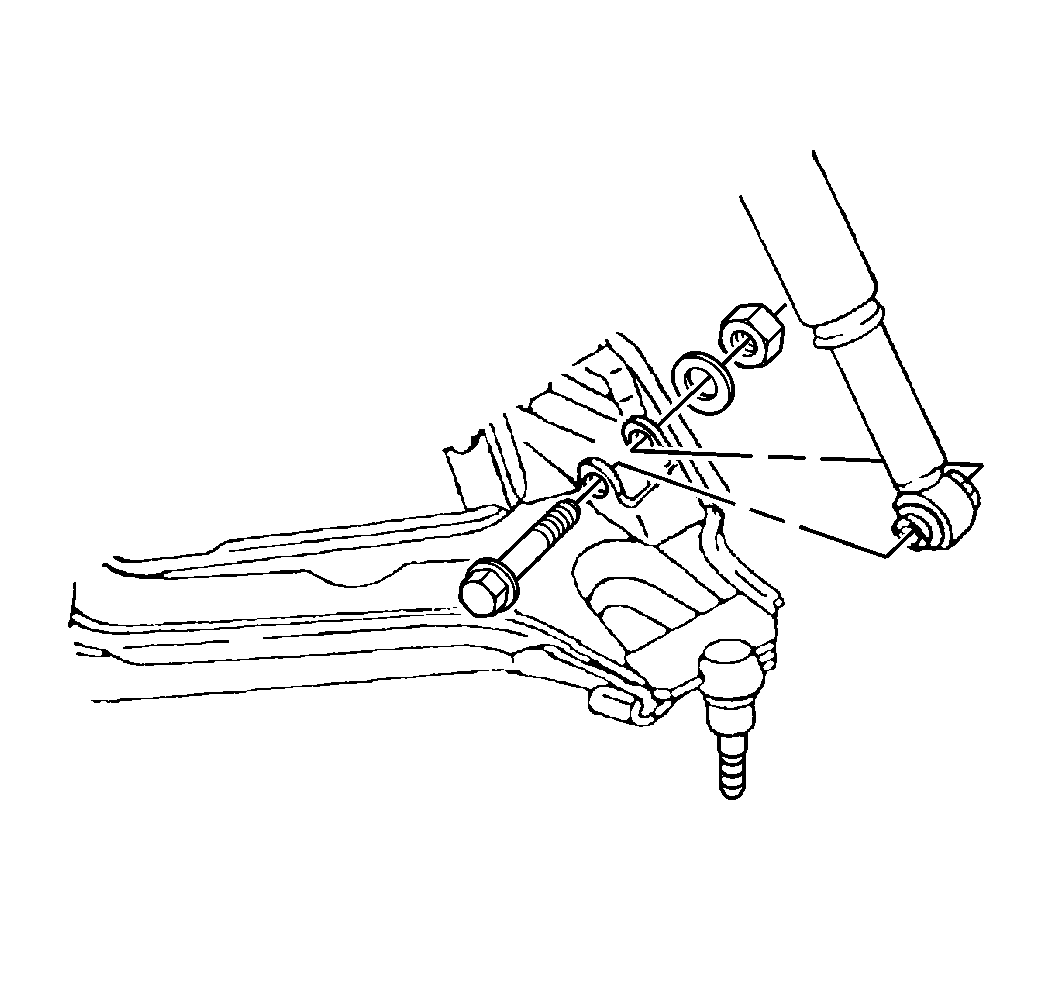
- Remove the lower shock mounting nut, washers, and bolt.
- Collapse the shock absorber and secure if necessary.
- Remove the stabilizer link nut, bolt, and spacer assembly (8050 GVW and above).
- Support the inboard end of the wheel drive shaft and remove the six bolts (1) from the inboard joint flange.
- Separate the wheel drive shaft outer C/V joint splined shank from the knuckle assembly using a hammer and a brass drift or equivalent.
- Remove the wheel drive shaft from the vehicle, rotating as necessary to avoid contact with the lower control arm.
- For unit repair of the wheel drive shaft, refer to Inner Joint and Seal Replacement and Outer Joint and Seal Replacement in Wheel Drive Shafts.
- Inspect the deflector ring and the wheel bearing seal for nicks, dents, cuts, or tears.
- If the deflector ring is dented or nicked, refer to Deflector Ring Replacement in Wheel Drive Shafts.
- If the seal is cut or torn, replace the seal and inspect the wheel bearing for damage. Refer to Front Wheel Hub, Bearing, and Seal Replacement in Front Suspension.
Notice: Wheel drive shaft boots, seals and clamps should be protected from sharp objects any time service is performed on or near the wheel drive shaft(s). Damage to the boot(s), the seal(s) or the clamp(s) may cause lubricant to leak from the joint and lead to increased noise and possible failure of the wheel drive shaft.
Important: Cover the shock mounting bracket and the ball stud on the lower control arm with a shop towel in order to prevent possible wheel drive shaft boot damage during removal and installation.
Important: Clean and inspect the deflector ring on the wheel drive shaft and the wheel bearing seal area on the knuckle. Replace if necessary
Installation Procedure
- Prior to wheel drive shaft installation, cover the shock mounting bracket, lower control arm ball stud, and all other sharp edges with shop towels so that the wheel drive shaft boot is not damaged during assembly.
- Insert the outer C/V joint splined shank into the knuckle hub, rotating as necessary to avoid contact with the lower control arm. Secure the inboard C/V joint flange to companion flange with bolts. Do not tighten.
- Install the stabilizer shaft link spacer assembly, bolt, and nut (8050 GVW and above).
- Install the shock absorber to the lower shock mounting bracket.
- Install the shock mounting bolt, washer, and nut.
- Install the hub nut washer (3) and the nut (2).
- Seat the shank splines in the hub.
- Insert a drift through the brake caliper in order to prevent the wheel drive shaft from turning.
- Install the hub nut.
- Remove the drift.
- Install the wheel and tire assembly. Refer to Tire and Wheel Removal and Installation in Tires and Wheels.
- Lower the vehicle.
Important: Do not lubricate the wheel drive shaft splines and knuckle with grease.
Notice: Use the correct fastener in the correct location. Replacement fasteners must be the correct part number for that application. Fasteners requiring replacement or fasteners requiring the use of thread locking compound or sealant are identified in the service procedure. Do not use paints, lubricants, or corrosion inhibitors on fasteners or fastener joint surfaces unless specified. These coatings affect fastener torque and joint clamping force and may damage the fastener. Use the correct tightening sequence and specifications when installing fasteners in order to avoid damage to parts and systems.
Tighten
Obtain torque by running the nut assembly to the unthreaded portion of the bolt, then tighten to 18 N·m (13 lb ft).
Tighten
Tighten the nut to 73 N·m (54 lb ft).
Notice: Use only a genuine GM front wheel drive shaft nut. Installation of anything but an OEM front wheel drive shaft nut could cause damage to the vehicle.
Tighten
Tighten the inboard flange bolts to 78 N·m (58 lb ft).
Tighten
Tighten the hub nut to 225 N·m (165 lb ft).
