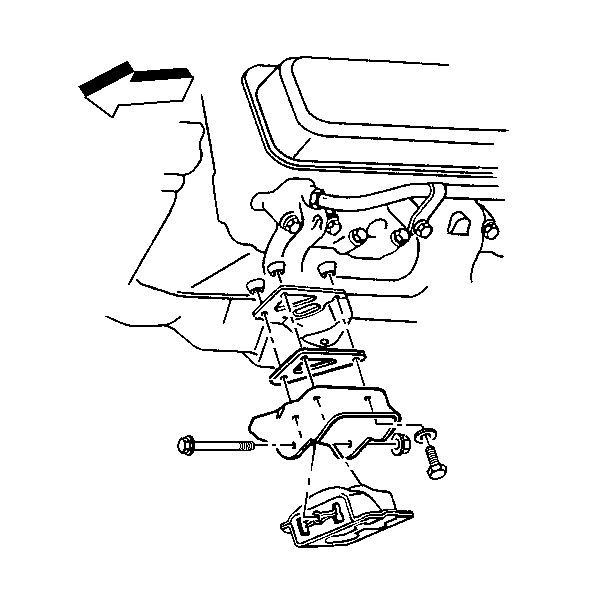
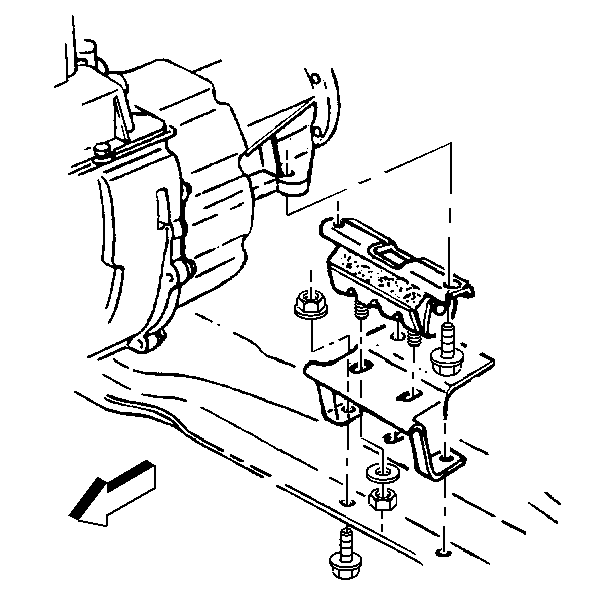
Engine Mount Replacement Front K
Removal Procedure
- Support the engine with a suitable jack. Do not load the engine mounting.
- Raise the engine only enough in order to permit removal of the engine mounting.
- Remove the engine mounting through-bolt and nut.
- Remove the mounting assembly bolts, nuts, and washers.
- Remove the mounting assembly.
Notice: When supporting the engine to replace a mounting, raise the engine only to the height required to provide clearance for mounting removal. It may be necessary to drain the cooling system and disconnect hoses to avoid damage when the engine is raised. Be careful that control linkage and wiring are not damaged from raising the engine. When replacing a single front mounting, both mountings, should be detached before attempting to raise the engine. Failure to do this will place excessive stress on the attached mounting when the engine is raised.
Notice: Raise the engine to allow sufficient clearance. Distributor damage results from interference between the rear of the engine and the dash panel.
Installation Procedure
- Install the mounting assembly.
- Install the mounting assembly bolts, nuts, and washers.
- Install the engine mount through-bolt and nut.
Tighten
| • | Tighten the bolts to 59 N·m (44 lb ft). |
| • | Tighten the nuts to 45 N·m (33 lb ft). |
Notice: Use the correct fastener in the correct location. Replacement fasteners must be the correct part number for that application. Fasteners requiring replacement or fasteners requiring the use of thread locking compound or sealant are identified in the service procedure. Do not use paints, lubricants, or corrosion inhibitors on fasteners or fastener joint surfaces unless specified. These coatings affect fastener torque and joint clamping force and may damage the fastener. Use the correct tightening sequence and specifications when installing fasteners in order to avoid damage to parts and systems.
| 3.1. | Lower the engine until the bolt can be inserted. |
| 3.2. | Install the through-bolt nut. |
Tighten
Tighten the nut to 68 N·m (50 lb ft).
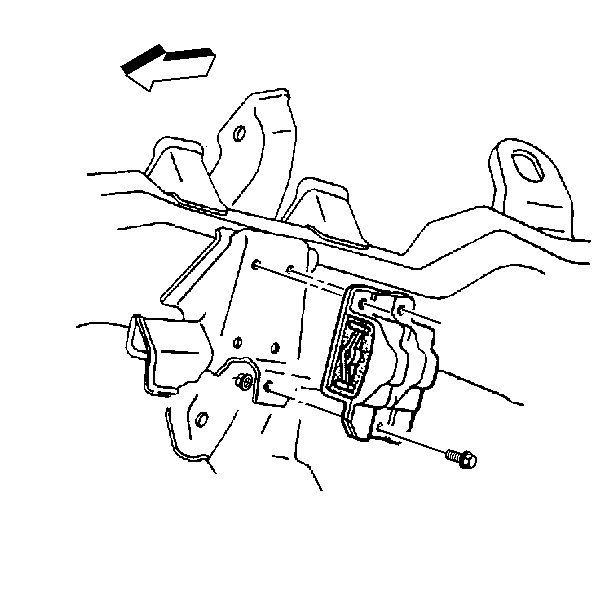
Engine Mount Replacement Rear C with Manual Trans.
Removal Procedure
- Support the rear of the engine to relieve the weight on the rear mountings.
- Remove the mounting to crossmember nuts and washers.
- Remove the mounting to transmission bolts and washers.
- Raise the rear of the engine only enough to permit removal of the mounting.
- Remove the mounting.
Notice: When supporting the engine to replace a mounting, raise the engine only to the height required to provide clearance for mounting removal. It may be necessary to drain the cooling system and disconnect hoses to avoid damage when the engine is raised. Be careful that control linkage and wiring are not damaged from raising the engine. When replacing a single front mounting, both mountings, should be detached before attempting to raise the engine. Failure to do this will place excessive stress on the attached mounting when the engine is raised.
Installation Procedure
- Install the mounting.
- Lower the rear of the engine.
- Install the mounting to transmission bolts and washers.
- Install the mounting to crossmember nuts and washers.
Tighten
Tighten the bolts to 59 N·m (44 lb ft).
Notice: Use the correct fastener in the correct location. Replacement fasteners must be the correct part number for that application. Fasteners requiring replacement or fasteners requiring the use of thread locking compound or sealant are identified in the service procedure. Do not use paints, lubricants, or corrosion inhibitors on fasteners or fastener joint surfaces unless specified. These coatings affect fastener torque and joint clamping force and may damage the fastener. Use the correct tightening sequence and specifications when installing fasteners in order to avoid damage to parts and systems.
Tighten
Tighten the nuts to 45 N·m (33 lb ft).
Engine Mount Replacement Rear C with Automatic Trans.
Removal Procedure
- Support the rear of the engine to relieve the weight on the rear mountings.
- Remove the mounting to crossmember nuts and washers.
- Remove the mounting to transmission bolts and washers.
- Raise the rear of the engine only enough to permit removal of the mounting.
- Remove the mounting.
Notice: When supporting the engine to replace a mounting, raise the engine only to the height required to provide clearance for mounting removal. It may be necessary to drain the cooling system and disconnect hoses to avoid damage when the engine is raised. Be careful that control linkage and wiring are not damaged from raising the engine. When replacing a single front mounting, both mountings, should be detached before attempting to raise the engine. Failure to do this will place excessive stress on the attached mounting when the engine is raised.

Installation Procedure
- Install the mounting.
- Lower the rear of the engine.
- Install the mounting to transmission bolts and washers.
- Install the mounting to crossmember nuts and washers.
Tighten
Tighten the bolts to 59 N·m (44 lb ft).
Notice: Use the correct fastener in the correct location. Replacement fasteners must be the correct part number for that application. Fasteners requiring replacement or fasteners requiring the use of thread locking compound or sealant are identified in the service procedure. Do not use paints, lubricants, or corrosion inhibitors on fasteners or fastener joint surfaces unless specified. These coatings affect fastener torque and joint clamping force and may damage the fastener. Use the correct tightening sequence and specifications when installing fasteners in order to avoid damage to parts and systems.
Tighten
Tighten the nuts to 45 N·m (33 lb ft).
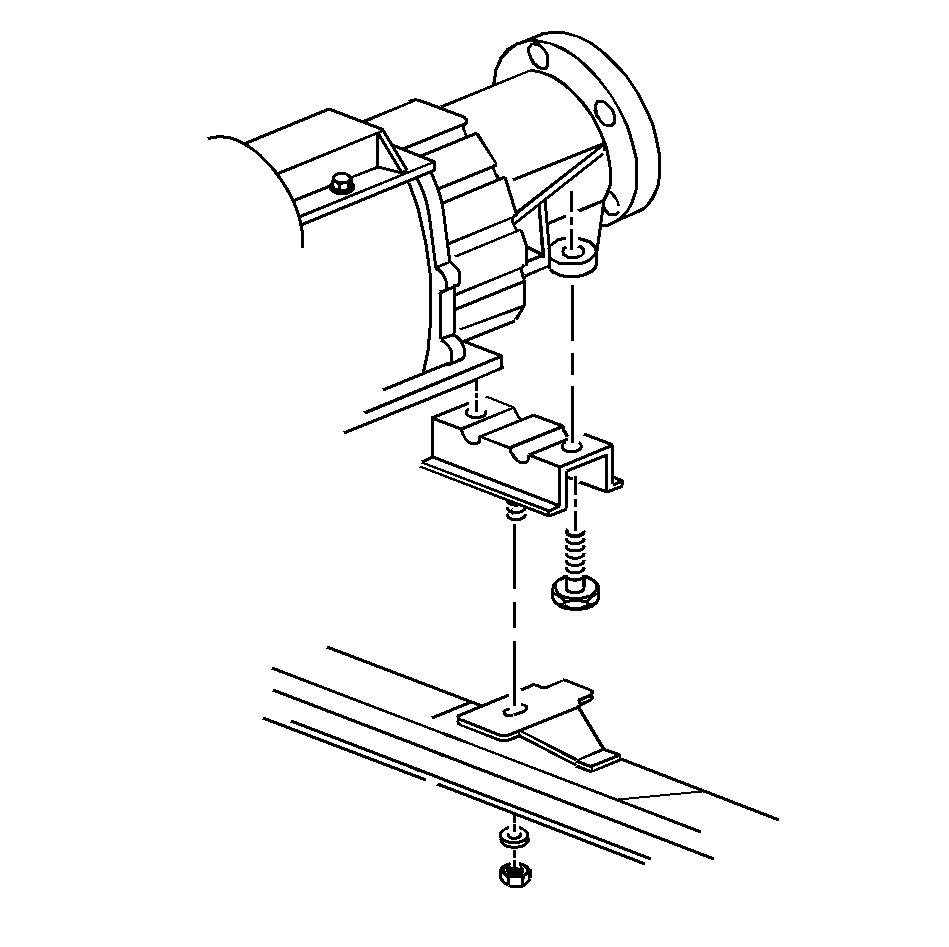
Engine Mount Replacement Rear 15K with Automatic Trans.
Removal Procedure
- Support the rear of the engine to relieve the weight on the rear mountings.
- Remove the mounting to crossmember nuts and washers.
- Remove the mounting to transmission bolts and washers.
- Raise the rear of the engine only enough to permit removal of the mounting.
- Remove the mounting.
Notice: When supporting the engine to replace a mounting, raise the engine only to the height required to provide clearance for mounting removal. It may be necessary to drain the cooling system and disconnect hoses to avoid damage when the engine is raised. Be careful that control linkage and wiring are not damaged from raising the engine. When replacing a single front mounting, both mountings, should be detached before attempting to raise the engine. Failure to do this will place excessive stress on the attached mounting when the engine is raised.
Installation Procedure
- Install the mounting.
- Lower the rear of the engine.
- Install the mounting to transmission bolts and washers.
- Install the mounting to crossmember nuts and washers.
Tighten
Tighten the bolts to 59N·m (44 lb ft).
Notice: Use the correct fastener in the correct location. Replacement fasteners must be the correct part number for that application. Fasteners requiring replacement or fasteners requiring the use of thread locking compound or sealant are identified in the service procedure. Do not use paints, lubricants, or corrosion inhibitors on fasteners or fastener joint surfaces unless specified. These coatings affect fastener torque and joint clamping force and may damage the fastener. Use the correct tightening sequence and specifications when installing fasteners in order to avoid damage to parts and systems.
Tighten
Tighten the nuts to 45N·m (33 lb ft).
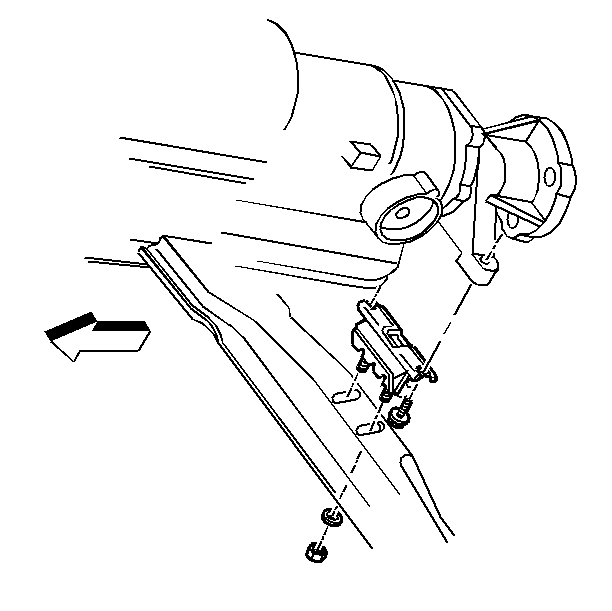
Engine Mount Replacement Rear 15K with Manual Trans.
Removal Procedure
- Support the rear of the engine to relieve the weight on the rear mountings.
- Remove the mounting to crossmember nuts and washers.
- Remove the mounting to transmission bolts and washers.
- Raise the rear of the engine only enough to permit removal of the mounting.
- Remove the mounting.
Notice: When supporting the engine to replace a mounting, raise the engine only to the height required to provide clearance for mounting removal. It may be necessary to drain the cooling system and disconnect hoses to avoid damage when the engine is raised. Be careful that control linkage and wiring are not damaged from raising the engine. When replacing a single front mounting, both mountings, should be detached before attempting to raise the engine. Failure to do this will place excessive stress on the attached mounting when the engine is raised.
Installation Procedure
- Install the mounting.
- Lower the rear of the engine.
- Install the mounting to transmission bolts and washers.
- Install the mounting to crossmember nuts and washers.
Tighten
Tighten the bolts to 59 (44 lb ft).
Notice: Use the correct fastener in the correct location. Replacement fasteners must be the correct part number for that application. Fasteners requiring replacement or fasteners requiring the use of thread locking compound or sealant are identified in the service procedure. Do not use paints, lubricants, or corrosion inhibitors on fasteners or fastener joint surfaces unless specified. These coatings affect fastener torque and joint clamping force and may damage the fastener. Use the correct tightening sequence and specifications when installing fasteners in order to avoid damage to parts and systems.
Tighten
Tighten the nuts to 45 N·m (33 lb ft).
Engine Mount Replacement Front C
Removal Procedure
- Inspect the engine mounts. Refer to Engine Mount Inspection .
- Support the engine with a suitable jack. Do not load the engine mounts.
- Remove the engine mount through bolt and the nut.
- Raise the engine only enough to permit removal of the engine mount.
- If servicing a C-model truck, remove the engine mount assembly bolts, nuts, and washers.
- Remove the engine mount assembly.
- If servicing a K-model truck, remove the engine mount assembly bolts, nuts, and washers.
- Remove the engine mount assembly.
Notice: When raising or supporting the engine for any reason, do not use a jack under the oil pan, any sheet metal, or the crankshaft pulley. Due to the small clearance between the oil pan and the oil pump screen, jacking against the oil pan may cause the pan to be bent against the pump screen. This will result in a damaged oil pickup unit.

Installation Procedure
- If servicing a C-model truck, install the engine mount assembly.
- If servicing a K-model truck, install the engine mount assembly.
- Install the engine mount assembly bolts, nuts, and washers.
- Lower the engine until the engine mount through bolt can be inserted.
- Install the engine mount through bolt and the nut.
Notice: Use the correct fastener in the correct location. Replacement fasteners must be the correct part number for that application. Fasteners requiring replacement or fasteners requiring the use of thread locking compound or sealant are identified in the service procedure. Do not use paints, lubricants, or corrosion inhibitors on fasteners or fastener joint surfaces unless specified. These coatings affect fastener torque and joint clamping force and may damage the fastener. Use the correct tightening sequence and specifications when installing fasteners in order to avoid damage to parts and systems.
Tighten
| • | Tighten the bolts to 59 N·m (44 lb ft). |
| • | Tighten the nuts to 45 N·m (33 lb ft). |
Tighten
Tighten the through bolt nut to 68 N·m (50 lb ft).
