GM Service Manual Online
For 1990-2009 cars only

Vibration Theory

The vehicle designs and the engineering requirements have undergone drastic changes in this decade. The following factors drive many of these requirements:

    • Increased fuel costs
    • Decreased fuel supplies
    • Corporate Average Fuel Economy (CAFE)
    • Clean air legislation
    • Foreign competition
    • Crashworthiness
    • Rising customer expectations

The vehicle designs have evolved from the full frame construction, where multiple isolating body mounts were used, to the lighter unibody designs of today. The unibody designs transfer any noise or vibration faster.

The use of heavier V8 engines has been reduced, being replaced with lighter, more fuel-efficient four and six-cylinder engines. During this same period, options such as A/C and PS have become more popular. These types of options increase the engine load, resulting in more unwanted noise and vibration.

The presence/absence of unwanted noise and vibration is linked to the customer's perception of the overall vehicle quality.

Vibration is the repetitive motion of an object, back and forth, or up and down. The following conditions cause most vehicle vibrations:

    • A rotating component
    • The engine combustion process firing impulses

Rotating components will vibrate with excessive imbalance or runout. During vibration diagnosis, the amount of allowable imbalance or runout should be considered a TOLERANCE and not a SPECIFICATION. In other words, the less imbalance or runout the better.

A vibration concern will occur when the firing impulses of the engine are not properly isolated from the passenger compartment.

A vibrating component operates at a consistent rate (km/h, mph, or rpm). Measure the rate of vibration in question. When the rate/speed is determined, relate the vibration to a component that operates at an equal rate/speed in order to pinpoint the source. Vibrations also tend to transmit through the body structure to other components. Therefore, just because the seat vibrates doesn't mean the source of vibration is in the seat.

Vibrations consist of the following three elements:

    • The source -- the cause of the vibration
    • The transfer path -- the path the vibration travels through the vehicle
    • The responder -- the component where the vibration is felt

Object Number: 95585  Size: SH

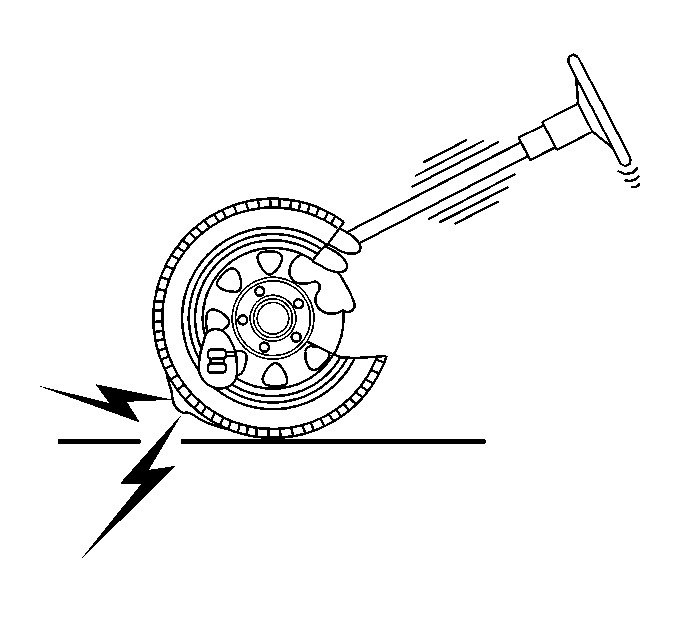
In the preceding picture, the source is the unbalanced tire. The transfer path is the route the vibrations travels through the vehicle's suspension system into the steering column. The responder is the steering wheel, which the customer reports as vibrating. Eliminating any one of these three elements will usually correct the condition. Decide, from the gathered information, which element makes the most sense to repair. Adding a brace to the steering column may keep the steering wheel from vibrating, but adding a brace is not a practical solution. The most direct and effective repair would be to properly balance the tire.


Object Number: 95586  Size: SH

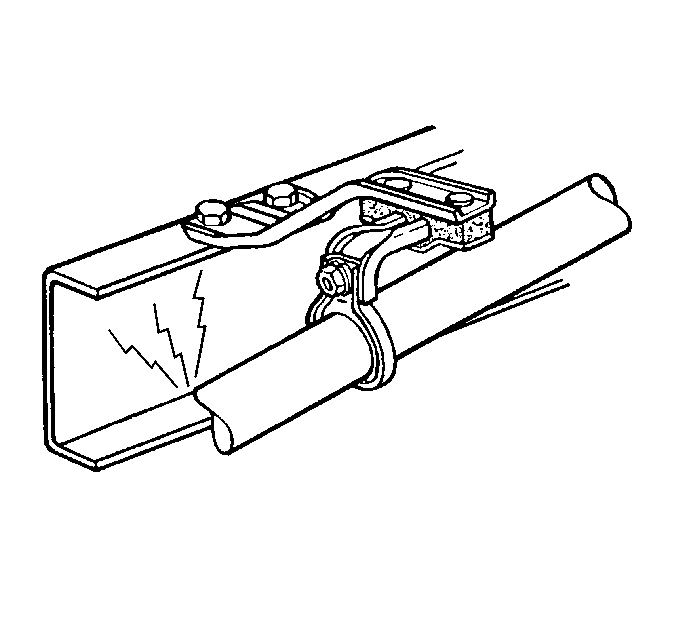
Vibration can also produce noise. As an example, consider a vehicle that has an exhaust pipe GROUNDED to the frame. The source of the vibration is the engine firing impulses traveling through the exhaust. The transfer path is a grounded or bound-up exhaust hanger. The responder is the frame. The floor panel vibrates, acting as a large speaker, which produces noise. The best repair would be to eliminate the transfer path. Aligning the exhaust system and correcting the grounded condition at the frame would eliminate the transfer path.

Basic Vibration Terminology

The following are the two primary components of vibration diagnosis:

    • The physical properties of objects
    • The object's properties of conducting mechanical energy

The repetitive up and down or back and forth movement of a component cause most customer vibration complaints. The following are the common components that vibrate:

    • The steering wheel
    • The seat cushion
    • The frame
    • The IP

Vibration diagnosis involves the following simple stepwise outline:

  1. Measure the repetitive motion and assign a value to the measurement in cycles per second or cycles per minute.
  2. Relate the frequency back on terms of the rotational speed of a component that is operating at the same rate or speed.
  3. Inspect and test the components for conditions that cause vibration.

For example, performing the following steps will help demonstrate the vibration theory:


    Object Number: 95587  Size: SH
  1. Clamp a yardstick to the edge of a table, leaving about 50 cm (20 in) hanging over the edge of the table.
  2. Pull down on the edge of the stick and release while observing the movement of the stick.

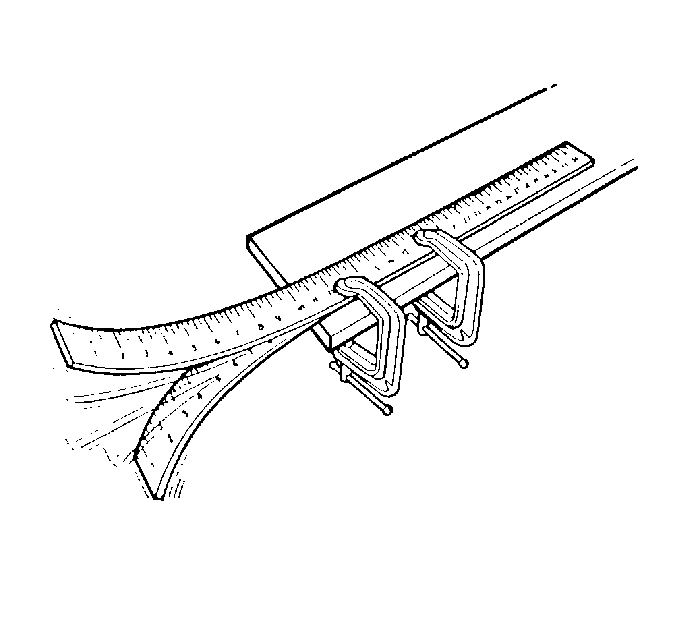
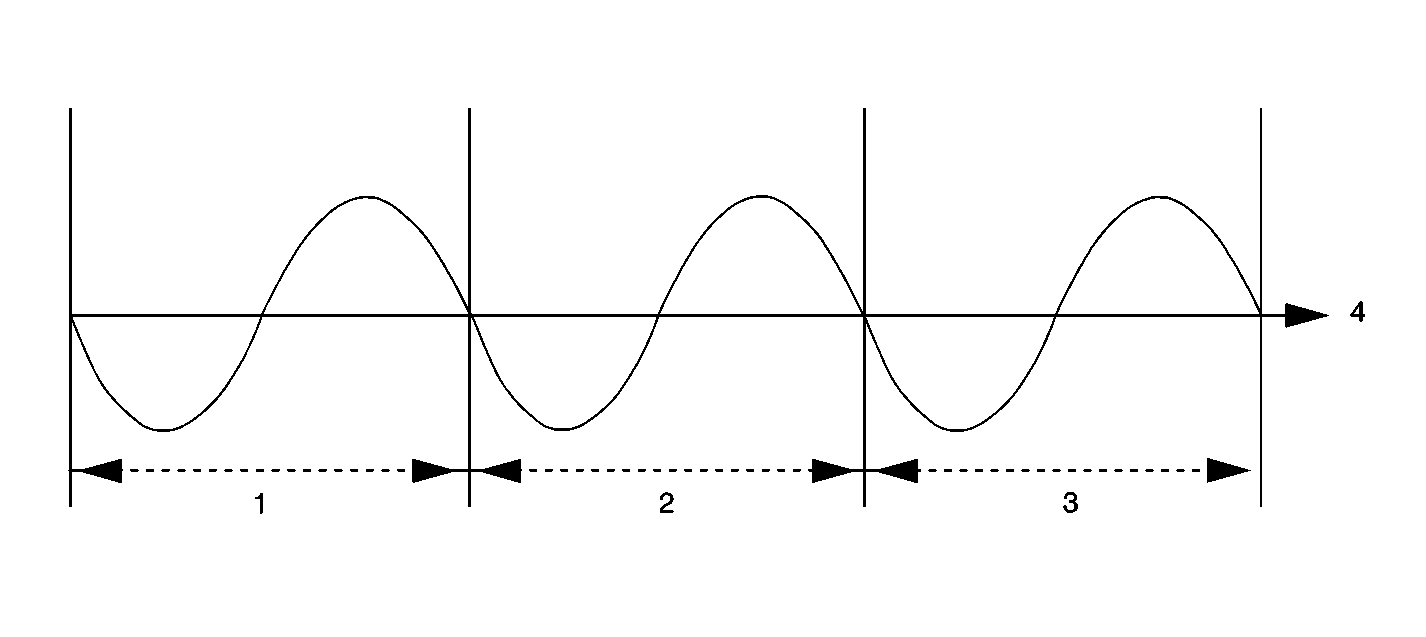
The motion of the stick occurs in repetitive cycles. The cycle begins at midpoint, continues through the lowest extreme of travel, then back past the midpoint, through the upper extreme of travel, and back to the midpoint where the cycle begins again.

The cycle occurs over and over again at the same rate, or frequency. In this case, about 10 cycles in one minute. If we measure the frequency to reflect the number of complete cycles that the yardstick made in one minute, the measure would be 10 cycles x 60 seconds = 600 cycles per minute (cpm).

We have also found a specific amount of motion, or amplitude, in the total travel of the yardstick from the very top to the very bottom. Redo the experiment as follows:

  1. Reclamp the yardstick to the edge of a table, leaving about 25 cm (10 in) hanging over the edge of the table.
  2. Pull down on the edge of the stick and release while observing the movement of the stick.

The stick vibrates at a much faster frequency: 30 cycles per second (1800 cycles per minute).

Cycle


Object Number: 95588  Size: SF
(1)1st Cycle
(2)2nd Cycle
(3)3rd Cycle
(4)Time

Vibration Cycles in Powertrain Components


Object Number: 95589  Size: SH
(1)Spindle
(2)Pinion Nose

The word CYCLE comes from the same root as the word CIRCLE. A circle begins and ends at the same point, as thus, so does a cycle. All vibrations consist of repetitive cycles.

Frequency


Object Number: 95590  Size: MF
(1)Amplitude
(2)Reference
(3)Time in Seconds
(4)1 Second

Frequency is defined as the rate at which an event occurs during a given period of time. With a vibration, the event is a cycle, and the period of time is one second. Thus, frequency is expressed in cycles per second.

The proper term for cycles per seconds is Hertz (Hz). This is the most common way to measure frequency. Multiply the Hertz by 60 to get the cycles or revolutions per minute (RPM).

Amplitude


Object Number: 95593  Size: SH
(1)Maximum
(2)Minimum
(3)Zero-to-Peak Amplitude
(4)Peak-to-Peak Amplitude

Amplitude is the maximum value of a periodically varying quantity. Used in vibration diagnostics, we are referring it to the magnitude of the disturbance. A severe disturbance would have a high amplitude; a minor disturbance would have a low amplitude.

Amplitude is measured by the amount of actual movement, or the displacement. For example, consider the vibration caused by an out-of-balance wheel at 80 km/h (50 mph) as opposed to 40 km/h (25 mph). As the speed increases, the amplitude increases.

Free Vibration

Free vibration is the continued vibration in the absence of any outside force. In the yardstick example, the yardstick continued to vibrate even after the end was released.

Forced Vibration

Forced vibration is when an object is vibrating continuously as a result of an outside force.

Centrifugal Force Due to an Imbalance


Object Number: 95594  Size: MF
(1)Location of Imbalance (Degrees)
(2)Centrifugal Force Acting on Spindle

A spinning object with an imbalance generates a centrifugal force. Performing the following steps will help to demonstrate centrifugal force:

  1. Tie a nut to a string.
  2. Hold the string. The nut hangs vertically due to gravity.
  3. Spin the string. The nut will spin in a circle.

Centrifugal force is trying to make the nut fly outward, causing the pull you feel on your hand. An unbalanced tire follows the same example. The nut is the imbalance in the tire. The string is the tire, wheel, and suspension assembly. As the vehicle speed increases, the disturbing force of the unbalanced tire can be felt in the steering wheel, the seat, and the floor. This disturbance will be repetitive (Hz) and the amplitude will increase. At higher speeds, both the frequency and the amplitude will increase. As the tire revolves, the imbalance, or the centrifugal force, will alternately lift the tire up and force the tire downward, along with the spindle, once for each revolution of the tire.

Natural or Resonant Frequency


Object Number: 95595  Size: SH

The natural frequency is the frequency at which an object tends to vibrate. Bells, guitar strings, and tuning forks are all examples of objects that tend to vibrate at specific frequencies when excited by an external force.

Suspension systems, and even engines within the mounts, have a tendency to vibrate at certain frequencies. This is why some vibration complaints occur only at specific vehicle speeds or engine RPM.

The stiffness and the natural frequency of a material have a relationship. Generally, the stiffer the material, the higher the natural frequency. The opposite is also true. The softer a material, the lower the natural frequency. Conversely, the greater the mass, the lower the natural frequency.

Resonance


Object Number: 95596  Size: SH
(1)Frequency - cps
(2)Suspension Frequency
(3)Unbalanced Excitation
(4)Point of Resonance
(5)Problem Speed

All objects have natural frequencies. The natural frequency of a typical automotive front suspension is in the 10-15Hz range. This natural frequency is the result of the suspension design. The suspension's natural frequency is the same at all vehicle speeds. As the tire speed increases along with the vehicle speed, the disturbance created by the tire increases in frequency. Eventually, the frequency of the unbalanced tire will intersect with the natural frequency of the suspension. This causes the suspension to vibrate. The intersecting point is called the resonance.

The amplitude off a vibration will be greatest at the point of resonance. While the vibration may be felt above and below the problem speed, the vibration may be felt the most a the point of resonance.

Damping


Object Number: 95597  Size: MF
(1)Low Damping
(2)High Damping

Damping is the ability of an object or material to dissipate or absorb vibration. The automotive shock absorber is a good example. The function of the shock absorber is to absorb or dampen the oscillations of the suspension system.

Beating (Phasing)


Object Number: 95599  Size: MF

Two separate disturbances that are relatively close together in frequency will lead to a condition called beating, or phasing. A beating vibration condition will increase in intensity or amplitude in a repetitive fashion as the vehicle travels at a steady speed. This beating vibration can produce the familiar droning noise heard in some vehicles.

Beating occurs when two vibrating forces are adding to each other's amplitude. However, two vibrating forces can also subtract from each other's amplitude. The adding and subtracting of amplitudes in similar frequencies is called beating. In many cases, eliminating either one of the disturbances can correct the condition.

Order

Order refers to how many times an event occurs during one revolution of a rotating component.


Object Number: 95600  Size: SH

For example, a tire with one high spot would create a disturbance once for every revolution of the tire. This is called first-order vibration.


Object Number: 95601  Size: SH

An oval-shaped tire with two high spots would create a disturbance twice for every revolution. This is called second-order vibration. Three high spots would be third-order, and so forth. Two first-order vibrations may add or subtract from the overall amplitude of the disturbance, but that is all. Two first-order vibrations do not equal a second-order. Due to centrifugal force, an unbalanced component will always create at least a first-order vibration.

Electronic Vibration Analyzer (EVA)


Object Number: 95602  Size: SH

The J 38792 Electronic Vibration Analyzer (EVA) is specifically designed to diagnose vibrations. This hand-held device is similar to a scan tool. A standard 12-volt power feed supplies the power. The vibration sensor, or the accelerometer, is at the end of a 6 m (20 ft) cord. The vibration sensor can be mounted virtually anywhere on the vehicle where a vibration is felt.

EVA Basic Hookup

  1. Inspect that the software cartridge is correctly inserted at the bottom of the unit. (The cartridge usually remains there at all times.)
  2. Connect the vibration sensor cord into either input A or B.
  3. Line up the connector so that the release button is at the bottom.
  4. Important: Do not twist the connector. The sensor should remain plugged into the unit at all times.

  5. Push the connector into the input until the connector clicks and locks in place.
  6. Plug the power cord into a 12-volt power feed in order to turn the EVA on. (There is no ON-OFF switch.)

To Disconnect the sensor, press the release button and gently pull the connector straight out.

EVA Sensor Placement


Object Number: 95603  Size: SH

Proper EVA sensor placement is critical in order to take proper vibration readings. The sensor can be placed anywhere on the vehicle where vibrations are felt. Use putty or a hook and loop fastener in order to hold the sensor in place on non-ferrous surfaces, such as the surface of the steering column.


Object Number: 95604  Size: SH

A magnet is supplied in order to hold the sensor to ferrous surfaces.

Vibrations are typically felt in an up-and-down direction. The sensor is directionally sensitive. Therefore, place the sensor as flat as possible with the side marked UP facing upward. Place the UP side of the sensor in the exact position every time for consistent results when repeating the tests or making a comparison.

EVA Display


Object Number: 95605  Size: SH

The EVA offers the following main display features, all of which are described below:

    • Freeze
    • Record/Playback
    • Averaging/Non-averaging modes
    • Strobe Balancing

Freeze

Pressing the FREEZE button on the keypad activates the freeze function, which locks the display of data. The display shows FRZ at the top. The freeze function is useful when conducting an acceleration/deceleration test in which the significant amount of vibration registers only for a very short time. Pressing EXIT or the FREEZE button again deactivates the freeze function.

Record/Playback

The displayed vibration information can be recorded for later playback. The EVA retains stored data for about 70 hours after the unit has been unplugged from a power source. Data is recorded as SNAPSHOTS of vibration information. Each snapshot consists of 10 different frames. Up to 10 of these snapshots can be recorded.

Press RECORD in order to record a snapshot. The screen will display R? in order to request a tag number between 0 and 9. These tag numbers are the individual frames of the snapshot recording. New data will replace the existing data when a number is chosen that has already been used in order to tag a snapshot.

Pressing PLAYBACK plays back the recorded data. The screen shows P? in order to request the tag number for the wanted snapshot. Once the number is entered, the snapshot data is displayed: P and the tag number will appear. Then, an F and a 0-9 will be displayed in order to indicate which frame of the snapshot is being displayed.

The freeze function can be used in order to freeze the display at any point in the sequence during playback. Individual frames can be viewed in a forward or backward sequence using the up and down arrow keys.

The display returns to the active screen when the recording or playback of a snapshot is finished, or when EXIT is pressed.

Averaging/Non-Averaging Modes

The EVA normally operates in an averaging mode that averages multiple vibration samples over a period of time. The averaging mode minimizes the effects of sudden vibration that are not related to the problem (such as form potholes or uneven road surfaces). Most tests use the averaging mode.

The EVA is more sensitive to vibrations in the non-averaging mode. The display is more instantaneous and not averaged over a period of time. The non-averaging mode is used when measuring a vibration that exists for only a short period of time, and during acceleration/deceleration tests.

Pressing the AVG button switches between the averaging and non-averaging modes. The screen will display AVG.

Strobe Balancing


Object Number: 95606  Size: SH

The EVA can strobe balance a rotating component. A trigger wire is located on the top of the EVA, which is used in conjunction with an inductive pick-up light strobe. The EVA triggers the strobe light at the same frequency as the vibration. The timing light clips on to the trigger wire. The vibration sensor must be attached to input A. Input B does not provide the strobe function.

Pressing STROBE starts the strobe balancing function. The EVA will ask a series of questions in order to determine the correct filter range: full, low, or high.

The low and high ranges prevent other vibrations from interfering with the operation of the strobe light. Use the full range as a last resort only. Press YES in order to select a range. Press NO in order to go on to the next range. The vibration/strobe frequency must fall within the selected range.

The EVA will display the strobe frequency, amplitude, and filter range. The EVA is now ready to begin the strobe balance procedure.

EVA Calibration

The EVA features the following two built in calibration procedures:

    • Sensor Calibration
    • Phase Shift Calibration

A replaced or added sensor must be calibrated in order to function properly with the EVA unit. The phase shift calibration is performed at the factory and should not be repeated under normal use.

Sensor Calibration

  1. Lay the sensor on a flat stationary surface with the UP side facing upward.
  2. Plug the sensor into either input A or B.
  3. Plug the EVA into a 12-volt power supply.
  4. After the display initializes, select the proper input.
  5. Press the up arrow key.
  6. Press the number 2 three times on the keypad. The message BURNING will appear, followed by a request to turn the sensor over.
  7. Turn the sensor over.
  8. Press any key in order to commence calibration:
  9. • Calibration will take about 20 seconds.
    • The display will return to the active mode when calibration is complete.

Phase Shift Calibration

  1. Plug the EVA into a 12-volt power supply.
  2. Press the down arrow key on the EVA keypad.
  3. Press the number 2 three times in order to begin calibration:
  4. • Do not press any key until the message ANY KEY TO CONTINUE appears. Pressing a key will cancel the calibration process.
    • The display will flash numbers for 5-6 minutes. (If the numbers flash for more than 10 minutes, the EVA is defective.)
    • The message BURNING PHASE SHIFT CONSTANTS will appear for one minute.
    • The BURNING CENTER FREQUENCIES LOW=39 HIGH=48 message will appear.
    • The ANY KEY TO CONTINUE message should appear.
  5. Press any key in order to return to the active mode.