Starter Assemble SD-260 Drive End Frame
- Wipe the armature shaft clean.
- Lubricate the area that will be under the drive assembly. Use
Lubricant GM P/N 1960954 or equivalent.
- Wipe the drive assembly clean
- Assemble the drive assembly onto the armature shaft.
- Assemble the pinion stop collar with the flat side of the collar
toward the drive pinion.
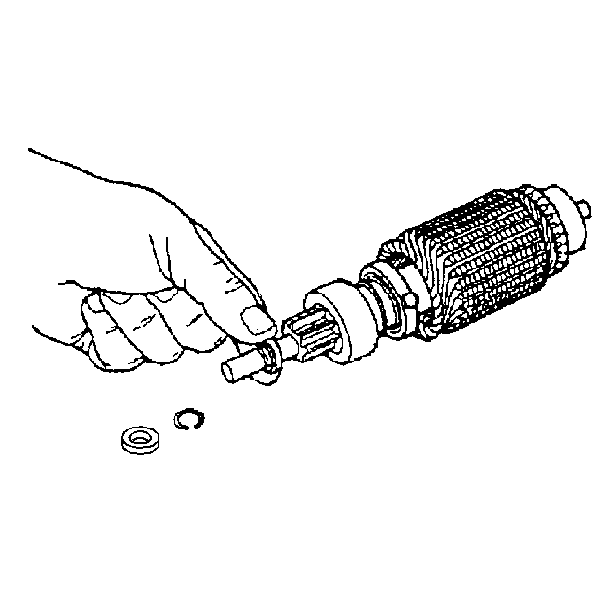
- Assemble the new retaining ring onto the armature shaft. Slide the ring
down the shaft until it seats in the shaft grove.
- Assemble the thrust collar onto the shaft with the small flange toward
the retaining ring. Using two sets of pliers, push the pinion stop collar
and the thrust collar together to snap the stop collar onto the retaining
ring
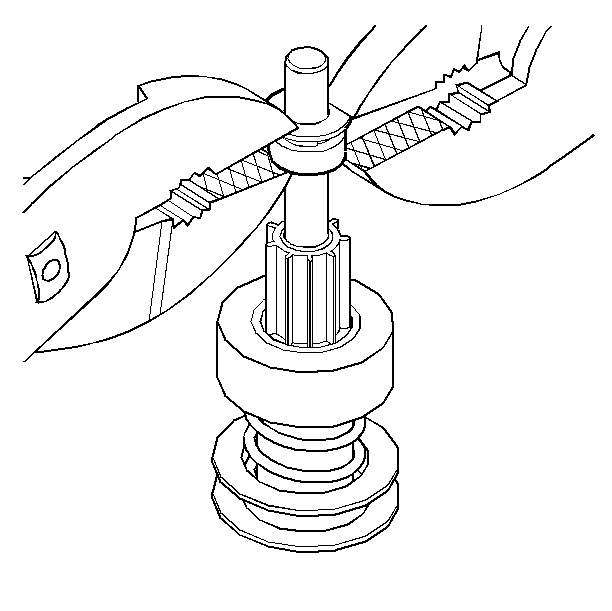
- Inspect the drive end bearing. If no lubrication is visible, replace
the bearing using a suitable driver and hammer. Do not lubricate the bearing.
- Assemble the new drive end bearing by pressing it until it is
recessed 1.6 mm (0.06 inch) into the casing. It is prelubricated.
Do not add lubricant.
- Assemble the shift lever to the drive assembly by spreading the
arms slightly to snap it onto the buttons on the drive collar.
- Assemble the plunger to the lever by snapping into place. Note which
side of the lever is up.
- Assemble the armature shaft into the drive end bearing while sliding
the shift lever retainer into the slot on the drive end housing.
- Assemble the spring onto the plunger.
- Assemble the plug.
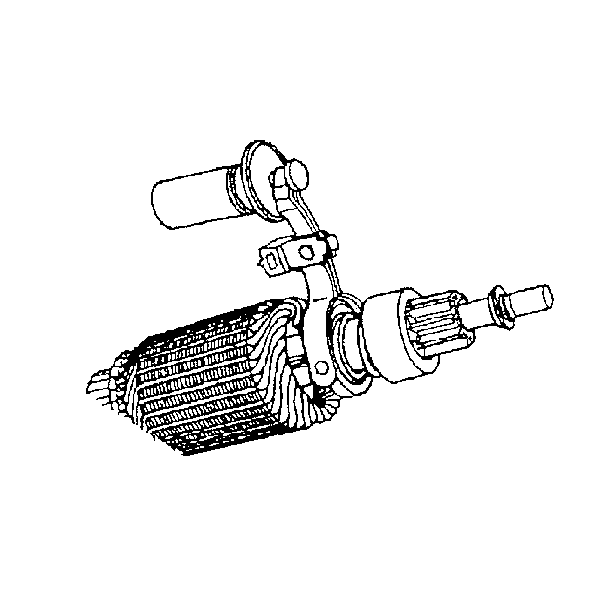
- Assemble the solenoid and clamp onto the drive end frame, aligning
the "M" terminal with the field connector.
- Assemble the solenoid clamp retaining screws.
Tighten
Tighten the solenoid clamp retaining screws to 11 N·m (95 lb inch).
Notice: Use the correct fastener in the correct location. Replacement fasteners
must be the correct part number for that application. Fasteners requiring
replacement or fasteners requiring the use of thread locking compound or sealant
are identified in the service procedure. Do not use paints, lubricants, or
corrosion inhibitors on fasteners or fastener joint surfaces unless specified.
These coatings affect fastener torque and joint clamping force and may damage
the fastener. Use the correct tightening sequence and specifications when
installing fasteners in order to avoid damage to parts and systems.
Starter Assemble SD-260 Frame and Field
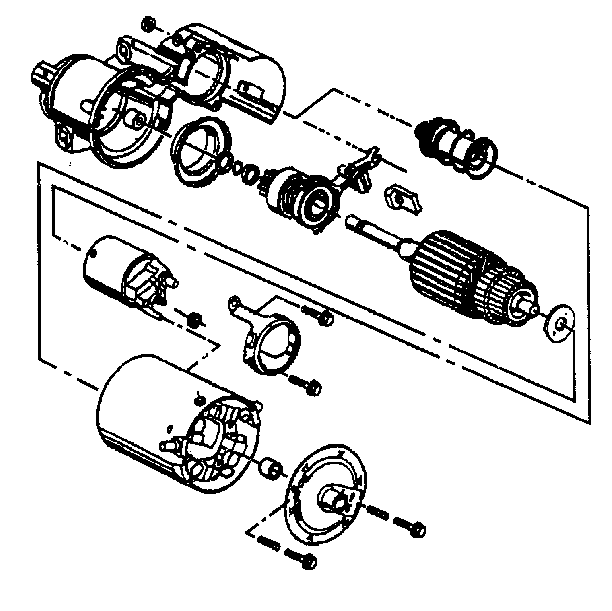
- Assemble the frame and field assembly onto the armature.
| • | Clean the contact faces of the brushes and the commutator with
a soft cloth. |
| • | Push the brushes into the brush holders and hold them in place
while installing the frame. |
| • | Align the scribe mark on the frame with the scribe mark on the
drive end frame. |
| • | Release the brushes onto the commutator, making sure all four
brushes move freely and contact the commutator. |
- Assemble the brake washer to the armature assembly.
- Assemble the drain tube to the frame, if it was removed.
- Assemble the drive end frame to the field frame.
| • | If the drive end frame bearing shows no lubrication or looks damaged,
replace it. |
| • | Recess the new bearing 2 mm (0.08 in) into the housing.
The bearing is pre-lubricated. Do not add any lubricant. |
- Assemble the identification tag over the hole in the drive end
frame with the fluted end around the bearing well.
- Assemble the through-bolts in their original locations
Tighten
Tighten the bolts to 8.5 N·m (75 lb in).
Notice: Use the correct fastener in the correct location. Replacement fasteners
must be the correct part number for that application. Fasteners requiring
replacement or fasteners requiring the use of thread locking compound or sealant
are identified in the service procedure. Do not use paints, lubricants, or
corrosion inhibitors on fasteners or fastener joint surfaces unless specified.
These coatings affect fastener torque and joint clamping force and may damage
the fastener. Use the correct tightening sequence and specifications when
installing fasteners in order to avoid damage to parts and systems.
- Assemble the motor field lead over the motor terminal on the solenoid.
- Assemble the field lead attaching nut.
Tighten
Tighten the nut to 11 N·m (95 lb in).
- Assemble the solenoid shield onto the protruding ends of the solenoid
attachment screws.
- Assemble the shield attaching nuts.
Tighten
Tighten the shield attaching nuts to 8 N·m (70 lb in).
Starter Assemble 28-MT Driveshaft and Clutch
If disassembled, position the driveshaft on a work surface
with the internal gear end down. Assemble the driveshaft and clutch group
in the following way:
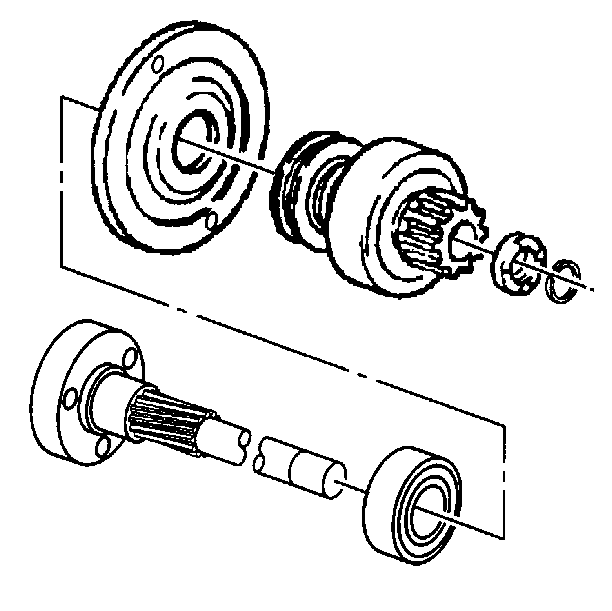
Important: If the center support bearing is being replaced, install it on the driveshaft.
- Install the driveshaft support to the driveshaft, seating the bearing
in the support.
- Install the clutch drive assembly to the driveshaft.
- Install the new pinion stop onto the driveshaft.
| • | Slide the pinion stop onto the driveshaft until recess for the
stop rings faces up. |
| • | Install the stop rings into the groove in the driveshaft. |
| • | Pick the assembly up and support it under the pinion stop. A metal
block, with a U-shaped cutout that will slide over the shaft between the pinion
gear and stop, can be clamped in a vise to provide support. |
| • | Make sure the stop rings are fully seated in the pinion stop recess.
Stake the upper edge of the pinion stop over the stop ring at four equally
spaced places. Do not allow the staked metal to contact the driveshaft. |
Starter Assemble 28-MT Reduction and Drive
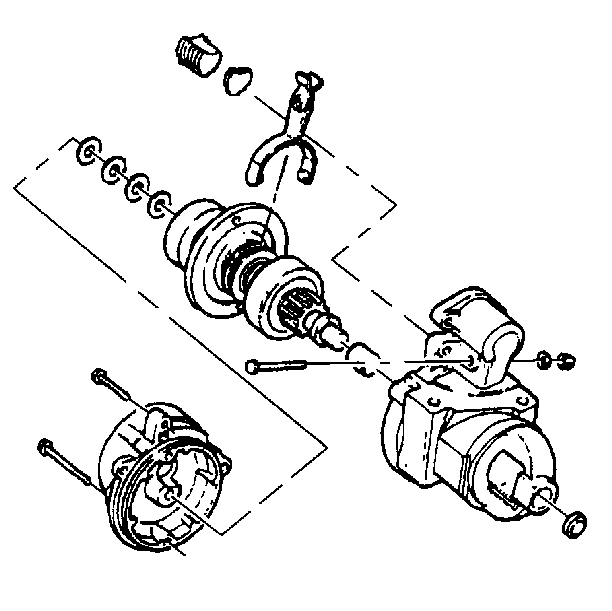
Important:
| • | If the drive end bushing and plug are being replaced, install
them in the drive housing. |
| • | Lubricate the drive end housing bushing, the shift lever and the
driveshaft. |
- Install the arms on the shift lever with the shift collar onto the driveshaft
and clutch group.
- Installed the assembled shift lever and the driveshaft and clutch
group into the drive housing.
| • | Align the holes in the driveshaft support with those in the drive
housing. |
| • | Make sure that the driveshaft support is fully seated in the drive
housing and that the driveshaft bearing remains fully seated in the driveshaft
support. |
- Install the shift lever screw, washer, and nut.
Tighten
Tighten the nut to 4.5 N·m (40 lb in).
Notice: Use the correct fastener in the correct location. Replacement fasteners
must be the correct part number for that application. Fasteners requiring
replacement or fasteners requiring the use of thread locking compound or sealant
are identified in the service procedure. Do not use paints, lubricants, or
corrosion inhibitors on fasteners or fastener joint surfaces unless specified.
These coatings affect fastener torque and joint clamping force and may damage
the fastener. Use the correct tightening sequence and specifications when
installing fasteners in order to avoid damage to parts and systems.
- Install the plate, if used, and the drive housing.
- Install the washers in the same number and position as noted at
disassembly.
- Install the armature support bracket to the drive housing. Align
the mark made prior to disassembly with that on the drive housing.
- Install the drive housing.
Tighten
Tighten the drive housing bolts to 8.5 N·m (75 lb in).
Notice: Use the correct fastener in the correct location. Replacement fasteners
must be the correct part number for that application. Fasteners requiring
replacement or fasteners requiring the use of thread locking compound or sealant
are identified in the service procedure. Do not use paints, lubricants, or
corrosion inhibitors on fasteners or fastener joint surfaces unless specified.
These coatings affect fastener torque and joint clamping force and may damage
the fastener. Use the correct tightening sequence and specifications when
installing fasteners in order to avoid damage to parts and systems.
Starter Assemble 28-MT Frame and Field
- Install the brush springs if removed.
| 1.1. | Start each brush spring onto the post on the brush holder assembly
just enough to hold the inside end of spring from turning. |
| 1.2. | Grasp the free end of the spring with needle nose pliers and twist
it to the right over the top of the brush socket. |
| 1.3. | Push the spring fully onto the post then release the free end
to engage the notch in the brush socket. |
Notice: Brush leads may be damaged by excessive handling. Do not overflex the
leads near the clip welds or the clips may break
- Install brushes, if they were removed.
| 2.1. | Ensure that the insulated brushes go into the brush sockets of
the brush holder assembly that mounts on the insulation. |
| 2.2. | To install each brush, grasp the free end of the brush spring
with needle nose pliers, twist it to the right to clear the brush socket,
then insert the brush partly into the brush socket. |
| 2.3. | Gradually release the springs so that its end contacts the side
(not end) of the brush. This will hold the brushes retracted until after the
brush holder is installed over the armature commutator. |
- Install the grounded brush screws.
| 3.1. | Position the terminals of the grounded brush leads behind the
terminal tabs on the brush holder. |
| 3.2. | Insert the brush screws through the terminal tabs on the brush
holder and thread them into the brush lead terminals. |
Tighten
Tighten the grounded brush screws to 1.5 N·m (13 lb in).
Notice: Use the correct fastener in the correct location. Replacement fasteners
must be the correct part number for that application. Fasteners requiring
replacement or fasteners requiring the use of thread locking compound or sealant
are identified in the service procedure. Do not use paints, lubricants, or
corrosion inhibitors on fasteners or fastener joint surfaces unless specified.
These coatings affect fastener torque and joint clamping force and may damage
the fastener. Use the correct tightening sequence and specifications when
installing fasteners in order to avoid damage to parts and systems.
- Install the frame and field assembly to the brush holder assembly.
| 4.1. | Position the brush holder assembly (with installed brushes) over
the terminal end of the frame and field assembly. |
| 4.2. | Attach the terminals of the insulated brush leads to the conductors
in the frame and field assembly with the insulated brush screws. |
Tighten
Tighten the insulated brush screws to 1.5 N·m (13 lb in).
Notice: Use the correct fastener in the correct location. Replacement fasteners
must be the correct part number for that application. Fasteners requiring
replacement or fasteners requiring the use of thread locking compound or sealant
are identified in the service procedure. Do not use paints, lubricants, or
corrosion inhibitors on fasteners or fastener joint surfaces unless specified.
These coatings affect fastener torque and joint clamping force and may damage
the fastener. Use the correct tightening sequence and specifications when
installing fasteners in order to avoid damage to parts and systems.
