WIND NOISE/COLD AIR INTRUSION AT DOORS(NEW DOOR SEALS)

SUBJECT: WIND NOISE/COLD AIR INTRUSION AT DOORS
MODELS: ALL 1985-86 C/K AND 1987-90 R/V TRUCKS
Wind noise and/or cold air intrusion through front or rear door handles and switches, may be experienced in some 1985-86 C/K, AND 1987-90 R/V model pick ups, Jimmys and Suburbans. New seal assemblies are now available to prevent wind noise and/or air intrusion. Part numbers are listed below:
SERVICE PARTS INFORMATION
Description Part Number Application Quantity ----------- ---------- ----------- --------- PRIMARY SEAL (CLEAR) L Front Door 15647015 All models 1 per door seal asm
R Front Door seal asm 15647016 All model 1 per door
L Rear Door R/V Suburban & seal asm 15647017 Crew Cab 1 per door
R Rear Door R/V Suburban & seal asm 15647018 Crew Cab 1 per door SECONDARY SEAL (FOAM)
Top Seal L and R Front 00363139 All model 1 per door (30.0 in.)
Lower Seal L & R Front 00363139 All model 1 per door (45.0 in.)
Top Seal L R/V Suburban & 1 per door (24.0 in.) and R Front 00363139 Crew Cab
Lower Seal R/V Suburban & 1 per door (45.0 in.) L and R rear 00363139 Crew Cab
Parts are currently available through GMSPO.
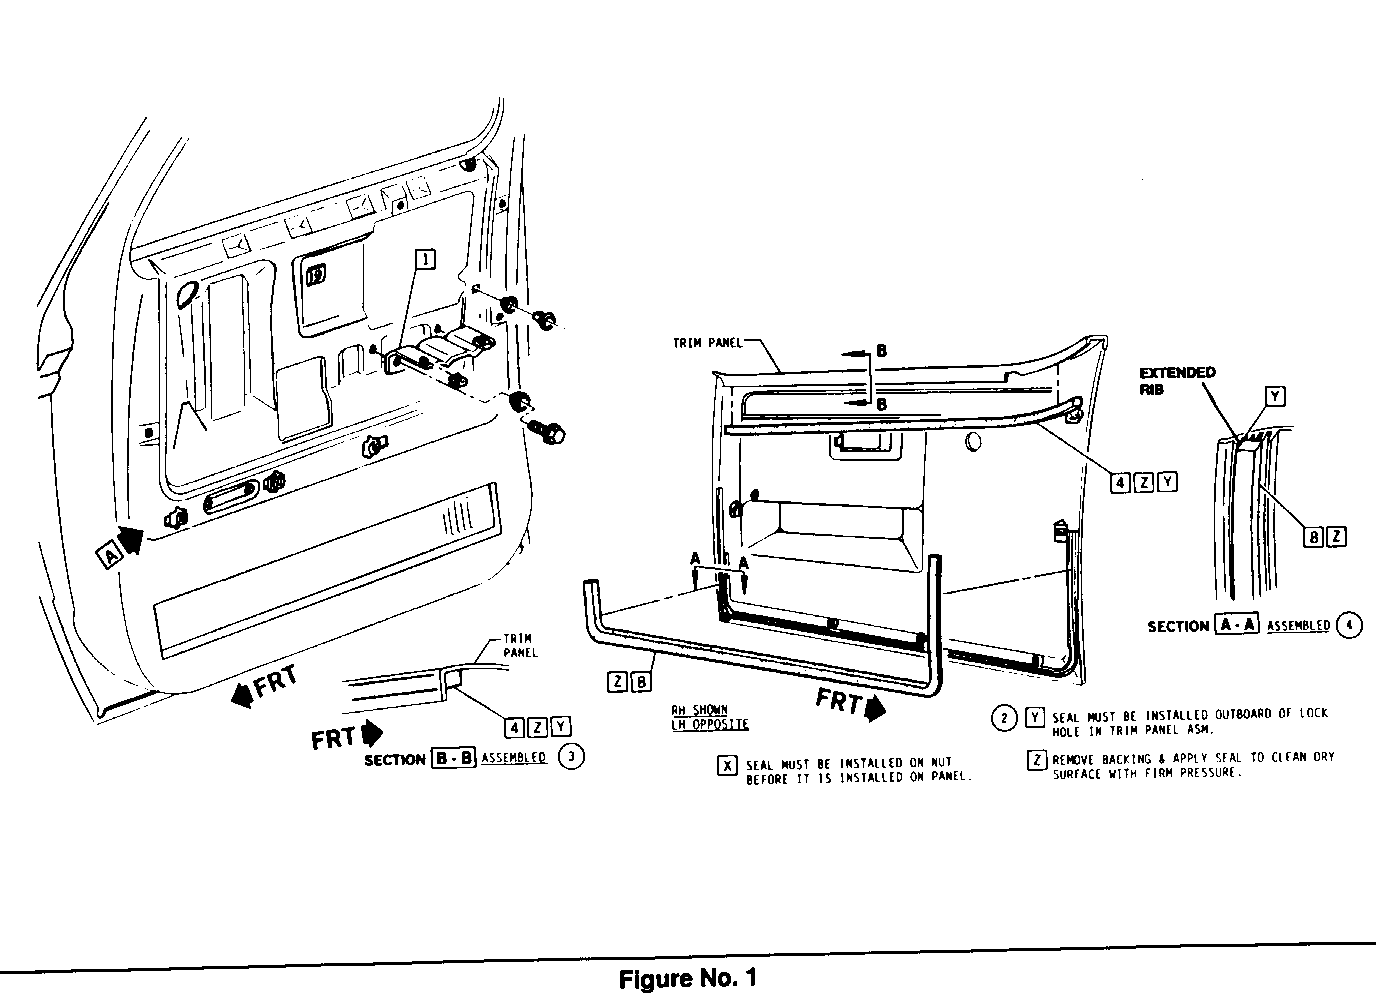
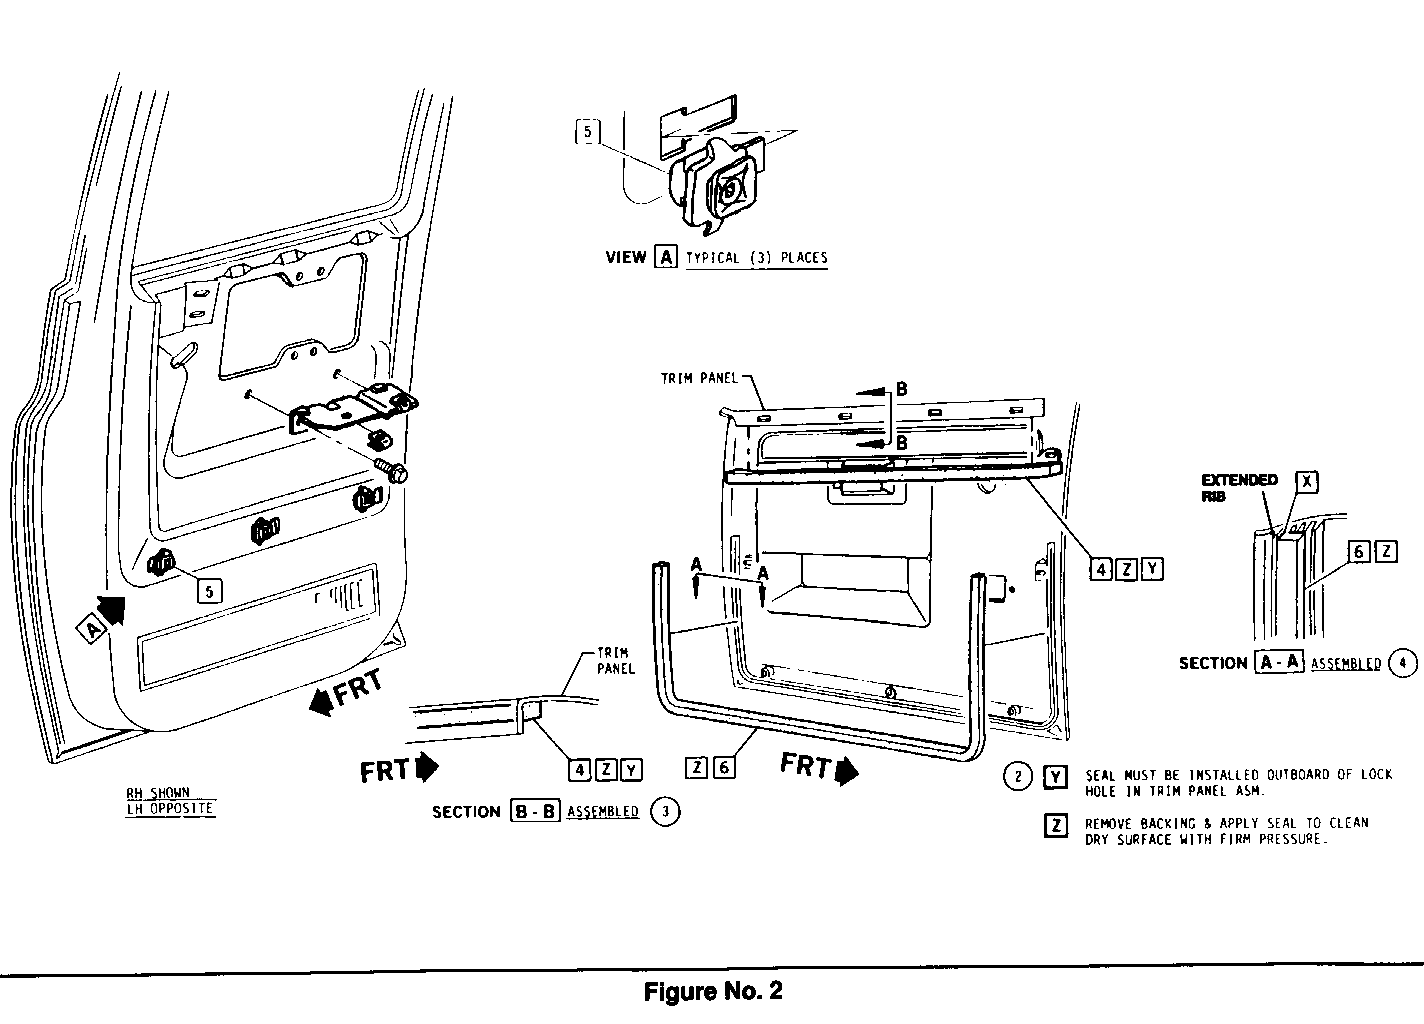
Note: Part number 00363139 is available in 45 inch lengths, which must be cut as indicated. This part requires special installation to insure proper sealing. Top seal must be installed on the outboard side of the the lock hole (see Figure 1). Lower seal must be installed on the same side as the extended rib (see Figure 2). To install remove backing and apply to a clean dry surface.
VIN BREAKPOINTS
1990 R/V vehicles built after the following VIN breakpoints have the new seal assemblies incorporated into production. GMC LF516049 Chevrolet LF132240
SERVICE PROCEDURE
The installation/removal procedures are as follows:
Tools required:
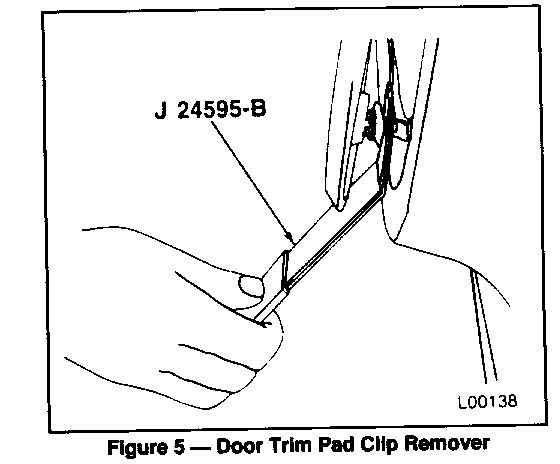
J 9886-01 Door handle clip remover. J 24595-B Door trim pad clip remover.
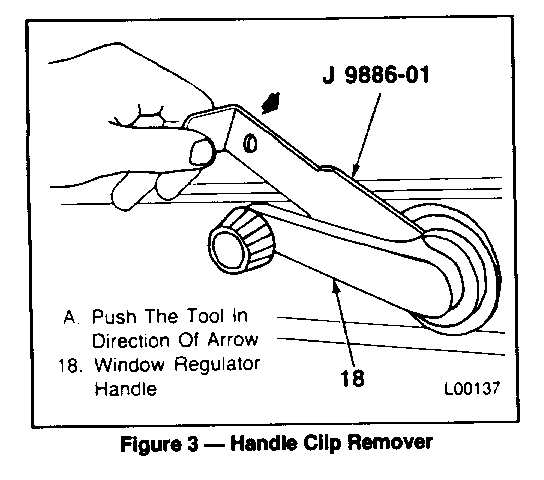
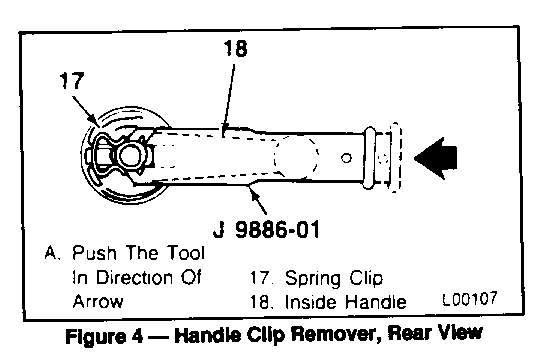
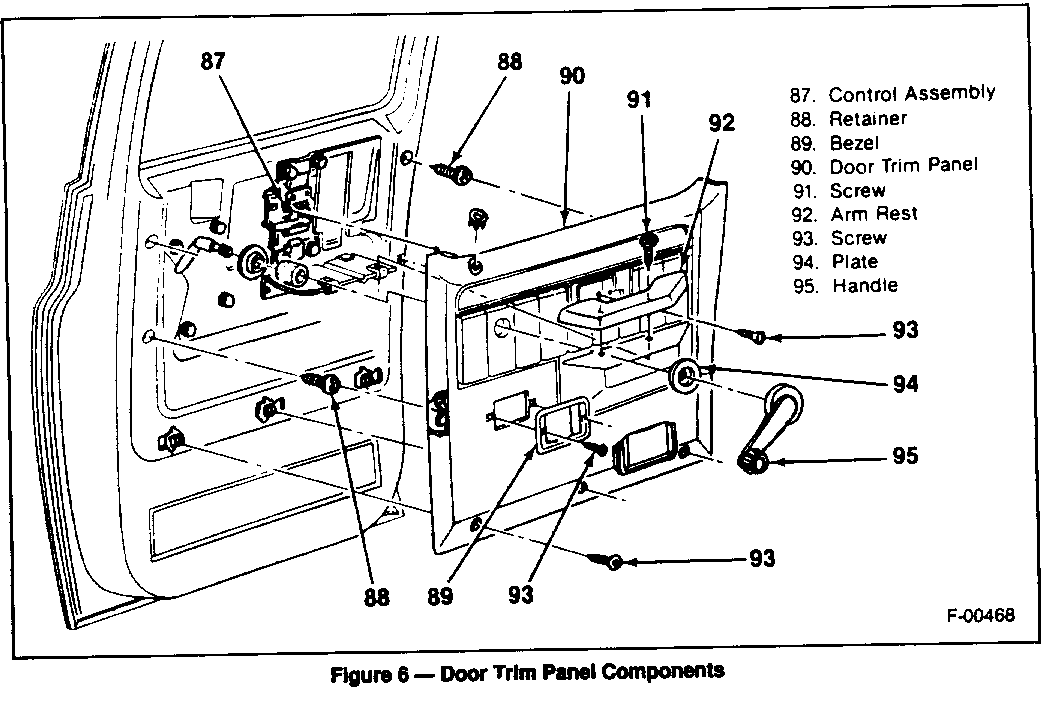
() Remove or Disconnect (see Figures 3-6) 1. Remove window regulator handle using J9886-01 (see Figures 3 and 4.)
2. Remove lock knob.
3. Remove arm rest bracket screws (91).
4. Remove arm rest from the rest of the door.
5. Remove strap assembly covers (it equipped).
6. Remove strap assembly screws (if equipped).
7. Disconnect strap assembly (if equipped).
8. Remove inside door arm rest plate.
9. Remove inside door handle assembly and rod.
10. Remove door trim panel to door retainers using J24595-B (see Figure 5).
11. Disconnect all electrical connections to door trim panel (it equipped with power locks and/or windows).
NOTE: Pry the tops of the panel away from the side seal clips.
() Install or Connect (see Figures 1-7)
Note: Check that all the trim retainers are securely fastened, and are not damaged. Replace damaged fasteners.
1. Clean the area where the seal will be applied with a grease or wax remover.
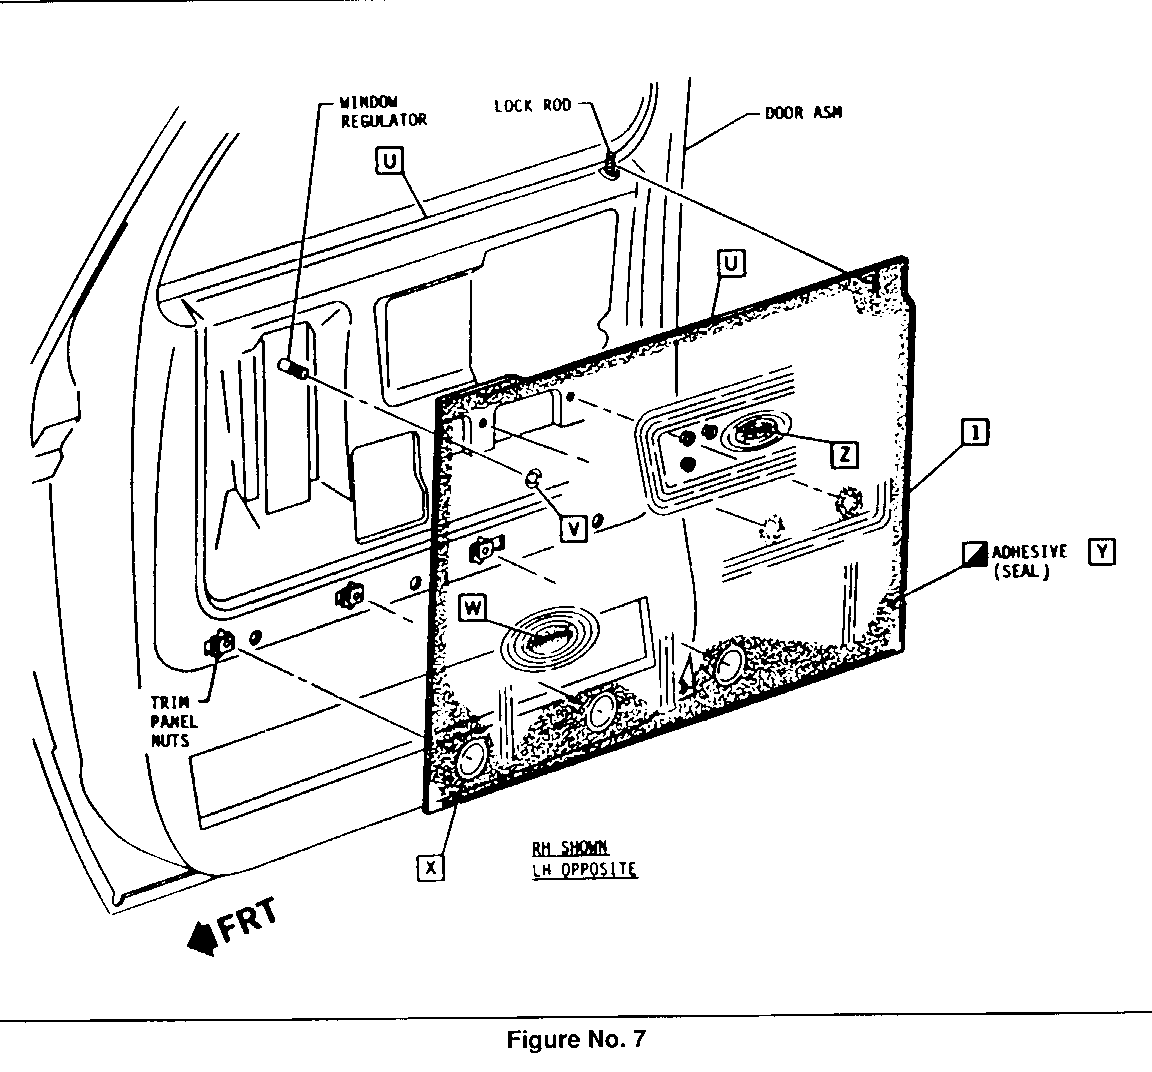
2. Install new style seal assembly (see Figure 7).
3. Install top and lower foam seals (see Figures 1 and 2).
4. Connect all electrical connections to door trim panel (if equipped with power locks and/or windows).
5. Install door trim panel onto the door side window seal clips.
6. Install inside door handle assembly and rod.
7. Install door trim retainers into the door panel.
8. Install door trim panel to door screws (22).
9. Install strap assembly covers (if equipped).
10. Install strap assembly screws (if equipped).
11. Install strap assembly (if equipped).
12. Install arm rest to the door.
13. Install arm rest to arm rest bracket screws (91).
14. Install manual door lock knob.
15. Install window regulator handle.
WARRANTY INFORMATION
For vehicles repaired under warranty use:
Labor Door Labor Time Operation T7056 Right Front .6 hr T7057 Left Front .6 hr T7058 Right Rear .5 hr T7059 Left Rear .5 hr
NOTE: Labor Operation is coded to base vehicle coverage in the warranty system.
General Motors bulletins are intended for use by professional technicians, not a "do-it-yourselfer". They are written to inform those technicians of conditions that may occur on some vehicles, or to provide information that could assist in the proper service of a vehicle. Properly trained technicians have the equipment, tools, safety instructions and know-how to do a job properly and safely. If a condition is described, do not assume that the bulletin applies to your vehicle, or that your vehicle will have that condition. See a General Motors dealer servicing your brand of General Motors vehicle for information on whether your vehicle may benefit from the information.
