Product Safety - Drivers Safety Belt Buckle

| Subject: | 03020A - Driver's Safety Belt Buckle |
| Models: | 1997 Chevrolet Blazer |
| 1997 GMC Jimmy |
| 1997 Oldsmobile Bravada |
This bulletin is being revised to include a revised service procedure. This new procedure provides instructions in the event that a seat belt bolt or weld nut breaks during removal. Discard all copies of Bulletin 03020 issued August 2003.
Condition
General Motors has decided that a defect which relates to motor vehicle safety exists in certain 1997 model year Chevrolet Blazer, GMC Jimmy, and Oldsmobile Bravada vehicles. These vehicles are equipped with a driver safety belt system that includes an energy-absorbing loop in the safety belt buckle assembly. If the energy-absorbing loop fully deploys during a high-speed multiple rollover event, the driver may not remain properly restrained, which could increase the risk of serious injury.
Correction
Dealers are to replace the driver's safety belt buckle assembly with one that does not have the energy-absorbing loop.
Vehicles Involved
Involved are certain 1997 model year Chevrolet Blazer, GMC Jimmy, and Oldsmobile Bravada vehicles built within these VIN breakpoints:
Year | Division | Model | From | Through |
|---|---|---|---|---|
1997 | Chevrolet | Blazer | V2100001 | V2263811 |
VK100001 | VK250286 | |||
1997 | GMC | Jimmy | V2500001 | V2575067 |
VK500001 | VK522335 | |||
1997 | Oldsmobile | Bravada | V2700001 | V2727731 |
Important: Dealers should confirm vehicle eligibility through GMVIS (GM Vehicle Inquiry System) or GM Access Screen (Canada only) or DCS Screen 445 (IPC only) before beginning recall repairs. [Not all vehicles within the above breakpoints may be involved.]
Computer listings containing the complete Vehicle Identification Number, customer name and address data have been prepared, and are being furnished to involved dealers with the recall bulletin. The customer name and address data furnished will enable dealers to follow-up with customers involved in this recall. Any dealer not receiving a computer listing with the recall bulletin has no involved vehicles currently assigned.
These dealer listings may contain customer names and addresses obtained from Motor Vehicle Registration Records. The use of such motor vehicle registration data for any other purpose is a violation of law in several states/provinces/countries. Accordingly, you are urged to limit the use of this listing to the follow-up necessary to complete this recall.
Parts Information
Parts required to complete this recall are to be obtained from General Motors Service Parts Operations (GMSPO). Please refer to your "involved vehicles listing" before ordering parts. Normal orders should be placed on a DRO=Daily Replenishment Order. In an emergency situation, parts should be ordered on a CSO=Customer Special Order.
Part Number | Description | Qty |
|---|---|---|
88957098 | Belt Kit, F/Seat Ctr (Lat Si) (Bkl/Lat) (12I Graphite) (Bench Seat A52/AM6) | 1 |
88957099 | Belt Kit, F/Seat Ctr (Lat Si) (Bkl/Lat) (13I Gray) (Bench Seat A52/AM6) | 1 |
88958019 | Belt Kit, F/Seat Ctr (Lat Si) (Bkl/Lat) (26I Blue) (Bench Seat A52/AM6) | 1 |
88958020 | Belt Kit, F/Seat Ctr (Lat Si) (Bkl/Lat) (64I Beige) (Bench Seat A52/AM6) | 1 |
88958021 | Belt Kit, D/Seat (Bkl Si) (12I Graphite) (Bucket Seat AN3/AV5) | 1 |
88958022 | Belt Kit, D/Seat (Bkl Si) (13I Gray) (Bucket Seat AN3/AV5) | 1 |
88958023 | Belt Kit, D/Seat (Bkl Si) (26I Blue) (Bucket Seat AN3/AV5) | 1 |
88958024 | Belt Kit, D/Seat (Bkl Si) (64I Beige) (Bucket Seat AN3/AV5) | 1 |
15652061 | Bolt, F/Seat (shipped in pkg of 5) | 1 |
Special Tool
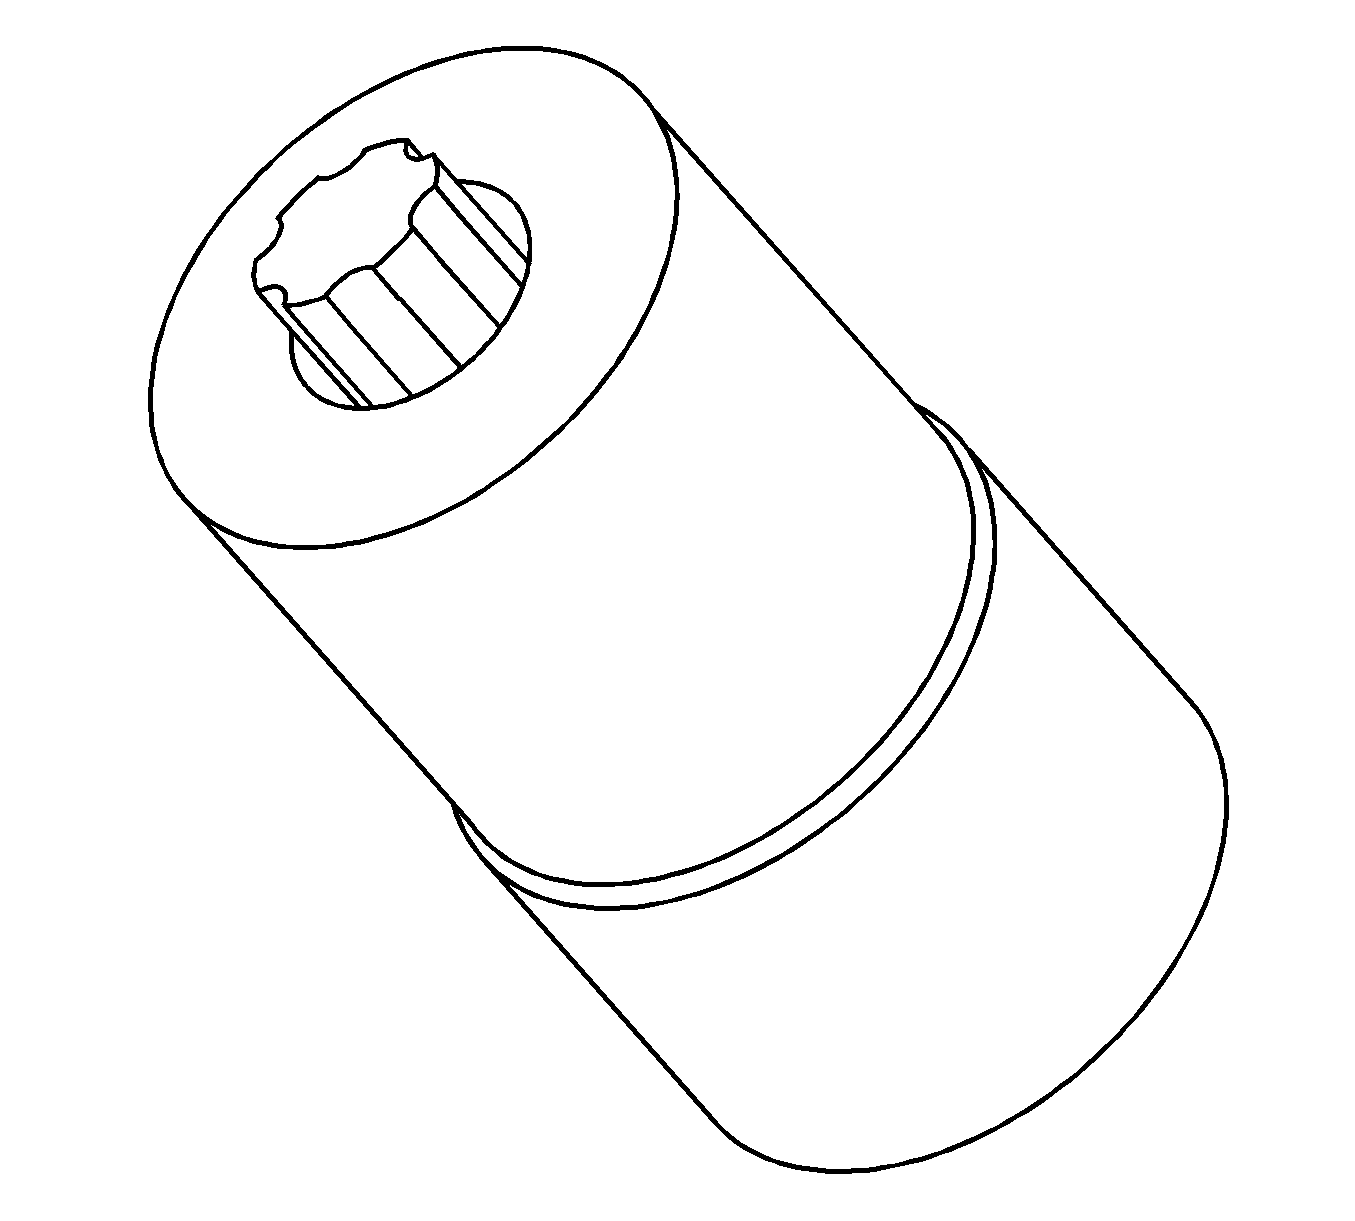
The week of July 21, 2003 through the week of August 4, 2003, each dealer will be shipped a Seat Belt Bolt Removal Tool, BO-47549, for use in this recall. This tool is being furnished at no charge. Additional tools, if required, may be purchased by contacting SPX Kent-Moore at 1-800-GM-TOOLS (1-800-468-6657).
Each dealer will receive on tool, BO-47549, consisting of one drive holder and two Torx® bits. This tools is provided at no charge. The drive holder portion of the Seat Belt Bolt Removal Tool is warranted by SPX Kent-Moore against defects in materials and workmanship for the life of the product. See your SPX Kent-Moore Catalog for additional warranty details. The Torx® bits are covered by SPX Kent-Moore with an unconditional warranty for a period of one (1) year from the date of this recall bulletin. After that time replacement Torx® bits can be purchased from SPX Kent-Moore at a cost of $3.00 USD each (including shipping). Note: The cost listed for replacement Torx® bits is based upon today's pricing and may change in the future without notice.
Service Procedure
Tools Required
BO-47549 Seat Belt Bolt Removal Tool

Notice: The following procedure requires the use of special tool BO-47549 and a 1/2-inch drive pneumatic impact gun. Do not attempt to perform this procedure using other similar type tools. Doing so may cause damage to the Torx® feature in the bolt head, which may make bolt removal extremely difficult.
- Move the driver's seat to the full forward position.
- Pull open the carpet flap to expose the bolt that attaches the driver's seat belt buckle to the floor pan.
- Remove any dirt or debris from the Torx® feature in the head of the bolt.
- Position a punch with a diameter no larger than 6 mm (1/4 in) inside the center of the Torx® feature on the head of the bolt. With the punch centered in the Torx® opening, strike the other end of the punch two or three times with a suitable size hammer.
- Remove the Torx® bit from BO-47549, Seat Belt Bolt Removal Tool and place the tip of the bit into the bolt head. Using a suitable size hammer, strike the end of the bit to fully seat it into the bolt head.
- Install BO-47549 over the bit and down onto the bolt head.
- Attach a 1/2 inch drive pneumatic impact gun to BO-47549 and remove the bolt from the floor pan. Do not reuse the bolt.
- Pull the electrical connector for the seat belt buckle out from under the console and disconnect it.
- Route the seat belt buckle and wiring harness through the opening in the seat.
- Route the new seat belt buckle and wiring harness through the opening in the seat.
- Position the seat belt buckle to the floor pan and install a new bolt.
- Connect the electrical connector and position the connector back under the console.
- Close the carpet flap over the bolt head.
- Return the seat to the original position.
- While sitting in the driver's seat, connect the seat belt buckle latch plate to the seat belt buckle.
- Turn the ignition switch to the ON position and verify that the seat belt buckle indicator light goes out.
- Turn the ignition switch to the OFF position.
- Install the GM Recall Identification Label.
Important: Because of vehicle age and underbody corrosion, some bolt may be more difficult to remove than others. Therefore, before attempting to remove the bolt, it is recommended that a hammer and punch be used as described in the next step to help break it loose.
Important: If the bolt breaks off or the weld nut comes loose from the underside of the floor pan, review the repair procedures at the end of this Service Procedure.
Notice: DO NOT use a pneumatic impact gun when installing the new bolt in the next step. Install the new bolt using only hand tools and a torque wrench.
Tighten
Tighten to 70 N·m (52 lb ft).
Repairing a Broken Bolt or Loose Weld Nut
The labor time for performing either of the following procedure should be charged as straight time and listed under "other labor hours" on the repair order. Please H Route the claim to your GM service representative.
Service Procedure - Broken Bolt
If the head of the bolt breaks off during removal it will be necessary to drill out the remaining portion of the bolt and install a new bolt with washers and a loose nut.
Caution: Only the fastener part numbers listed in the following procedure can be used in this repair. DO NOT substitute other part number fasteners.
- Raise the vehicle on a suitable hoist and support.
- Locate the end of the broken bolt and its proximity to other parts of the vehicle.
- Lower the vehicle.
- Insert the appropriate diameter drill bit into a power drill.
- If necessary, make a drill bit travel stop out of a piece of vacuum hose. Slide the vacuum hose over the grill bit and trim it as necessary.
- From inside the vehicle, drill out the remaining portion of the broken bolt.
- Clean up any metal shavings.
- Install the new bolt into the new buckle and through the drilled out hole in the floor pan.
- With an assistant inside of the vehicle, raise the vehicle on a suitable hoist and support.
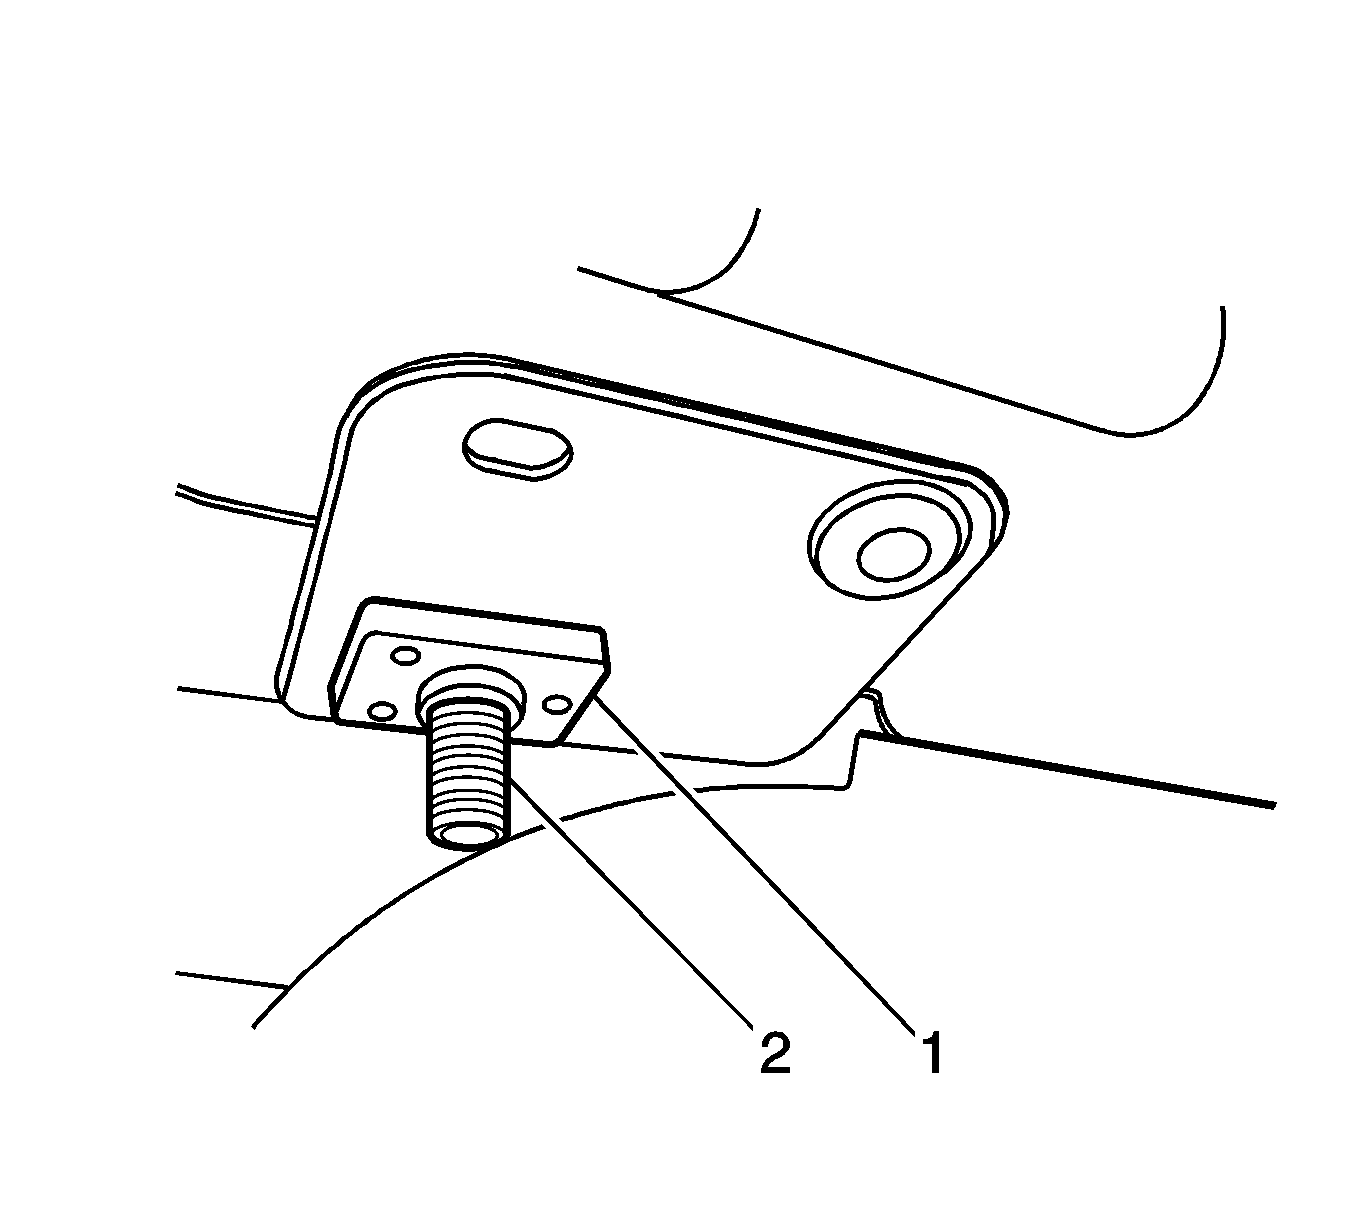
- From underneath the vehicle, locate the end of the new bolt (2) and the original weld nut (1).
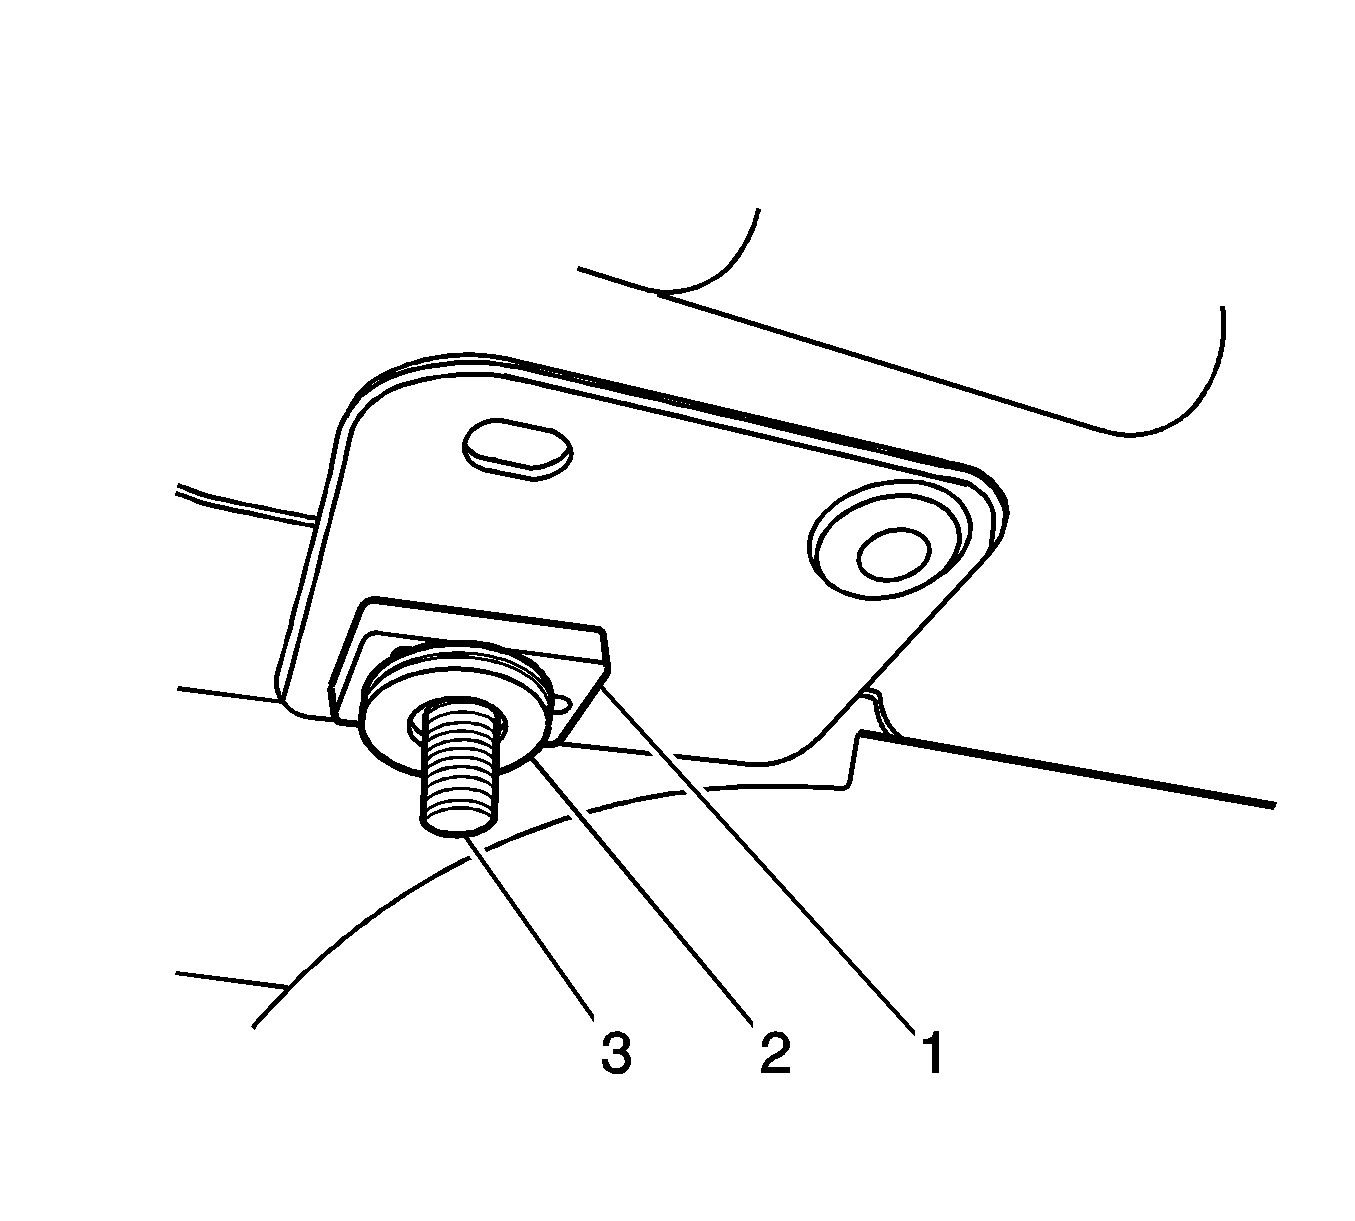
- Install TWO washers (2), P/N 15614782, over the end of the new bolt (3) and up to the weld nut (1) that is attached to the floor pan. The lip on the weld nut must fit inside of the holes in the washers.
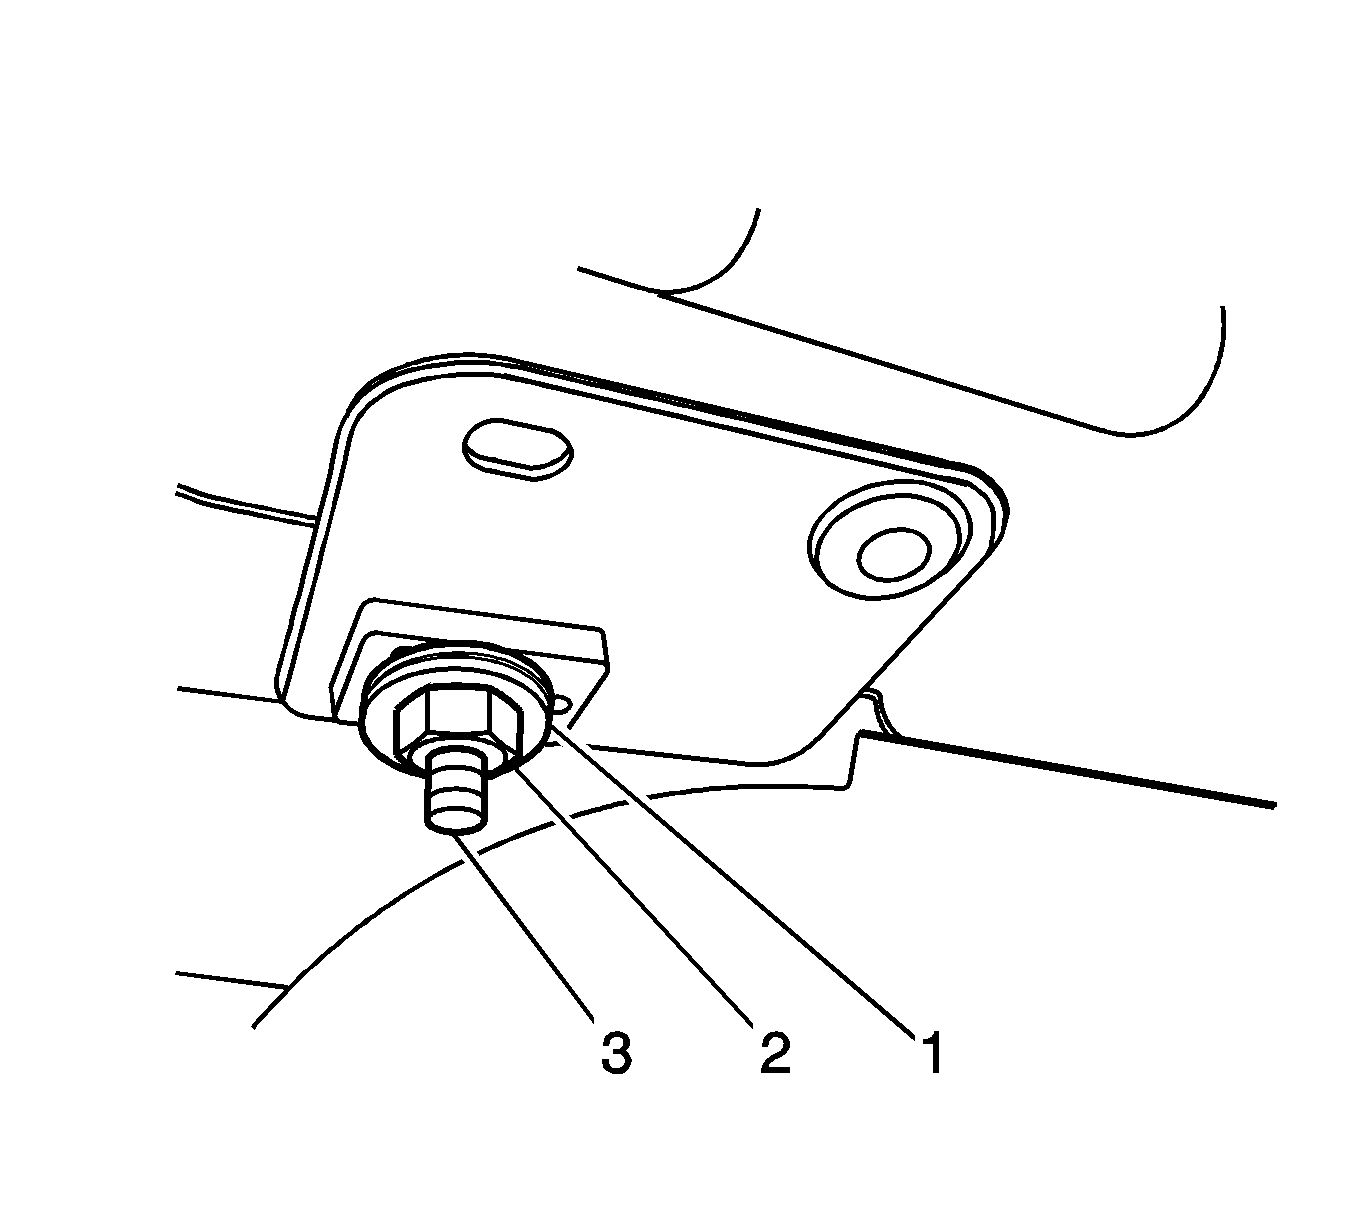
- With the washers (1) in position, install a new loose nut (2), P/N 11516073, on the new bolt (3).
Important: It will be necessary to have an assistant hold the head of the new bolt when tightening the new loose nut in the next steps.


Tighten
Tighten to 70 N·m (52 lb ft).
Service Procedure -- Weld Nut Has Broken Loose from Underside of Floor Pan
If the weld nut has broken loose from the underside of the floor pan, it will be necessary to reinstall it along with TWO new washers and a loose nut.
Caution: Only the fastener part numbers listed in the following procedure can be used in this repair. DO NOT substitute other part number fasteners.
- If the bolt is still in the floor and the weld nut has broken loose from the bottom of the floor pan, it will be necessary to either cut the bolt off or stop the weld nut from spinning when removing the bolt.
- If you had to cut the bolt off, it will be necessary to remove the remaining threaded section from the weld nut. The weld nut will be reused later in this procedure.
- Install the threaded portion of the bolt in a workbench vise and remove the weld nut.
- Install the new bolt into the new buckle and through the hole in the floor panel. With an assistant holding the weld nut, tighten the bolt.
- With an assistant inside, raise the vehicle on a suitable hoist and support.
- From underneath the vehicle, locate the end of the new bolt (2) and install the original weld nut (1) with the small lip around the hold in the weld nut facing downwards. Do not re-weld the weld nut to the floor pan.
- Install TWO washers (2), P/N 15614782 over the end of the new bolt (3) and up to the weld nut (1) that is attached to the floor pan. The lip on the weld nut must fit inside the holes in the washers.
- With the washers (1) in position install a new loose nut (2), P/N 11516073, on the new bolt (3).
Important: Applying penetrating oil on the bolt threads may improve removal of the weld nut in the next step.
Important: It will be necessary to have an assistant hold the weld nut when tightening the new bolt in the next step.
Tighten
Tighten the bolt to 70 N·m (52 lb ft).
Important: It will be necessary to have an assistant hold the head of the new bolt when tightening the new loose nut in the next steps.


Tighten
Tighten to 70 N·m (52 lb ft).
Recall Identification Label - For US and IPC
Place a Recall Identification Label on each vehicle corrected in accordance with the instructions outlined in this Product Recall Bulletin. Each label provides a space to include the recall number and the five (5) digit dealer code of the dealer performing the recall service. This information may be inserted with a typewriter or a ball point pen.
Put the Recall Identification Label on a clean and dry surface of the radiator core support in an area that will be visible to people servicing the vehicle. When installing the Recall Identification Label, be sure to pull the tab to allow the adhesion of the clear protective covering. Additional Recall Identification Labels for US dealers can be obtained from Dealer Support Materials by either ordering on the web from DWD Store, gm-dealerworld.com, or calling 1-866-700-0001 (Monday-Friday, 8:00 am to 5:00 pm EST). Ask for Item Number S-1015 when ordering.
Additional Recall Identification Labels for IPC dealers can be obtained from your Regional Marketing Office.
Recall Identification Label - For Canada
Place a Recall Identification Label on each vehicle corrected in accordance with the instructions outlined in this Product Recall Bulletin. Each label provides a space to include the recall number and the five (5) digit dealer code of the dealer performing the recall service. This information may be inserted with a typewriter or a ball point pen. Put the Recall Identification Label on a clean and dry surface of the radiator core support in an area that will be visible to people servicing the vehicle. Additional Recall Identification Labels for Canadian dealers can be obtained from DGN by calling 1-800-668-5539 (Monday-Friday, 8:00 a.m. to 5:00 p.m. EST). Ask for Item Number GMP 91 when ordering.
Claim Information
Submit a Product Recall Claim with the information indicated below:
Repair Performed | Part Count | Part No. | Parts Allow | CC-FC | Labor Op | Labor Hours* |
|---|---|---|---|---|---|---|
Replace Driver's Safety Belt Buckle | 1 | -- | ** | MA-96 | V1011 | 0.3 |
* -- For Program Administrative Allowance, add 0.1 hours to the "Labor Hours". ** -- The "Parts Allowance: should be the sum total of the current GMSPO Dealer net price plus applicable Mark-Up or Landed Cost Mark-Up (for IPC) for the belt kit needed to complete the repair. | ||||||
Refer to the General Motors WINS Claims Processing Manual for details on Product Recall Claim Submission.
Customer Notification - For US and Canada
Customers will be notified of this recall on their vehicles by General Motors (see copy of customer letter included with this bulletin).
Customer Notification - For IPC
Letters will be sent to known owners of record located within areas covered by the US National Traffic and Motor Vehicle Safety Act. For owners outside these areas, dealers should notify customers using the attached sample letter.
Dealer Recall Responsibility - For US and IPC (US States, Territories, and Possessions)
The US National Traffic and Motor Vehicle Safety Act provides that each vehicle which is subject to a recall of this type must be adequately repaired within a reasonable time after the customer has tendered it for repair. A failure to repair within sixty days after tender of a vehicle is prima facie evidence of failure to repair within a reasonable time. If the condition is not adequately repaired within a reasonable time, the customer may be entitled to an identical or reasonably equivalent vehicle at no charge or to a refund of the purchase price less a reasonable allowance for depreciation. To avoid having to provide these burdensome remedies, every effort must be made to promptly schedule an appointment with each customer and to repair their vehicle as soon as possible. In the recall notification letters, customers are told how to contact the US National Highway Traffic Safety Administration if the recall is not completed within a reasonable time.
Dealer Recall Responsibility - ALL
All unsold new vehicles in dealers' possession and subject to this recall MUST be held and inspected/repaired per the service procedure of this recall bulletin BEFORE customers take possession of these vehicles.
Dealers are to service all vehicles subject to this recall at no charge to customers, regardless of mileage, age of vehicle, or ownership, from this time forward.
Customers who have recently purchased vehicles sold from your vehicle inventory, and for which there is no customer information indicated on the dealer listing, are to be contacted by the dealer. Arrangements are to be made to make the required correction according to the instructions contained in this bulletin. This could be done by mailing to such customers a copy of the customer letter accompanying this bulletin. Recall follow-up cards should not be used for this purpose, since the customer may not as yet have received the notification letter.
In summary, whenever a vehicle subject to this recall enters your vehicle inventory, or is in your dealership for service in the future, please take the steps necessary to be sure the recall correction has been made before selling or releasing the vehicle.
August, 2003Dear General Motors Customer:
This notice is sent to you in accordance with the requirements of the National Traffic and Motor Vehicle Safety Act.
Reason For This Recall
General Motors has decided that a defect which relates to motor vehicle safety exists in certain 1997 model year Chevrolet Blazer, GMC Jimmy, and Oldsmobile Bravada vehicles. These vehicles are equipped with a driver safety belt system that includes an energy-absorbing loop in the safety belt buckle assembly. If the energy-absorbing loop fully deploys during a high-speed multiple rollover event, the driver may not remain properly restrained, which could increase the risk of serious injury.
What Will Be Done
Your GM dealer will replace the driver's safety belt buckle assembly with one that does not have the energy-absorbing loop.
How Long Will The Repair Take?
This service correction will take approximately 20 minutes. However, due to service scheduling requirements, your dealer may need your vehicle for a longer period of time.
Contacting Your Dealer
Please contact your GM dealer as soon as possible to arrange a service date. Parts are available and instructions for making this correction have been sent to your dealer.
Your GM dealer is best equipped to obtain parts and provide services to correct your vehicle as promptly as possible. Should your dealer be unable to schedule a service date within a reasonable time, you should contact the appropriate Customer Assistance Center at the number listed below:
Division | Number | Deaf, Hearing Impaired, or Speech Impaired* |
|---|---|---|
Chevrolet | 1-800-630-2438 | 1-800-833-2438 |
GMC | 1-866-996-9463 | 1-800-462-8583 |
Oldsmobile | 1-800-630-6537 | 1-800-833-6537 |
Puerto Rico - English | 1-800-496-9992 |
|
Puerto Rico - Español | 1-800-496-9993 |
|
Virgin Islands | 1-800-496-9994 |
|
* Utilizes Telecommunication Devices for the Deaf/Text Telephones (TDD/TTY) | ||
If, after contacting the appropriate customer assistance center, you are still not satisfied that we have done our best to remedy this condition without charge and within a reasonable time, you may wish to write the Administrator, National Highway Traffic Safety Administration, 400 Seventh Street SW, Washington, DC 20590 or call 1-888-327-4236.
Customer Reply Card
The attached customer reply card identifies your vehicle. Presentation of this card to your dealer will assist in making the necessary correction in the shortest possible time. If you no longer own this vehicle, please let us know by completing the attached and mailing it in the postage paid envelope.
We are sorry to cause you this inconvenience; however, we have taken this action in the interest of your safety and continued satisfaction with our products.
General Motors Corporation
Enclosure
