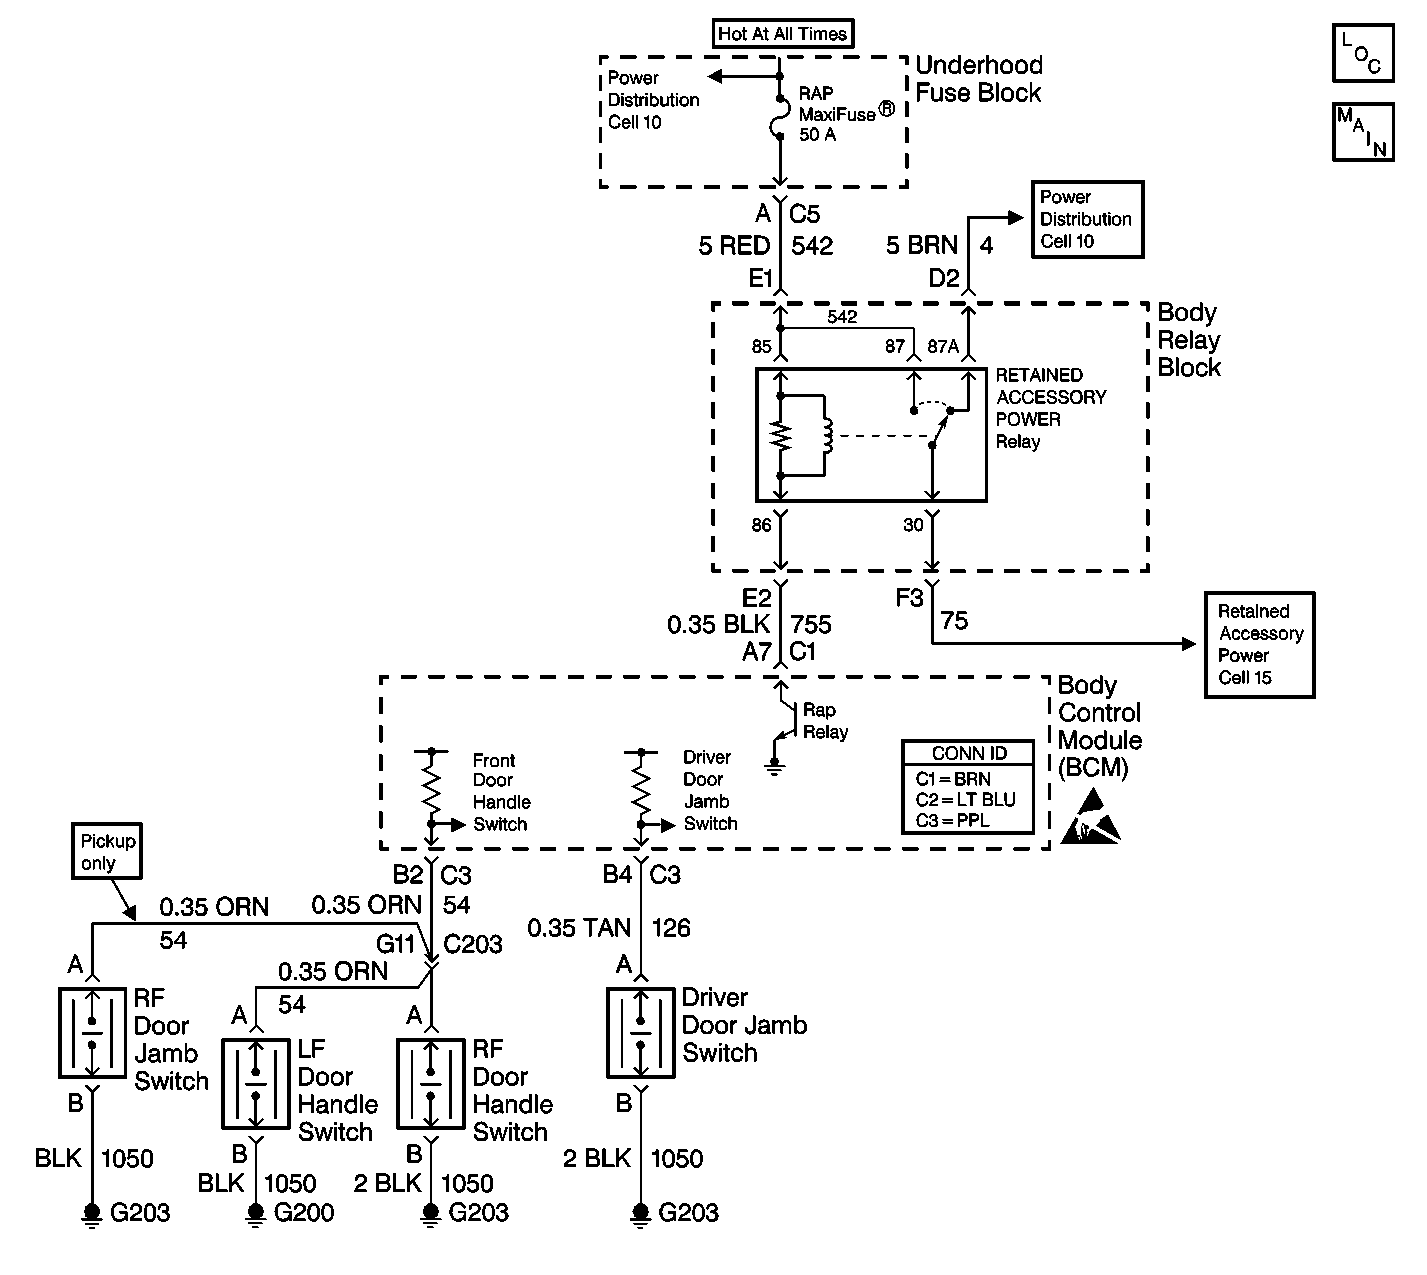
Circuit Description
The retained accessory power function allows certain systems to operate for 20 minutes after the ignition switch is turned OFF. Examples of systems that retain power include the following systems:
| • | The radio |
| • | The power windows |
| • | The sunroof |
The BCM monitors the following items:
| • | The ignition switch position |
| • | The mini wedge (door jamb) switches |
| • | The voltage on CKT 755 |
The BCM will command the RAP relay to turn ON by grounding CKT 755 when the following conditions exist:
| • | All of the doors are closed. |
| • | The ignition switch is in the OFF position. |
DTC B1477 will set if the following conditions exist:
| • | The BCM detects an open or a short to ground in CKT 755. |
| • | The RAP relay is commanded ON. |
Conditions for Setting the DTC
| • | The BCM does not detect battery voltage on CKT 755 (open or shorted to ground) with the ignition switch in the OFF position. |
| • | The system voltage is between 9.0-16.0 volts. |
| • | The above conditions exist for 0.5 seconds. |
Action Taken When the DTC Sets
| • | If CKT 755 is open, the following items will not operate if the ignition switch is turned OFF and all of the doors are CLOSED: |
| - | The radio |
| - | Power windows |
| - | The sunroof |
| • | If CKT 755 is shorted to ground, the following items will not operate if the ignition switch is turned OFF: |
| - | The radio |
| - | The power windows |
| - | The sunroof |
Conditions for Clearing the MIL/DTC
| • | DTC B1477 will clear immediately when one of the following actions occurs: |
| - | The condition that sets the fault is corrected when the ignition is in the OFF position. |
| - | The next ignition cycle begins. |
| • | A history DTC will clear after 100 consecutive ignition cycles without a fault present. |
| • | History and current DTCs may be cleared using a scan tool. |
Diagnostic Aids
| Important: Use the appropriate probe from the J 35616 connector test adapter kit for any probing of the fuse blocks or relay blocks in this table. Use of the appropriate probe prevents damage to the fuse blocks or relay blocks. |
| • | Always diagnose the first current DTC that is listed on the scan tool. |
| • | Verify that the scan tool displays DTC B1477 as a current code before you perform diagnostics. |
| • | Inspect the following components: |
| - | The wiring |
| - | The terminals |
| - | The connectors |
| • | Refer to Circuit Testing and Wiring Repairs in Wiring Systems. |
| • | Refer to Intermittents and Poor Connections Diagnosis in Wiring Systems. |
Test Description
The numbers below refer to the step numbers on the diagnostic table.
-
This step verifies the condition of the RAP relay fuse and CKT 542 to the body relay block.
-
This step determines if CKT 755 (BLK) is shorted to ground.
-
This step determines if the BCM is operating correctly.
-
This step determines if CKT 542 is open to the RAP relay in the body relay block.
-
This step determines if one of the following conditions exists:
| • | CKT 542 (RED) is shorted to ground. |
| • | CKT 542 (RED) is open in the underhood fuse block. |
Step | Action | Value(s) | Yes | No |
|---|---|---|---|---|
1 | Did you perform the BCM Diagnostic System Check? | -- | Go to Step 2 | |
Do the radio and the power windows operate? | -- | Go to Step 3 | Go to Step 4 | |
Does the J 39200 DMM read battery voltage? | -- | Go to Step 15 | Go to Step 14 | |
Do the power door locks and the power mirrors operate? | -- | Go to Step 9 | Go to Step 14 | |
Connect a test lamp between each side of the RAP fuse and ground. Does the test lamp light on both sides of the RAP fuse? | -- | Go to Step 13 | Go to Step 6 | |
Does the test lamp light on one side of the fuse? | -- | Go to Step 7 | Go to Step 8 | |
7 | Locate and repair the short to ground in CKT 542 (RED) in the body relay block between the underhood fuse block and the RAP relay (in the body relay block). Is the repair complete? | -- | Go to Step 16 | -- |
8 | If the test lamp does not light on either side of the fuse, replace the underhood fuse block. Is the repair complete? | -- | Go to Step 16 | -- |
9 |
Does the J 39200 DMM read battery voltage? | -- | Go to Step 15 | Go to Step 10 |
10 |
Is the resistance within the specified range? | 65-90 ohms | Go to Step 12 | Go to Step 11 |
11 | Locate and repair the open in CKT 755 (BLK) between the BCM and the RAP relay in the body relay block. Is the repair complete? | -- | Go to Step 16 | -- |
12 | Replace the RAP relay in the body relay block. Is the repair complete? | -- | Go to Step 16 | -- |
13 | Locate and repair the open in CKT 542 (RED) between the underhood fuse block and the RAP relay. Is the repair complete? | -- | Go to Step 16 | -- |
14 | Locate and repair the short to ground in CKT 755 (BLK) between the BCM and the RAP relay. Is the repair complete? | -- | Go to Step 16 | -- |
15 |
Is the repair complete? | -- | Go to Step 16 | -- |
16 | Clear the DTCs. Is the repair complete? | -- | -- |
