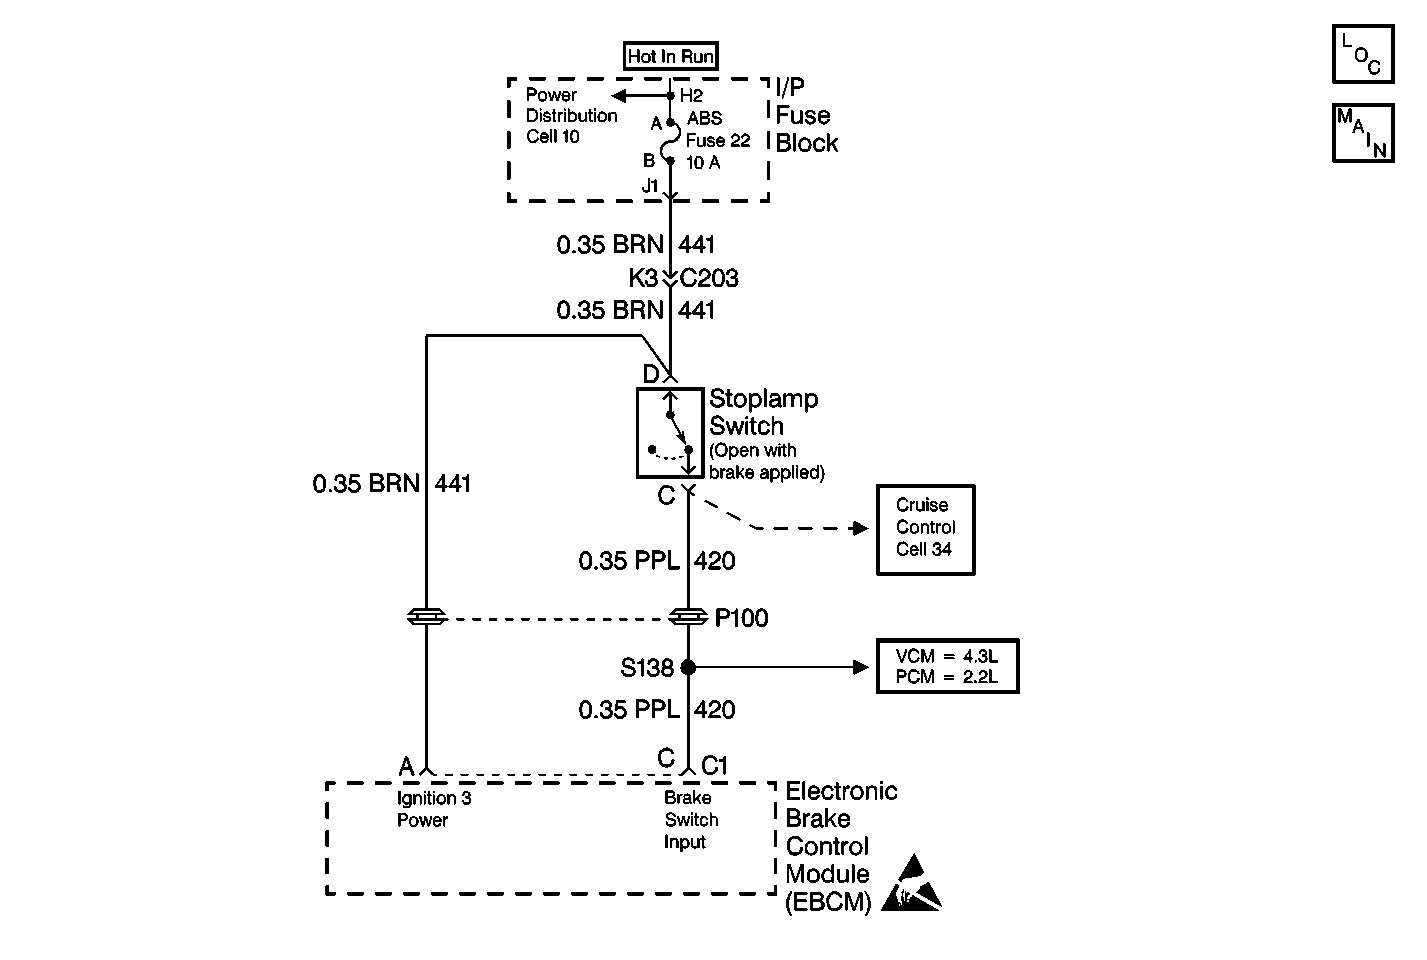
Circuit Description
The Stop Lamp Switch is normally closed. With the ignition in the RUN position and the brake pedal not depressed, the EBCM will have ignition voltage present at terminal C of the 10-way connector. When the brakes are applied, the ignition voltage present at the EBCM will be zero. In a normal braking situation, if the EBCM senses wheel slippage without seeing the brake switch input, it will set a DTC C0281. The ABS indicator lamp will come on and the code will be stored as an ignition latched DTC. The EBCM can also sense operating conditions where wheel slippage is occuring without the brakes applied. In this case, the EBCM will attempt to compensate for wheel slippage by initiating an ABS event. When this occurs, the EBCM will sense that there is no brake switch applied. Under these conditions, the EBCM will set a DTC C0281 as an advisory code, which means that the DTC will be stored, however no ABS indicator lamp will light.
Conditions for Setting the DTC
| • | After power-up, the microprocessor never sees the brake switch released and the vehicle reaches a speed above 56 km/h (35 mph), or |
| • | The vehicle is in an ABS stop for more than 1 second and the brake switch is not depressed. |
Action Taken When the DTC Sets
| • | Depending upon the conditions, DTC C0281 can be either an ignition latched, or advisory code |
| • | The ABS indicator lamp will not be illuminated if it is set as an advisory code |
| • | The ABS will not be disabled |
Conditions for Clearing the DTC
| • | Repair the conditions responsible for setting the DTC. |
| • | Use the Scan Tool Clear DTCs function. |
Diagnostic Aids
DTC C0281 can be set by a faulty Stop Lamp Switch, or damage in CKT 420 or CKT 441.
Thoroughly check any circuitry that is suspected of causing the intermittent complaint for the following conditions:
| • | Backed out terminals |
| • | Improper mating |
| • | Broken locks |
| • | Improperly formed or damaged terminals |
| • | Poor terminal to wiring connections |
| • | Physical damage to the wiring harness |
Test Description
The numbers below refer to the steps in the diagnostic table:
-
This step checks the functionality of the Stoplamp Switch circuit using the Scan Tool .
-
This step decides between a shorted stoplamp switch and a short to voltage in CKT 420 or the EBCM.
-
This step decides between a short to voltage in CKT 420 and a malfunctioning EBCM.
-
This step decides between an open in CKT 420, or an open in the stoplamp switch or CKT 441.
-
This step checks for any possible intermittent causes for the DTC to set.
Step | Action | Value(s) | Yes | No | ||||
|---|---|---|---|---|---|---|---|---|
1 | Was the Diagnostic System Check performed? | -- | Go to Step 2 | |||||
Does the scan tool show the Brake Switch Status changing from ON (brake applied) to OFF (brake released)? | -- | Go to Step 7 | Go to Step 3 | |||||
3 | Does the scan tool indicate that the Brake Switch Status is OFF constantly? | -- | Go to Step 4 | Go to Step 6 | ||||
Does the scan tool show the Brake Switch Status changing from OFF (brake released) to ON (brake applied)? | -- | Go to Step 11 | Go to Step 5 | |||||
Is the voltage within the specified range? | 5-15V | Go to Step 12 | Go to Step 14 | |||||
Is the resistance within the specified range? | 0-2ohms | Go to Step 15 | Go to Step 13 | |||||
Is there damage to the stoplamp switch or the wiring harness? | -- | Go to Step 9 | Go to Step 8 | |||||
8 | Reconnect the stoplamp switch connector and observe the Brake Switch Status on the scan tool while applying and releasing the brake pedal. Does the scan tool show the Brake Switch Status changing from ON (brake applied) to OFF (brake released)? | -- | Go to Step 10 | Go to Step 14 | ||||
9 | Repair or replace damaged or corroded terminals, or damaged harness. Refer to Connector Repairs . Is the repair complete? | -- | -- | |||||
10 | Malfunction is intermittent.
Is the repair complete? | -- | -- | |||||
11 | Replace the stoplamp switch. Refer to Stop Lamp Switch Replacement . Is the repair complete? | -- | -- | |||||
12 | Repair the short to voltage in CKT 420. Is the repair complete? | -- | -- | |||||
13 | Repair the open or high resistance in CKT 420. Is the repair complete? | -- | -- | |||||
14 | Replace the EBCM. Refer to Electronic Brake Control Module Replacement . Is the repair complete? | -- | -- | |||||
15 |
Is the voltage within the specified range? | 10-15V | Go to Step 11 | Go to Step 16 | ||||
16 | Repair the open in CKT 441. Is the repair complete? | -- | -- |
