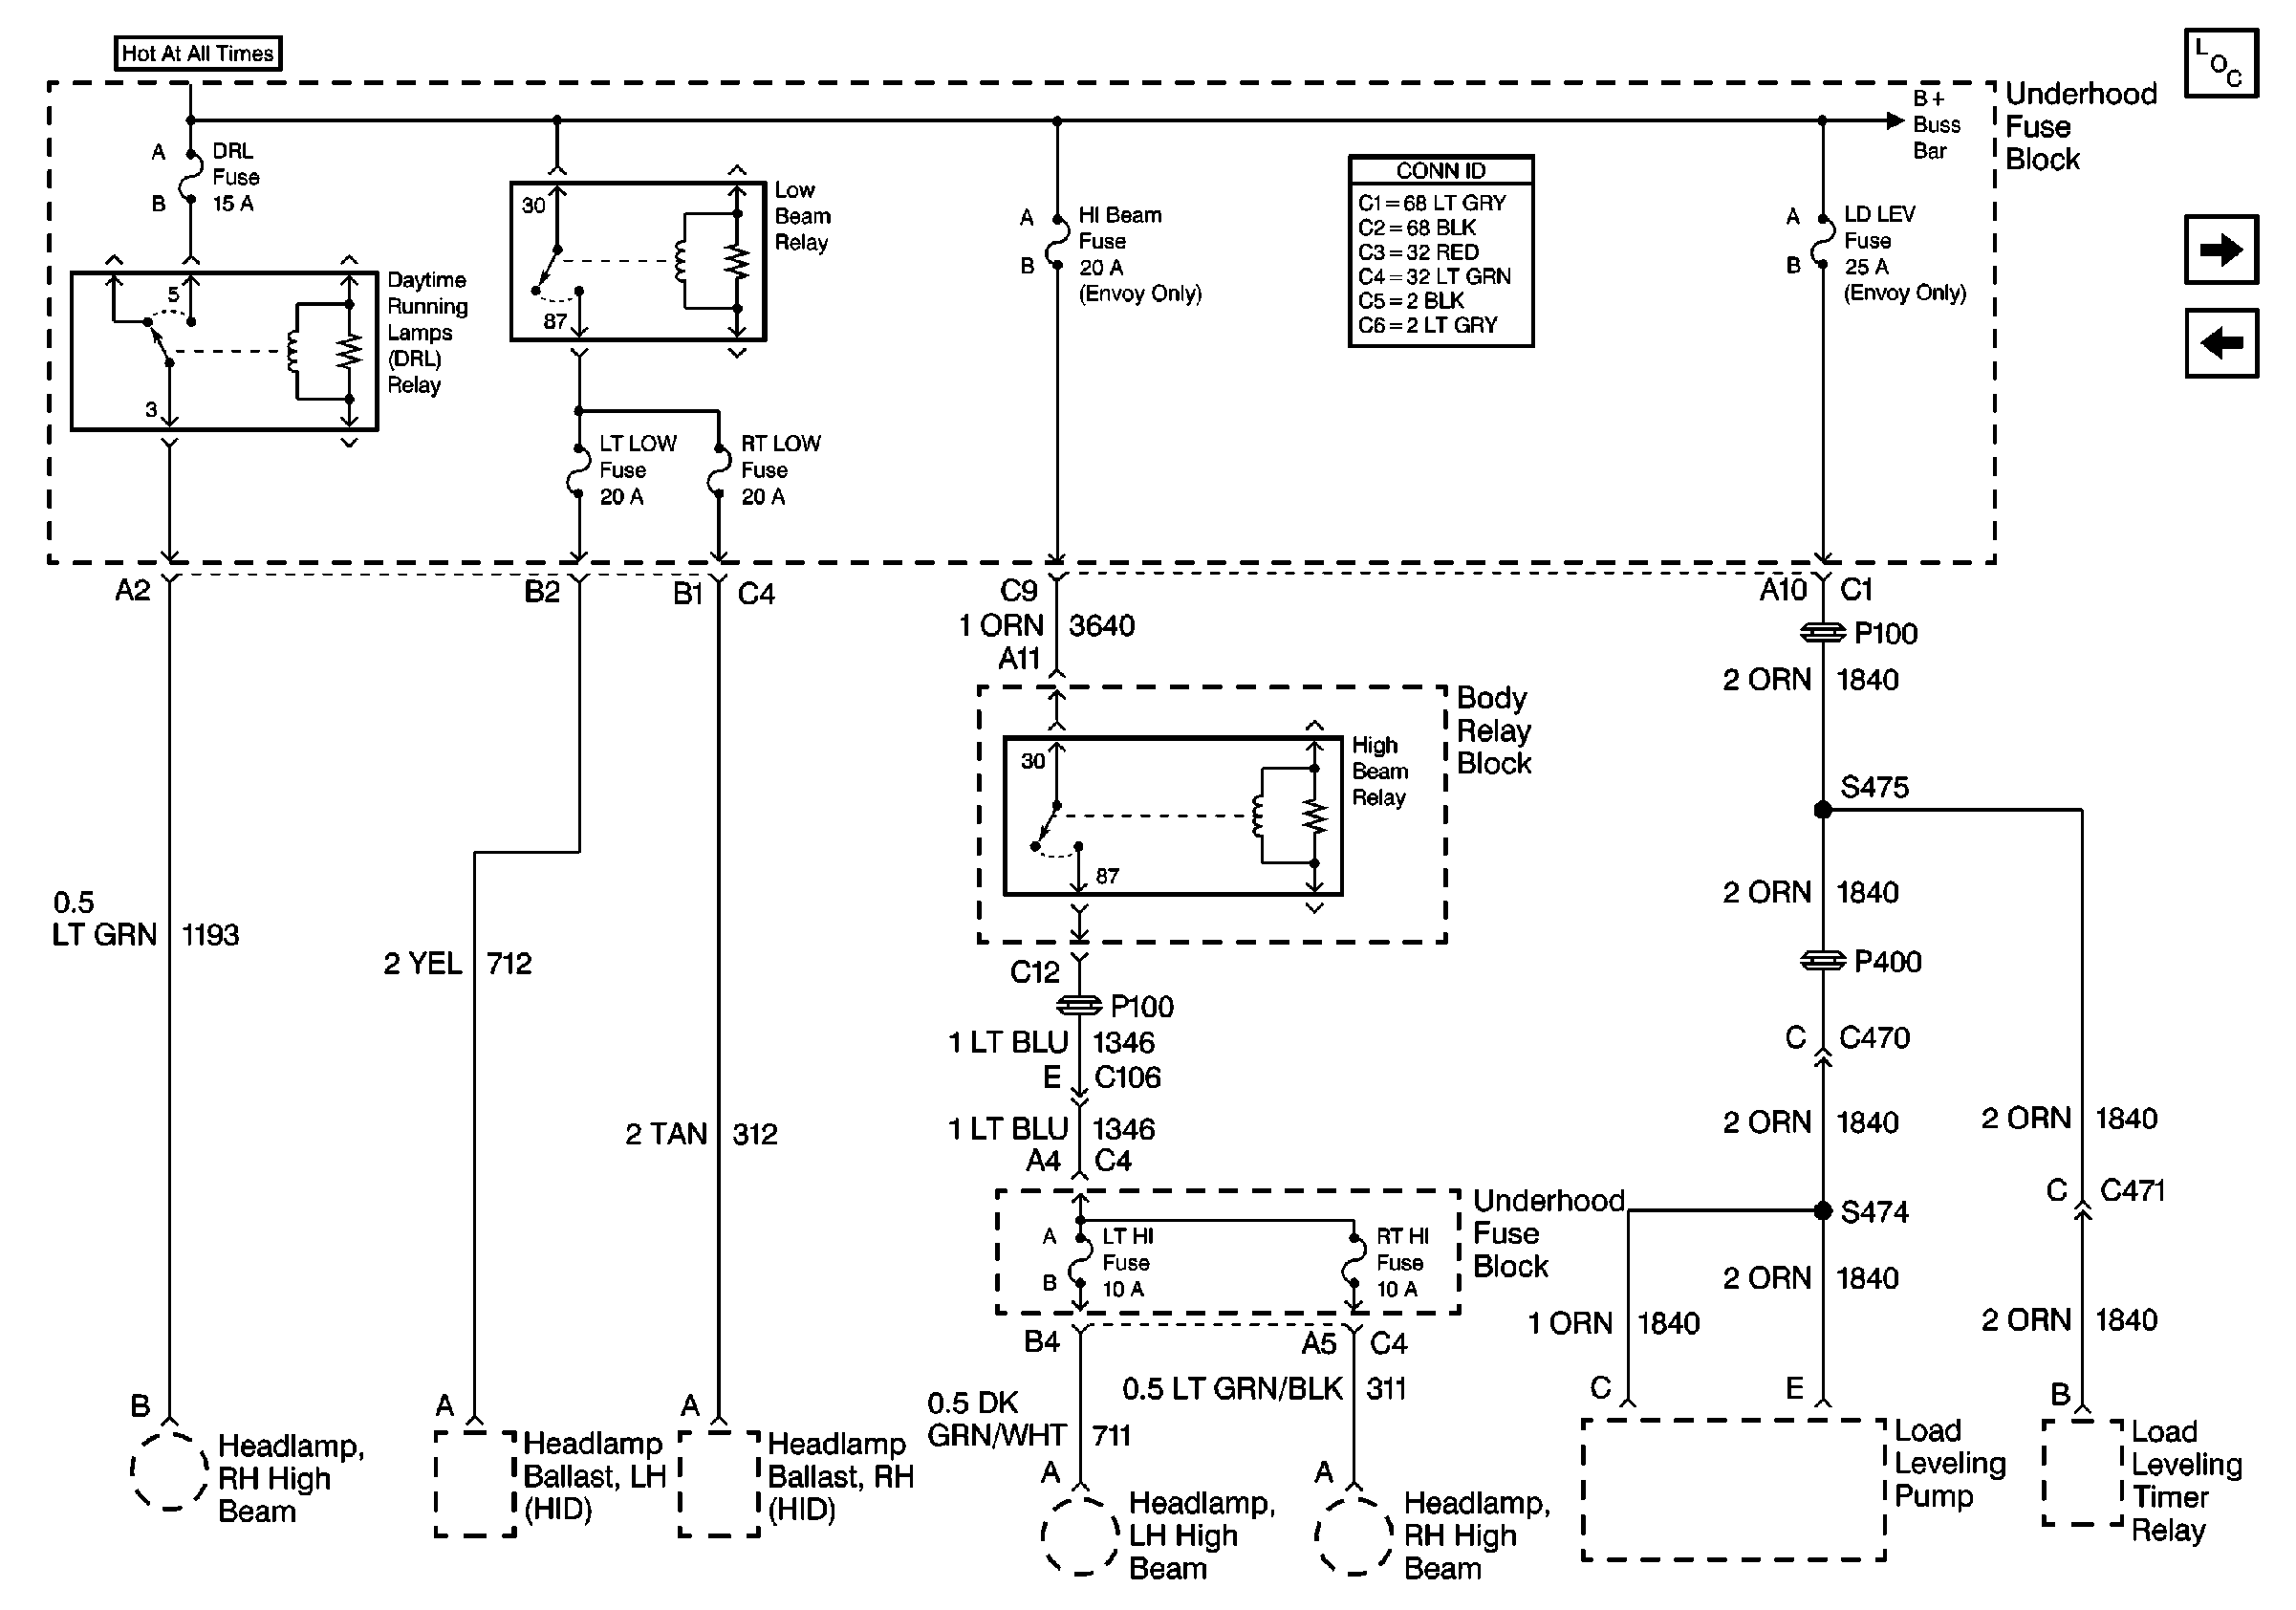
Daytime Running Lamps (DRL) Inoperative, Headlamp Switch Operates Normally Standard
Step | Action | Value(s) | Yes | No |
|---|---|---|---|---|
1 | Did you perform the DRL System Check? | -- | Go to Step 2 | |
2 | Use the scan tool in order to read the current body control module (BCM) diagnostic trouble codes (DTCs). Does the scan tool show any DTCs? | -- | Go to Diagnostic Trouble Code (DTC) List/Type in Body Control Systems | Go to Step 3 |
3 |
Do the DRLs illuminate? | -- | Go to Step 4 | Go to Step 5 |
4 | Replace the DRL relay. Is the repair complete? | -- | -- | |
5 | Using the J 39200 and the connector test adapter kit, test terminal 2 of the DRL relay socket in the underhood fuse block for voltage. Is voltage present? | Battery Voltage | Go to Step 7 | Go to Step 6 |
6 | Replace the underhood fuse block. Is the repair complete? | -- | -- | |
7 |
Is voltage present? | -- | Go to Step 9 | Go to Step 8 |
8 | Locate and repair the open in CKT 592. Is the repair complete? | -- | -- | |
9 | Replace the BCM. Refer to Body Control Module Replacement in Body Control System. Is the repair complete? | -- | -- |
Daytime Running Lamps (DRL) Inoperative, Headlamp Switch Operates Normally Envoy
Step | Action | Value(s) | Yes | No | ||||
|---|---|---|---|---|---|---|---|---|
1 | Did you perform the DRL System Check? | -- | Go to Step 2 | |||||
2 |
Does the test lamp illuminate at both test points? | -- | Go to Step 7 | Go to Step 3 | ||||
3 | Does the test lamp illuminate at one of the test points? | -- | Go to Step 4 | Go to Step 14 | ||||
4 |
Does the test lamp illuminate? | -- | Go to Step 5 | Go to Step 6 | ||||
5 | Replace the underhood fuse block. Is the repair complete? | -- | -- | |||||
6 | Replace the daytime running lamps (DRL) relay. Is the repair complete? | -- | -- | |||||
7 | Connect a test lamp between ground and each test point on the back of the DRL fuse. Does the test lamp illuminate at both test points? | -- | Go to Step 19 | Go to Step 8 | ||||
8 | Does the test lamp illuminate at one of the test points? | -- | Go to Step 10 | Go to Step 9 | ||||
9 | Locate and repair
the power feed to the DRL fuse. Refer to
Is the repair complete? | -- | -- | |||||
10 |
Did the test lamp illuminate? | -- | Go to Step 5 | Go to Step 11 | ||||
11 | Inspect for a short to ground in CKT 1193 (LT GRN). Is a short present? | -- | Go to Step 12 | Go to Step 13 | ||||
12 | Repair the short to ground in CKT 1193 (LT GRN). Is the repair complete? | -- | -- | |||||
13 | Replace the DRL relay. Is the repair complete? | -- | -- | |||||
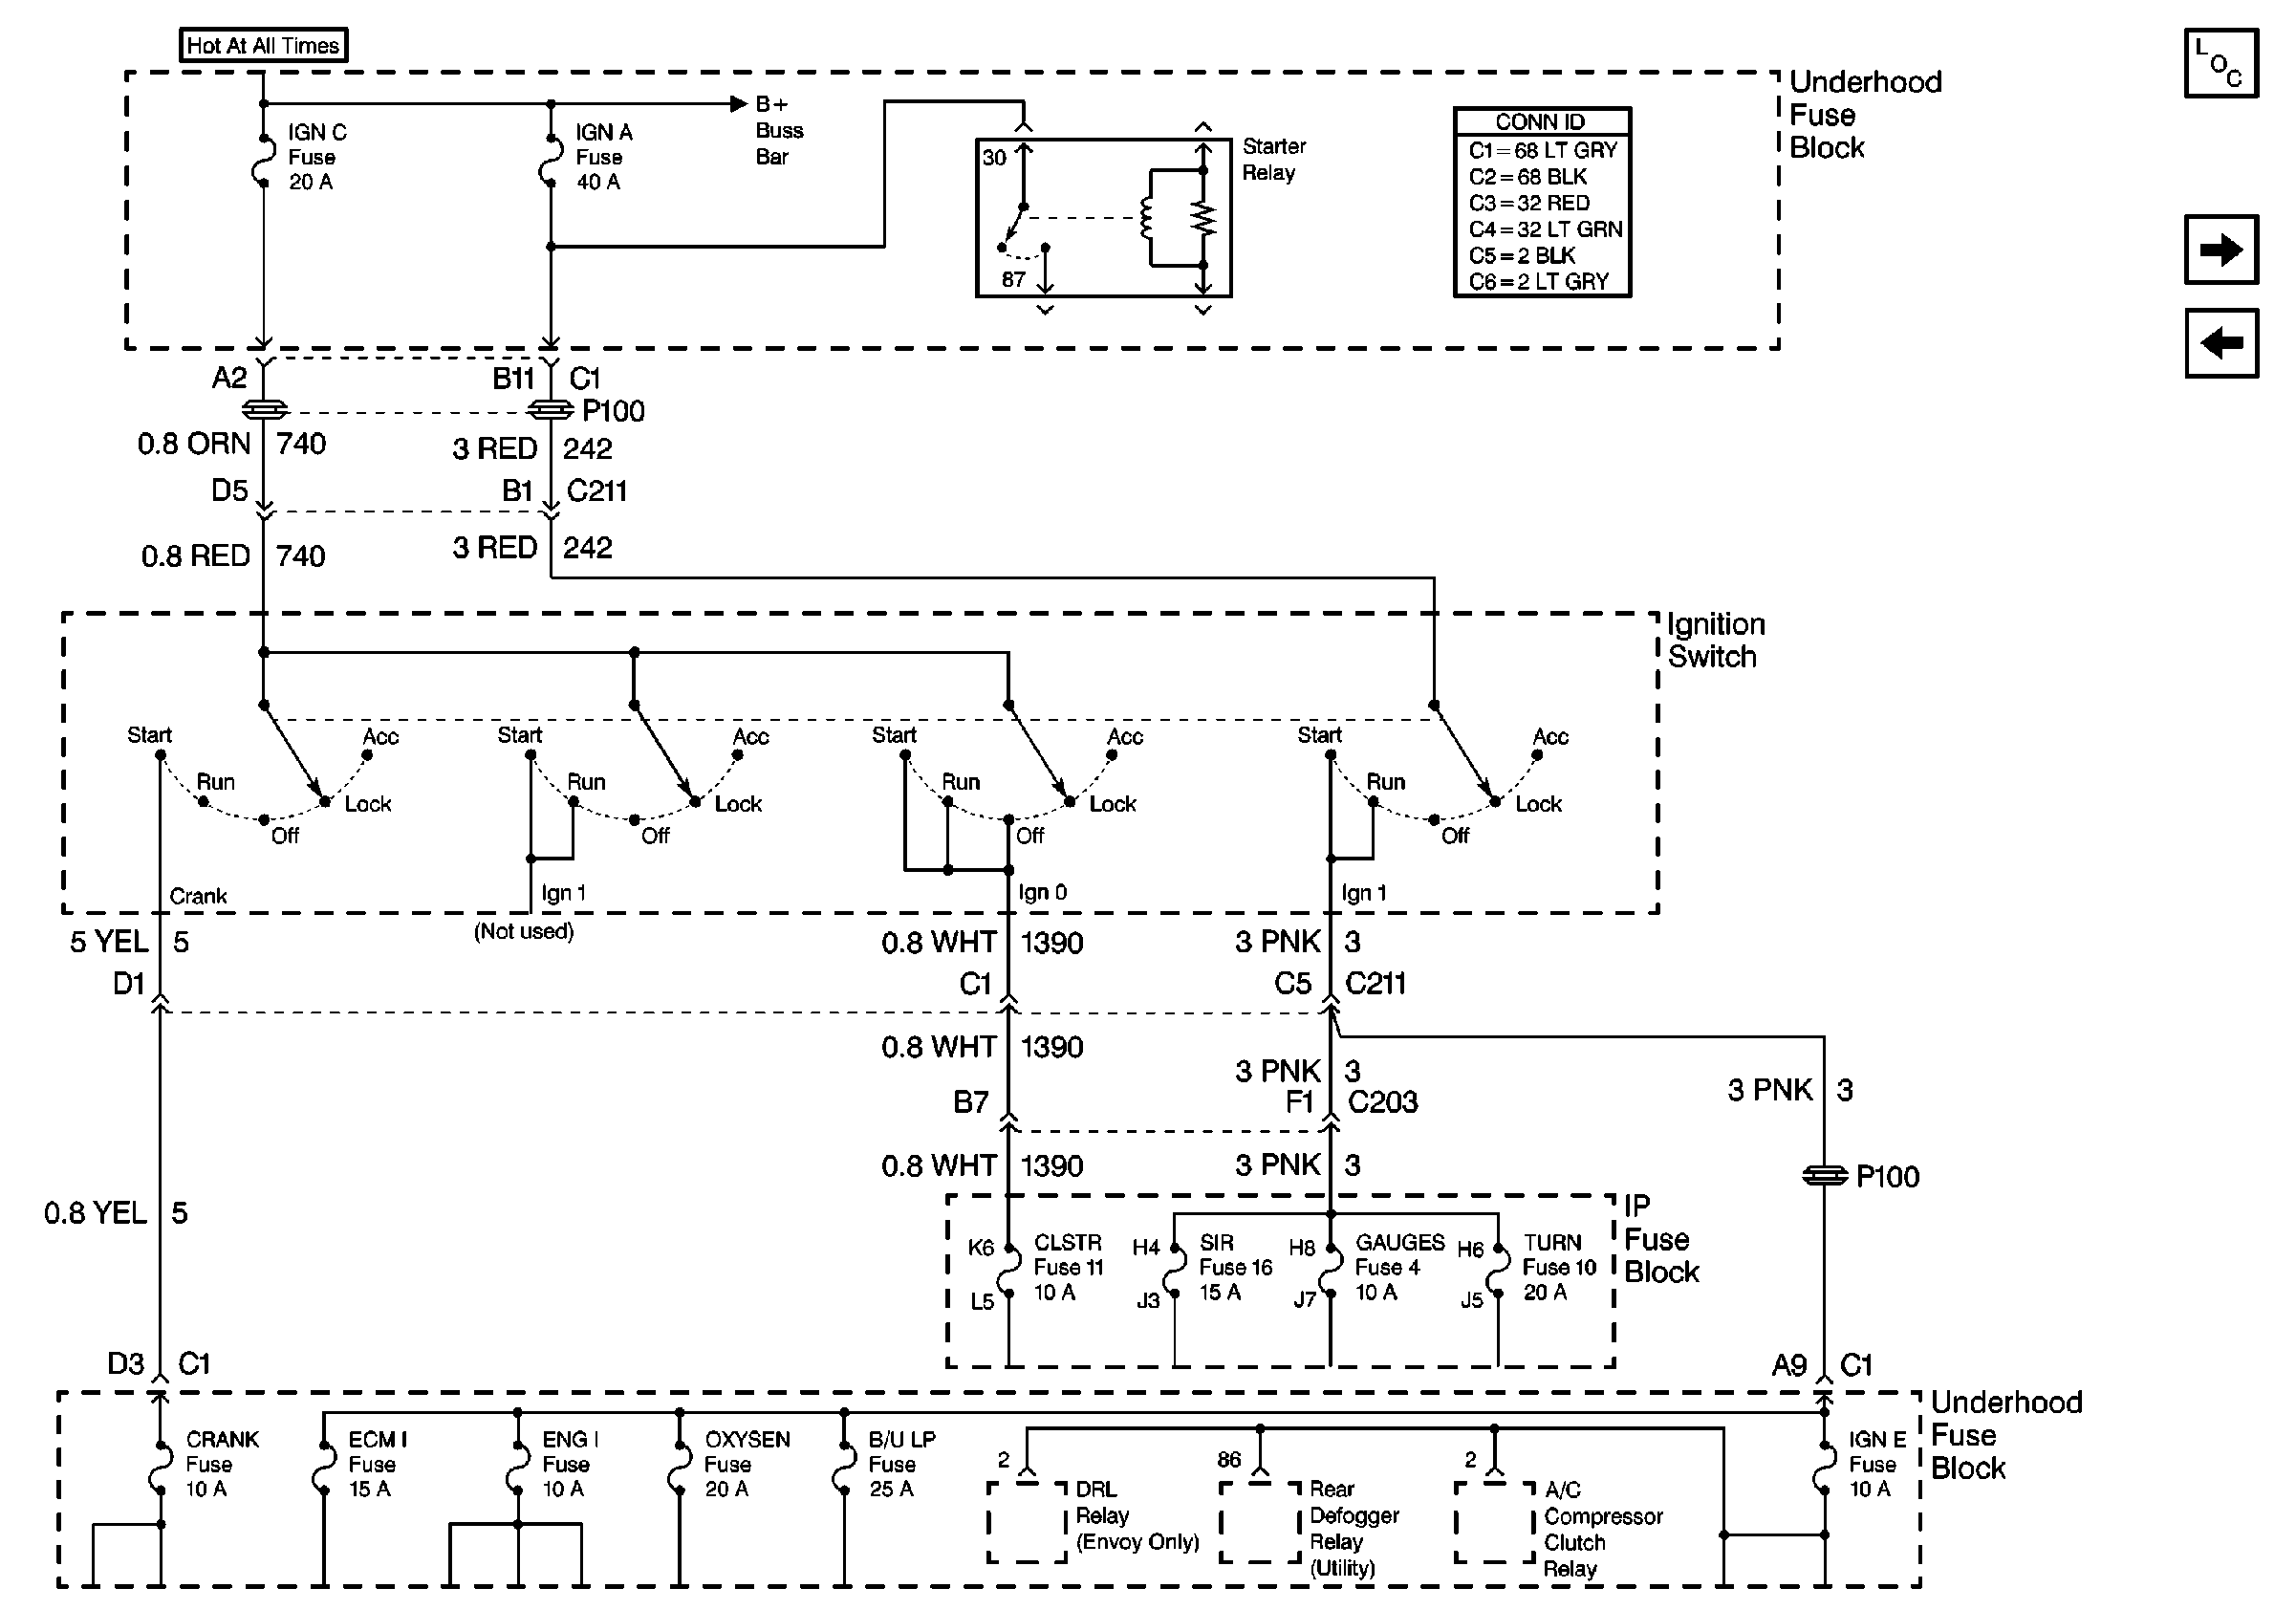
14 | Connect a test lamp between ground and each test point on the back of the IGN A fuse. Does the test lamp illuminate at both test points? | -- | Go to Step 18 | Go to Step 15 | ||||
15 | Does the test lamp illuminate at one of the test points? | -- | Go to Step 16 | Go to Step 17 | ||||
16 | Locate and repair a short to ground in the following circuits between the IGN A fuse and the IGN E fuse:
Is the repair complete? | -- | -- | |||||
17 | Locate and repair the power feed to IGN A fuse. Refer to
Is the repair complete? | -- | -- | |||||
18 | Locate and repair an open in the following circuits between the IGN A fuse and the IGN E fuse:
Is the repair complete? | -- | -- | |||||
19 |
Do the daytime running lamps illuminate? | -- | Go to Step 37 | Go to Step 20 | ||||
20 | Connect a test lamp between ground and each test point on the back of the RT HI fuse. Does the test lamp illuminate at both test points? | -- | Go to Step 28 | Go to Step 21 | ||||
21 | Does the test lamp illuminate at one of the test points? | -- | Go to Step 22 | Go to Step 23 | ||||
22 |
Is the repair complete? | -- | -- | |||||
23 | Inspect the right high beam bulb. Is the bulb open? | -- | Go to Step 24 | Go to Step 25 | ||||
24 | Replace the right high beam bulb. Is the repair complete? | -- | -- | |||||
25 | Connect a J 39200 DMM between cavity 3 at the DRL relay socket and CKT 1193 (LT GRN), cavity B at the RH high beam bulb connector. Is the resistance less than the specified value? | 0.5 ohms | Go to Step 27 | Go to Step 26 | ||||
26 | Locate and repair an open in CKT 1193 (LT GRN) between the DRL relay and the right high beam bulb. Is the repair complete? | -- | -- | |||||
27 | Locate and repair an open in CKT 311 (LT GRN/BLK) between the following components:
Is the repair complete? | -- | -- | |||||
28 | Connect a test lamp between ground and each test point on the back of the LT HI fuse. Does the test lamp illuminate at both of the test points? | -- | Go to Step 32 | Go to Step 29 | ||||
29 | Does the test lamp illuminate at one of the test points? | -- | Go to Step 31 | Go to Step 30 | ||||
30 | Replace the underhood fuse block. Is the repair complete? | -- | -- | |||||
31 | Locate and repair a short to ground in CKT 711 (DK GRN/WHT). Is the repair complete? | -- | -- | |||||
32 | Inspect the left high beam bulb. Is the bulb open? | -- | Go to Step 33 | Go to Step 34 | ||||
33 | Replace the left high beam bulb. Is the repair complete? | -- | -- | |||||
34 | Connect a test lamp between CKT 711 (DK GRN/WHT) and ground. Does the test lamp illuminate? | -- | Go to Step 36 | Go to Step 35 | ||||
35 | Locate and repair an open in CKT 711 (DK GRN/WHT). Is the repair complete? | -- | -- | |||||
36 | Locate and repair an open in CKT 150 (BLK). Is the repair complete? | -- | -- | |||||
37 |
Does the Daytime Running Lamps status display the specified value? | ACTIVE | Go to Step 44 | Go to Step 38 | ||||
38 |
Does the Park Brake Switch status display the specified value? | SET | Go to Step 39 | Go to Step 43 | ||||
39 |
Does the Park Brake Switch status display the specified value? | SET | Go to Step 40 | Go to Step 42 | ||||
40 | Inspect for a short to ground in CKT 80 (LT GRN) between the parking brake switch and BCM connector C1. Is circuit OK? | -- | Go to Step 43 | Go to Step 41 | ||||
41 | Repair the short to ground in CKT 80 (LT GRN) between the parking brake switch and BCM connector C1. Is the repair complete? | -- | -- | |||||
42 | Adjust or replace the parking brake switch as necessary. Is the repair complete? | -- | -- | |||||
43 | Replace the body control module. Refer to Body Control Module Replacement in Body Control System. Is the repair complete? | -- | -- | |||||
44 |
Do the daytime running lamps illuminate? | -- | Go to Step 43 | Go to Step 45 | ||||
45 |
Does the test lamp illuminate? | -- | Go to Step 46 | Go to Step 47 | ||||
46 | Replace the DRL relay. Is the repair complete? | -- | -- | |||||
47 | Locate and repair the open in CKT 592 (LT GRN/BLK) between the DRL relay cavity 2 and the BCM. Is the repair complete? | -- | -- |
