REVISED 4WAL BRAKE SYSTEM BLEEDING PROCEDURE (INFO.)

SUBJECT: REVISED 4WAL BRAKE SYSTEM BLEEDING PROCEDURE (INFORMATIONAL)
MODELS: 1990-93 WL, S/T AND 1992-93 C/K AND 1993 G MODELS WITH 4WAL
THIS BULLETIN CANCELS AND REPLACES TRUCK SERVICE BULLETIN 91-5E-23, CORPORATE NUMBER 065001R, DATED SEPTEMBER 1990 TO UPDATE THE BLEED PROCEDURE AND TO ADD MODELS SINCE EQUIPPED WITH 4WAL BRAKE SYSTEMS. ALL COPIES OF 91-5E-23 SHOULD BE DISCARDED. THIS BULLETIN ALSO UPDATES INFORMATION IN 1993 M/L SERVICE MANUAL X9330, 1993 S/T SERVICE MANUAL X9329, 1993 C/K SERVICE MANUAL X9331, 1993 G SERVICE MANUAL X9357, AND STG RWAL/4WAL 1988-1991 APPLICATIONS MANUAL 15005.05 (VERSIONS 2 TO 5). PLEASE PLACE A COPY OF THIS BULLETIN IN EACH MANUAL. THIS BULLETIN IS EQUIVALENT TO,SERVICE MANUAL UPDATE (CORP. NO. 263003).
This 4WAL brake system bleed procedure is the most efficient bleed procedure to date.
The 4WAL Brake Pressure Modulator Valve (BPMV), formerly called Electro Hydraulic Control Unit (EHCU), should be bled after replacement or if air is suspected to be trapped inside the unit. There are two conventional methods to use when bleeding the 4WAL BPMV: (1.) Pressure Bleeding or (2.) Manual Bleeding.
Important
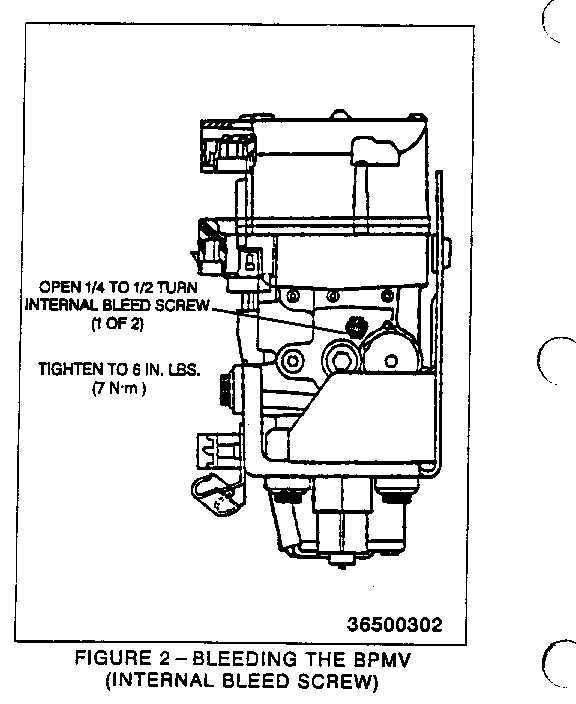
There are two internal bleed screws (brass colored), one on each side of the BPMV, that open internal channels. Open the internal bleed screws 1/4 to 1/2 turn before bleeding (Figure 2). New 4WAL BPMV's are shipped with the internal bleed screws open, so first close the internal bleed screws until snug, then open 1/4 to 1/2 turn.
Note: Brake fluid will damage electrical connections and painted surfaces. Use shop cloths, suitable containers, and fender covers to prevent brake fluid from contacting these areas. Clean any fluid that may drip onto wheel cylinders or calipers to prevent corrosion. Always re-seal and wipe off brake fluid containers to prevent spills.
Tools Required:
J 39177 Valve Pressure Bleeding Tool (three required)
Note: You can also use a modified J 35856 Valve Pressure Bleeding Tool providing you remove the dimple from it first.
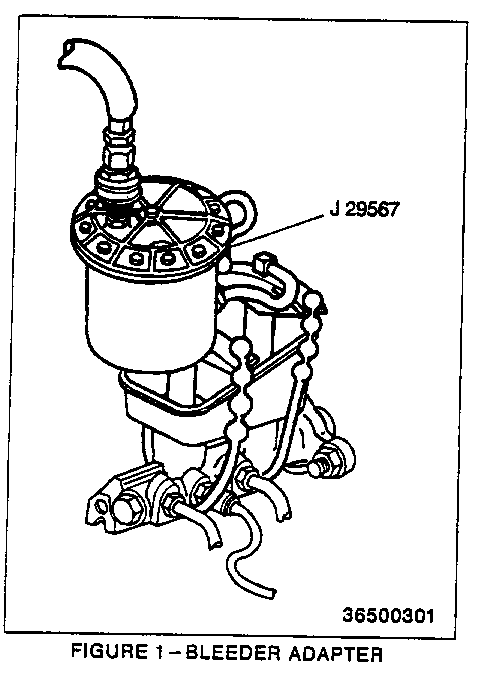
J 29567 Universal Brake Bleeder Adaptor (use for pressure bleed)
J 29532 Diaphragm Type Brake Bleeder (brake fluid pressure tank for pressure bleed)
TK 00000 Tech-1 Scan Tool
TK 02650 RWAL/4WAL Cartridge Kit (include proper cable/adaptor), or
7000001 Mass Storage Cartridge Kit (include proper cable/adaptor)
3000003 Mass Storage Cartridge (include proper cable/adaptor)
Note: When performing the 4WAL brake system bleeding procedure, the ignition switch must be in the "OFF" position or false diagnostic trouble codes could be set to memory. If trouble codes are set, refer to section 5E1 "Clearing Diagnostic Trouble Codes" in the 1993 Service Manual.
PRESSURE BLEED PROCEDURE
The pressure bleeding equipment must be of the diaphragm type. It must have a rubber diaphragm between the air supply and the brake fluid to prevent air, moisture, oil, and other contaminants from entering the hydraulic system.
Important
You can expect to use two quarts of brake fluid to thoroughly bleed the system.
1. Begin by attaching the pressure bleeder adaptor J 29567 to the master cylinder (Figure 1).
2. Fill the pressure bleeder tank J 29532 at least 2/3 full with Delco Supreme No. 11 Hydraulic Brake Fluid (GM P/N 1052535) or an equivalent DOT 3 motor vehicle brake fluid. The bleeder tank must be bled each time brake fluid is added.
3. Charge the bleeder tank to 140-170 kPa (20-25 psi) and connect the hose from the bleeder tank to the bleeder adaptor.
4. Open the internal bleed screws 1/4 to 1/2 turn, on each side of the BPMV (Figure 2).
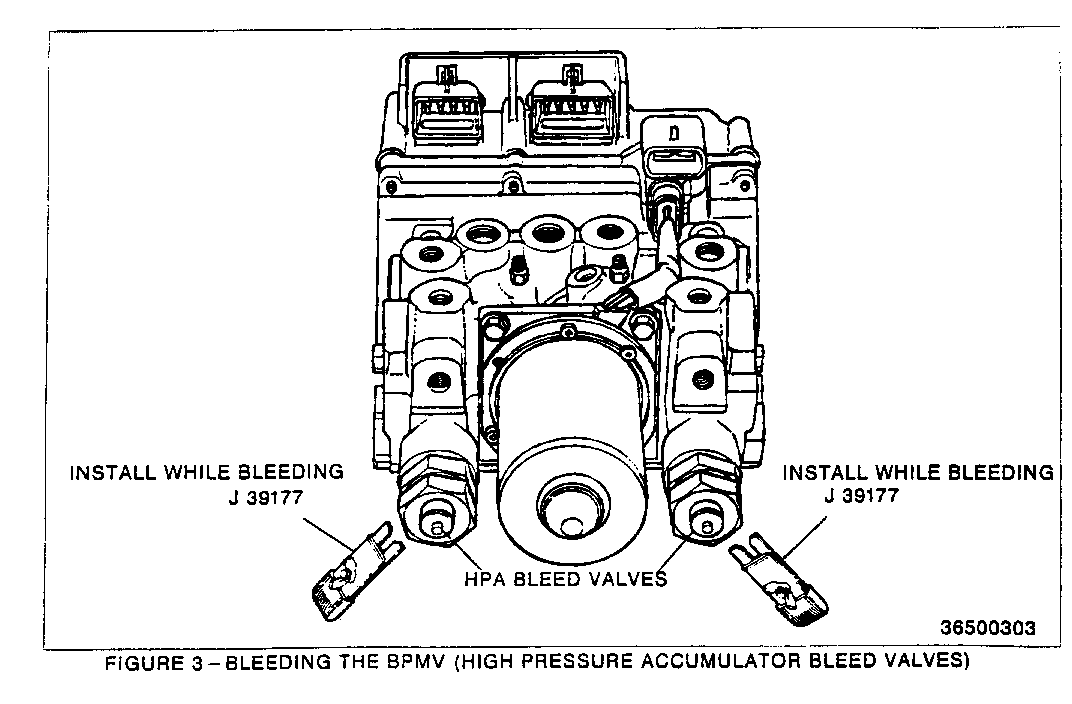
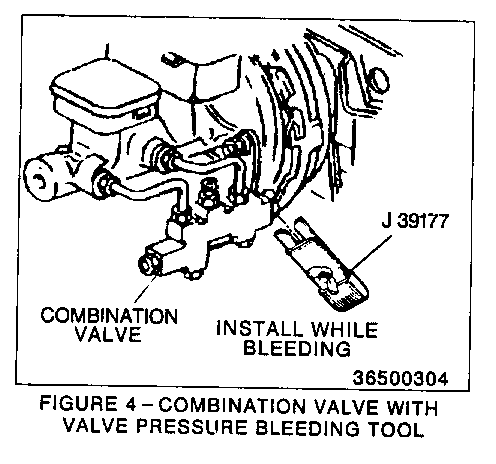
5. Attach the valve pressure bleeding tools J 39177 to the left and right high pressure accumulator bleed valve stems of the BPMV (Figure 3) and to the combination valve (Figure 4). Tighten tool J 39177 only finger tight.
6. Open the pressure bleeder tank valve.
7. Bleed each wheel in the following sequence:
* Right rear
* Left rear
* Right front
* Left front
Note: Rear wheel bleeder valves are 5116 in. (8 mm) and front wheel bleeder valves are 10 mm.
Note: A clear plastic hose can be attached to the bleeder valve and immersed into a container partially filled with clean brake fluid.
8. Open the bleeder valve at least 3/4 of a turn and allow the fluid to flow until no air is seen in the fluid. Tighten the bleeder valve.
9. Repeat step 7 and 8 at each wheel cylinder/caliper until all the air is purged.
10. Disconnect the bleeder tank hose from the bleeder adaptor and remove the bleeder adaptor.
11. Fill the master cylinder to the proper level and replace lid.
12. CLOSE and tighten the two BPMV internal bleed screws (Figure 2) to 7 N-m (60 lbs. in.).
13. Remove the valve pressure bleeding tools J 39177 from the BPMV high pressure accumulator bleed valve stems and the combination valve.
14. With the ignition switch "ON" and the engine off, bleed the pump and pressure (lower) portion of the BPMV by performing six ABS function tests with the Tech-1.
Important
DURING THE TECH-1 FUNCTION TESTS, THE BRAKE PEDAL MUST BE FIRMLY DEPRESSED. THIS WILL PUSH ANY AIR FROM THE CONTROL AREA OF THE BPMV INTO THE BRAKE SYSTEM.
15. Finally, rebleed the four wheel cylinder/calipers again, to purge any remaining air put into the system during the function tests. Use either the pressure bleed or manual bleed for this step.
Important
DO NOT OPEN THE BPMV INTERNAL BLEED SCREWS OR DEPRESS THE HIGH PRESSURE ACCUMULATOR BLEED VALVES WHEN REBLEEDING AFTER THE FUNCTION TESTS.
16. Tighten all four wheel cylinder/caliper bleeder valves to 7 N-m (60 lbs. in.).
17. Remove the bleeder adaptor, if using the pressure bleed procedure (Figure 1), and fill the master cylinder to the proper level with brake fluid.
18. Apply firm pressure to the brake pedal and evaluate the brake pedal feel.
Important
MAKE SURE YOU HAVE A GOOD, HARD BRAKE PEDAL BEFORE ATTEMPTING TO MOVE THE VEHICLE.
19. Repeat the entire brake bleed procedure if necessary.
MANUAL BLEED PROCEDURE
When a pressure bleeder is not available, use the (two person) manual bleed procedure. One person will push on the brake pedal while the other person will open and close the bleed valves.
Important
You can expect to use two quarts of brake fluid to thoroughly bleed the system.
1. Begin by opening the internal bleed screws 1/4 to 1/2 turn, on each side of the BPMV (Figure 2).
2. Attach the valve pressure bleeding tool J 39177 to the left and right high pressure accumulator bleed valve stems of the BPMV (Figure 3). Tighten tool J 39177 only finger tight.
Note: It is not necessary to attach bleeding tool J 39177 to the combination valve when using the manual bleed procedure.
3. Bleed each wheel in the following sequence:
* Right rear
* Left rear
* Right front
* Left front
Note: Rear wheel bleeder valves are 5116 in. (8 mm) and front wheel bleeder valves are 10 mm.
Note: A clear plastic hose can be attached to the bleeder valve and immersed into a container partially filled with clean brake fluid.
4. Slowly apply the brake pedal one time and hold.
5. Loosen the bleeder valve to purge the air from the wheel cylinder/caliper.
6. Tighten the bleeder valve and slowly release the pedal.
7. Wait 15 seconds.
8. Be sure to check the master cylinder fluid level after 4-5 strokes to avoid running dry.
9. Repeat steps 4 through 8, until all air is purged from the wheel cylinder/caliper.
Note: It may be necessary to repeat this sequence as many as 15 to 20 times per wheel.
10. Fill the master cylinder to the proper level and replace lid.
11. CLOSE and tighten the two BPMV internal bleed screws (Figure 2) to 7 N-m (60 lbs. in.).
12. Remove the valve pressure bleeding tools J 39177 from the BPMV high pressure accumulator bleed valve stems and the combination valve.
13. With the ignition switch "ON" and the engine off, bleed the pump and pressure (lower) portion of the BPMV by performing six ABS function tests with the Tech-1.
Important
DURING THE TECH-1 FUNCTION TESTS, THE BRAKE PEDAL MUST BE FIRMLY DEPRESSED. THIS WILL PUSH ANY AIR FROM THE CONTROL AREA OF THE BPMV INTO THE BRAKE SYSTEM.
14. Finally, rebleed the four wheel cylinder/calipers again, to purge any remaining air put into the system during the function tests. Use either the pressure bleed or manual bleed for this step.
Important
DO NOT OPEN THE BPMV INTERNAL BLEED SCREWS OR DEPRESS THE HIGH PRESSURE ACCUMULATOR BLEED VALVES WHEN REBLEEDING AFTER THE FUNCTION TESTS.
15. Tighten all four wheel cylinder/caliper bleeder valves to 7 N-m (60 lbs. in.).
16. Fill the master cylinder to the proper level with brake fluid.
17. Apply firm pressure to the brake pedal and evaluate the brake pedal feel.
Important
MAKE SURE YOU HAVE A GOOD, HARD BRAKE PEDAL BEFORE ATTEMPTING TO MOVE THE VEHICLE.
18. Repeat the entire brake bleed procedure if necessary.
WARRANTY INFORMATION
For vehicles repaired under warranty, use:
Labor Operation Model Labor Time --------------- ----- ---------- H0700 S/T See H0700 M/L Applicable H0700 C/K Labor Time H0700 G Guide


General Motors bulletins are intended for use by professional technicians, not a "do-it-yourselfer". They are written to inform those technicians of conditions that may occur on some vehicles, or to provide information that could assist in the proper service of a vehicle. Properly trained technicians have the equipment, tools, safety instructions and know-how to do a job properly and safely. If a condition is described, do not assume that the bulletin applies to your vehicle, or that your vehicle will have that condition. See a General Motors dealer servicing your brand of General Motors vehicle for information on whether your vehicle may benefit from the information.
