FMVSS Non-Compliance 00003 - Seat Belt Relocation

| Subject: | Seat Belt Relocation |
| Models: | 1986-1991 Chevrolet and GMC M/L Conversion Vans |
| Converted By The Van House |
This Non-Compliance Campaign is being conducted by The Van House, a conversion company, and General Motors has agreed to administer this campaign through its GMC and Chevrolet dealer body.
The Highway Safety Act, as amended, provides that each vehicle which is subject to a recall campaign of this type must be adequately repaired within a reasonable time after the customer has tendered it for repair. A failure to repair within sixty (60) days after tender of a vehicle is prima facie evidence of failure to repair within a reasonable time.
If the condition is not adequately repaired within a reasonable time, the customer may be entitled to an identical or reasonably equivalent vehicle at no charge or to a refund of the purchase price less a reasonable allowance for depreciation.
To avoid having to provide these burdensome remedies, every effort must be made to promptly schedule an appointment with each customer and to repair their vehicle as soon as possible. As you will see in reading the attached copy of the divisional letter that is being sent to customers, the customers are being instructed to contact the appropriate Customer Assistance Center if their dealer does not remedy the condition within five (5) days of the mutually agreed upon service date. If the condition is not remedied within a reasonable time, they are instructed on how to contact the National Highway Traffic Safety Administration.
Non-Compliance Involved
The Van House has decided that all 1986-1991 Chevrolet and GMC M/L conversion vans converted by The Van House fail to conform to Federal Motor Vehicle Safety Standard (FMVSS) 208, "Occupant Crash Protection." These vehicles exhibit a condition in which the front seat belt buckles were installed on a seat bar attached to the seat pedestal, raising the buckle location approximately five inches. This placement resulted in the junction between the lap and shoulder belt (when buckled) being closer to the occupant centerline than permitted by FMVSS 208. This could increase the occupant's risk of injury in the event of a vehicle crash.
To correct this non-compliance, dealers are requested to relocate the anchorage of the front seat belt buckles and disable the front seat swivel feature permanently.
Vehicles Involved
The vehicles involved include all 1986-1991 Chevrolet and GMC M/L conversion vans converted by The Van House.
Important: Dealers should confirm vehicle eligibility through VISS (Vehicle Information Service System) prior to beginning campaign repairs. [Not all vehicles within the above breakpoints may be involved.]
Parts Information
Parts required to complete this campaign are to be obtained from The Van House at 1-888-948-6310. When calling, supply the model year and the trim color. DO NOT ORDER THIS KIT FROM GMSPO.
Model Year | Trim Color | Qty/ Vehicle |
|---|---|---|
1986 | Saddle | 1 |
1986 | Blue | 1 |
1986 | Gray | 1 |
1986 | Maple | 1 |
1987 | Saddle | 1 |
1987-89 | Maple | 1 |
1987-91 | Blue | 1 |
1987-91 | Gray | 1 |
1988-91 | Cognac | 1 |
1990-91 | Red | 1 |
Customer Notification
Customers will be notified of this campaign on their vehicles by The Van House (see copy of customer letter included with this bulletin).
Dealer Campaign Responsibility
Dealers are requested to service all vehicles subject to this campaign at no charge to customers, regardless of mileage, age of vehicle, or ownership, from this time forward.
In summary, whenever a vehicle subject to this campaign enters your vehicle inventory, or is in your dealership for service in the future, please take the steps necessary to be sure the campaign correction has been made before selling or releasing the vehicle.
Service Procedure
- Remove the bolt that attaches the seat belt buckle to the inboard side of the seat assembly and discard the buckle and the bolt.
- Using a sharp knife, cut the carpet below the driver's seat in four places (1). Refer to Figures 1 and 2.
- Pull back the carpet as shown in Figure 2 to expose the two bolts (4) and the two nuts (10) that attach the lower pedestal base (5) to the floor (6).
- Remove the front two bolts (4) and washers and the rear two nuts (10) that attach the seat assembly to the floor. Remove the seat from the vehicle. Retain these bolts and washers for reinstallation. Refer to Figure 2.
- Remove the nuts and the washers on each corner (3) that attach the seat to the upper portion of the seat pedestal (2). Retain these nuts and washers for reinstallation. Refer to Figure 2.
- Separate the seat from the upper pedestal (2).
- On the upper pedestal, where the seat belt buckle was located (7), measure, mark, and using a hacksaw or similar tool, cut 100 mm (4 inches) off of the end of the bar (1) as shown in Figure 3. Discard the cut off section.
- File or grind off any rough edges on the remaining portion of the bar on the upper pedestal.
- With the seat swivel locked in the straight-ahead position (swivel release lever/bar (4) positioned in notch (5) in lower pedestal), measure 89 mm (3-1/2 inches) from the center of the nut (2) as shown in Figure 3 and mark the location.
- Drill out and remove the two rivets (3) on the top of the upper pedestal as shown in Figure 3. These two rivets attach the swivel release lever/bar (4) to the upper pedestal.
- Remove and discard the swivel release lever/bar (4).
- At the location marked in Step 10, drill a 10.3 mm (13/32 inch) hole (6) through the top of the upper pedestal. The drilled hole should be directly in line with the notch (5) in the lower pedestal. Refer to Figure 3.
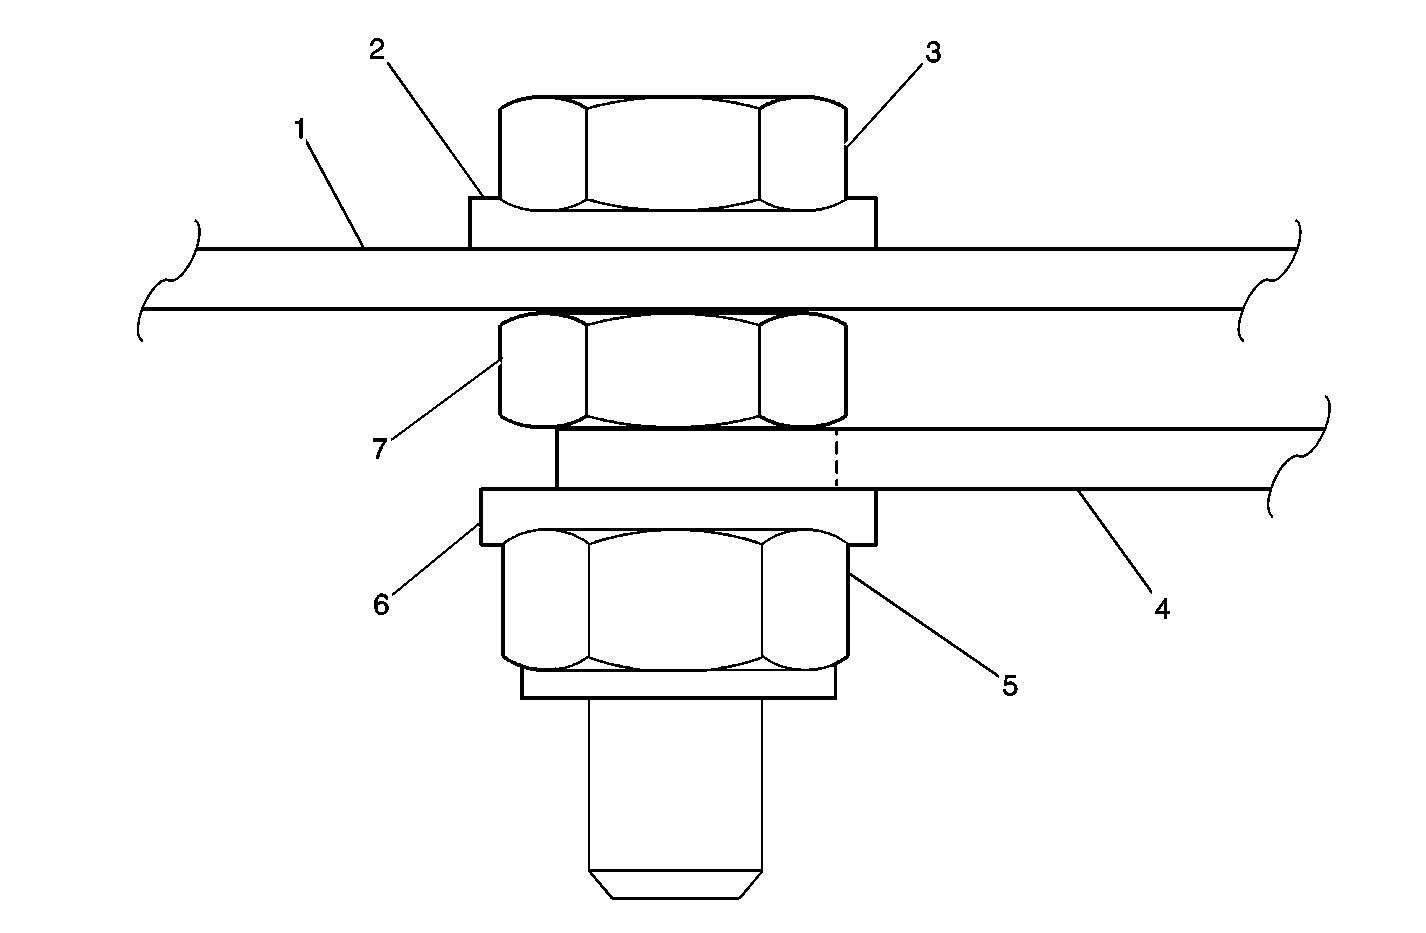
- Install the 10 mm flat washer (2) on the 10 mm x 40 mm long bolt (1) and put through the drilled hole in the top of the upper pedestal. Install the 10 mm hex nut (4) on the bolt (1) between the upper pedestal top plate (3) and the swivel (7).
- Install the 10 mm flat washer (6) and the 10 mm locknut (5) on the bolt (3). Refer to Figure 4.
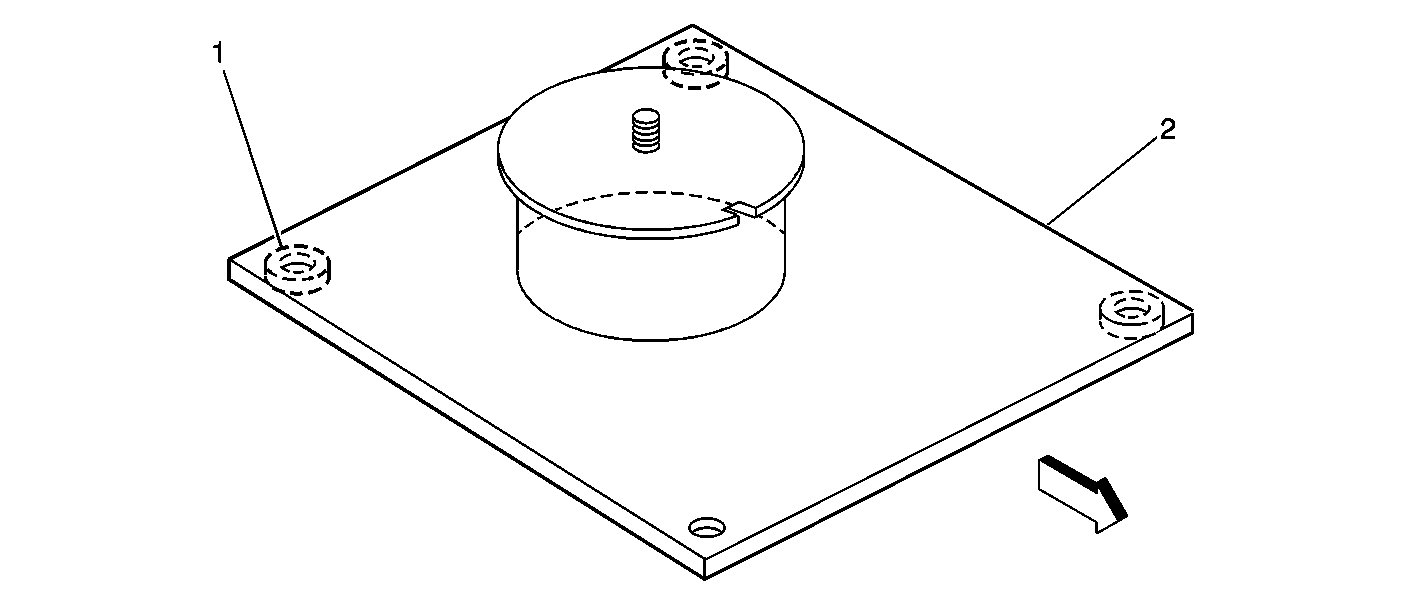
- On the bottom side of the lower pedestal (2), using a hacksaw or similar tool, cut off the rear inboard spacer (1) as shown in Figure 5. DO NOT cut off any other spacers.
- File or grind off any rough edges remaining on the lower pedestal.
- Assemble the seat assembly to the upper pedestal and install the washers and the nuts.
- Install the NEW seat belt buckle (8) on the rear inboard floor stud (7) in the vehicle. Refer to Figure 2.
- Install the three new washers supplied with the new buckle (9) on the top of the seat belt buckle anchor plate on the rear inboard floor stud.
- Install the seat assembly in the vehicle.
- Install the front two bolts with the washers and the rear two nuts.
- Verify the proper operation by inserting the seat belt latch plate into the NEW buckle. Pull on the seat belt webbing material to confirm that the latch plate is locked in the buckle. Release the latch plate from the buckle.
- Verify that the seat will NOT swivel from side to side.
- Using a sharp utility knife, cut the carpeting as necessary around the seat belt buckle to allow the carpeting to be reinstalled over the pedestal base.
- Apply 3M™ General Trim Adhesive (P/N 08081 or 08088) or the equivalent to the backside of the carpet. Reinstall the carpet over the pedestal base.
- Repeat the procedure on the other front seat.
- Install the Campaign Identification Label.
Figure 1
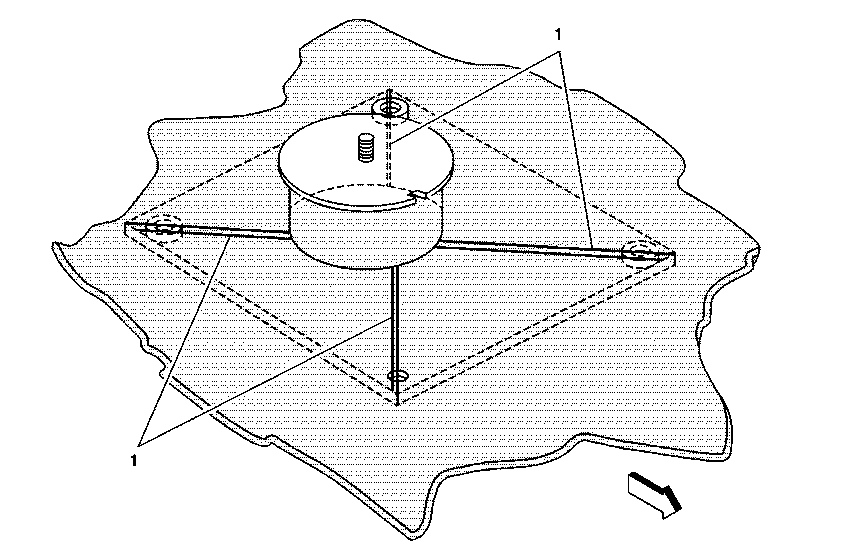
Figure 2 -- Driver's Seat Shown (Passenger Seat Opposite)
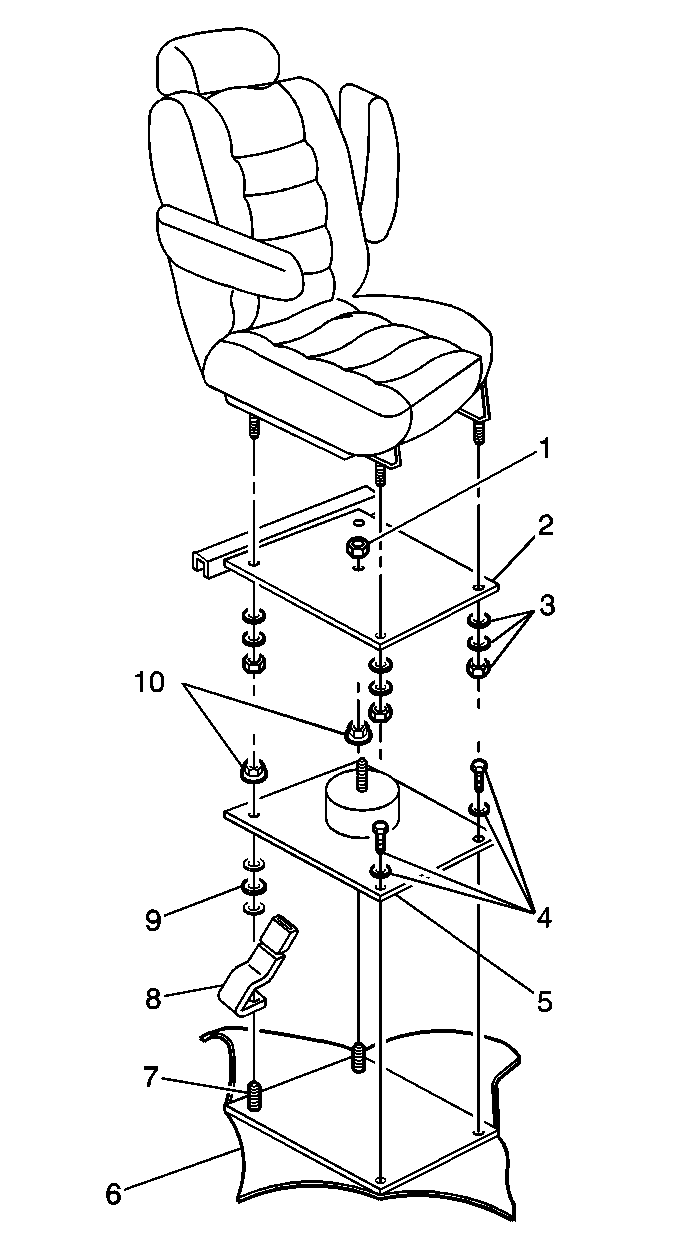
Figure 3 -- Driver's Seat Shown (Passenger Seat Opposite)
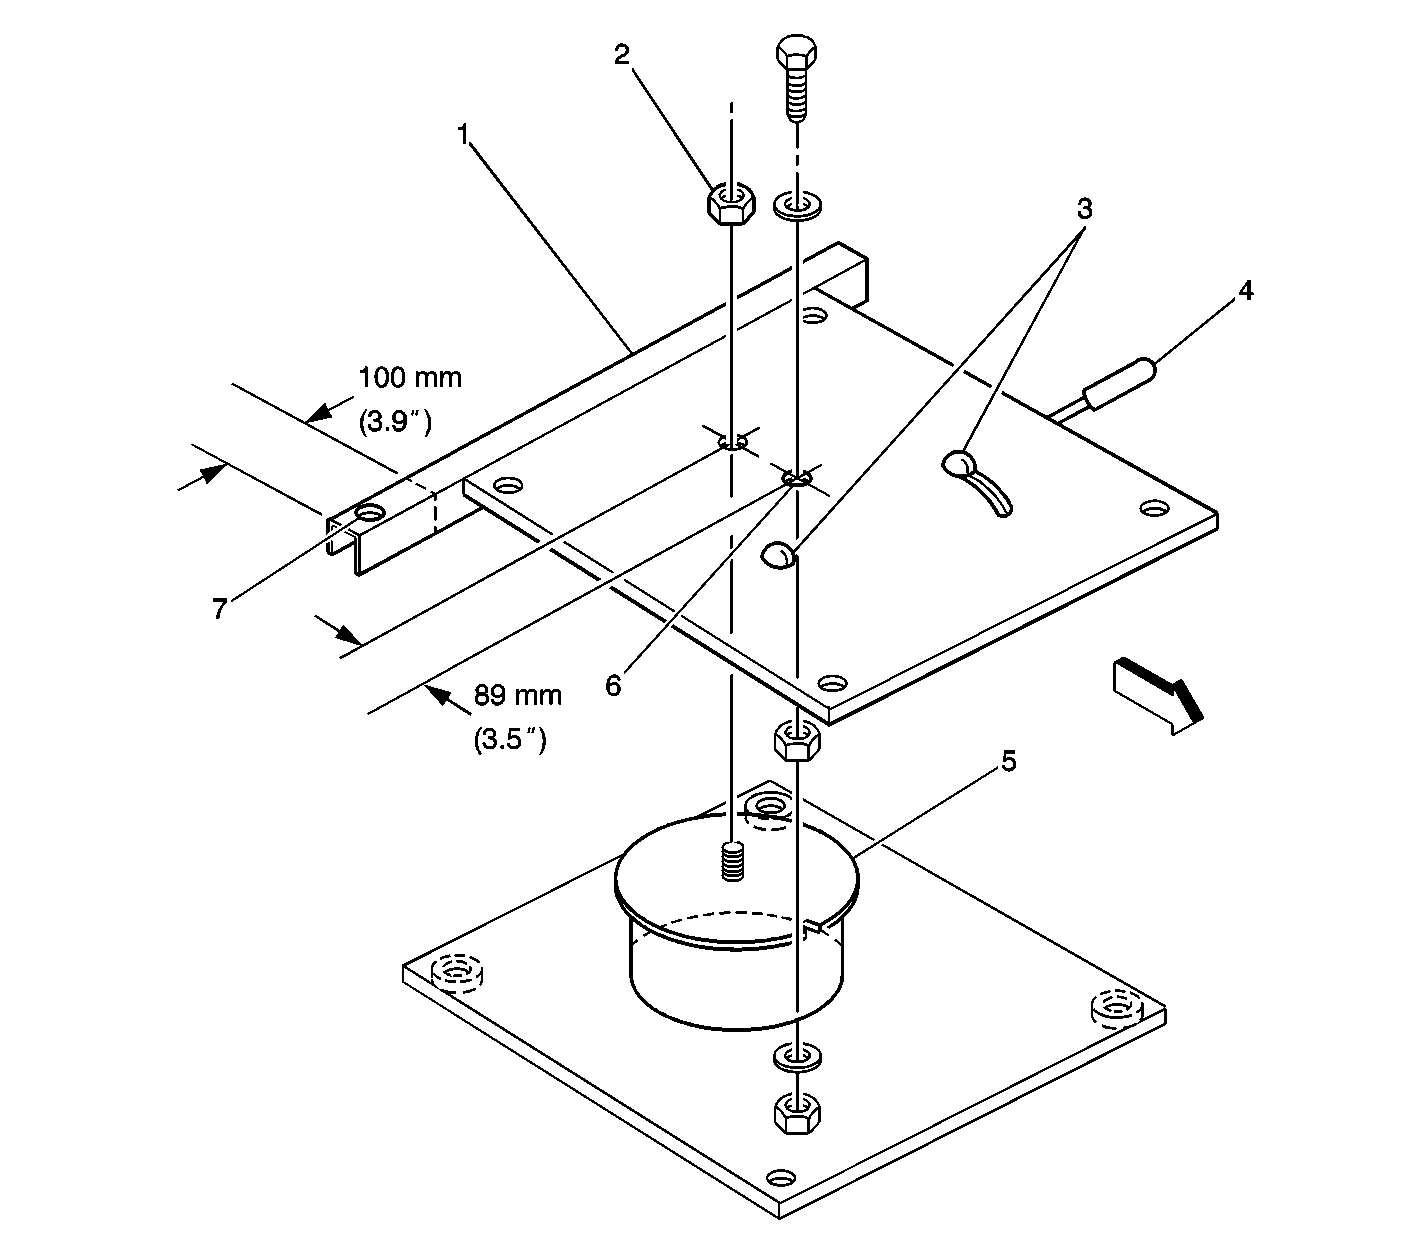
The marked location should be directly over the notch (5) in the lower pedestal. A hole will be drilled at this location later in this procedure.
Important: To disable the seat swivel, use the bolts, the washers and the nuts supplied with the kit. Refer to Figures 3 and 4.
Tighten
Tighten the nut to 34 N·m (25 lb ft).
Figure 4
Tighten
Tighten the nut to 34 N·m (25 lb ft).
Figure 5 -- Driver's Seat Shown (Passenger's Seat Opposite)
Tighten
Tighten the nuts to 25 N·m (19 lb ft).
Tighten
Tighten the nuts to 34 N·m (25 lb ft).
Important: When installed properly, the new seat belt buckle and the washers will be positioned between the floor and the lower pedestal on the rear inboard stud. The washers must be positioned between the seat belt buckle and the lower pedestal.
Campaign Identification Label
Each vehicle corrected in accordance with the instructions outlined in this Product Campaign Bulletin will require a "Campaign Identification Label". Each label provides a space to include the campaign number and the five (5) digit dealer code of the dealer performing the campaign service. This information may be inserted with a typewriter or a ball point pen.
Each "Campaign Identification Label" is to be located on the radiator core support in an area which will be visible when the vehicle is brought in by the customer for periodic servicing. When installing the Campaign Identification Label, be sure to pull the tab to allow the adhesion of the clear protective covering.
Apply the "Campaign Identification Label" only on a clean, dry surface.
Claim Information
Important: General Motors Corporation has agreed to allow the use of their Claims System for dealer payment.
Submit a claim with the information indicated below:
Repair Performed | Part Count | Part No. | Parts Allow | CC-FC | Labor Op | Labor Hours* | Net Item** |
|---|---|---|---|---|---|---|---|
Relocate Both Front Seat Belt Buckles & Disable Seat Swivel | 0 | NA | NA | MA-96 | V0457 | 1.7 | $1.00 |
* -- For Campaign Administrative Allowance, add 0.1 hours to the "Labor Hours". ** -- The amount identified in the "Net Item" column represents the sum total of the trim adhesive needed to perform the required repair. | |||||||
Dear Chevrolet/GMC Conversion Van Customer:
This notice is sent to you in accordance with the requirements of the National Traffic and Motor Vehicle Safety Act.
Reason For This Recall
Pan-Witt Inc., d/b/a The Van House has decided that all 1986-1991 Chevrolet and GMC M/L conversion vans converted by The Van House fail to conform to Federal Motor Vehicle Safety Standard (FMVSS) 208, "Occupant Crash Protection." These vehicles exhibit a condition in which the front seat belt buckles were installed on a seat bar attached to the seat pedestal, raising the buckle location approximately five inches. This placement resulted in the junction between the lap and shoulder belt (when buckled) being closer to the occupant centerline than permitted by FMVSS 208. This could increase the occupant's risk of injury in the event of a vehicle crash.
What Will Be Done
To correct this non-compliance, your dealer will relocate the anchorage of front seat belt buckles and disable the front seat swivel feature permanently. This service will be performed for you at no charge . General Motors has voluntarily agreed to administer this campaign through its GMC and Chevrolet dealers.
How Long Will The Repair Take?
The length of time required to perform this service correction is approximately one hour and 45 minutes. Additional time may be required to schedule and process your vehicle. If you dealer has a large number of vehicles awaiting service, this additional time may be significant. Please ask your dealer if you wish to know how much additional time will be needed schedule, process, and repair your vehicle.
Contacting Your Dealer
General Motors has agreed to allow The Van House to use their dealers to perform this procedure. Please contact your Chevrolet/GMC dealer as soon as possible to arrange a service date. Parts are available and instructions for making this correction have been sent to your dealer.
Your Chevrolet/GMC dealer will obtain parts from The Van House and General Motors' dealers have been requested to provide services to correct your vehicle as promptly as possible. Should your dealer be unable to schedule a service date within a reasonable time, you should contact The Van House Customer Assistance Center at 1-888-948-6310.
If, after contacting The Van House Customer Assistance Center, you are still not satisfied that we have done our best to remedy this condition without charge and within a reasonable time, you may wish to write the Administrator, National Highway Traffic Safety Administration, 400 Seventh Street SW, Washington, D.C. 20590 or call 1-800-424-9393 (Washington, D.C. residents use 202-366-0123).
Customer Reply Card
The enclosed customer reply card identifies your vehicle. Presentation of this card to your dealer will assist in making the necessary correction in the shortest possible time. If you no longer own this vehicle, please let us know by completing the attached and mailing it in the postage paid envelope.
We are sorry to cause you this inconvenience; however, we have taken this action in the interest of your safety and continued satisfaction with our products.
The Van House
Enclosure
