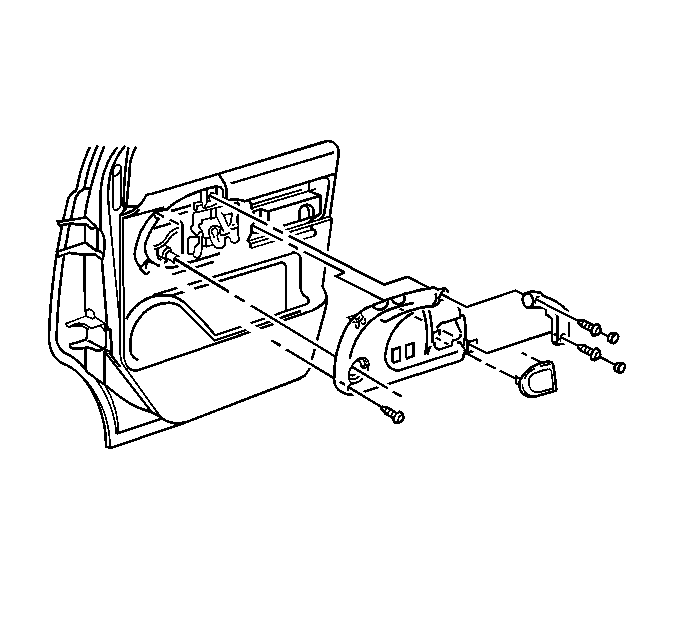
For 1990-2009 cars only
Removal Procedure
- Remove the armrest screws and the armrest YC5.
- Remove the window handle, if equipped.
- Pull out on the escutcheon in order to remove the lock lever escutcheon. Start with the front edge of the escutcheon.
- Remove the upper corner trim using the following method:
- Remove the caps that cover the screws for the assist handle.
- Remove the screws that retain the assist handle to the door.
- Remove the screw at the front edge of the accessory switch mount plate.
- Remove the plate from the trim panel.
- Disconnect the electrical connectors from the switches on the plate, as needed.

| 4.1. | Pull the upper corner trim at the top edge. |
| 4.2. | Pivot the upper corner trim down in order to clear the tab at the trim panel, YC6 and YC7. |
Installation Procedure
- Connect the electrical connectors to the switches on the accessory switch mounting plate, as needed.
- Install the plate to the trim panel.
- Install the screw at the front edge of the accessory switch mount plate.
- Install the assist handle and screws to the door.
- Install the caps that cover the screws on the assist handle.
- Insert the tab in the slot on the door trim panel.
- Snap the lock lever escutcheon into place in order to install the lock lever escutcheon. Start at the rear edge of the escutcheon.
- Install the window handle, if equipped.
- Install the armrest and armrest screws, YC5.

Notice: Refer to Fastener Notice in the Preface section.
Tighten
Tighten the screws at the front edge of the accessory switch mount plate
to 5 N·m (44 lb in).
Tighten
Tighten the assist handle screws to 5 N·m (44 lb in).
Seat the fastener into the door at the top, YC6 and YC7 in order to install the upper corner trim.
Tighten
Tighten the armrest screws to 5 N·m (44 lb in).
