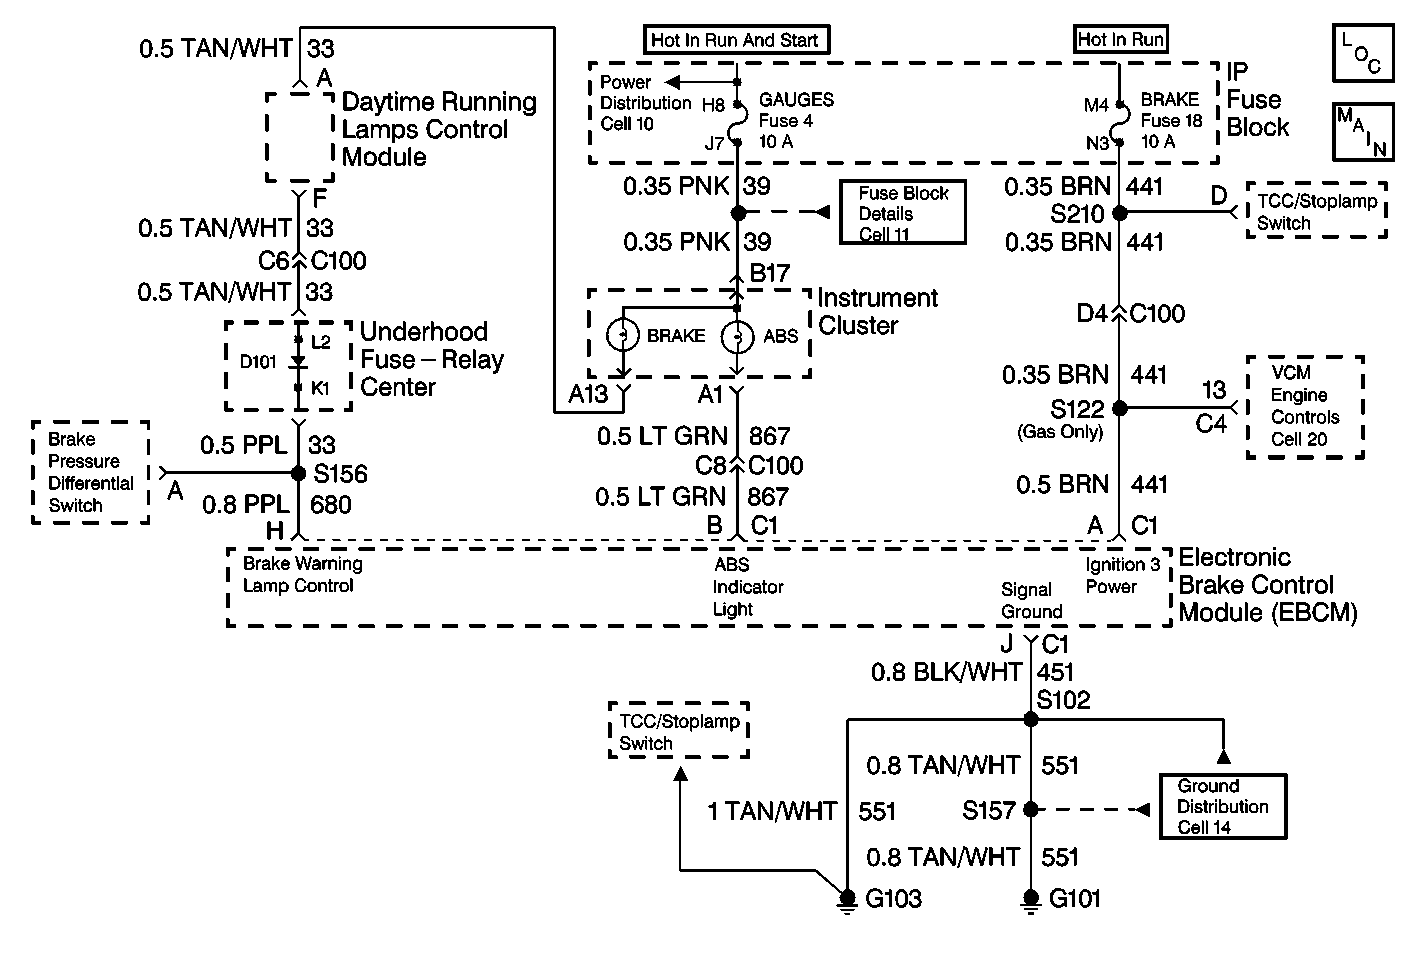
ABS Indicator Always On Domestic

Circuit Description
The EBCM controls the ANTILOCK indicator lamp illumination by supplying a ground to terminal B. When the vehicle is started or the ignition is turned to the RUN position, the ANTILOCK indicator should illuminate for three seconds and turn off.
Diagnostic Aids
If the ANTILOCK indicator lamp is on always with no DTCs set (never turns off after three seconds with the vehicle started or with the ignition switch in the RUN position), there is a short to ground in CKT 867 between the instrument cluster and the EBCM or the EBCM is internally shorted to ground.
Test Description
The numbers below refer to the steps in the diagnostic table:
Step | Action | Value(s) | Yes | No |
|---|---|---|---|---|
1 | Was the Diagnostic System Check performed? | -- | Go to Step 2 | |
Does the ABS indicator lamp turn on? | -- | Go to Step 3 | Go to Step 4 | |
3 | Repair the short to ground in CKT 867. Refer to Wiring Repairs . Is the repair complete? | -- | -- | |
4 |
Is the ABS indicator lamp on constantly? | -- | Go to Step 5 | Go to Diagnostic Aids |
5 | Replace the EBCM. Refer to Electronic Brake Control Module Replacement . Is the repair complete? | -- | -- |
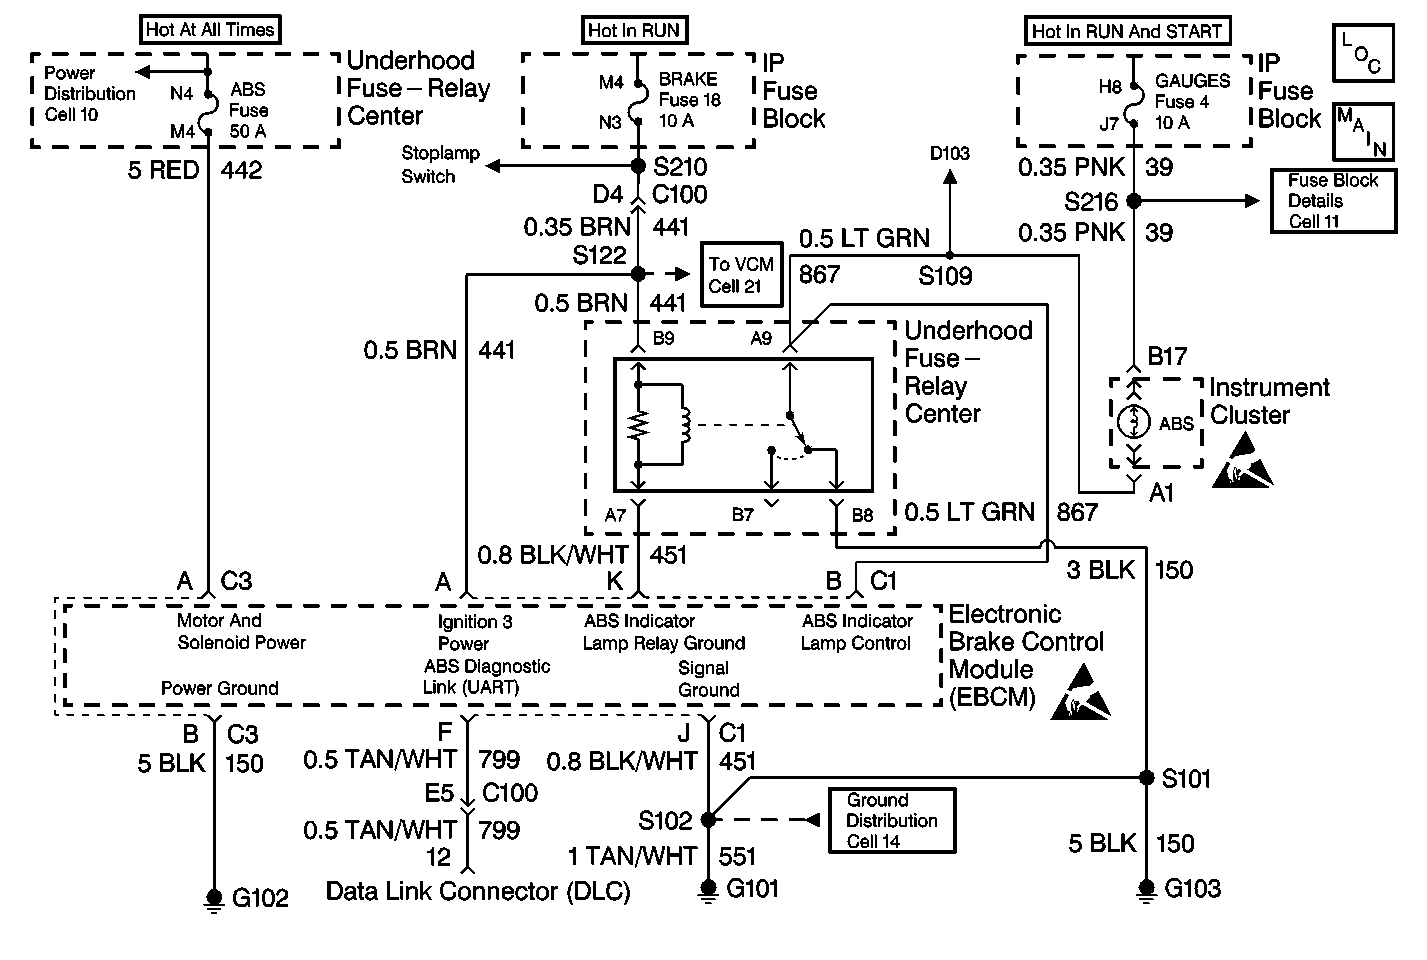
ABS Indicator Always On Export

Circuit Description
The EBCM controls the ANTILOCK indicator lamp illumination by supplying a ground to terminal B. When the vehicle is started or the ignition is turned to the RUN position, the ANTILOCK indicator should illuminate for three seconds and turn off. A ground will also be supplied to the ABS indicator lamp through contacts A9 and B8 of the electronic brake control lamp relay if the 10-way EBCM connector is unseated or disconnected.
Diagnostic Aids
If the ANTILOCK indicator lamp is on always with no DTCs set (never turns off after three seconds with the vehicle started or with the ignition switch in the RUN position), check for the proper connection of the 10-way EBCM harness connector. Check for a failed electronic brake control lamp relay. If no problems are found, then there could be a short to ground in CKT 867 between the instrument cluster and the EBCM, or an open in the power or ground circuits to the electronic brake control lamp relay, or the EBCM is internally shorted to ground on C1 terminal B, or open internally on C1 terminal K.
Test Description
The numbers below refer to the steps in the diagnostic table:
-
This step removes the ABS safeguard indicator circuitry from consideration as the cause of the fault.
-
This step checks the ground circuit from the EBCM to the electronic brake control lamp relay.
-
This step decides between a faulty ground in the EBCM terminal K or CKT 451.
-
This step decides between a faulty electronic brake control lamp relay, or an open in CKT 441.
Step | Action | Value(s) | Yes | No |
|---|---|---|---|---|
1 | Was the Diagnostic System Check performed? | -- | Go to Step 2 | |
2 | Make sure that the 10-way EBCM harness connector is securely connected and free of damage. Is the 10-way EBCM harness connector securely connected and free of damage? | -- | Go to Step 3 | Go to Step 12 |
Remove the antilock brake indicator relay. Does the ABS indicator lamp remain on? | -- | Go to Step 7 | Go to Step 4 | |
Using a J 39200 , test for continuity between terminal A7 in the antilock brake indicator relay socket and chassis ground. Is the resistance measured within the range specified? | 0-2ohms | Go to Step 6 | Go to Step 5 | |
Is the resistance within the range specified? | 0-2ohms | Go to Step 11 | Go to Step 10 | |
Using a J 39200 , test for voltage between terminal B9 in the antilock brake indicator relay socket and chassis ground. Is the voltage measured within the range specified? | Greater than 10V | Go to Step 9 | Go to Step 8 | |
7 |
Is the ABS indicator lamp on constantly? | -- | Go to Step 11 | Go to Diagnostic Aids |
8 | Repair the open in CKT 441. Refer to Wiring Repairs . Is the repair complete? | -- | -- | |
9 | Replace the antilock brake indicator relay. Is the repair complete? | -- | -- | |
10 | Repair the open in CKT 451. Refer to Wiring Repairs . Is the repair complete? | -- | -- | |
11 | Replace the EBCM. Refer to Electronic Brake Control Module Replacement . Is the repair complete? | -- | -- | |
12 | Repair any damage to the 10-way EBCM harness connector and securely connect the connector. Refer to Connector Repairs . Is the repair complete? | -- | -- |
