ABS Indicator Inoperative Domestic

Circuit Description
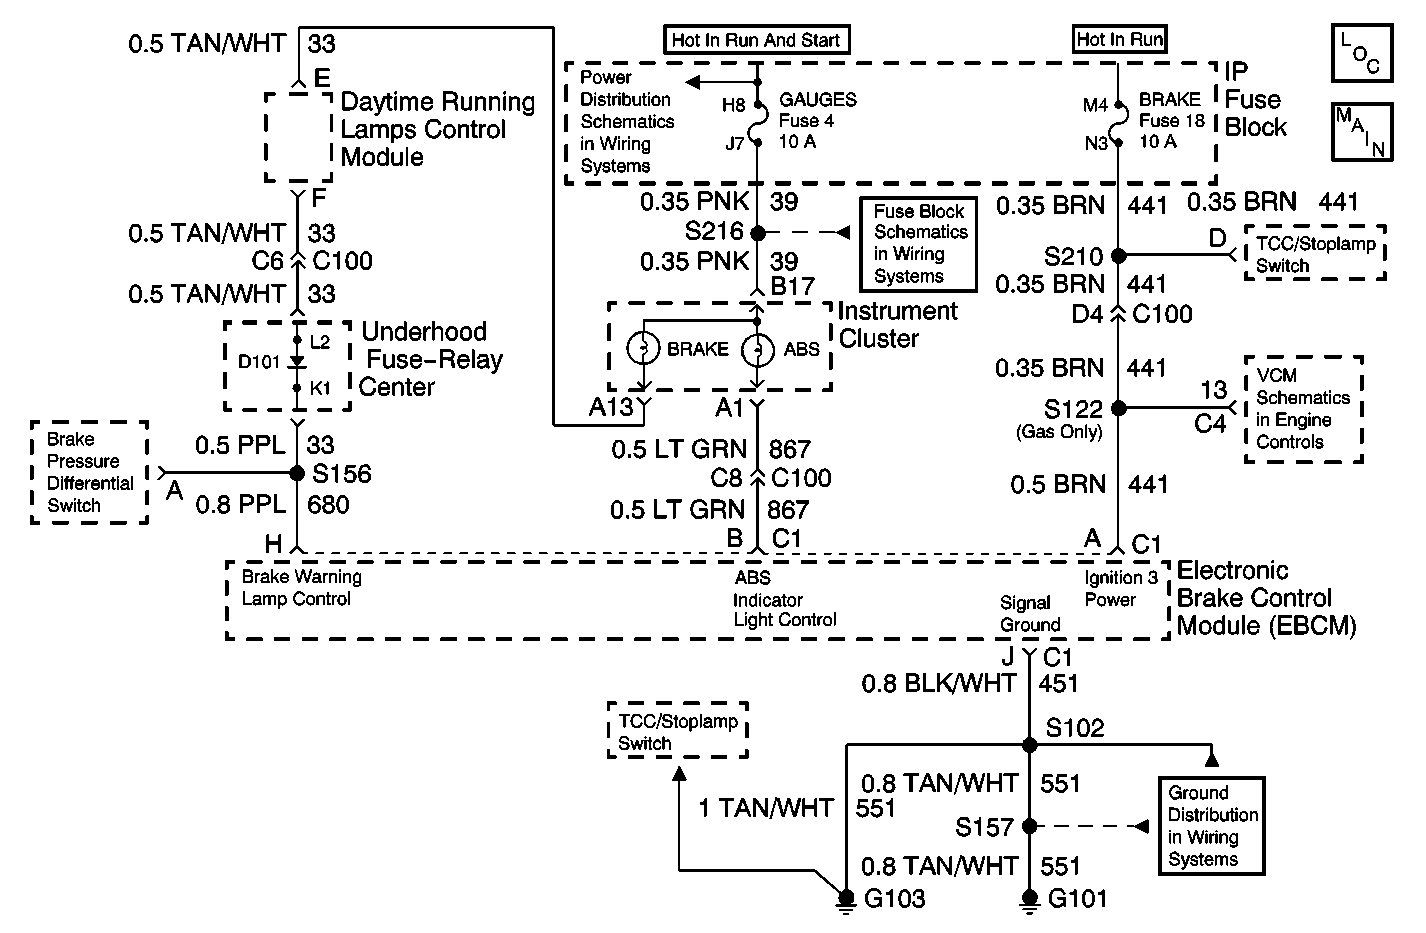
The EBCM controls the ABS indicator lamp illumination by supplying a ground to the EBCM 10-way terminal B. When the vehicle is started or the ignition is turned to the RUN position, the ABS indicator should illuminate for three seconds and turn off.
Diagnostic Aids
If the ABS indicator lamp is off constantly with no DTCs set, an open circuit is present between the instrument panel cluster and the EBCM, the GAUGES fuse is open or an open is present between the Fuse Block and the Instrument Panel Cluster.
Test Description
The numbers below refer to the steps in the diagnostic table:
-
This step manually (with fused jumper) turns on the ABS indicator lamp.
-
This step checks for a short to ground in CKT 39.
-
This step checks for an open in CKT 867.
-
This step checks for ignition voltage at the instrument cluster.
Step | Action | Value(s) | Yes | No |
|---|---|---|---|---|
1 | Was the Diagnostic System Check performed? | -- | Go to Step 2 | Go to Diagnostic System Check |
Does the ABS indicator lamp turn on? | -- | Go to Step 9 | Go to Step 3 | |
3 | Inspect the J 36169-A Fused Jumper Wire fuse. Is the fuse open? | -- | Go to Step 11 | Go to Step 4 |
4 | Inspect the GAUGES Fuse. Is the fuse open? | -- | Go to Step 5 | Go to Step 6 |
Is the GAUGES Fuse open? | -- | Go to Step 15 | Go to Step 6 | |
6 | Remove and inspect the ABS indicator lamp. Refer to Instrument Cluster. Is the ABS indicator lamp open? | -- | Go to Step 12 | Go to Step 7 |
Is the resistance measurement within the specified range? | 0-2 ohms | Go to Step 8 | Go to Step 13 | |
Is the voltage measurement equal to or greater than the specified value? | 10 V | Go to Instrument Cluster Diagnosis | Go to Step 14 | |
9 |
Is the ABS indicator lamp off constantly? | -- | Go to Step 10 | Go to Diagnostic Aids |
10 | Replace the EBCM. Refer to Electronic Brake Control Module Replacement . Is the repair complete? | -- | Go to Diagnostic System Check | -- |
11 | Repair the short to voltage in CKT 867. Refer to Wiring Repairs in Wiring Systems. Is the repair complete? | -- | Go to Diagnostic System Check | -- |
12 | Replace the ABS indicator lamp. Is the repair complete? | -- | Go to Diagnostic System Check | -- |
13 | Repair the open or the high resistance in CKT 867. Refer to Wiring Repairs in Wiring Systems. Is the repair complete? | -- | Go to Diagnostic System Check | -- |
14 | Repair the open in CKT 39. Refer to Wiring Repairs in Wiring Systems. Is the repair complete? | -- | Go to Diagnostic System Check | -- |
15 | Repair the short to ground in CKT 39. Refer to Wiring Repairs in Wiring Systems. Is the repair complete? | -- | Go to Diagnostic System Check | -- |
ABS Indicator Inoperative Export

Circuit Description
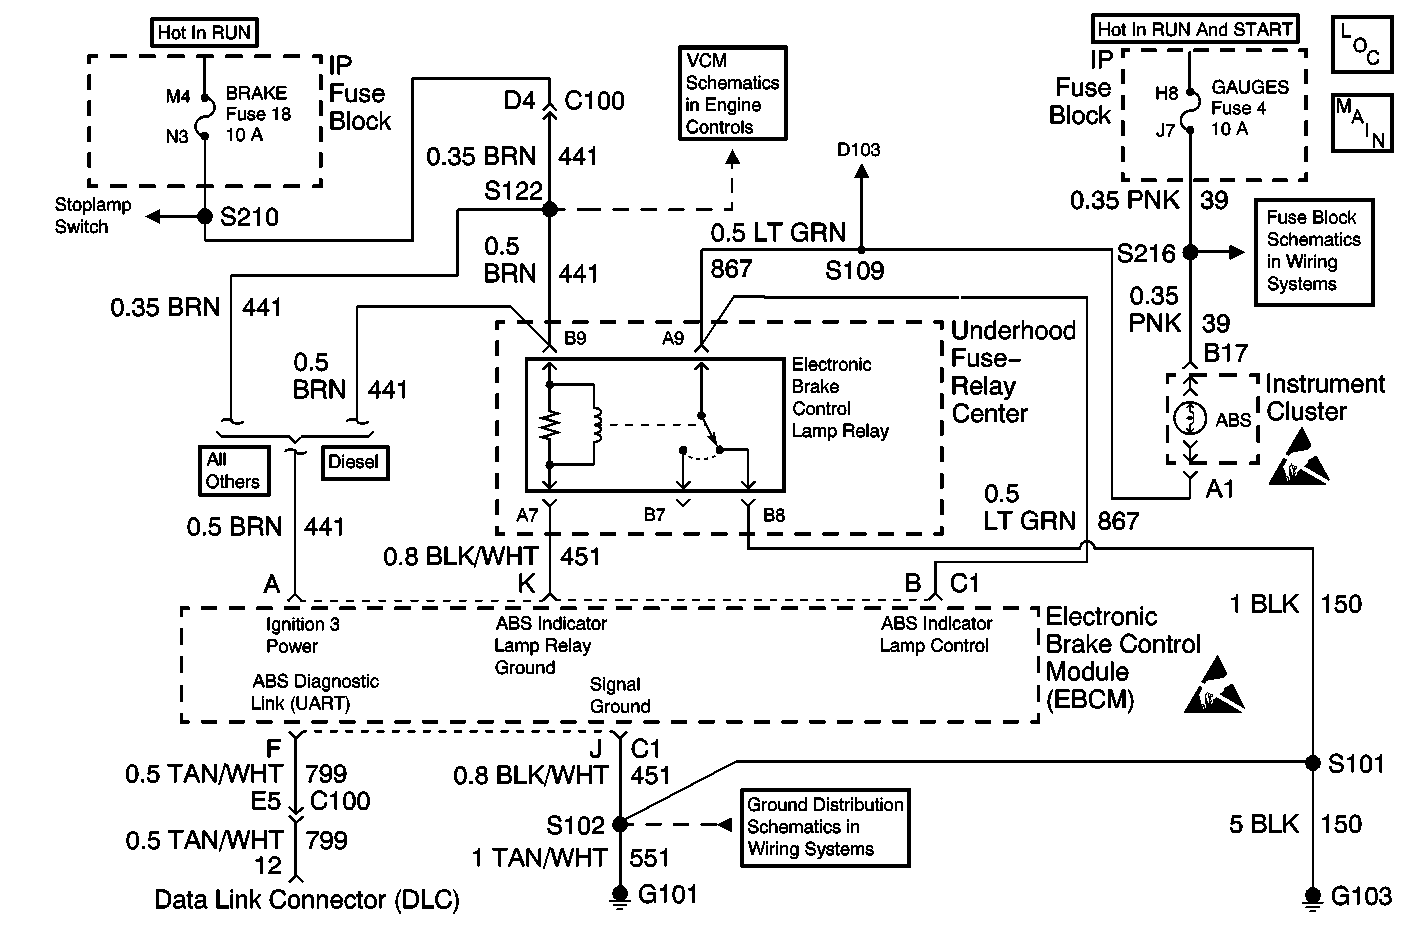
The EBCM controls the ABS indicator lamp illumination by supplying a ground to the EBCM 10-way terminal B. When the vehicle is started or the ignition is turned to the RUN position, the ABS indicator should illuminate for two seconds and then turn off. The EBCM controls the ABS indicator lamp in three modes of operation. Under normal conditions with the ignition switch set to the RUN position, 12 volts is supplied from connector C1, terminal B of the EBCM and the ABS indicator lamp is off. If conditions in the EBCM warrant turning the ABS indicator lamp on, ground is supplied from connector C1, terminal B of the EBCM to turn the lamp on. This would normally occur during the ABS bulb check, when the ignition is turned to the RUN position and the ABS indicator lamp flashes for 3 seconds. Otherwise, this condition would occur when a DTC which requires turning the ABS bulb on has set. If conditions warrant, and the EBCM or the brake pressure warning switch turns the BRAKE warning lamp on, the ABS indicator lamp will also be turned on through diode D103. If the EBCM 10-way connector is removed while the ignition is set to RUN, a ground normally supplied from the EBCM through connector C1, terminal K is removed from the antilock brake indicator relay, and the relay de-energizes. This causes relay contacts A9 and B8 to close, which switches a constant ground to the ABS indicator lamp circuit.
Diagnostic Aids
If the ABS indicator lamp is off constantly with no DTCs set, an open circuit is present between the instrument panel cluster and the EBCM, the GAUGES fuse is open or an open is present between the fuse block and the instrument panel cluster.
Test Description
The numbers below refer to the steps in the diagnostic table:
-
This step manually (with fused jumper) turns on the ABS indicator lamp.
-
This step checks for a short to ground in CKT 39.
-
This step checks for an open in CKT 867.
-
This step checks for ignition voltage at the instrument cluster.
Step | Action | Value(s) | Yes | No |
|---|---|---|---|---|
1 | Was the Diagnostic System Check performed? | -- | Go to Step 2 | Go to Diagnostic System Check |
Does the ABS indicator lamp turn on? | -- | Go to Step 9 | Go to Step 3 | |
3 | Inspect the J 36169-A Fused Jumper Wire fuse. Is the fuse open? | -- | Go to Step 11 | Go to Step 4 |
4 | Inspect the GAUGES Fuse. Is the fuse open? | -- | Go to Step 5 | Go to Step 6 |
Is the GAUGES Fuse open? | -- | Go to Step 15 | Go to Step 6 | |
6 | Remove and inspect the ABS indicator lamp. Refer to Instrument Cluster. Is the ABS indicator lamp open? | -- | Go to Step 12 | Go to Step 7 |
Is the resistance measurement within the specified range? | 0-2 ohms | Go to Step 8 | Go to Step 13 | |
Is the voltage measurement equal to or greater than the specified value? | 10 V | Go to Instrument Cluster Diagnosis | Go to Step 14 | |
9 |
Is the ABS indicator lamp off constantly? | -- | Go to Step 10 | Go to Diagnostic Aids |
10 | Replace the EBCM. Refer to Electronic Brake Control Module Replacement . Is the repair complete? | -- | Go to Diagnostic System Check | -- |
11 | Repair the short to voltage in CKT 867. Refer to Wiring Repairs in Wiring Systems. Is the repair complete? | -- | Go to Diagnostic System Check | -- |
12 | Replace the ABS indicator lamp. Is the repair complete? | -- | Go to Diagnostic System Check | -- |
13 | Repair the open or the high resistance in CKT 867. Refer to Wiring Repairs in Wiring Systems. Is the repair complete? | -- | Go to Diagnostic System Check | -- |
14 | Repair the open in CKT 39. Refer to Wiring Repairs in Wiring Systems. Is the repair complete? | -- | Go to Diagnostic System Check | -- |
15 | Repair the short to ground in CKT 39. Refer to Wiring Repairs in Wiring Systems. Is the repair complete? | -- | Go to Diagnostic System Check | -- |
