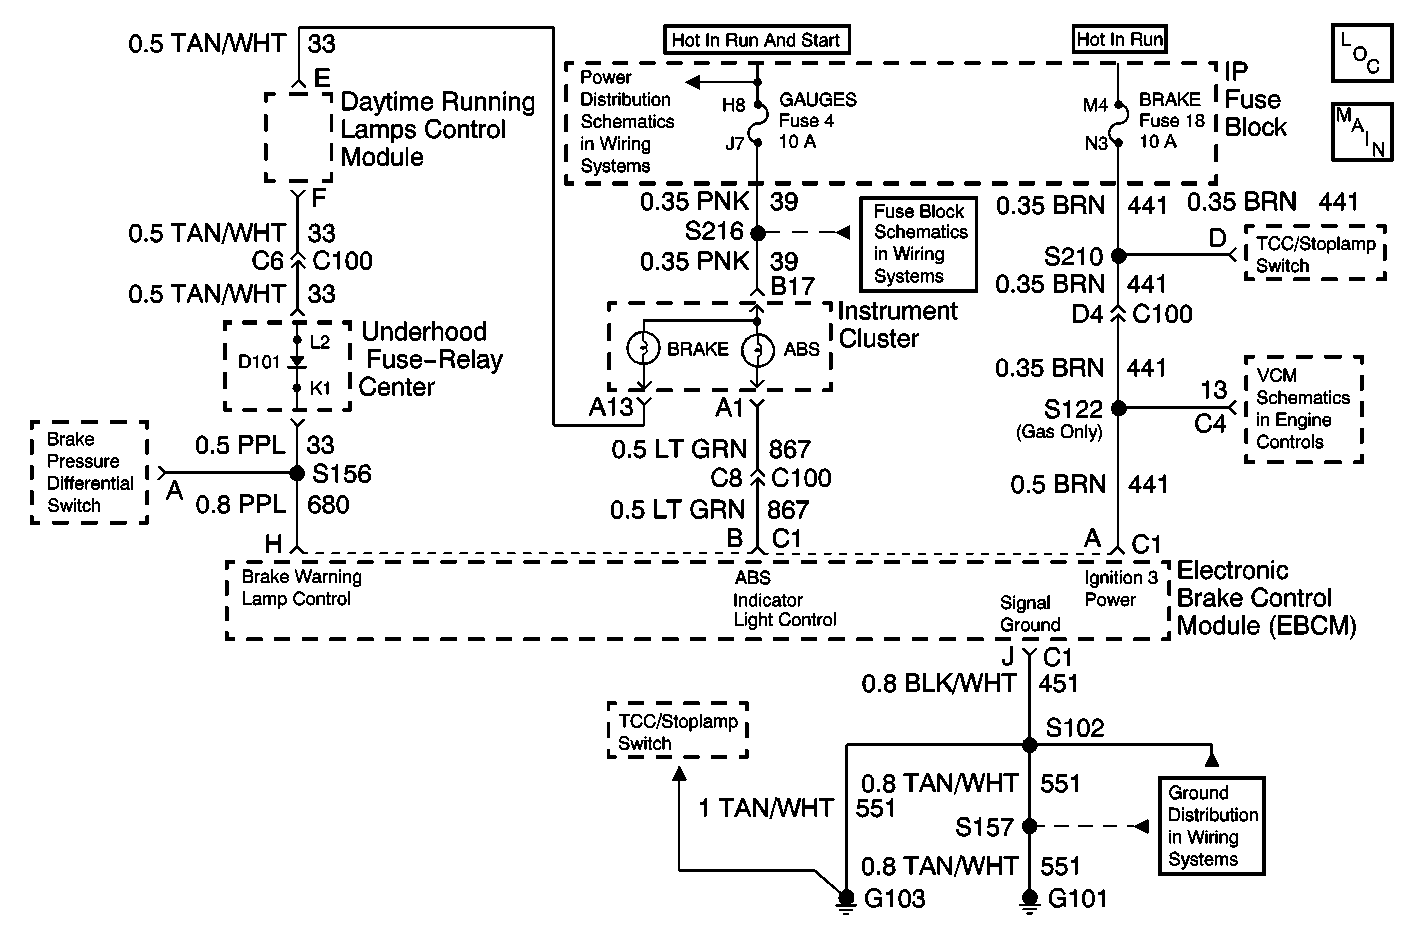
ABS Indicator Always On Domestic

Circuit Description
The EBCM controls the ANTILOCK indicator lamp illumination by supplying a ground to terminal B. When the vehicle is started or the ignition is turned to the RUN position, the ANTILOCK indicator should illuminate for three seconds and turn off.
Diagnostic Aids
If the ANTILOCK indicator lamp is on always with no DTCs set (never turns off after three seconds with the vehicle started or with the ignition switch in the RUN position), there is a short to ground in CKT 867 between the instrument cluster and the EBCM or the EBCM is internally shorted to ground.
Test Description
The numbers below refer to the steps in the diagnostic table:
Step | Action | Value(s) | Yes | No |
|---|---|---|---|---|
1 | Was the Diagnostic System Check performed? | -- | Go to Step 2 | Go to Diagnostic System Check |
Does the ABS indicator lamp turn on? | -- | Go to Step 3 | Go to Step 4 | |
3 | Repair the short to ground in CKT 867. Refer to Wiring Repairs in Wiring Systems. Is the repair complete? | -- | Go to Diagnostic System Check | -- |
4 |
Is the ABS indicator lamp on constantly? | -- | Go to Step 5 | Go to Diagnostic Aids |
5 | Replace the EBCM. Refer to Electronic Brake Control Module Replacement . Is the repair complete? | -- | Go to Diagnostic System Check | -- |
ABS Indicator Always On Export
Circuit Description
The EBCM illuminates the ABS indicator by applying ground to the ABS indicator failure control circuit. Ground may also be applied to the ABS indicator failure control circuit by the electronic brake control lamp relay. This occurs if the ground circuit between the EBCM and the electronic brake control lamp relay becomes open.
Diagnostic Aids
Thoroughly inspect connections or circuitry that may cause an intermittent malfunction. Refer to Testing for Intermittent Conditions and Poor Connections , Wiring Repairs and Connector Repairs in Wiring Systems.
Test Description
The numbers below refer to the step numbers on the diagnostic table.
-
This step tests for a poor connection to the EBCM or a faulty EBCM.
-
This step tests if the electronic brake control lamp relay is applying ground to the ABS indicator failure control circuit.
Step | Action | Yes | No |
|---|---|---|---|
Schematic Reference: Antilock Brake System Schematics | |||
1 | Did you perform the ABS Diagnostic System Check? | Go to Step 2 | Go to Diagnostic System Check |
2 |
Does the ABS indicator illuminate for 2 seconds and then turn off? | Go to Diagnostic Aids | Go to Step 3 |
3 | Does the BRAKE indicator remain illuminated also? | Go to Brake Warning Indicator Always On in Hydraulic Brakes | Go to Step 4 |
Does the ABS indicator illuminate? | Go to Step 5 | Go to Step 10 | |
Does the ABS indicator illuminate for 2 seconds and then turn off? | Go to Step 6 | Go to Step 7 | |
6 | Test the ground circuit for the electronic brake control lamp relay and the ignition 3 voltage circuit for an open. Refer to Circuit Testing and Wiring Repairs in Wiring Systems. Did you find and correct the condition? | Go to Step 14 | Go to Step 8 |
7 | Test the ABS indicator failure control circuit for a short to ground. Refer to Circuit Testing and Wiring Repairs in Wiring Systems. Did you find and correct the condition? | Go to Step 14 | Go to Step 12 |
8 | Inspect for poor connections at the harness connector of the electronic brake control lamp relay. Refer to Testing for Intermittent Conditions and Poor Connections and Connector Repairs in Wiring Systems. Did you find and correct the condition? | Go to Step 14 | Go to Step 9 |
9 | Replace the electronic brake control lamp relay. Did you complete the replacement? | Go to Step 14 | -- |
10 | Inspect for poor connections at the harness connector of the EBCM. Refer to Testing for Intermittent Conditions and Poor Connections and Connector Repairs in Wiring Systems. Did you find and correct the condition? | Go to Step 14 | Go to Step 11 |
11 | Replace the EBCM. Refer to Electronic Brake Control Module Replacement . Important: Perform the Tire Size Calibration procedure. Did you complete the replacement? | Go to Step 14 | -- |
12 | Inspect for poor connections at the harness connector of the instrument panel cluster. Refer to Testing for Intermittent Conditions and Poor Connections and Connector Repairs in Wiring Systems. Did you find and correct the condition? | Go to Step 14 | Go to Step 13 |
13 | Replace the instrument panel cluster. Refer to Instrument Cluster Replacement in Instrument Panel, Gauges, and Console. Did you complete the replacement? | Go to Step 14 | -- |
14 |
Does the ABS indicator illuminate for 2 seconds and then turn off? | System OK | Go to Step 3 |
