Frame Straightening
Frame straightening can be complicated and can require special equipment. Only trained personnel can straighten frames.
Analyze the condition of the frame before attempting to straighten the frame. Analyze the cause of the failure. This will determine the correct sequence of steps in the repair. Use corrective procedures in order to reverse the flow of the damaging forces. Apply pressure from different directions at the same time in order to reverse the flow of forces.
Avoid the following uses of heat:
| • | Too much |
| • | Too little |
| • | The improper application |
Use a large size multi-hole heating tip and a neutral flame in order to heat the frame. Heat the area of the frame you want to stretch. In a neutral flame, the oxygen adjust opens just enough in order to remove the feathers or the stringers from the blue center at the tip of the torch. Heat the area after you exert sufficient pressure in order to cause a slight checking, or silvery cracks to appear on the surface of the metal. Gradually increase the pressure while heating. Do not heat the frame beyond 606°C (1200°F). A red glow indicates that the material is overheated. Overheating will cause distortion and stretching, as well as a change in the characteristics of the metal.
Repairing Cracks

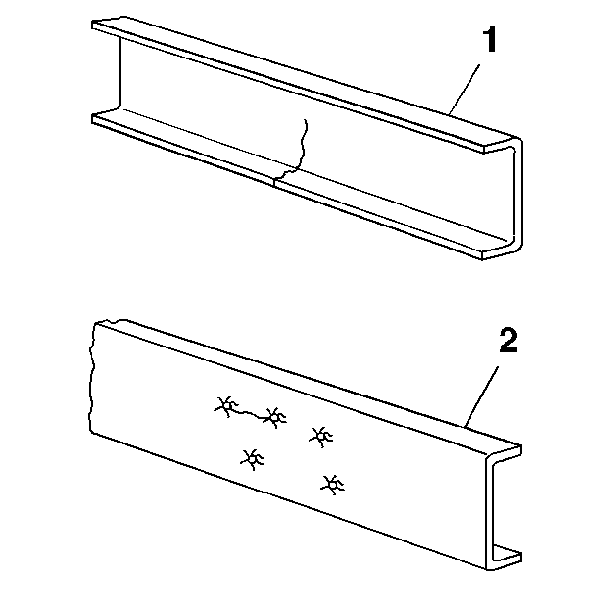
There are 2 common types of cracks:
| • | Straight cracks |
| • | Sunburst cracks |
The straight crack (1) will normally start from the edge of a flange. The crack will travel across the flange and through a web section of rail. The crack will continue through the other flange. This type of crack may result from the following conditions:
| • | A high concentration of stress in the small areas of the frame |
| • | Excessive bending movement |
| • | Torsional loading |
Sunburst cracks (2) radiate from a hole in the web section of a rail or a crossmember. Sunburst cracks are caused by high loads applied at a mounting bracket or a crossmember which is not securely or properly attached to the rail.
If cracks occur to both the rail and the reinforcement at a particular area of the frame, repair the rail and the reinforcement separately. The flanges need to react independently in order to prevent localized stress concentration. Use a copper spacer between the flanges of the cracked base rail flanges and the reinforcement flanges.
Repair the crossmember mounting flange cracks in the same manner as the side rail cracks. Build up the weld bead in order to provide a smooth radius. If a crossmember is badly damaged, replace the crossmember.
Align the frame and level the rails before repairing the frame, when necessary, using the following procedure:
- Remove any equipment that will interfere with access to the crack.
- Locate the extreme end of the crack and drill a 6 mm (0.25 in) hole.
- "V" grind the entire length of the crack from the starting point to the 6 mm (0.25 in) hole at the extreme end.
- Use a hacksaw blade in order to open the bottom of the crack 2 mm (0.0625 in) in order to allow good penetration of the weld.
- Weld with the proper electrode. Use the proper welding techniques.
- Grind the weld smooth on both the inside and the outside of the rail or the crossmember. Eliminate weld build up or notches on the edge of the flange.
