Special Tools
| • | J 36857 Engine Lift Bracket |
| • | J 43178 Fuel Line Disconnect Tool |
| • | J 44581 Fuel Line Disconnect Tool |
Removal Procedure
- Remove the engine cover. Refer to Engine Cover Replacement .
- Remove the cooling layer. Refer to Cooling Layer Removal .
- Remove the cooling fan. Refer to Fan Replacement .
- Remove the drive belt. Refer to Drive Belt Replacement .
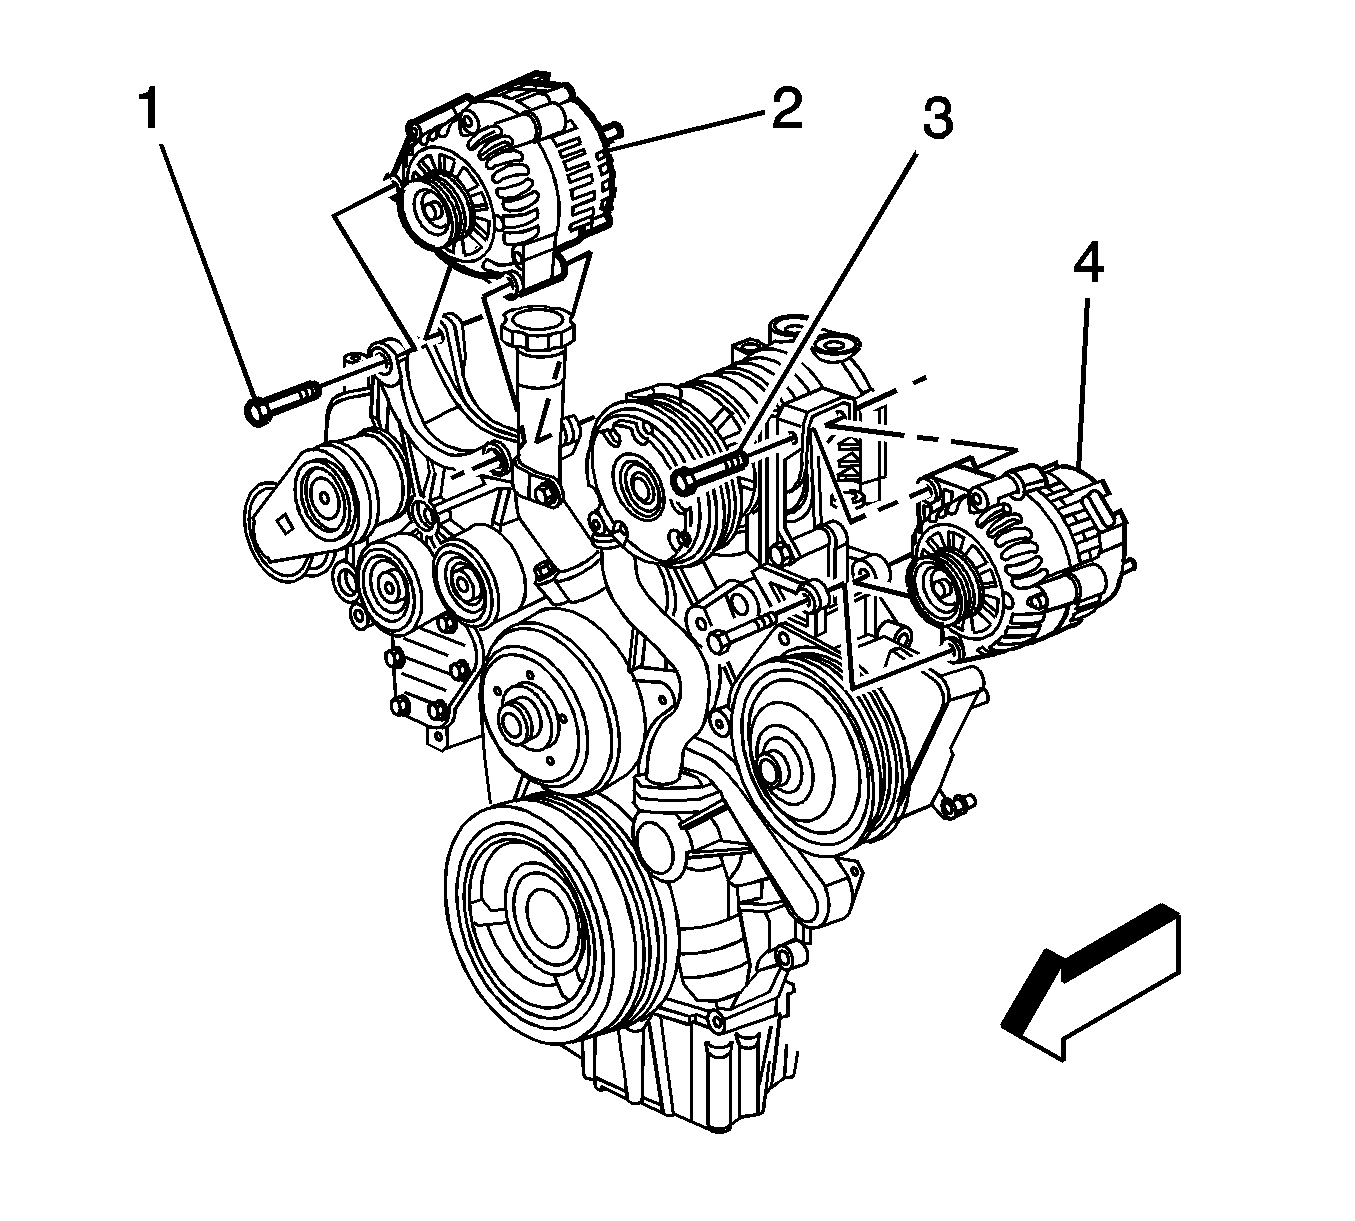
- Disconnect the generator electrical connector.
- Unbolt and reposition the generator to access the output wire nut. Refer to Generator Replacement .
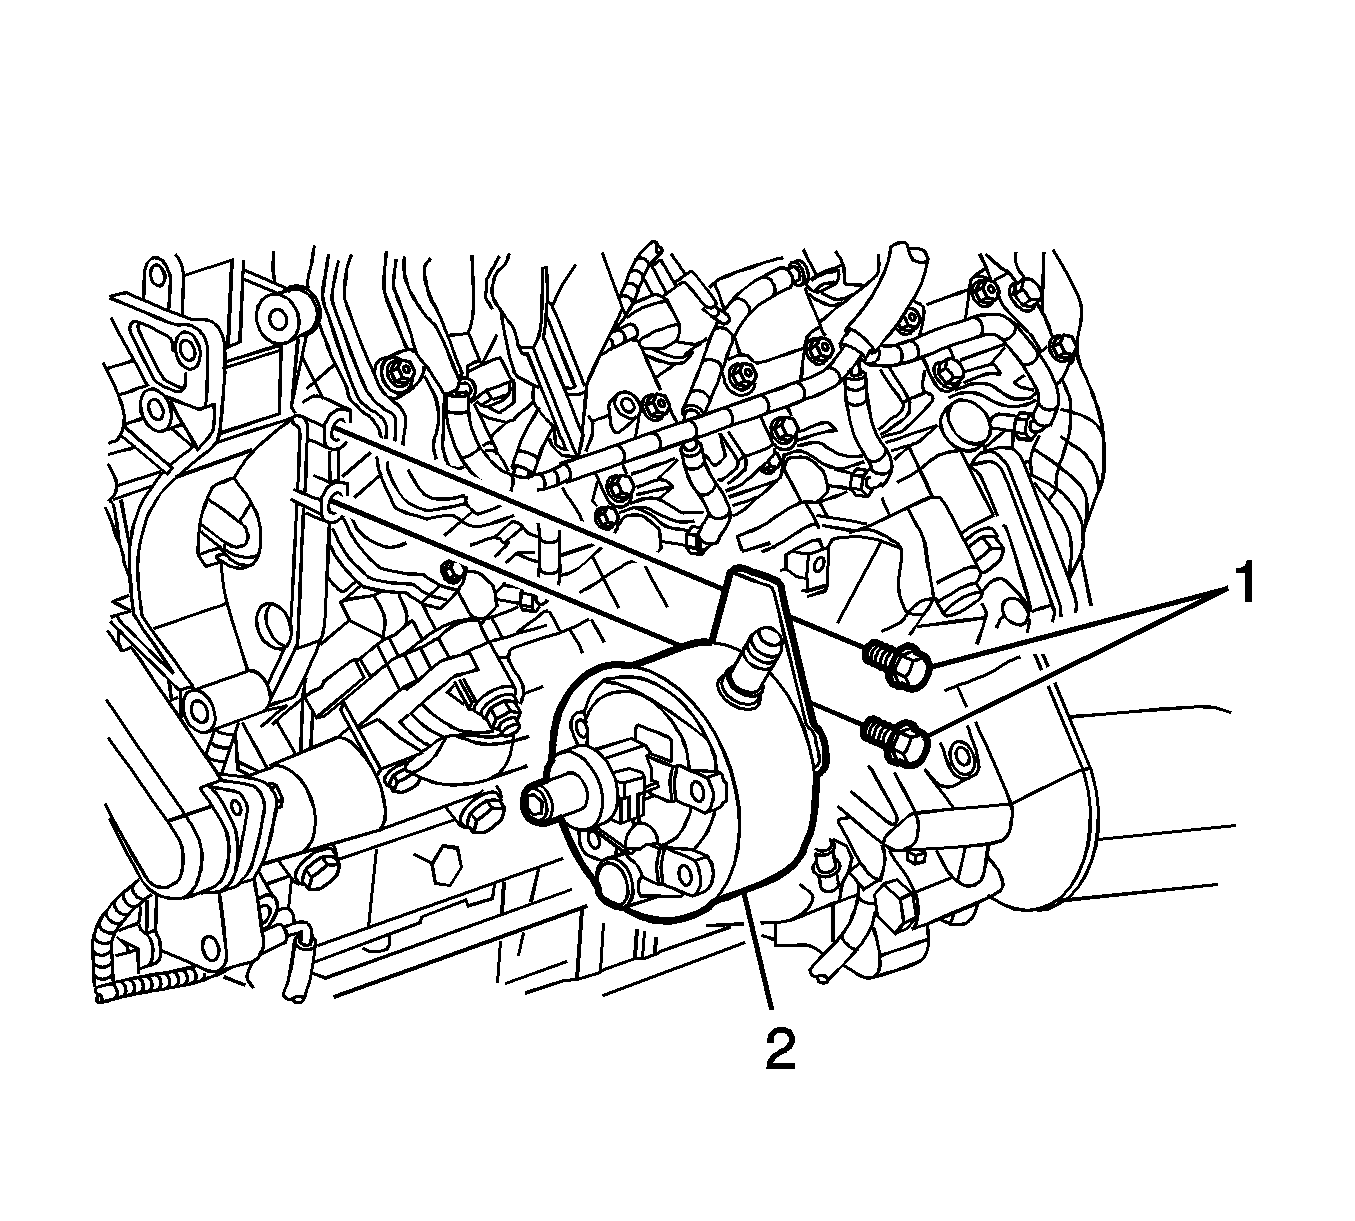
- Remove the generator bolts (1).
- Remove the generator (2).
- Disconnect the RH engine wiring harness connector.
- Remove the positive battery cable from the generator, perform the following:
- Remove the 2 RH engine wiring harness bracket bolts and position aside.
- Remove the 2 wiring harness routing bolts.
- Remove the transmission tube bolt and reposition the transmission tube.
- Remove the oil indicator tube bracket bolt.
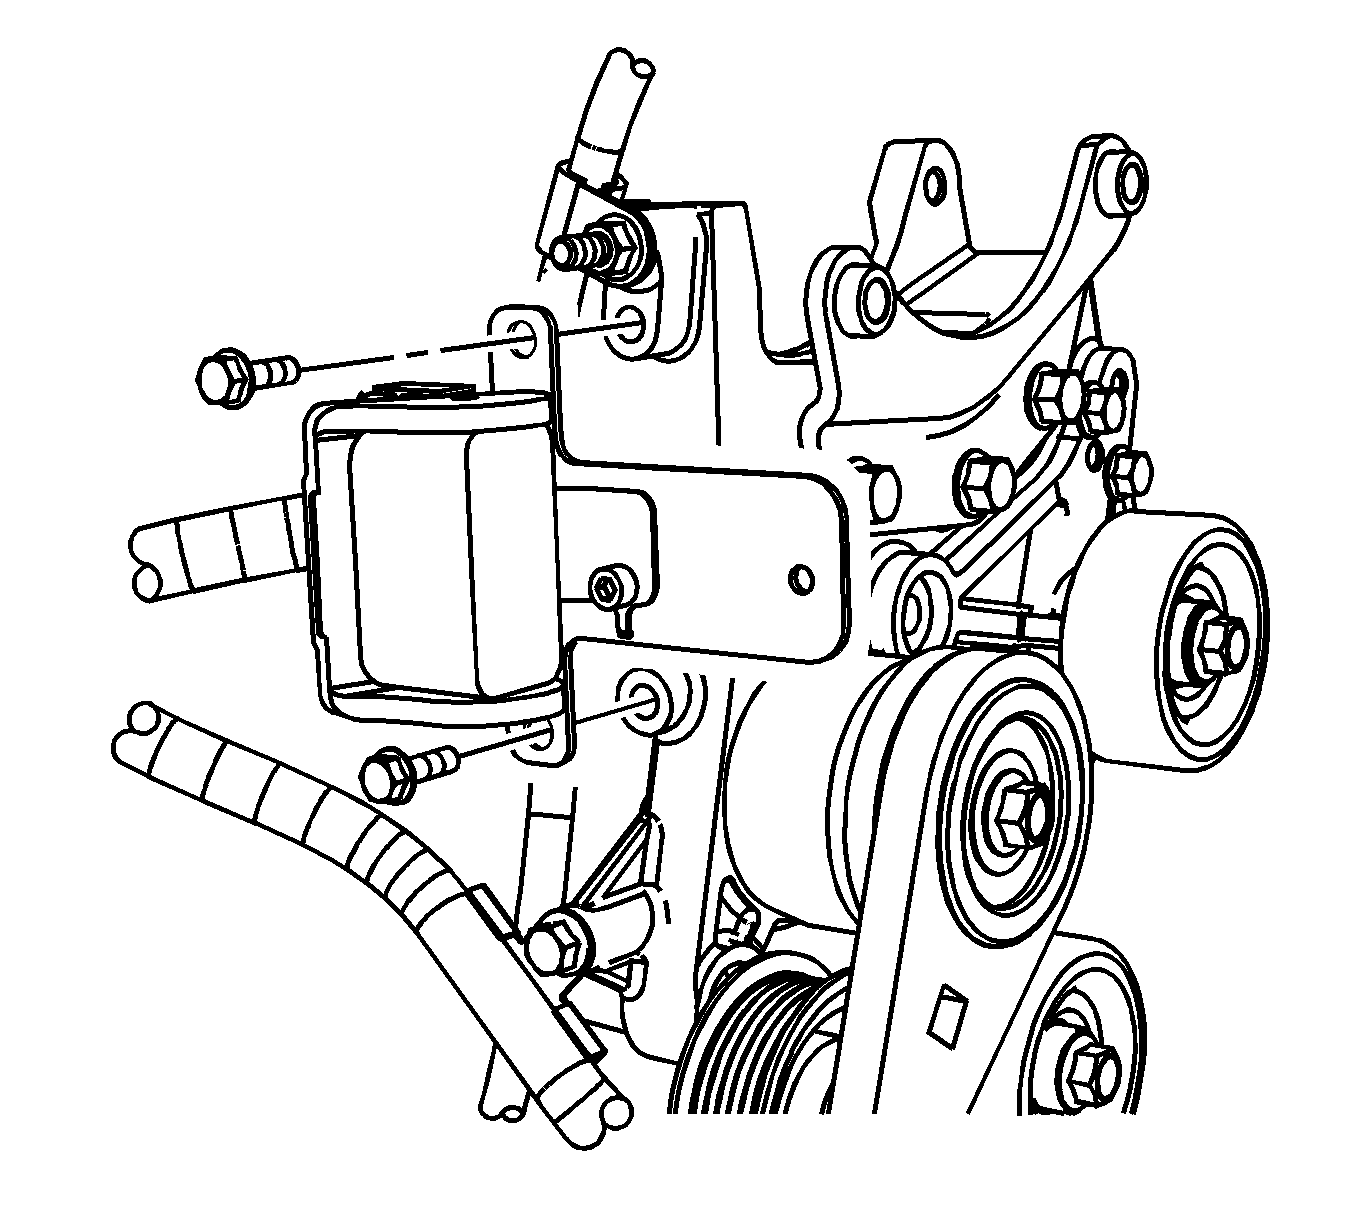
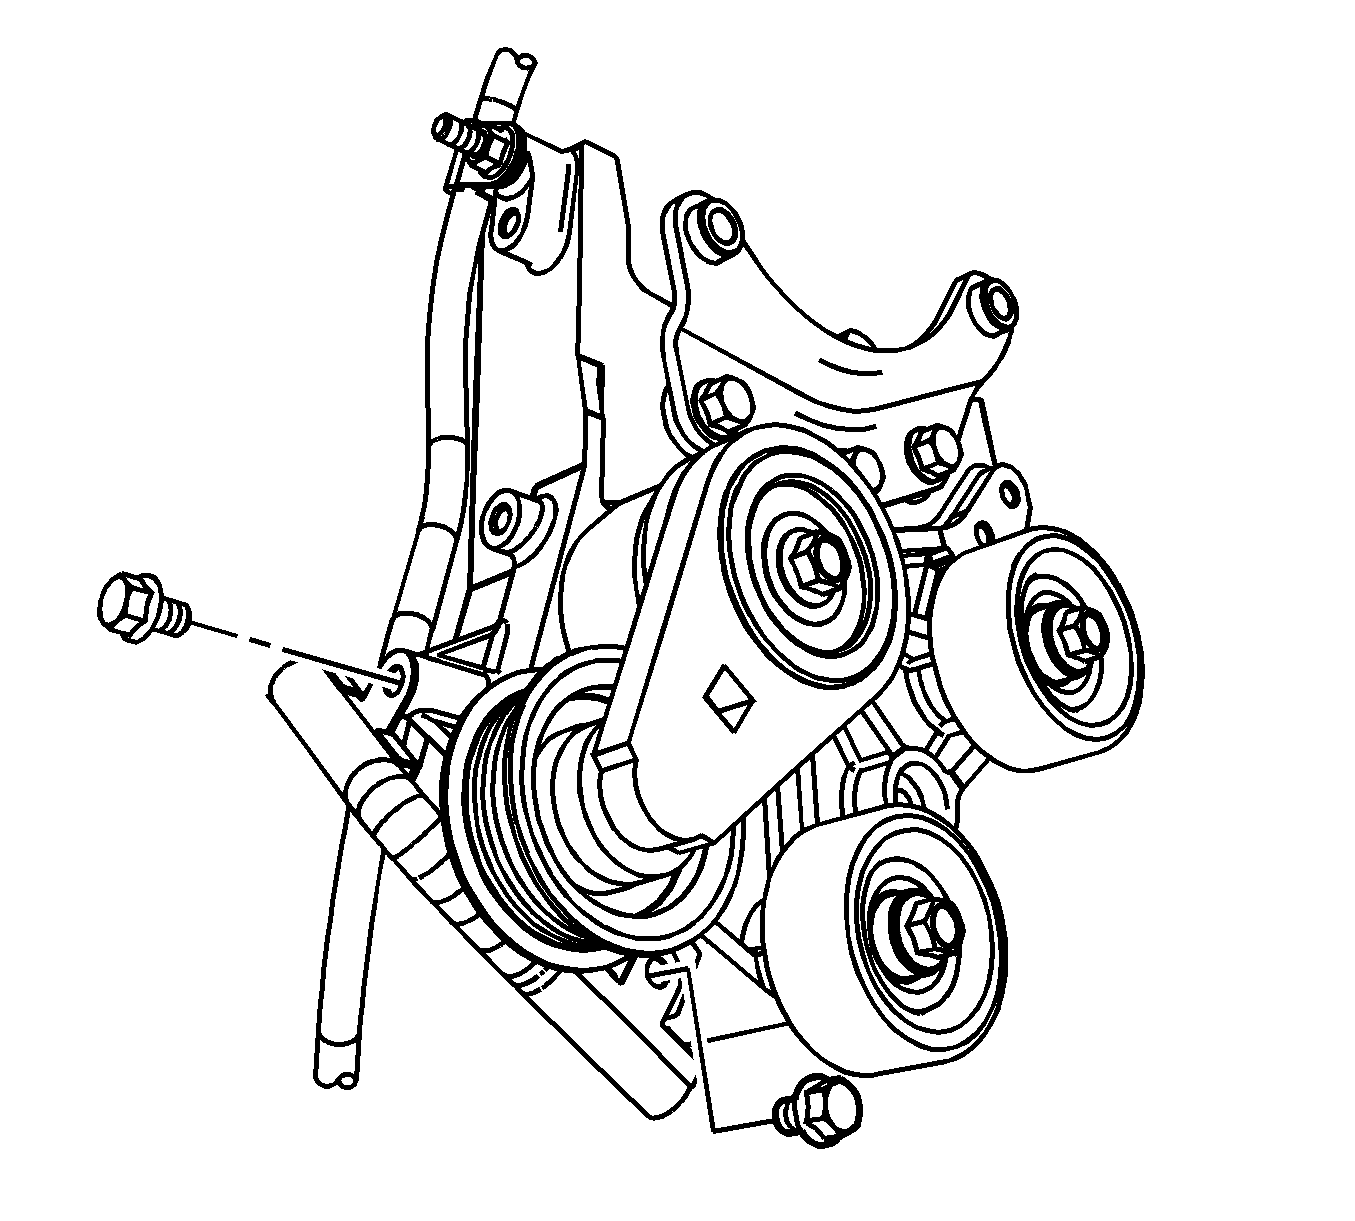
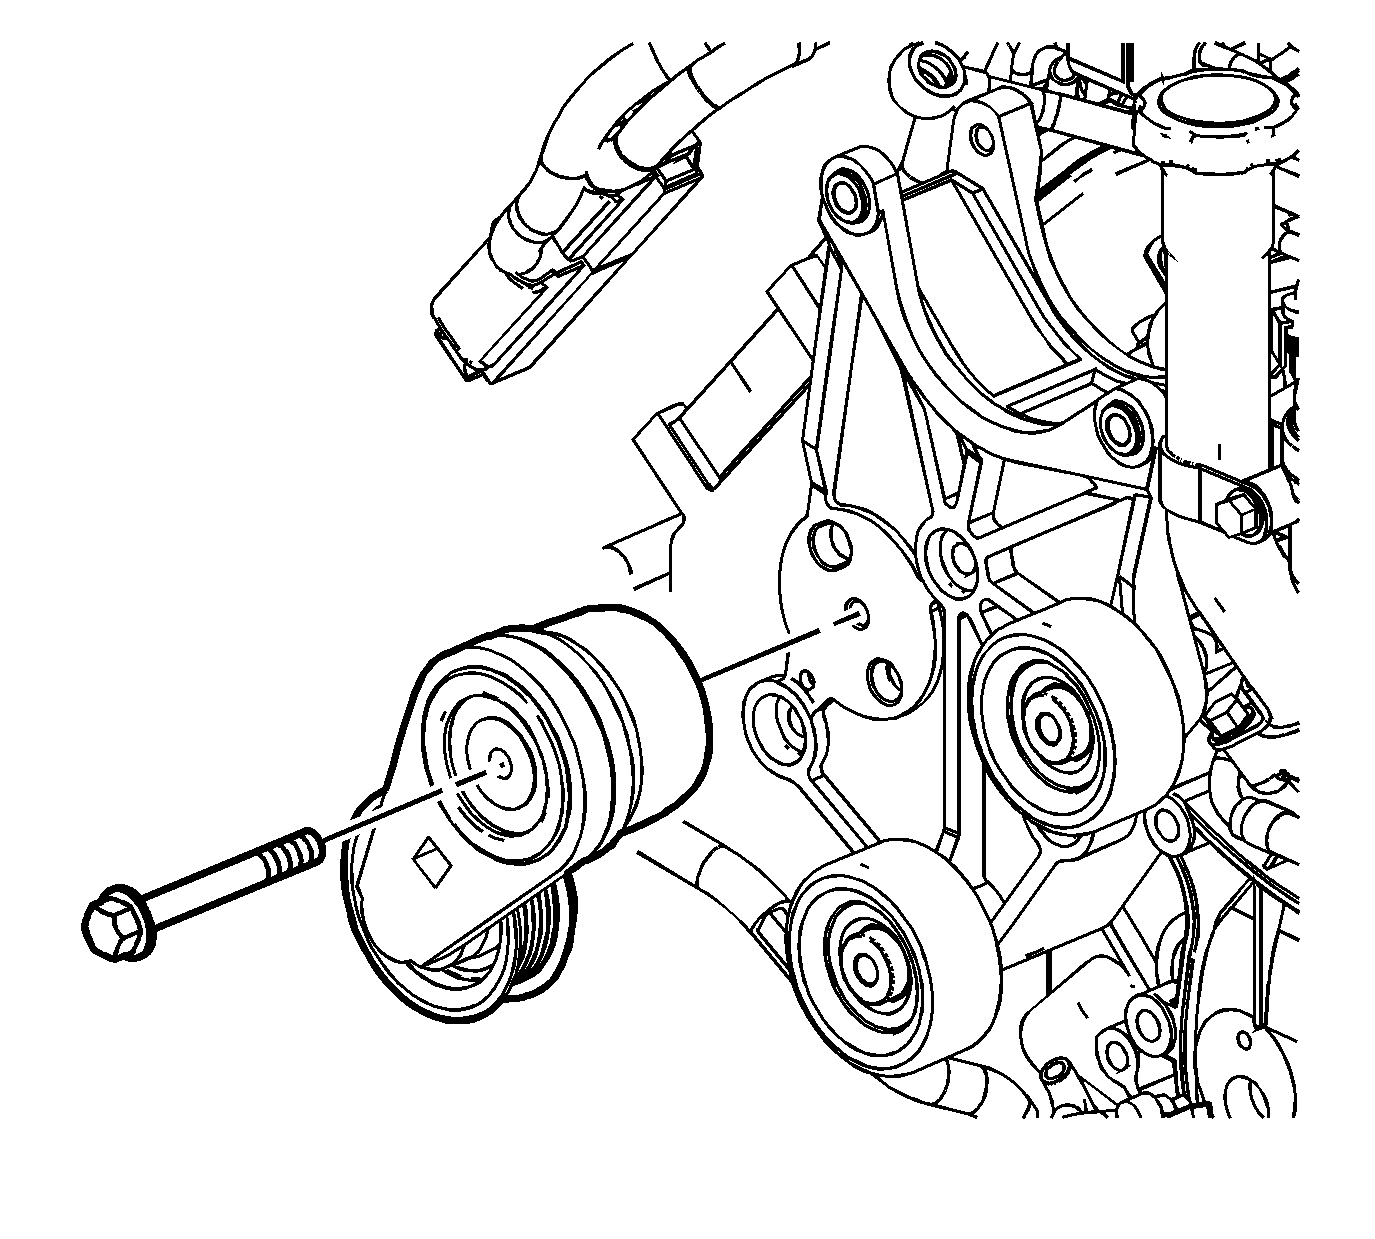
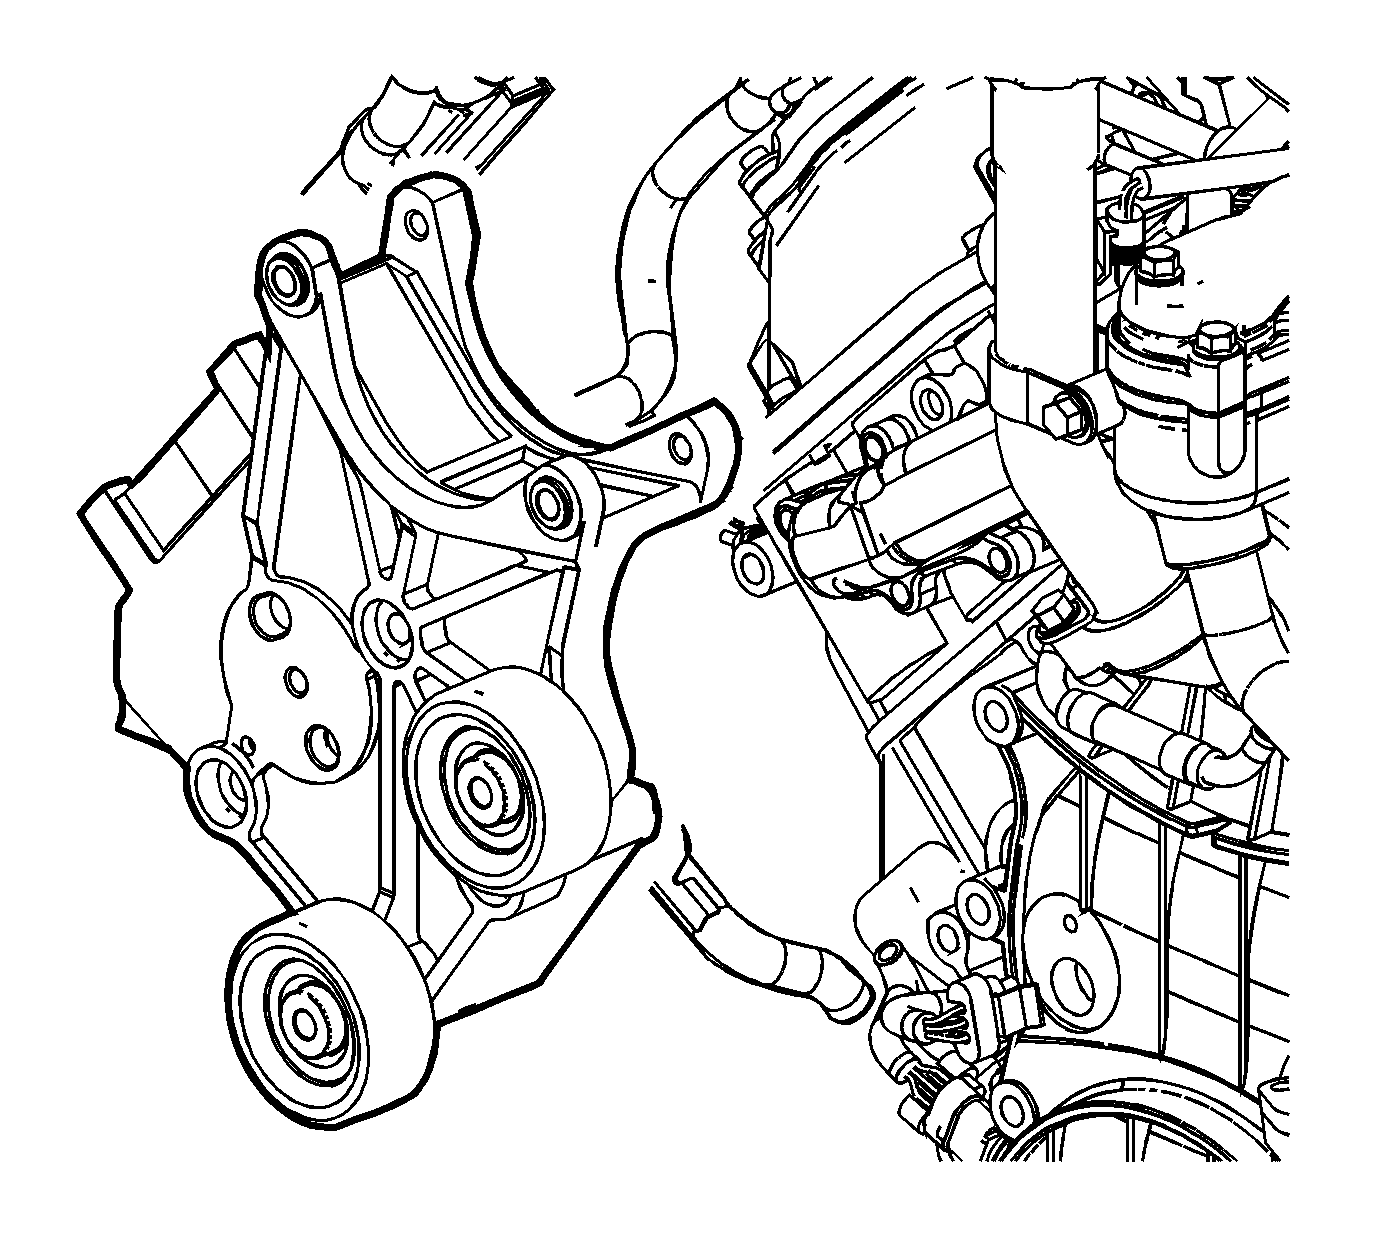
- Remove the drive belt tensioner bolt and tensioner.
- Remove the bolts and the generator mounting bracket.
- If equipped, remove the auxiliary generator. Refer to Auxiliary Generator Replacement .
- Remove the auxiliary generator bracket bolt and bracket, if equipped.
- If equipped with a dual generator system, remove the bolt from the left side idler pulley and remove the idler pulley.
- Disconnect the air conditioning (A/C) compressor clutch electrical connector.
- Disconnect the A/C cut out switch electrical connector.
- Disconnect the A/C suction and discharge lines at the compressor. Refer to Discharge Hose Replacement and Suction Hose Replacement .
- Remove the A/C compressor bolts.
- Remove the A/C compressor.
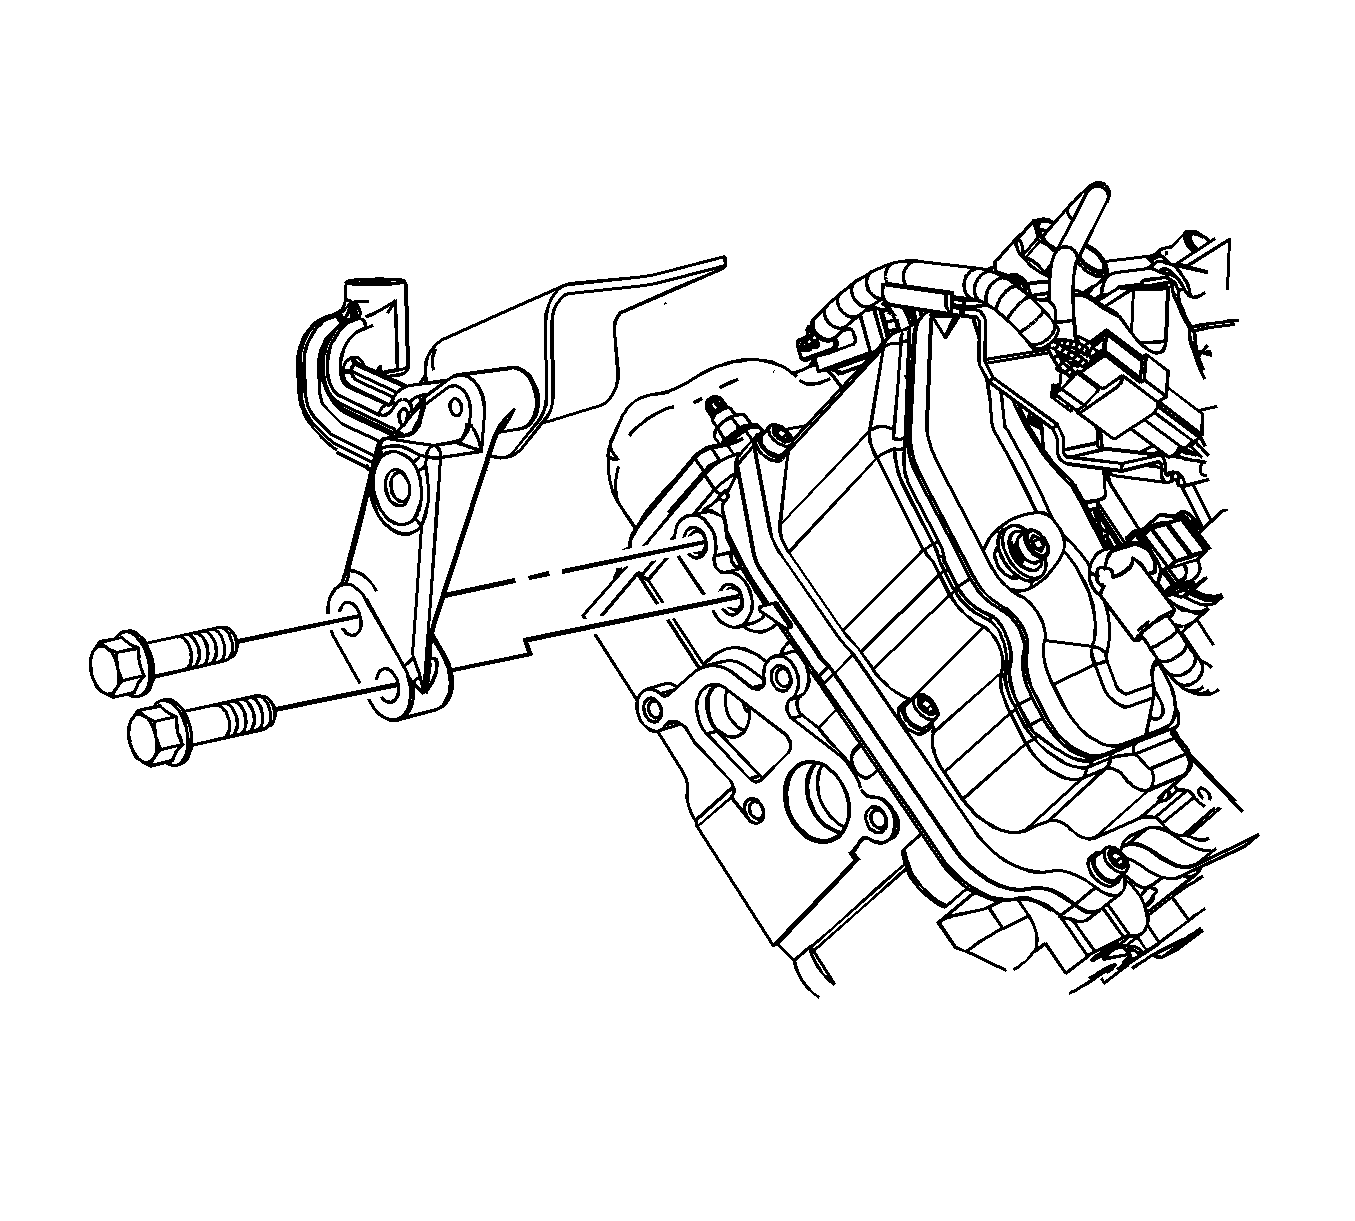
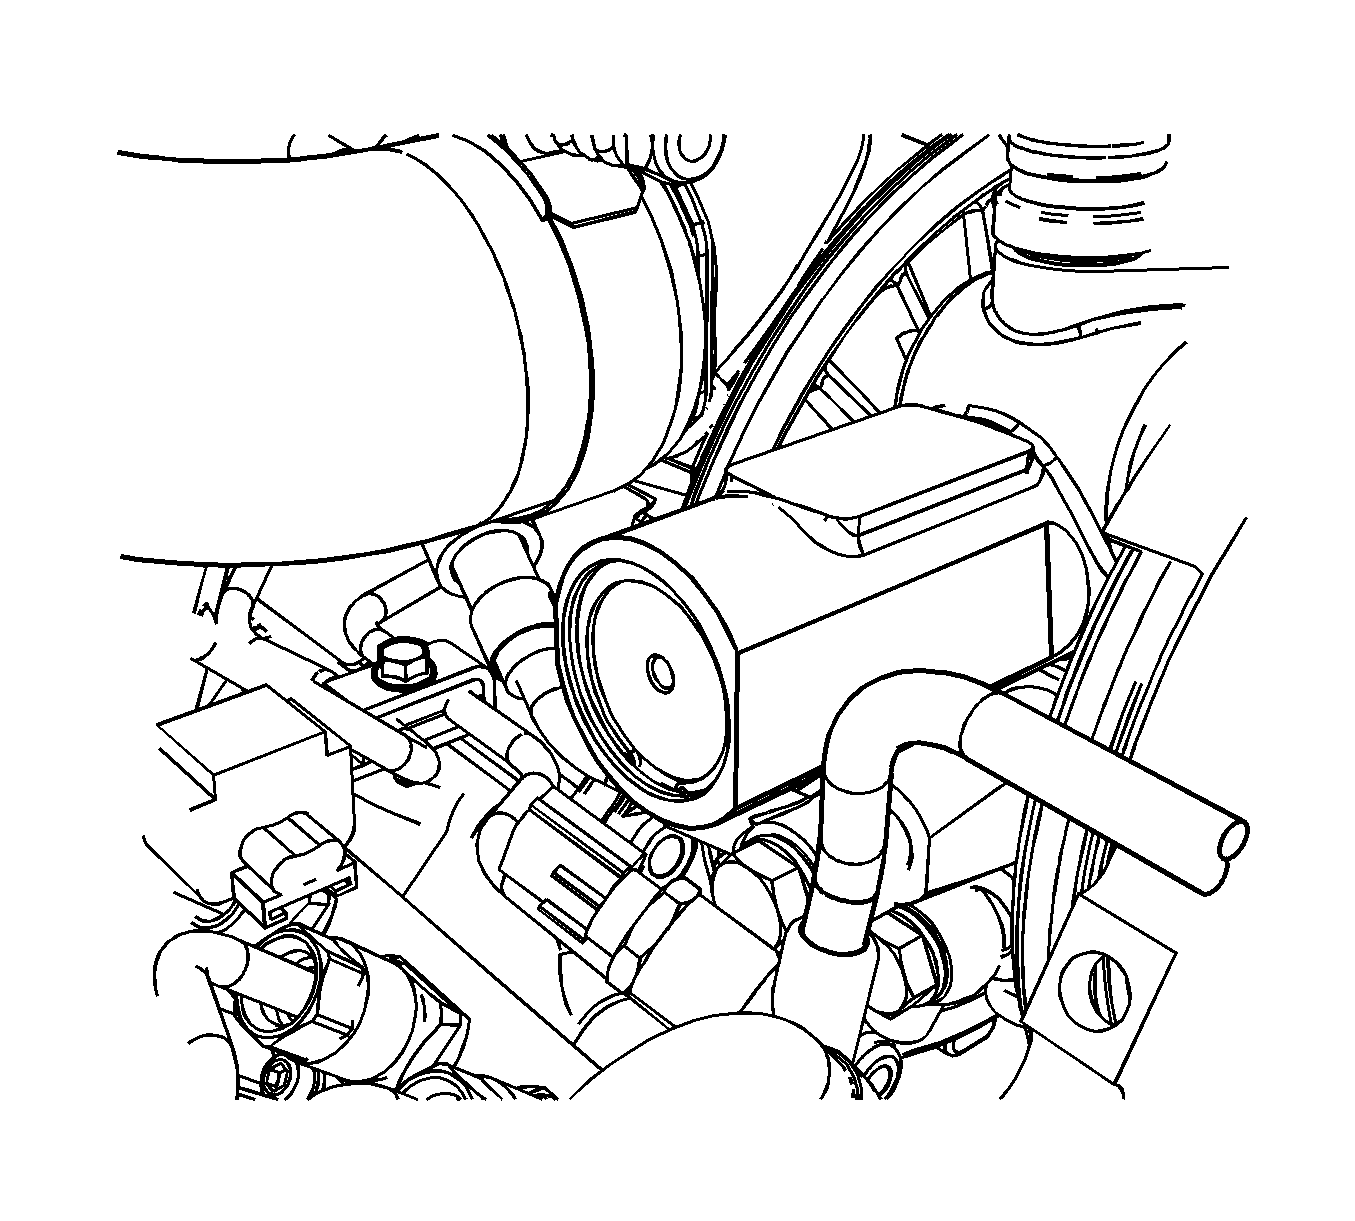
- Remove the power steering pump and bracket bolts (1).
- Remove the rear power steering pump bracket bolts (1) from the bracket.
- Position the power steering pump aside and secure.
- Remove the A/C and power steering bracket mounting nuts/bolts and bracket. Refer to Air Conditioning (A/C) Compressor and Power Steering Pump Bracket Replacement .
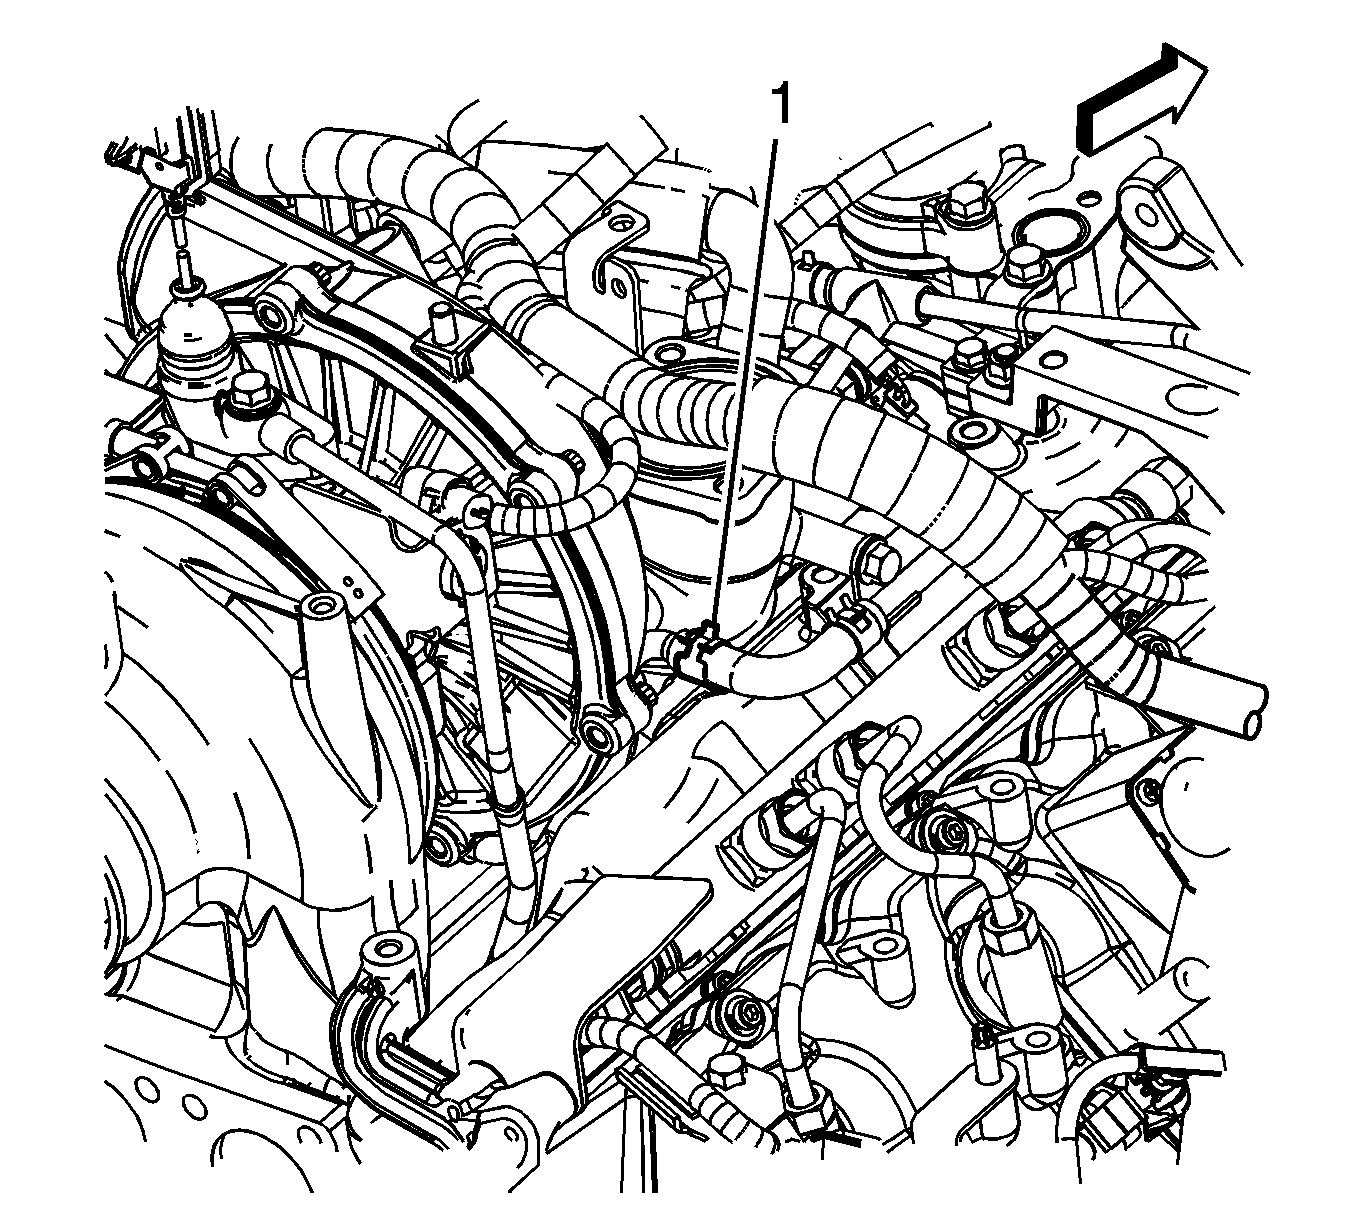
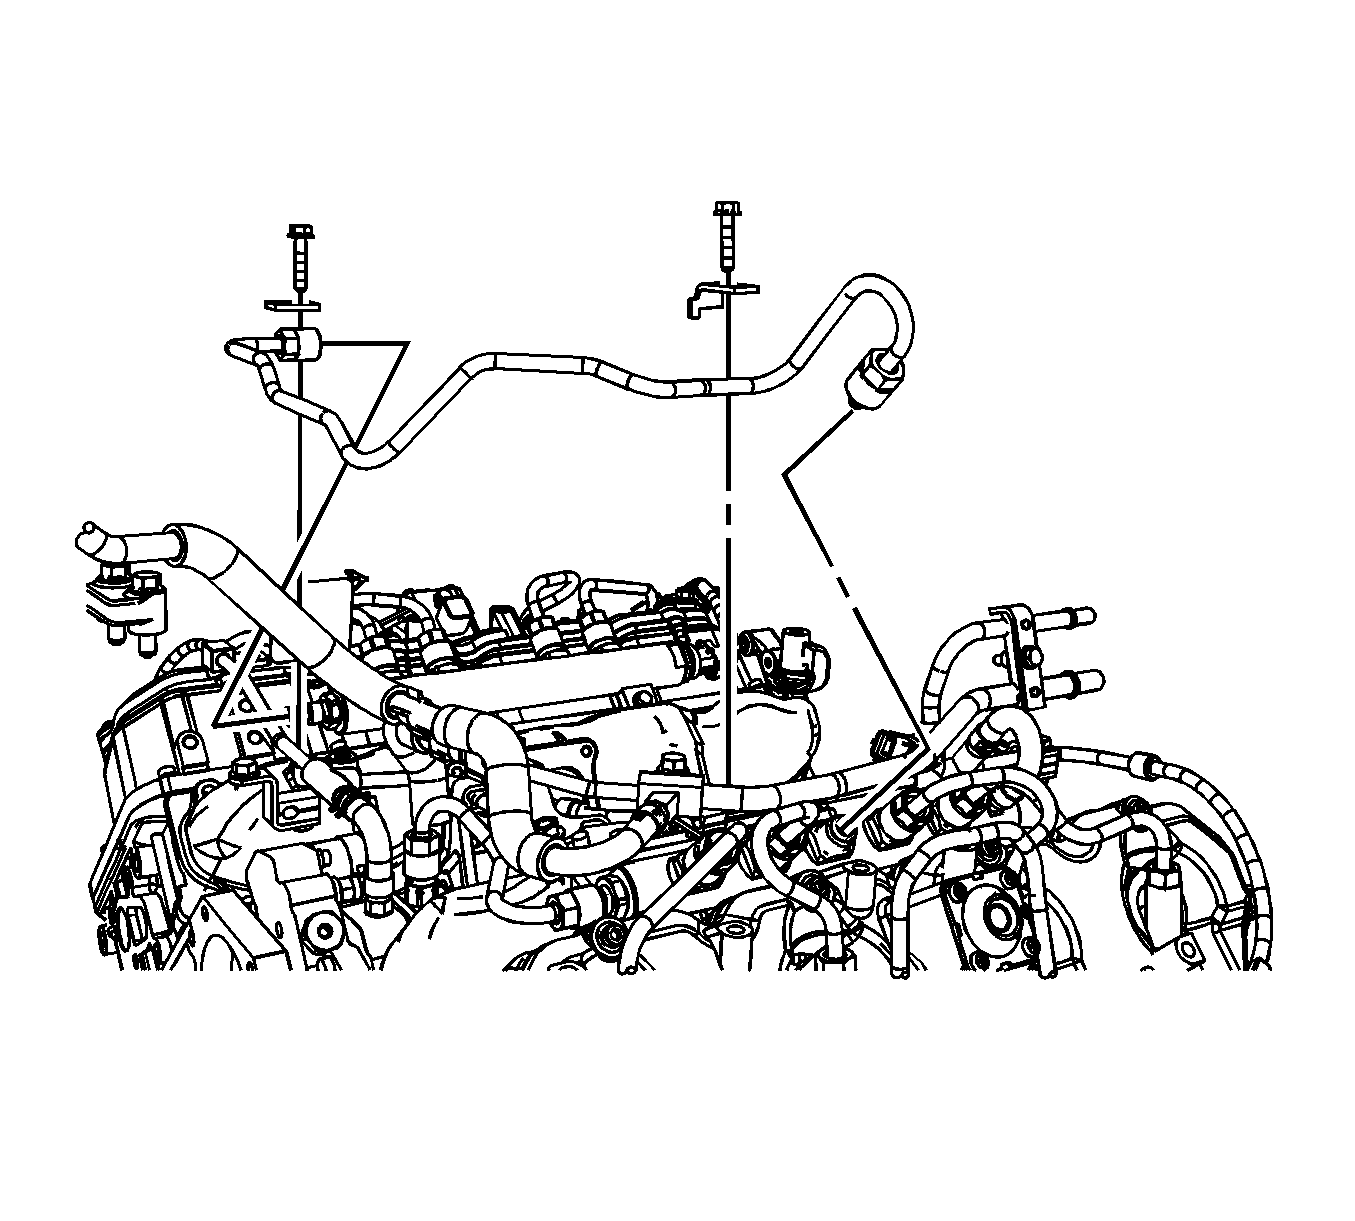
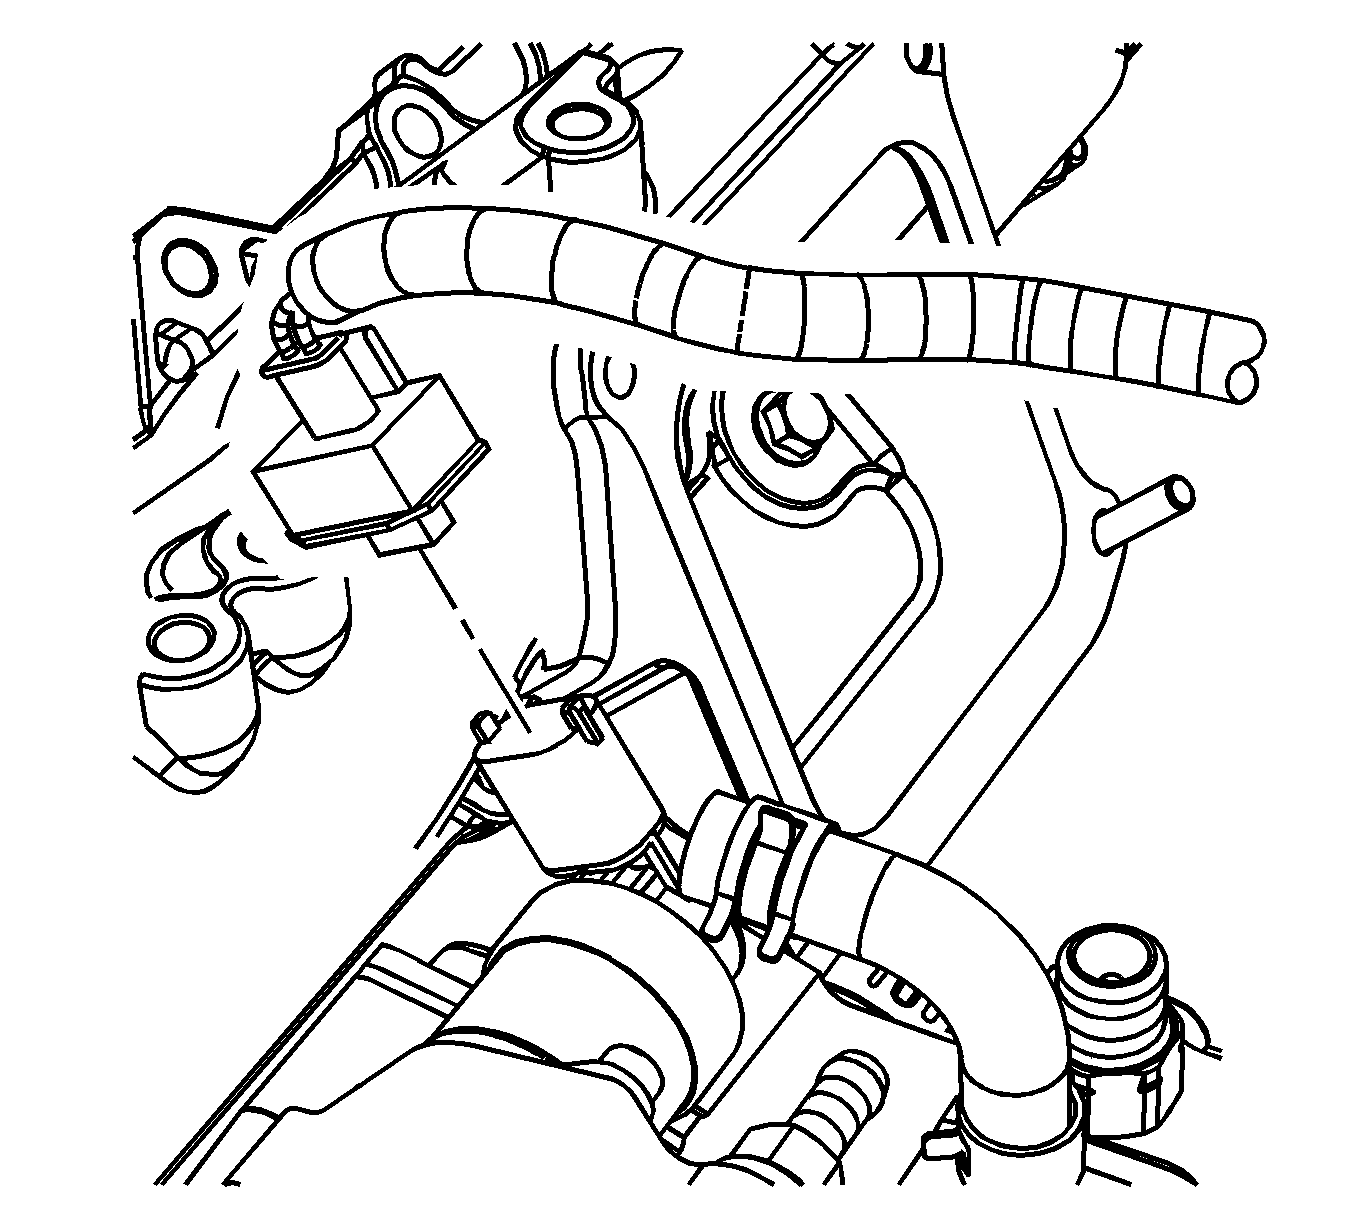
- Remove the fuel line bolt and position the fuel line aside.
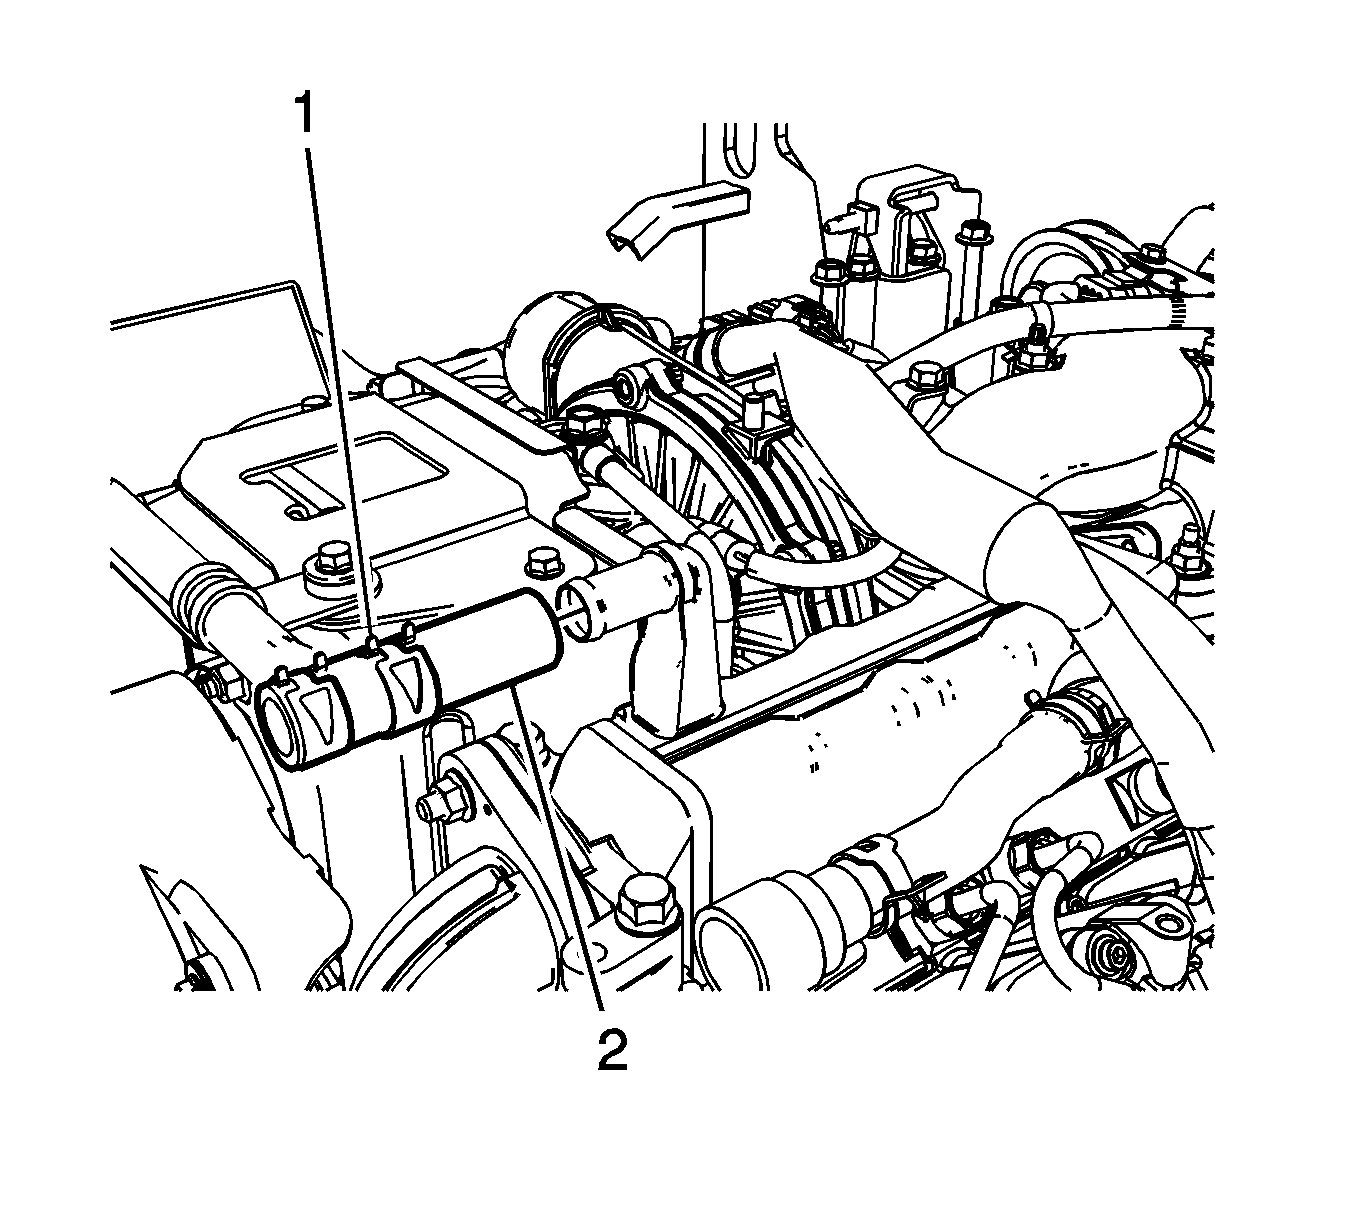
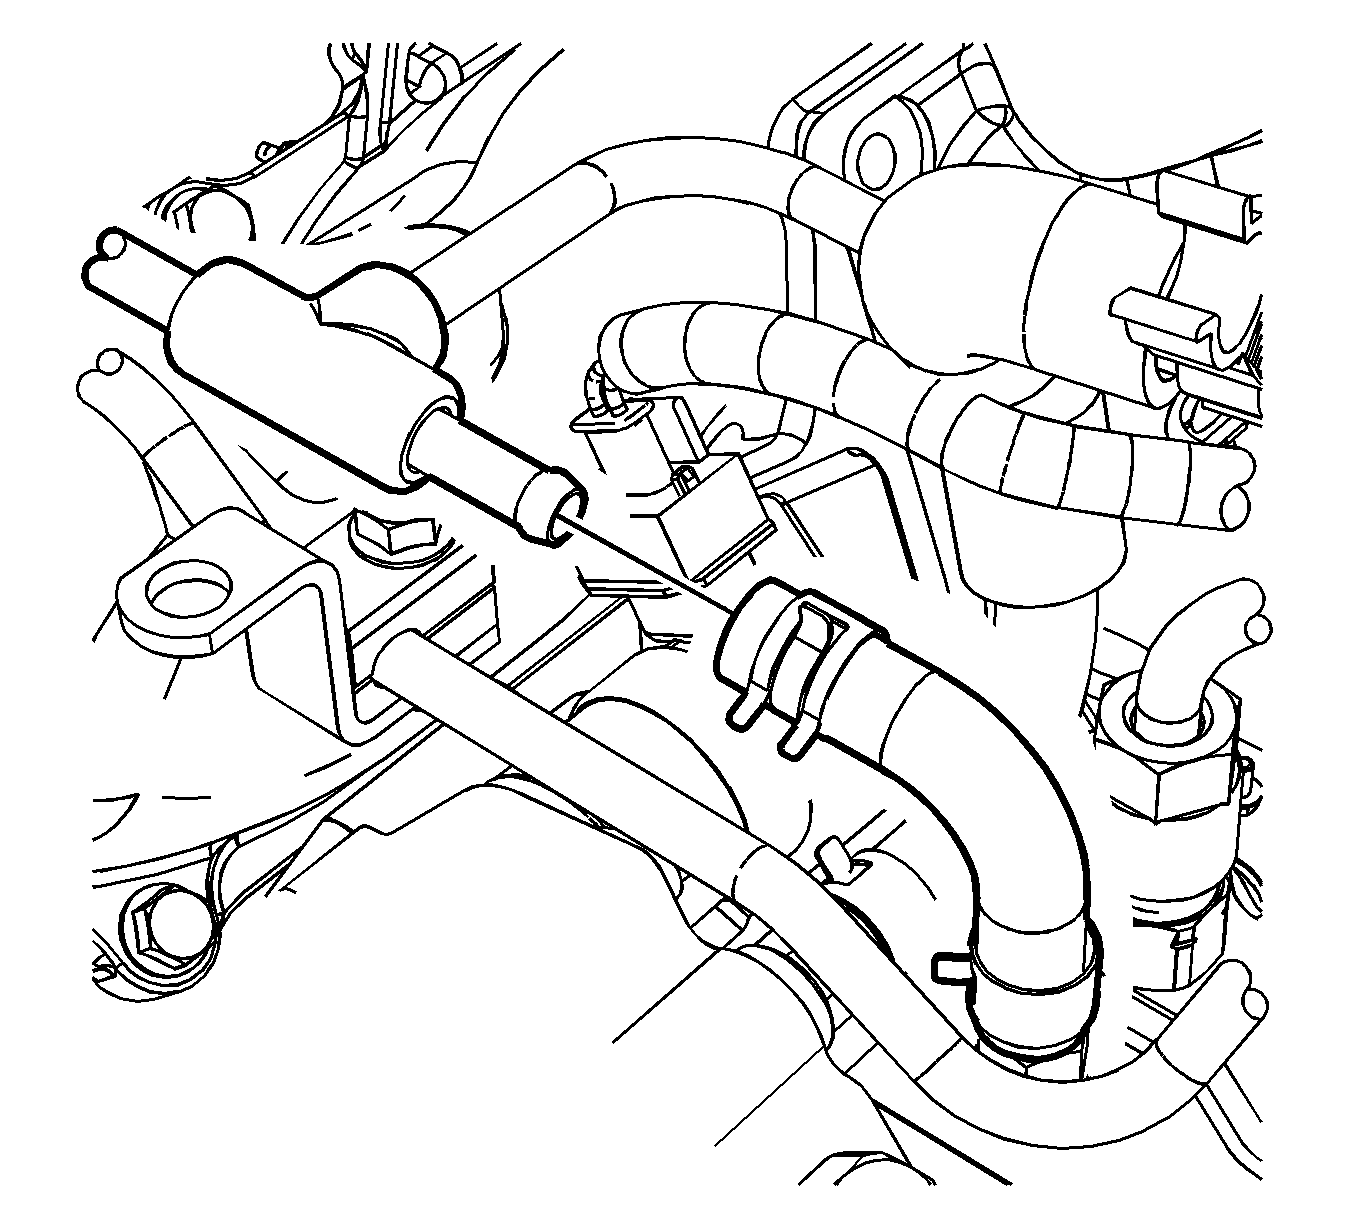
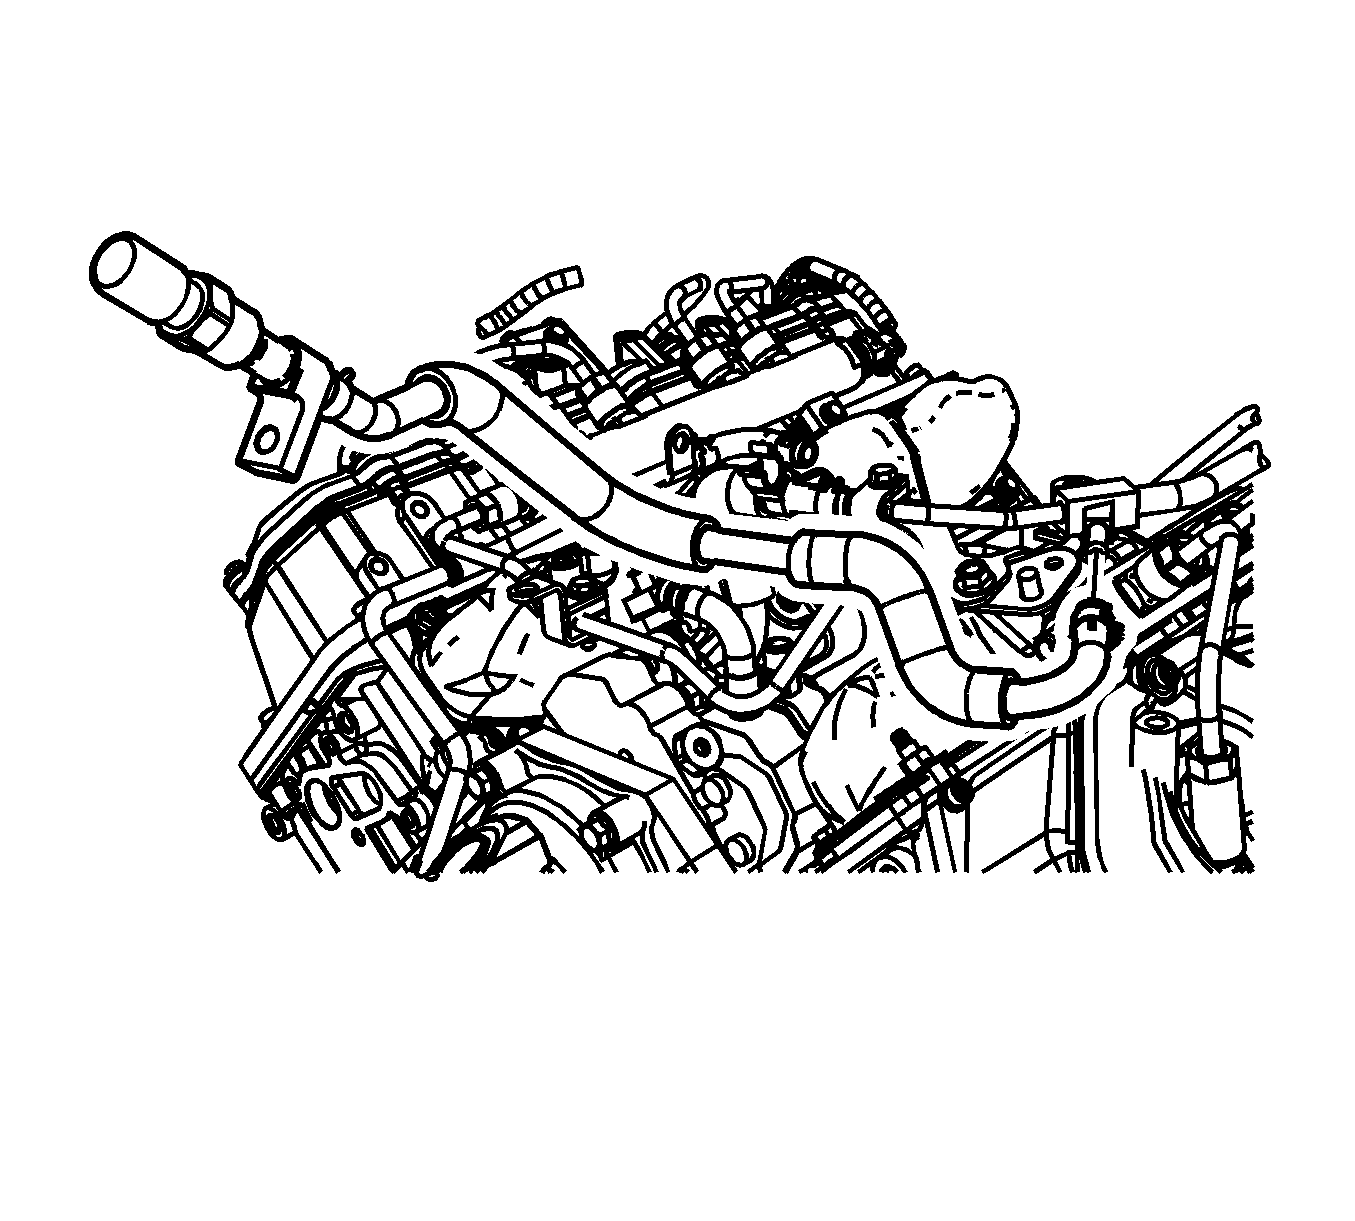
- Compress the clamp and disconnect the turbocharger inlet cooling hose/pipe.
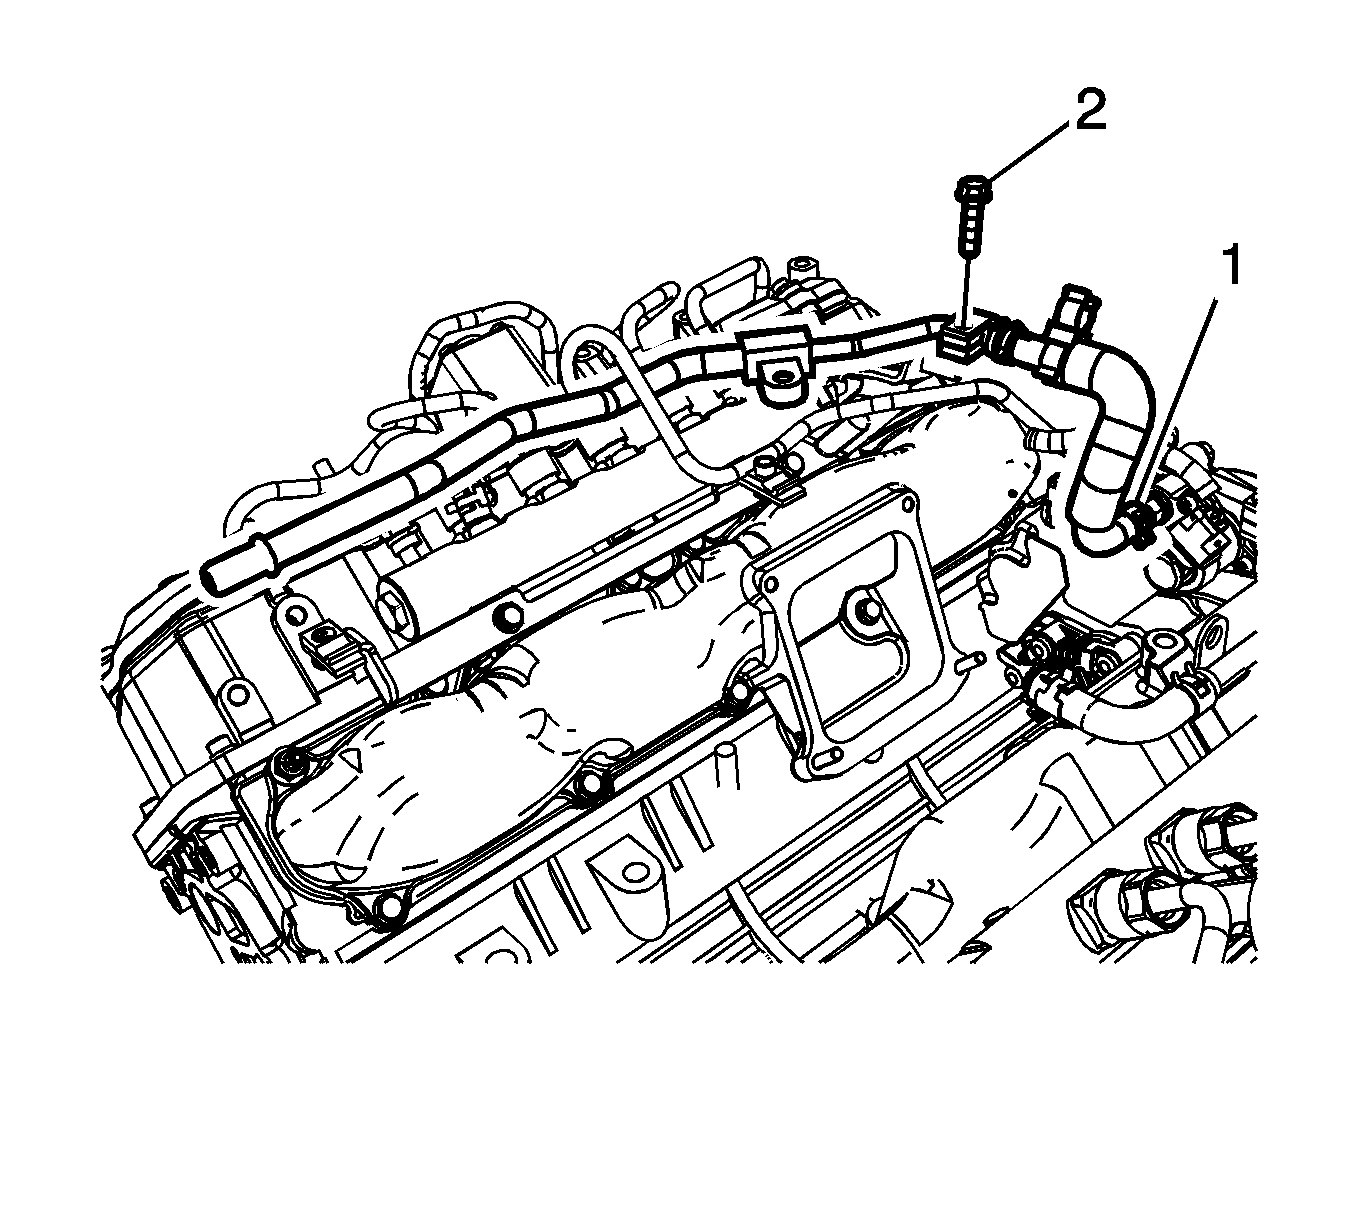
- Remove the oil fill tube bolts and the oil fill tube.
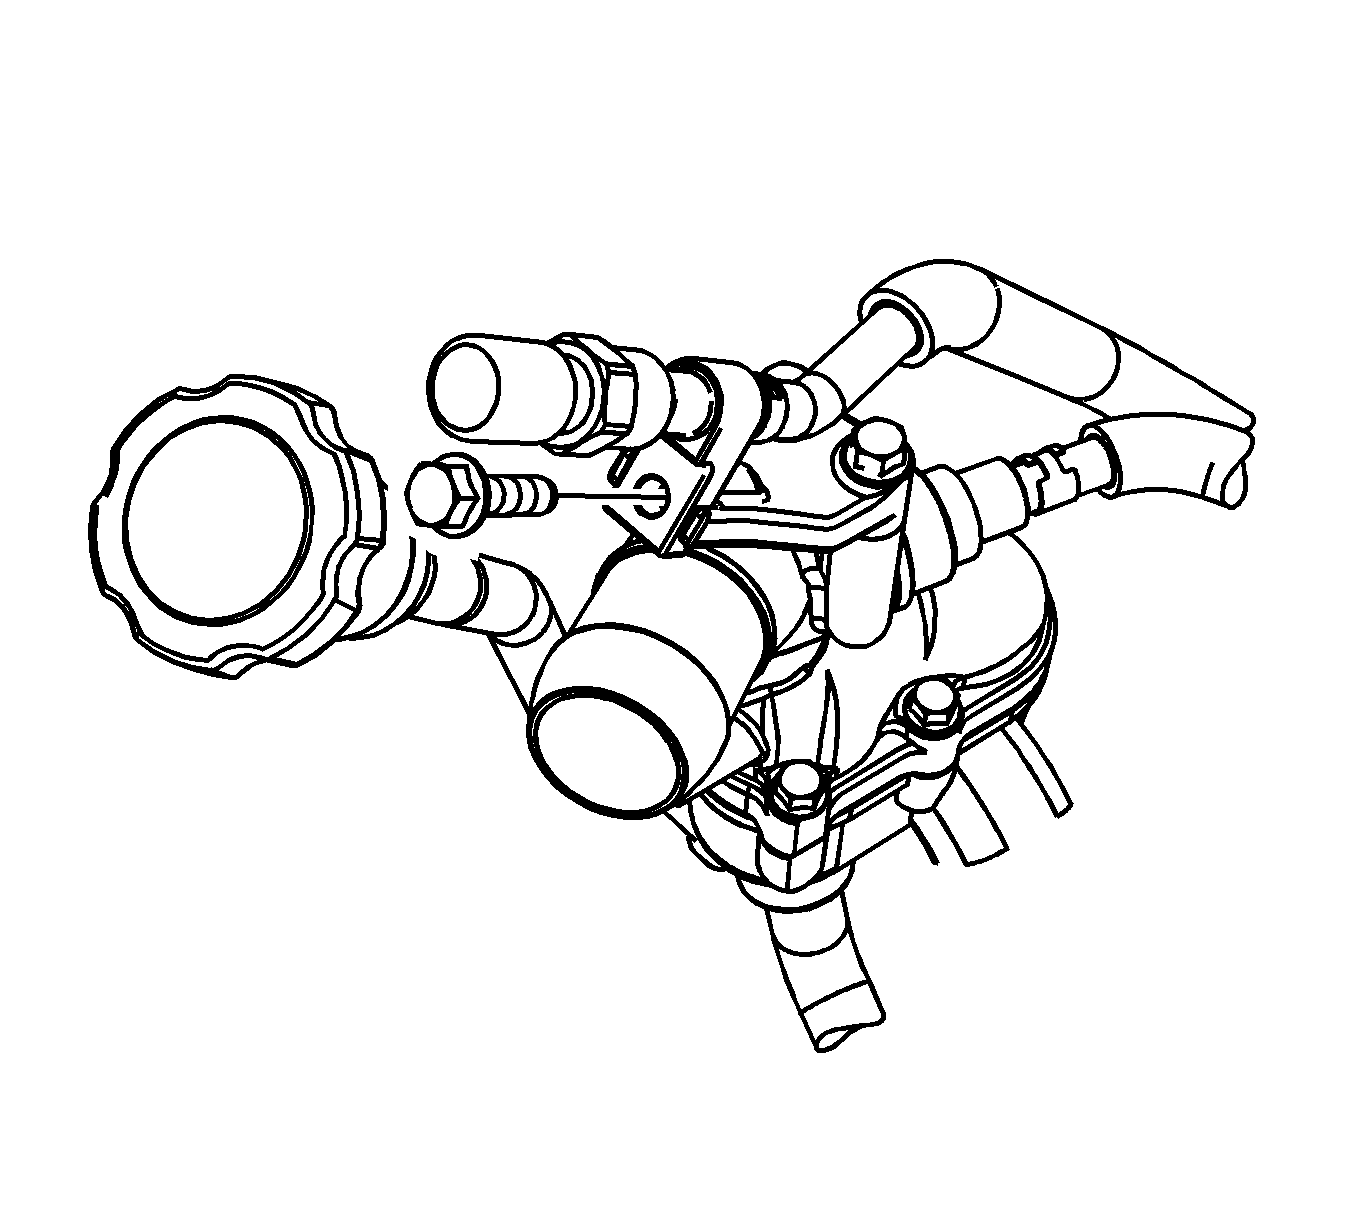
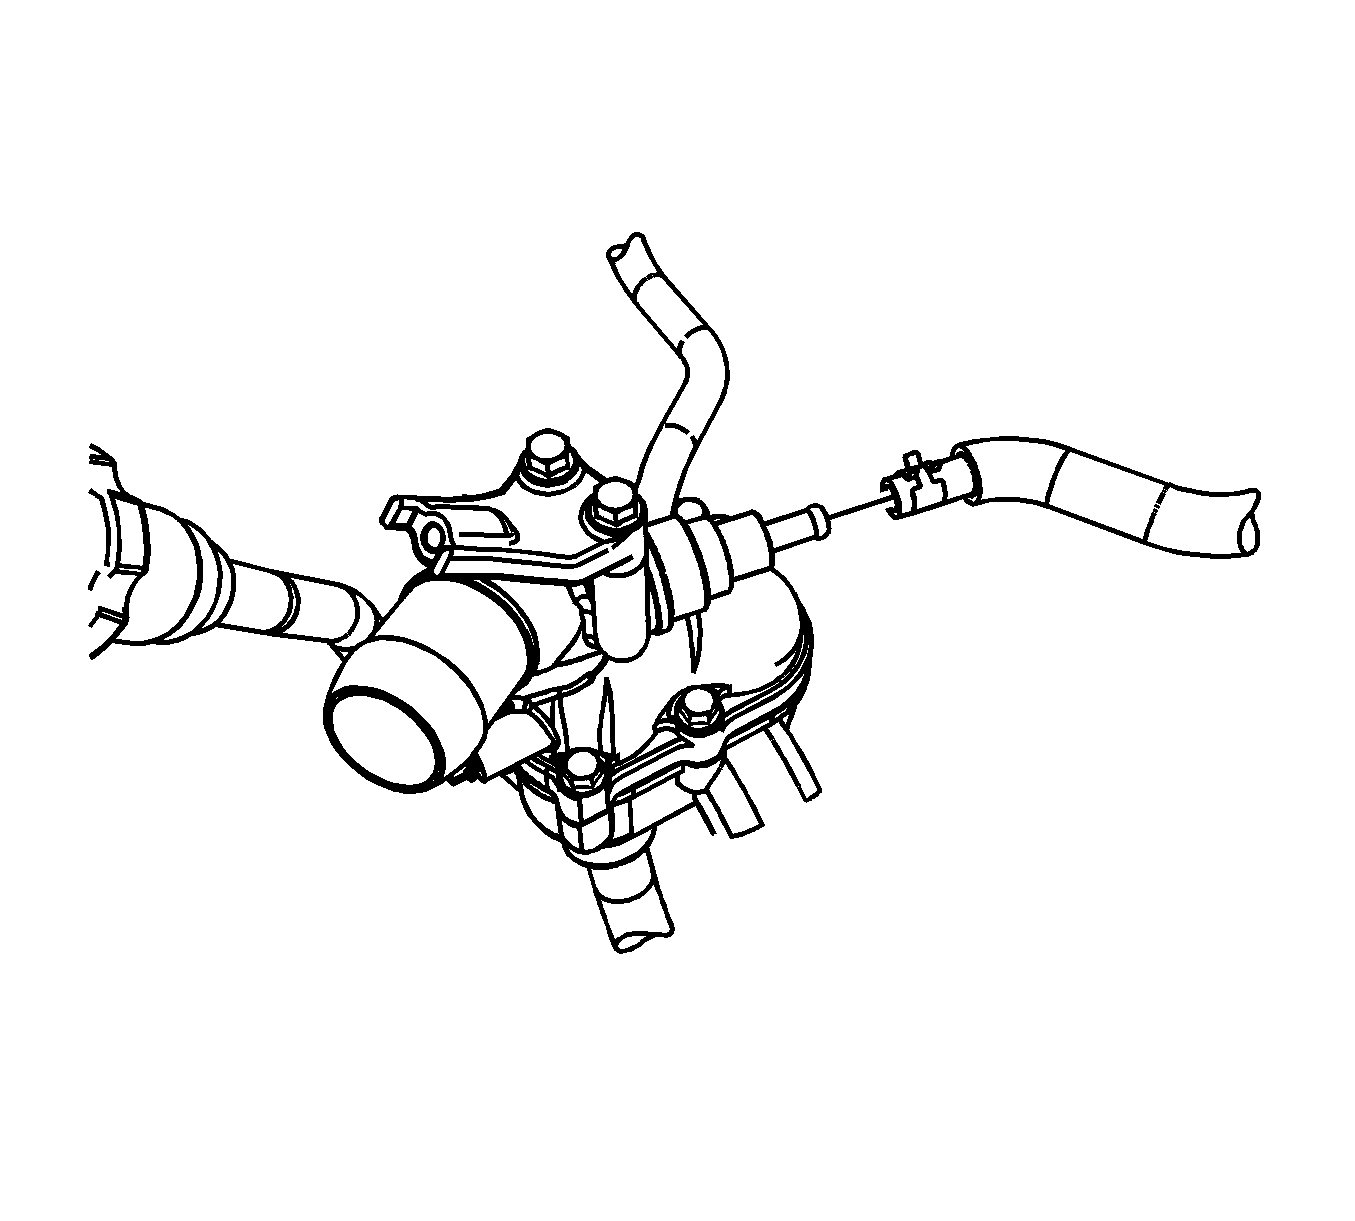
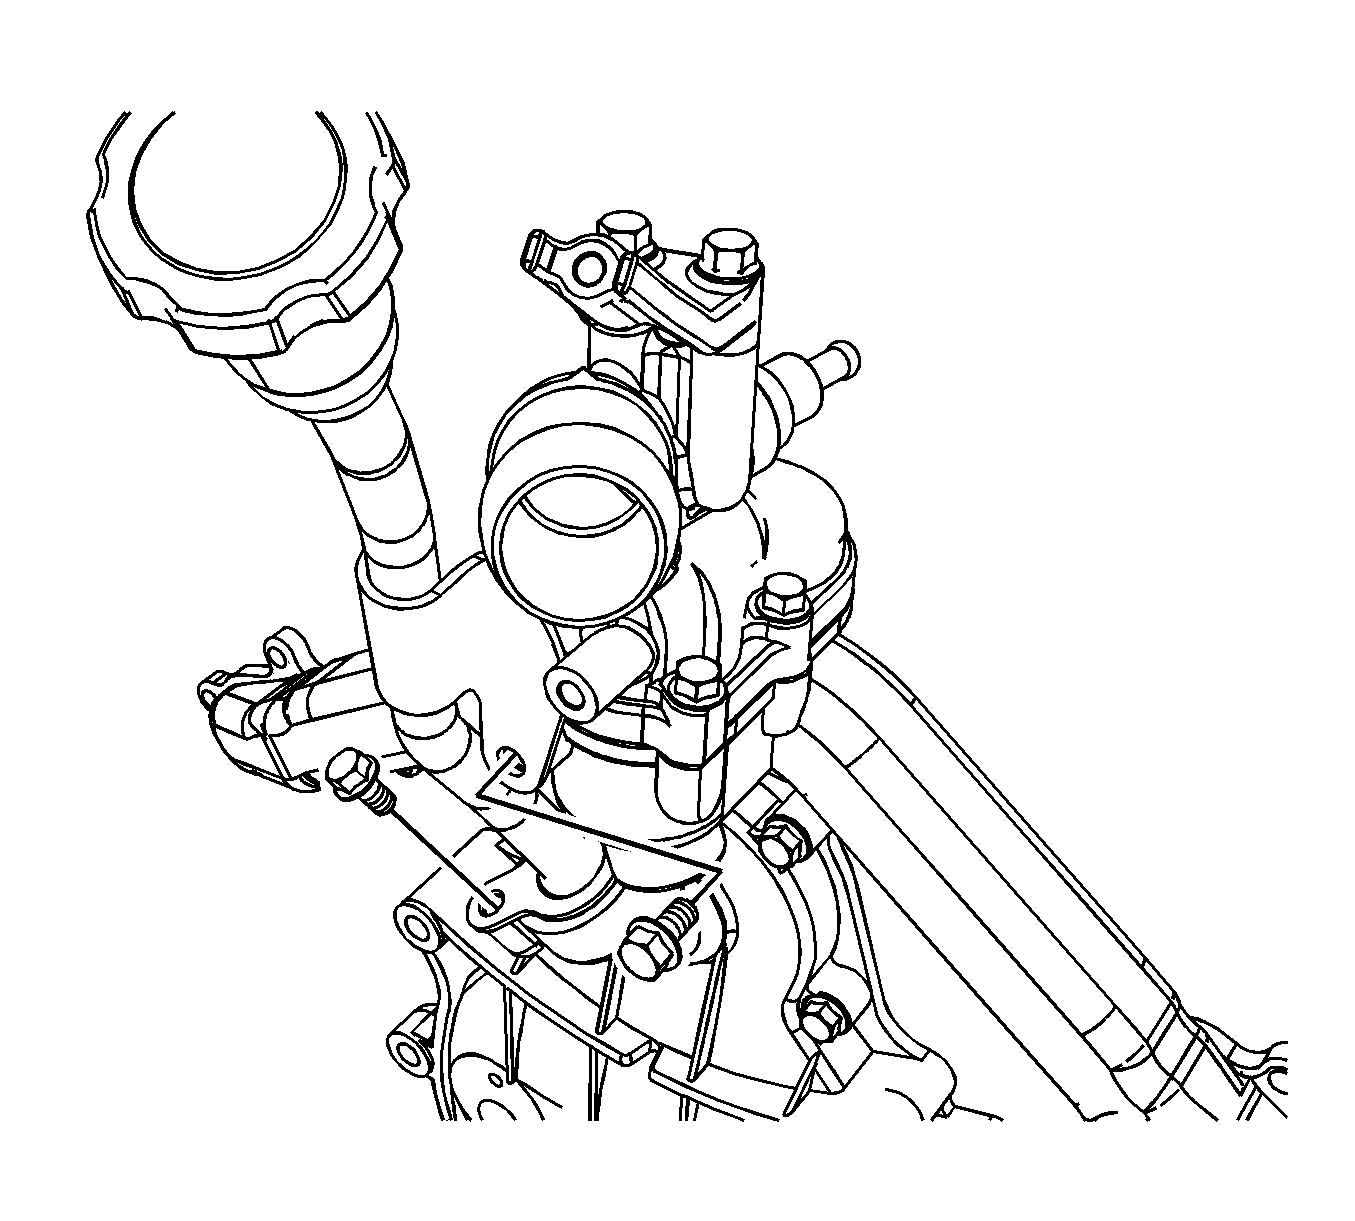
- Remove the exhaust gas recirculation (EGR) valve coolant pipe to thermostat housing bolt.
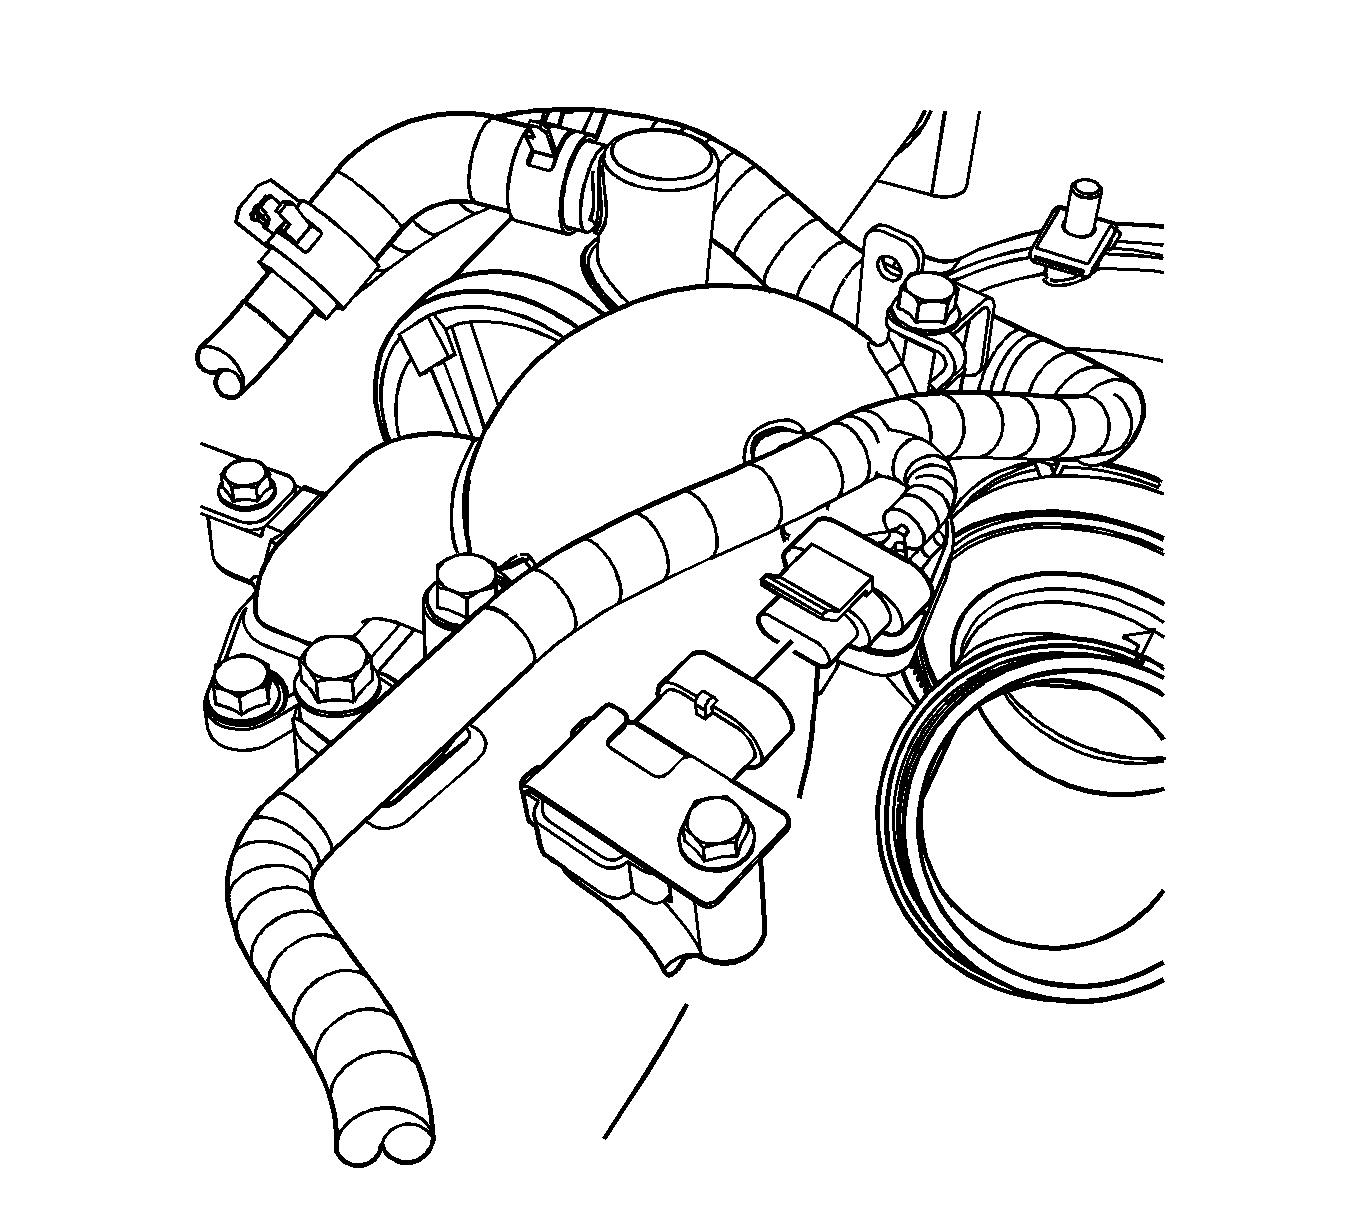
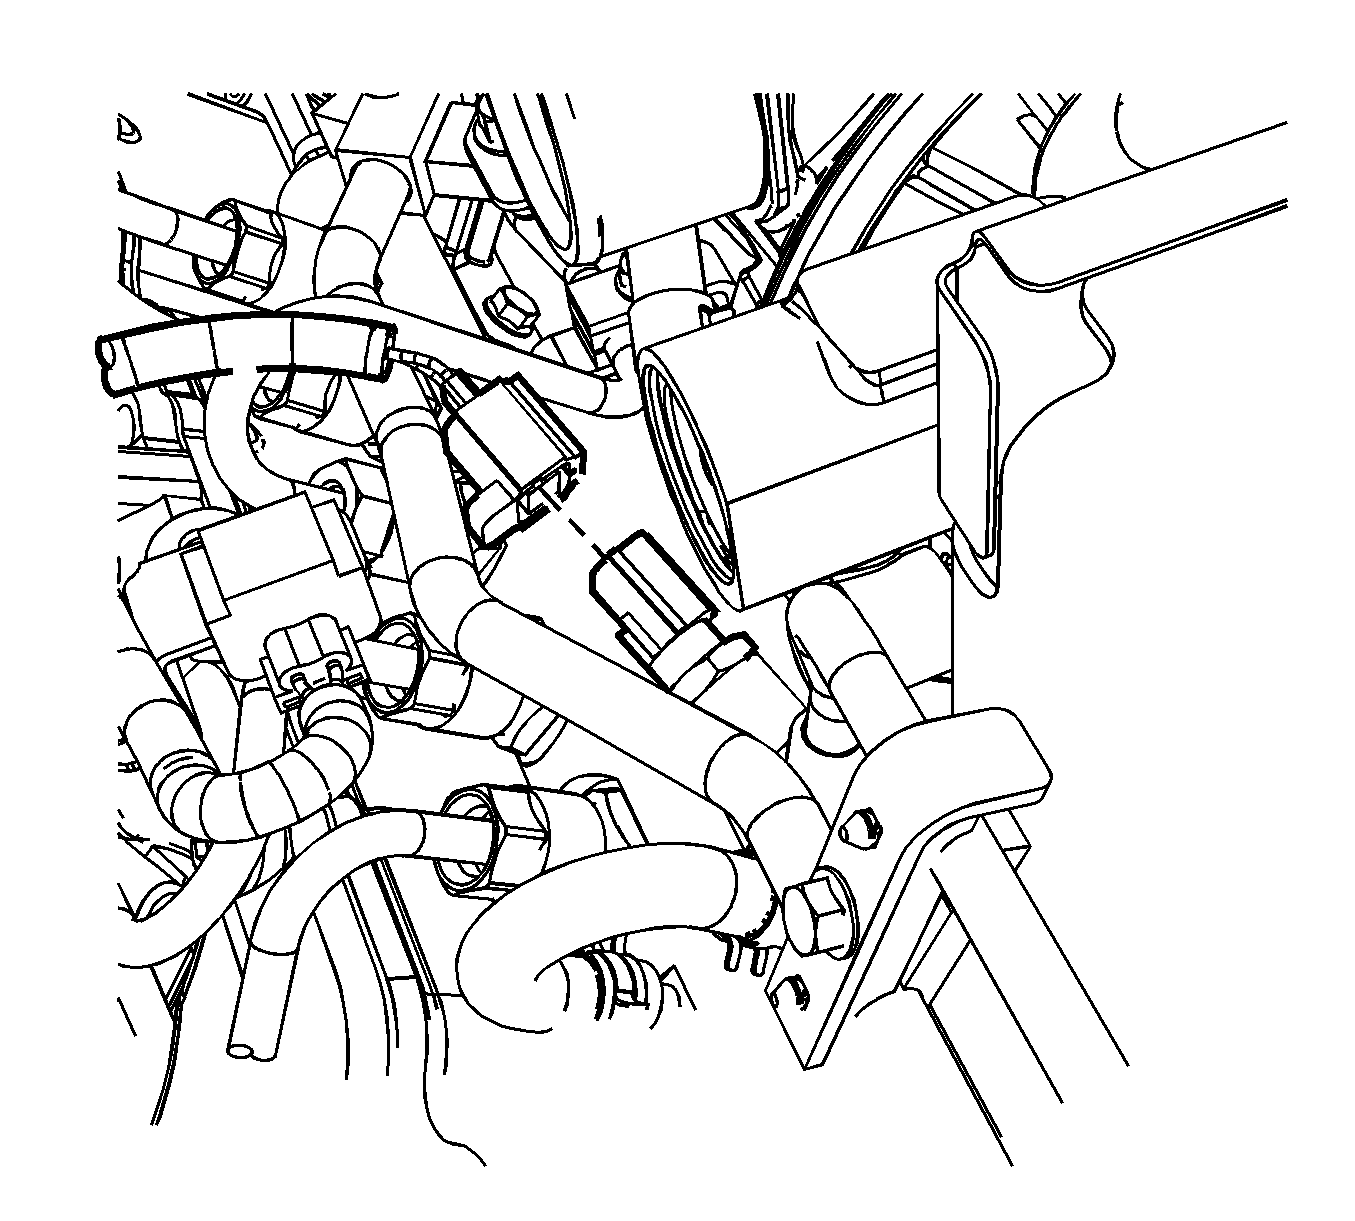
- Disconnect the coolant temperature sensor electrical connector.
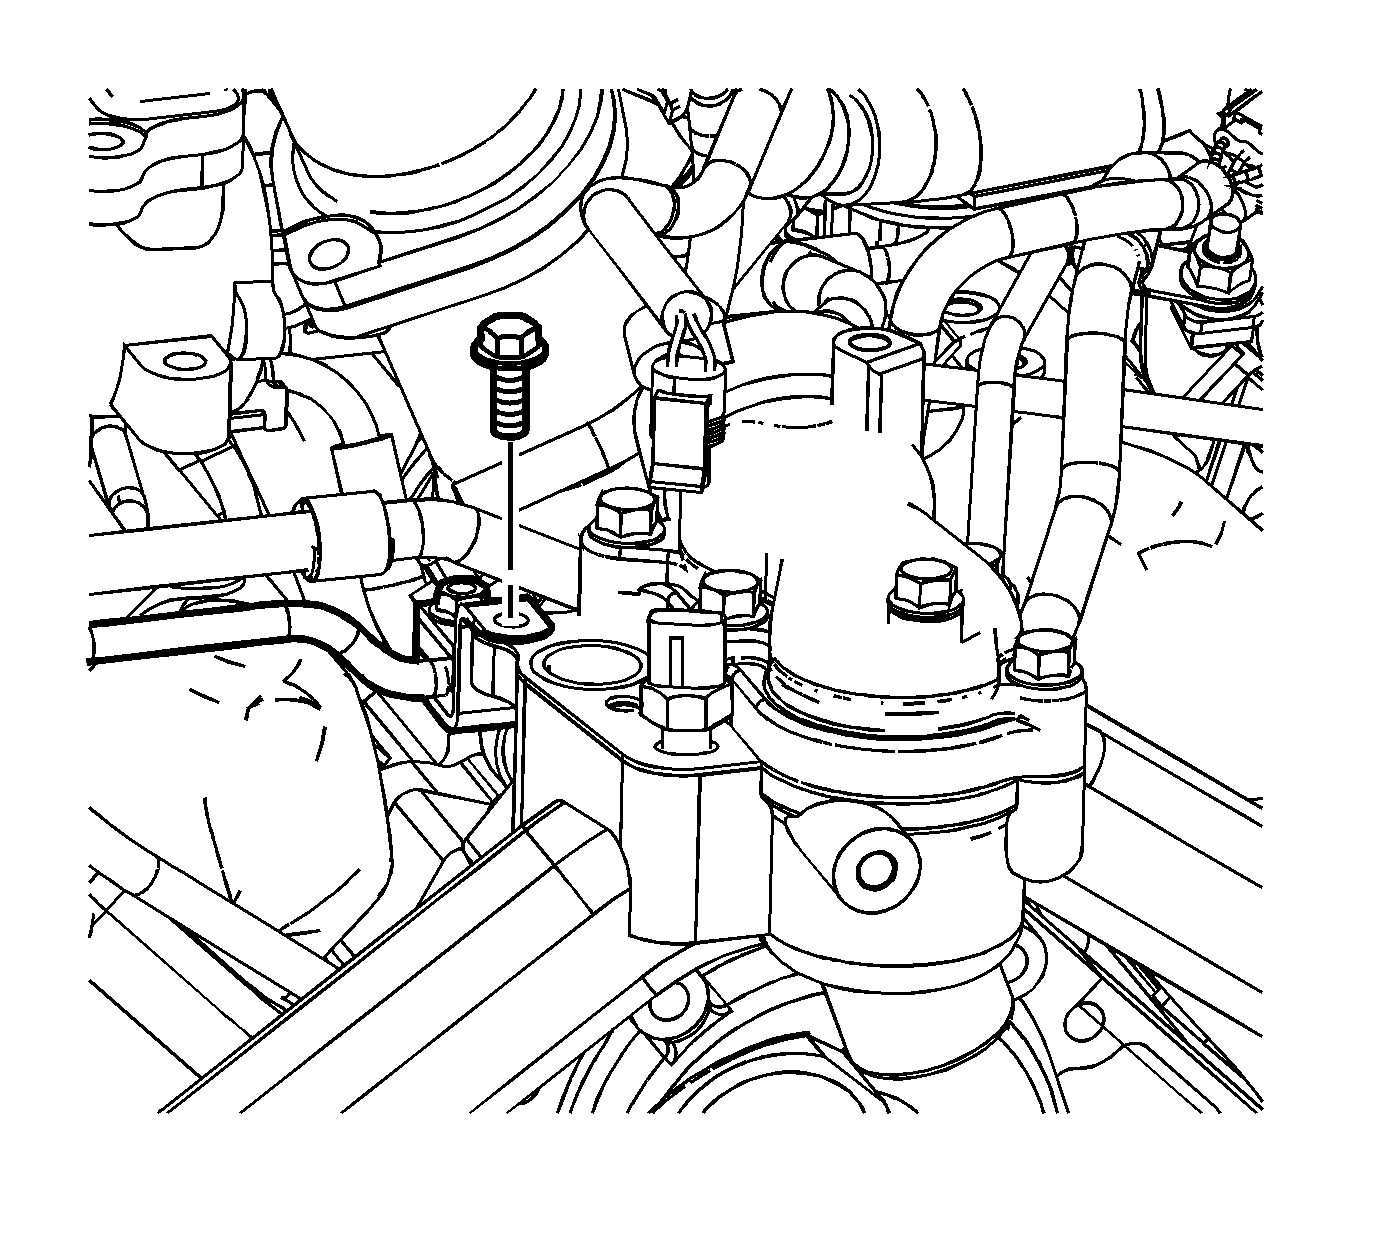
- Remove the fuel pipe bracket bolt.
- Remove the thermostat housing crossover bolts/nuts and the thermostat housing crossover.
- Remove the thermostat pipe. Refer to Thermostat Bypass Pipes Replacement .
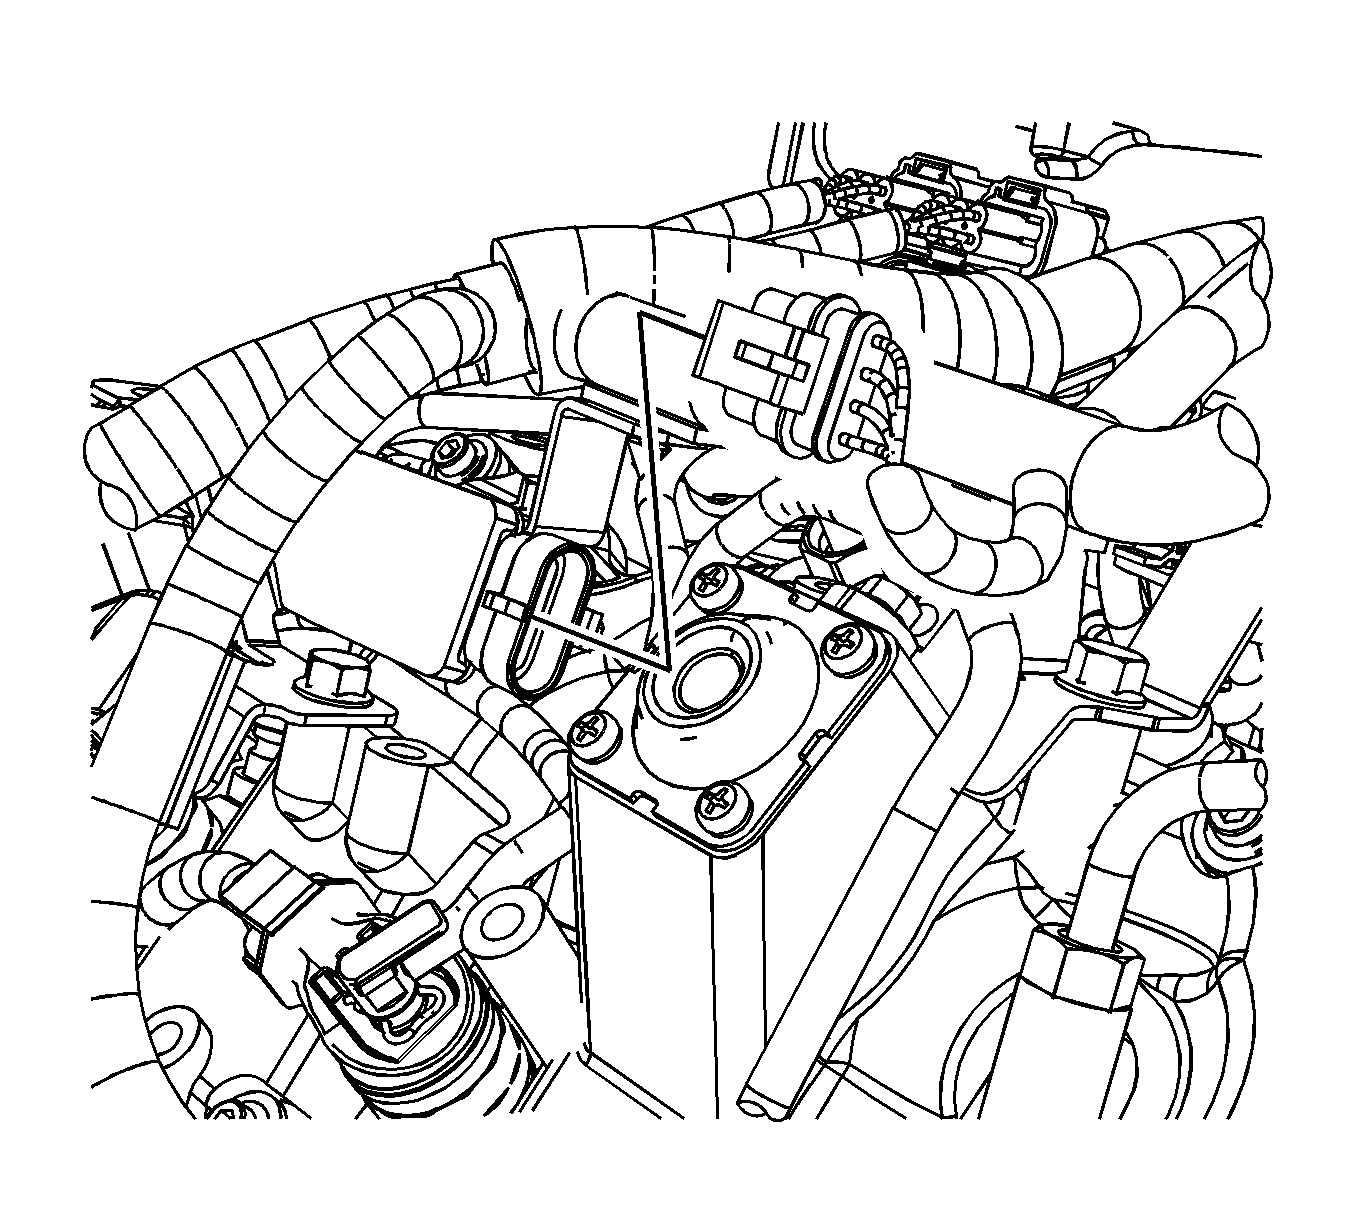
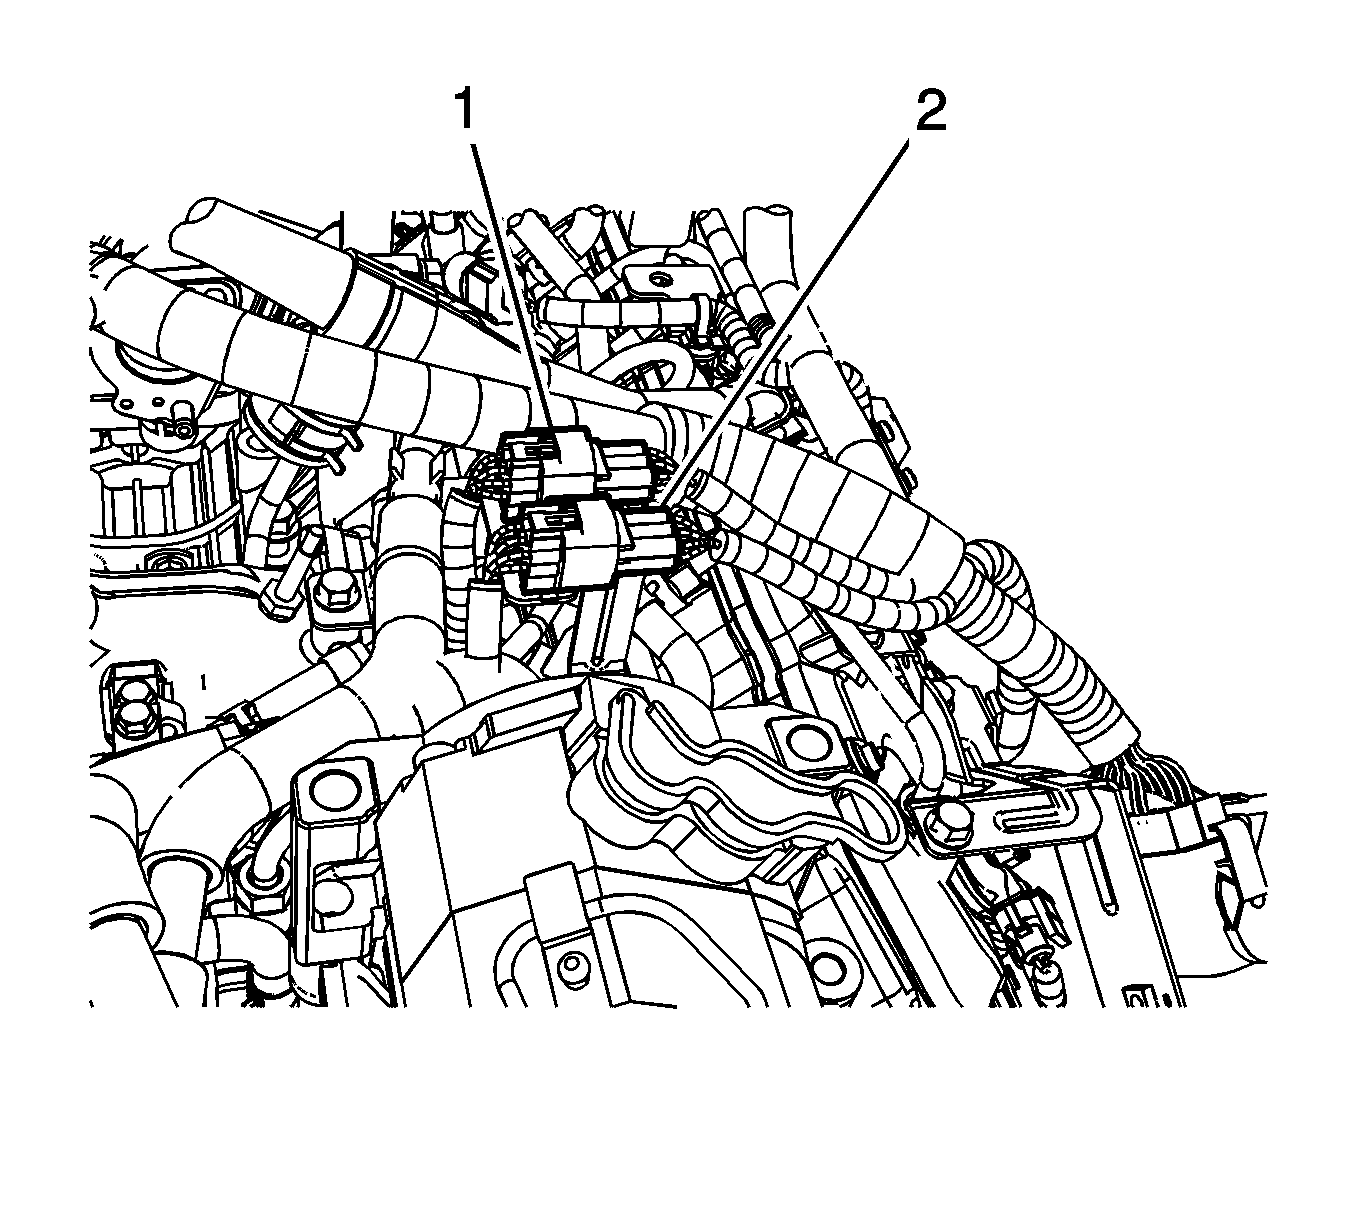
- Disconnect the intake air heater (IAH) electrical connector.
- Disconnect the engine harness electrical connector from the manifold absolute pressure (MAP) sensor.
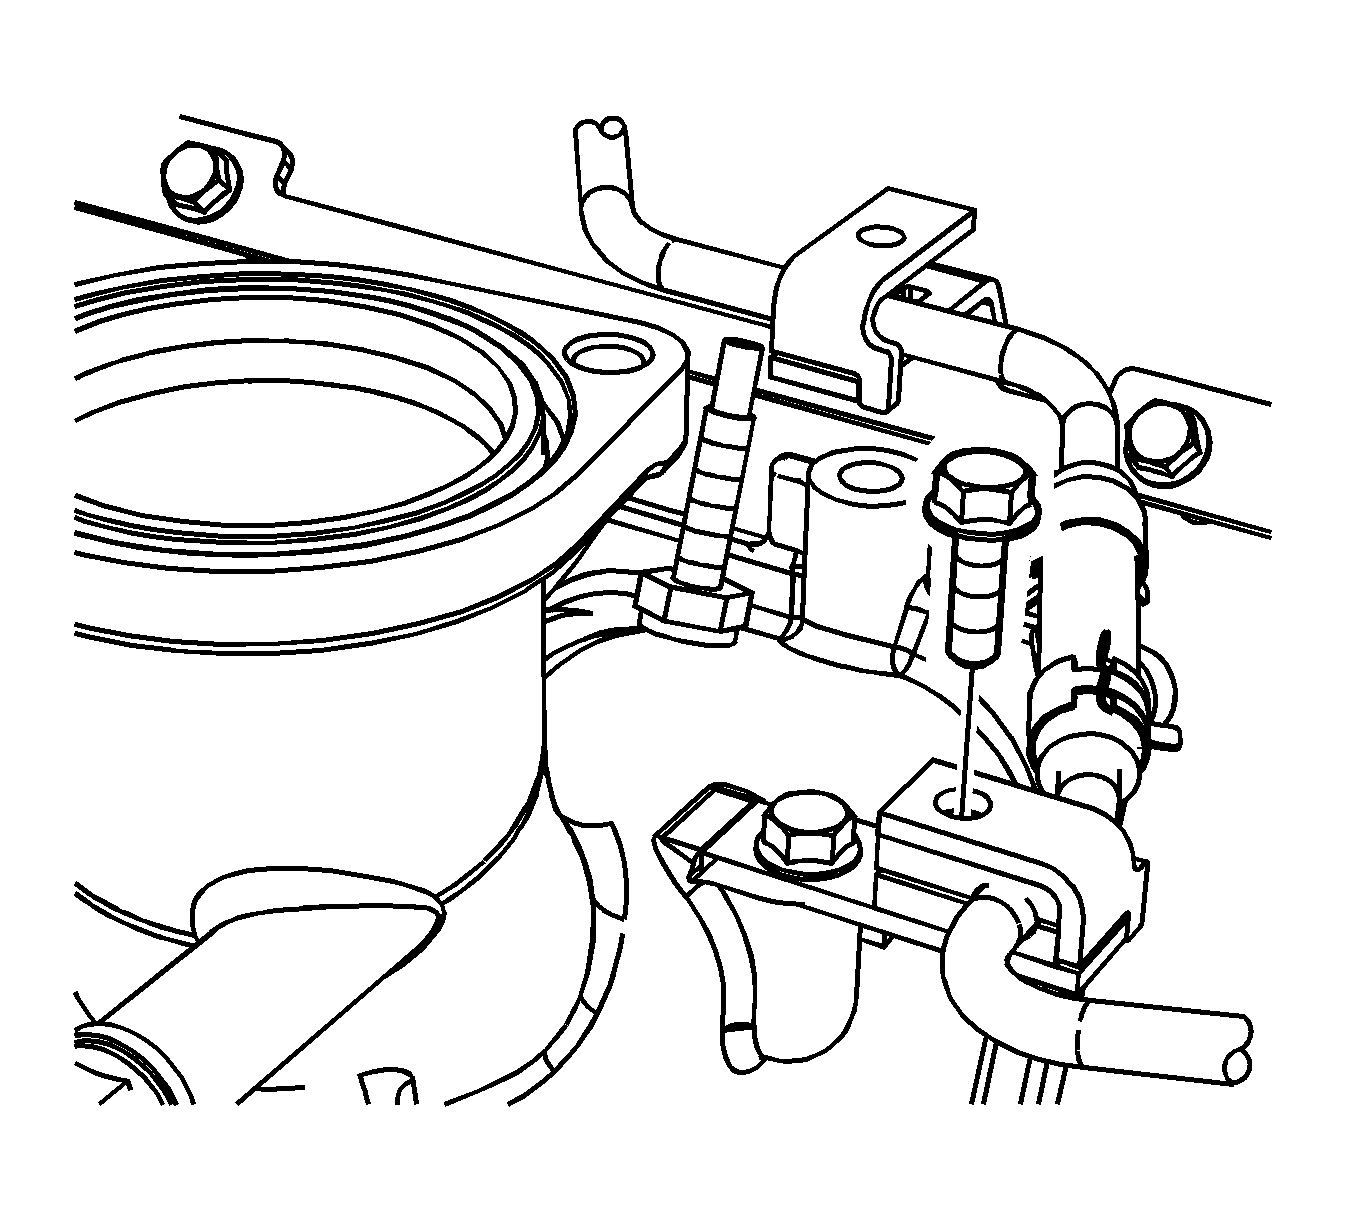
- Disconnect the positive cable from the IAH by performing the following:
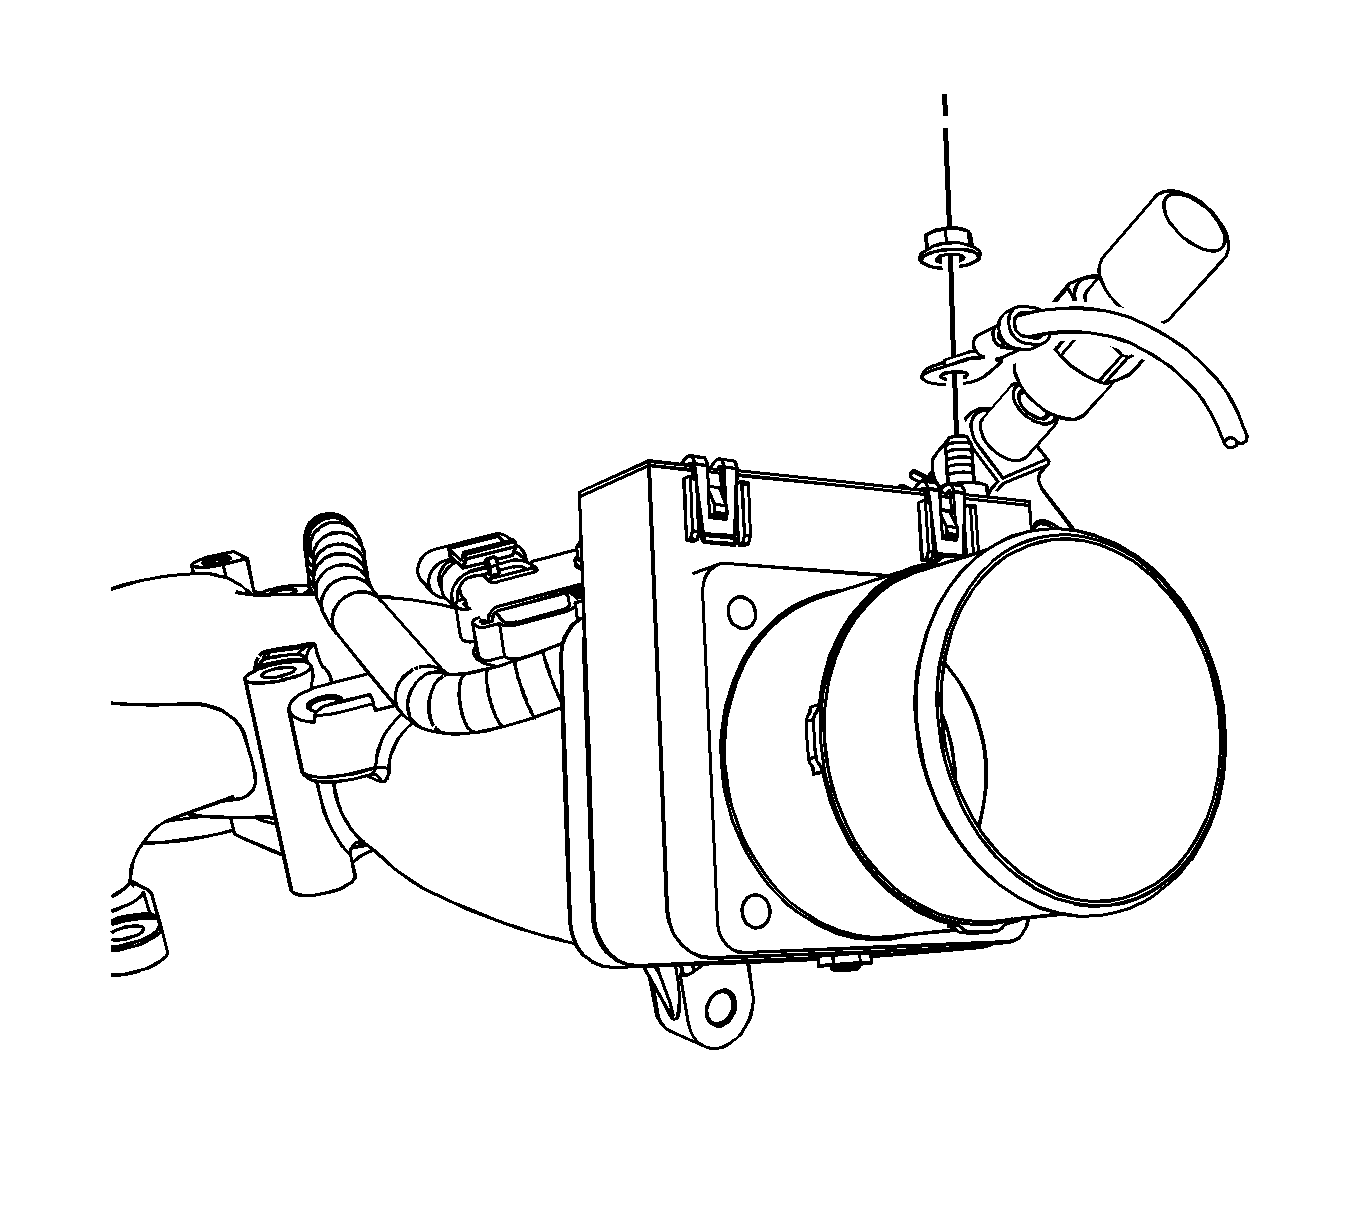
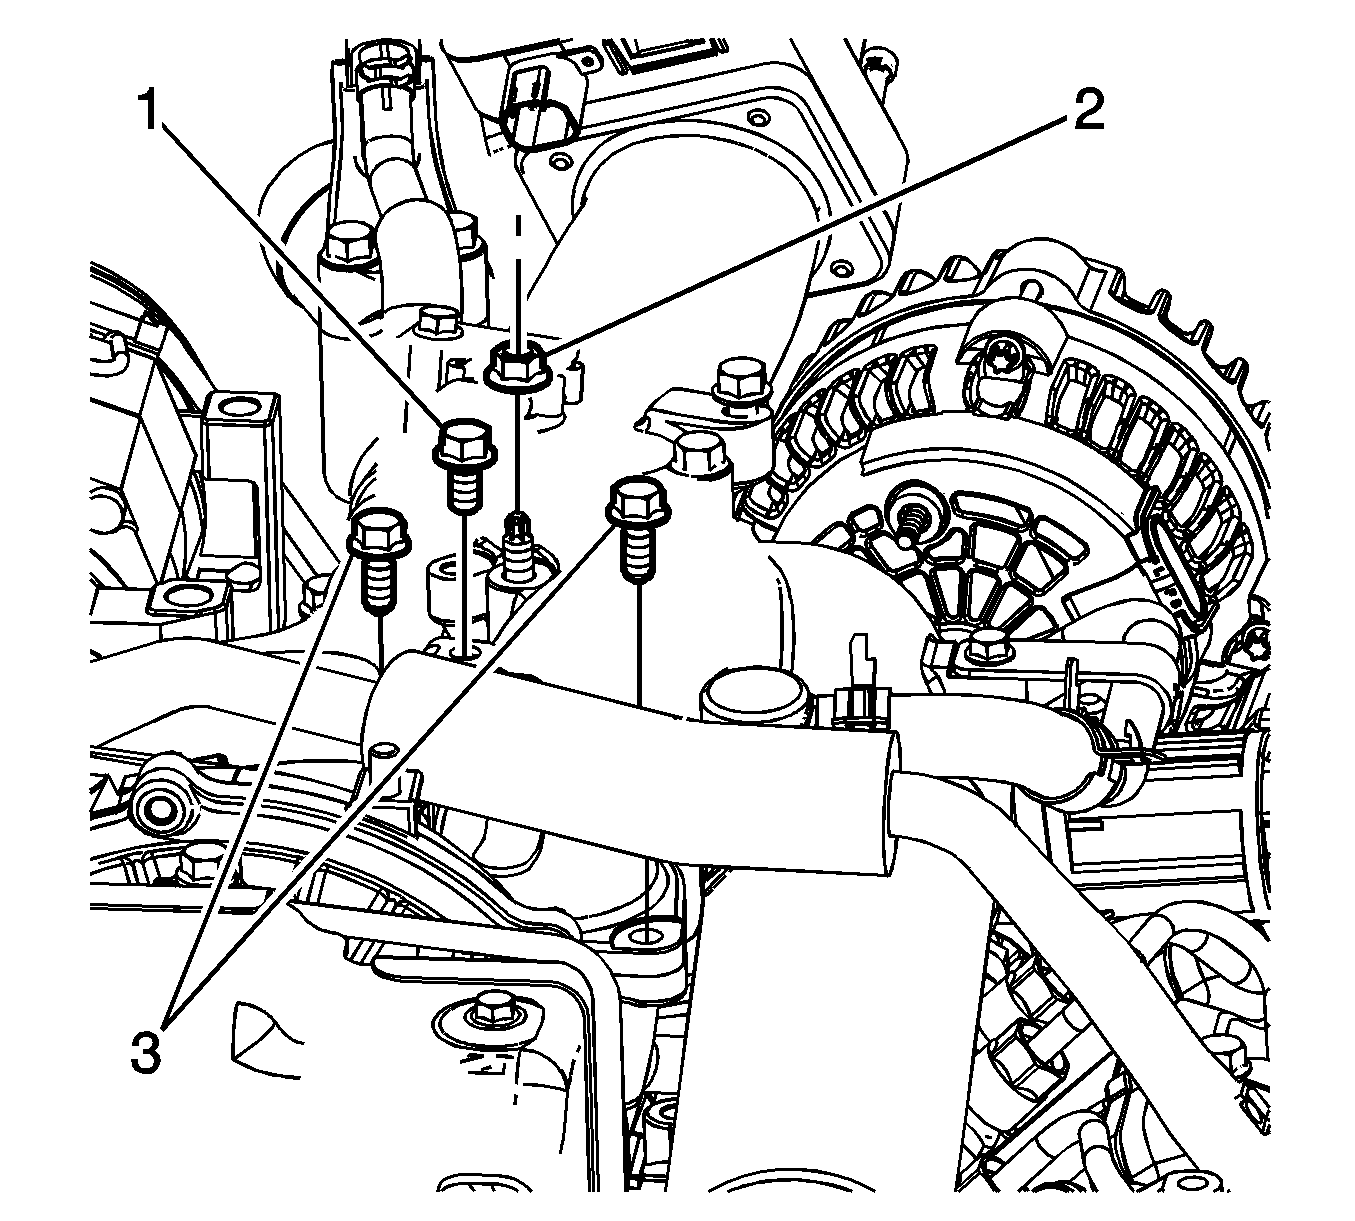
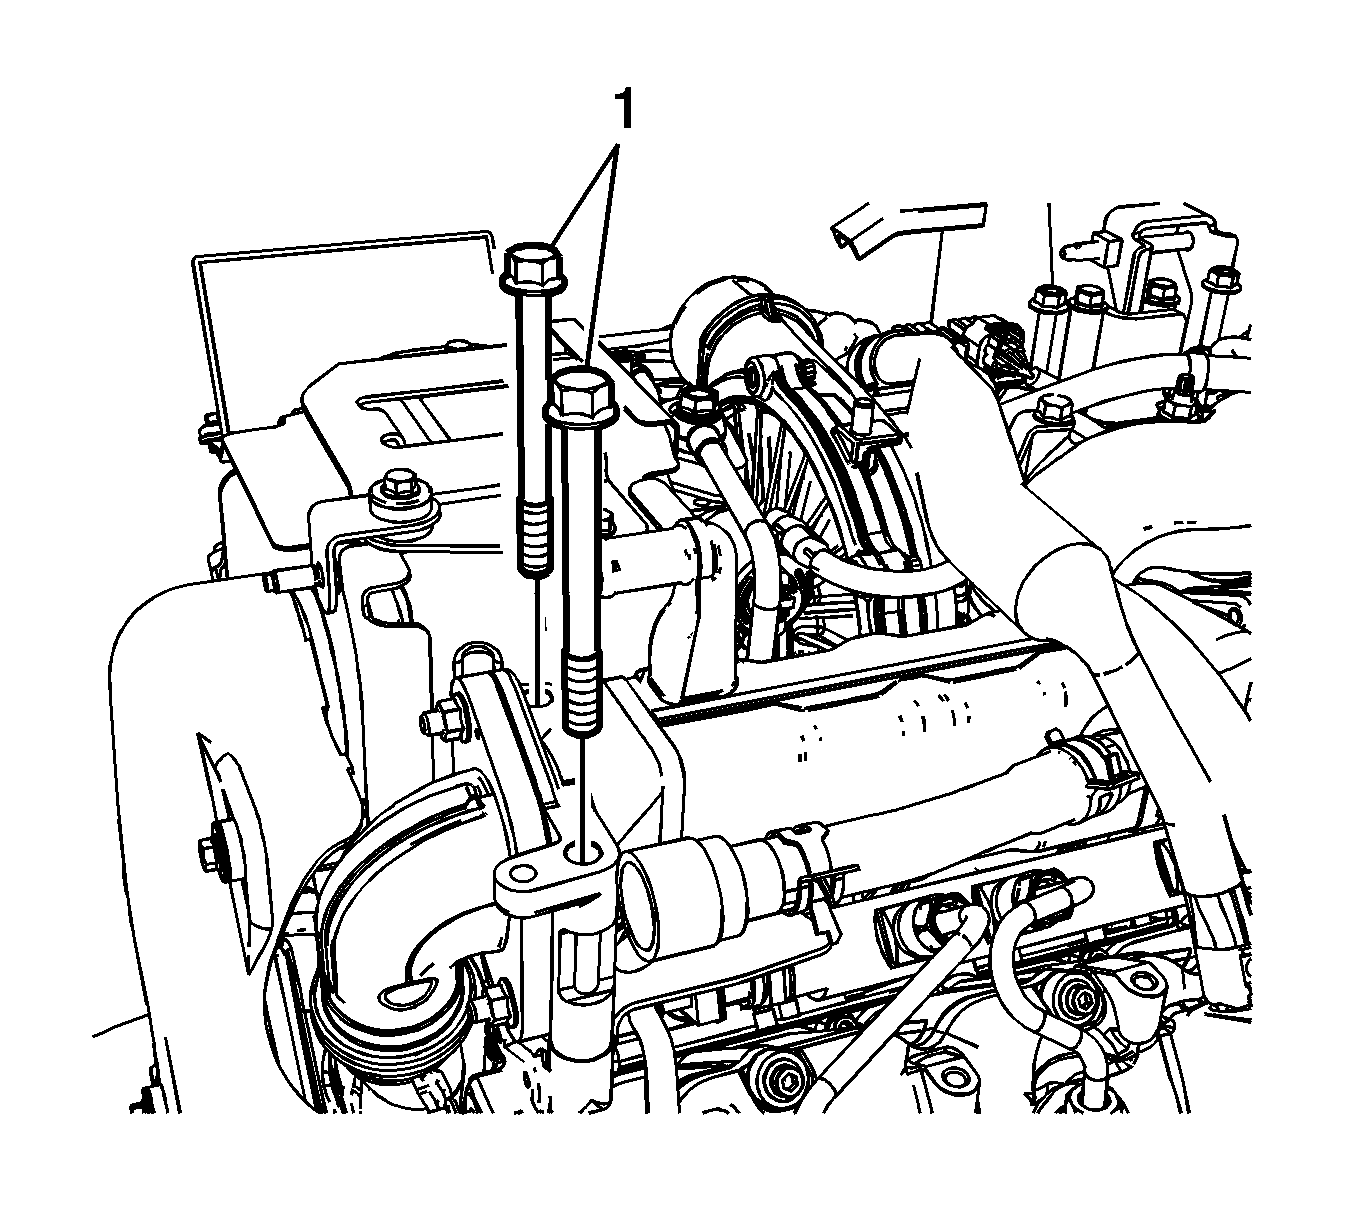
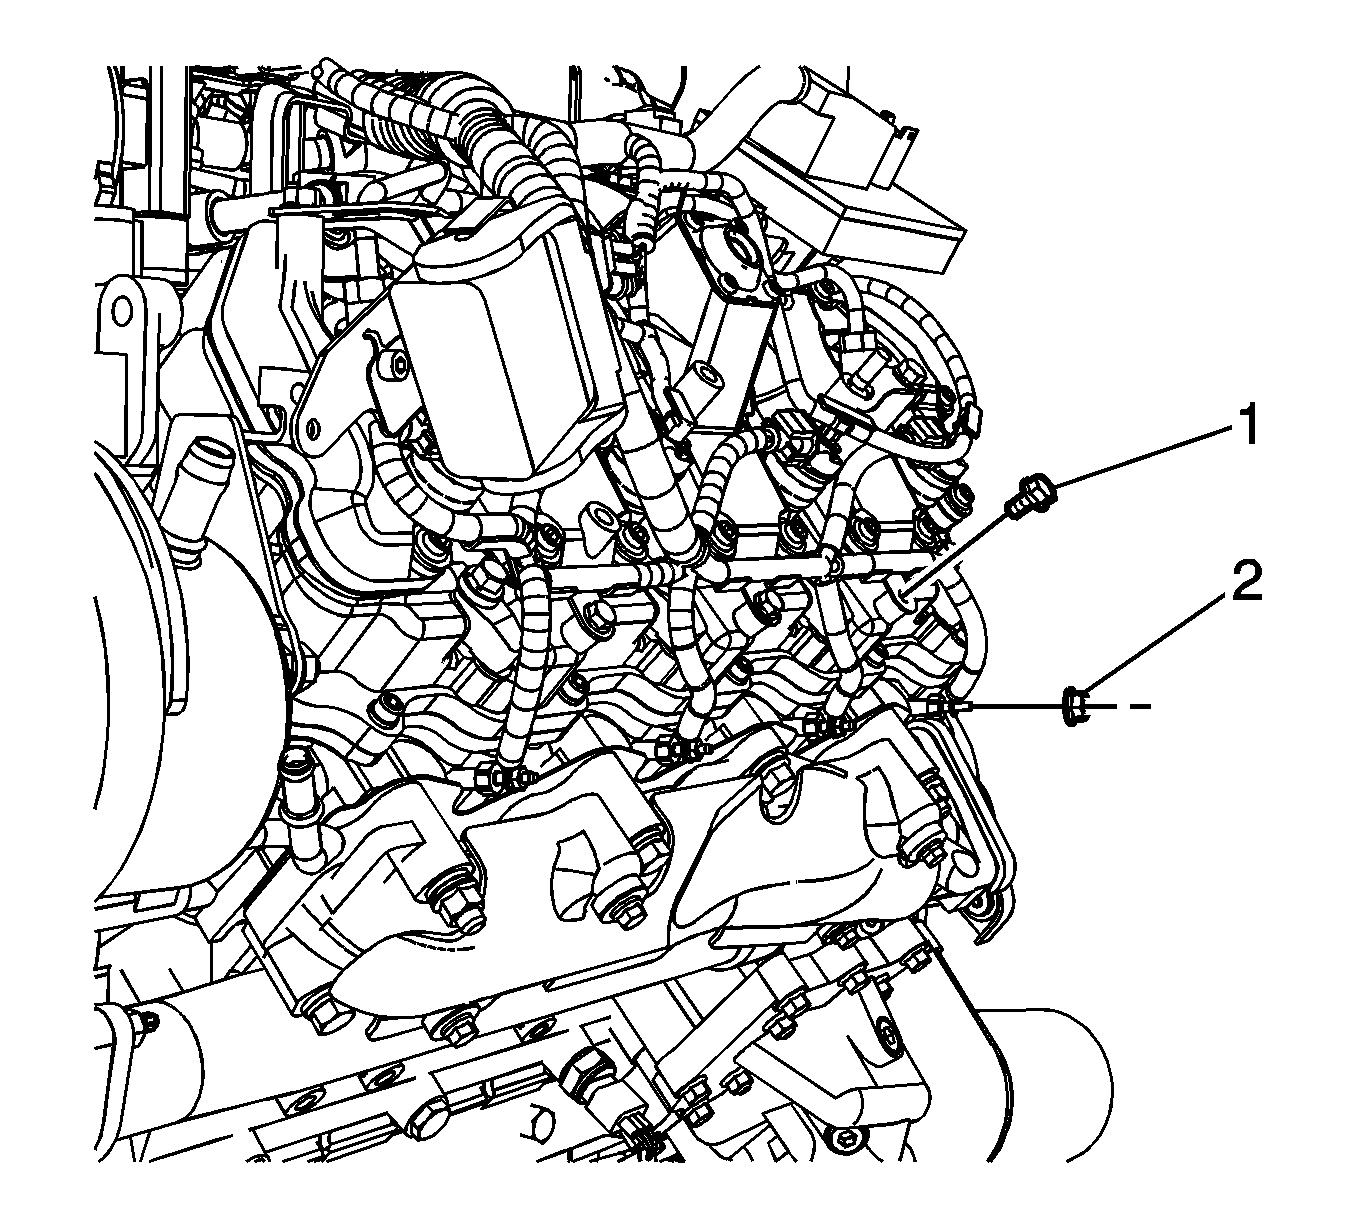
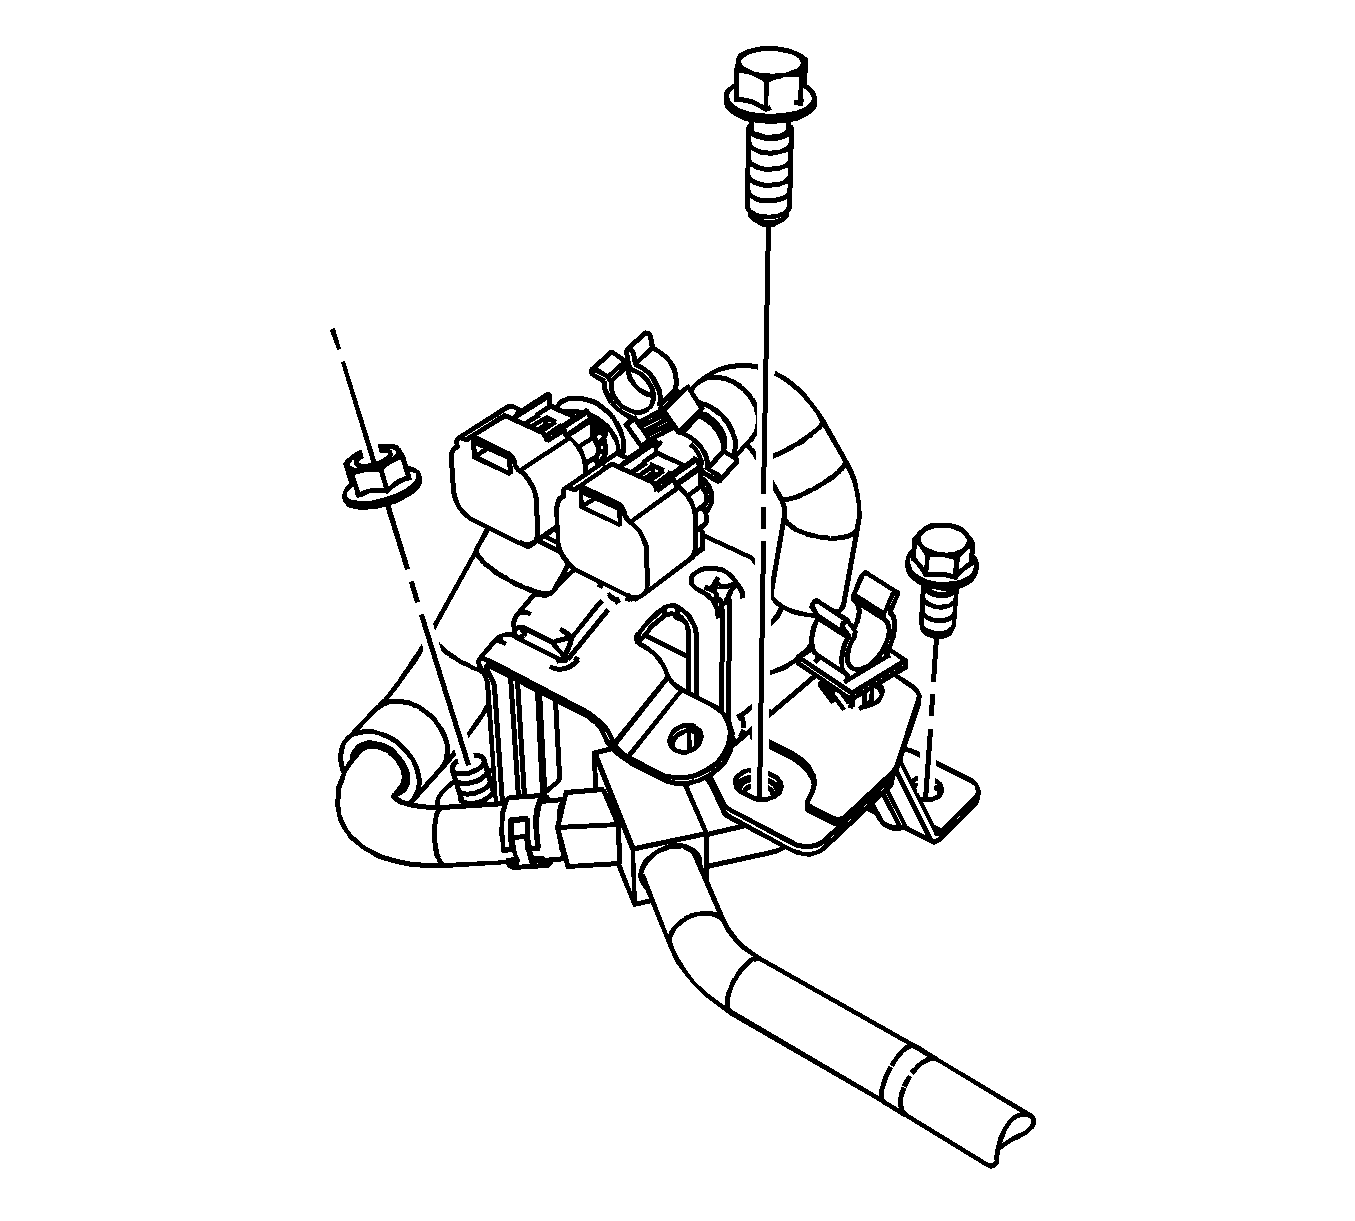
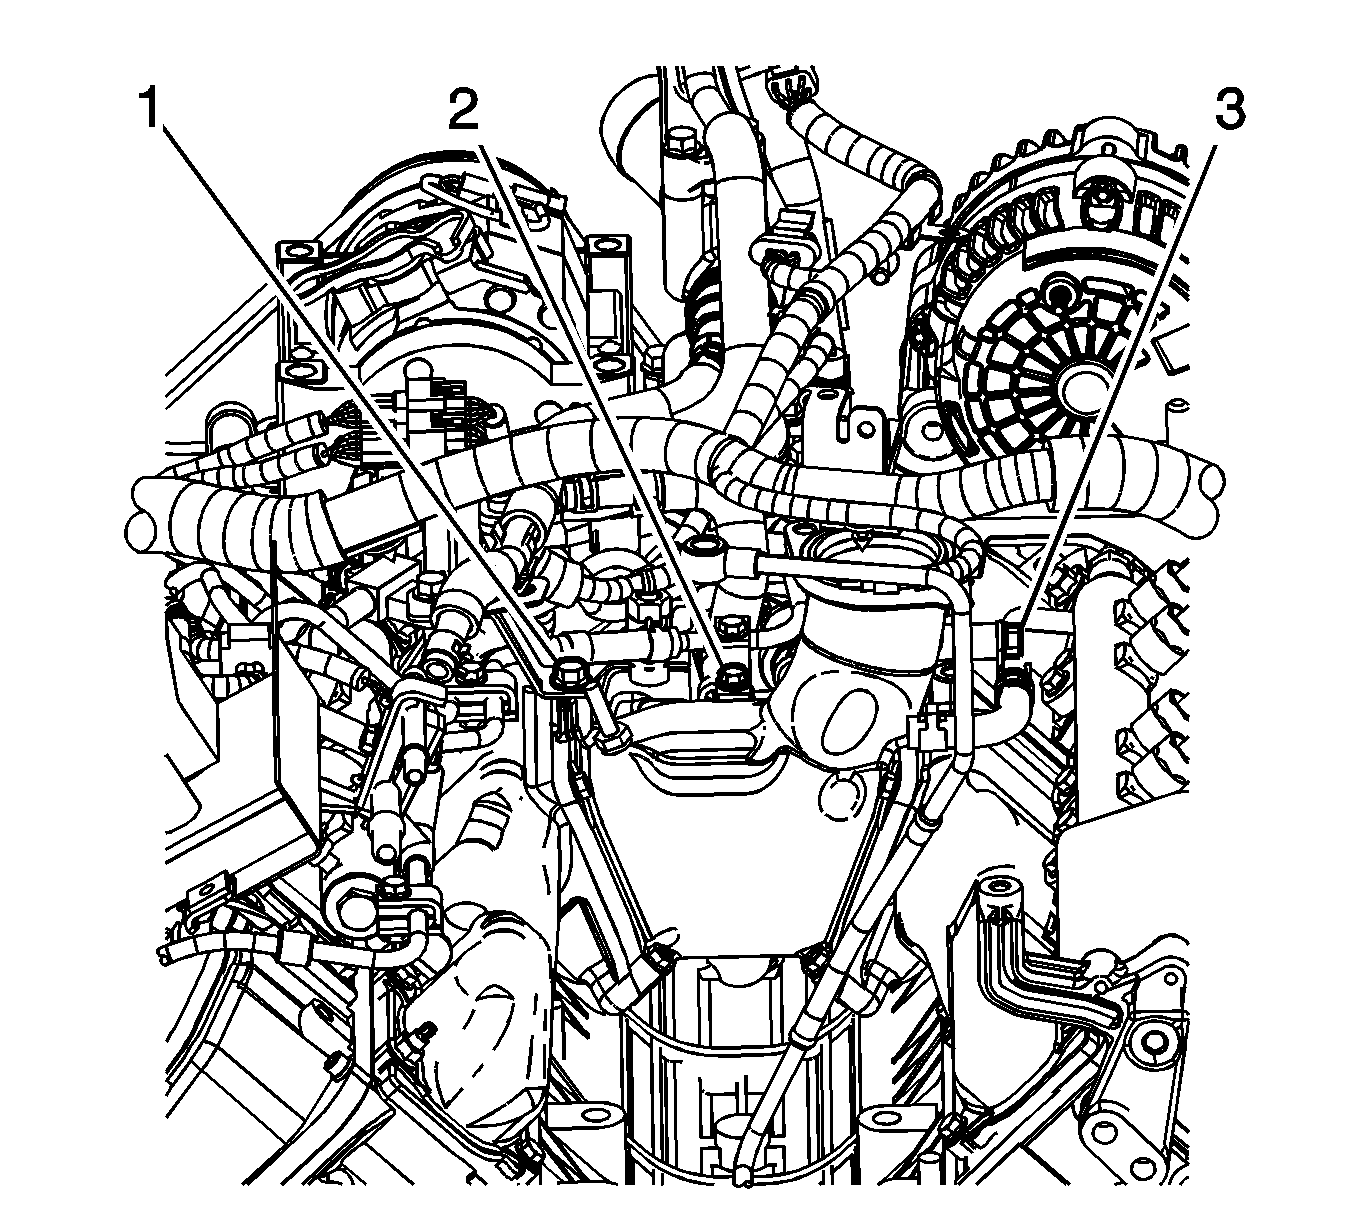
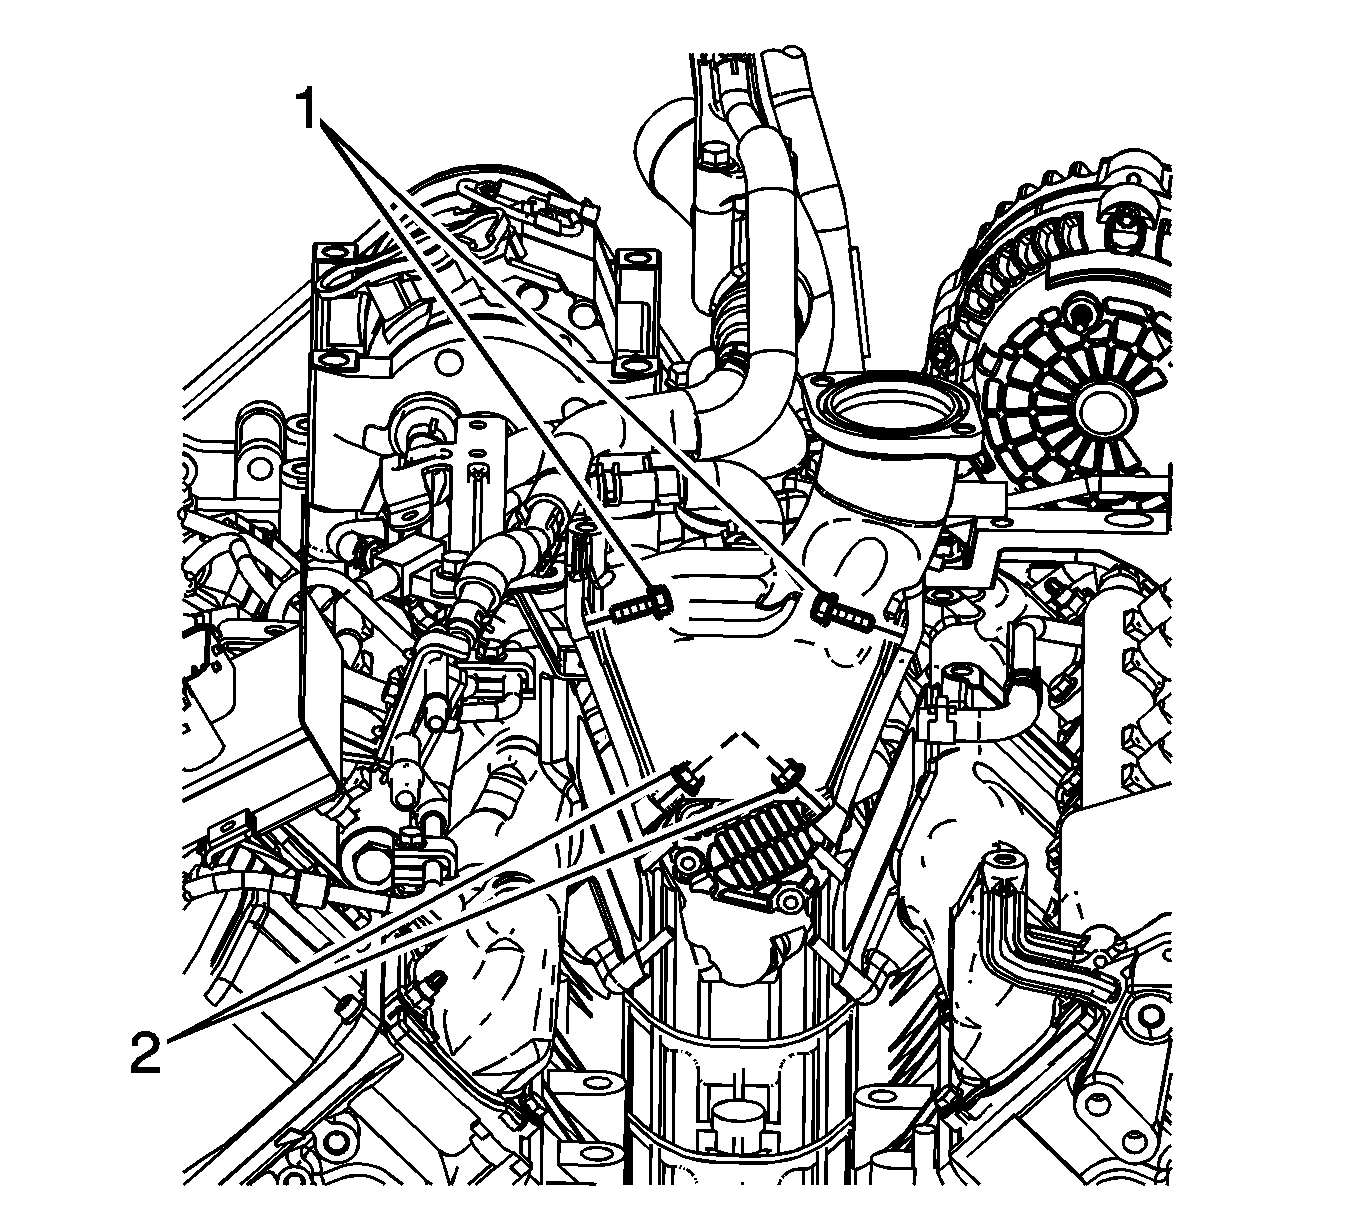
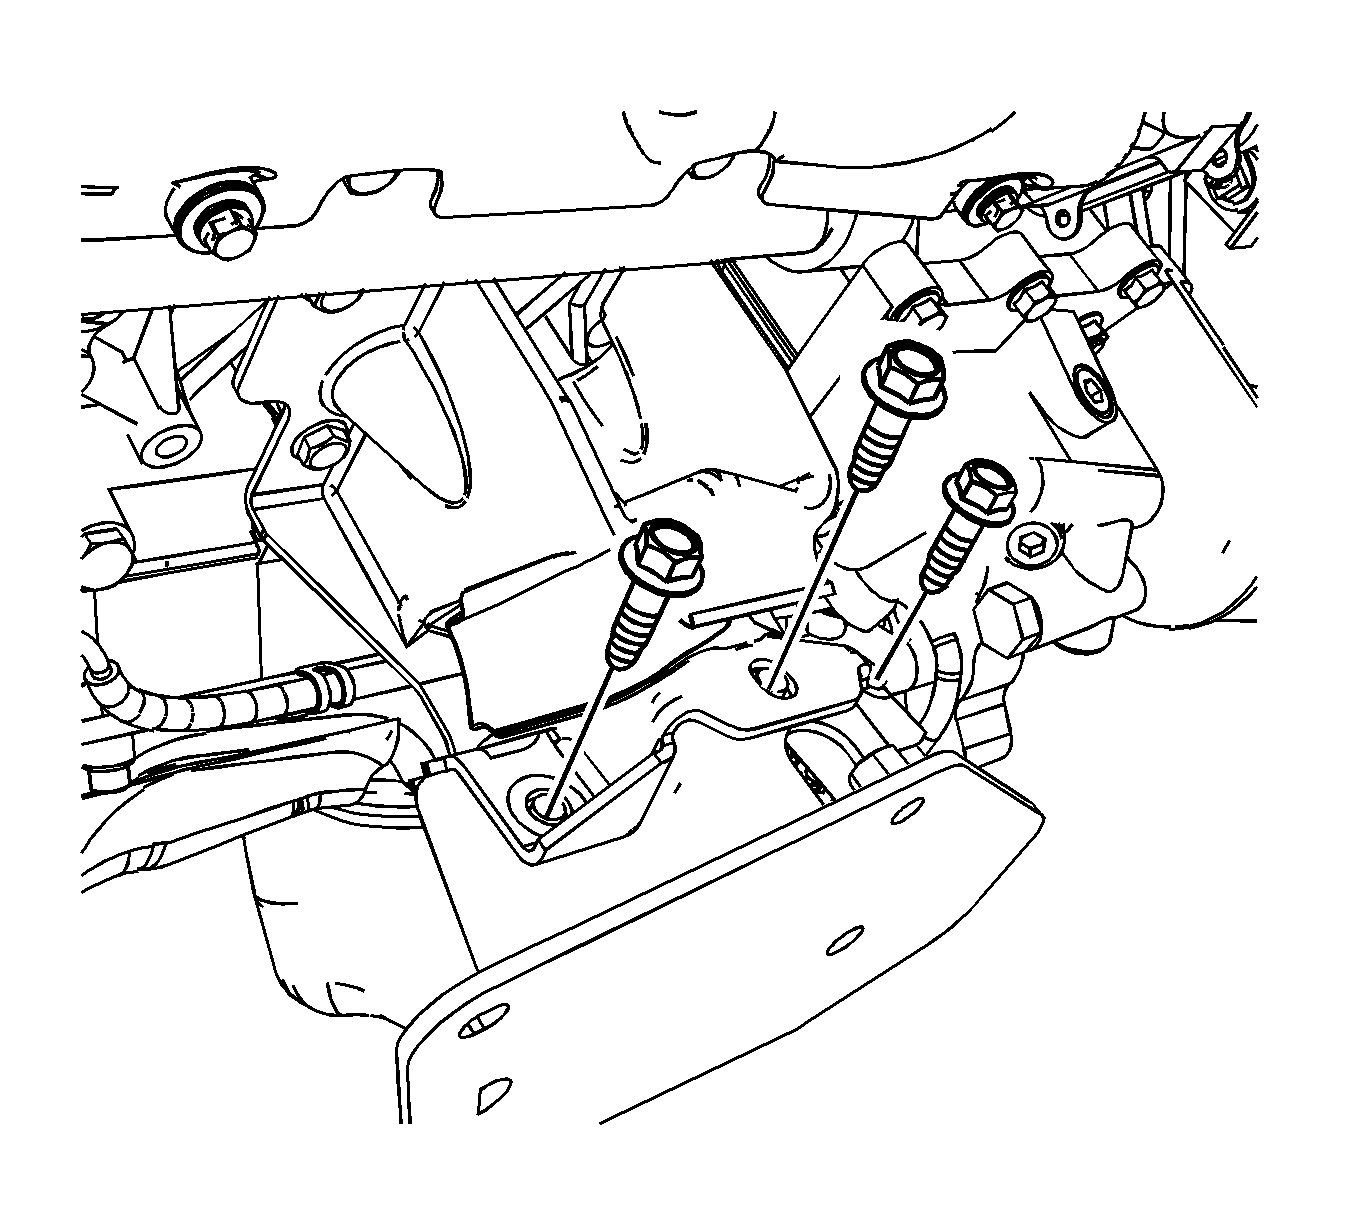
- Remove the engine wiring harness clip bolt (1) at the rear of the intake manifold tube.
- Remove the 2 rear intake manifold tube bolts (3).
- Remove the rear intake manifold tube nut (2).
- Remove the engine wiring harness clip from the intake manifold tube.
- Remove the engine wiring harness clip bolt (3).
- Remove the EGR cooler water pipe bracket bolt (5).
- Remove the intake manifold tube bolts (2, 4) and nut (1).
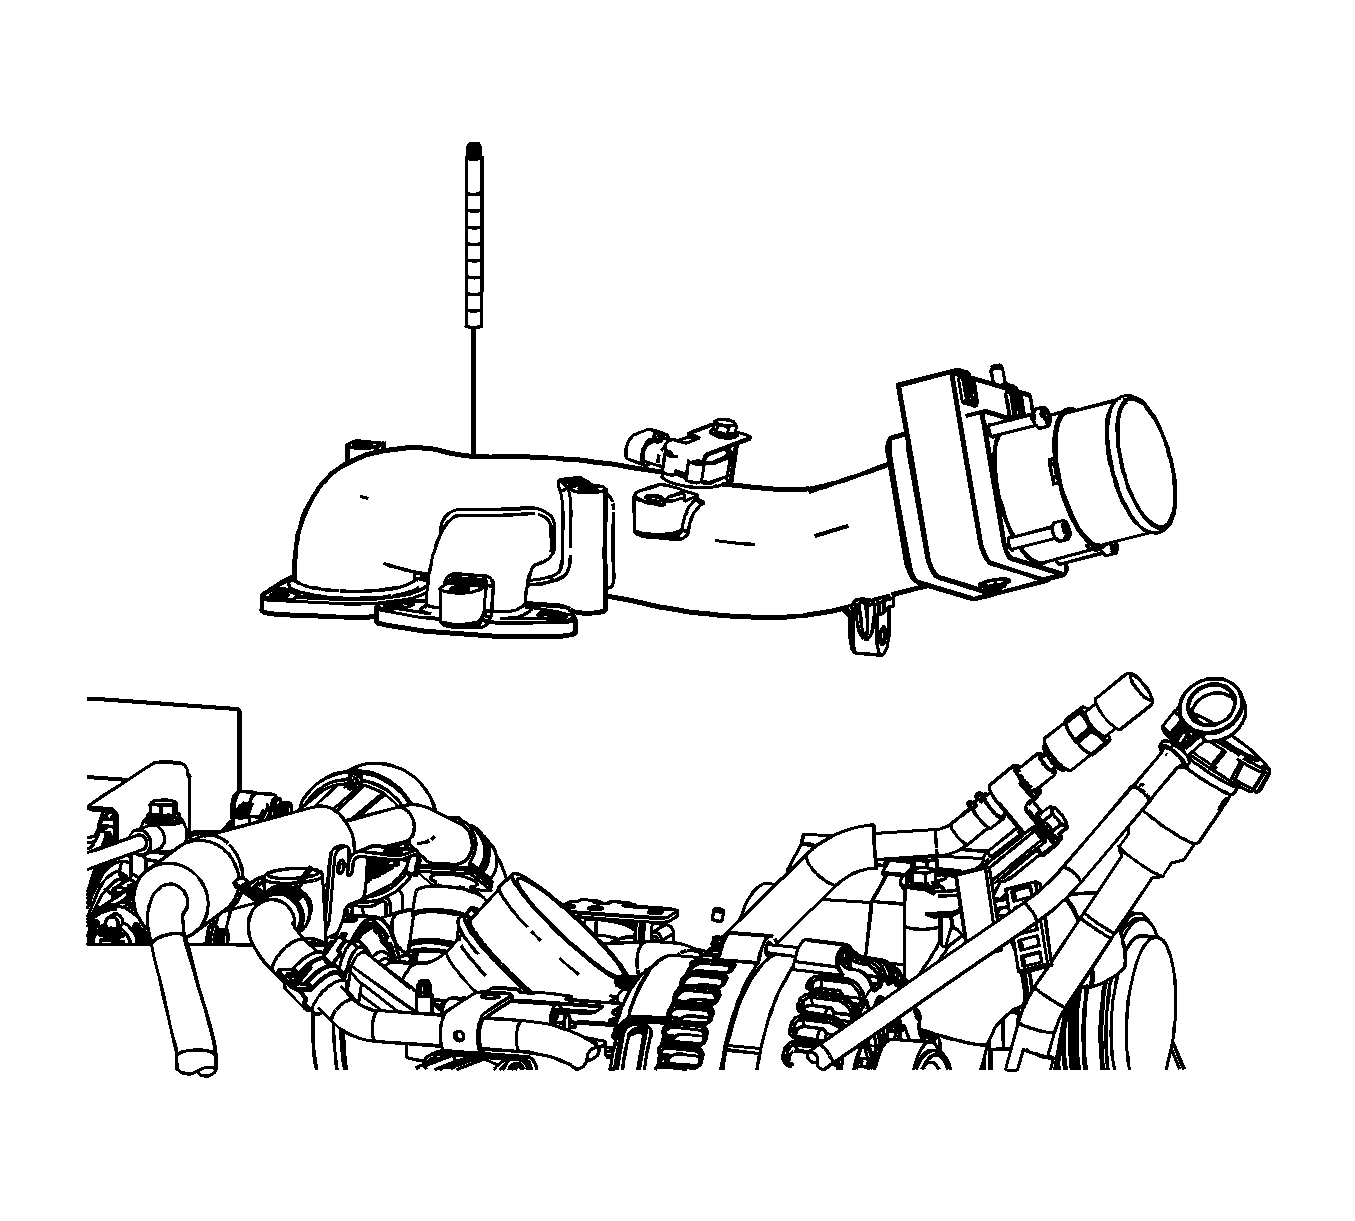
- Remove the intake manifold tube with the stud.
- Remove and discard the 2 metal EGR gaskets from the EGR valve.
- Remove and discard the O-ring seal from the center intake manifold.
- Remove the air intake pipe. Refer to Air Intake Pipe Replacement .
- Remove the right exhaust pipe. Refer to Exhaust Pipe Replacement - Right Side .
- Remove the left exhaust pipe. Refer to Exhaust Pipe Replacement - Left Side .
- Remove the EGR coolant hose. Refer to Exhaust Gas Recirculation Coolant Hoses/Pipes Replacement .
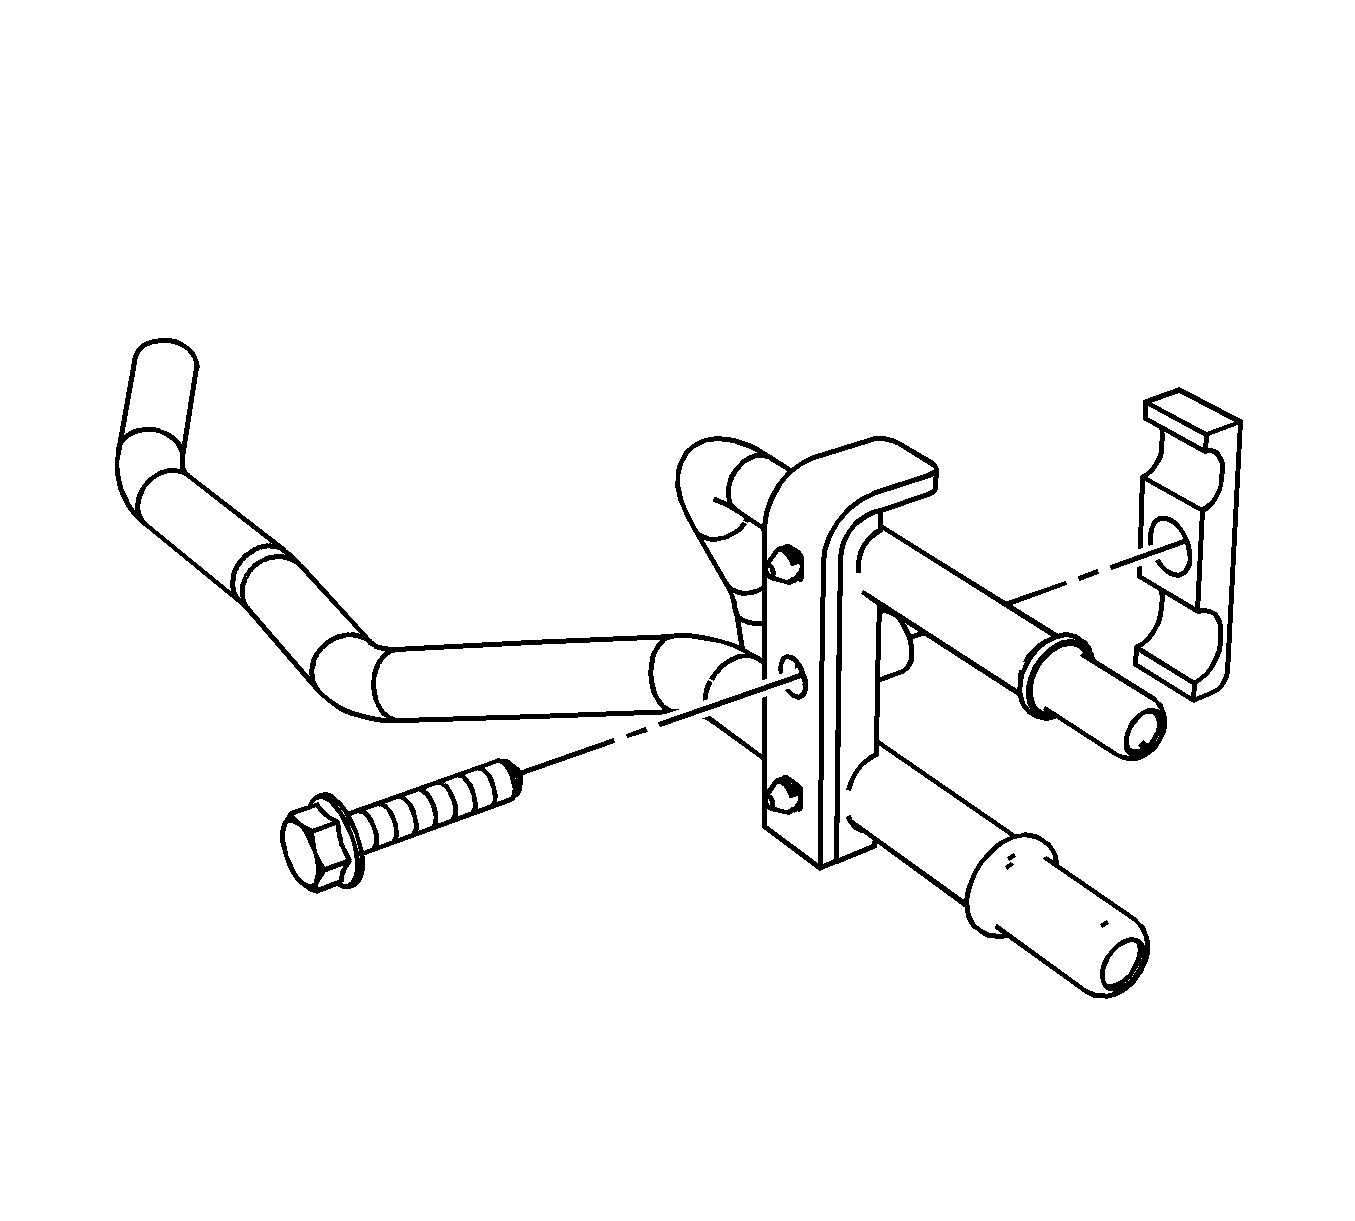
- Compress the clamp (1) and disconnect the EGR heater inlet hose/pipe (2) from the EGR cooler tube.
- Remove the EGR cooler tube bracket bolts (1).
- Remove the crankcase ventilation hose/pipe. Refer to Positive Crankcase Ventilation Hose/Pipe/Tube Replacement .
- Disconnect the EGR solenoid electrical connector.
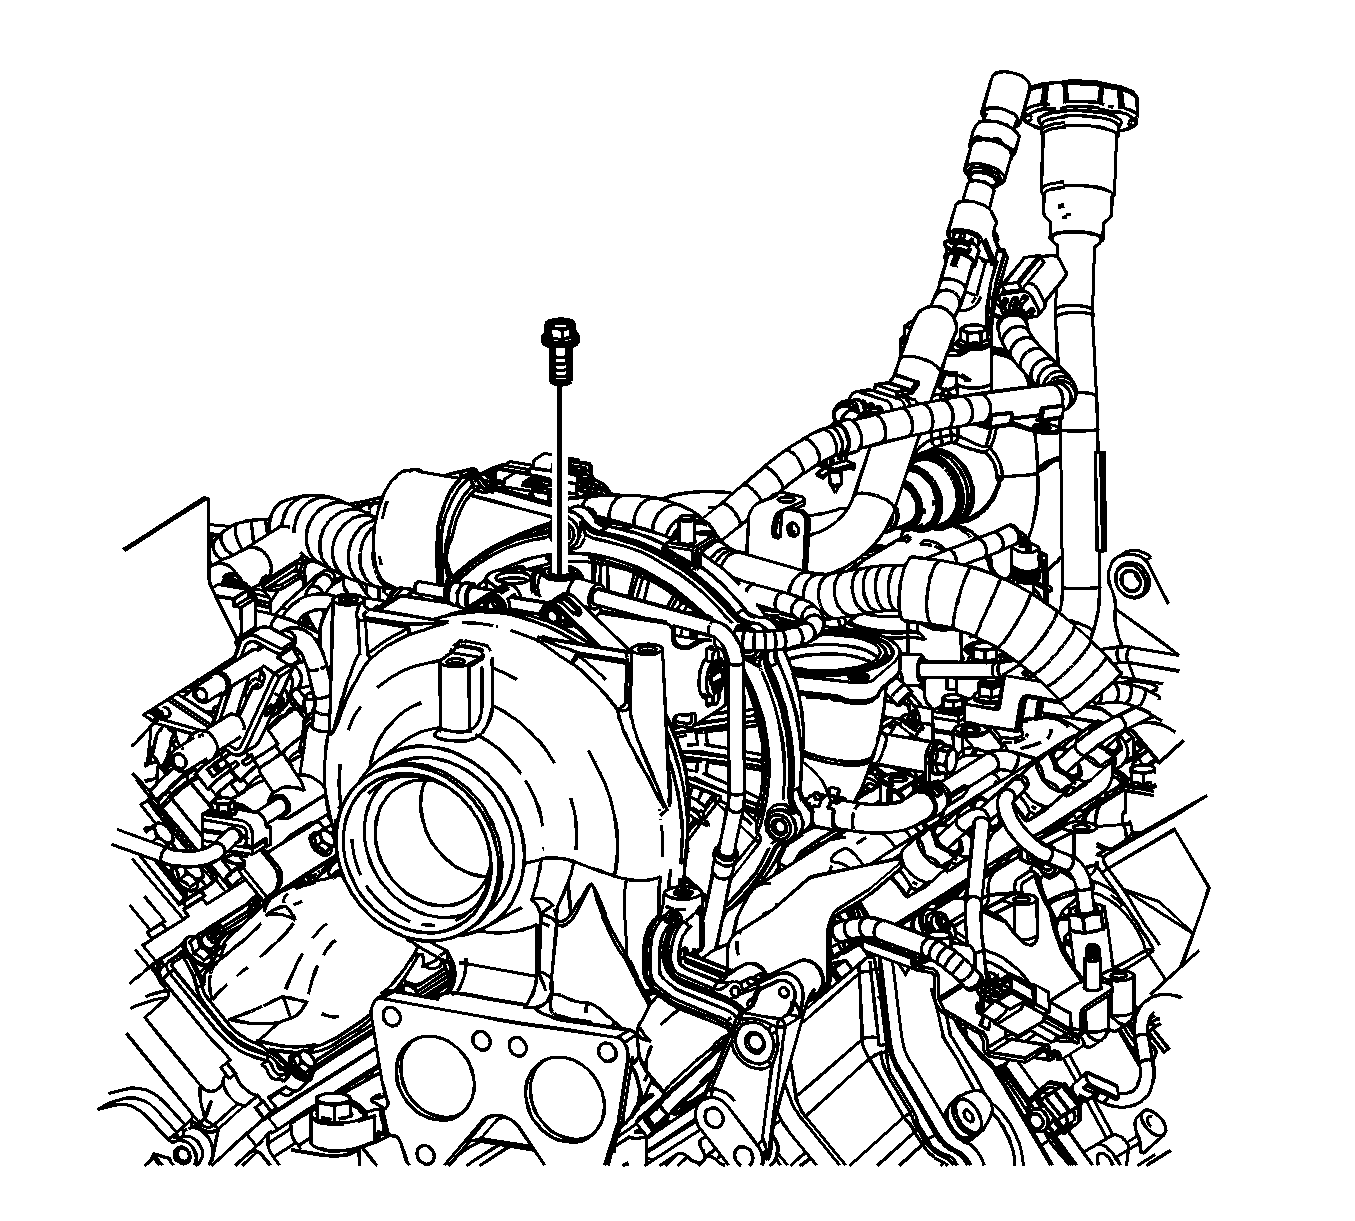
- Remove the EGR nut (1) and bolt (2).
- Remove the EGR valve and EGR cooler tube as an assembly.
- If necessary, remove the EGR bracket bolt, nut, and EGR bracket.
- Remove the 2 bolts and the EGR cooler tube bracket.
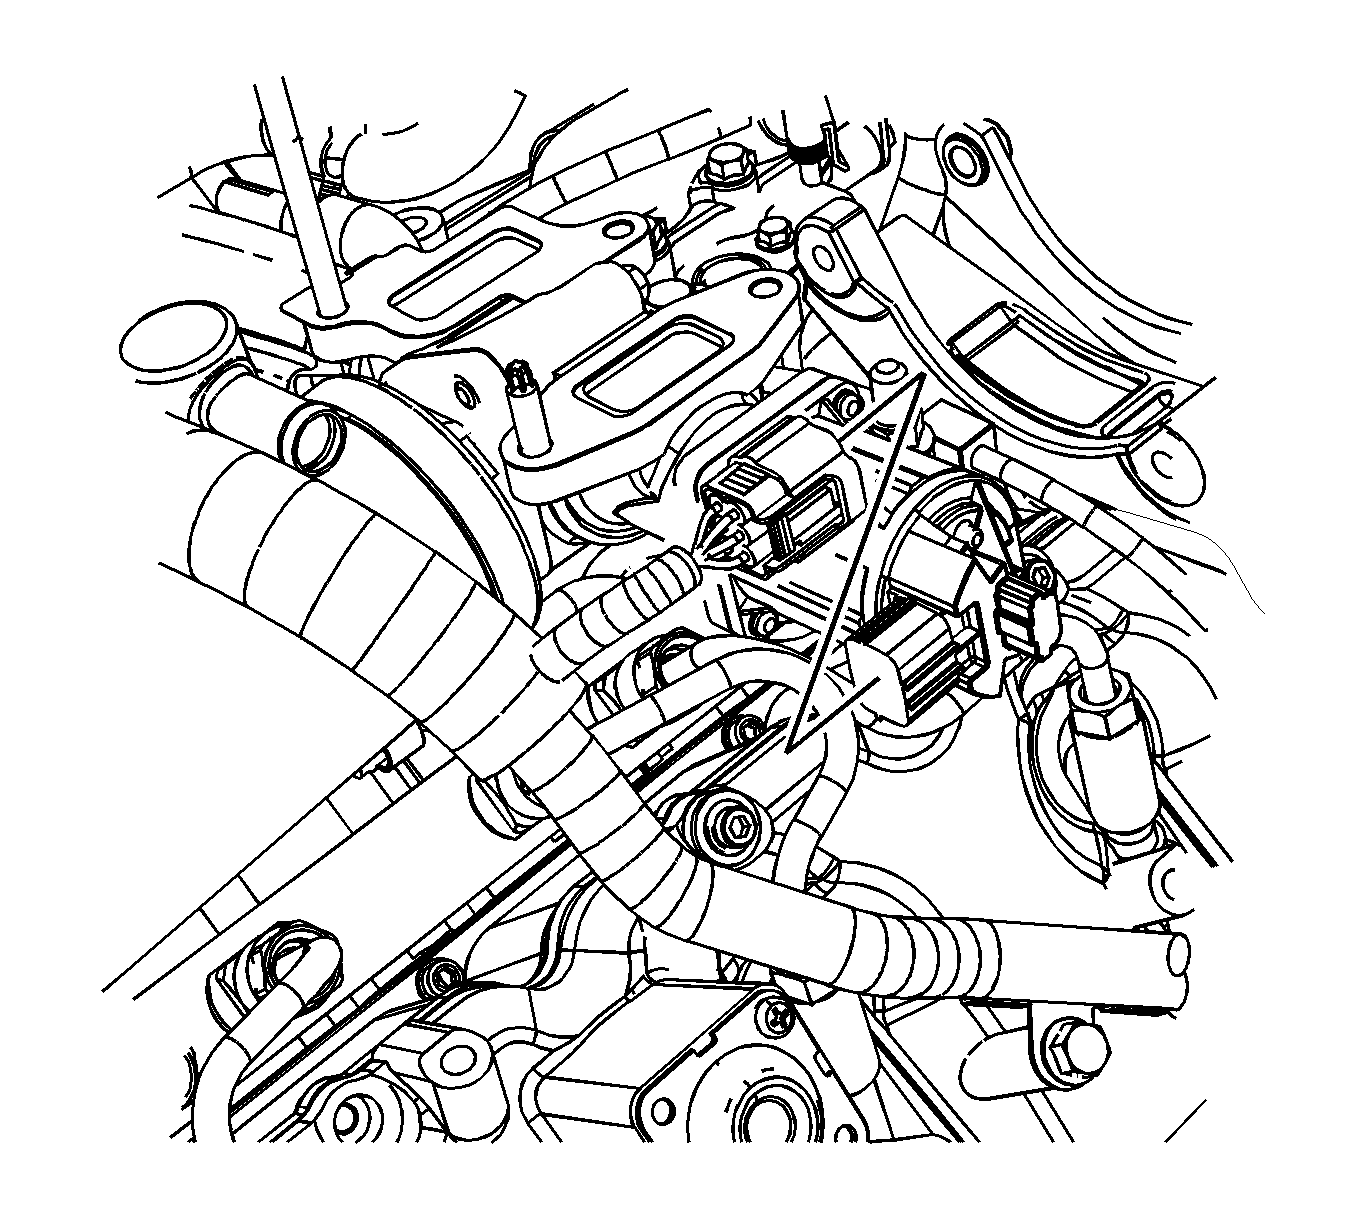
- Disconnect the engine wiring harness electrical connector from the turbocharger vane position sensor.
- Disconnect the engine wiring harness electrical connector from the turbocharger vane control solenoid valve.
- Remove the turbocharger upper heat shield bolts.
- Remove the turbocharger upper heat shield.
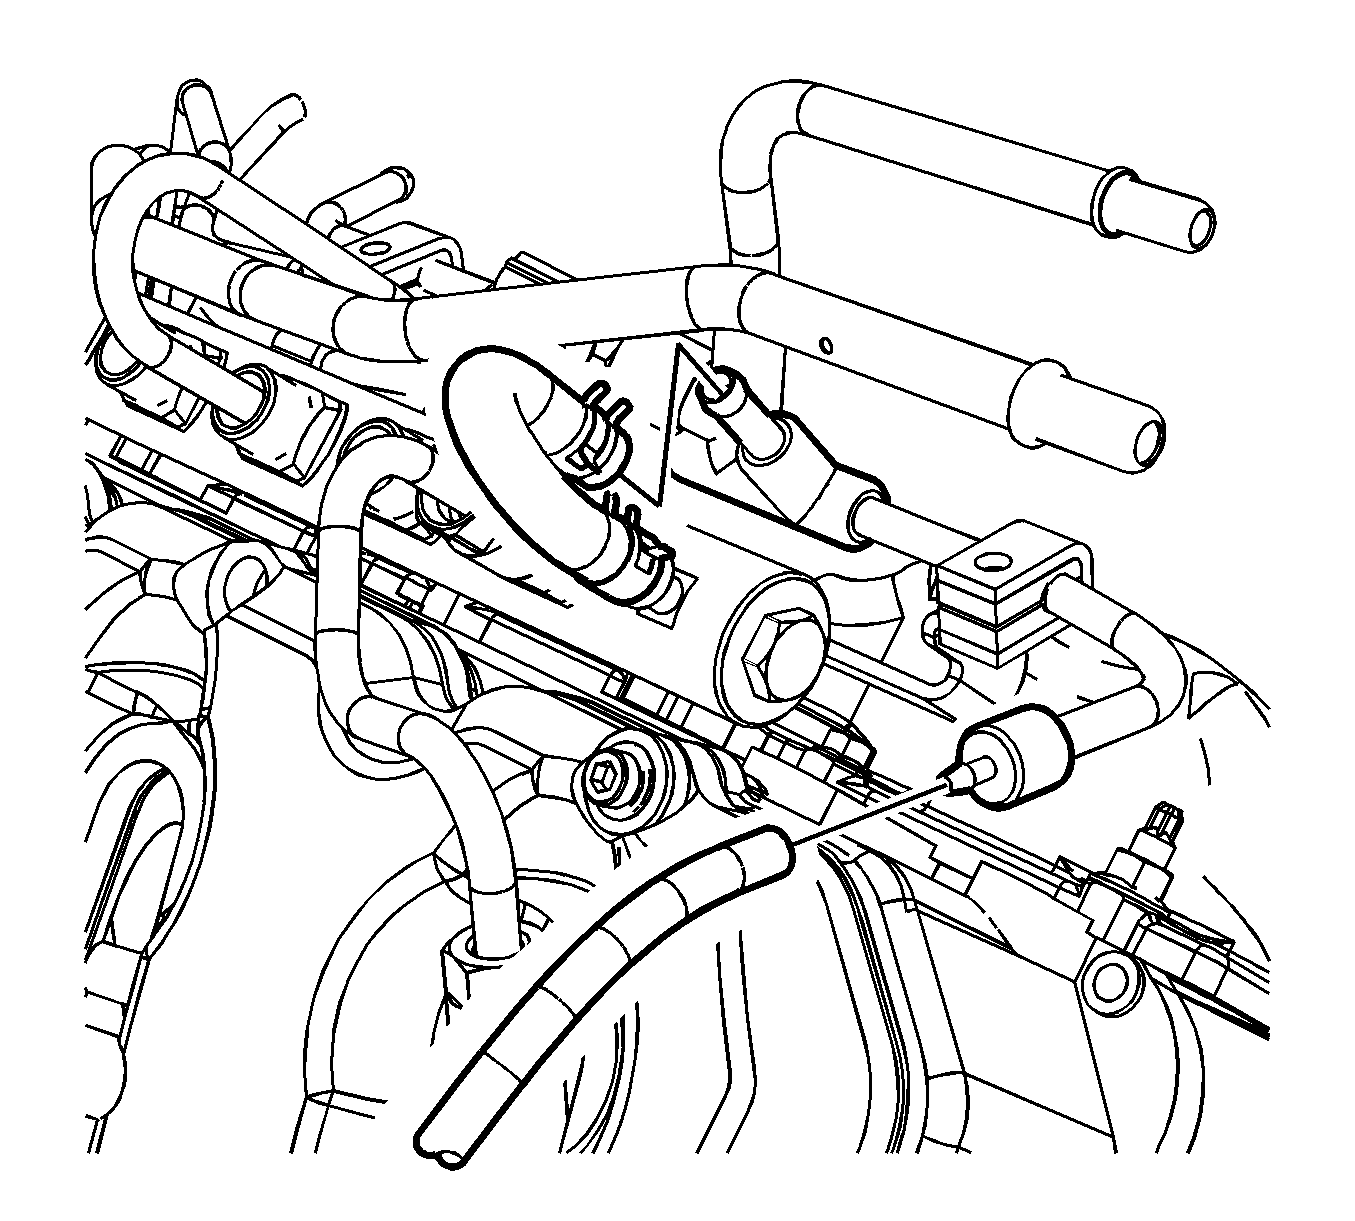
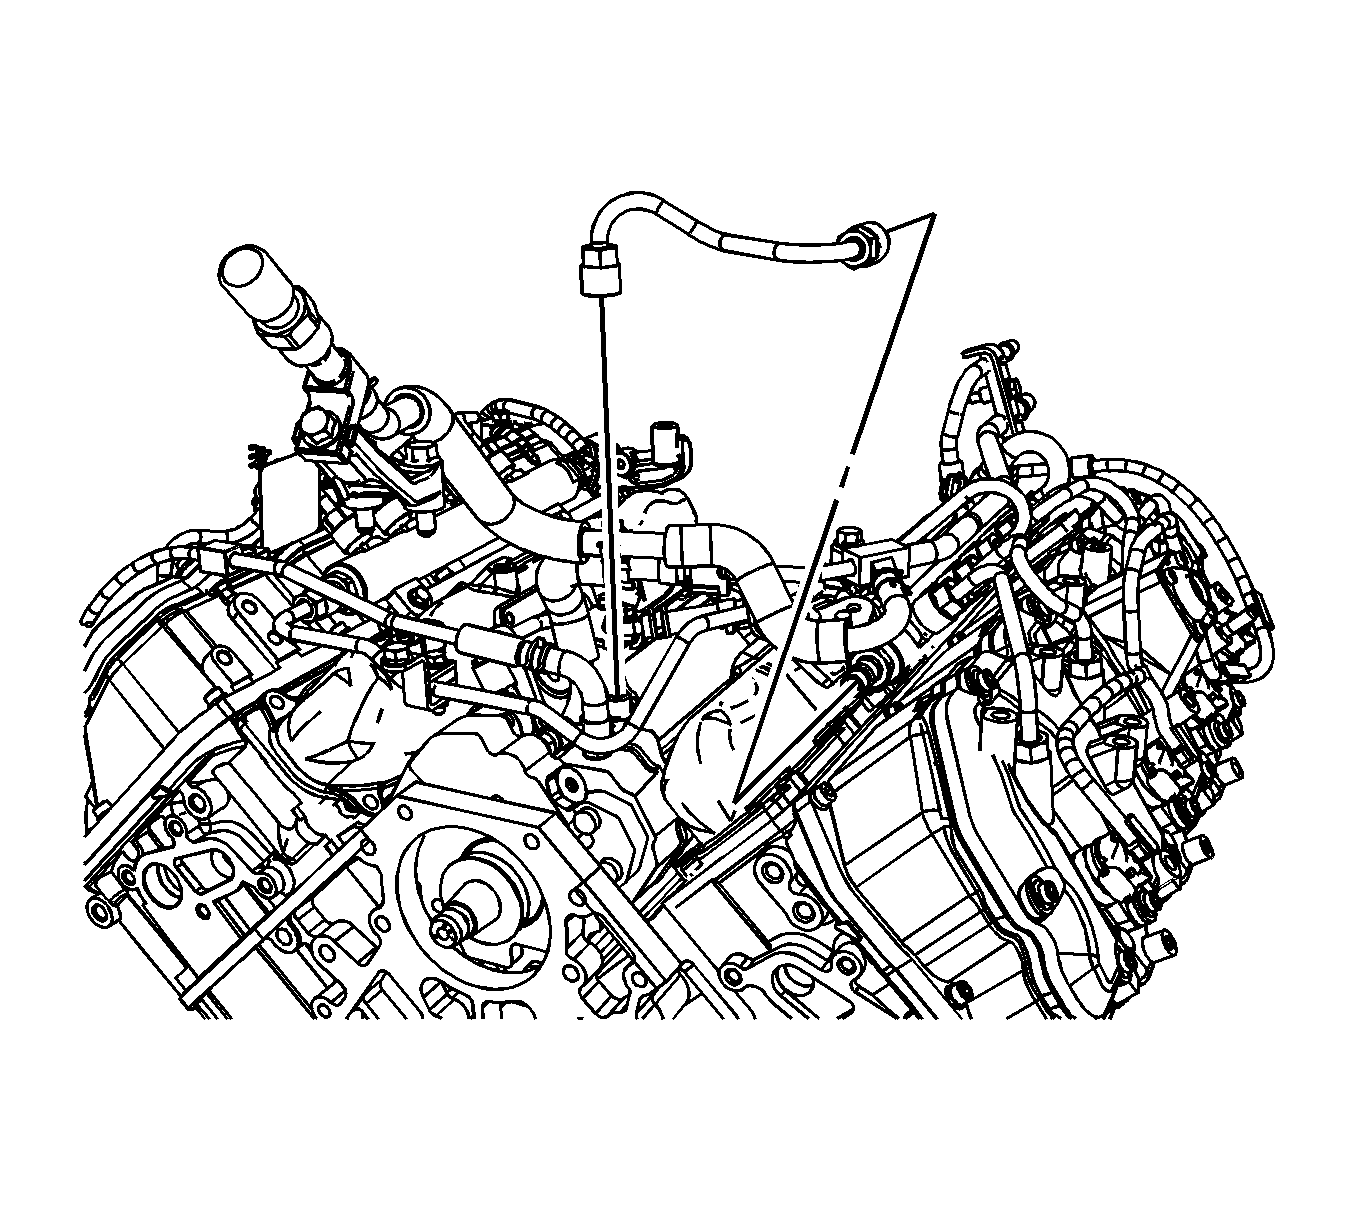
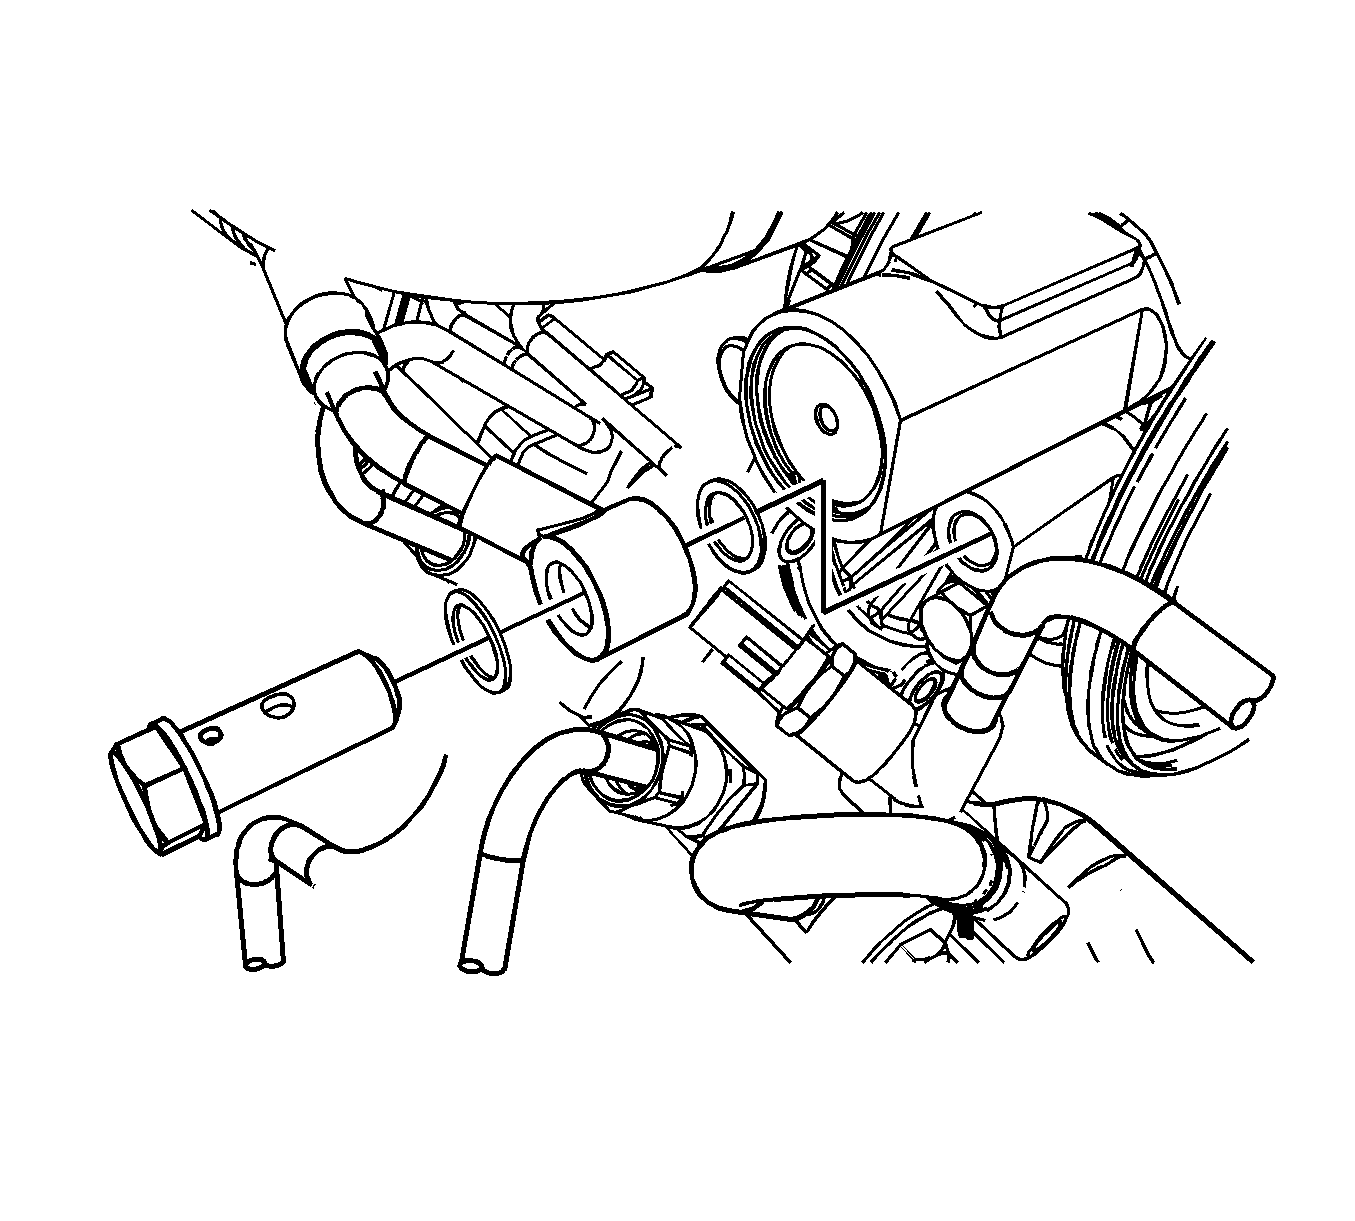
- Reposition the turbocharger coolant outlet pipe clamp (1) and remove the hose from the turbocharger pipe.
- Using the J 43178 and J 44581 , disconnect the fuel feed and return pipes.
- Disconnect the positive battery cable from the glow plug control module.
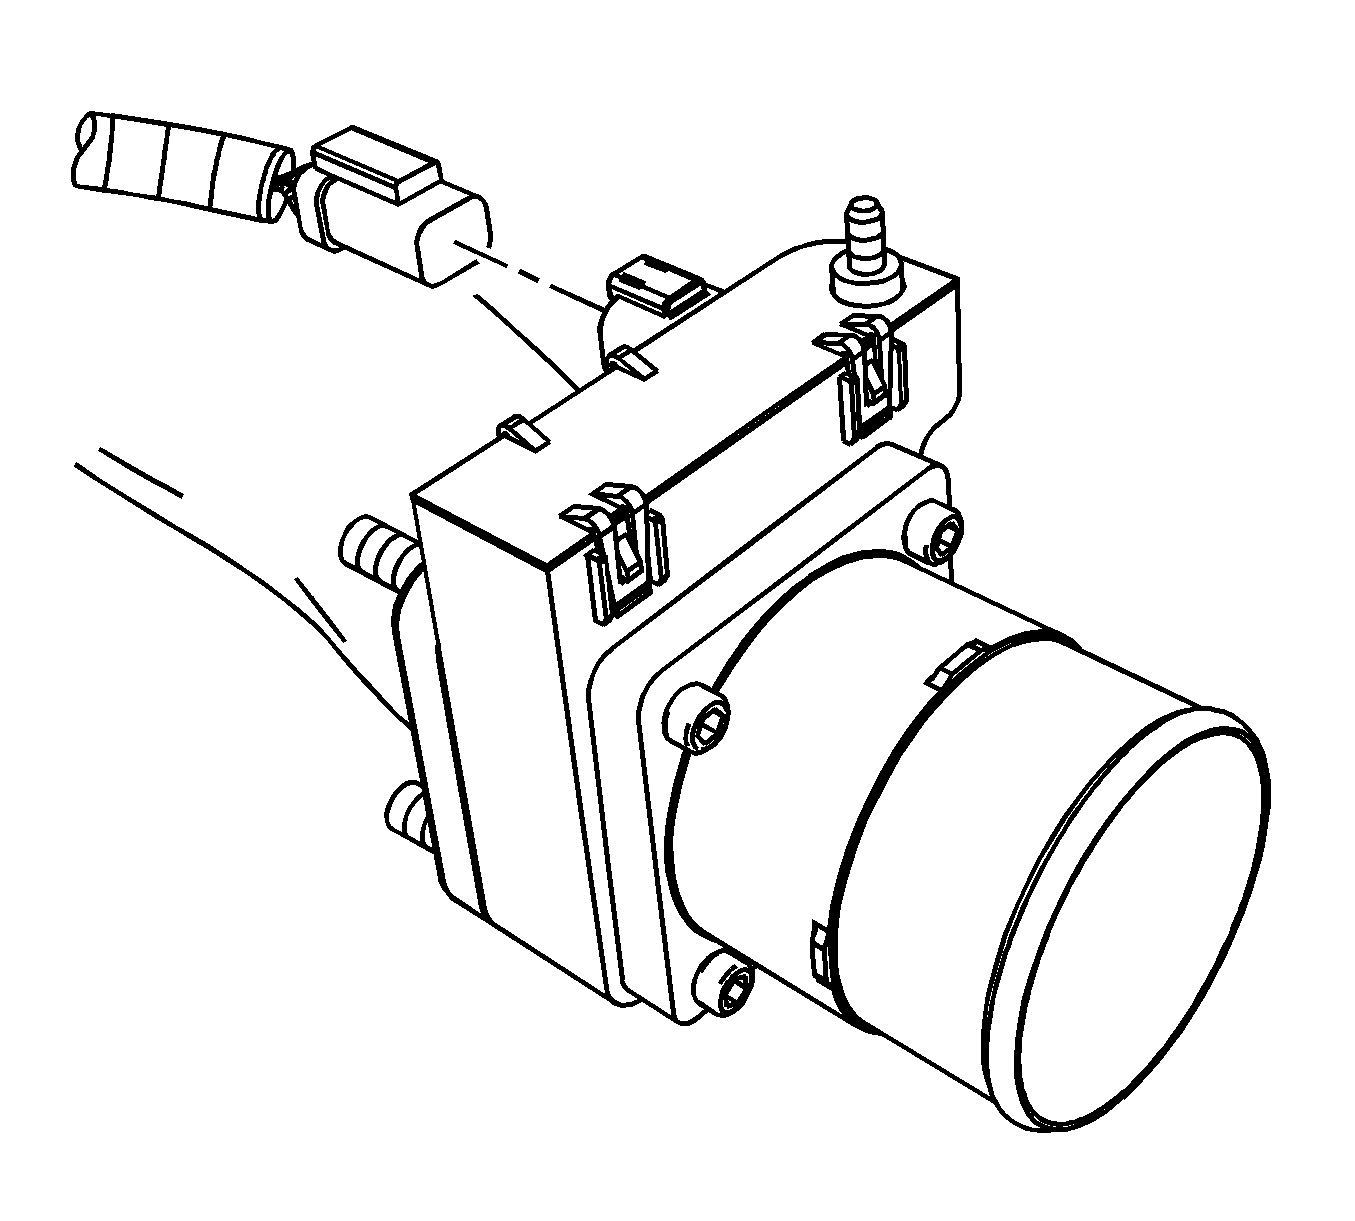
- Remove the glow plug control module bolts.
- Remove the glow plug control module.
- Remove the glow plug control module bracket bolts (2).
- Remove the fuel line bracket bolt (1).
- Remove the fuel line bracket bolt.
- Remove the turbocharger coolant inlet pipe bolt and remove the hose from the turbocharger.
- Remove the turbocharger oil feed pipe banjo bolt and washer. Discard the banjo bolt and washer.
- Reposition and secure the turbocharger oil fed pipe out of the way.
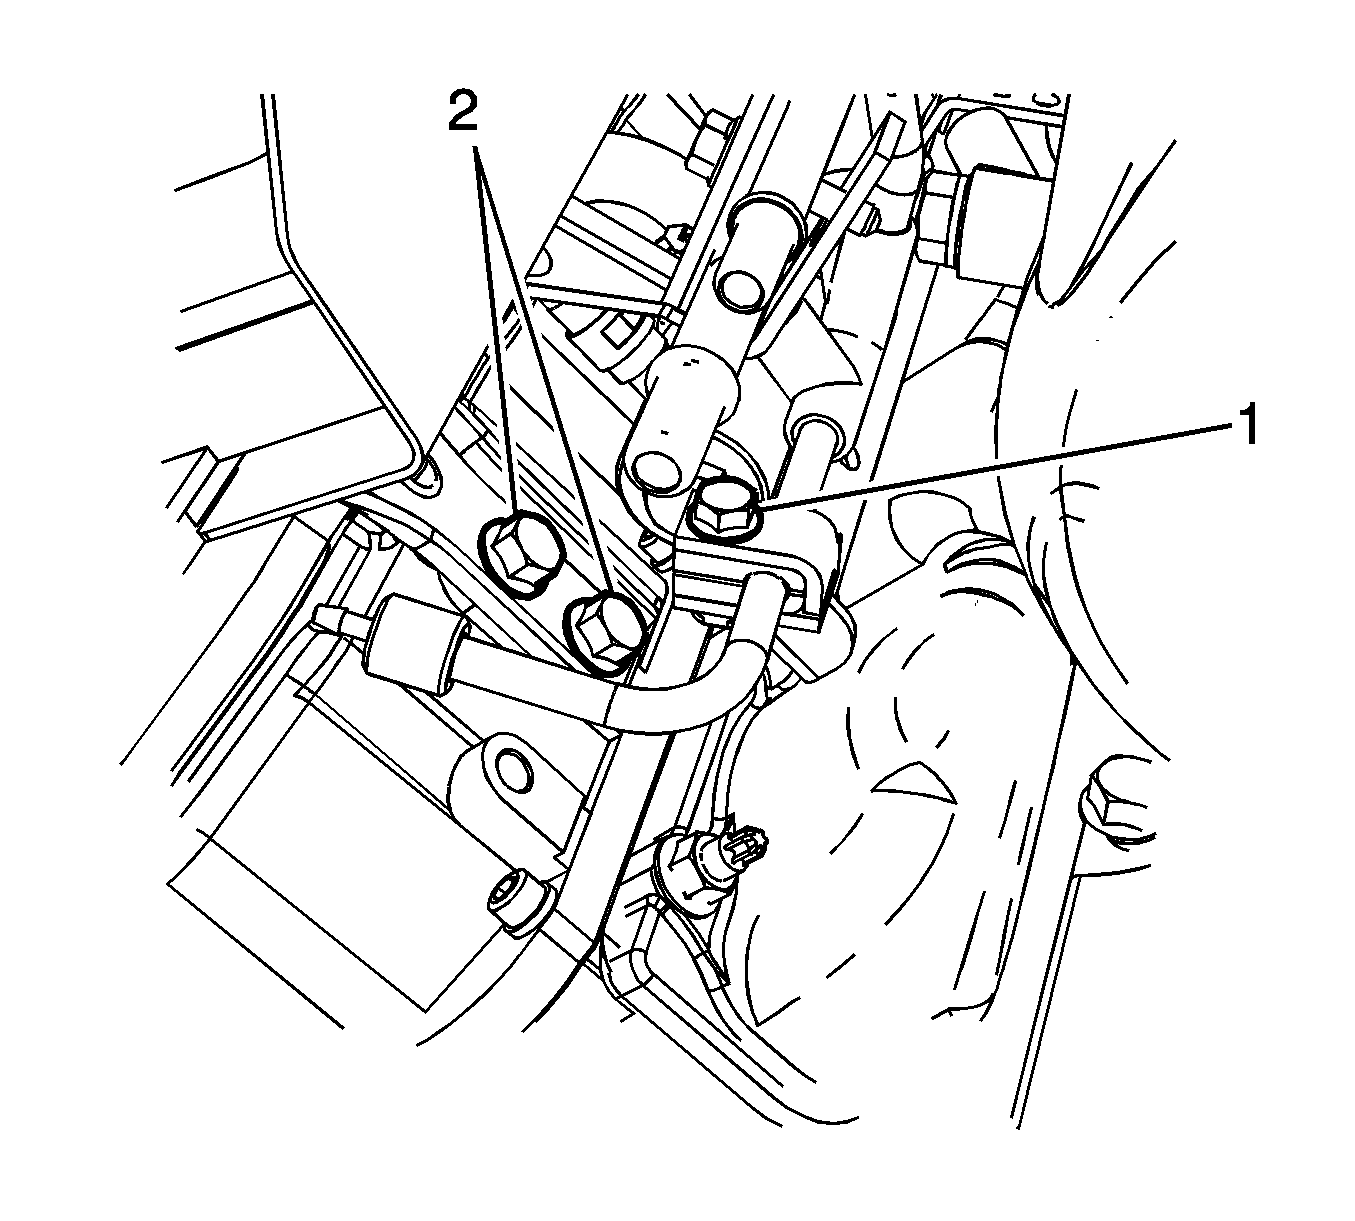
- Remove the turbocharger oil return pipe nuts (1) at the top of the flywheel housing.
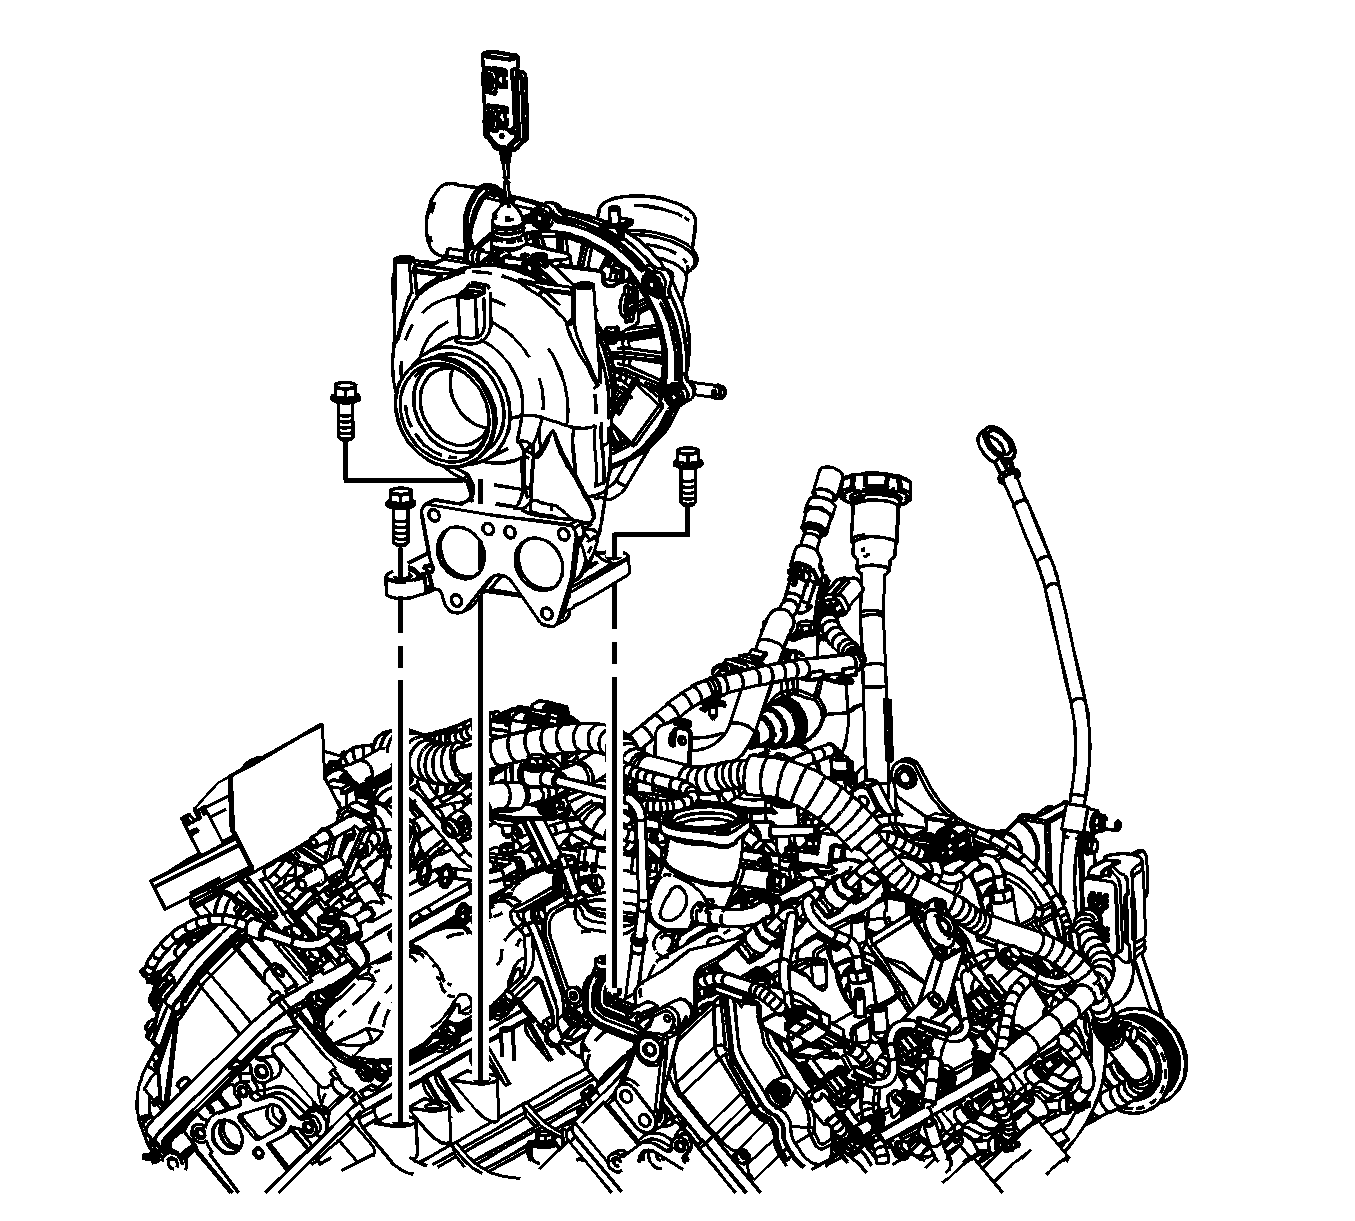
- Remove the turbocharger bolts.
- Remove the turbocharger (with the oil return pipe).
- Remove and discard the turbocharger oil return pipe gasket at the flywheel housing.
- Remove the turbocharger lower heat shield.
- Remove the turbocharger oil feed pipe, washer, and pipe.
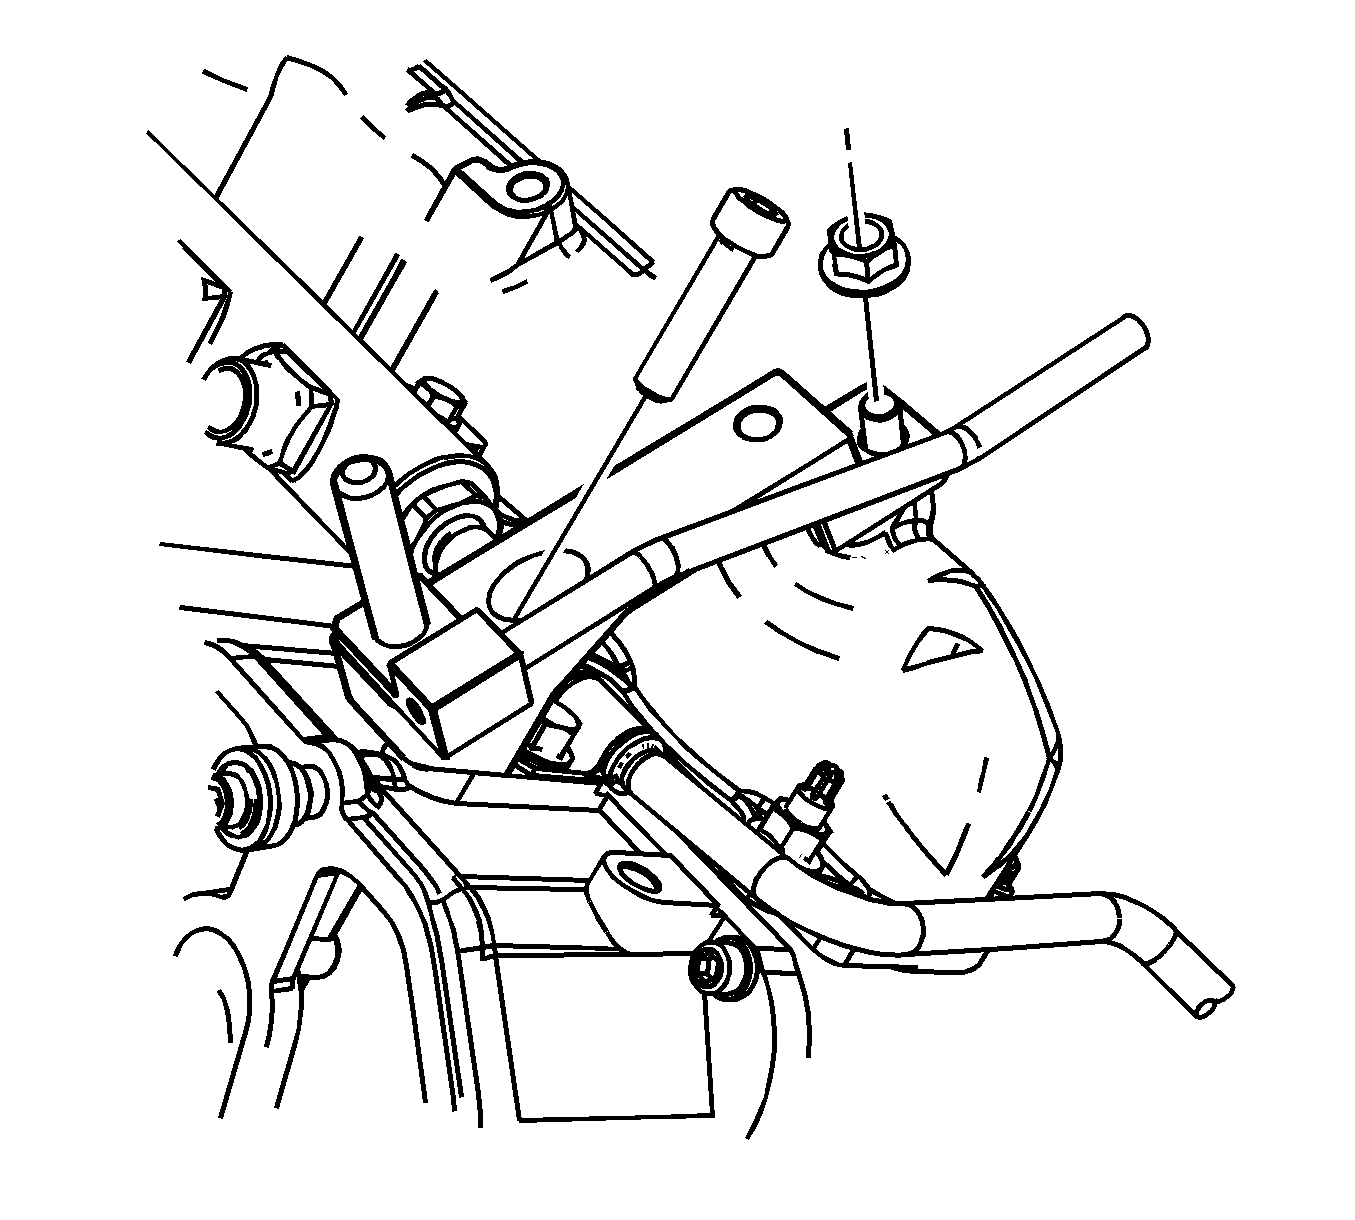
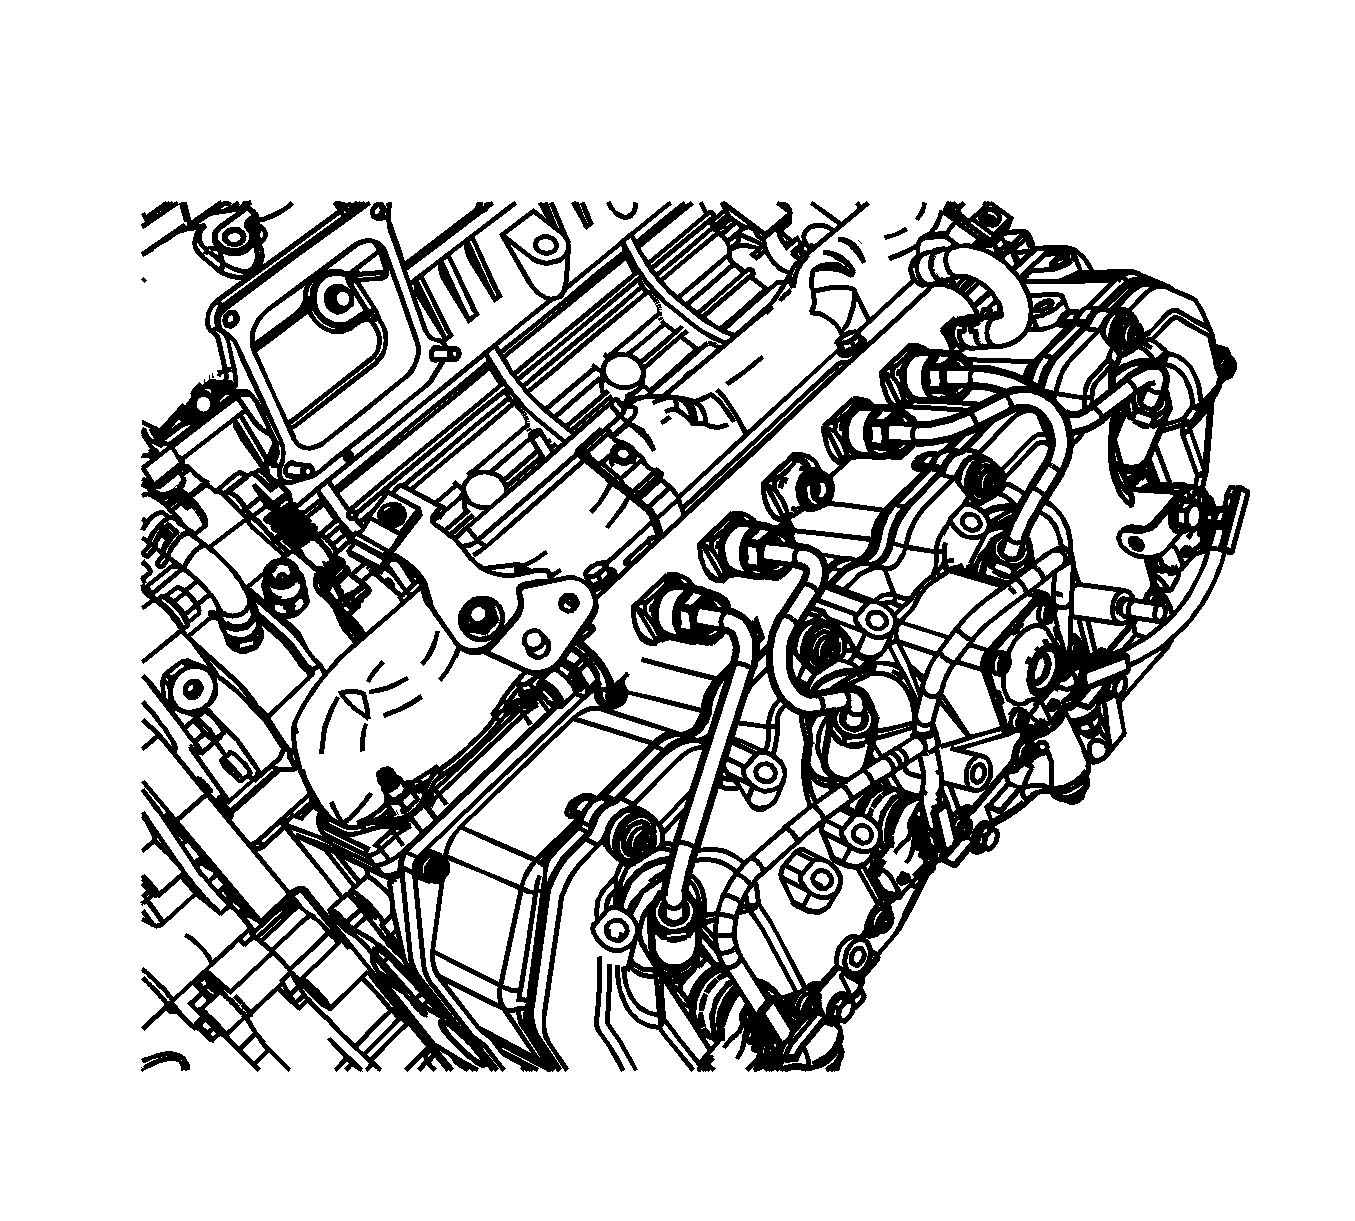
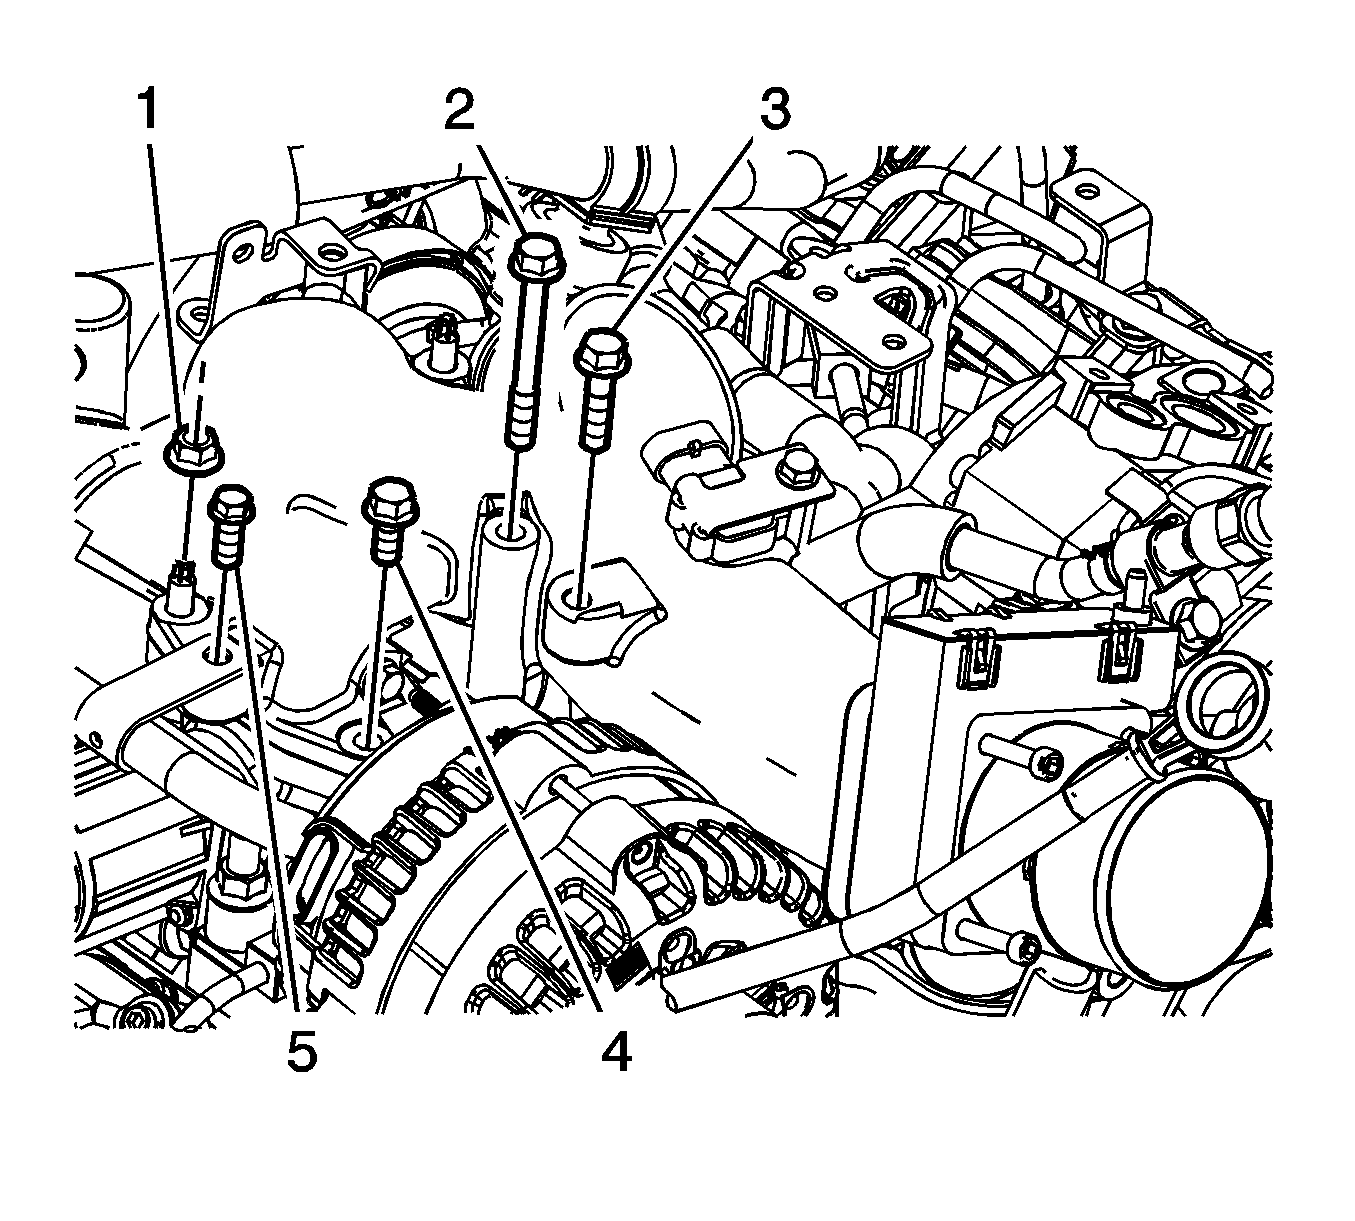
- Disconnect the LH main engine wiring harness connector and remove the bracket bolts (1).
- Remove the LH glow plug nuts (2) and the routing bolts (1).
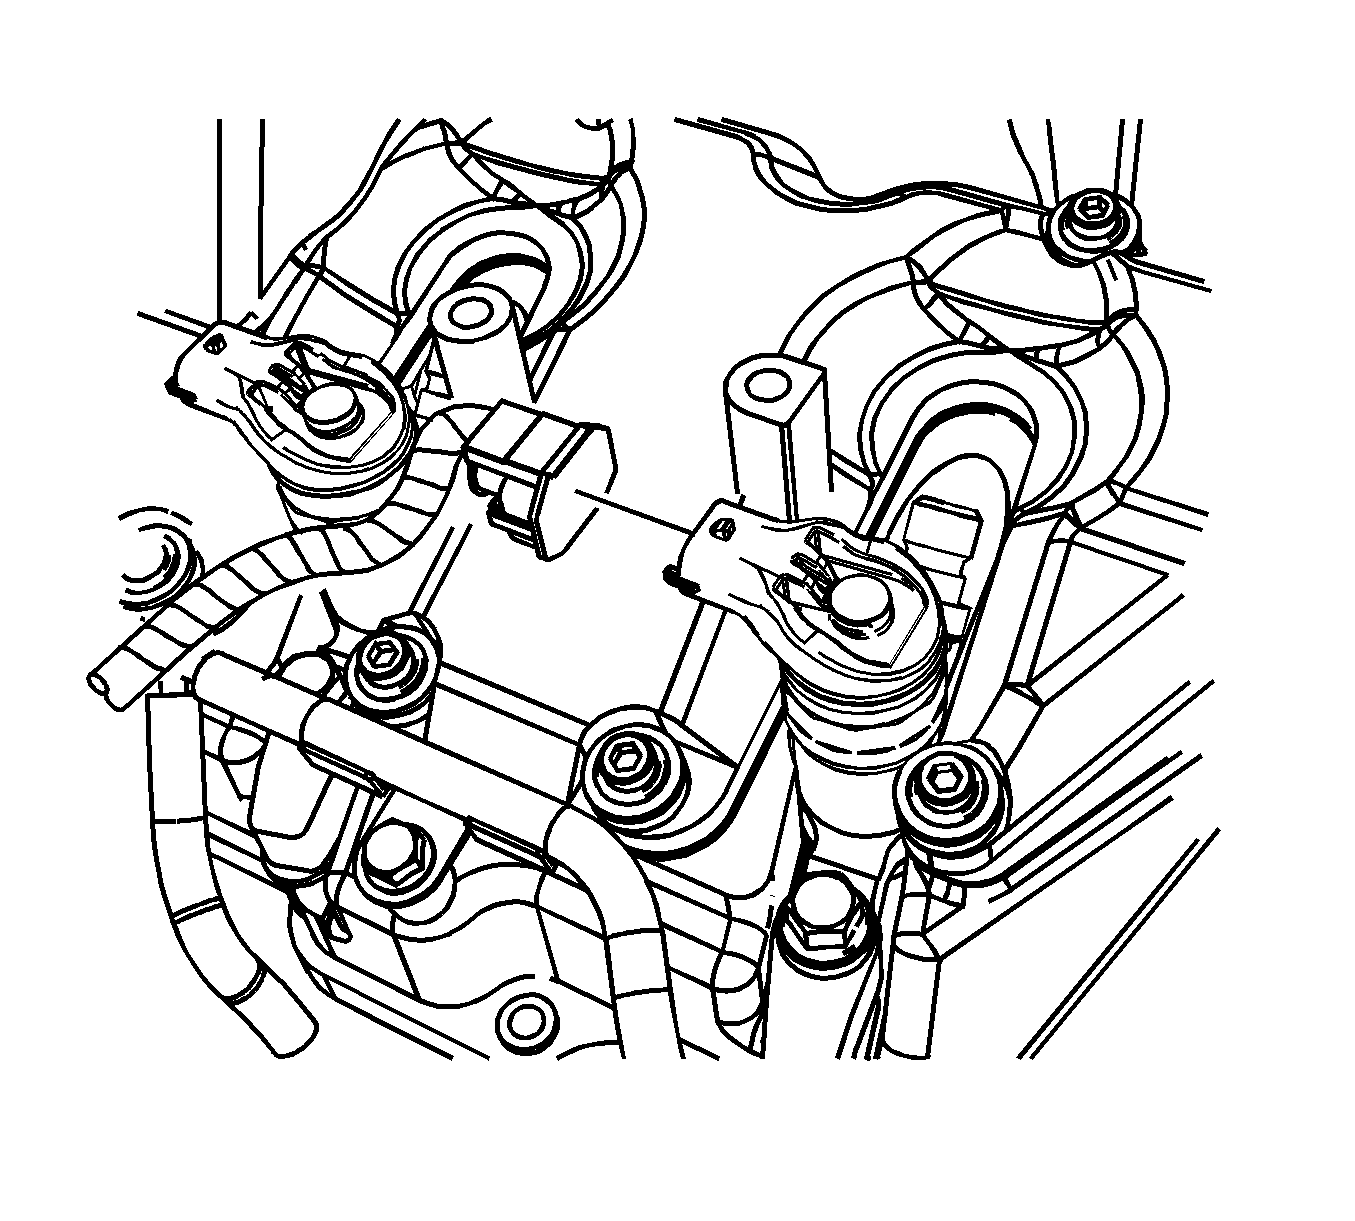
- Disconnect the fuel injector electrical connectors.
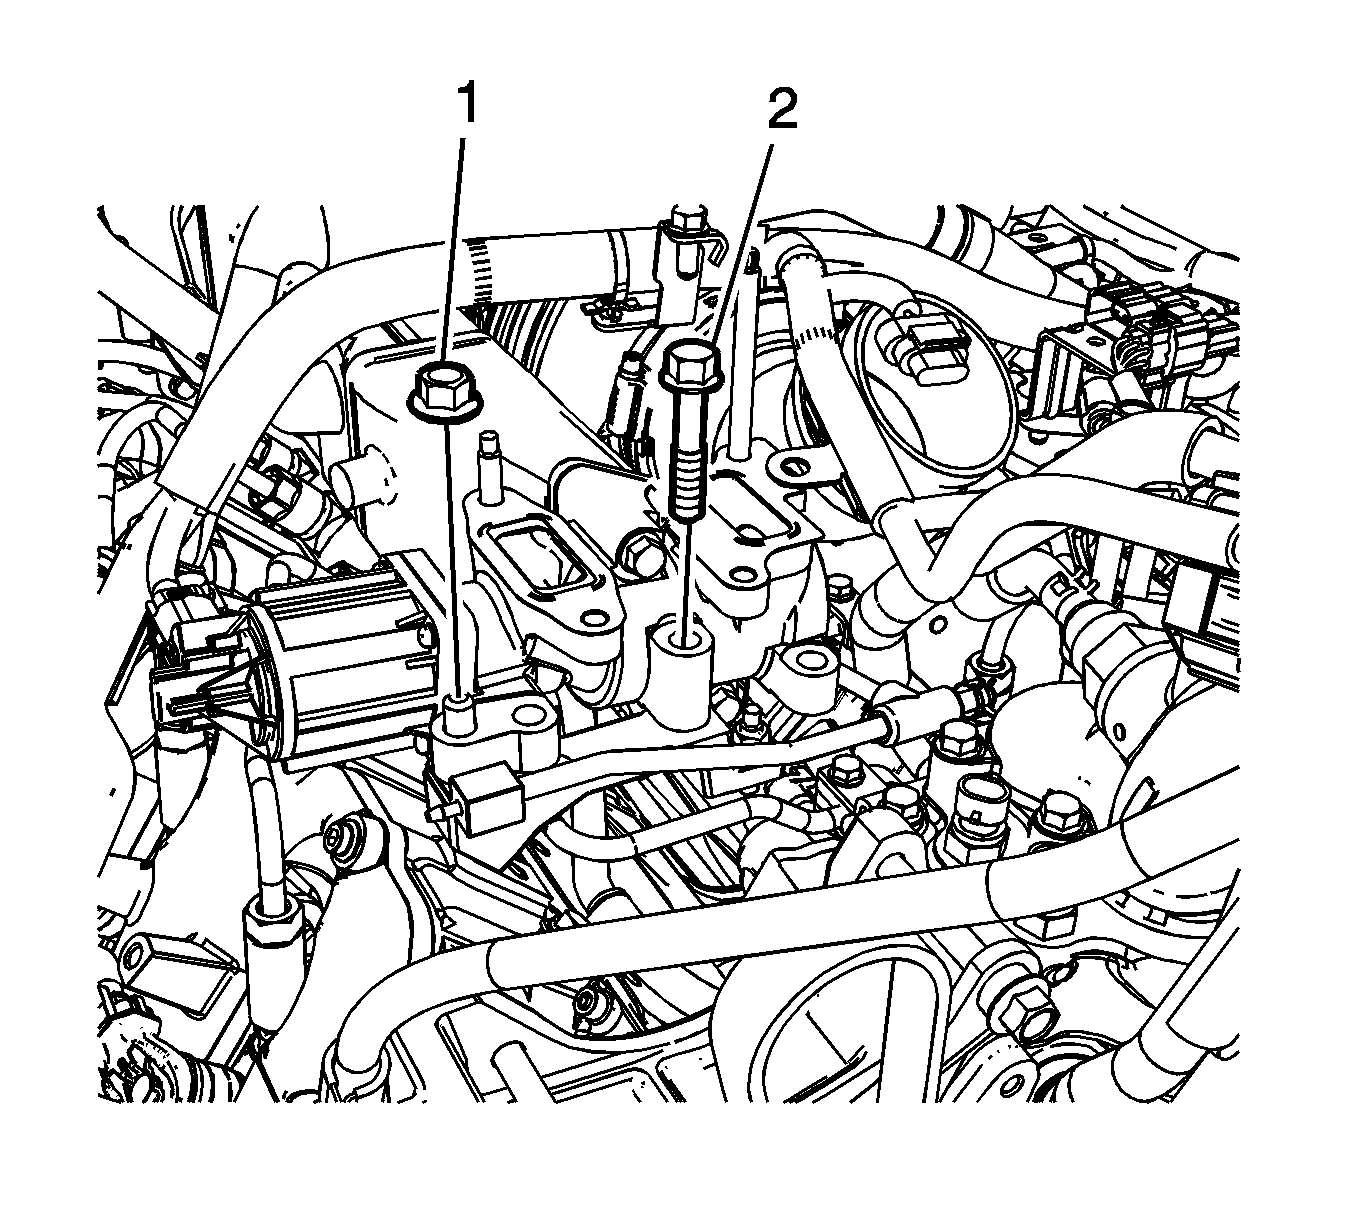
- Disconnect the intake air temperature (IAT) sensor 2 and fuel rail temperature sensor electrical connector.
- Disconnect the engine coolant temperature (ECT) wiring harness electrical connector (1) and the oil pressure sensor electrical wiring harness electrical connector (2).
- Position the engine wiring harness over the RH side of engine.
- Remove the nut, the 2 bolts and position the bracket aside.
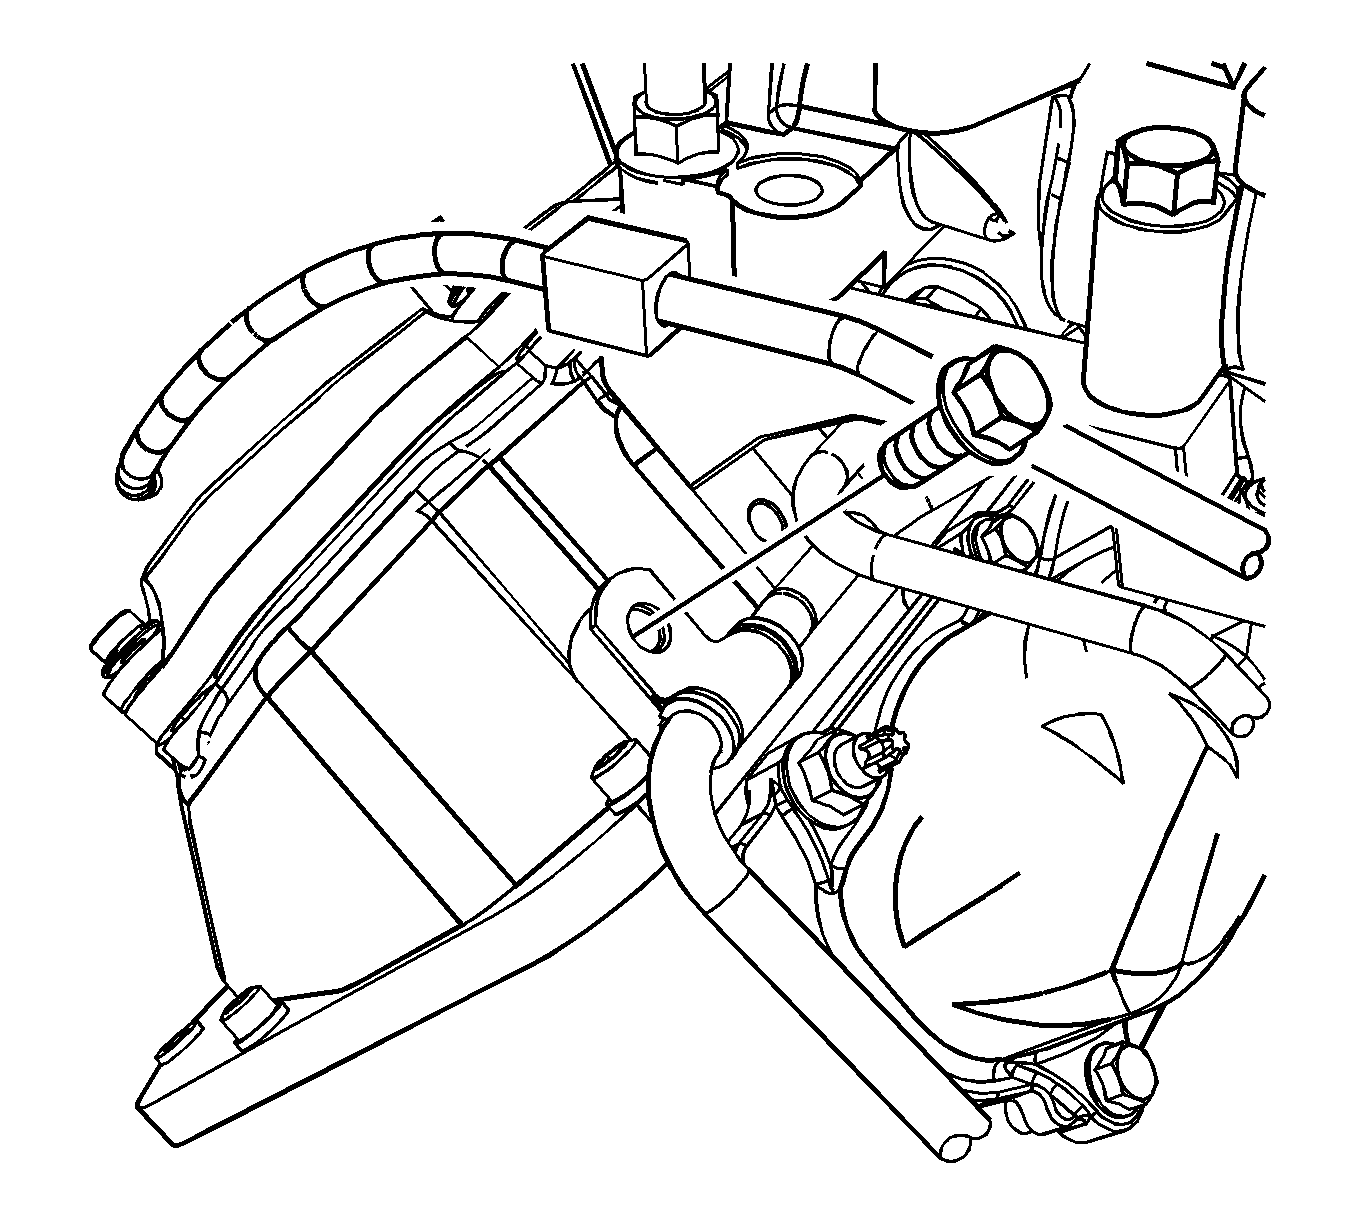
- Remove the fuel feed/return pipe bracket bolt.
- Disconnect the fuel hoses from the fuel pipe.
- Remove the fuel line bracket bolt.
- Disconnect the fuel pump hose from the fuel pipe.
- Disconnect the fuel injector return hoses from the return pipe assembly.
- Remove the fuel pipe.
- Remove the fuel pipe clamp bolt (2) and turbocharger coolant inlet pipe bracket bolt (3).
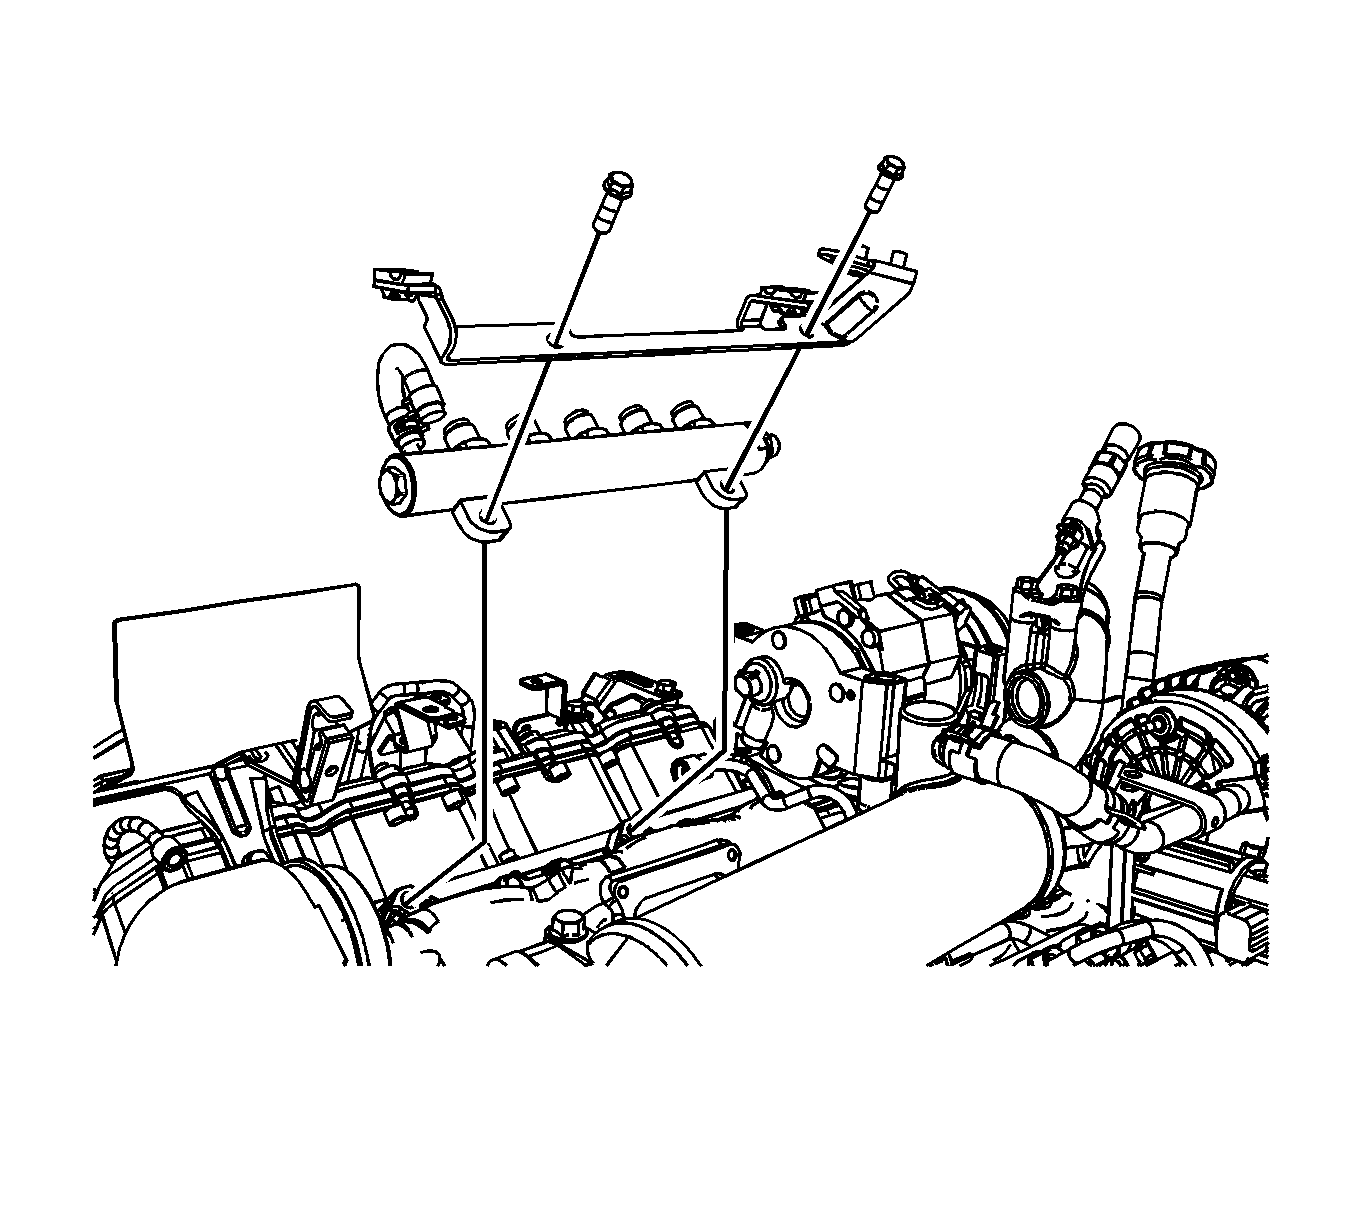
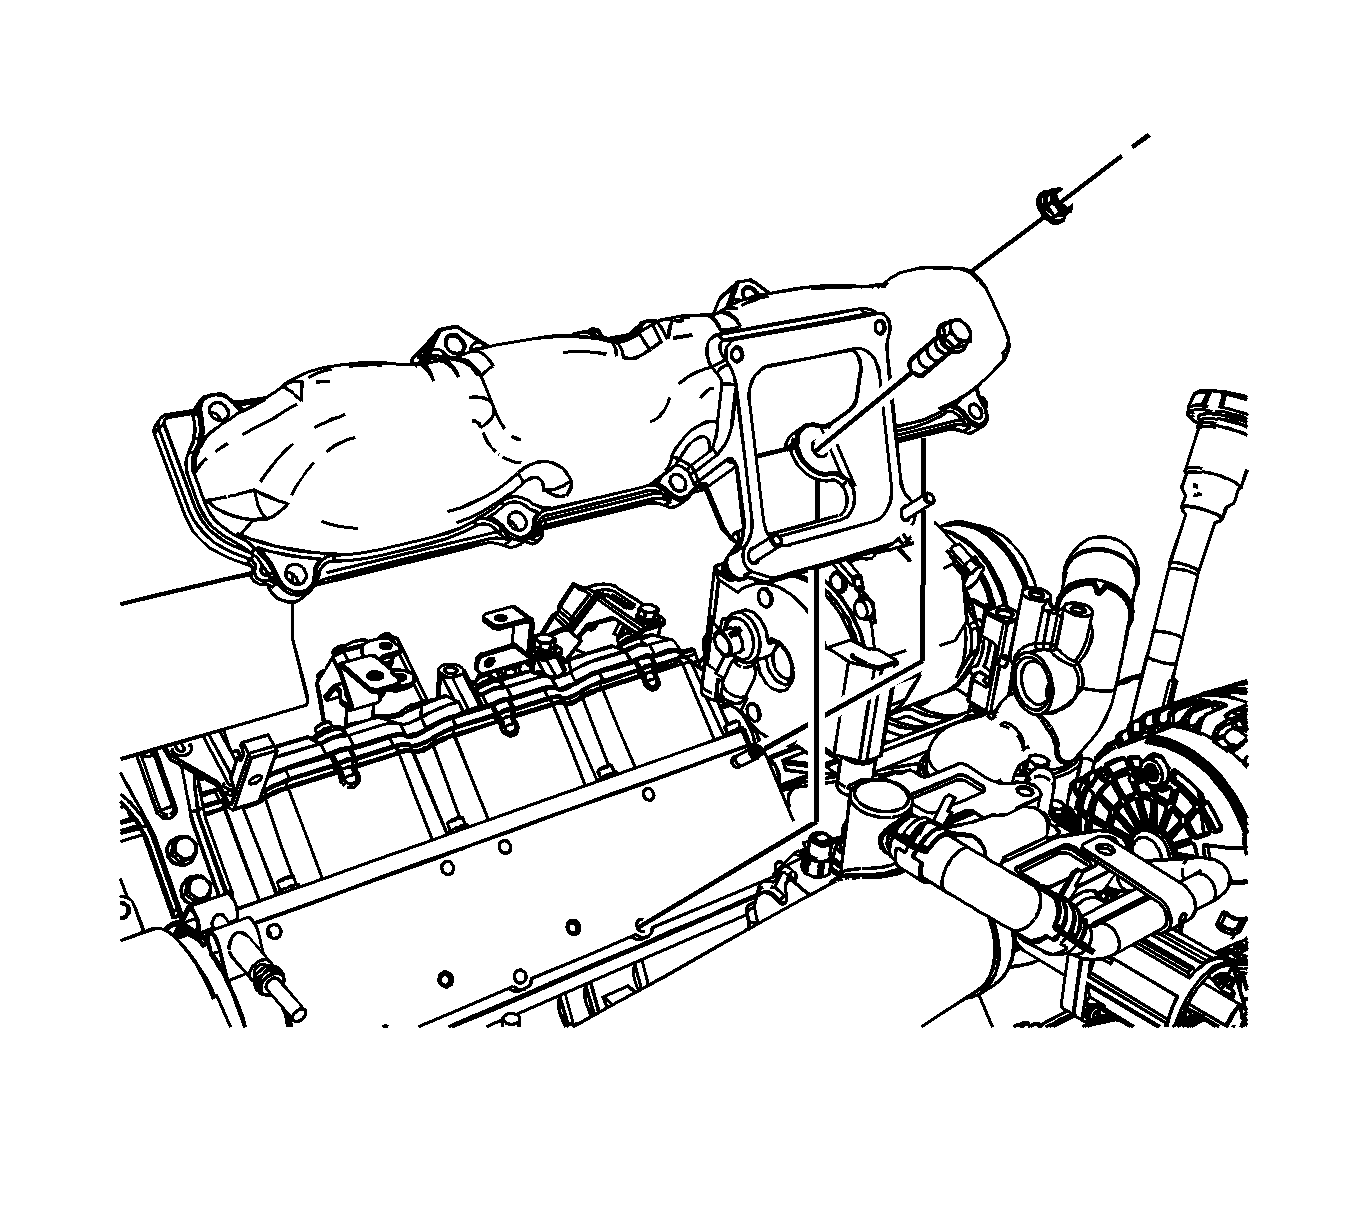
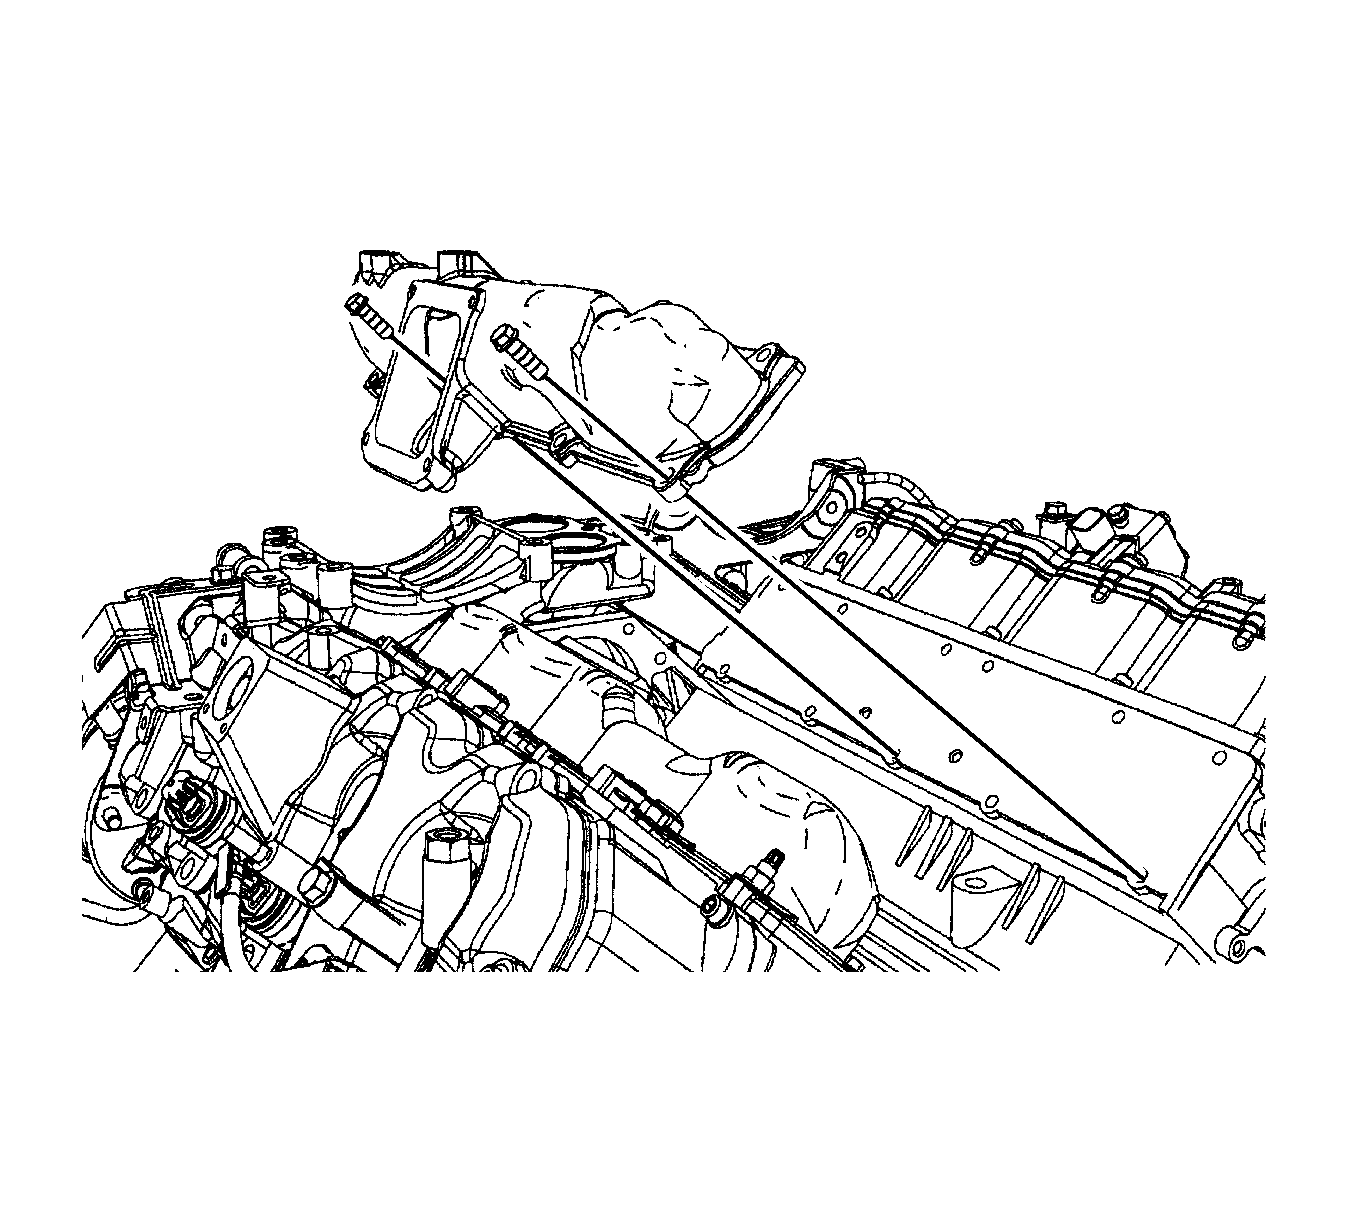
- Remove the center intake manifold bolts (1) and 2 nuts (2).
- Remove the center intake manifold.
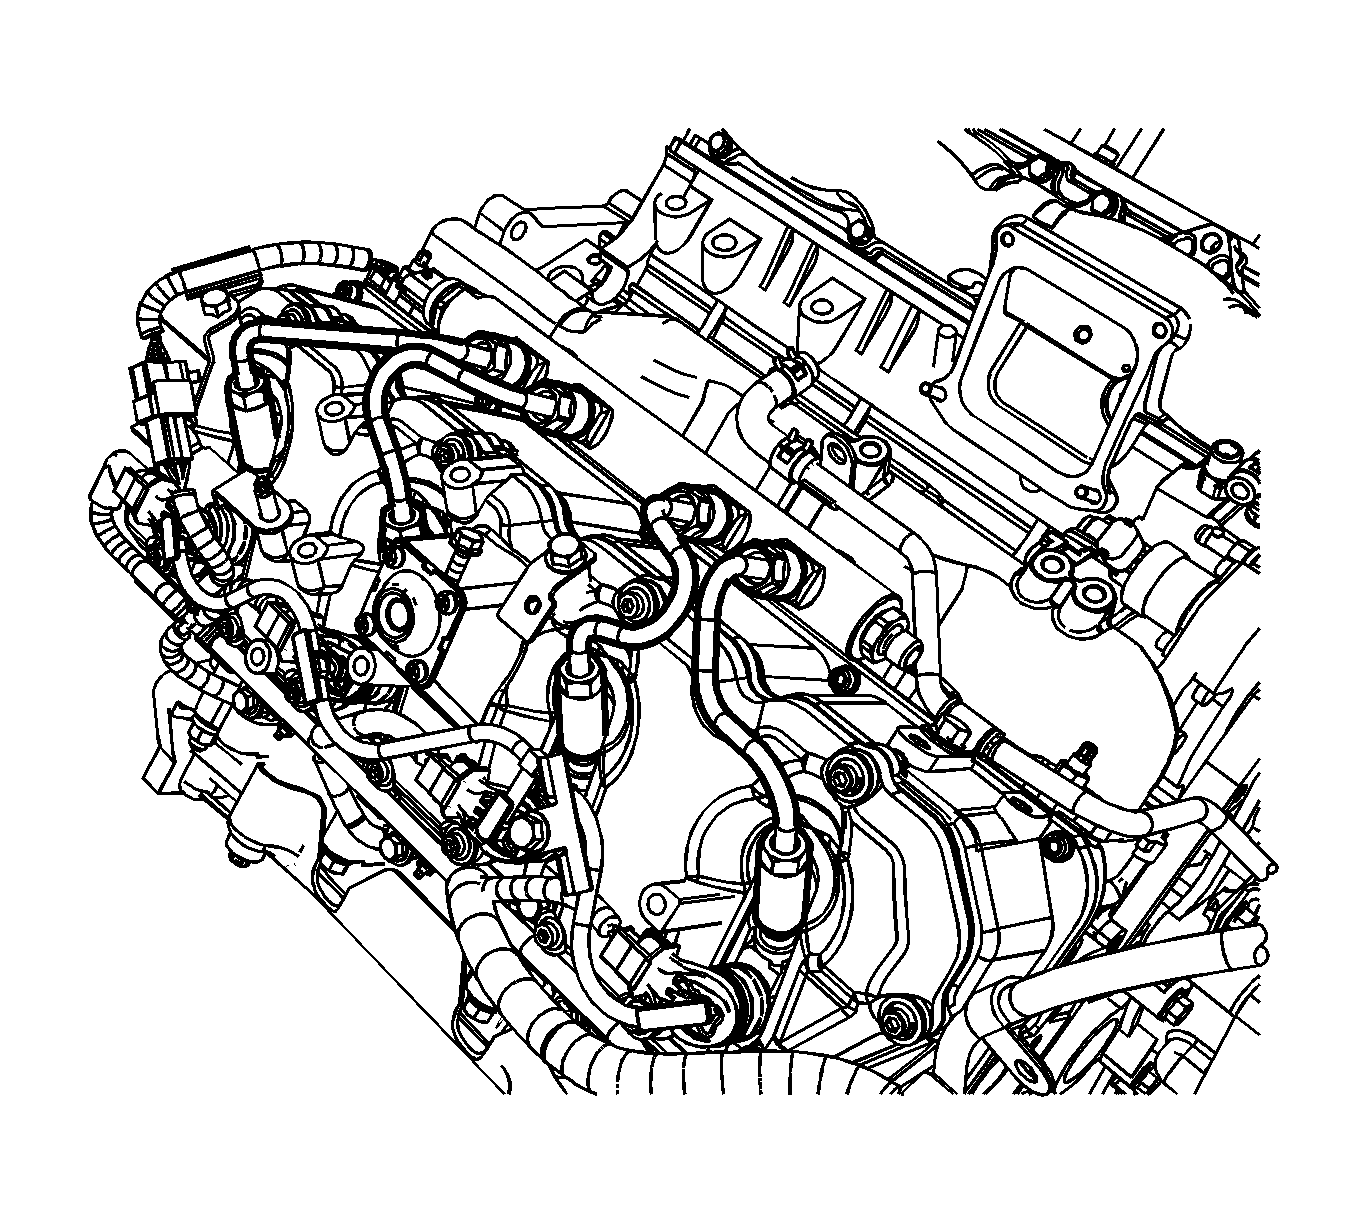
- Remove the fuel pump to LH fuel rail pipe.
- Compress the clamp and remove the fuel pressure relief hose.
- Remove the fuel pipe bracket bolt (2), disconnect the hose (1) at the fuel pump and remove the fuel pipe/hose assembly.
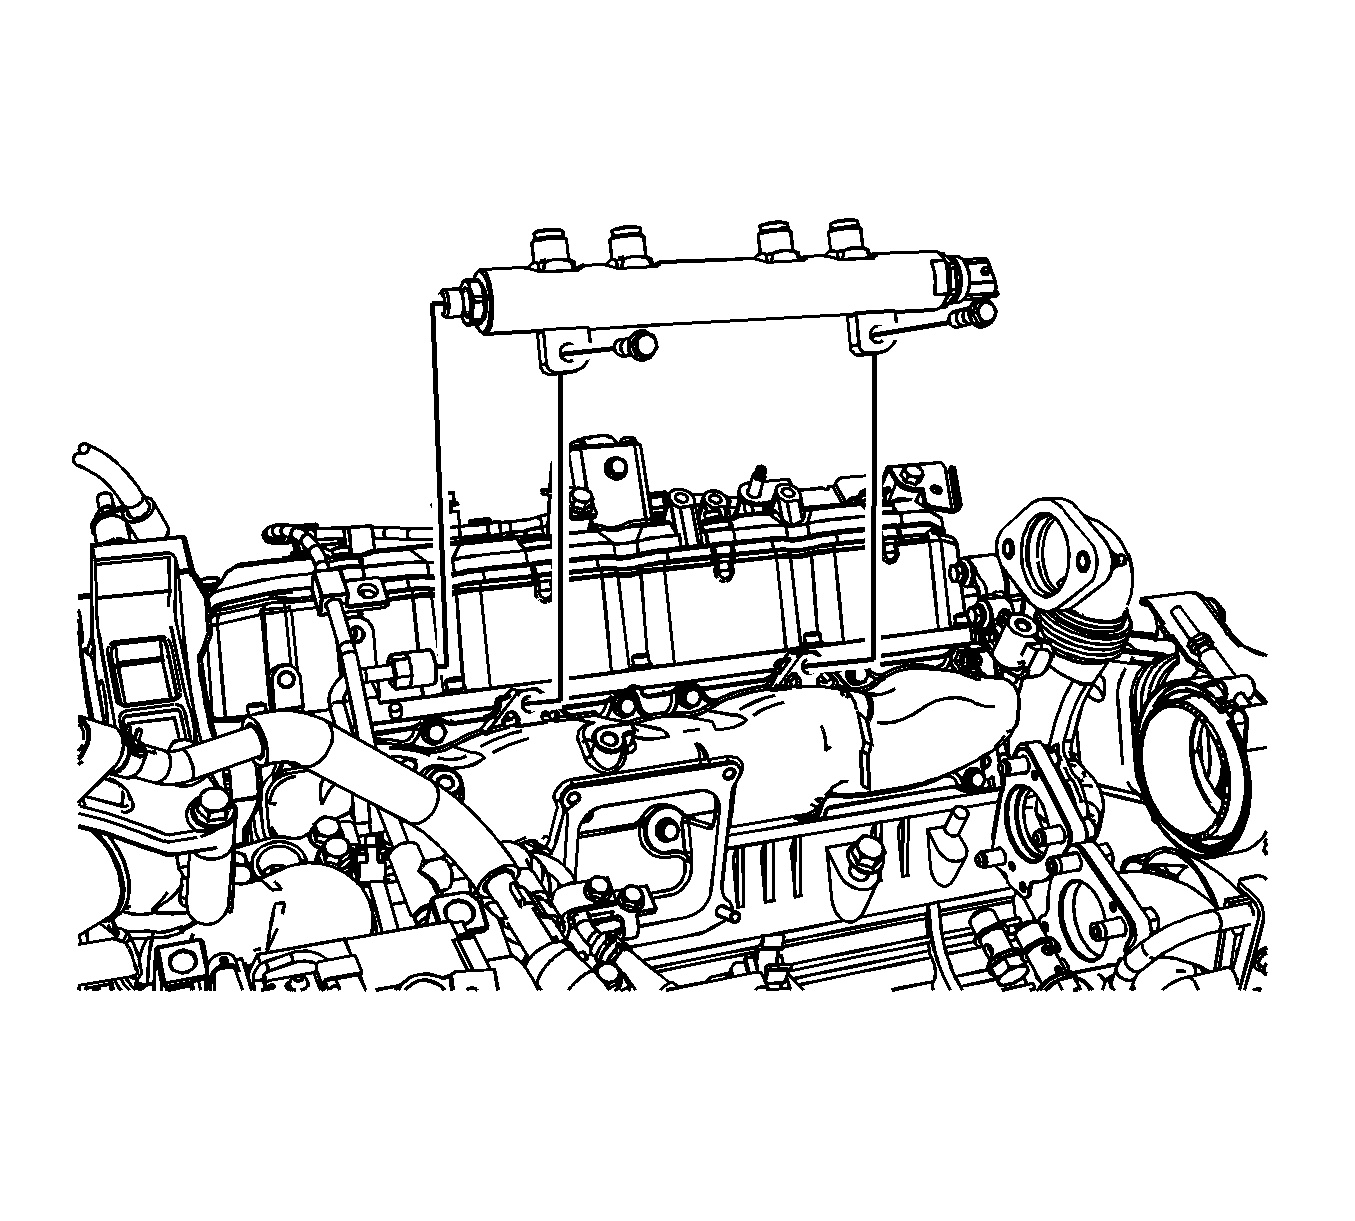
- Remove the LH to RH fuel rail pipe.
- Remove the LH fuel injector feed pipes.
- Remove the 2 bolts and the LH fuel rail.
- Disconnect the fuel rail pressure (FRP) sensor electrical connector (1).
- Remove the RH fuel injector feed pipes.
- Remove the 2 bolts and the RH fuel rail.
- Remove the 2 bolts and the turbocharger cooling outlet pipe.
- Remove the left intake manifold nuts/bolts and remove the manifold.
- Remove the right intake manifold nuts/bolts and remove the manifold.
- Disconnect the fuel pump electrical connector.
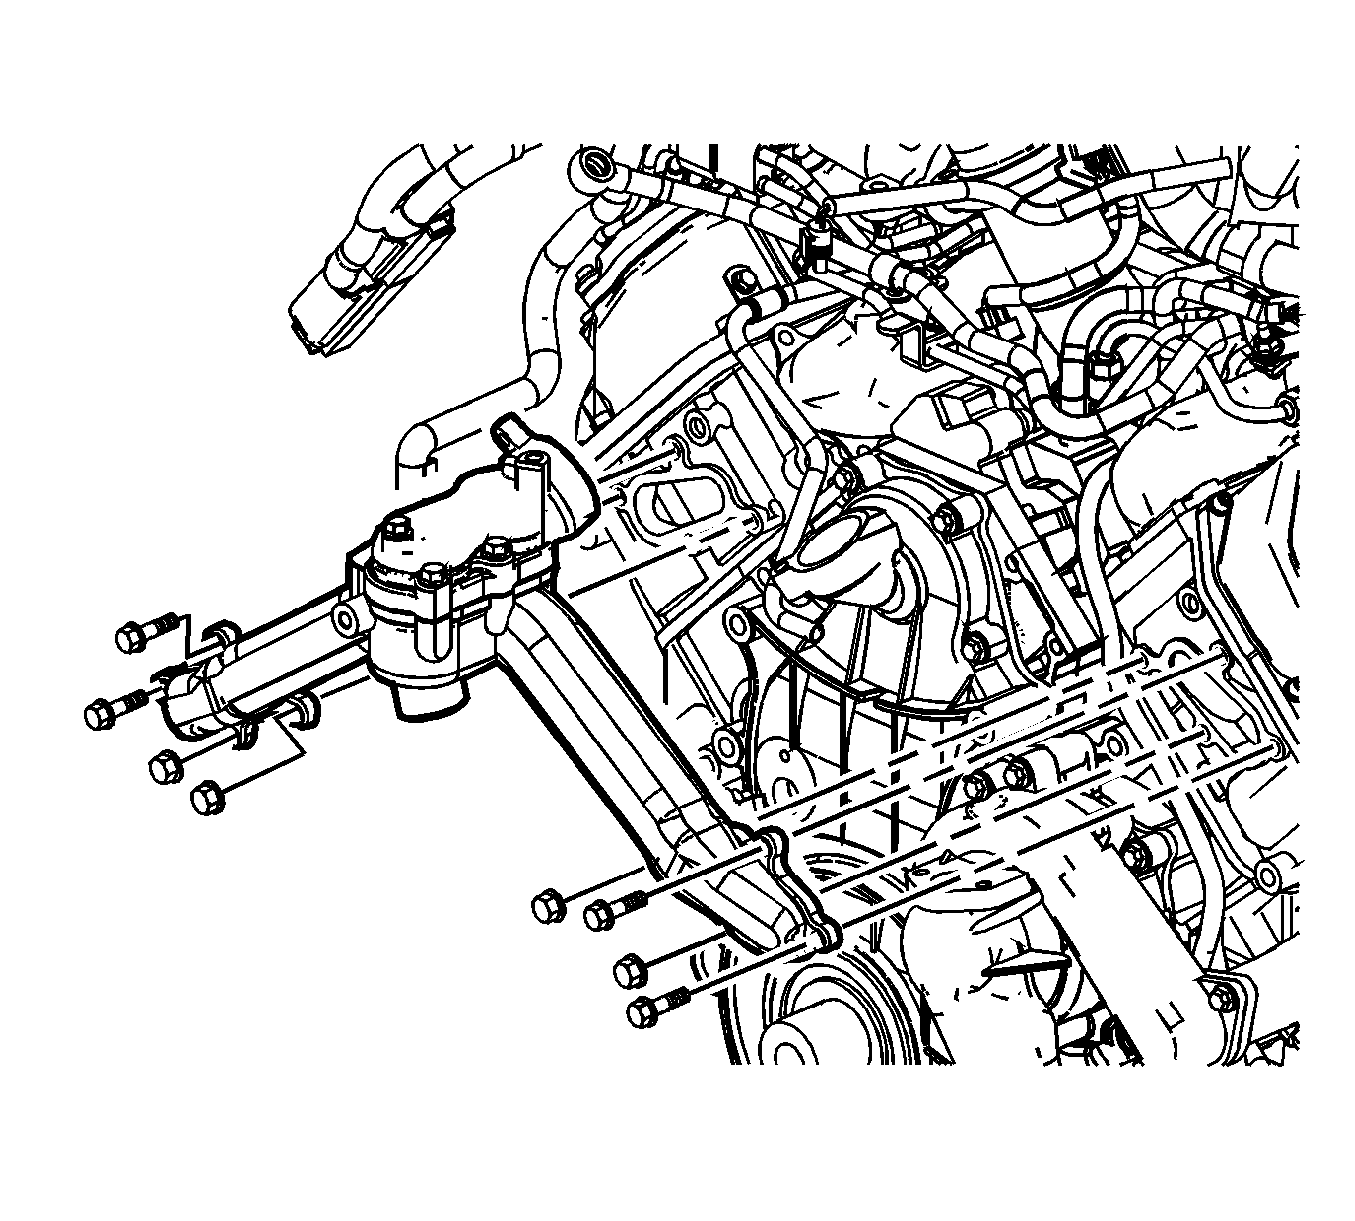
- Remove the 4 bolts and fuel injection pump.
- Remove the transmission fill tube.
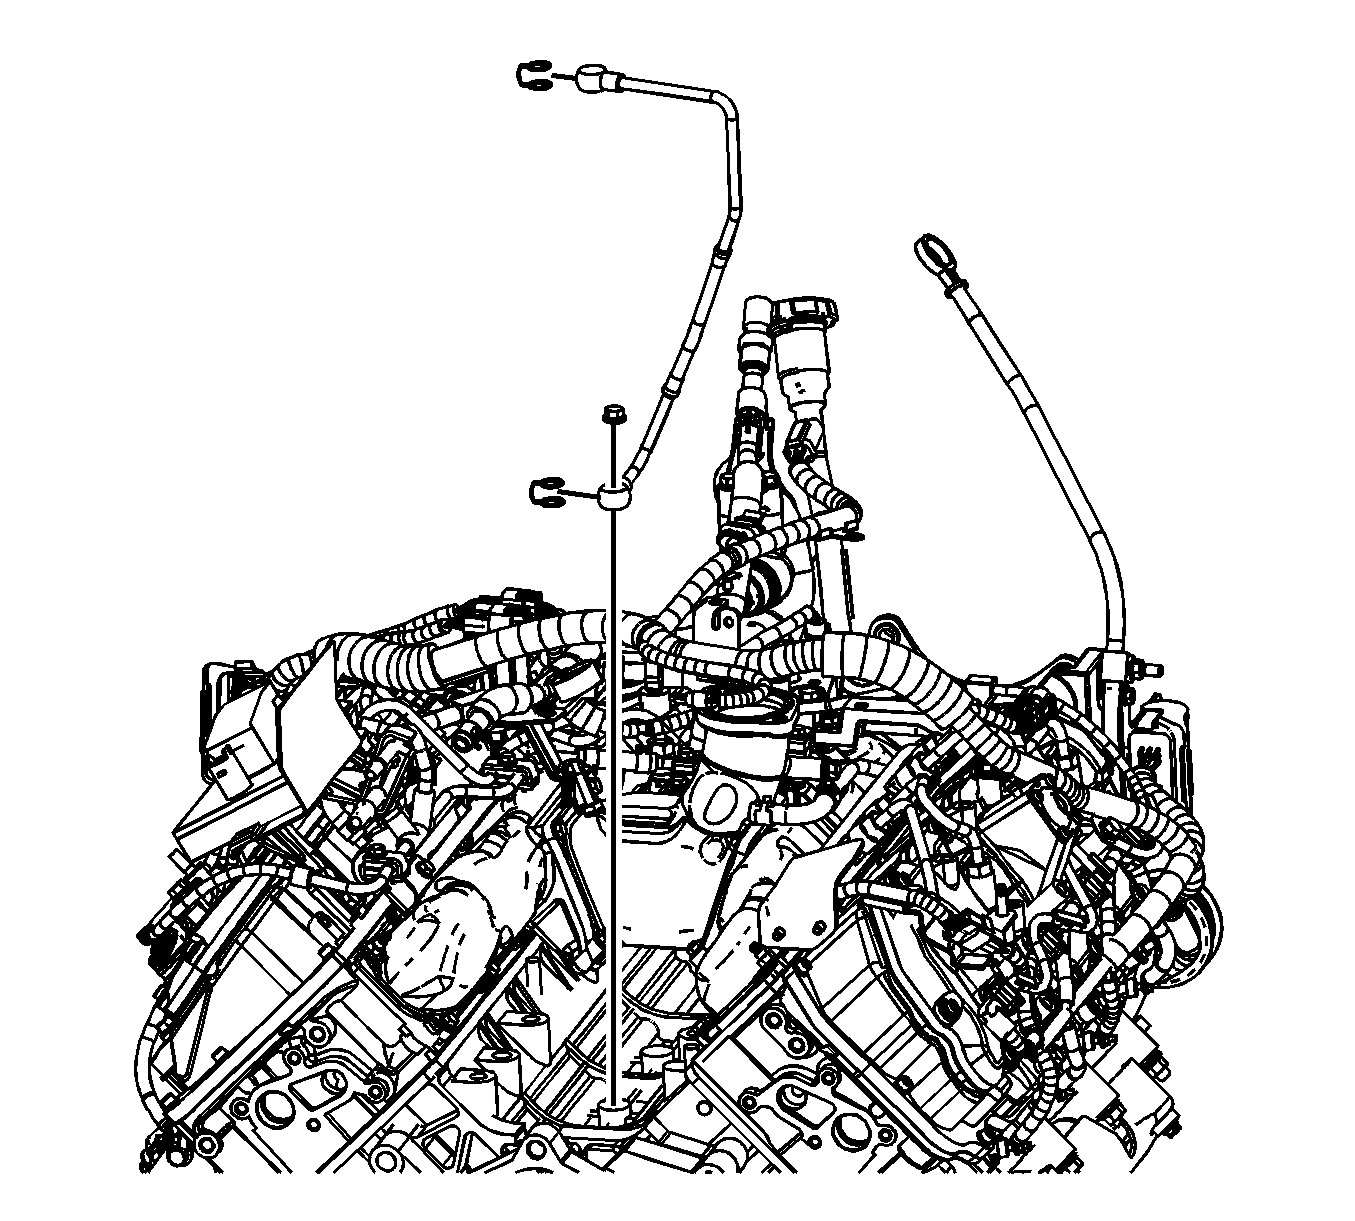
- Remove the engine oil indicator tube. Refer to Oil Level Indicator and Tube Replacement .
- Remove the transmission. Refer to Transmission Replacement .
- Remove the engine flywheel. Refer to Engine Flywheel Replacement .
- Remove the upper oil pan. Refer to Upper Oil Pan Replacement .
- Remove the engine flywheel housing. Refer to Engine Flywheel Housing Replacement .
- Remove the oil pump pickup tube. Refer to Oil Pump Suction Pipe and Screen Assembly Removal .
- Remove the oil filter adapter and the oil cooler assembly replacement. Refer to Oil Filter Adapter and Oil Cooler Assembly Replacement .
- Remove the left exhaust manifold. Refer to Exhaust Manifold Replacement - Left Side .
- Remove the right exhaust manifold. Refer to Exhaust Manifold Replacement - Right Side .
- Remove the G102, G103 and G108.
- Using J 36857 engine lift hooks, install a suitable lifting device.
- Raise the engine off the engine mounts.
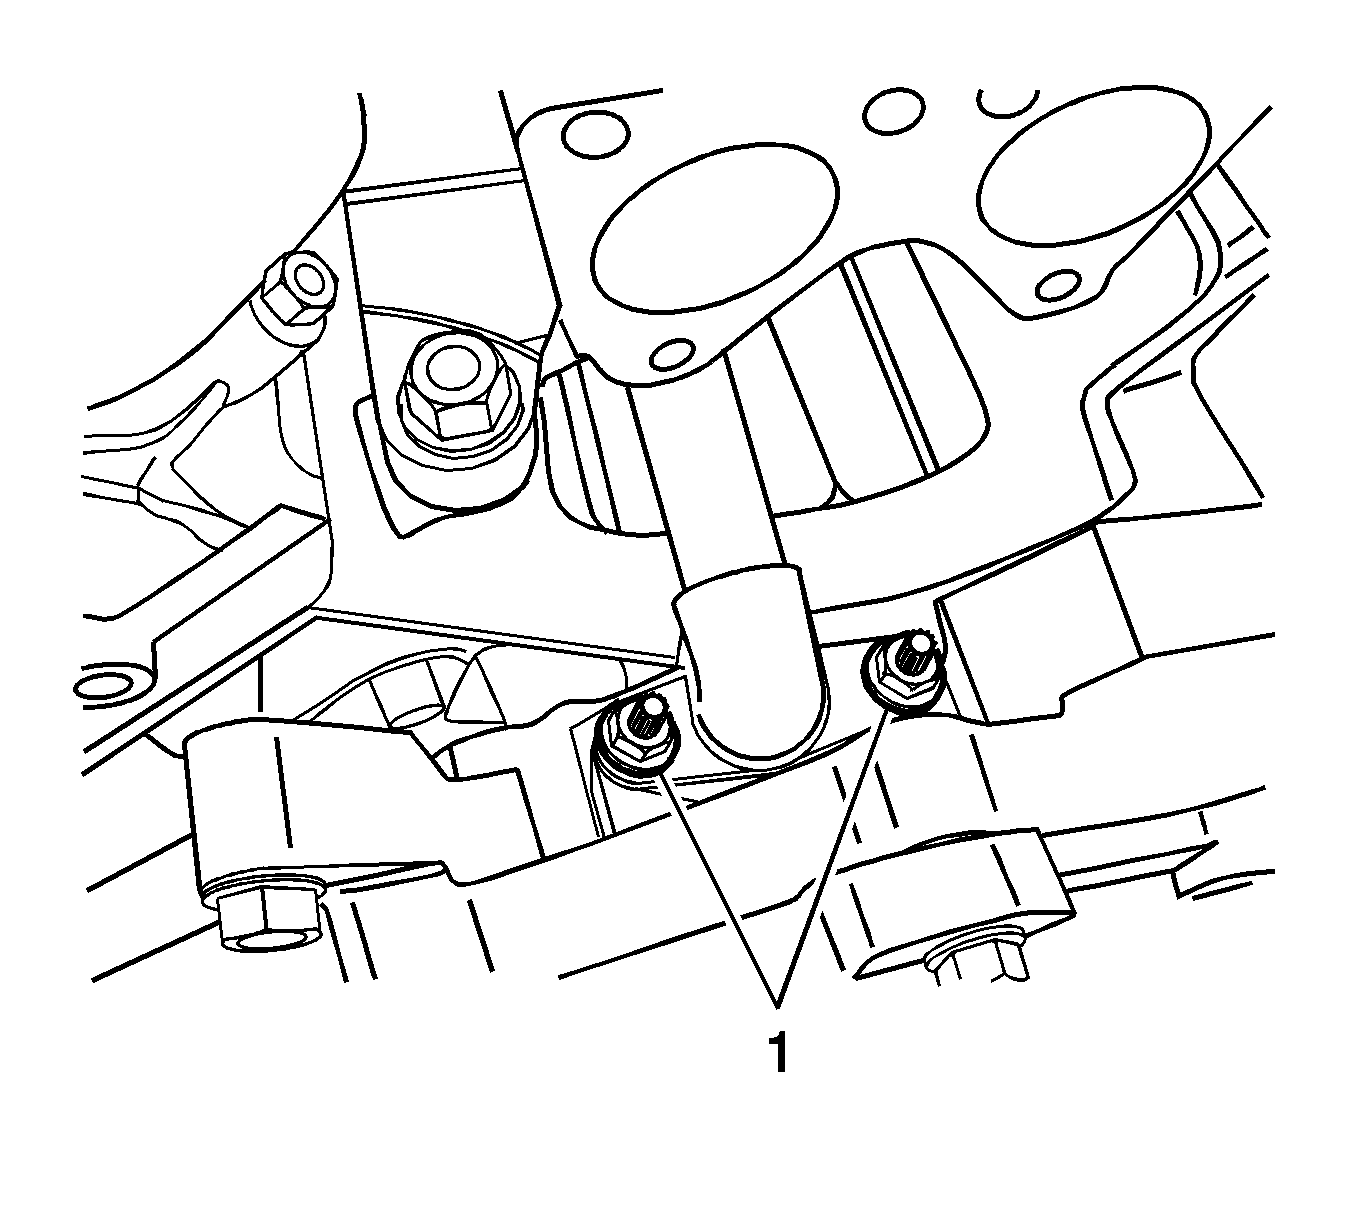
- Remove the left engine mount to engine mount frame bracket bolts.
- Remove the left engine mount to engine bolts.
- Remove the left engine mount bracket to frame bolts.
- Remove the right engine mount to engine mount frame bracket bolts.
- Remove the right engine mount to engine bolts.
- Remove the right engine mount bracket to frame bolts.
- Remove the engine from the vehicle.
- Place the engine on a suitable stand.
Important: In order to remove the engine, the vehicle needs to be on a hoist. The front wheels and tires will also require removal. The vehicle will have to be supported by the frame when the tires are removed.
| 10.1. | Slide the boot down to access the terminal stud. |
| 10.2. | Remove the positive cable nut. |
| 10.3. | Remove the positive cable. |


| 39.1. | Reposition the positive battery cable boot. |
| 39.2. | Remove the positive battery cable nut at the IAH. |
| 39.3. | Remove the positive battery cable from the IAH stud. |

Important: Use care not to damage this hose during the procedure.
Important: Use care not to damage this hose during the procedure.


Important: Remove the engine flywheel housing before installing the engine on a stand.
The engine will have to be angled in order to remove. Use a load positioning sling to assist in angling the engine.


Installation Procedure
- Remove the engine from the stand.
- Install the engine to the vehicle.
- Install the right engine mount bracket to frame bolts.
- Install the right engine mount to engine bolts.
- Install the right engine mount to engine mount bracket bolts.
- Install the left engine mount bracket to frame bolts.
- Install the left engine mount to engine bolts.
- Install the left engine mount to engine mount bracket bolts.
- Lower the engine onto the engine mounts.
- Remove the lifting device and the J 36857 engine lift hooks.
- Install the G102, G103 and G108.
- Install the right exhaust manifold. Refer to Exhaust Manifold Replacement - Right Side .
- Install the left exhaust manifold. Refer to Exhaust Manifold Replacement - Left Side .
- Install the oil filter adapter and oil cooler assembly replacement. Refer to Oil Filter Adapter and Oil Cooler Assembly Replacement .
- Install the oil pump pickup tube. Refer to Oil Pump Suction Pipe and Screen Assembly Removal .
- Install the engine flywheel housing. Refer to Engine Flywheel Housing Replacement .
- Install the upper oil pan. Refer to Upper Oil Pan Replacement .
- Install the engine flywheel. Refer to Engine Flywheel Replacement .
- Install the transmission. Refer to Transmission Replacement .
- Install the engine oil indicator tube. Refer to Oil Level Indicator and Tube Replacement .
- Install the transmission fill tube.
- Position the fuel injection pump and install the 4 bolts.
- Connect the fuel pump electrical connector.
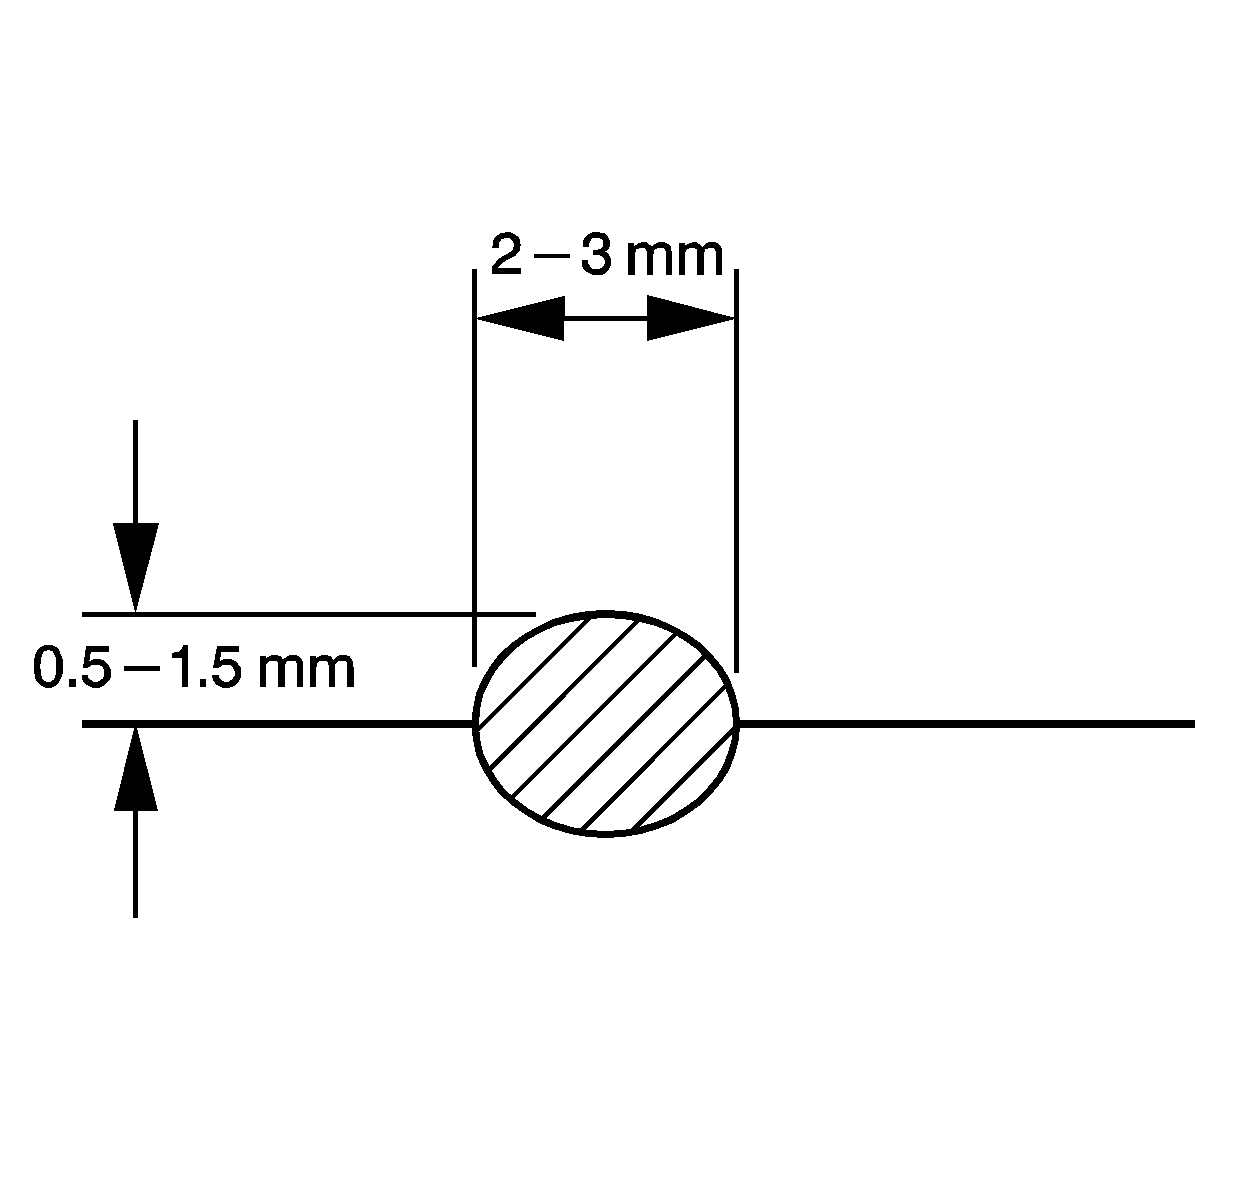
- Apply a 2-3 mm wide by 0.5-1.5 mm high bead of GM P/N 12378521 (Canadian P/N 88901148) sealant on the right intake manifold mating surface.
- Install the right intake manifold.
- Install the intake manifold bolts/nuts.
- Tighten the right intake manifold bolts/nuts.
- Apply a 2-3 mm wide by 0.5-1.5 mm high bead of GM P/N 12378521 (Canadian P/N 88901148) sealant on the left intake manifold mating surface.
- Install the left intake manifold.
- Tighten the left intake manifold bolts/nuts.
- Position the turbocharger cooling outlet pipe and install the 2 bolts.
- Position the RH fuel rail and install the 2 bolts.
- Install the RH fuel injector feed pipes.
- After installing the fuel injector pipes, clean the injector pipes and apply sealant GM P/N 97720043, at the fitting to prevent moisture and debris from collecting between the line and fitting.
- Connect the FRP sensor electrical connector (1).
- Position the LH fuel rail and install the 2 bolts.
- Install the LH fuel injector feed pipes.
- After installing the fuel injector pipes, clean the injector pipes and apply sealant GM P/N 97720043, at the fitting to prevent moisture and debris from collecting between the line and fitting.
- Install the LH to RH fuel rail pipe.
- After installing the fuel pipes, clean the pipes and apply sealant GM P/N 97720043, at the fitting to prevent moisture and debris from collecting between the line and fitting.
- Position the fuel pipe/hose assembly and connect the hose (1) at the fuel pump.
- Install the fuel pipe bracket bolt (2).
- Compress the clamp and install the fuel system pressure relief hose.
- Install the fuel pump to the LH fuel rail pipe.
- After installing the fuel pipe, clean the pipe and apply sealant GM P/N 97720043, at the fitting to prevent moisture and debris from collecting between the line and fitting.
- Install NEW center intake manifold gaskets to the center intake.
- Install the center intake manifold.
- Install the center intake manifold lower 4 nuts (2).
- Install the center intake manifold upper 4 nuts (1).
- Install the fuel pipe clamp bolt (2) and turbocharger coolant inlet pipe bracket bolt (3).
- Install the fuel pipe.
- Connect the fuel injector return hoses to the return pipe assembly.
- Connect the fuel pump hose to the fuel pipe.
- Install the fuel line bracket bolt.
- Connect the fuel hoses to the fuel pipe.
- Install the fuel feed/return bracket bolt.
- Position the bracket, and install the nut and the 2 bolts.
- Position the engine wiring harness over from the RH side of the engine.
- Connect the ECT wiring harness electrical connector (1) and the oil pressure sensor electrical wiring harness electrical connector (2).
- Connect the intake air temperature sensor No. 2 and the fuel rail temperature sensor electrical connector.
- Connect the fuel injector electrical connectors.
- Install the LH glow plug nuts (2) and the routing bolts (1).
- Connect the LH main engine wiring harness connector and install the bracket bolts (1).
- Position the oil fed pipe and a NEW washer into place.
- Install the oil feed pipe bolt.
- Position the turbocharger lower heat shield.
- Install a new turbocharger oil return pipe gasket at the flywheel housing.
- Install the turbocharger (with the oil return pipe).
- Install the turbocharger bolts.
- Install the turbocharger oil return pipe nuts (1) at the top of the flywheel housing.
- Install the turbocharger oil feed pipe banjo bolt and a NEW washer.
- Position the turbocharger coolant inlet pipe hose to the turbocharger and install the bolt with NEW washers.
- Install the fuel line to the bracket bolt.
- Position the glow plug control module bracket.
- Install the glow plug control module bracket bolts (2).
- Install the fuel line bracket bolt (1).
- Position the glow plug control module and install the glow plug control module bolts.
- Connect the positive battery cable to the glow plug control module.
- Connect the fuel feed and return plugs.
- Position the turbocharger coolant outlet pipe clamp (1) and install the hose to the turbocharger pipe.
- Install the turbocharger upper heat shield.
- Install the turbocharger upper heat shield bolts.
- Connect the engine wiring harness electrical connector to the turbocharger vane control solenoid valve.
- Connect the engine wiring harness electrical connector to the turbocharger vane position sensor.
- Install the EGR cooler tube bracket and the 2 bolts.
- If necessary, install the EGR bracket, nut, and the EGR bracket bolt.
- Install the EGR valve and EGR cooler tube assembly.
- Install the EGR nut (1) and bolt (2).
- Connect the EGR solenoid electrical connector.
- Install the crankcase ventilation hose/pipe. Refer to Positive Crankcase Ventilation Hose/Pipe/Tube Replacement .
- Install the EGR cooler tube bracket bolt.
- Compress the clamp (1) and connect the EGR heater inlet hose/pipe (2) to the EGR cooler tube.
- Install the EGR coolant hose. Refer to Exhaust Gas Recirculation Coolant Hoses/Pipes Replacement .
- Install the left exhaust pipe. Refer to Exhaust Pipe Replacement - Left Side .
- Install the right exhaust pipe. Refer to Exhaust Pipe Replacement - Right Side .
- Install the air intake pipe. Refer to Air Intake Pipe Replacement .
- Install a NEW O-ring seal to the center intake manifold.
- Install 2 NEW metal EGR gaskets to the EGR valve.
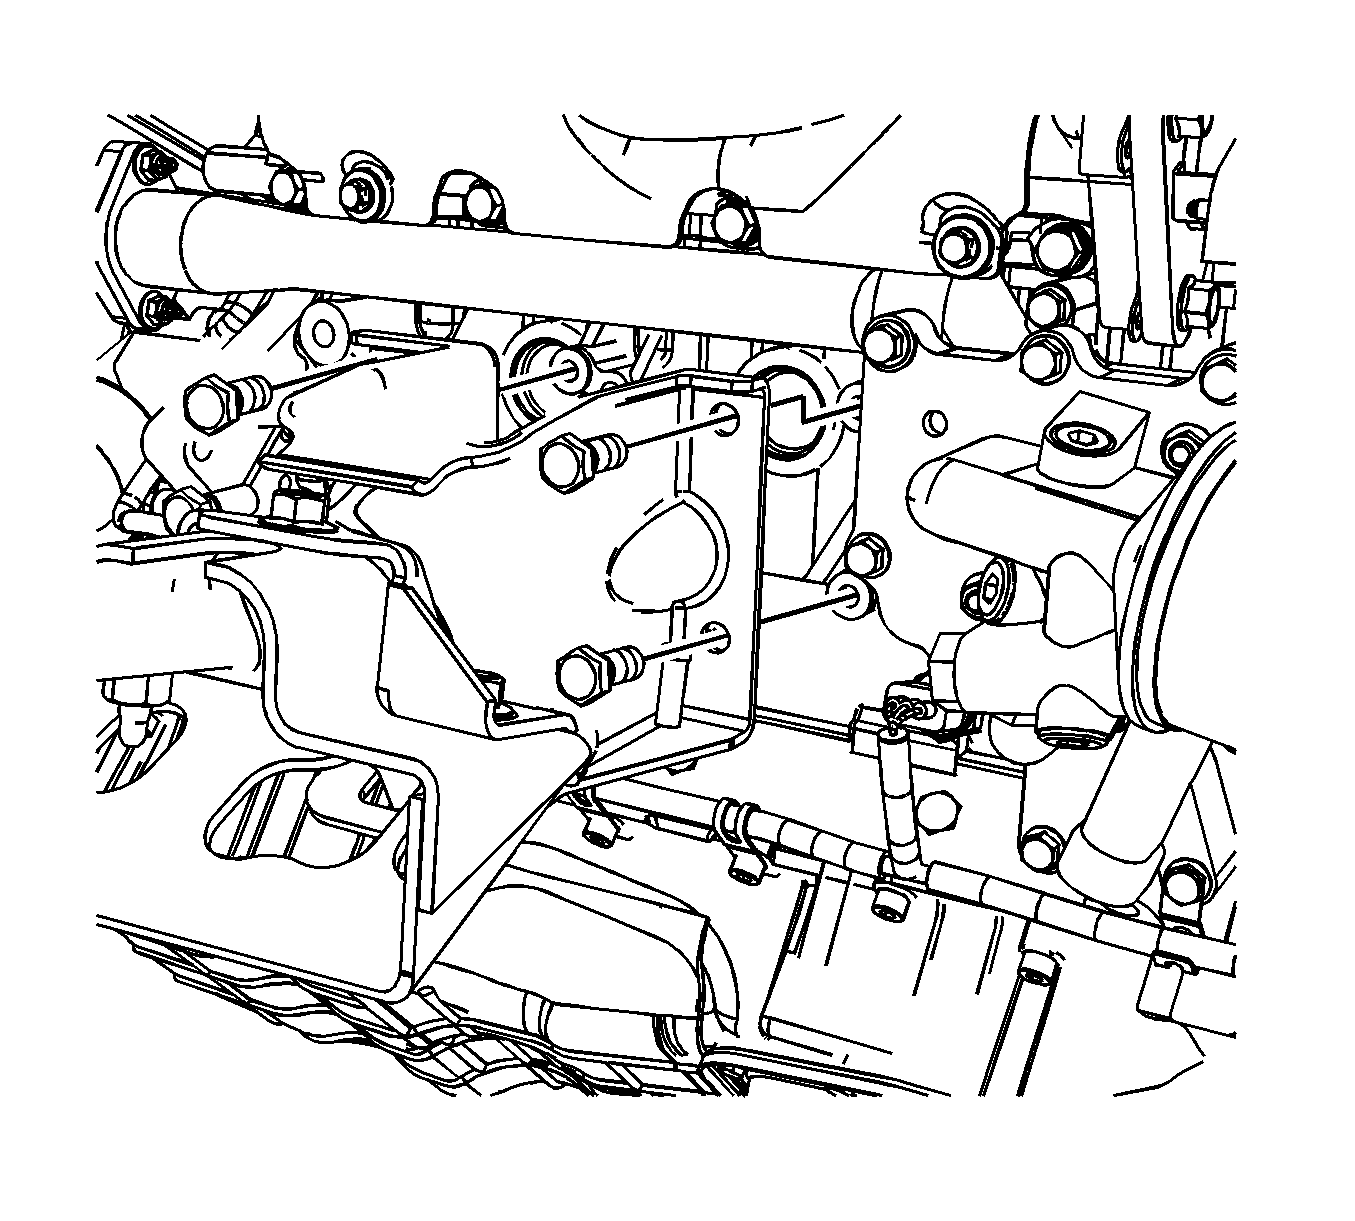
- Install the intake manifold tube with the stud.
- Install the intake manifold tube bolts (2, 4) and nut (1).
- Install the EGR cooler water pipe bracket bolt (5).
- Install the engine wiring harness clip to the intake manifold tube.
- Install the engine wiring harness clip to the intake manifold tube.
- Install the rear intake manifold tube nut (2).
- Install the 2 rear intake manifold tube bolts (3).
- Install the engine wiring harness clip bolt (1) at the rear of the intake manifold tube.
- Connect the positive cable to the IAH by performing the following:
- Reposition the positive battery cable boot.
- Connect the engine harness electrical connector to the MAP sensor.
- Connect the IAH electrical connector.
- Install the thermostat bypass pipe. Refer to Thermostat Bypass Pipes Replacement .
- Position the thermostat housing crossover with the NEW gaskets.
- Install the thermostat housing crossover nuts and bolts.
- Connect the coolant temperature sensor electrical connector.
- Install the fuel pipe bracket bolt.
- Install the EGR valve coolant pipe to the thermostat housing bolt.
- Install the oil fill tube and the oil fill tube bolts.
- Compress the clamp and connect the turbocharger inlet cooling hose/pipe.
- Position the fuel line and install the fuel line bolt.
- Position the A/C compressor and power steering pump bracket.
- Install the A/C compressor and power steering pump bracket bolts.
- Position the power steering pump and loosely install the front bracket bolts.
- Loosely install the rear power steering pump bracket bolts.
- Install the A/C compressor.
- Install the A/C compressor bolts.
- Connect the A/C suction and discharge lines. Refer to Discharge Hose Replacement and Suction Hose Replacement .
- Connect the A/C cut out switch electrical connector.
- Connect the A/C compressor clutch electrical connector.
- If equipped with dual generator system, install the idler pulley and the bolt.
- Install the auxiliary generator bracket and bolt, if equipped.
- If equipped, install the auxiliary generator. Refer to Auxiliary Generator Replacement .
- Install the generator mounting bracket and bolts.
- Install the drive belt tensioner and tensioner belt.
- Install the oil indicator tube bracket bolt.
- Install the transmission tube and bolt.
- Install the 2 wiring harness routing bolts.
- Install the 2 RH engine wiring harness bracket bolts.
- Connect the RH engine wiring main harness connector.
- Install the generator (2) and the generator bolts (1).
- Install the positive battery cable to the generator, perform the following:
- Position the boot to cover the terminal stud.
- Connect the generator electrical connector.
- Install the drive belt. Refer to Drive Belt Replacement .
- Install the cooling fan. Refer to Fan Replacement .
- Install the cooling layer. Refer to Cooling Layer Installation .
- Prime the fuel system. Refer to Fuel System Priming .
- Run the vehicle to verify correct engine operation and inspect for engine fluid leaks.
- Install the engine cover. Refer to Engine Cover Replacement .
Notice: Refer to Fastener Notice in the Preface section.
Tighten
Tighten the bolts to 65 N·m (48 lb ft).
Tighten
Tighten the bolts to 58 N·m (43 lb ft).
Tighten
Tighten the bolts to 65 N·m (48 lb ft).
Tighten
Tighten the bolts to 65 N·m (48 lb ft).
Tighten
Tighten the bolts to 58 N·m (43 lb ft).
Tighten
Tighten the bolts to 65 N·m (48 lb ft).
Tighten
Tighten the ground bolts to 34 N·m (25 lb ft).
Tighten
Tighten the bolts to 25 N·m (18 lb ft).
Tighten
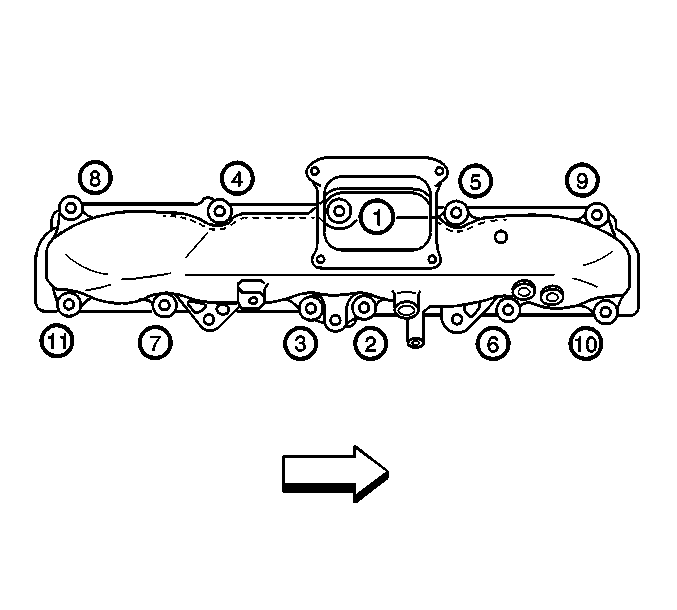
Tighten the bolts/nuts in sequence to 25 N·m (18 lb ft).

Tighten
Tighten the bolts/nuts in sequence to 25 N·m (18 lb ft).
Tighten
Tighten the bolts to 9 N·m (80 lb in).
Tighten
Tighten the bolts to 25 N·m (18 lb ft).
Tighten
Tighten the fittings to 41 N·m (30 lb in).
Tighten
Tighten the bolts to 25 N·m (18 lb ft).
Tighten
Tighten the fittings to 41 N·m (30 lb ft).
Tighten
Tighten the fittings to 41 N·m (30 lb ft).
Tighten
Tighten the bolt to 25 N·m (18 lb ft).
Tighten
Tighten the fittings to 41 N·m (30 lb ft).
Important: The center intake manifold lower nuts MUST be installed and tightened first.
Tighten
Tighten the nuts to 10 N·m (89 lb in).
Tighten
Tighten the nuts to 10 N·m (89 lb in).
Tighten
Tighten the bolt to 25 N·m (18 lb ft).
Tighten
Tighten the bolt to 25 N·m (18 lb ft).
Tighten
Tighten the bolt to 25 N·m (18 lb ft).
Tighten
Tighten the glow plug nut to 1.7 N·m (15 lb in).
Important: Lubricate the NEW washer with diesel fuel before installing.
Tighten
Tighten the bolt to 34 N·m (25 lb ft).
Tighten
Tighten the bolts to 108 N·m (80 lb ft).
Tighten
Tighten the nuts to 21 N·m (15 lb ft).
Tighten
Tighten the bolt to 34 N·m (25 lb ft).
Important: Use care not to damage this hose during the procedure.
Tighten
Tighten the bolt to 25 N·m (18 lb ft).
Tighten
Tighten the bolt to 25 N·m (18 lb ft).
Tighten
Tighten the bolts to 10 N·m (89 lb in).
Tighten
Tighten the bolt to 25 N·m (18 lb ft).
Tighten
Tighten the bolts to 10 N·m (89 lb in).
Important: Use care not to damage this hose during the procedure.
Tighten
Tighten the bolts to 9 N·m (80 lb in).
Tighten
Tighten the 2 bolts to 25 N·m (18 lb ft).
Tighten
Tighten the EGR bracket bolt and nut to 25 N·m (18 lb ft).
Tighten
Tighten the EGR nut and bolt to 50 N·m (37 lb ft).
Tighten
Tighten the EGR cooler tube bracket bolt to 25 N·m (18 lb ft).
Tighten
Tighten the stud to 25 N·m (18 lb ft).
Tighten
Tighten the bolt/nut to 25 N·m (18 lb ft).
Tighten
Tighten the bolt to 15 N·m (11 lb ft).
Tighten
Tighten the bolt to 15 N·m (11 lb ft).
Tighten
Tighten the nut to 25 N·m (18 lb ft).
Tighten
Tighten the nut to 25 N·m (18 lb ft).
| 107.1. | Position the positive battery cable to the IAH stud. |
| 107.2. | Install the positive battery cable nut to the IAH. |
Tighten
Tighten the nut to 10 N·m (89 lb in).
Tighten
Tighten the bolts to 25 N·m (18 lb ft).
Tighten
Tighten the fuel pipe bracket bolt to 25 N·m (18 lb ft).
Tighten
Tighten the oil fill tube bolts to 25 N·m (18 lb ft).
Tighten
Tighten the bolts to 46 N·m (34 lb ft).
Important: Tighten the front bracket bolts before the rear bracket bolts, to ensure pulley alignment.
Tighten
| • | Tighten the front bolts to 50 N·m (37 lb ft). |
| • | Tighten the rear bolts to 50 N·m (37 lb ft). |
Tighten
Tighten the bolts to 50 N·m (37 lb ft).
Tighten
Tighten the bolt to 50 N·m (37 lb ft).
Tighten
Tighten the bolt to 50 N·m (37 lb ft).
Tighten
Tighten the generator mounting bracket bolts to 50 N·m (37 lb ft).
Tighten
Tighten the bolt to 50 N·m (37 lb ft).
Tighten
Tighten the oil indicator tube bracket bolt to 21 N·m (15 lb ft).
Tighten
Tighten the transmission tube bolt to 21 N·m (15 lb ft).
Tighten
Tighten the wiring harness routing bolts to 10 N·m (89 lb in).
Tighten
Tighten the generator bolts to 50 N·m (37 lb ft).
| 140.1. | Install the positive cable. |
| 140.2. | Install the positive cable nut. |
Tighten
Tighten the positive cable nut to 9 N·m (80 lb in).
