Rear Fender Replacement Standard
Removal Procedure
- Remove the bolts from the front of the fender.
- Remove the screws in the wheel house attaching the fender to the box.
- Remove the tail lamp assembly. Refer to Tail/Turn Signal Lamp Replacement .
- Remove the fender to rear pillar retaining bolts through the tail lamp opening.
- Remove the rear bolts.
- Use the following procedure in order to remove the fender from the vehicle:
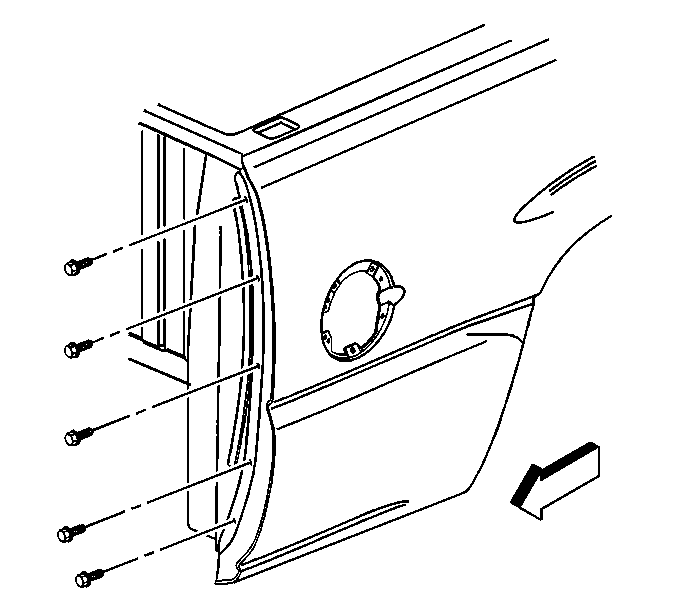
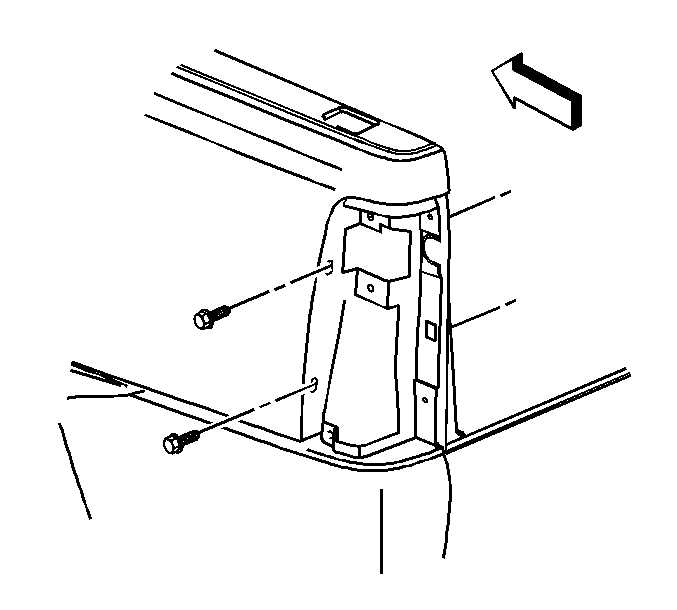
| 6.1. | Lift the fender at the bottom up 45 degrees. |
| 6.2. | Slide the fender upward to remove. |
Installation Procedure
- Use the following procedure in order to install the fender to the vehicle:
- Install the fender to rear pillar retaining bolts through the tail lamp opening.
- Install the rear retaining bolts.
- Install the tail lamp assembly. Refer to Tail/Turn Signal Lamp Replacement .
- Install the screws in the wheelhouse attaching the fender to the box.
- Install the bolts to the front of the fender.
| 1.1. | Rotate the fender up 45 degrees. |
| 1.2. | Rotate the fender down into the body position. |

Notice: Use the correct fastener in the correct location. Replacement fasteners must be the correct part number for that application. Fasteners requiring replacement or fasteners requiring the use of thread locking compound or sealant are identified in the service procedure. Do not use paints, lubricants, or corrosion inhibitors on fasteners or fastener joint surfaces unless specified. These coatings affect fastener torque and joint clamping force and may damage the fastener. Use the correct tightening sequence and specifications when installing fasteners in order to avoid damage to parts and systems.
Tighten
Tighten the bolts to 17 N·m (12 lb ft).
Tighten
Tighten the screws to 2 N·m (18 lb in).

Tighten
Tighten the bolts to 17 N·m (12 lb ft).
Rear Fender Replacement Step Side
Removal Procedure
- Remove the front filler bolts.
- Remove the step pad.
- Remove the lower fender brace rod bolts.
- Remove the fender step bolts.
- Remove the fender molding push-pins.
- Remove the tail lamp assembly. Refer to Tail/Turn Signal Lamp Replacement .
- Remove the fender to rear pillar retaining bolts through the tail lamp opening.
- Remove the rear retaining screws.
- Remove the top fender molding push-pin retainer.
- Remove the top fender molding.
- Use the following procedure in order to remove the fender from the vehicle:
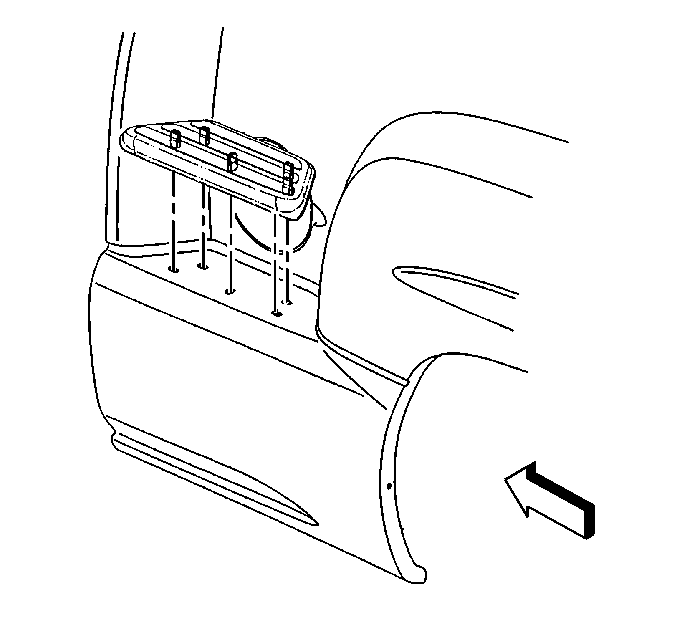
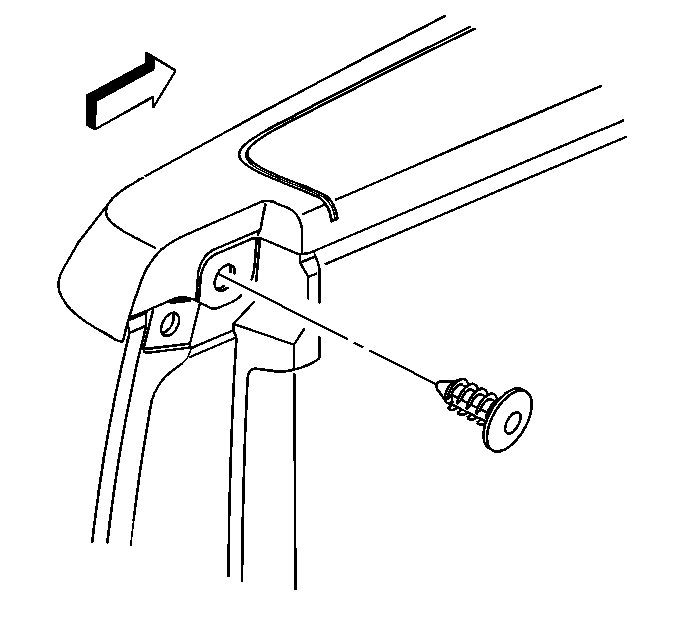
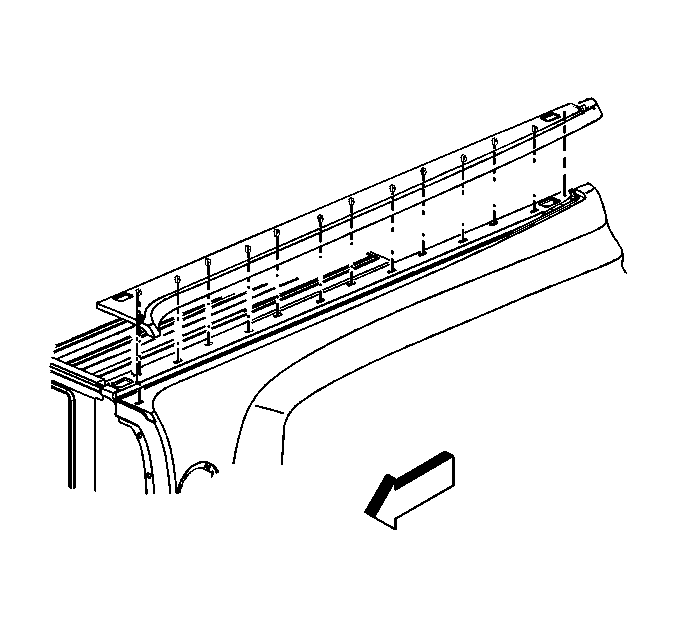
| 11.1. | Lift the fender up 90 degrees. |
| 11.2. | Slide the fender outward. |
Installation Procedure
- Use the following procedure in order to install the fender to the vehicle:
- Install the rear retaining screws.
- Install the fender to the rear pillar retaining bolts through the tail lamp opening.
- Install the tail lamp assembly. Refer to Tail/Turn Signal Lamp Replacement .
- Install the fender step bolts.
- Install the step pad.
- Install the front filler bolts.
- Install the lower fender brace rods bolts.
- Install the top fender molding.
- Install the top molding rear push-pin retainer.
| 1.1. | Position the locating notch in the fender to the vehicle. |
| 1.2. | Rotate the fender up 90 degrees. |
| 1.3. | Slide the fender under the retainers. |
| 1.4. | Rotate the fender down 90 degrees into the body position. |


Rear Fender Replacement QS4
Removal Procedure
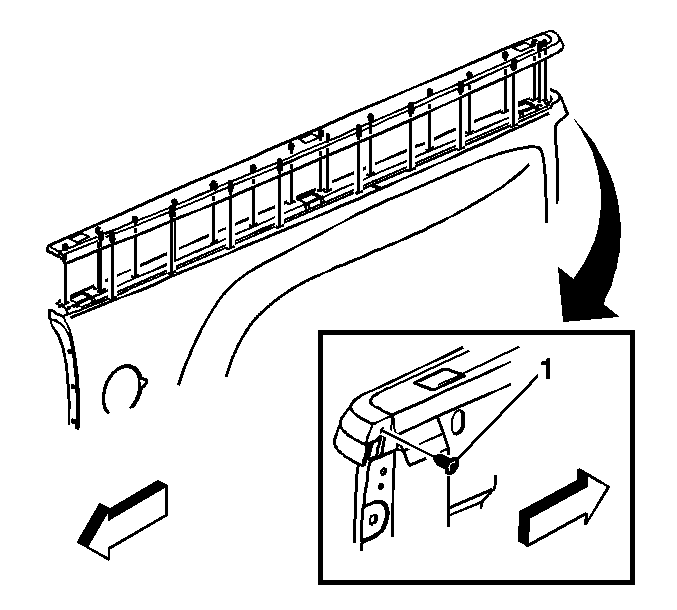
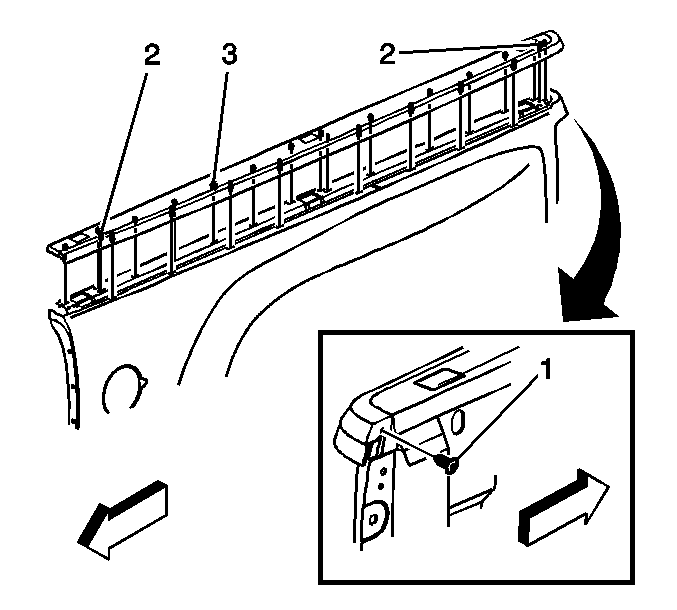
- Remove the upper molding rear retainer (1) from the fender.
- Remove the upper molding from the fender. Use a flat-bladed tool in order to release the top molding retainers.
- Remove the fuel filler neck from the vehicle, if necessary. Refer to Fuel Tank Filler Door Replacement .
- Remove the bolts from the front of the fender.
- Remove the rear tail lamp assembly from the vehicle. Refer to Tail/Turn Signal Lamp Replacement .
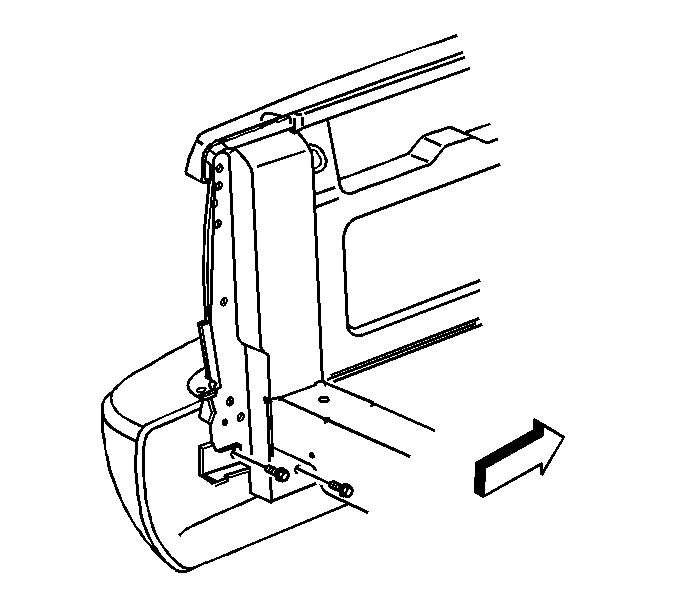
- Remove the bolts that retain the fender to the rear pillar.
- Remove the lower bolts from the rear of the fender.
- Disconnect the electrical connectors from the running lights, if equipped.
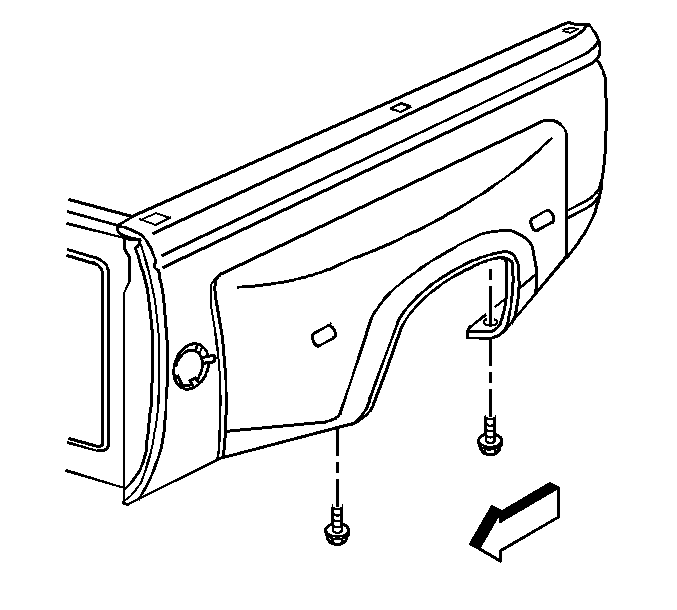
- Remove the screws from the outer wheel well.
- Remove the bolts from the bottom of the fender.
- With an assistant, pivot the fender from the bottom upward to approximately 90 degrees in order to remove the fender from the retainers.


Installation Procedure
- With an assistant, install the fender to the pickup box at a 90 degree angle and lower gently.
- Install the bolts to the bottom of the fender.
- Install the screws to the outer wheel well area.
- Install the bolts to the bottom of the fender.
- Connect the electrical connectors to the running lamps, if equipped.
- Install the lower bolts to the rear of the fender.
- Install the bolts in order to retain the fender to the rear pillar.
- Install the rear tail lamp assembly to the vehicle. Refer to Tail/Turn Signal Lamp Replacement .
- Install the bolts to the front of the fender.
- Install the fuel filler neck to the vehicle, if removed. Refer to Fuel Tank Filler Door Replacement .
- Install the upper molding to the pickup box side.
- Install the upper molding rear retainer (1) to the pickup box side.

Notice: Refer to Fastener Notice in the Preface section.
Tighten
Tighten the bolts to 9 N·m (80 lb in).
Tighten
Tighten the bolts to 9 N·m (80 lb in).

Tighten
Tighten the bolts to 9 N·m (80 lb in).
Tighten
Tighten the bolts to 9 N·m (80 lb in).


Tighten
Tighten the bolts to 17 N·m (13 lb ft).

Align the locator pins (2) and press down in order to secure.
Rear Fender Replacement Rear Dual Wheel
Removal Procedure
- Remove the upper molding rear retainer (1) from the fender.
- Remove the upper molding from the fender. Use a flat-bladed tool in order to release the top molding retainers.
- Remove the fuel filler neck from the vehicle, if necessary. Refer to Fuel Tank Filler Door Replacement .
- Remove the bolts from the front of the fender.
- Remove the rear tail lamp assembly from the vehicle. Refer to Tail/Turn Signal Lamp Replacement .
- Remove the bolts that retain the fender to the rear pillar. Remove the bolts through the tail lamp opening.
- Remove the lower bolts from the rear of the fender.
- Disconnect the electrical connectors from the running lights, if equipped.
- Remove the screws from the wheelwell.
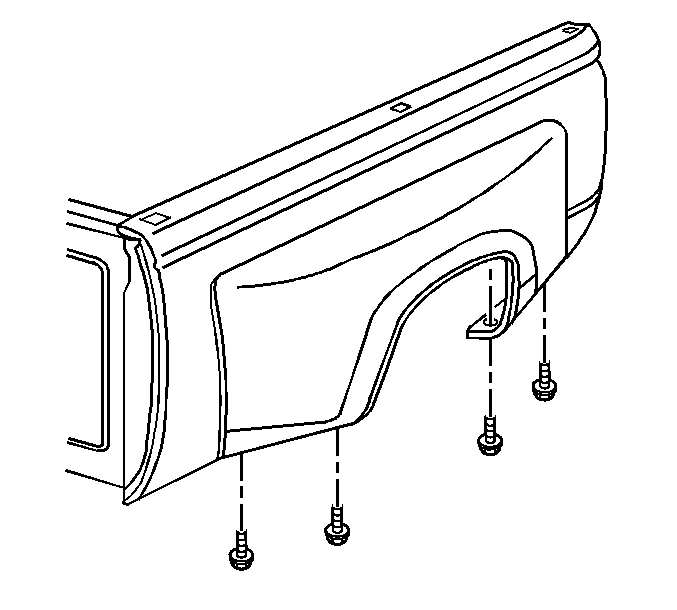
- Remove the bolts from the bottom of the fender.
- With an assistant, pivot the fender from the bottom to approximately 90 degrees in order to remove the fender.


Installation Procedure
- With an assistant, install the fender to the pickup box at a 90 degree angle and lower gently.
- Install the bolts to the bottom of the fender.
- Install the screws to the wheelwell area.
- Connect the electrical connectors to the running lamps, if equipped.
- Install the lower bolts to the rear of the fender.
- Install the bolts in order to retain the fender to the rear pillar.
- Install the rear tail lamp assembly to the vehicle. Refer to Tail/Turn Signal Lamp Replacement .
- Install the bolts to the front of the fender.
- Install the fuel filler neck to the vehicle, if removed. Refer to Fuel Tank Filler Door Replacement .
- Install the upper molding to the pickup box side.
- Install the upper molding rear retainer to the pickup box side.

Notice: Refer to Fastener Notice in the Preface section.
Tighten
Tighten the bolts to 25 N·m (18 lb ft).
Tighten
Tighten the screws to 2 N·m (18 lb in).

Tighten
Tighten the bolts to 25 N·m (18 lb ft).
Tighten
Tighten the bolts to 23 N·m (17 lb ft).


Tighten
Tighten the bolts to 23 N·m (17 lb ft).

Align the locator pins (2) and press down in order to secure.
