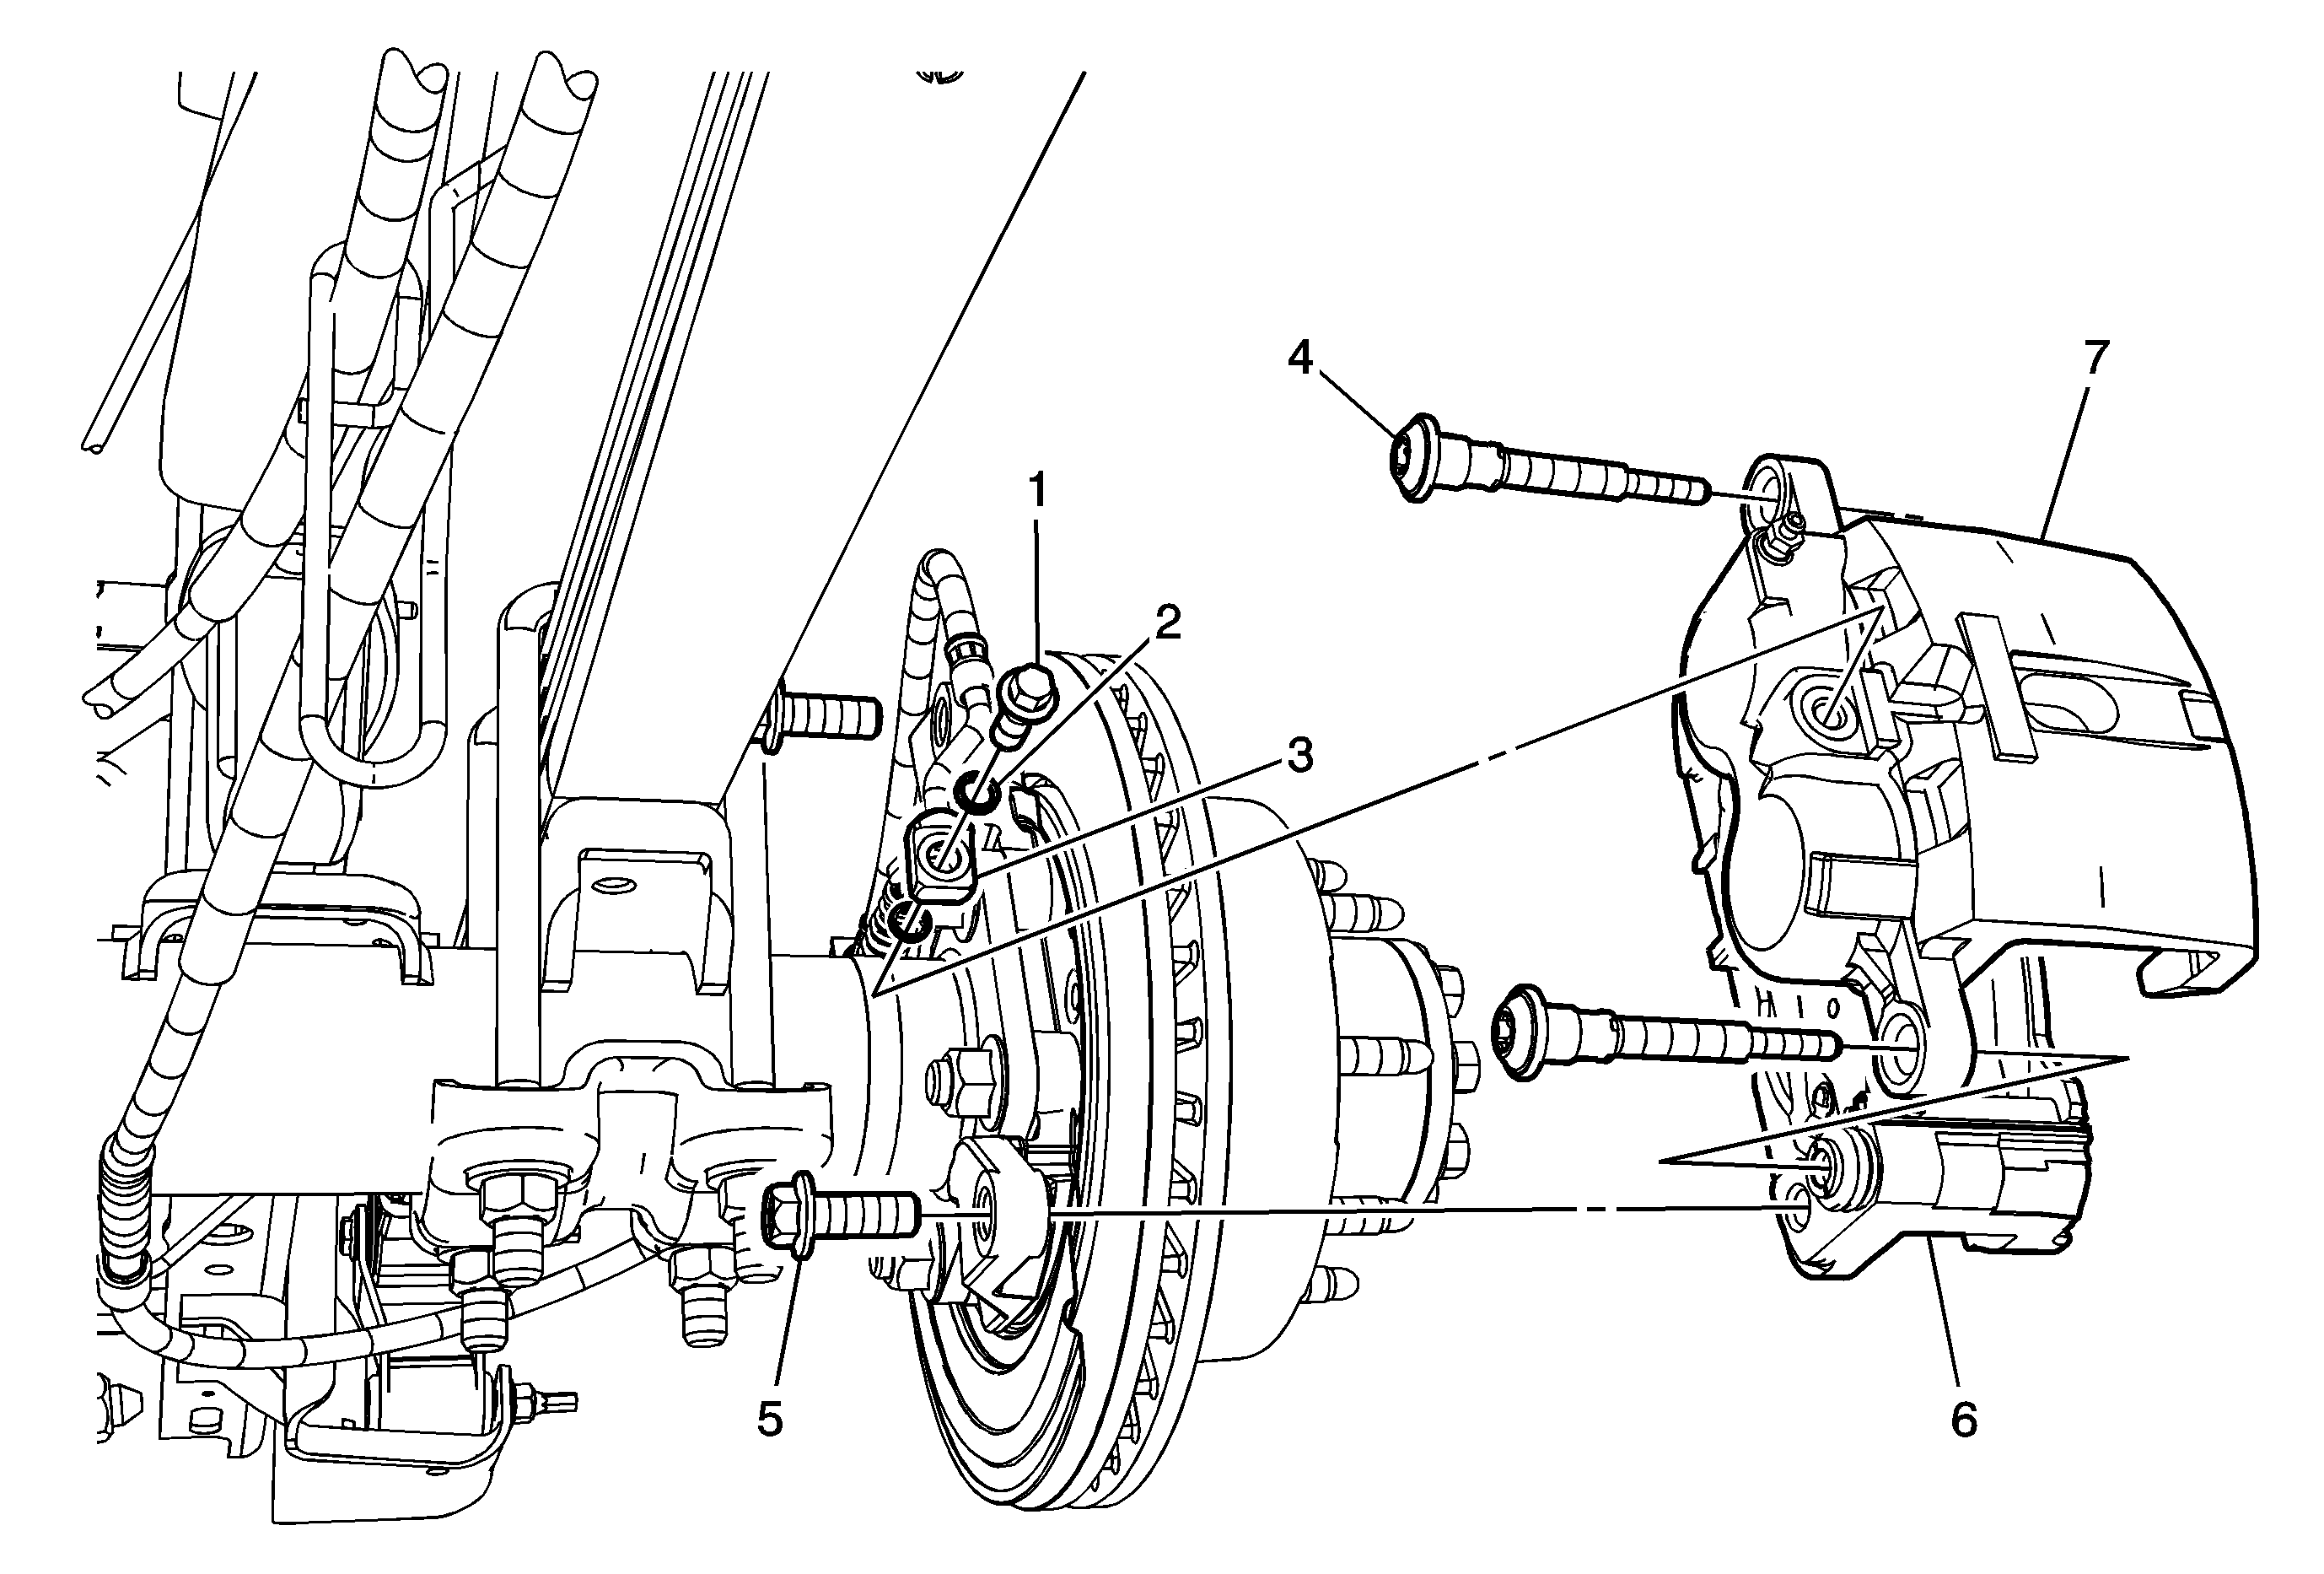
Callout
| Component Name
|
|
Caution: Refer to Brake Dust Caution in the Preface section.
Caution: Refer to Brake Fluid Irritant Caution in the Preface section.
Preliminary Procedures
- Raise and support the vehicle. Refer to
Lifting and Jacking the Vehicle
.
- Remove the tire and wheel assembly. Refer to
Tire and Wheel Removal and Installation
.
|
1
| Brake Hose Fitting Bolt
Notice: Refer to Fastener Notice in the Preface section.
Tighten
40 N·m (30 lb ft) |
2
| Brake Hose Fitting Gasket (Qty: 2)
ProcedureDiscard the brake hose fitting gaskets and install new gaskets.
|
3
| Rear Brake Hose Fitting
Tip
Plug the brake hose fitting to prevent brake fluid loss and contamination. |
4
| Brake Caliper Guide Pin Bolt (Qty: 2)
Tip
The upper brake caliper guide pin bolt cannot be removed until the brake caliper and bracket assembly are removed from the rear axle.
Only loosen the brake caliper upper guide pin bolt.
Tighten
108 N·m (80 lb ft) |
5
| Brake Caliper Bracket Bolt (Qty: 2)
Procedure
- Remove all traces of the adhesive patch on the brake caliper bracket bolts and threaded holes of the brake caliper bracket.
- Clean the brake caliper bracket bolt threads and the threaded holes of the brake caliper bracket with denatured alcohol or equivalent and allow to dry.
- Apply threadlocker G/M P/N 12345493 (Canadian P/N 10953488) to 2/3 of the threaded portion of the brake caliper bracket bolts.
Tighten
| • | JH6: 200 N·m (148 lb ft) |
| • | JH7: 300 N·m (221 lb ft) |
|
6
| Brake Caliper Bracket
ProcedureRemove the upper brake caliper guide pin bolt.
|
7
| Brake Caliper
Procedure
- Bleed the hydraulic brake system. Refer to
Hydraulic Brake System Bleeding
.
- After the installation is complete and with the engine OFF, gradually apply the brake pedal to approximately 2/3 of its travel distance.
- Slowly release the brake pedal.
- Wait 15 seconds, then repeat steps 2-3 until a firm brake pedal is obtained. This will properly seat the brake caliper pistons and the brake pads.
- Fill the master cylinder to the proper level. Refer to
Master Cylinder Reservoir Filling
.
|
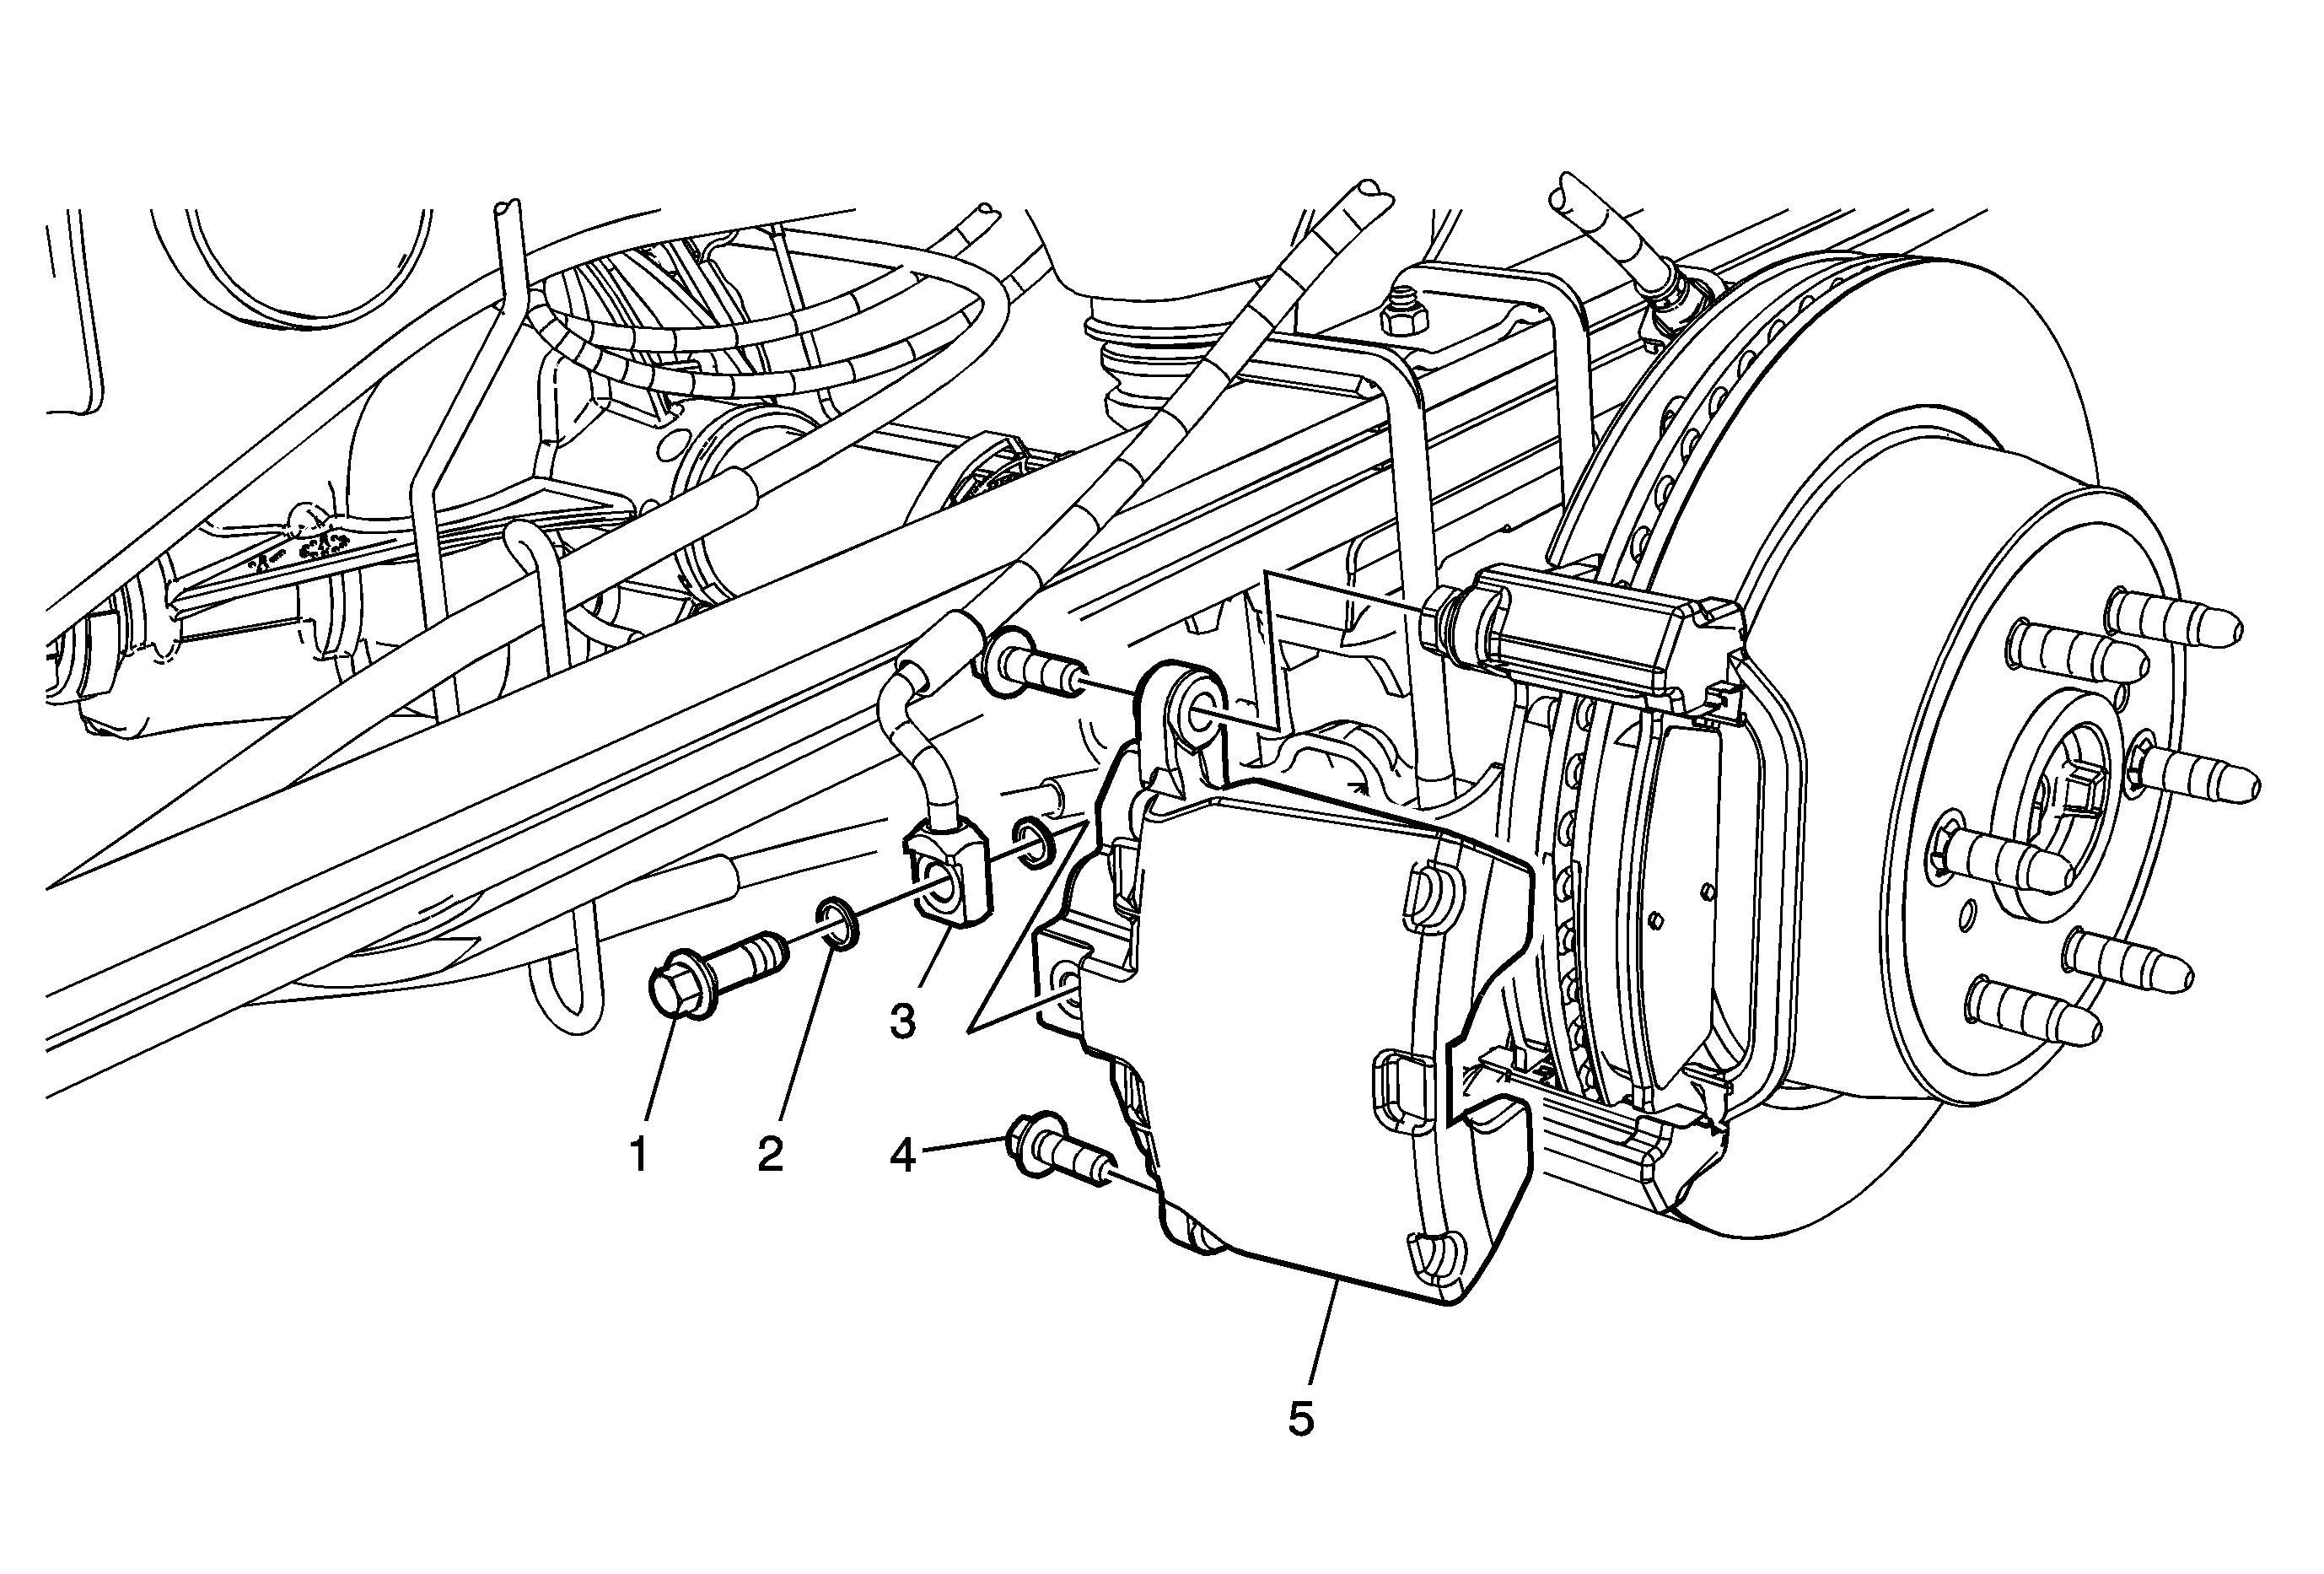
Callout
| Component Name
|
|
Caution: Refer to Brake Dust Caution in the Preface section.
Caution: Refer to Brake Fluid Irritant Caution in the Preface section.
Preliminary Procedures
- Raise and support the vehicle. Refer to
Lifting and Jacking the Vehicle
.
- Remove the tire and wheel assembly. Refer to
Tire and Wheel Removal and Installation
.
|
1
| Brake Hose Fitting Bolt
Notice: Refer to Fastener Notice in the Preface section.
Tighten
40 N·m (30 lb ft) |
2
| Brake Hose Fitting Gasket (Qty: 2)
ProcedureDiscard the brake hose fitting gaskets and install new gaskets.
|
3
| Brake Hose Fitting
Tip
Plug the brake hose fitting to prevent brake fluid loss and contamination. |
4
| Brake Caliper Guide Pin Bolt (Qty: 2)
Procedure
- DO NOT use any air tools to remove or install the brake caliper guide pin bolts. Use hand tools ONLY.
- Install an open end wrench to hold the caliper guide pin in line with the brake caliper while removing or installing the caliper guide pin bolts. DO NOT allow the open end wrench to contact the brake caliper. Allowing the open end wrench to contact
the brake caliper will cause a pulsation when the brakes are applied.
- Ensure the brake caliper guide pin seal is fully seated in the groove of the brake caliper guide pin and the guide pin slides freely in caliper bracket bore.
Tighten
38 N·m (28 lb ft) |
5
| Brake Caliper
Procedure
- Bleed the hydraulic brake system. Refer to
Hydraulic Brake System Bleeding
.
- After the installation is complete and with the engine OFF, gradually apply the brake pedal to approximately 2/3 of its travel distance.
- Slowly release the brake pedal.
- Wait 15 seconds, then repeat steps 2-3 until a firm brake pedal is obtained. This will properly seat the brake caliper piston and the brake pads.
- Fill the master cylinder to the proper level. Refer to
Master Cylinder Reservoir Filling
.
|


