Crankshaft Rear Oil Seal Housing Installation Without Seal in Housing
Special Tools
| • | J 41476 Front and Rear Cover Alignment Tool
|
| • | J 41480 Front and Rear Cover Alignment
|
For equivalent regional tools, refer to
Special Tools.
Note:
| • | Do not use the crankshaft rear oil seal or the engine rear housing gasket again. |
| • | Do not apply any type of sealant to the rear housing gasket, unless specified. |
| • | The special tools in this procedure are used to properly align the engine rear housing at the oil pan surface and to center the crankshaft rear oil seal. |
| • | The crankshaft rear oil seal will be installed after the rear housing has been installed and aligned. Install the rear housing without the crankshaft oil seal. |
| - | The crankshaft rear oil seal MUST be centered in relation to the crankshaft. |
| - | The oil pan sealing surface at the rear housing, and the engine block, MUST be aligned within specifications. |
| - | An improperly aligned rear housing may cause premature rear oil seal wear and/or engine assembly oil leaks. |
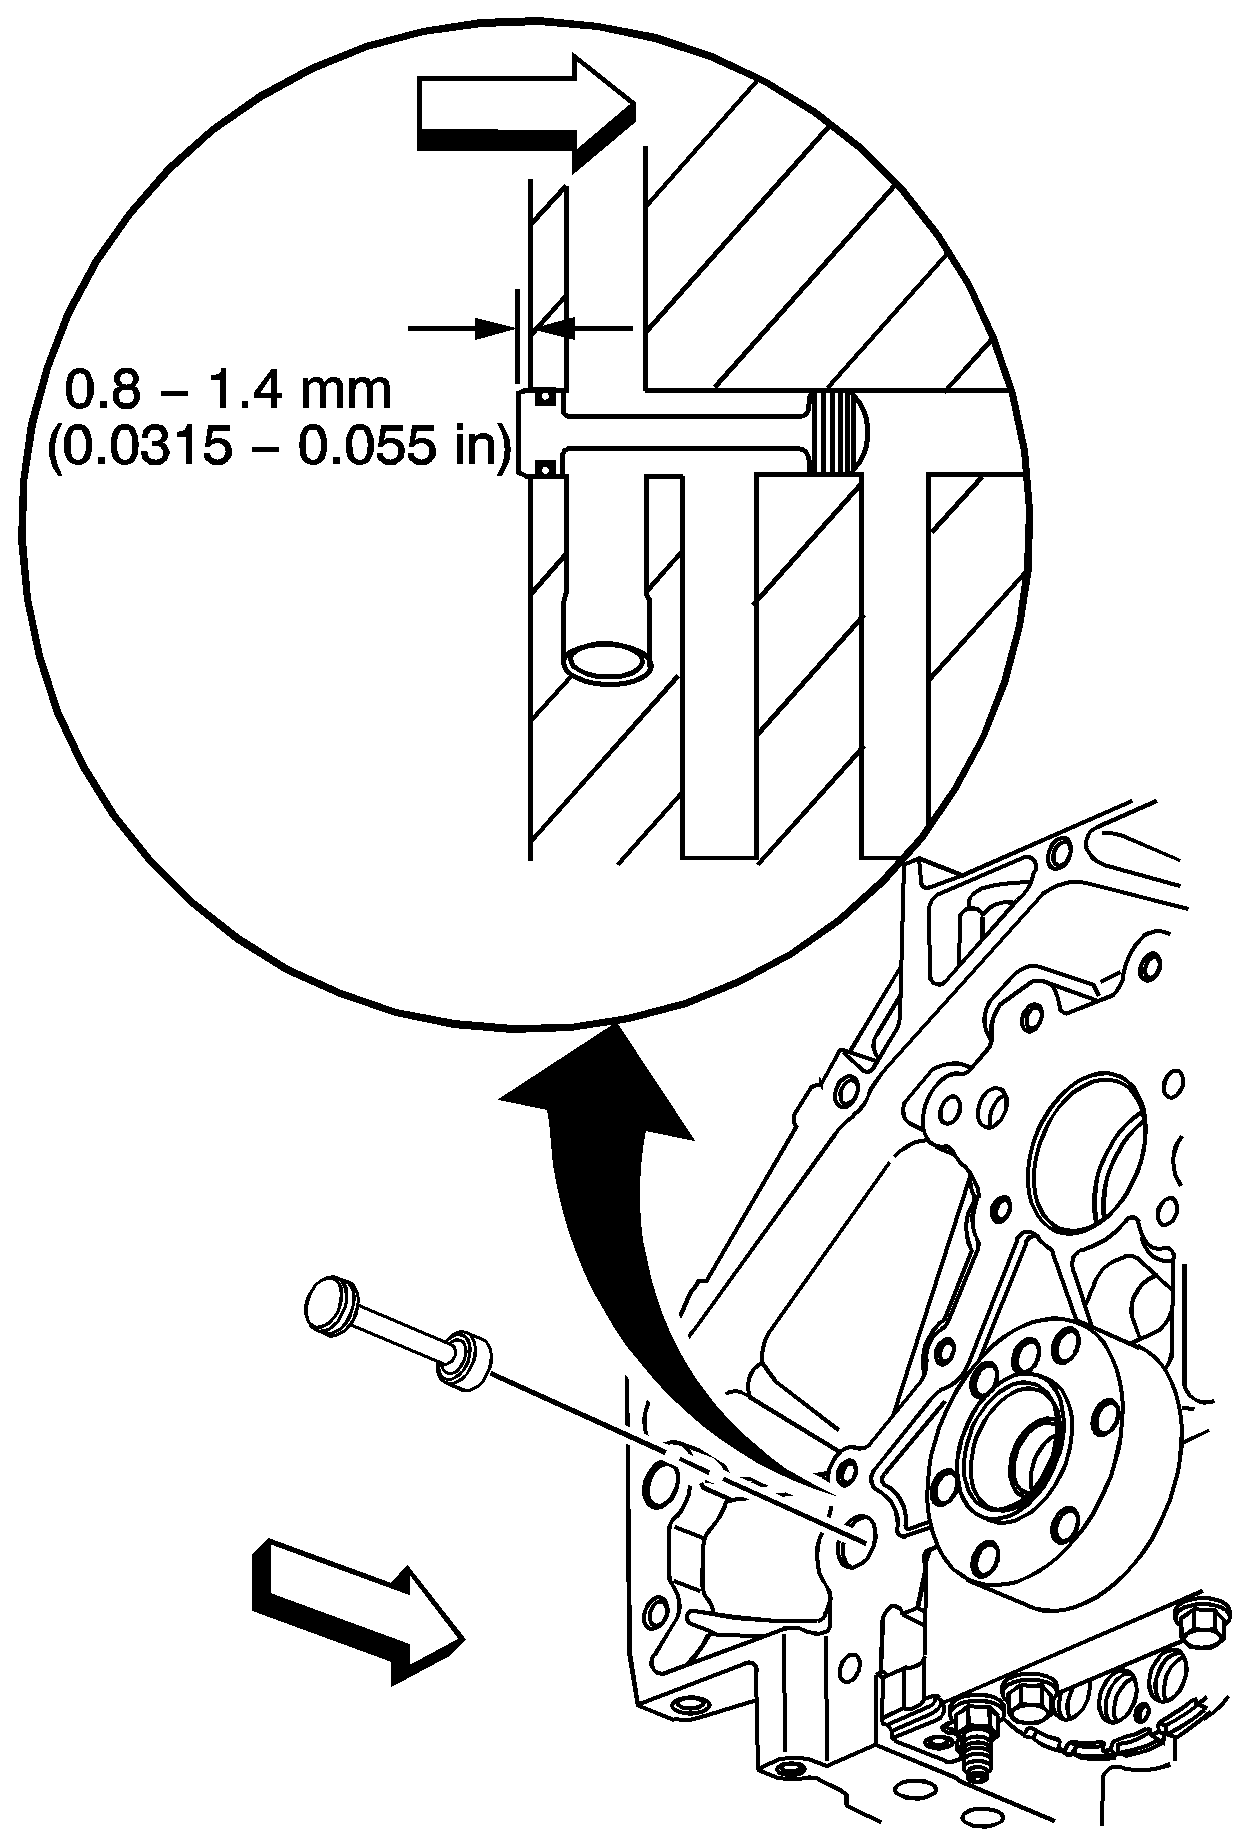
- Inspect the rear oil gallery plug for proper installation.
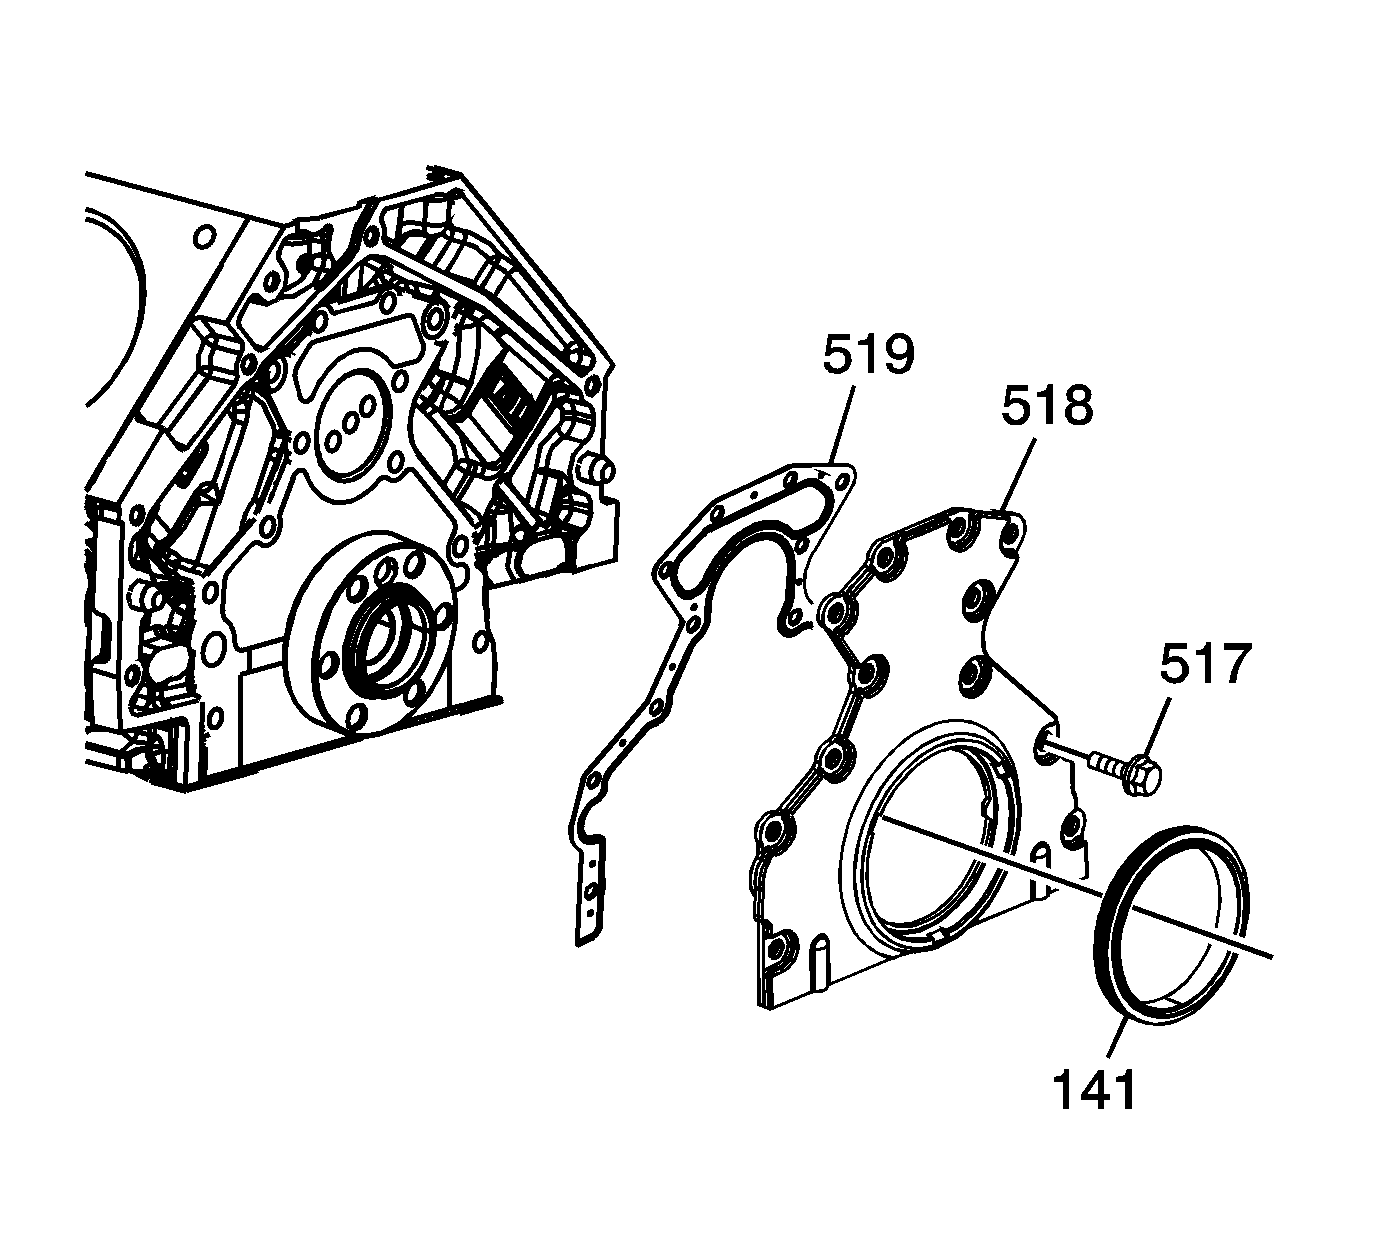
- Install the rear housing gasket (519), rear housing (518), and bolts (517).
- Tighten the bolts finger tight. Do not overtighten.
Caution: Refer to Fastener Caution in the Preface section.
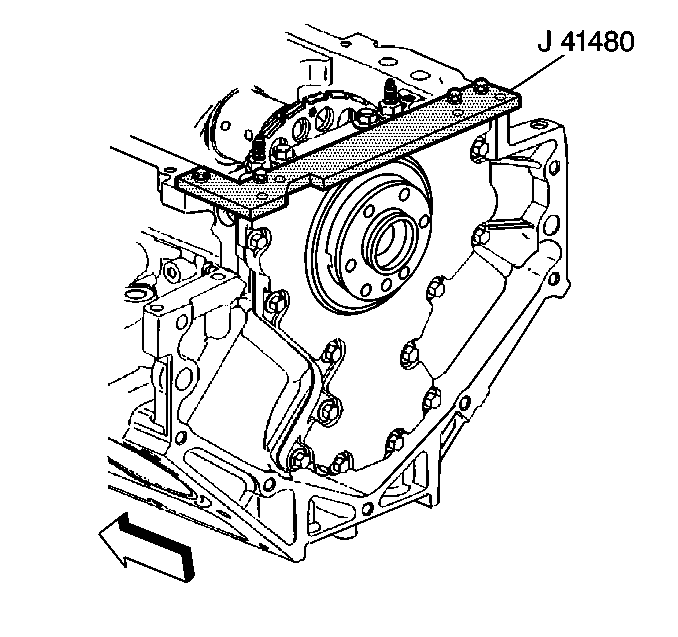
Note: Start the
J 41480 alignment
tool-to-rear housing bolts. Do not tighten the bolts at this time.
- Install the
J 41480 alignment
and bolts. Tighten the tool-to-engine block bolts to
25 N·m (18 lb ft).
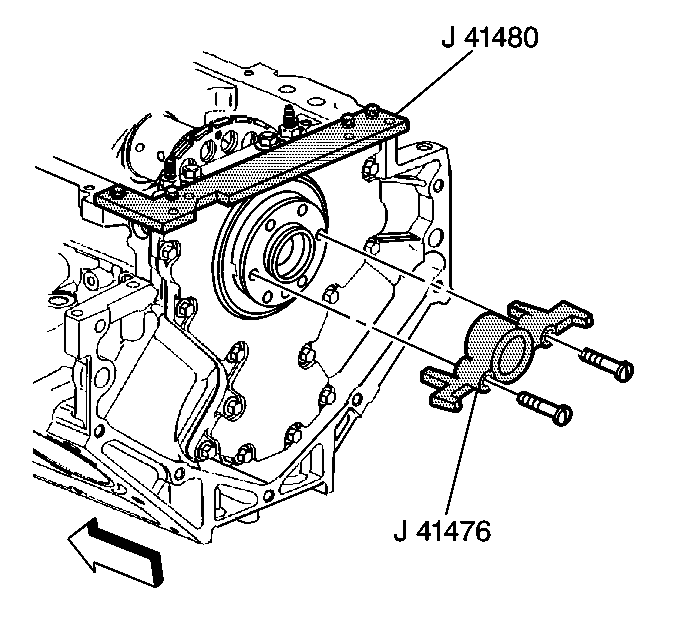
Note: To properly align the rear housing, the
J 41476 tool
must be installed onto the rear of the crankshaft with the tool mounting bolts parallel to the oil pan surface.
- Rotate the crankshaft until 2 opposing flywheel bolt holes are parallel to the oil pan surface.
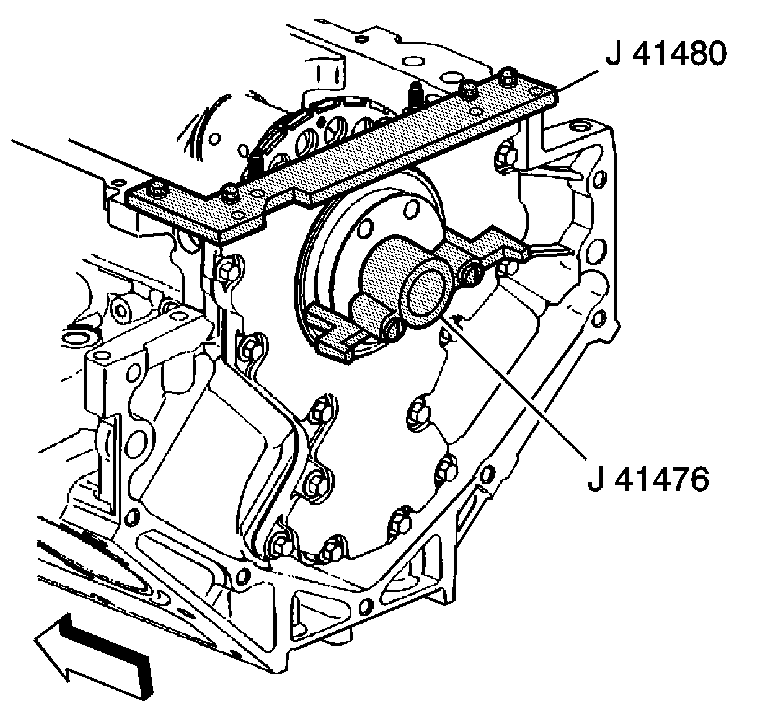
Note: The tapered legs of the alignment tool must enter the rear housing oil seal bore.
- Install the
J 41476 tool
and bolts onto the rear of the crankshaft.
| 6.1. | Tighten the tool mounting bolts until snug. Do not overtighten. |
| 6.2. | Tighten the
J 41480 alignment
tool-to-rear housing bolts evenly to
12 N·m (106 lb in). |
| 6.3. | Tighten the rear housing bolts to
30 N·m (22 lb ft). |
- Remove the tools.
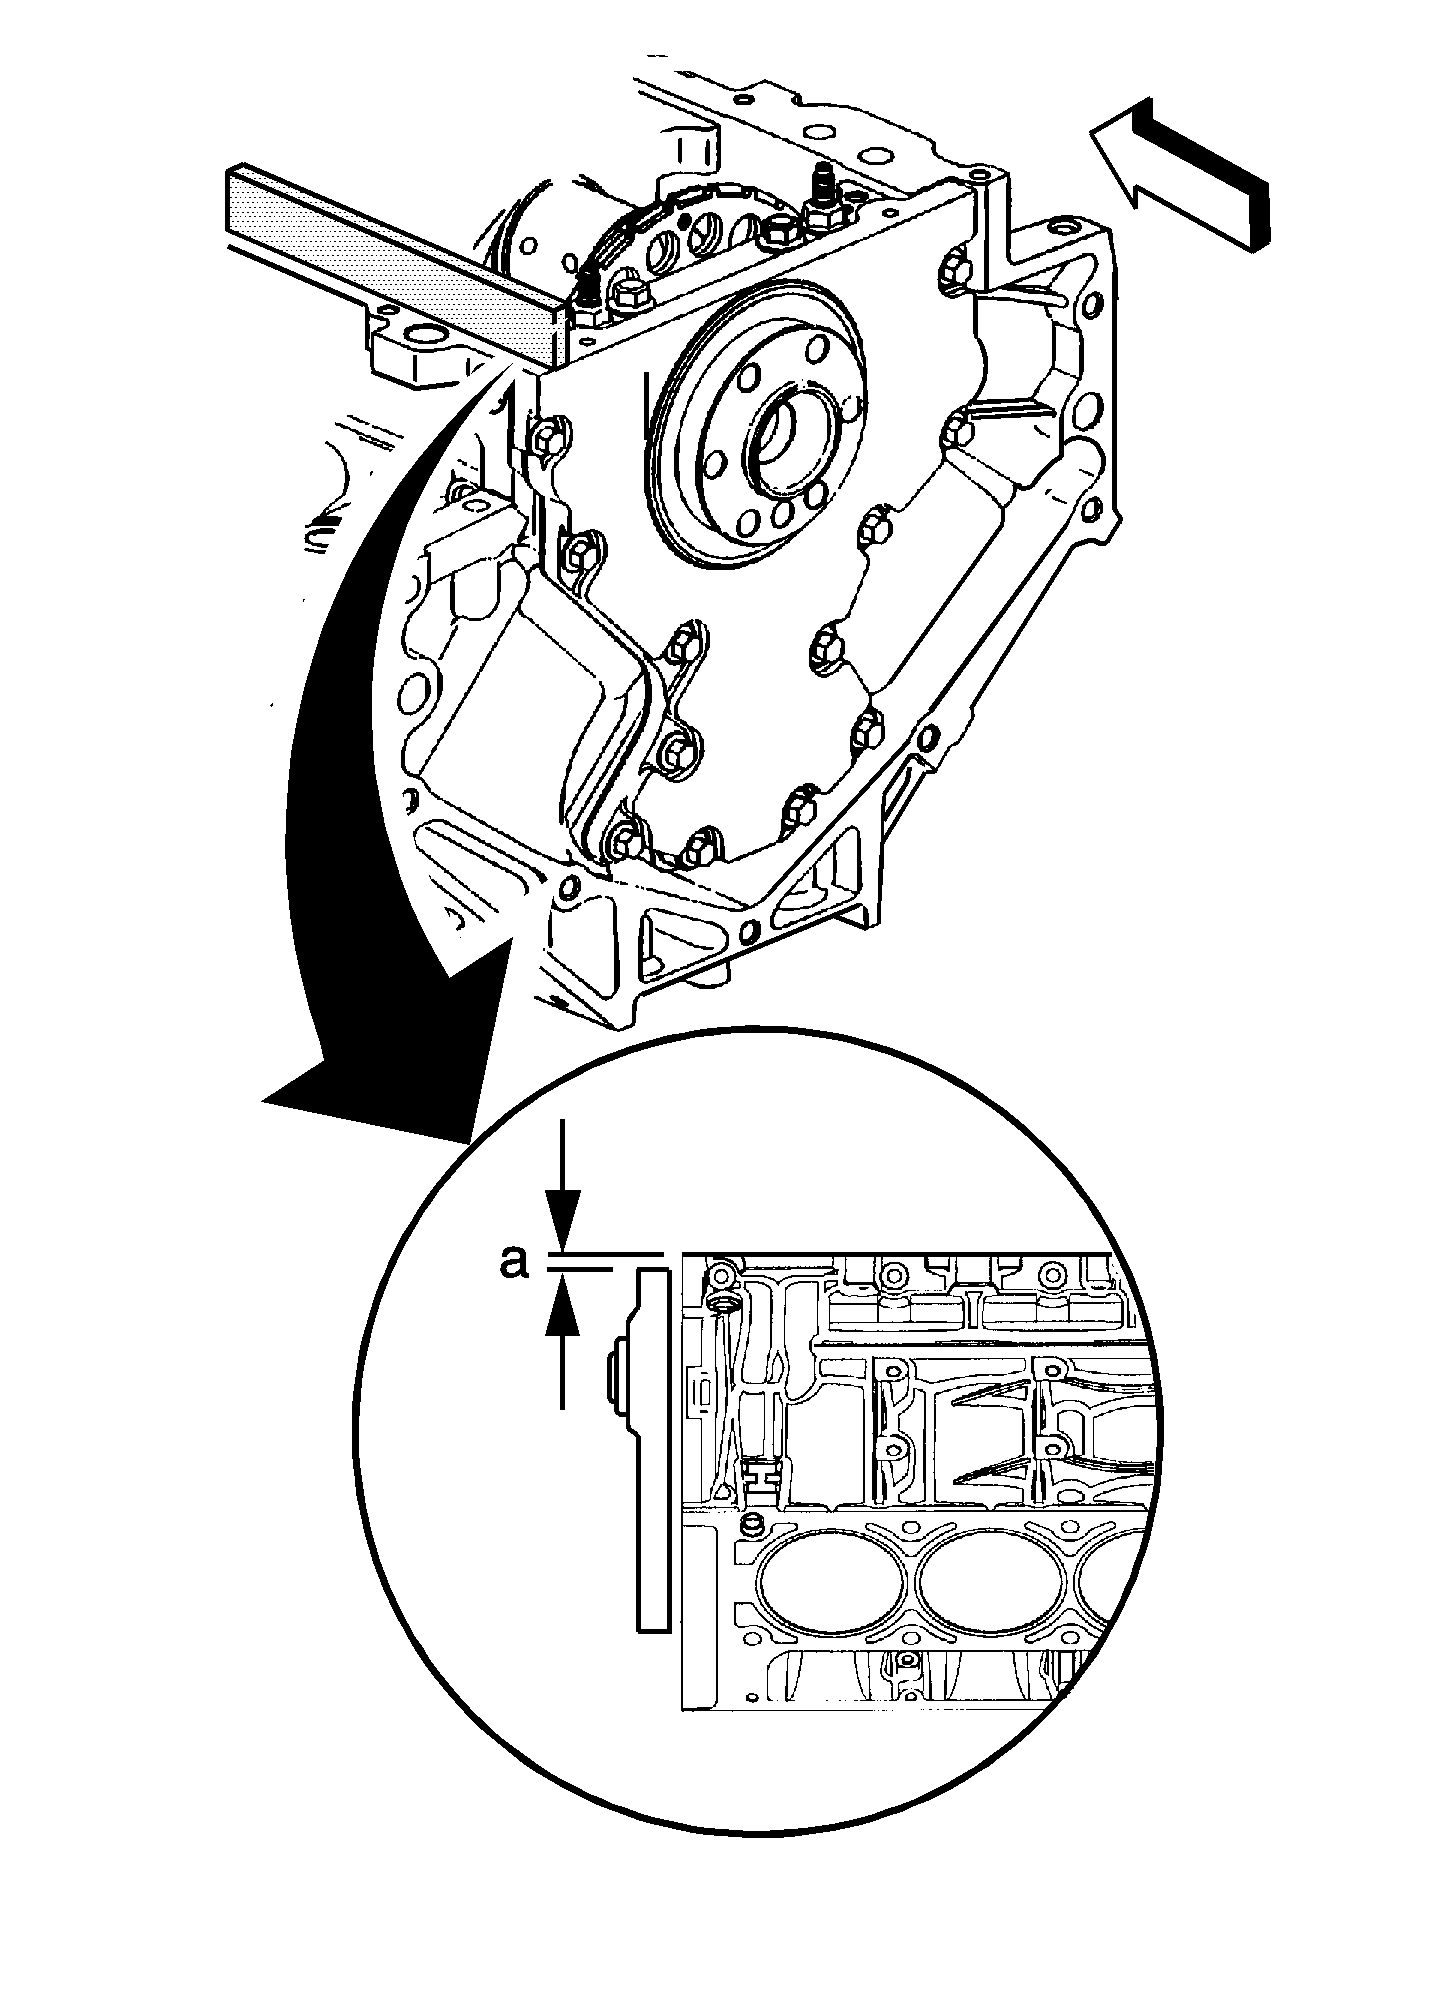
- Measure the rear housing-to-engine block oil pan surface for flatness.
| 8.1. | Place a straight edge onto the engine block and rear housing oil pan sealing surfaces. |
Avoid contact with the portion of the gasket that protrudes into the oil pan surface.
| 8.2. | Insert a feeler gage between the rear housing and the straight edge. The housing must be flush with the oil pan or no greater than 0.5 mm (0.02 in) below flush (a). |
- If the rear housing-to-engine block oil pan surface alignment is not within specifications, repeat the housing alignment procedure.
- If the correct rear housing-to-engine block alignment at the oil pan surface cannot be obtained, replace the rear housing.
Crankshaft Rear Oil Seal Housing Installation With Seal in Housing
Special Tools
| • | J 41479-2A Crankshaft Rear Oil Seal Installation Guide
|
| • | J 41480 Front and Rear Cover Alignment
|
For equivalent regional tools, refer to
Special Tools
Note:
| • | Do not use the crankshaft rear oil seal or the engine rear housing gasket again. |
| • | Do not apply any type of sealant to the rear housing gasket, unless specified. |
| • | The special tool in this procedure is used to properly align the engine rear housing at the oil pan surface. |
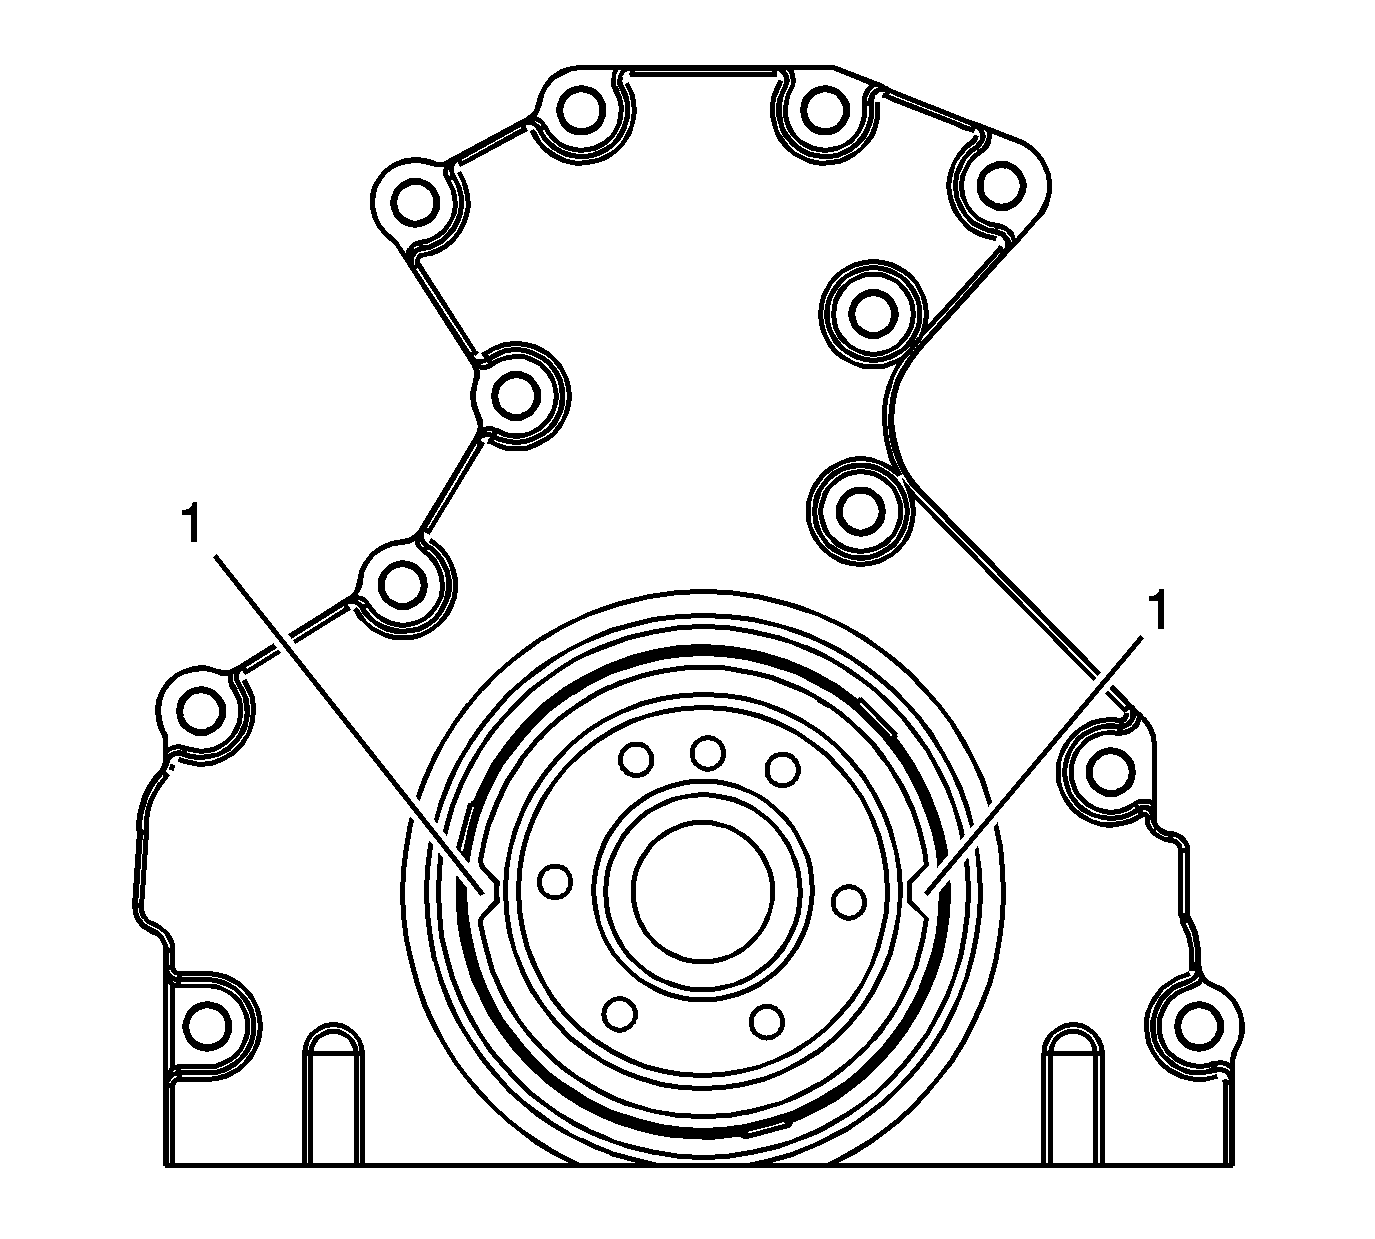
| • | First design rear housings do not have alignment tabs for alignment of the housing horizontally.
J 41476 tool
is required to properly align first design rear housings. The rear
oil seal must be removed from the housing for proper use of the tool. |
| • | Second design rear housings have alignment tabs for alignment of the housing horizontally.
J 41476 tool
is not required for proper alignment of second design rear housings. The
housing may be installed and aligned with the seal already installed into the housing. |
- Inspect the rear housing to identify for alignment tabs (1).

- Inspect the rear oil gallery plug for proper installation.
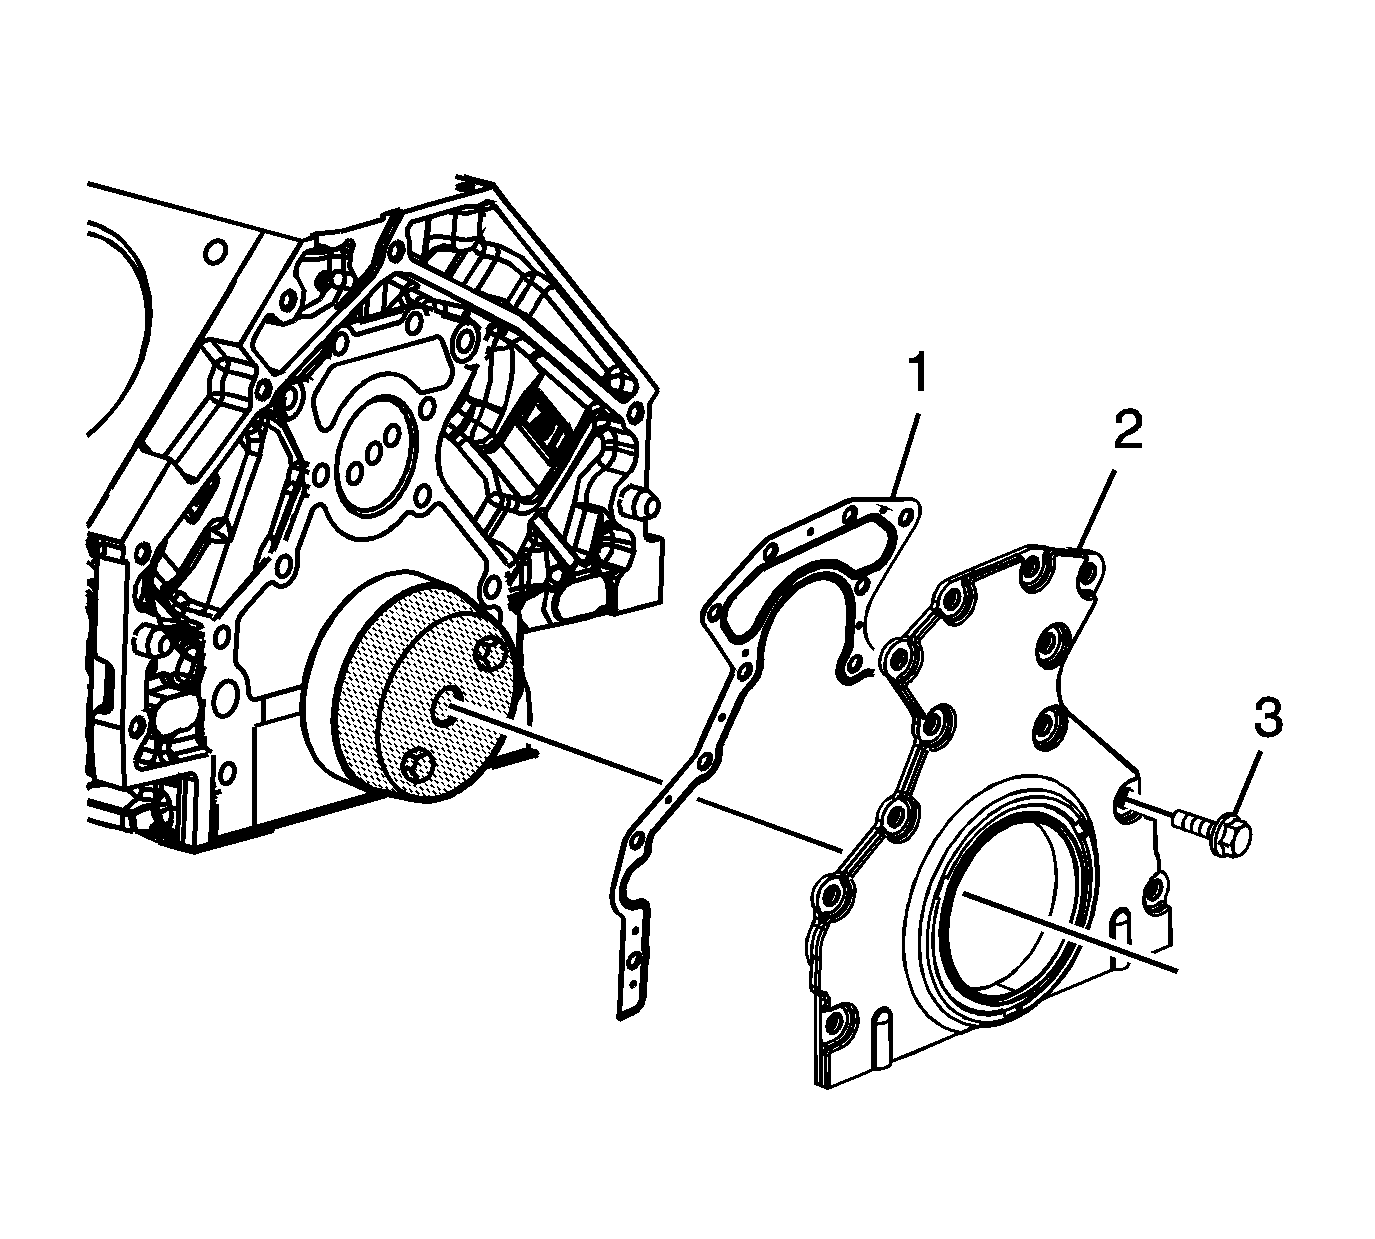
- Install the
J 41479-2A guide
cone and bolts onto the rear of
the crankshaft.
- Tighten the bolts until snug. Do not overtighten.
- Install the rear housing gasket (1), rear housing with seal (2), and bolts (3).
- Tighten the bolts finger tight. Do not overtighten.
- Remove the
J 41479-2A guide
and bolts.
Caution: Refer to Fastener Caution in the Preface section.

- Install the
J 41480 alignment
and bolts.
| 8.1. | Tighten the tool-to-engine block bolts to
25 N·m (18 lb ft). |
| 8.2. | Tighten the
J 41480 alignment
tool-to-rear housing bolts evenly to
12 N·m (106 lb in). |
| 8.3. | Tighten the rear housing-to-engine block bolts to
30 N·m (22 lb ft). |
- Remove the
J 41480 alignment
and bolts.

- Measure the rear housing-to-engine block oil pan surface for flatness.
| 10.1. | Place a straight edge onto the engine block and rear housing oil pan sealing surfaces. |
Avoid contact with the portion of the gasket that protrudes into the oil pan surface.
| 10.2. | Insert a feeler gage between the rear housing and the straight edge. The housing must be flush with the oil pan or no greater than 0.5 mm (0.02 in) (a) below flush. |
- If the rear housing-to-engine block oil pan surface alignment is not within specifications, repeat the housing alignment procedure.
- If the correct rear housing-to-engine block alignment at the oil pan surface cannot be obtained, replace the rear housing.


