Starter Solenoid Cable Replacement 4.8L, 5.3L, 6.0L, and 6.2L
Removal Procedure
- Disconnect the negative battery cable. Refer to Battery Negative Cable Disconnection and Connection .
- Remove the air cleaner outlet duct. Refer to Air Cleaner Resonator Outlet Duct Replacement .
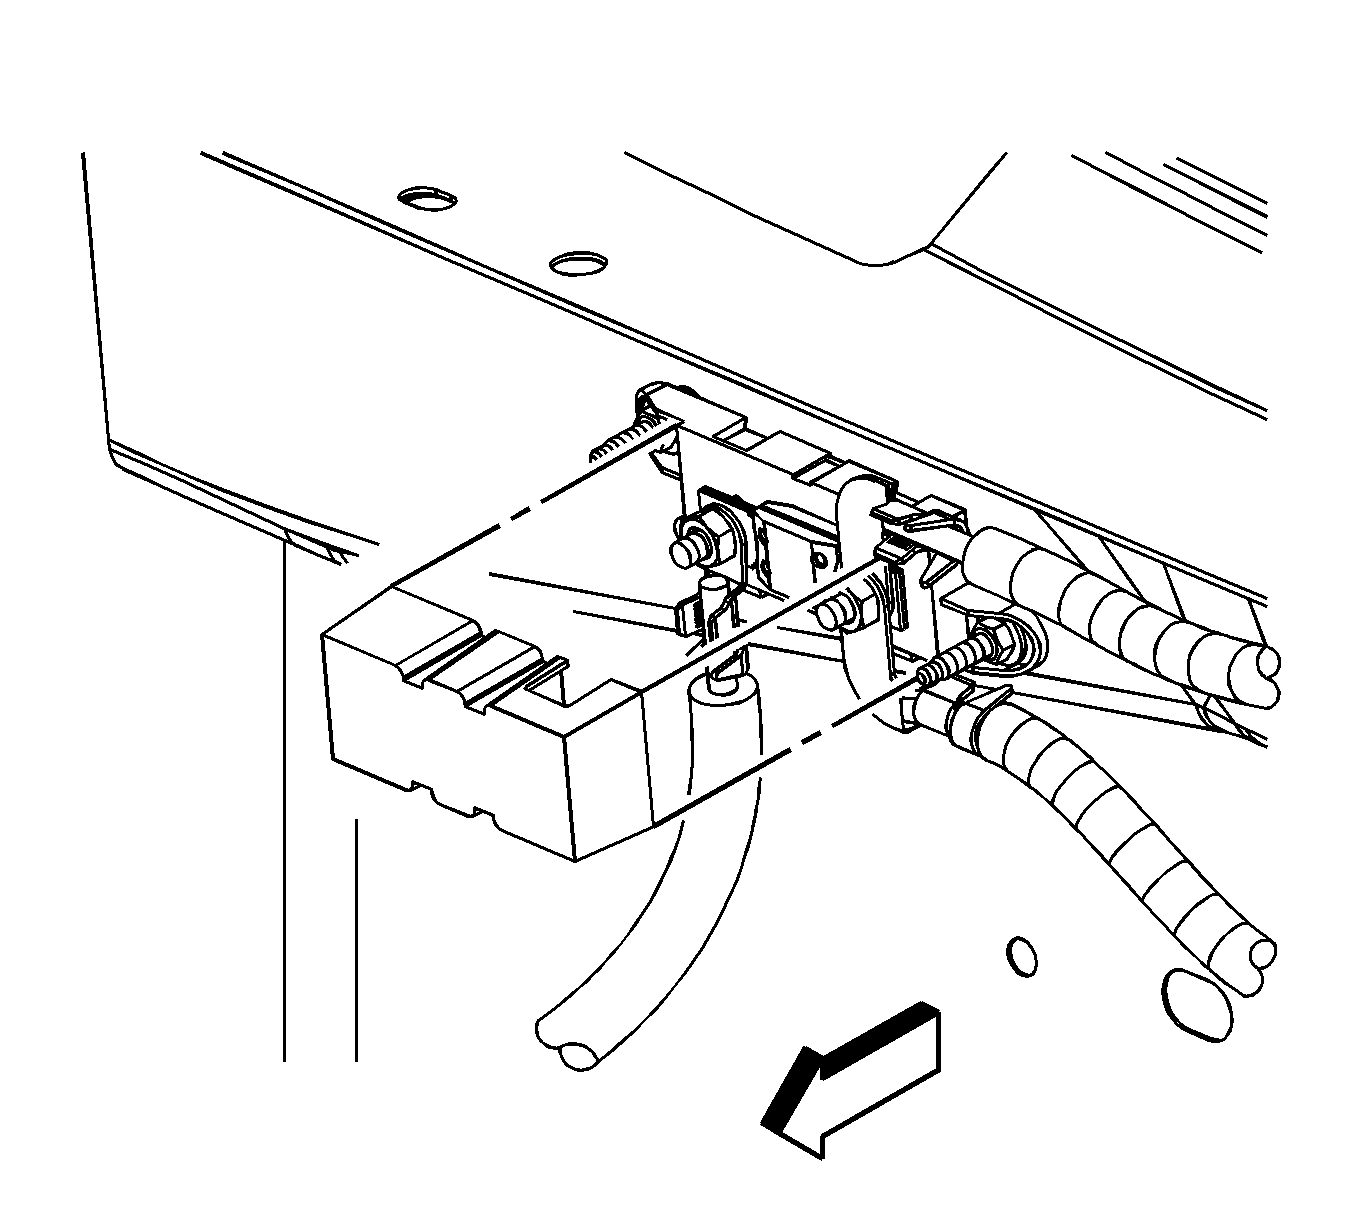
- Remove the mega fuse cover.
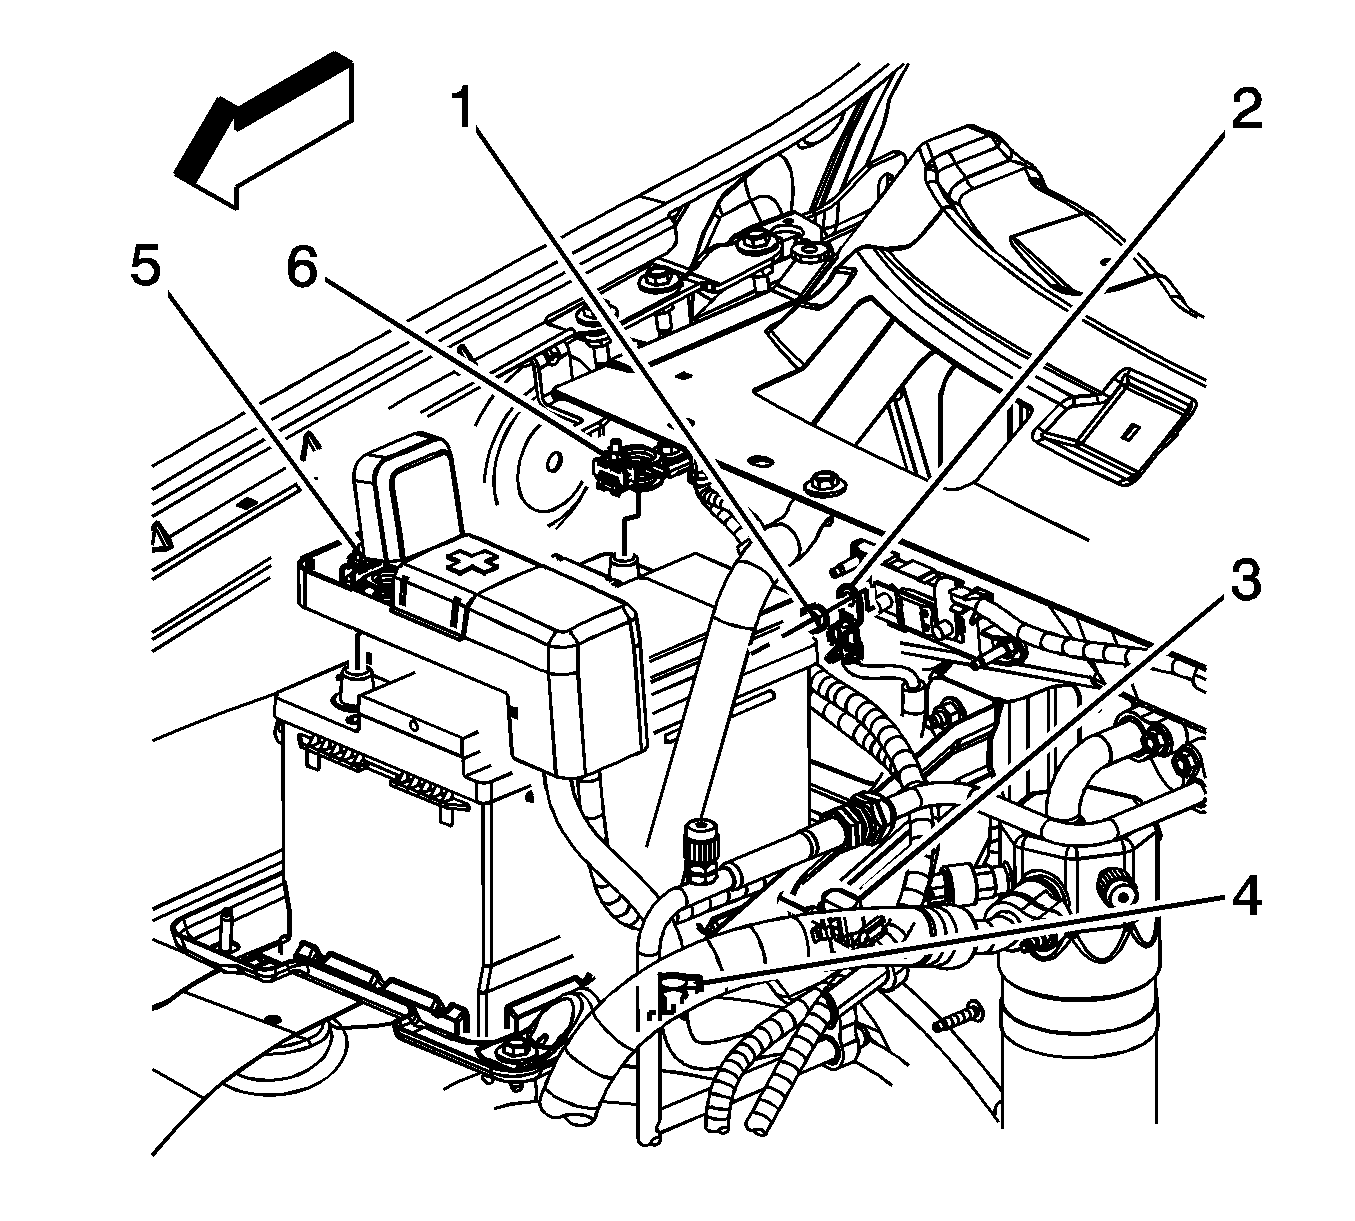
- Remove the starter solenoid cable nut (1) from the mega fuse stud.
- Remove the starter solenoid cable terminal (2) from the mega fuse stud.
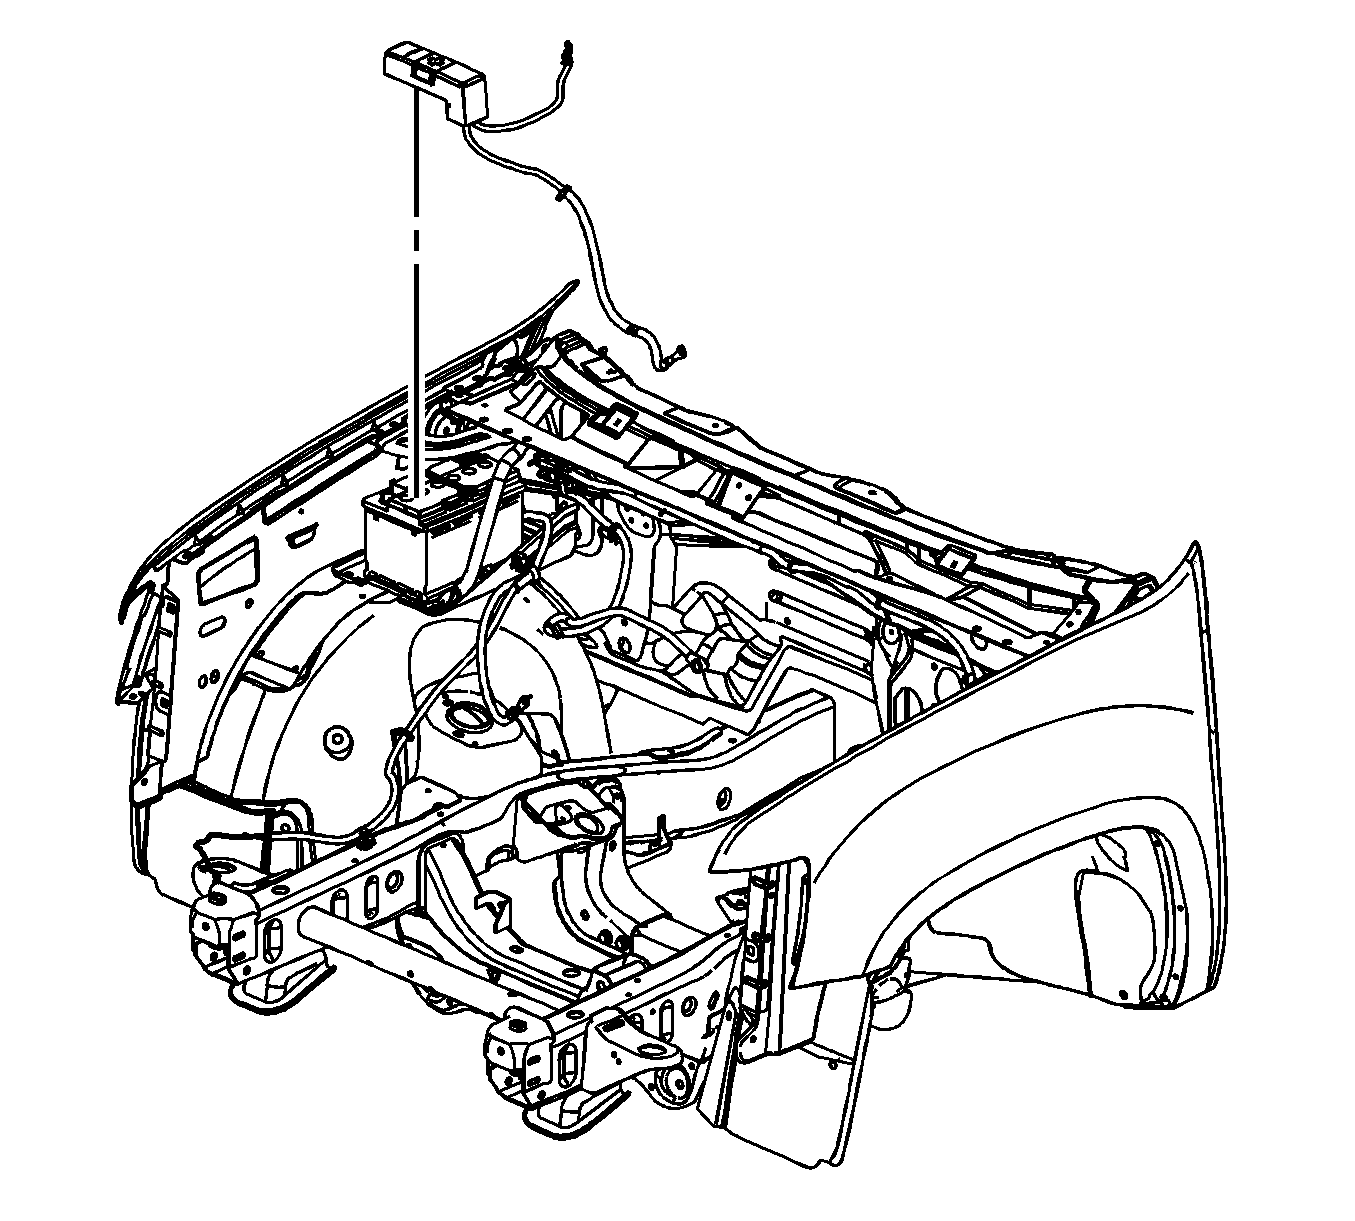
- Open the starter solenoid cable cover at the positive battery terminal.
- Loosen the starter solenoid cable nut (5).
- Remove the starter solenoid cable from the positive battery terminal.
- Remove the starter solenoid cable clip (4) from the air conditioning (A/C) evaporator tube.
- Raise and support the vehicle. Refer to Lifting and Jacking the Vehicle .
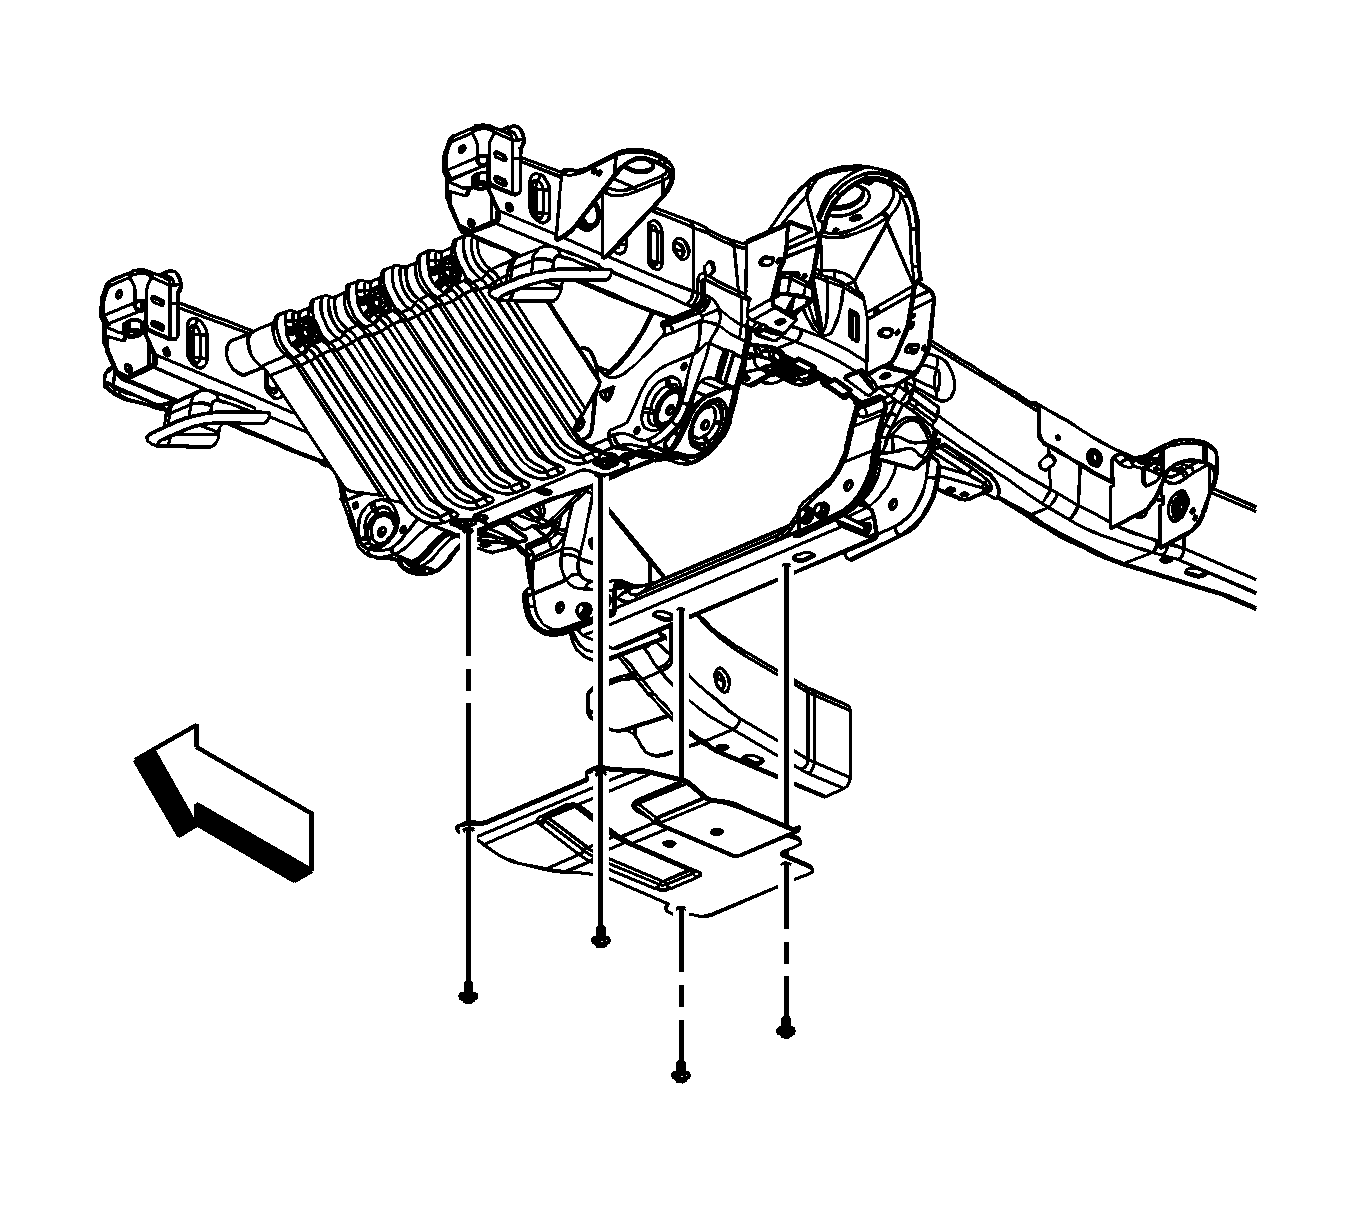
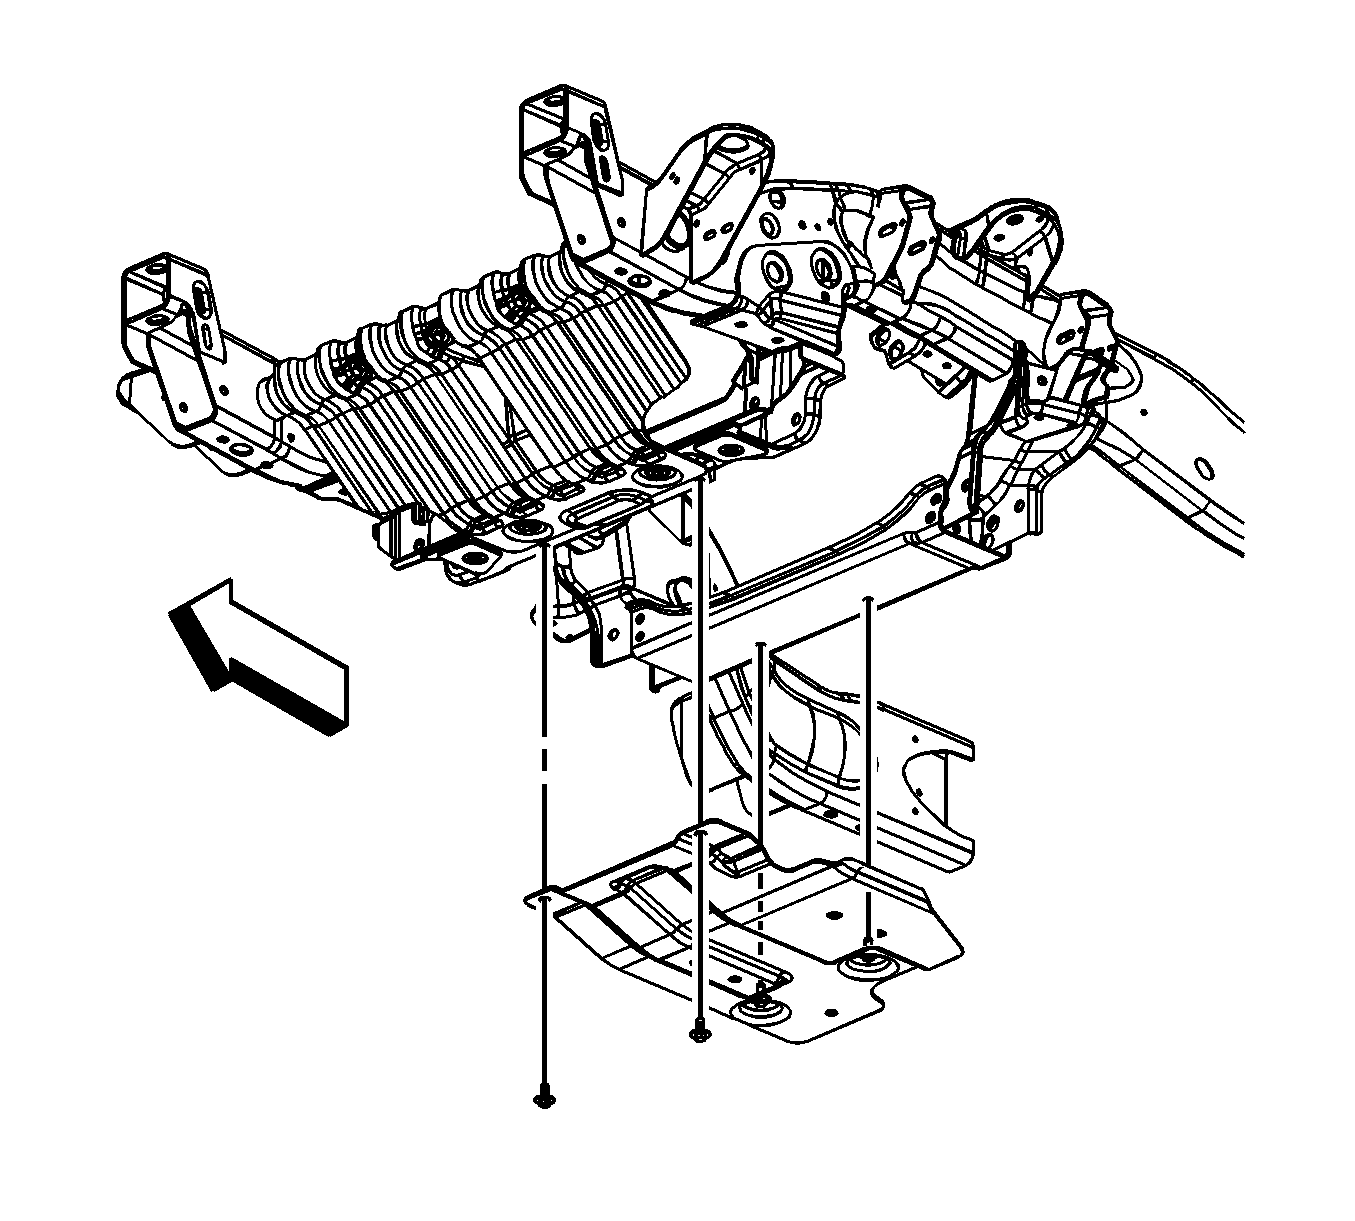
- For 1500 series vehicles, remove the oil pan skid plate bolts and plate.
- For 2500 series vehicles, remove the front 2 oil pan skid plate bolts, loosen the rear 2 bolts and remove the skid plate.
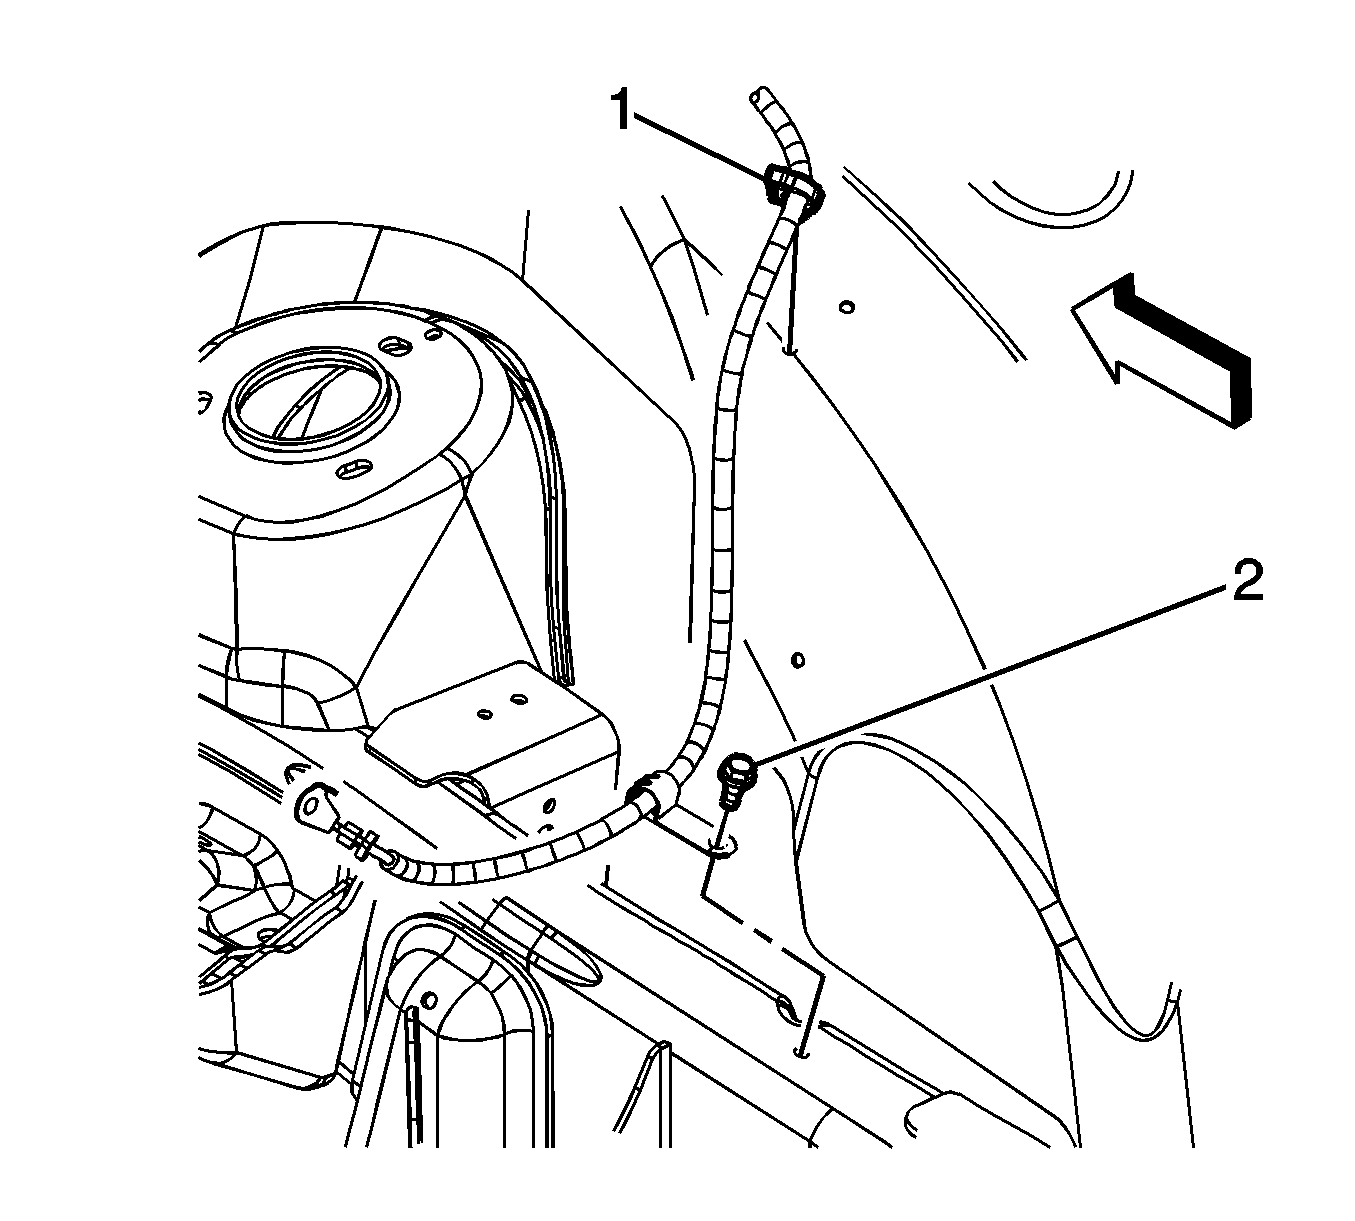
- Remove the starter solenoid cable clip (1) from the wheelhouse panel.
- Remove the starter solenoid cable clip bolt (2) from the frame.
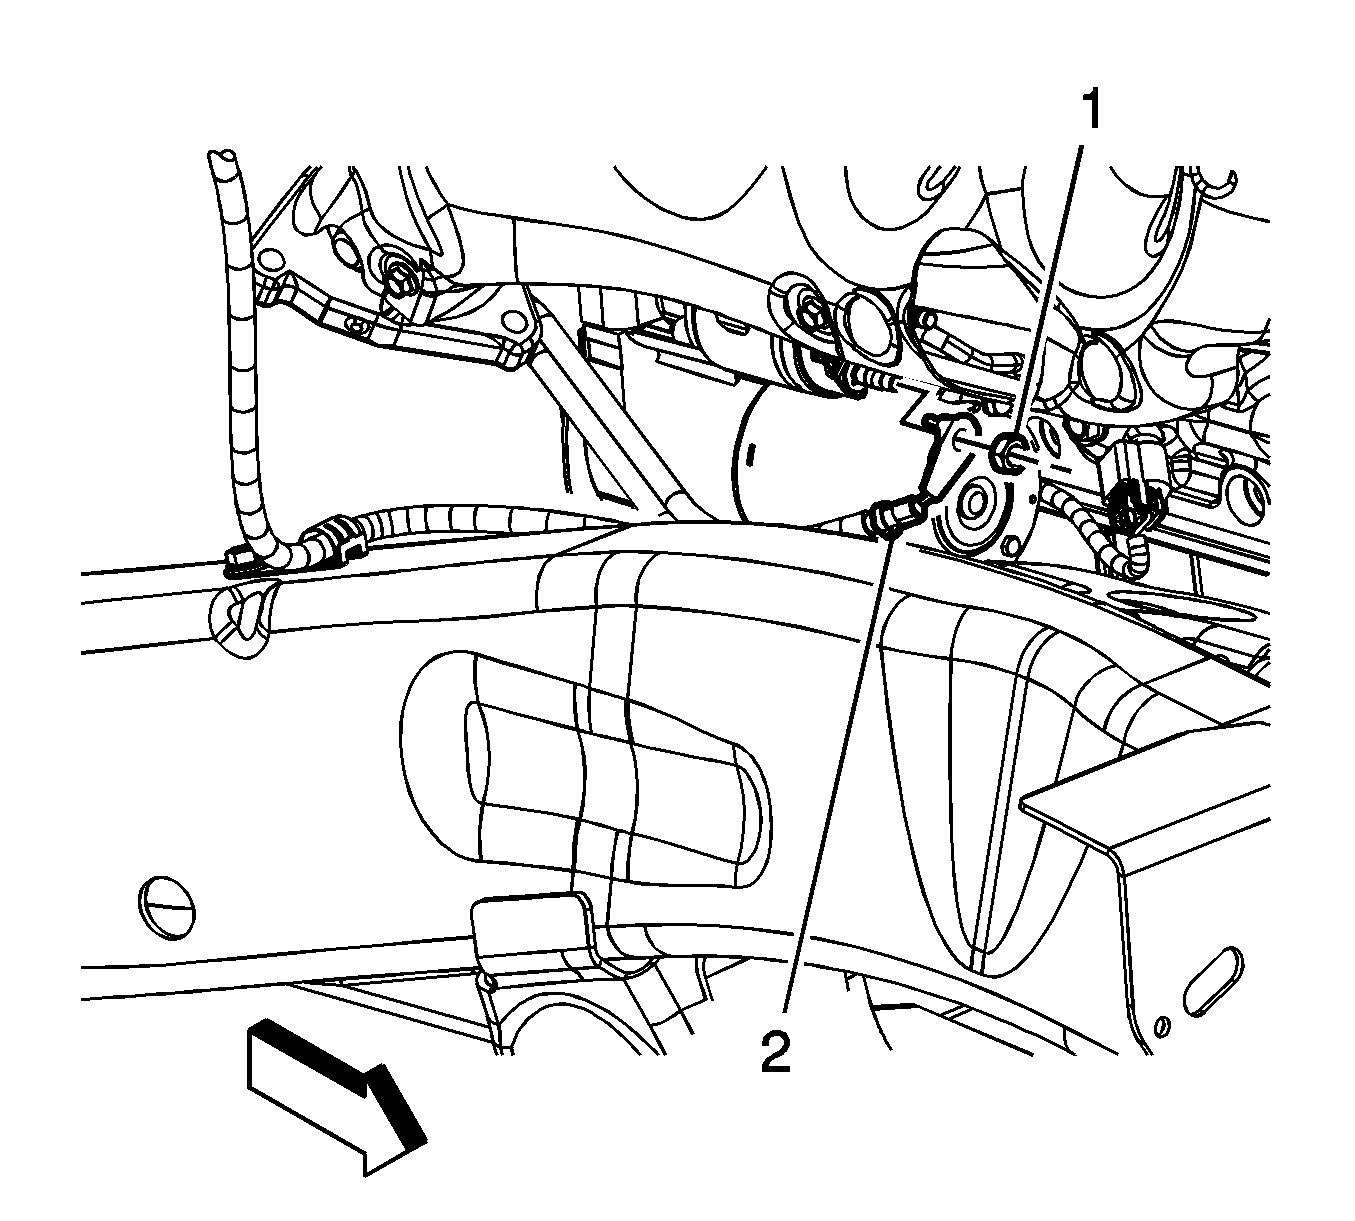
- Remove the starter solenoid cable nut (1) from the starter.
- Remove the starter solenoid cable (2) from the starter.
- Lower the vehicle.
- Remove the starter solenoid cable from the vehicle.
Installation Procedure
- Install the starter solenoid cable to the vehicle.
- Install the starter solenoid cable to the positive battery terminal.
- Tighten the starter solenoid cable nut (5).
- Close the starter solenoid cable cover at the positive battery terminal.
- Install the starter solenoid cable terminal (2) to the mega fuse stud.
- Install the starter solenoid cable nut (1) to the mega fuse stud.
- Install the starter solenoid cable clip (4) to the A/C evaporator tube.
- Install the mega fuse cover.
- Raise the vehicle.
- Install the starter solenoid cable (2) to the starter.
- Install the starter solenoid cable nut (1) to the starter.
- Position the starter solenoid cable clip to the frame and install the starter solenoid cable clip bolt (2).
- Install the starter solenoid cable clip (1) to the wheelhouse panel.
- For 2500 series vehicles, install the oil pan skid plate and tighten the rear 2 bolts and install and tighten the front 2 bolts.
- For 1500 series vehicles, install the oil pan skid plate and bolts.
- Lower the vehicle.
- Install the air cleaner outlet duct. Refer to Air Cleaner Resonator Outlet Duct Replacement .
- Connect the negative battery cable. Refer to Battery Negative Cable Disconnection and Connection .


Notice: Refer to Fastener Notice in the Preface section.
Tighten
Tighten the nut to 5 N·m (44 lb in).
Tighten
Tighten the nut to 9 N·m (80 lb in).


Tighten
Tighten the nut to 9 N·m (80 lb in).


Tighten
Tighten the bolts to 28 N·m (21 lb ft).

Tighten
Tighten the bolts to 28 N·m (21 lb ft).
Starter Solenoid Cable Replacement 6.2L w/Auxiliary Battery
Removal Procedure
- Disconnect the auxiliary battery negative cable. Refer to Battery Negative Cable Disconnection and Connection .
- Remove the air cleaner outlet duct. Refer to Air Cleaner Resonator Outlet Duct Replacement .
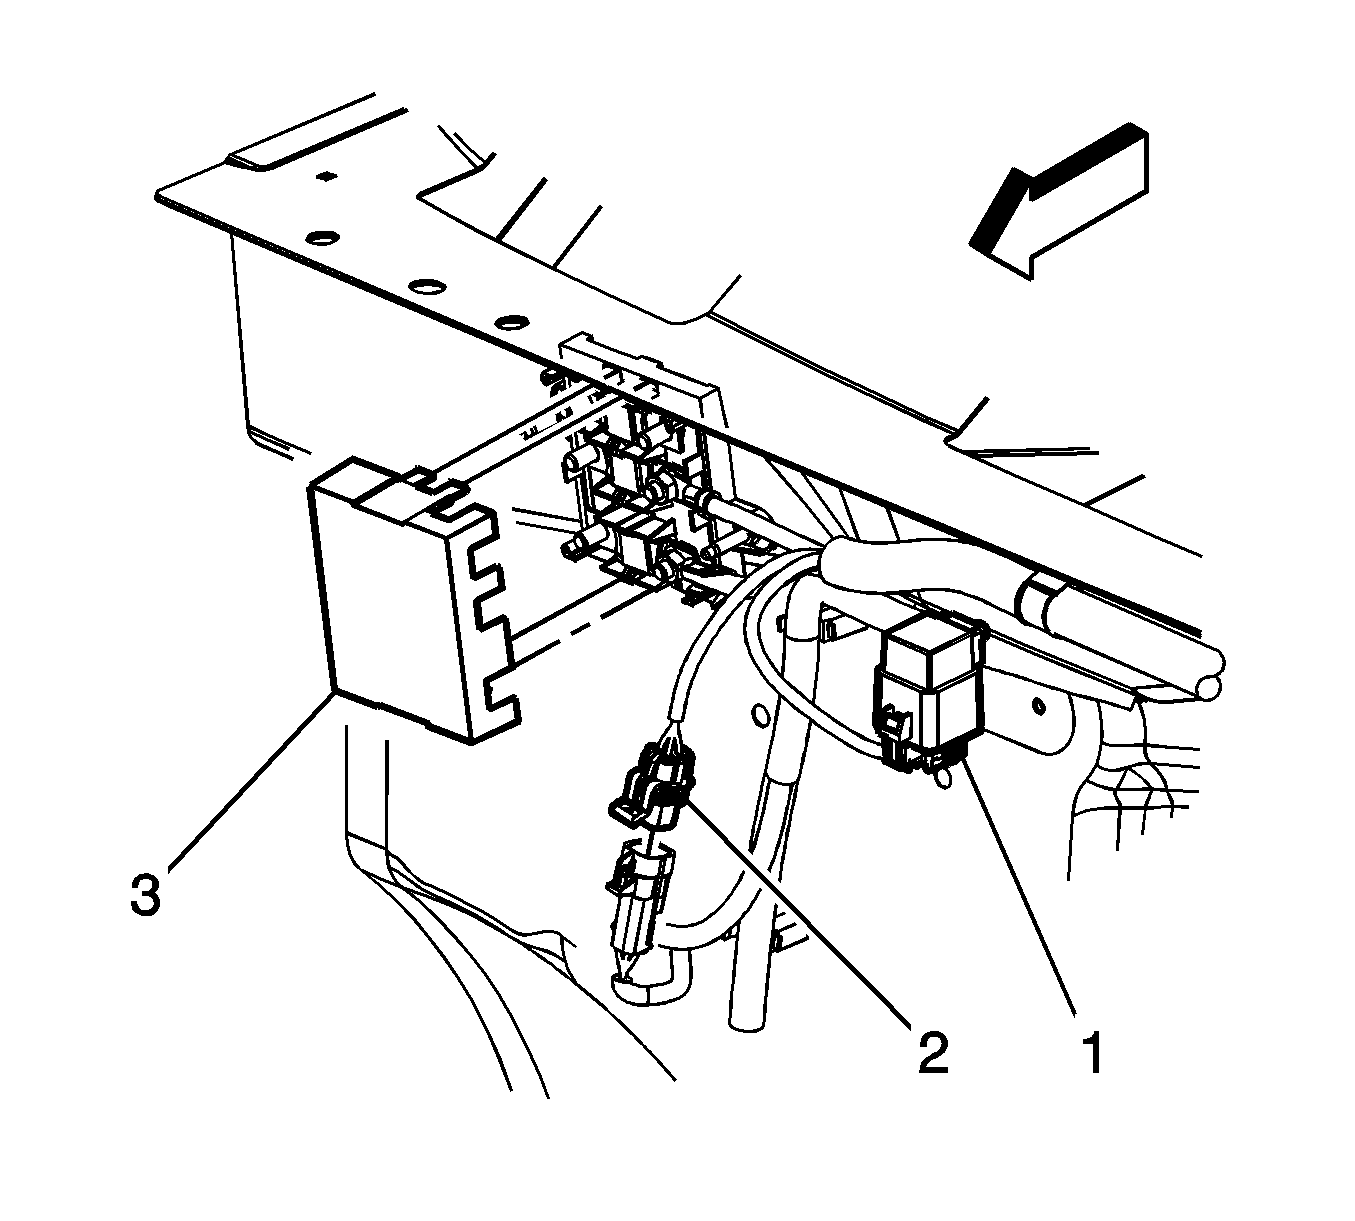
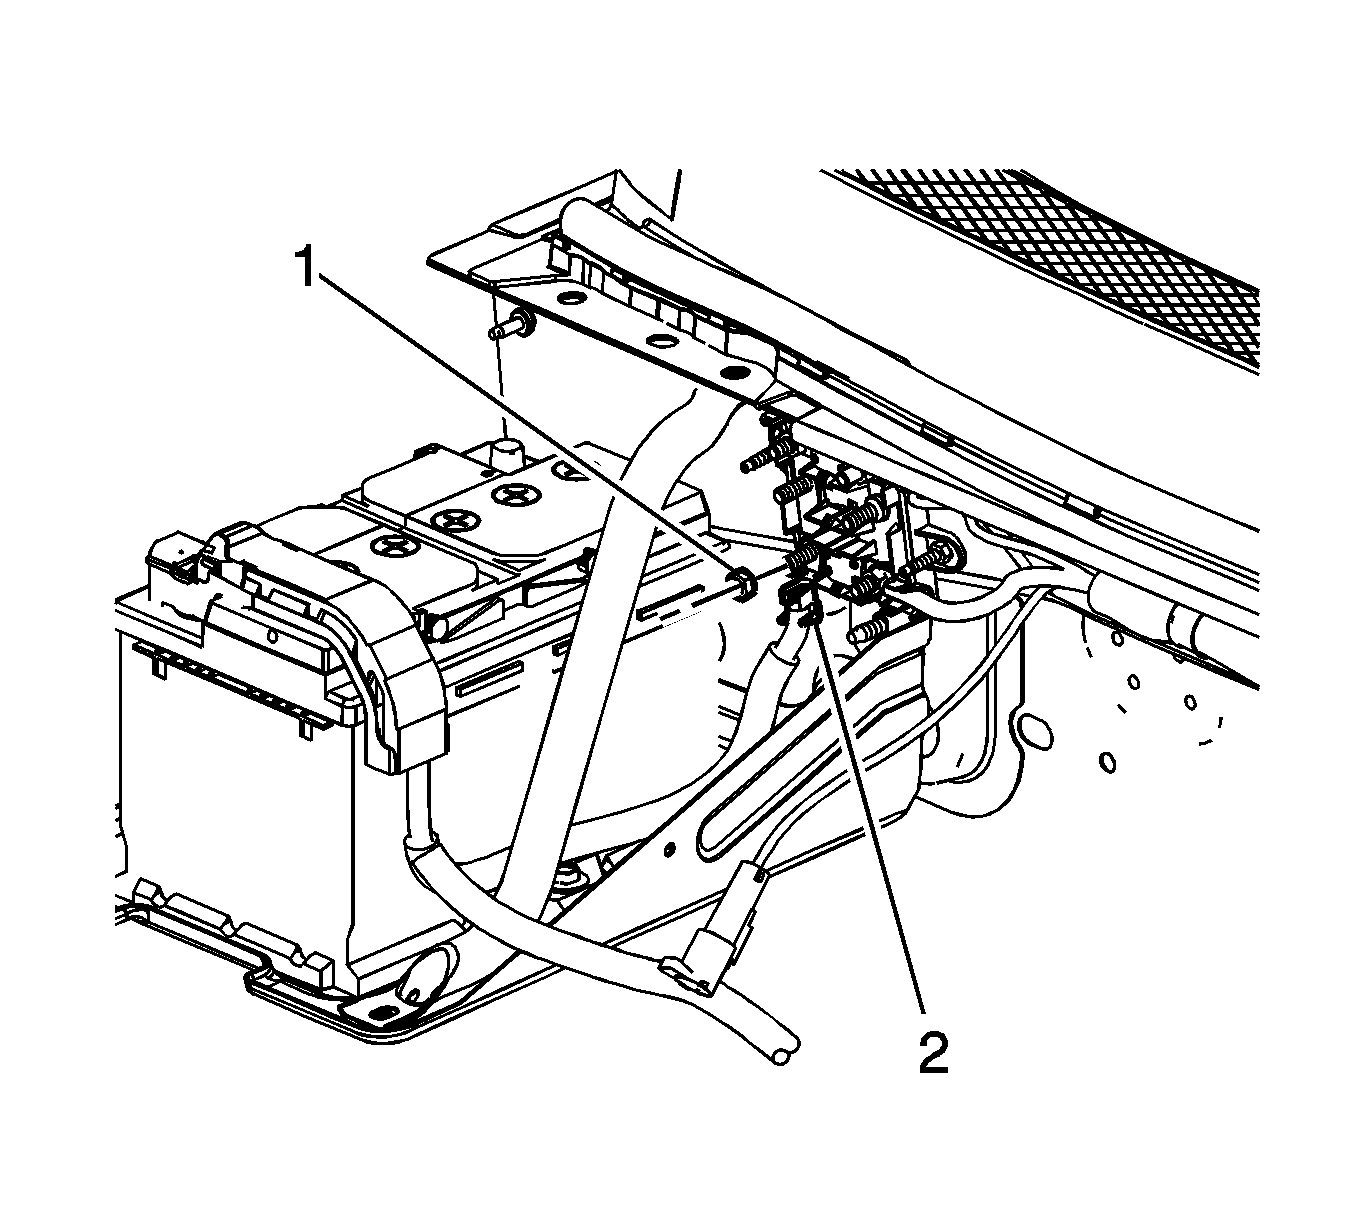
- Remove the mega fuse cover (3).
- Open the starter solenoid cable cover at the positive battery terminal.
- Loosen the starter solenoid cable nut (5).
- Remove the starter solenoid cable from the positive battery terminal.
- Remove the starter solenoid cable clip (4) from the air conditioning (A/C) evaporator tube.
- Remove the starter solenoid cable nut (1) from the mega fuse stud.
- Remove the starter solenoid cable terminal (2) from the mega fuse stud.
- Raise and support the vehicle. Refer to Lifting and Jacking the Vehicle .
- Remove the front 2 oil pan skid plate bolts, loosen the rear 2 bolts and remove the skid plate.
- Remove the starter solenoid cable clip (1) from the wheelhouse panel.
- Remove the starter solenoid cable clip bolt (2) from the frame.
- Remove the starter solenoid cable nut (1) from the starter.
- Remove the starter solenoid cable (2) from the starter.
- Lower the vehicle.
- Remove the starter solenoid cable from the vehicle.



Installation Procedure
- Install the starter solenoid cable to the vehicle.
- Install the starter solenoid cable to the positive battery terminal.
- Tighten the starter solenoid cable nut (5).
- Close the starter solenoid cable cover at the positive battery terminal.
- Install the starter solenoid cable clip (4) to the A/C evaporator tube.
- Install the starter solenoid cable terminal (2) to the mega fuse stud.
- Install the starter solenoid cable nut (1) to the mega fuse stud.
- Install the mega fuse cover (3).
- Raise the vehicle.
- Install the starter solenoid cable (2) to the starter.
- Install the starter solenoid cable nut (1) to the starter.
- Position the starter solenoid cable clip to the frame and install the starter solenoid cable clip bolt (2).
- Install the starter solenoid cable clip (1) to the wheelhouse panel.
- Install the oil pan skid plate and tighten the rear 2 bolts and install and tighten the front 2 bolts.
- Lower the vehicle.
- Install the air cleaner outlet duct. Refer to Air Cleaner Resonator Outlet Duct Replacement .
- Connect the auxiliary battery negative cable. Refer to Battery Negative Cable Disconnection and Connection .


Notice: Refer to Fastener Notice in the Preface section.
Tighten
Tighten the nut to 5 N·m (44 lb in).

Tighten
Tighten the nut to 9 N·m (80 lb in).


Tighten
Tighten the nut to 9 N·m (80 lb in).


Tighten
Tighten the bolts to 28 N·m (21 lb ft).
Starter Solenoid Cable Replacement 6.6L
Removal Procedure
- Disconnect the negative battery cable. Refer to Battery Negative Cable Disconnection and Connection .
- Remove the air cleaner assembly. Refer to Air Cleaner Assembly Replacement .
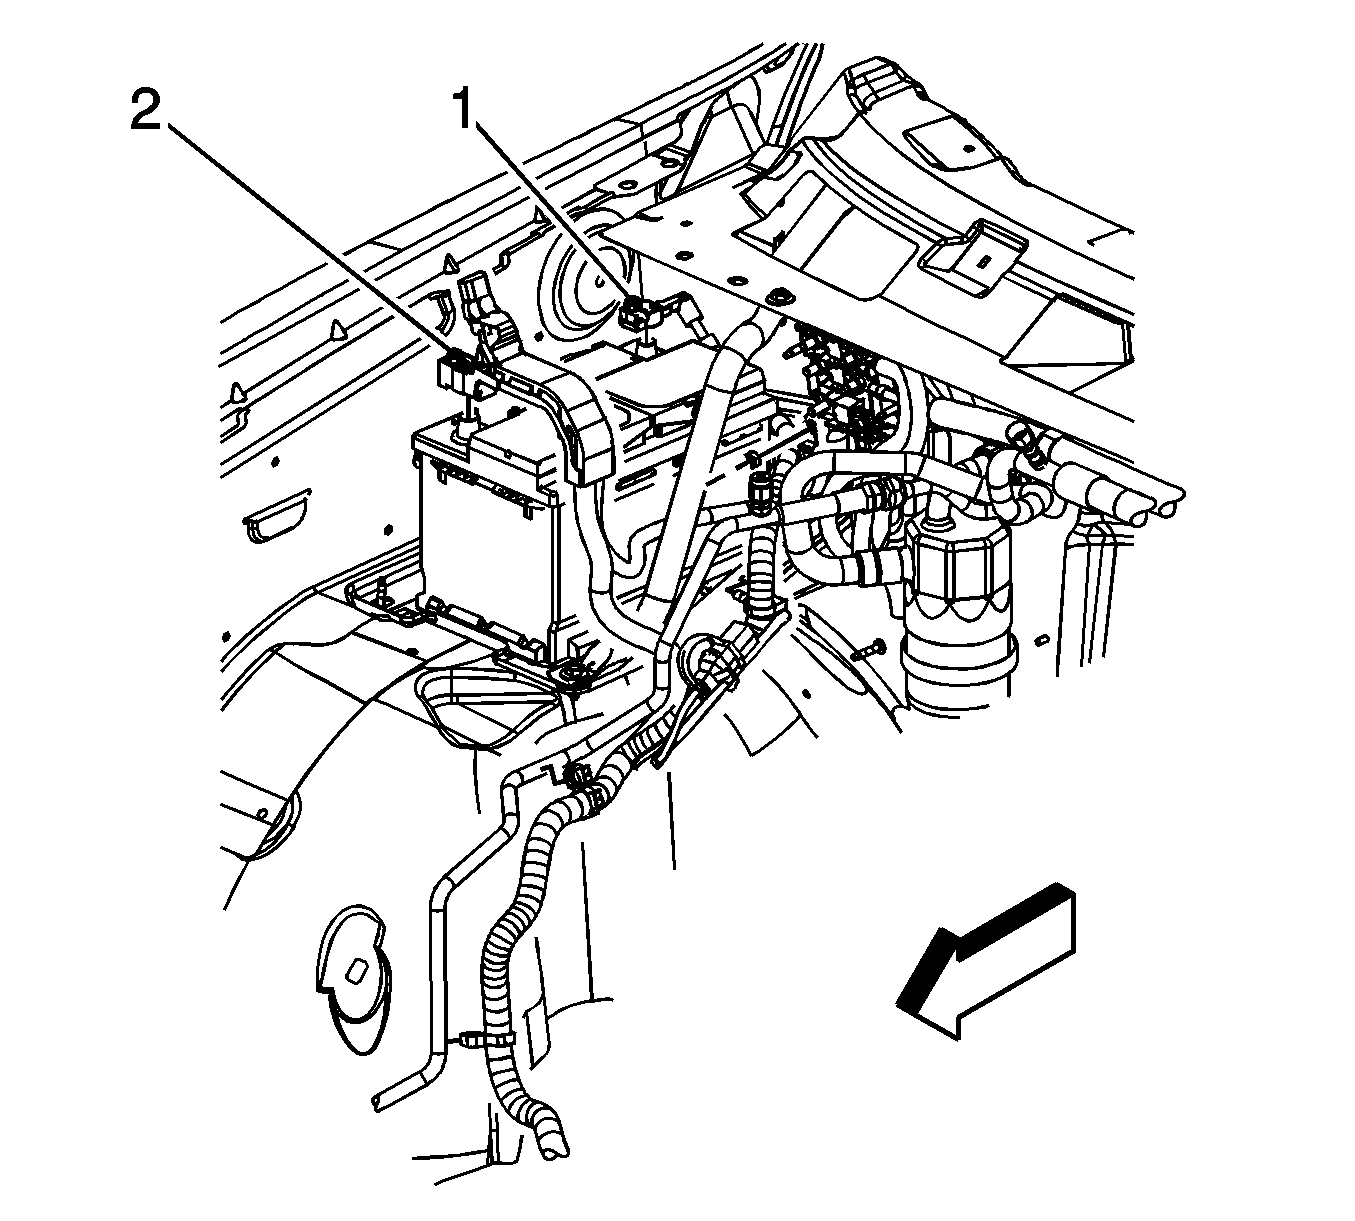
- Open the starter solenoid cable positive battery post cover.
- Loosen the starter solenoid cable nut (1).
- Remove the starter solenoid cable from the battery positive post.
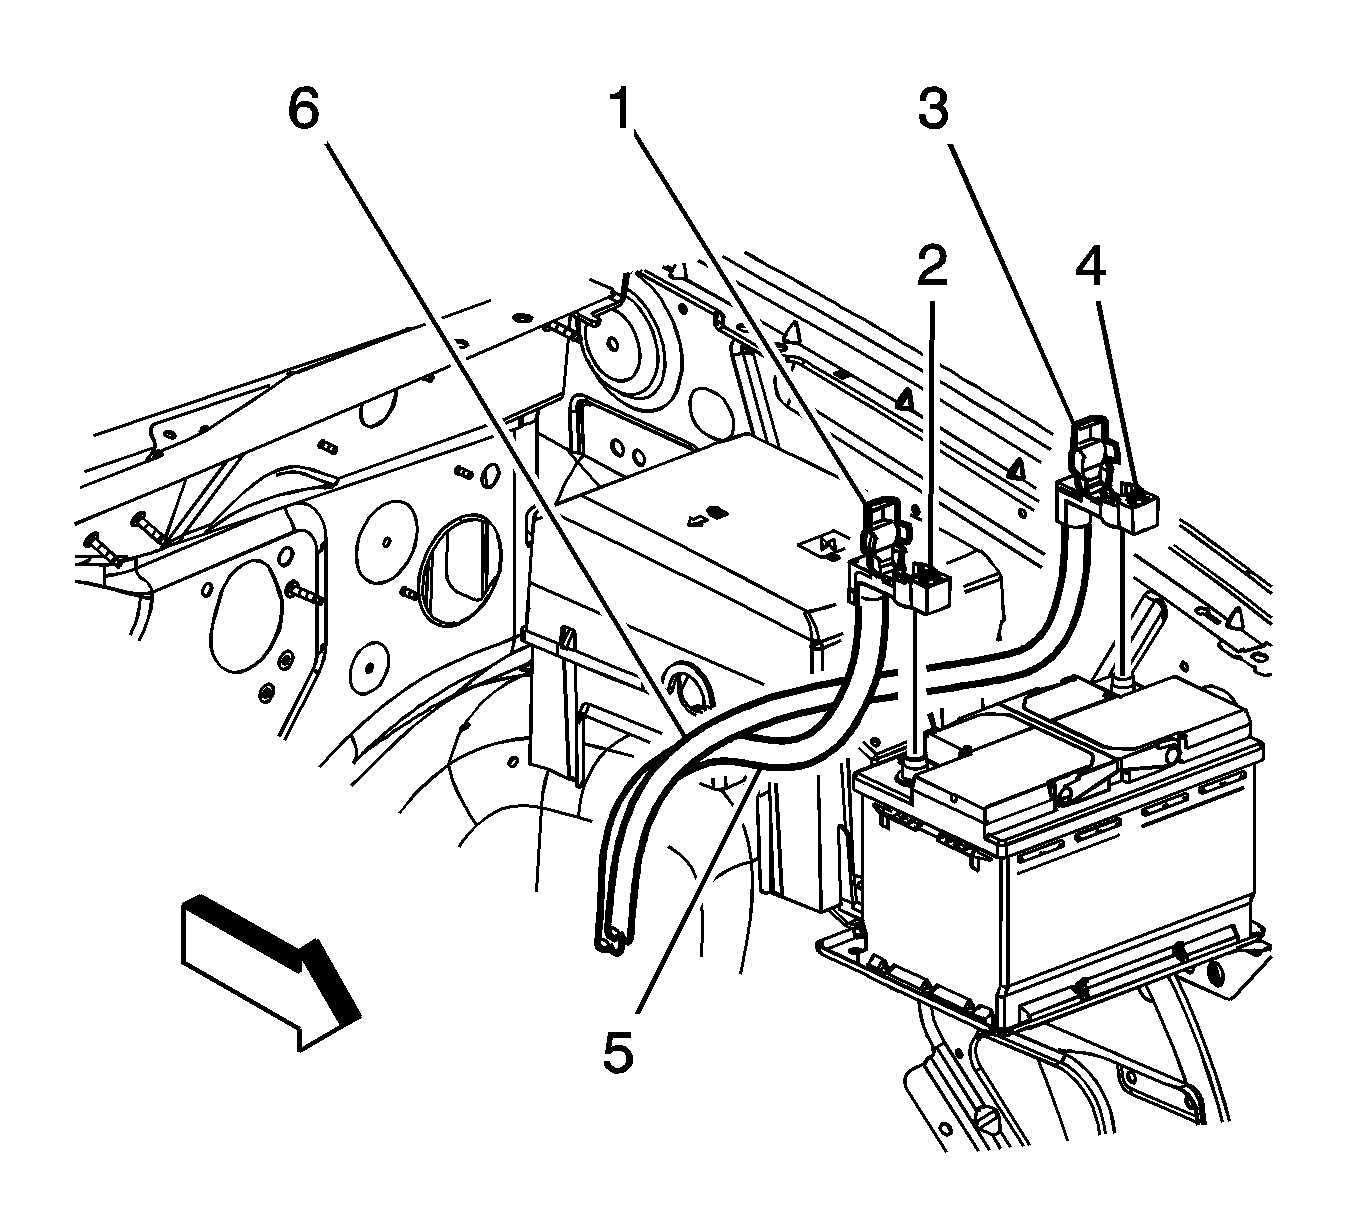
- Open the starter solenoid cable positive battery post cover (1).
- Loosen the starter solenoid cable nut (2).
- Remove the starter solenoid cable (5) from the battery positive post.
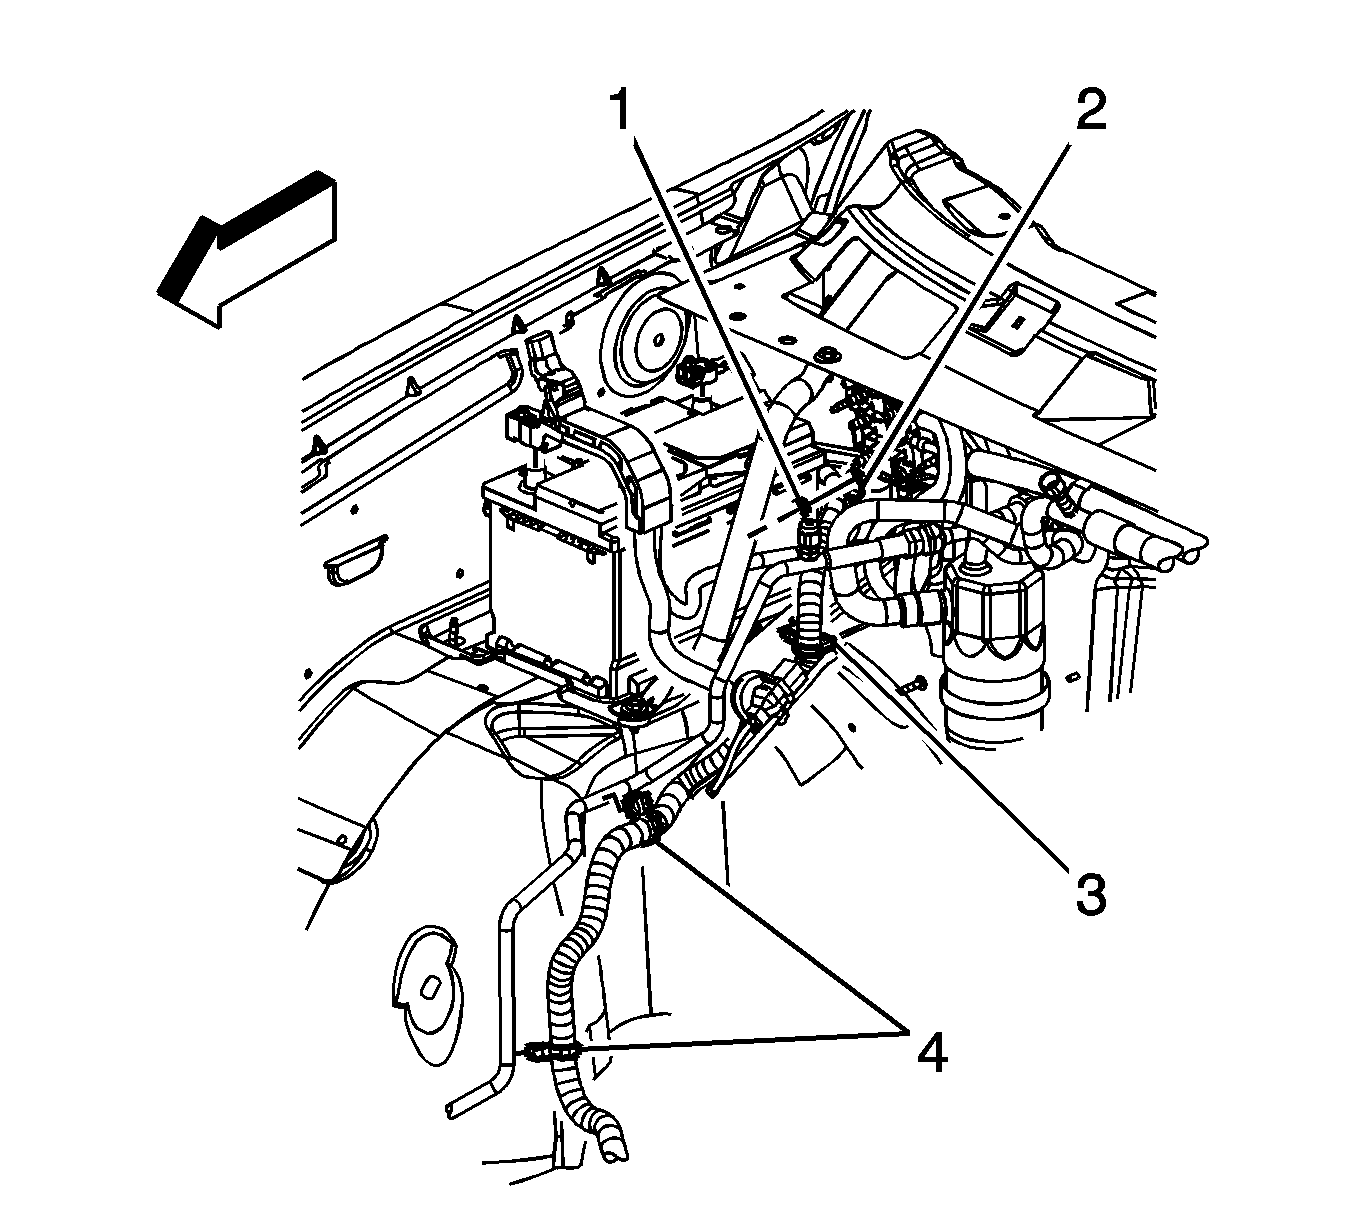
- Remove the starter solenoid cable clip (3) from the battery tray.
- Remove the starter solenoid cable clips (4) from the air conditioning (A/C) evaporator tube.
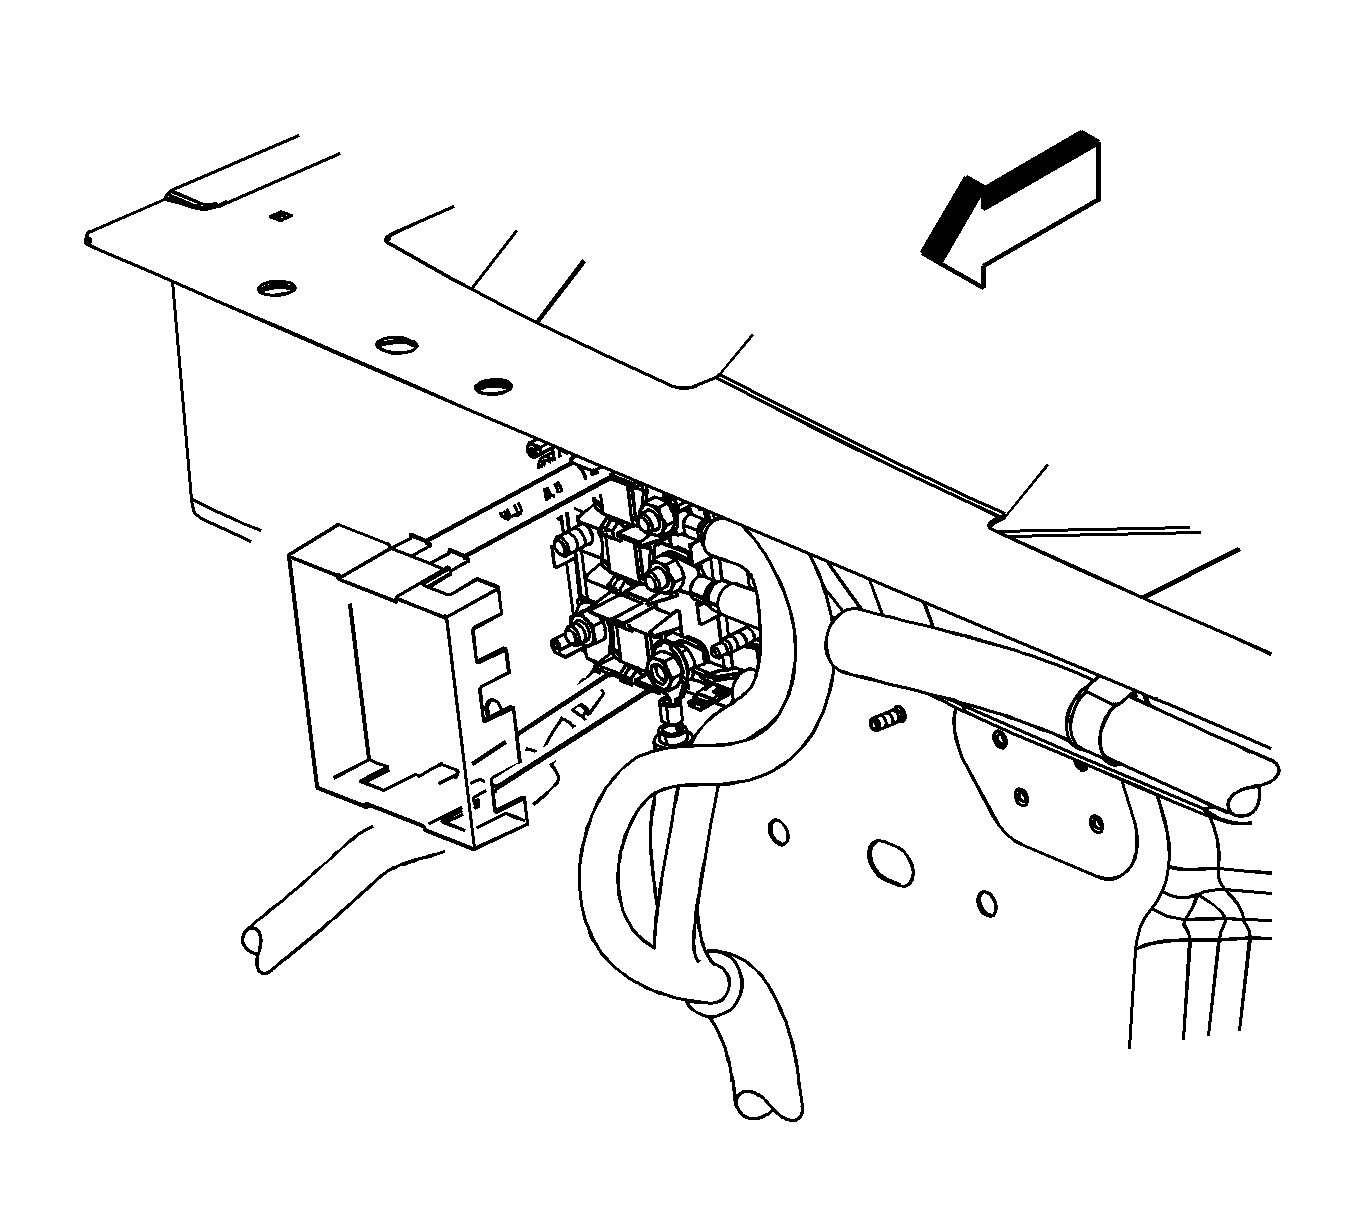
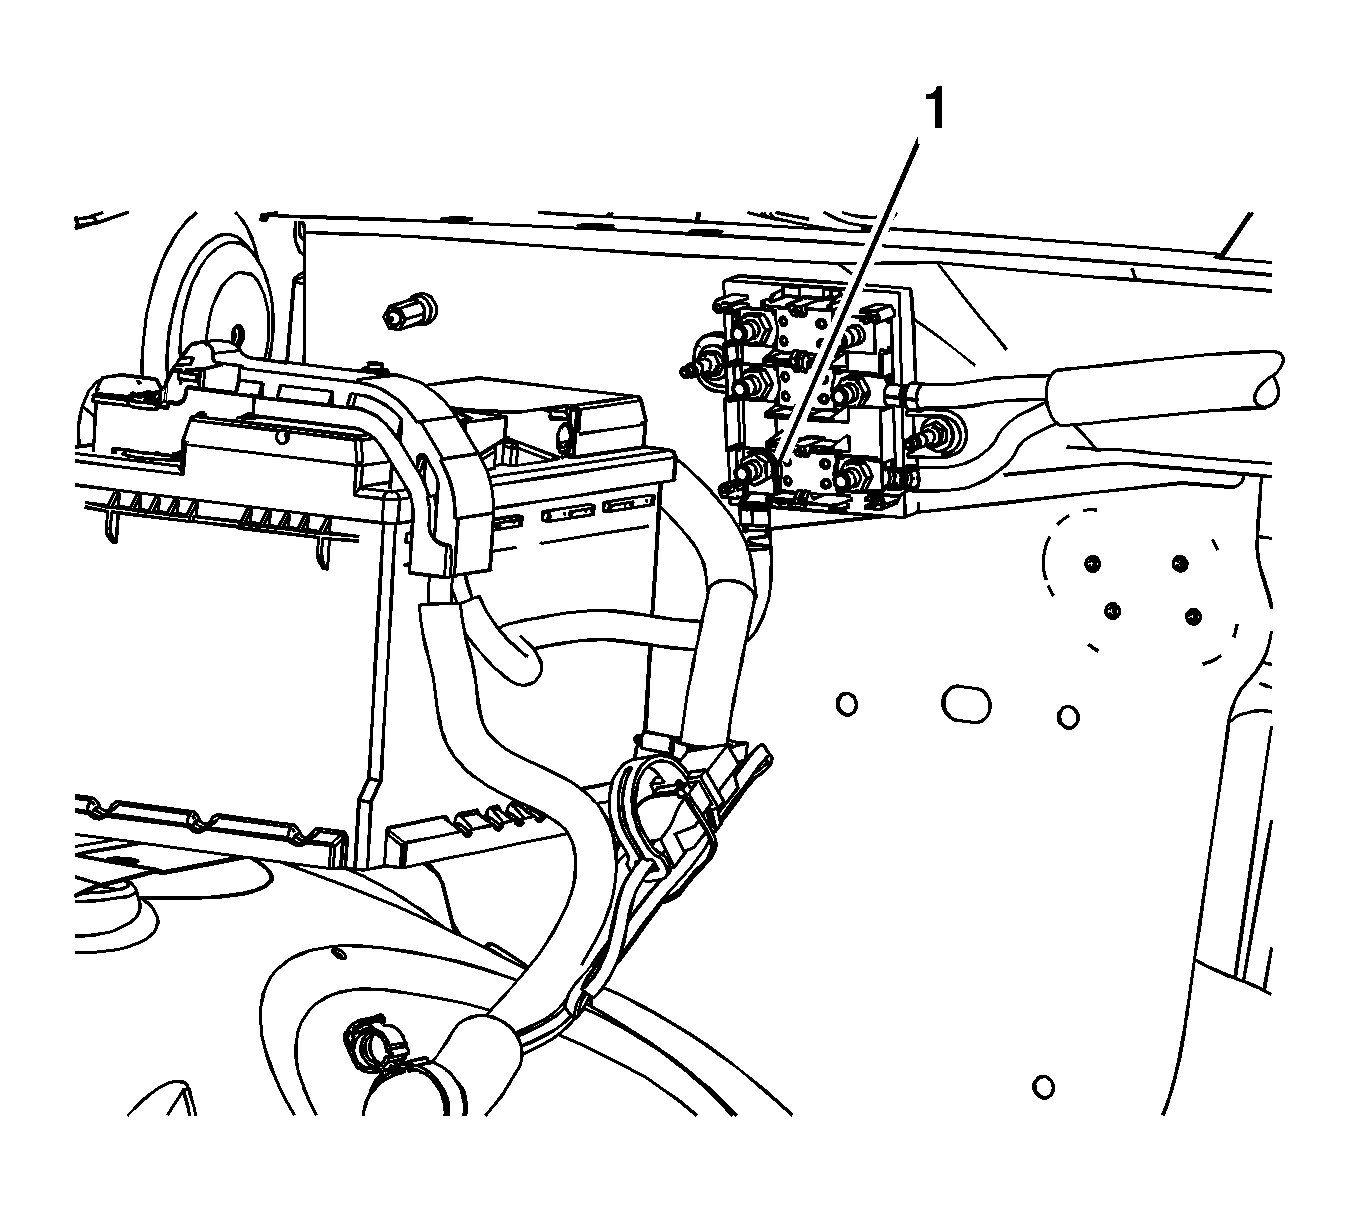
- Remove the mega fuse cover.
- Remove the starter solenoid cable to mega fuse nut (1).
- Remove the starter solenoid cable branch from the mega fuse stud.
- Remove the wheelhouse liner. Refer to Front Wheelhouse Liner Replacement - Right Side .
- Remove the front 2 oil pan skid plate bolts, loosen the rear 2 bolts and remove the skid plate.
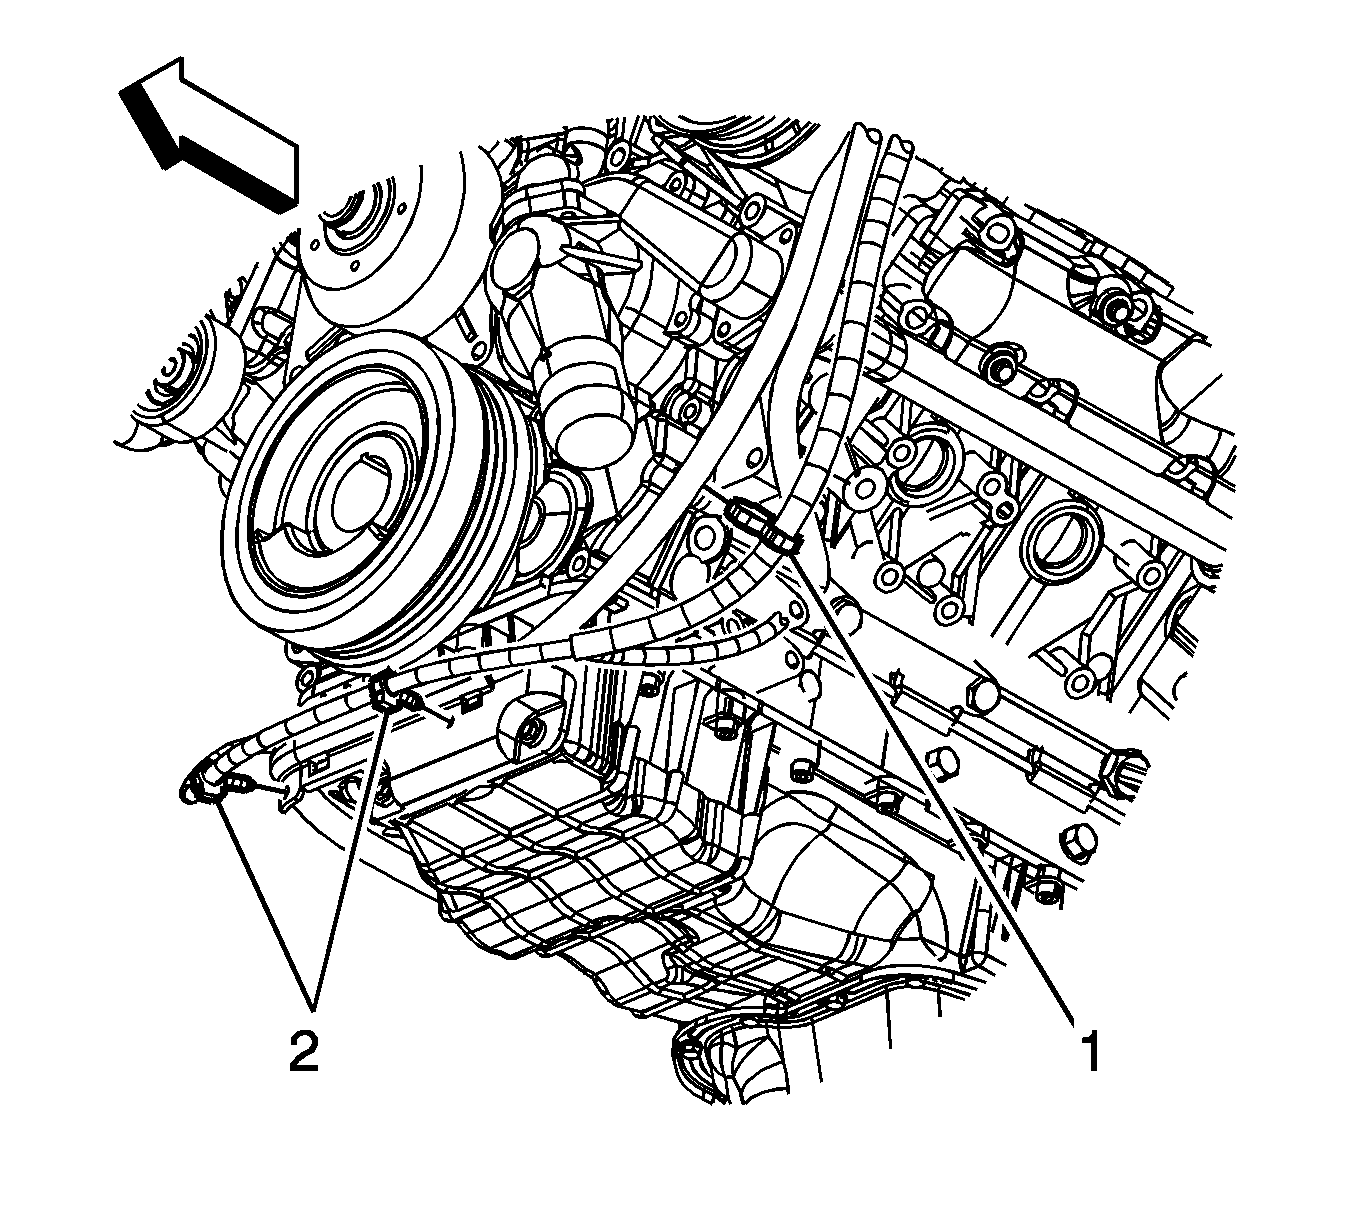
- Remove the engine wiring harness clip (1) from the starter solenoid cable.
- Remove the engine wiring harness clips (2) from the starter solenoid cable channel.
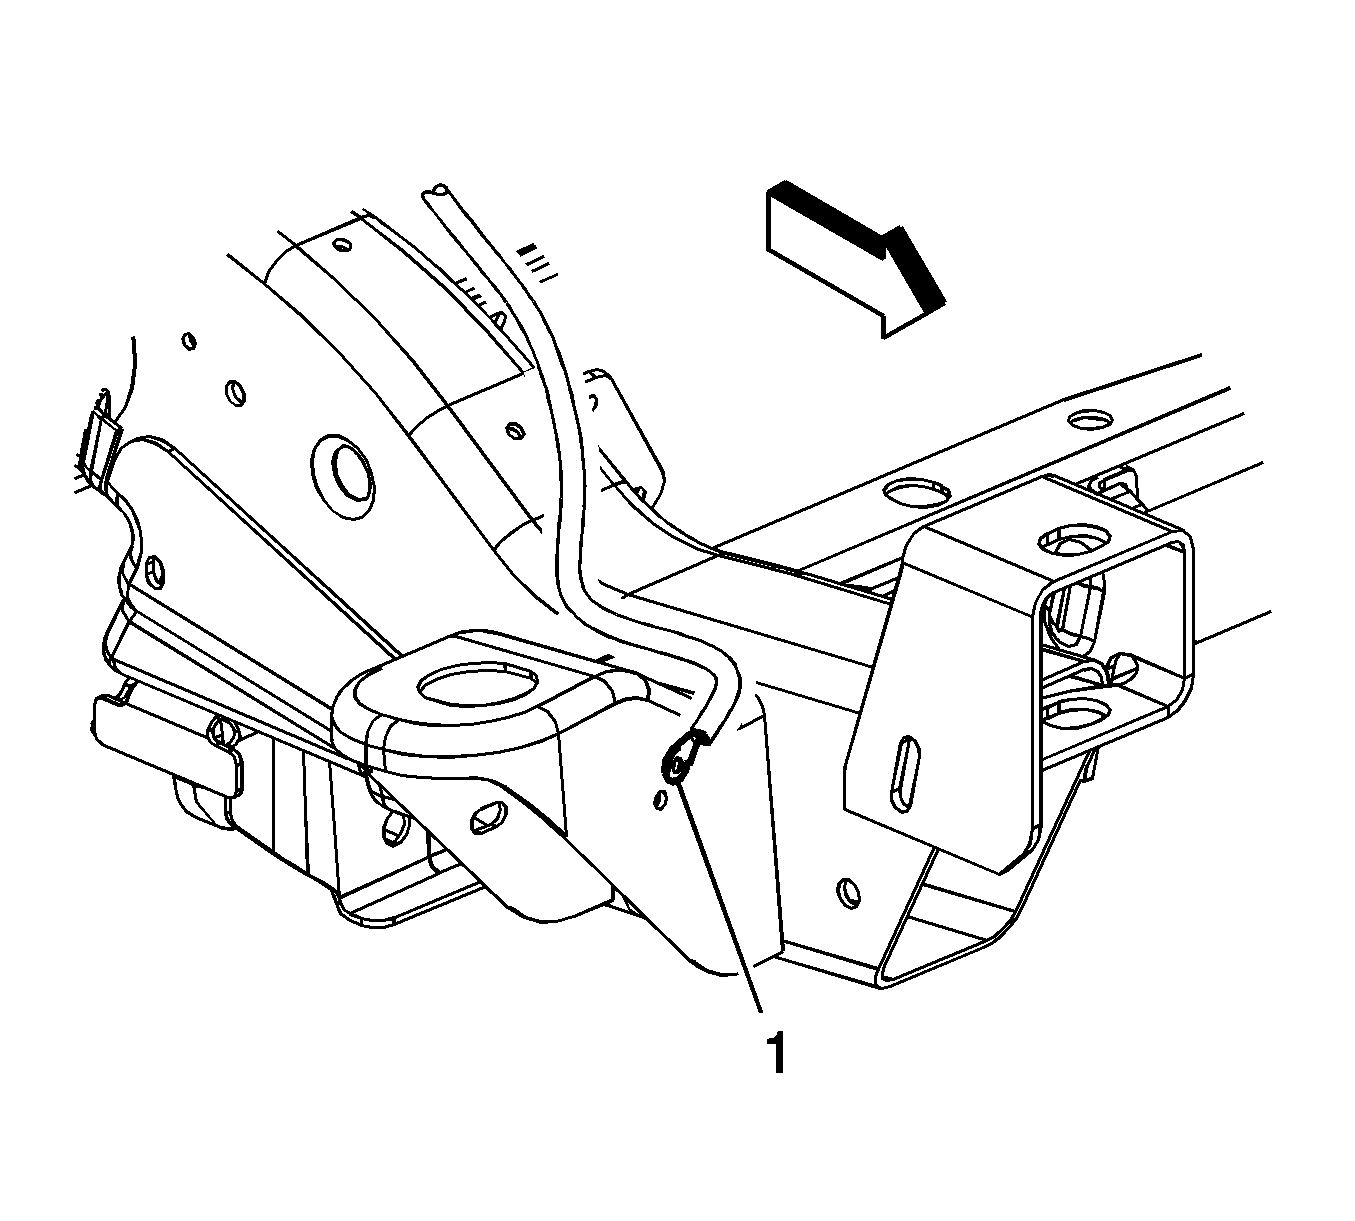
- Remove the starter solenoid cable bolt from the frame.
- Reposition the starter solenoid cable (1) from the frame.
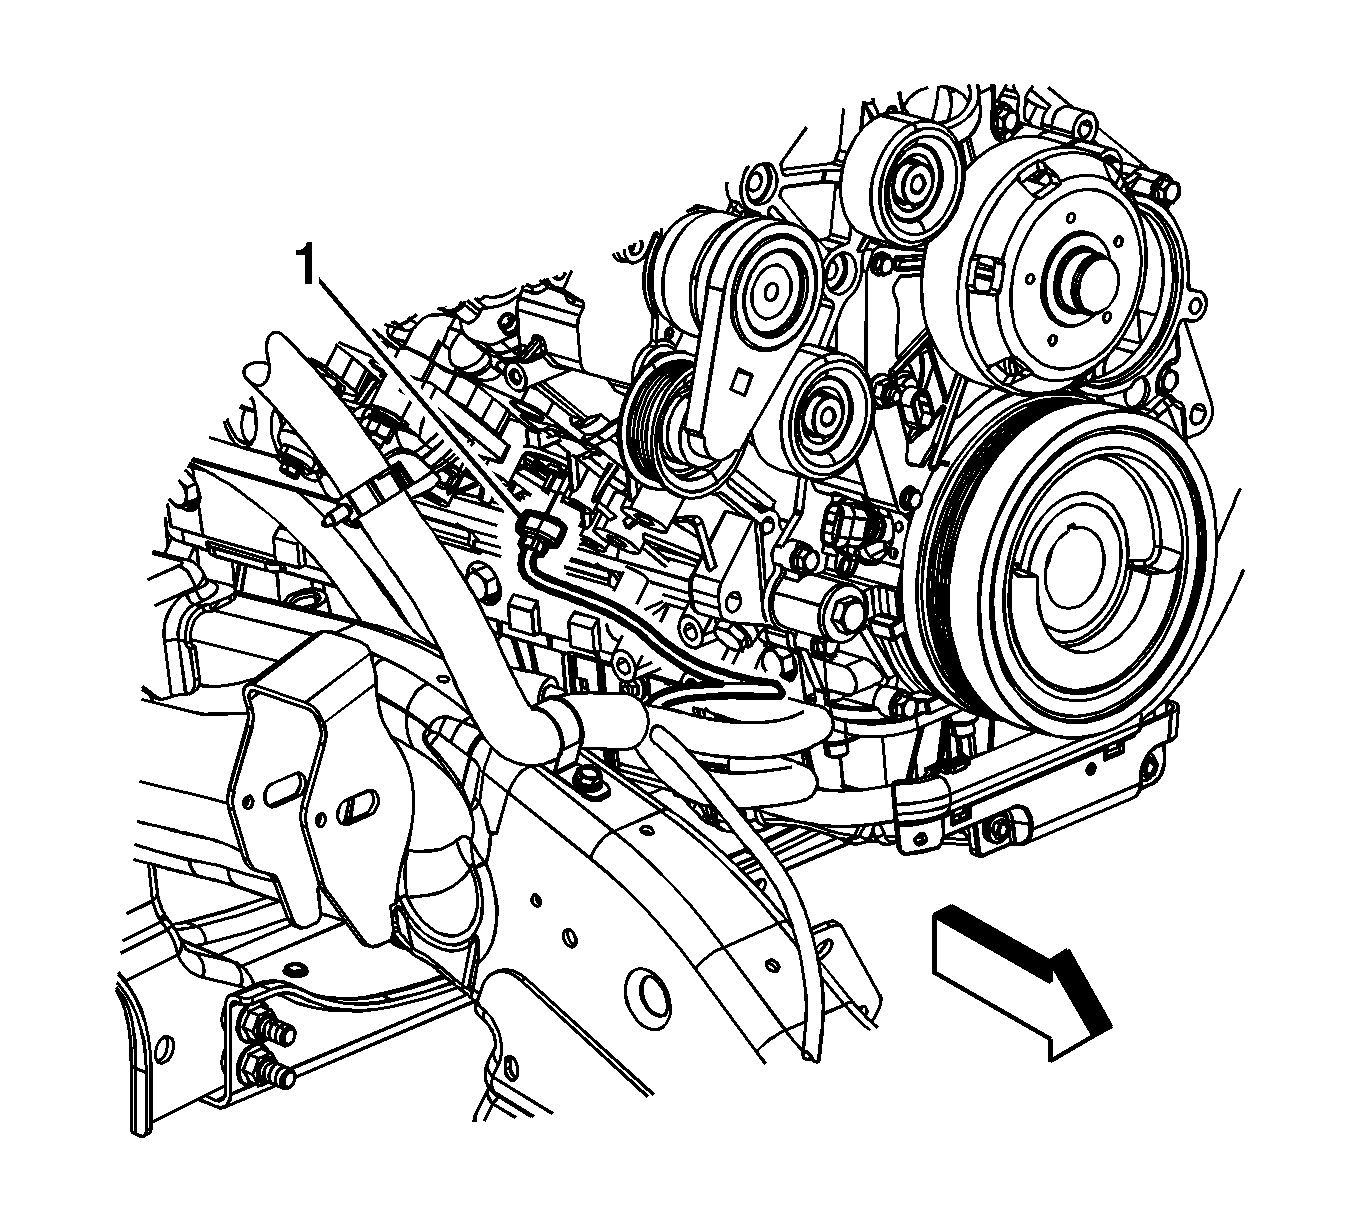
- Disconnect the coolant heater cord (1) from the coolant heater.
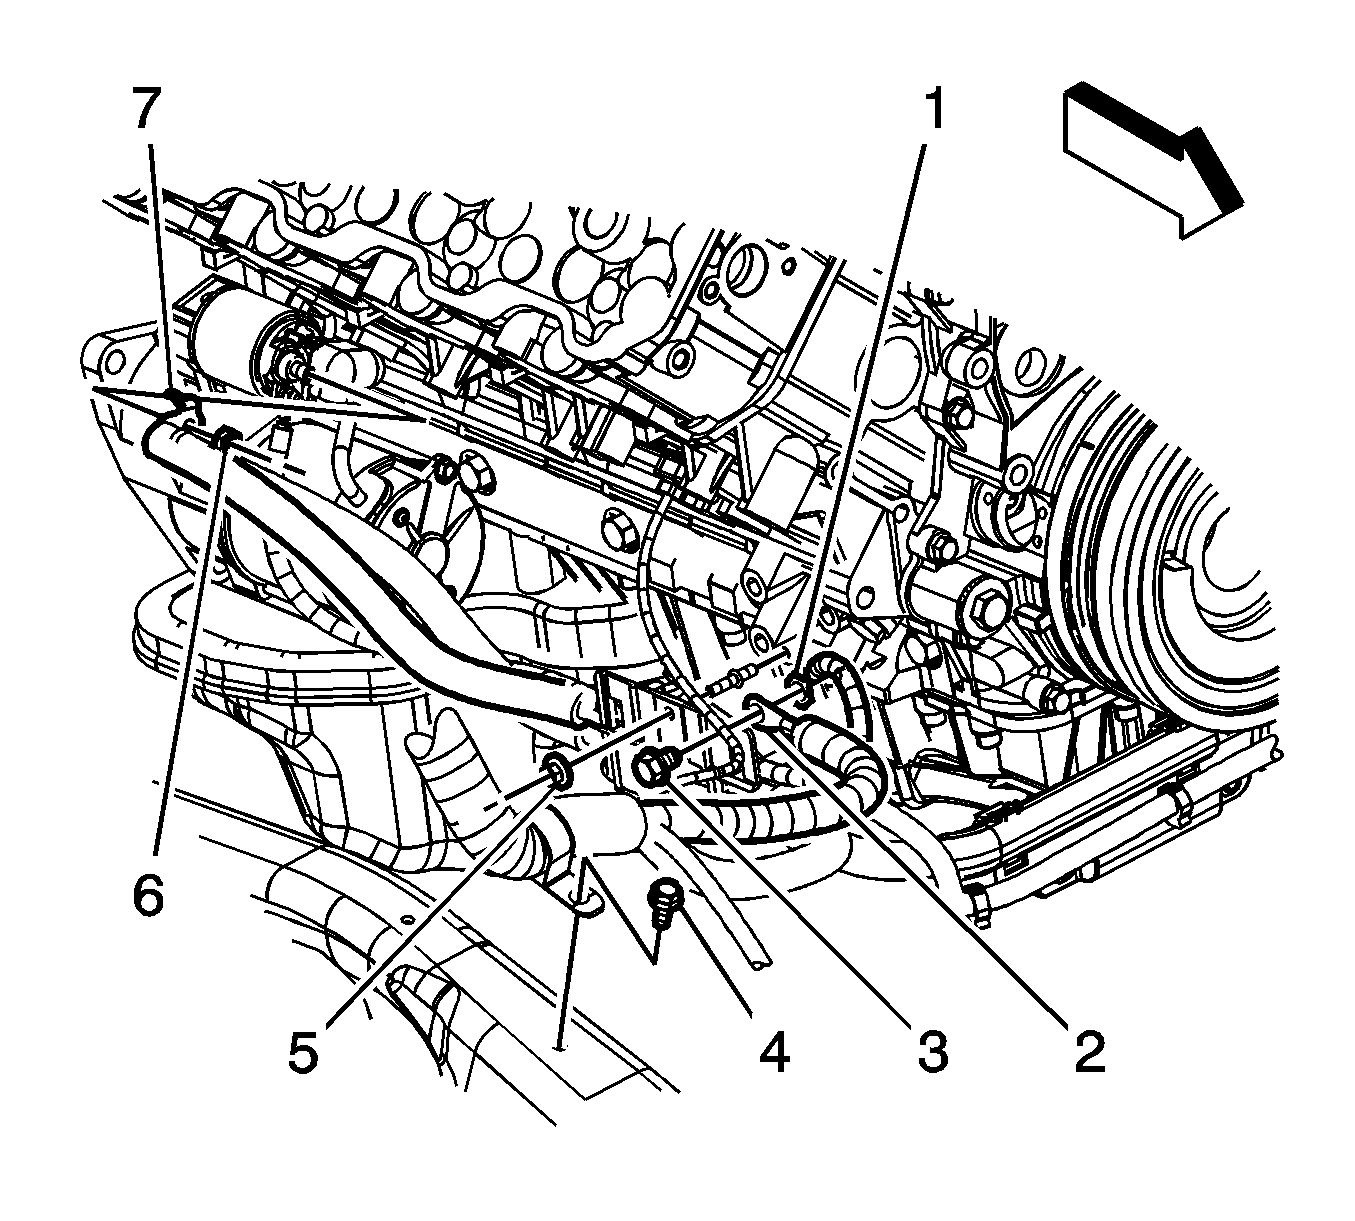
- Remove the starter solenoid cable nut (6) from the starter.
- Remove the starter solenoid cable (7) from the starter.
- Remove the starter solenoid cable bolt (3) from the engine block.
- Reposition the starter solenoid cable terminal (2) from the engine wiring harness ground terminal (1).
- Remove the starter solenoid cable bracket nut (5) and bracket from the stud.
- Remove the starter solenoid cable clip bolt (4) from the frame.
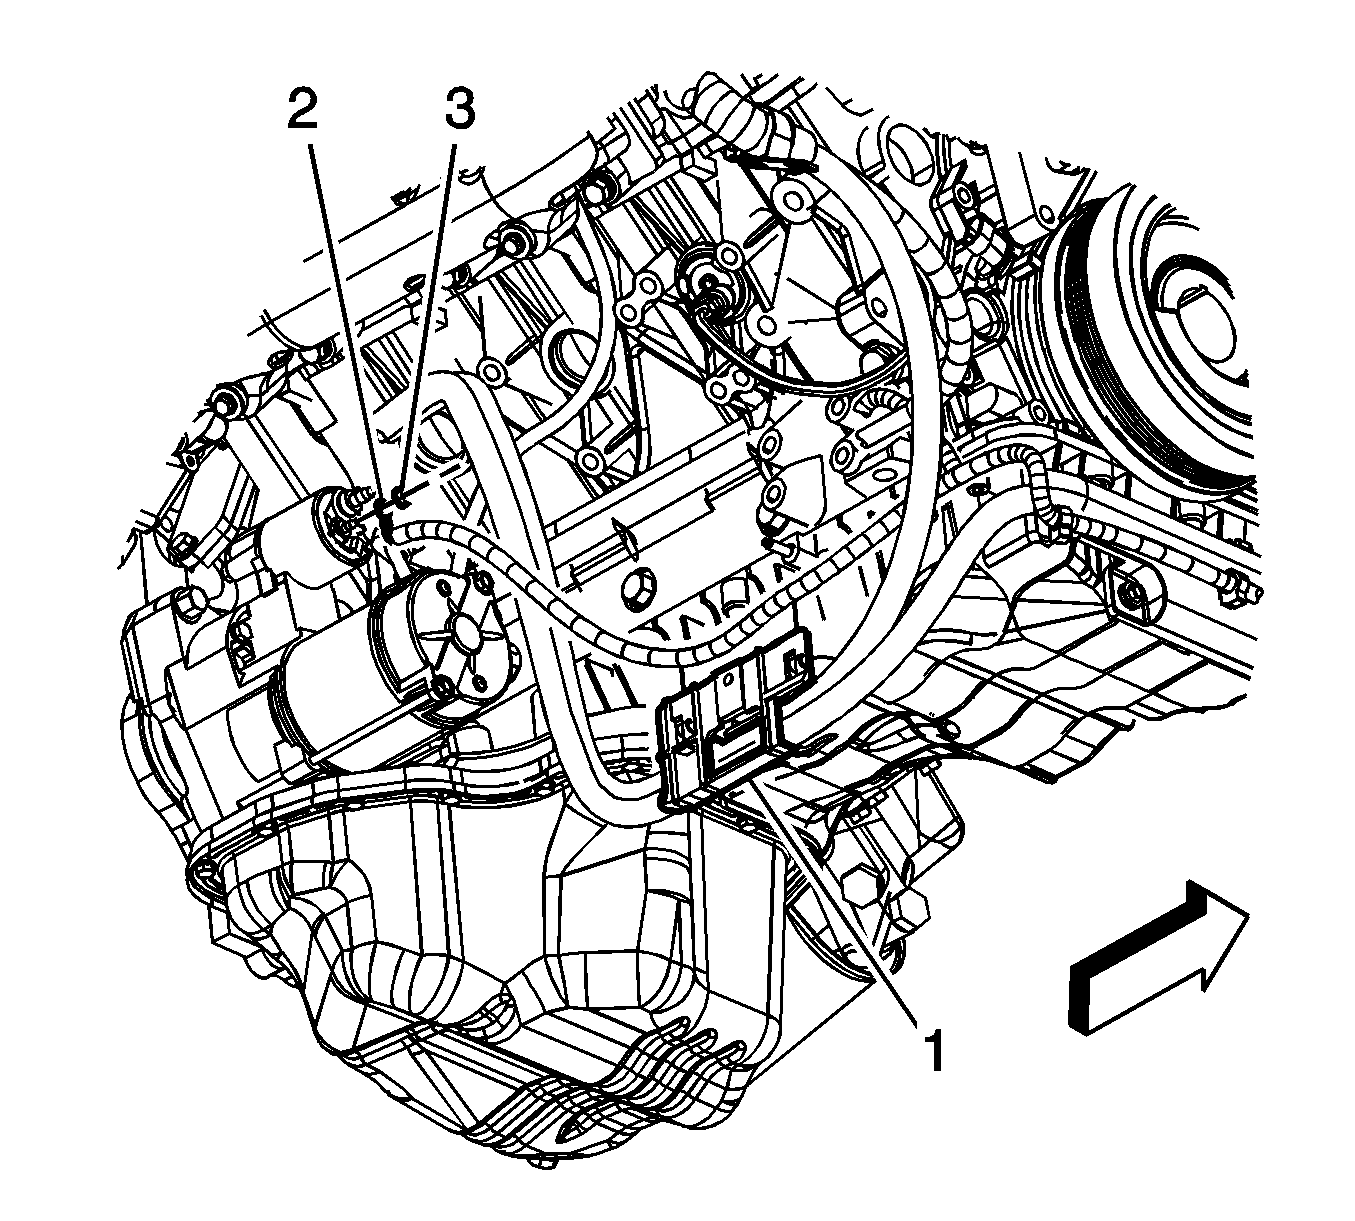
- Reposition the starter solenoid cable bracket (1) and remove the engine wiring harness from the rear clips on the bracket.
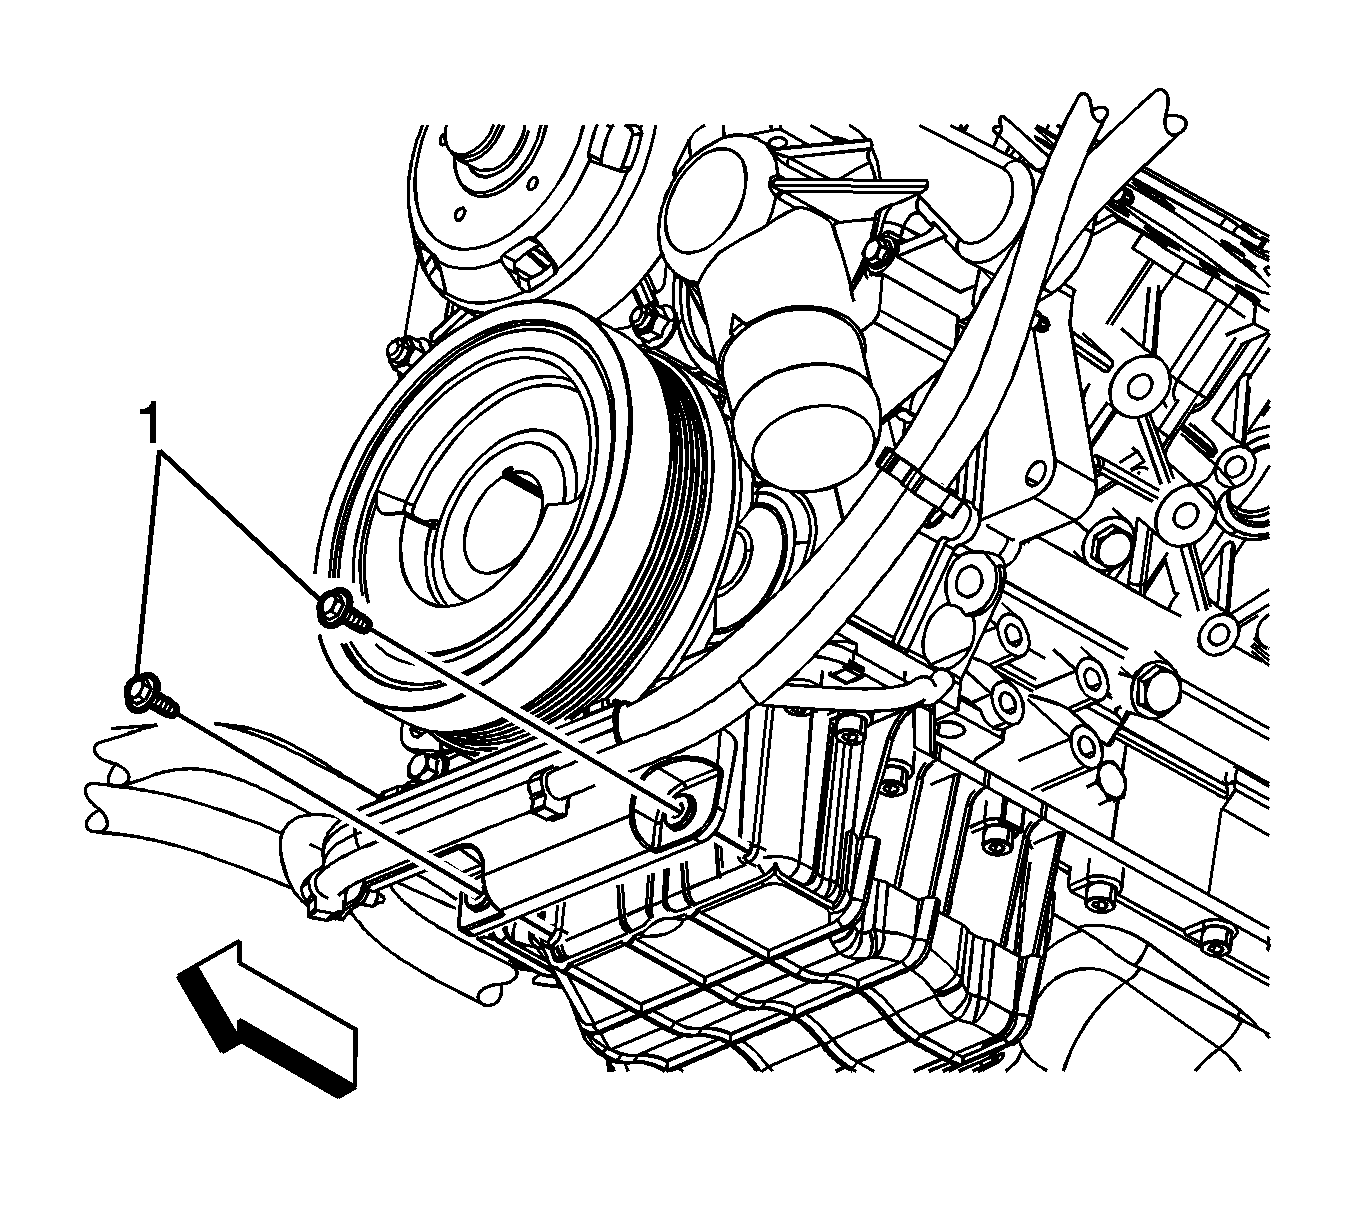
- Remove the starter solenoid cable channel bolts (1).
- Lower the vehicle.
- Remove the starter solenoid cable from the vehicle.

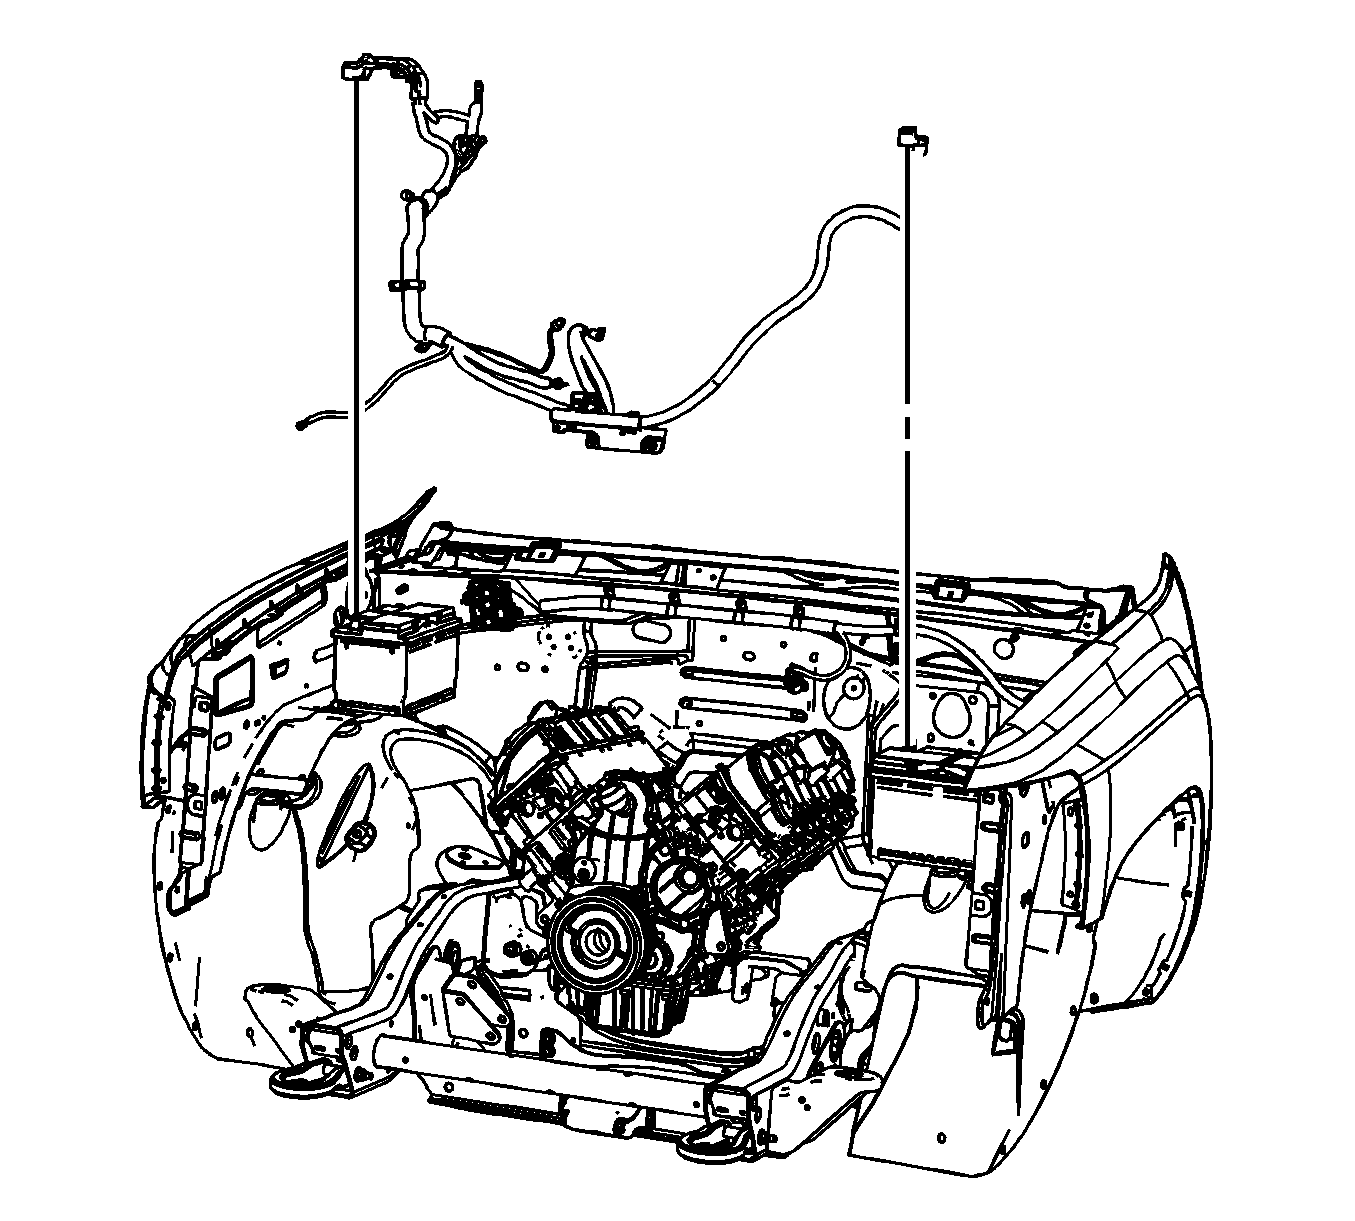
Installation Procedure
- Install the starter solenoid cable to the vehicle.
- Install the starter solenoid cable (5) to the battery positive post.
- Tighten the starter solenoid cable nut (2).
- Close the starter solenoid cable positive battery post cover (1).
- Install the starter solenoid cable to the battery positive post.
- Tighten the starter solenoid cable nut (1).
- Close the starter solenoid cable positive battery post cover.
- Raise and suitably support the vehicle. Refer to Lifting and Jacking the Vehicle .
- Position the starter solenoid cable to the oil pan and install the starter solenoid cable channel bolts (1).
- Reposition the starter solenoid cable bracket (1) and install the engine wiring harness to the clips on the rear of the bracket.
- Position the starter solenoid cable clip to the frame and install the bolt (4).
- Install the starter solenoid cable bracket onto the stud and install the nut (5).
- Position the engine wiring harness ground terminal (1) behind the starter solenoid cable terminal (2) and against the engine block.
- Install the starter solenoid cable bolt (3) to the engine block.
- Install the starter solenoid cable (7) onto the starter.
- Install the starter solenoid cable nut (6) to the starter.
- Connect the coolant heater cord (1) to the coolant heater.
- Position the starter solenoid cable (1) to the frame.
- Install the starter solenoid cable bolt to the frame.
- Install the engine wiring harness clip (1) to the starter solenoid cable.
- Install the engine wiring harness clips (2) to the starter solenoid cable channel.
- Install the oil pan skid plate and tighten the rear 2 bolts and install and tighten the front 2 bolts.
- Install the wheelhouse liner. Refer to Front Wheelhouse Liner Replacement - Right Side .
- Install the starter solenoid cable branch terminal to the mega fuse stud.
- Install the starter solenoid cable to mega fuse nut (1).
- Install the mega fuse cover.
- Install the starter solenoid cable clip (3) to the battery tray.
- Install the starter solenoid cable clips (4) to the A/C evaporator tube.
- Install the air cleaner assembly. Refer to Air Cleaner Assembly Replacement .
- Connect the negative battery cable. Refer to Battery Negative Cable Disconnection and Connection .


Notice: Refer to Fastener Notice in the Preface section.
Tighten
Tighten the nut to 5 N·m (44 lb in).

Tighten
Tighten the nut to 7.5 N·m (66 lb in).

Tighten
Tighten the bolts to 12 N·m (106 lb in).


Tighten
Tighten the bolt to 16 N·m (12 lb ft).
Tighten
Tighten the nut to 8 N·m (71 lb in)
Tighten
Tighten the bolt to 25 N·m (18 lb ft).
Tighten
Tighten the nut to 9 N·m (80 lb in).


Tighten
Tighten the bolt to 25 N·m (18 lb ft).


Tighten
Tighten the bolts to 28 N·m (21 lb ft).

Tighten
Tighten the nut to 9 N·m (80 lb in).


Starter Solenoid Cable Replacement 4.3L
Removal Procedure
- Disconnect the negative battery cable. Refer to Battery Negative Cable Disconnection and Connection .
- Remove the air cleaner outlet resonator. Refer to Air Cleaner Outlet Resonator Replacement .
- Remove the mega fuse cover.
- Remove the starter solenoid cable nut (1) from the mega fuse stud.
- Remove the starter solenoid cable terminal (2) from the mega fuse stud.
- Open the starter solenoid cable cover at the positive battery terminal.
- Loosen the starter solenoid cable nut (5).
- Remove the starter solenoid cable from the positive battery terminal.
- Remove the starter solenoid cable clip (4) from the air conditioning (A/C) evaporator tube.
- Raise and support the vehicle. Refer to Lifting and Jacking the Vehicle .
- Remove the oil pan skid plate bolts and plate, if equipped.
- Remove the starter solenoid cable clip (1) from the wheelhouse panel.
- Remove the starter solenoid cable clip bolt (2) from the frame.
- Remove the starter solenoid cable nut (1) from the starter.
- Remove the starter solenoid cable (2) from the starter.
- Lower the vehicle.
- Remove the starter solenoid cable from the vehicle.


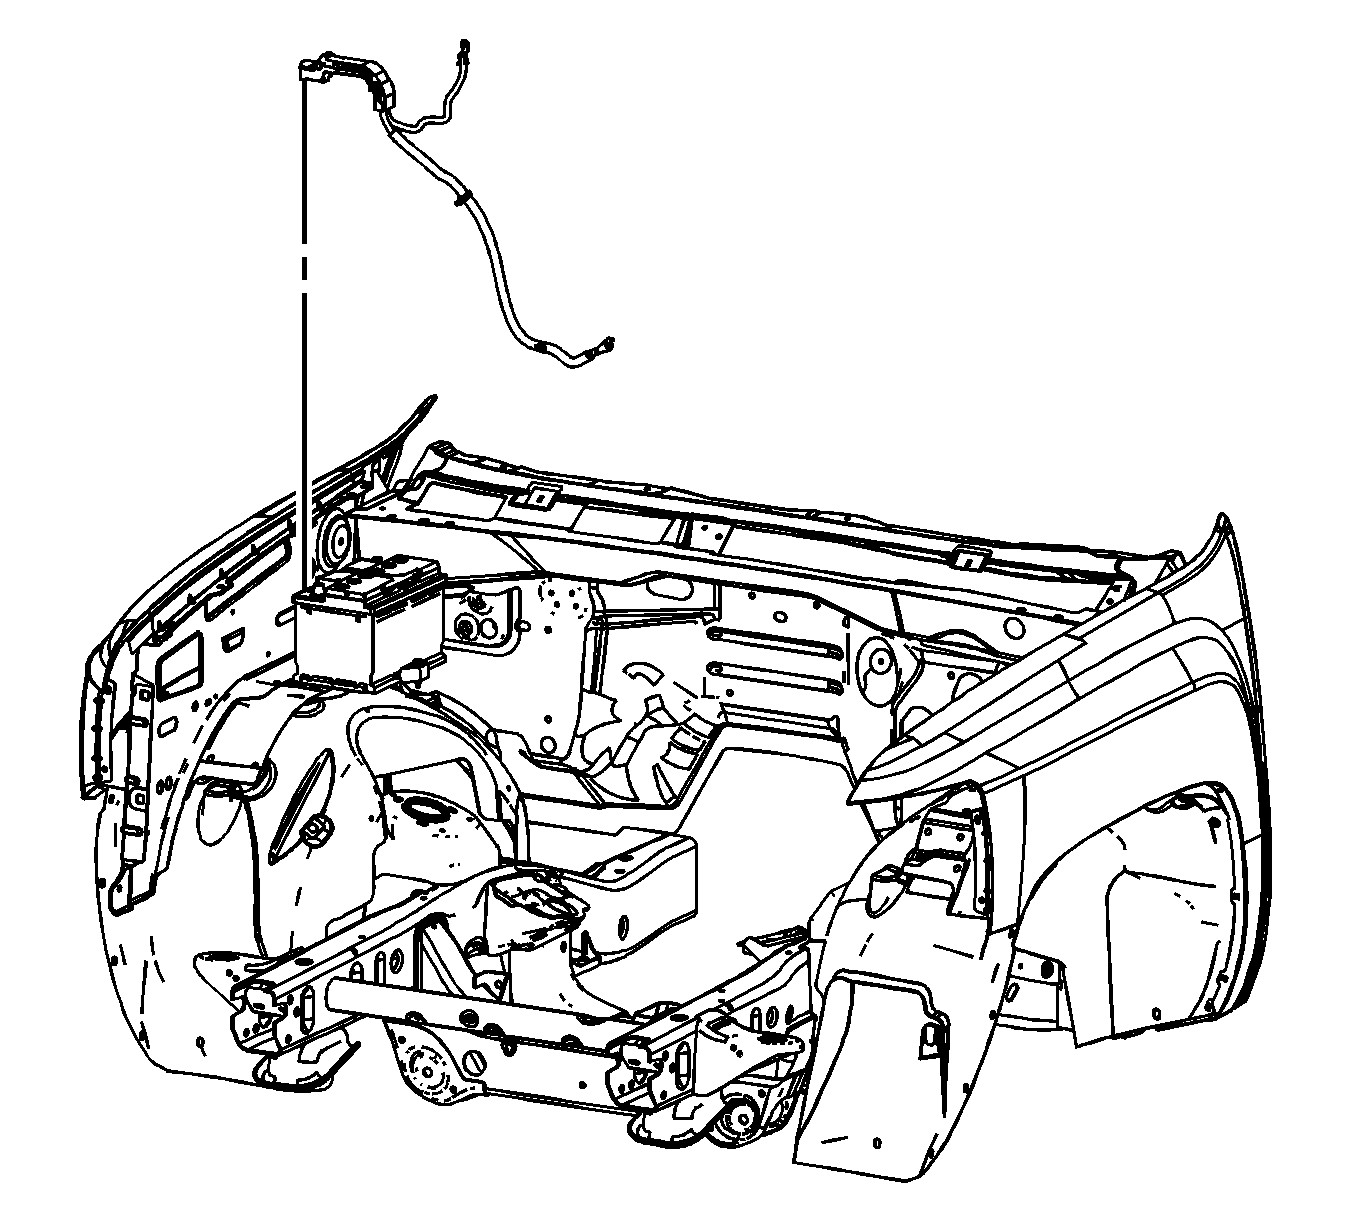
Installation Procedure
- Install the starter solenoid cable to the vehicle.
- Install the starter solenoid cable to the positive battery terminal.
- Tighten the starter solenoid cable nut (5).
- Close the starter solenoid cable cover at the positive battery terminal.
- Install the starter solenoid cable terminal (2) to the mega fuse stud.
- Install the starter solenoid cable nut (1) to the mega fuse stud.
- Install the starter solenoid cable clip (4) to the A/C evaporator tube.
- Install the mega fuse cover.
- Raise the vehicle.
- Install the starter solenoid cable (2) to the starter.
- Install the starter solenoid cable nut (1) to the starter.
- Position the starter solenoid cable clip to the frame and install the starter solenoid cable clip bolt (2).
- Install the starter solenoid cable clip (1) to the wheelhouse panel.
- Position the oil pan skid plate and install the bolts.
- Lower the vehicle.
- Install the air cleaner outlet resonator. Refer to Air Cleaner Outlet Resonator Replacement .
- Connect the negative battery cable. Refer to Battery Negative Cable Disconnection and Connection .


Notice: Refer to Fastener Notice in the Preface section.
Tighten
Tighten the nut to 5 N·m (44 lb in).
Tighten
Tighten the nut to 9 N·m (80 lb in).


Tighten
Tighten the nut to 9 N·m (80 lb in).


Tighten
Tighten the bolts to 28 N·m (21 lb ft).
