Special Tools
| • | J 36857 Engine Lift Brackets |
| • | J 44581 Fuel Line Disconnect Tool |
| • | J 41769 Fuel Line Quick Disconnect Tool |
Removal Procedure
Important: In order to remove the engine the vehicle needs to be on a hoist. The front wheels and tires will also require removal. The vehicle will have to be supported by the frame when the tires are removed.
- Open the hood.
- Remove the ground strap from the stud.
- Assemble 2 sets of the following: an M6 bolt, 2 each 19.05 mm (0.75 in) flat washers and an M6 nut.
- Release the retainer securing the hood strut rod to the hood strut bracket stud.
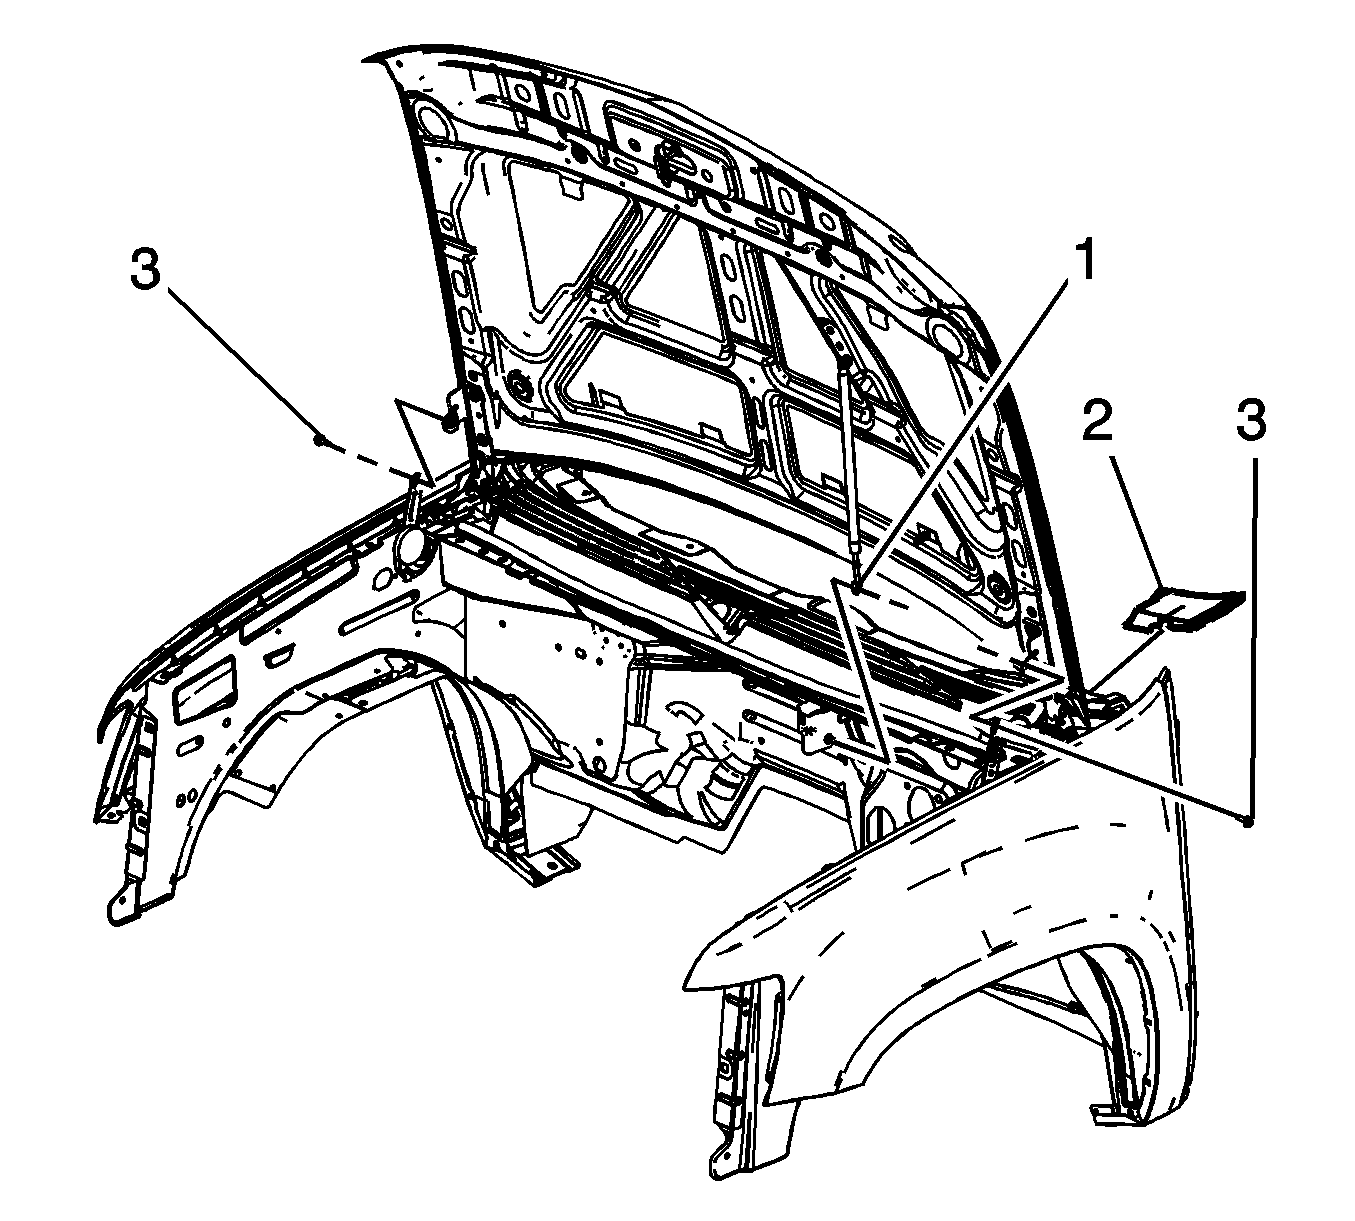
- Remove the air inlet grille end caps (1), lift the end cap up in order to disengage the retainers. (left side shown, right side similar).
- Have an assistant support the hood.
- Remove the hood hinge bolts (2) and set aside.
- Raise the hood until the service position notch (1) in the upper hinge is reached.
- Install the 2 sets of the M6 bolts to both the left and right side service notches and tighten finger tight.
- Lower the hood until the bolts rest against the lower hinge, tighten the bolts to secure the hood.
- The hood is now set in the service position.
- Recover the air conditioning (A/C) system. Refer to Refrigerant Recovery and Recharging .
- Disconnect the negative battery cables. Refer to Battery Negative Cable Disconnection and Connection .
- Drain the cooling system. Refer to Cooling System Draining and Filling .
- Disconnect the following engine wire harness connectors:
- Remove the air cleaner. Refer to Air Cleaner Assembly Replacement .
- Remove the surge tank. Refer to Radiator Surge Tank Replacement .
- Raise and suitably support the vehicle. Refer to Lifting and Jacking the Vehicle .
- Remove both front tires and wheels. Refer to Tire and Wheel Removal and Installation .
- Remove both fender wheelhouse inner panels. Refer to Front Wheelhouse Liner Replacement - Right Side and Front Wheelhouse Liner Replacement - Left Side .
- Lower the vehicle.
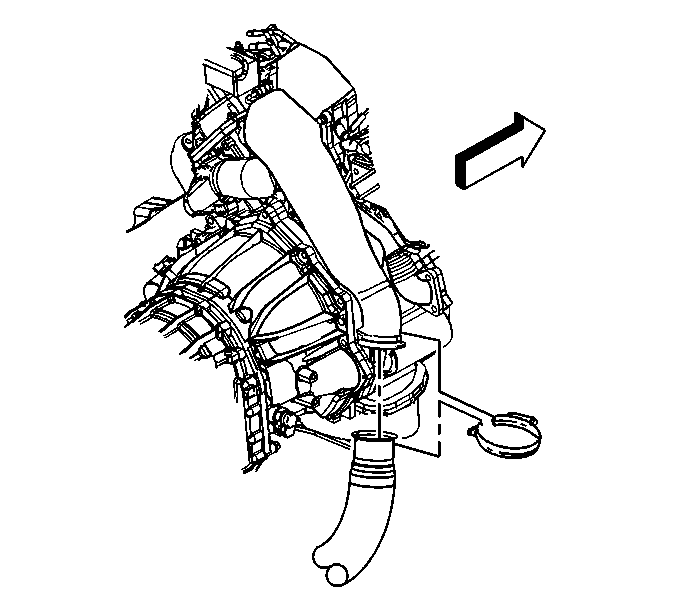
- Remove the charged air cooler pipes. Refer to Charge Air Cooler Inlet Pipe Replacement and Charge Air Cooler Outlet Pipe Replacement .
- Remove the radiator inlet hose. Refer to Radiator Inlet Hose Replacement .
- Remove the upper fan shroud. Refer to Engine Coolant Fan Upper Shroud Replacement .
- Remove the lower fan shroud. Refer to Engine Coolant Fan Lower Shroud Replacement .
- Remove the radiator outlet hose. Refer to Radiator Outlet Hose Replacement .
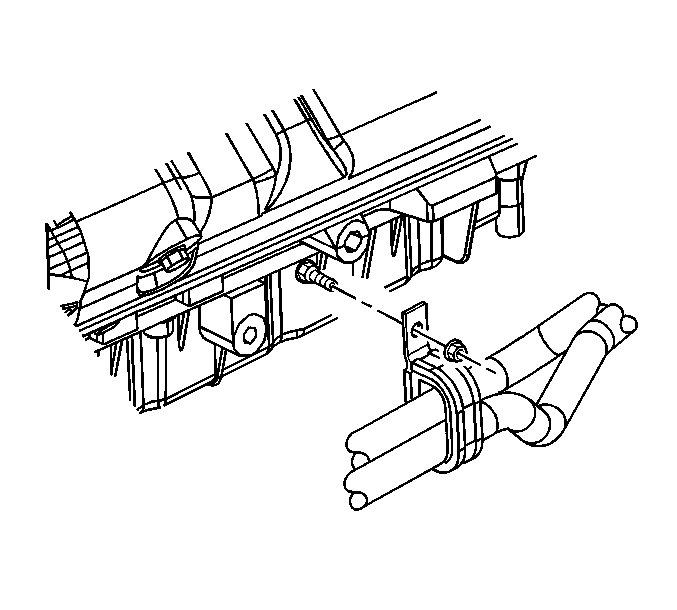
- Remove the outlet heater hose pipe bolt from the bracket.
- Remove the outlet heater hose pipe nut.
- Move the heater hose and secure aside.
- Remove the radiator support. Refer to Radiator Support Replacement .
- Disconnect the following electrical connectors:
- Remove the harness clip from the oil fill pipe.
- Remove the battery cable to the generator.
- If equipped, remove the battery cable to the auxiliary generator.
- Remove the battery cable harness clip from the upper air intake tube.
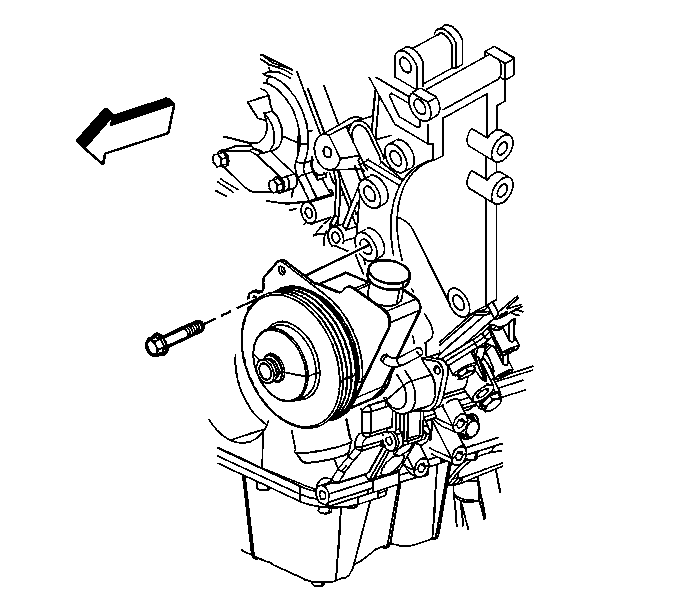
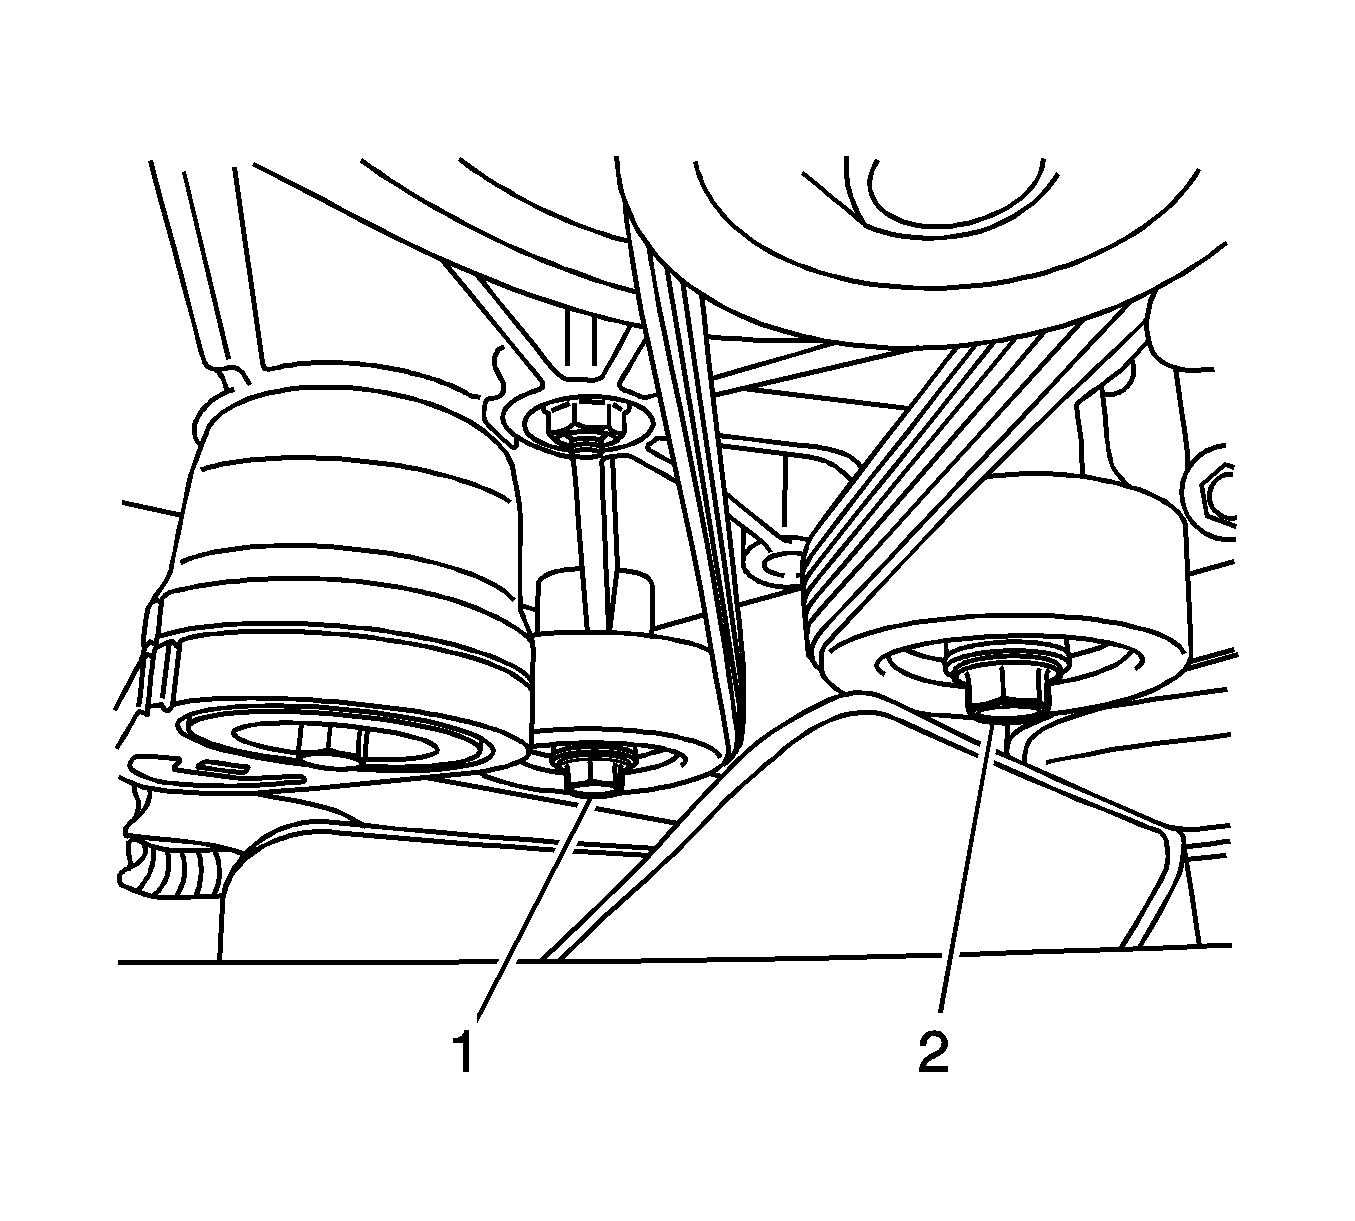
- Remove the battery cable junction block bolt (1) from the power steering pump.
- Move and secure the battery cables out of the way.
- Disconnect the main engine electrical harness connectors. Lift up on the latches (1) in order to disconnect the connectors.
- Open the harness clip (2).
- Remove the main engine electrical harness connectors.
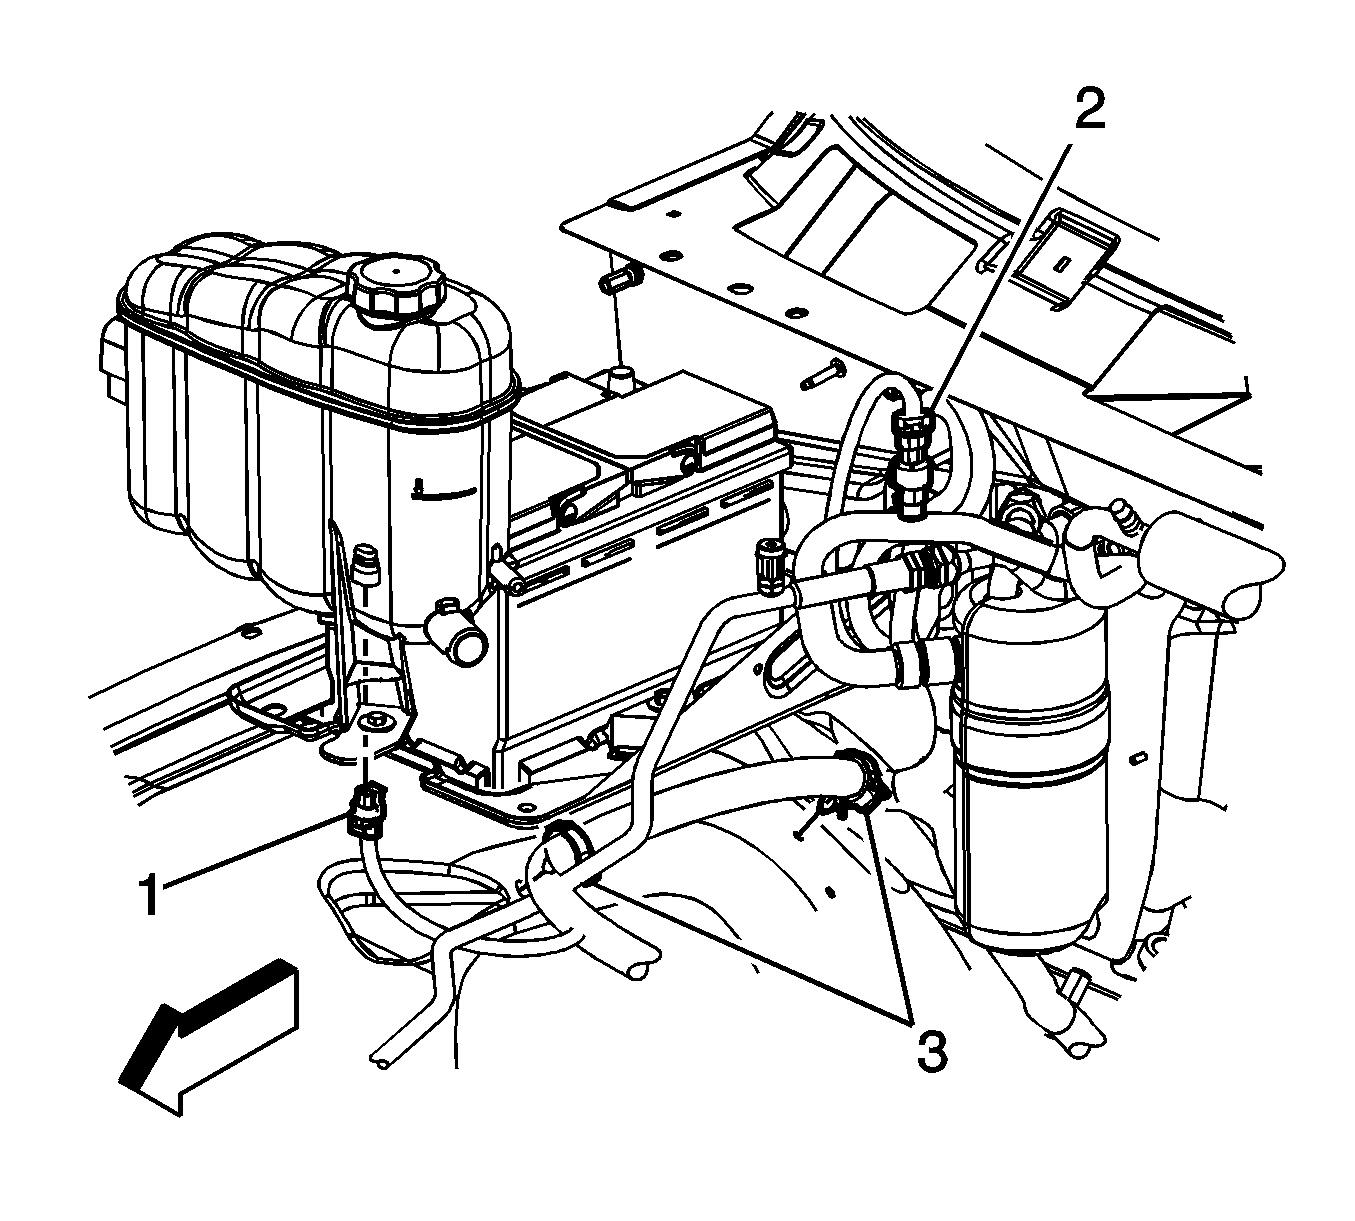
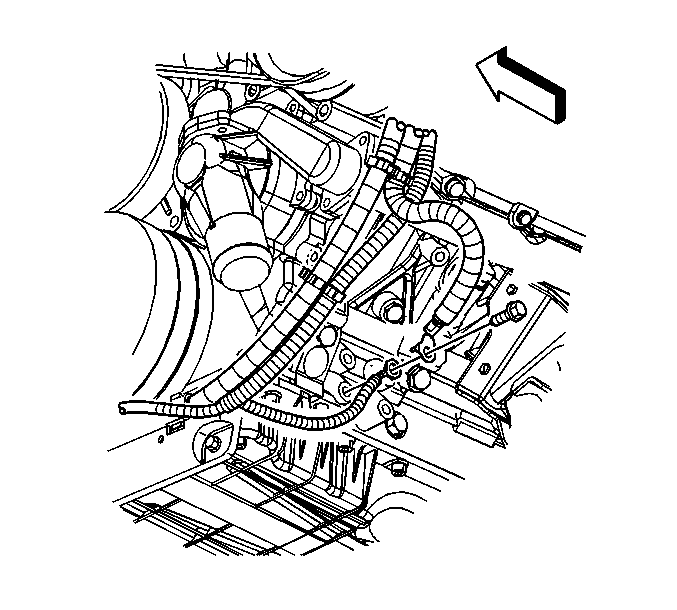
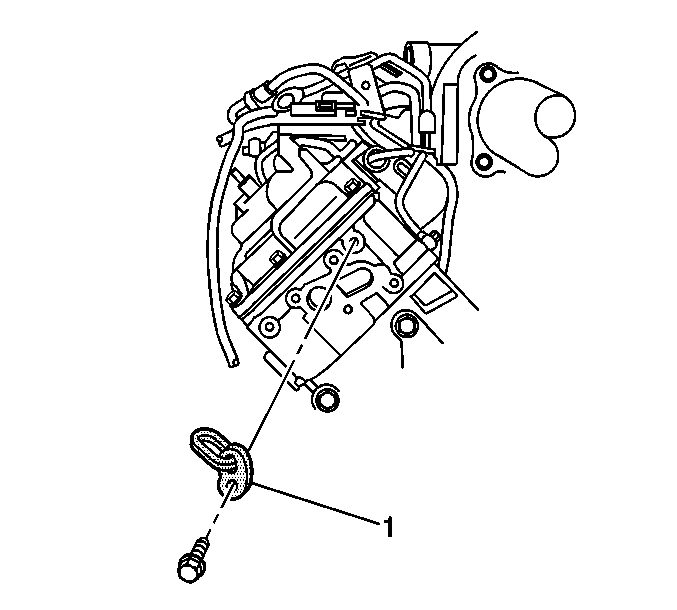
- Using J 41769 , disconnect the fuel lines at the engine.
- Remove the nut and the fuel line bracket from the upper valve rocker arm cover stud.
- Secure the fuel lines out of the way.
- Remove the drive belt. Refer to Drive Belt Replacement .
- Disconnect the suction hose from the accumulator.
- Remove the A/C compressor. Refer to Air Conditioning Compressor Replacement .
- Move the wiring harness to the left side of the vehicle and secure out to the way.
- Remove the bolts retaining the power steering pump front bracket to the power steering pump and the air conditioner compressor mounting bracket. Position the power steering pump aside.
- Remove the air conditioning and power steering pump mounting bracket. Refer to Air Conditioning (A/C) Compressor and Power Steering Pump Bracket Replacement .
- Remove the right idler pulley bolt (1) and pulley.
- Remove the generator bracket. Refer to Generator Bracket Replacement .
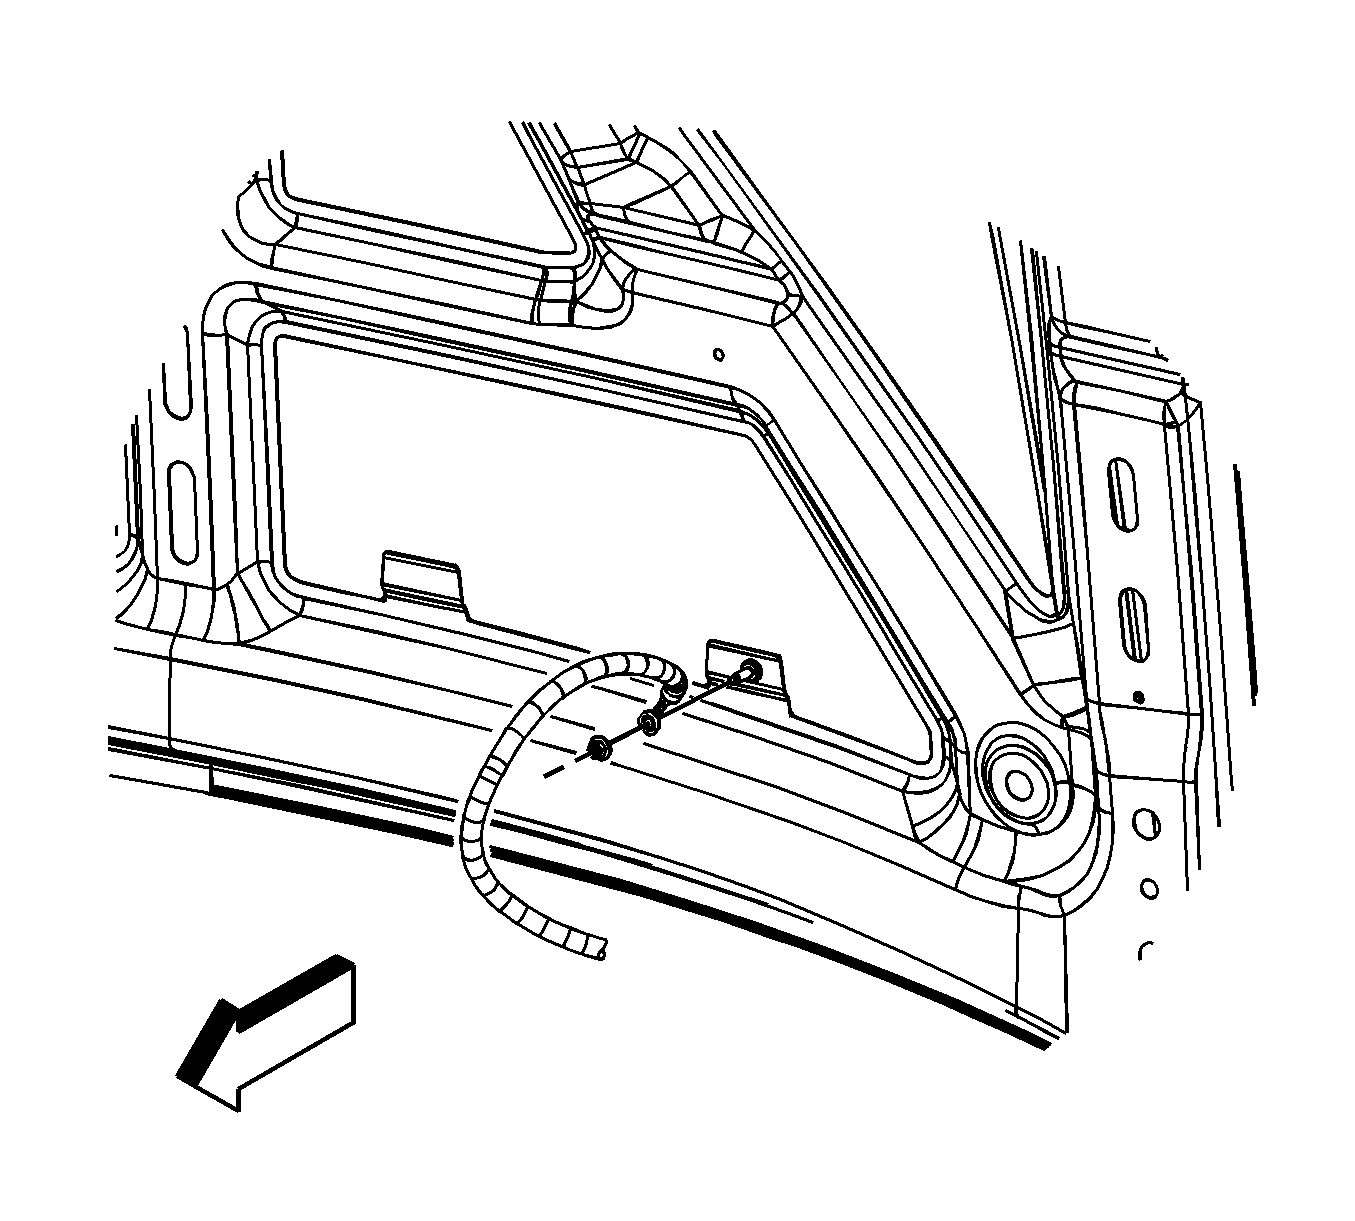
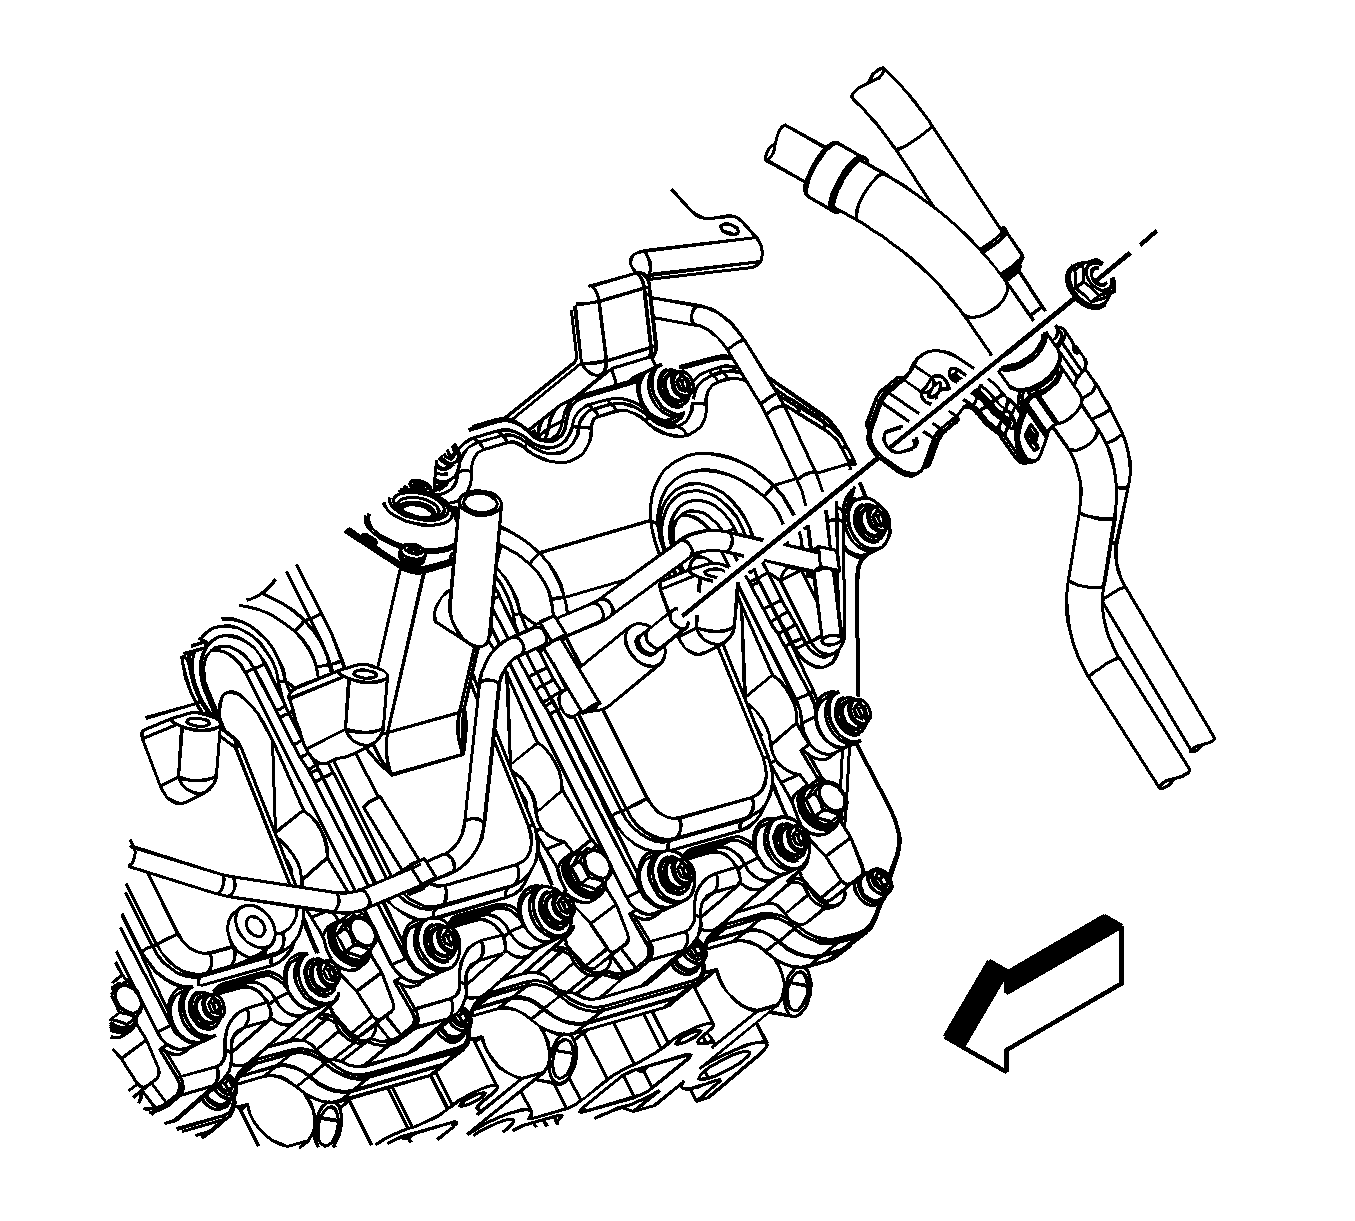
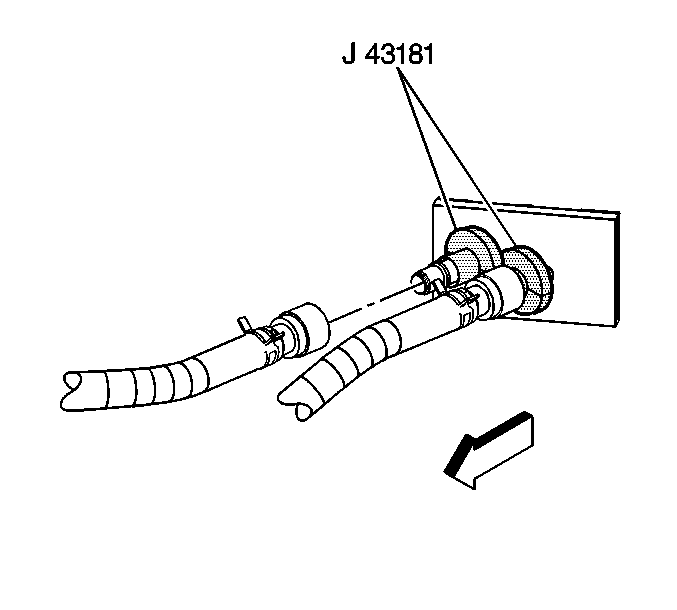
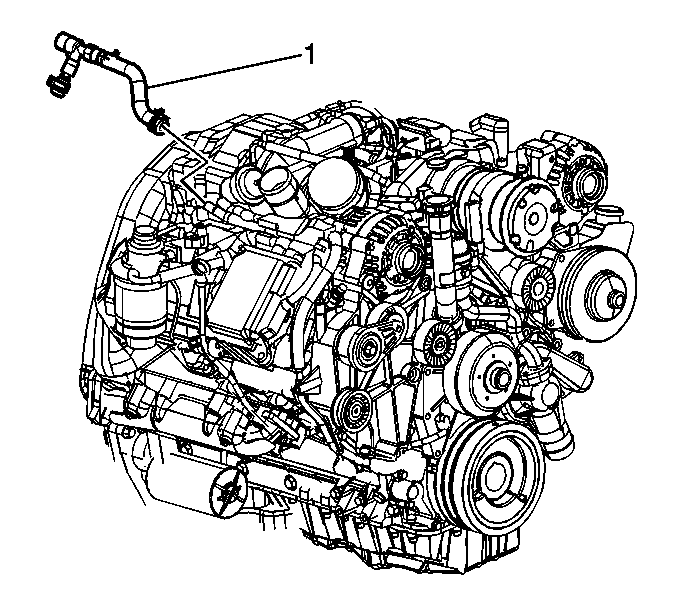
- Use the J 43181 in order to disconnect the inlet heater hose from the heater core inlet.
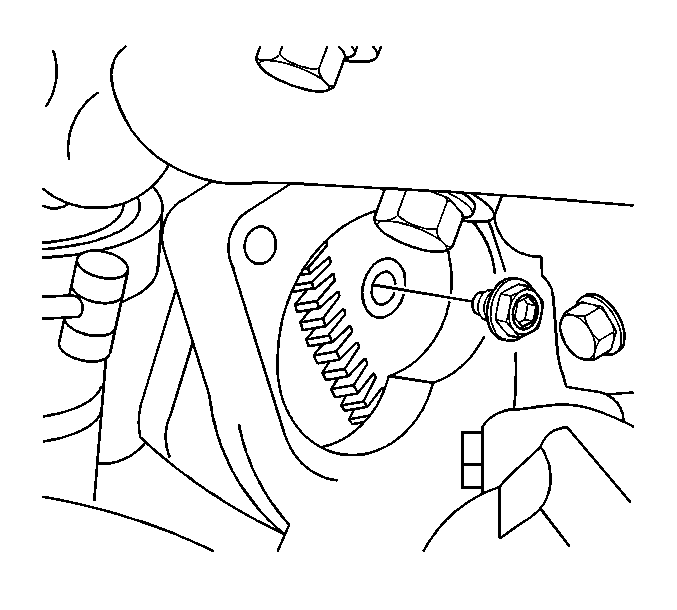
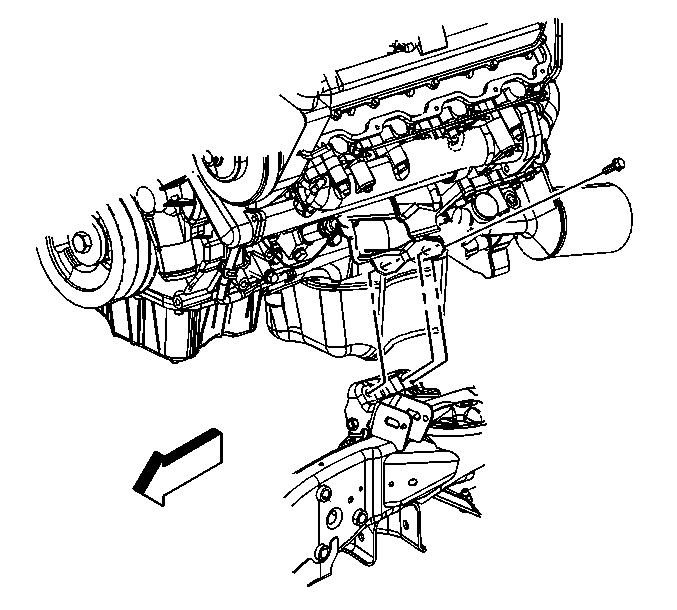
- Remove the bolt and the ground wires at the rear of the left cylinder head.
- Raise the vehicle. Refer to Lifting and Jacking the Vehicle .
- Remove the oil pan skid plate. Refer to Oil Pan Skid Plate Replacement .
- Remove the engine shield from the vehicle, if equipped. Refer to Engine Shield Replacement .
- Remove the bolt for the battery negative cable and the engine wiring harness ground wire from the left side of the engine.
- Remove the bolts holding the battery cable channel retainer to the lower crankcase.
- Disconnect the cord for the engine coolant heater.
- Remove the starter. Refer to Starter Motor Replacement .
- Remove the nut holding the battery cable bracket to the right side of the lower crankcase.
- Remove the bolt holding the auxiliary battery negative cable and the engine wiring harness ground wires to the right side of the engine.
- Move and secure the battery cables out of the way.
- Raise the vehicle. Refer to Lifting and Jacking the Vehicle .
- Drain the engine oil. Refer to Engine Oil and Oil Filter Replacement .
- Remove the exhaust pipe to the exhaust outlet clamp. Move the clamp onto the exhaust pipe.
- If vehicle is 4-wheel drive (4WD) equipped, remove the front differential carrier assembly. Refer to Differential Carrier Assembly Replacement .
- If equipped with an automatic transmission, mark the flywheel and torque converter relationship for assembly purposes.
- Remove the torque convertor bolts through the starter opening.
- If equipped with an automatic transmission, remove the transmission oil line clip nut.
- If equipped with an automatic transmission, remove the nuts retaining transmission fluid fill tube bracket.
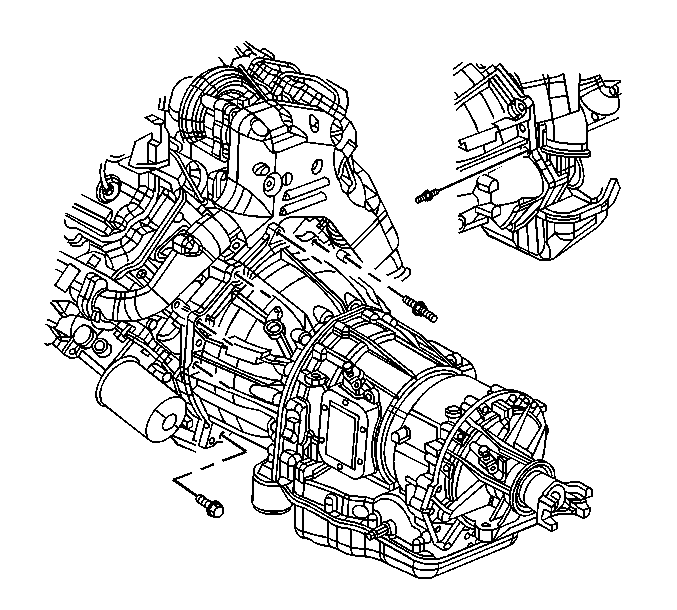
- Remove the transmission to engine stud and bolts (automatic transmission shown). Note the location of the studs and any brackets attached to the studs.
- Lower the vehicle to work through the wheelhouse opening.
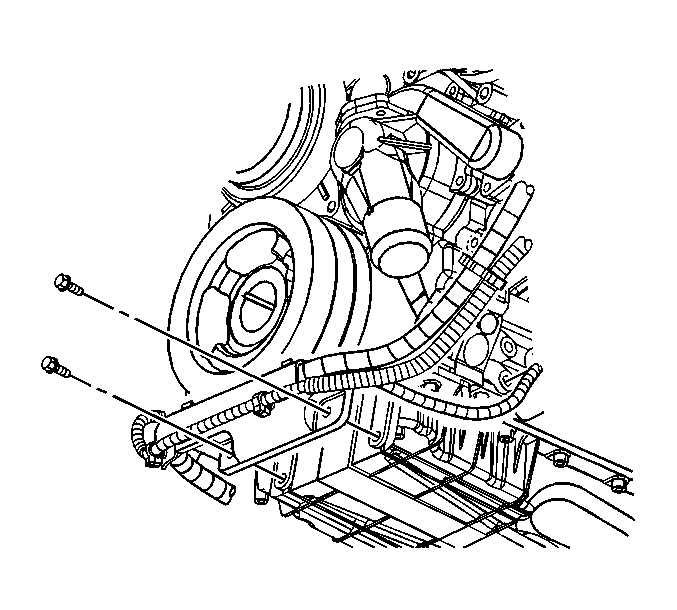
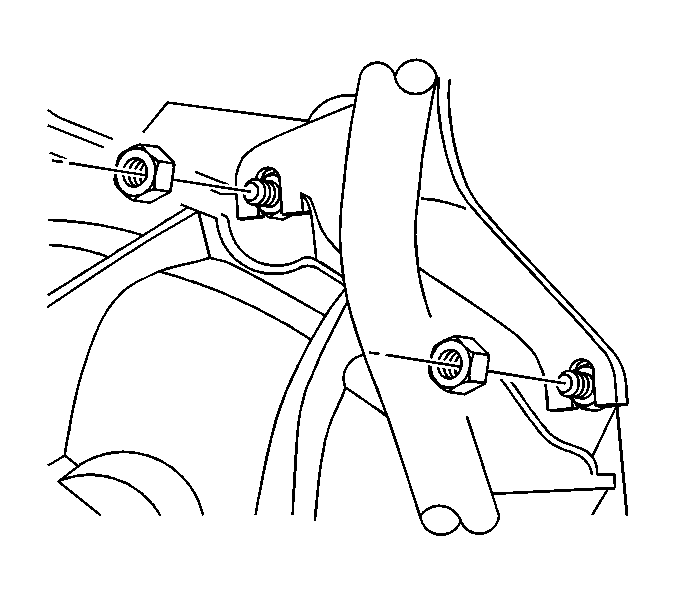
- Remove the engine mount to frame bracket bolts (left side shown).
- Lower the vehicle.
- Remove the upper exhaust gas reciriulation cooling pipe. Refer to Exhaust Gas Recirculation Cooling Pipe Replacement - Upper .
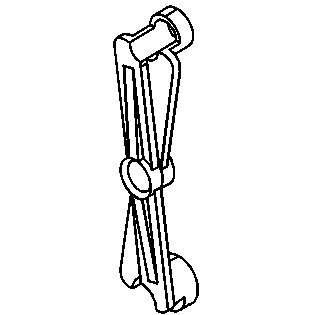
- Install the J 36857 (1) to the rear of the left cylinder head with a suitable bolt.
- Install the J 36857 (1) to the front of the right cylinder head with a suitable bolt.
- Install a suitable lifting device. The engine will have to be angled in order to remove. Use a load positioning sling to assist in angling the engine.
- Raise the vehicle off of the engine mounts.
- Remove the left and right engine mount frame brackets, if equipped.
- Remove the engine from the vehicle.
- In order to secure the engine to an engine stand remove the following and follow the special procedures:

Important: There is a positive stop which limits the hood from being opened too far.
Notice: Refer to Fastener Notice in the Preface section.
Tighten
Tighten the bolts to 20 N·m (15 lb ft).
| • | Surge tank switch (1) |
| • | A/C pressure cycling switch (2) |
| • | Remove the engine wire harness clips from the wheelhouse inner panel (3). |
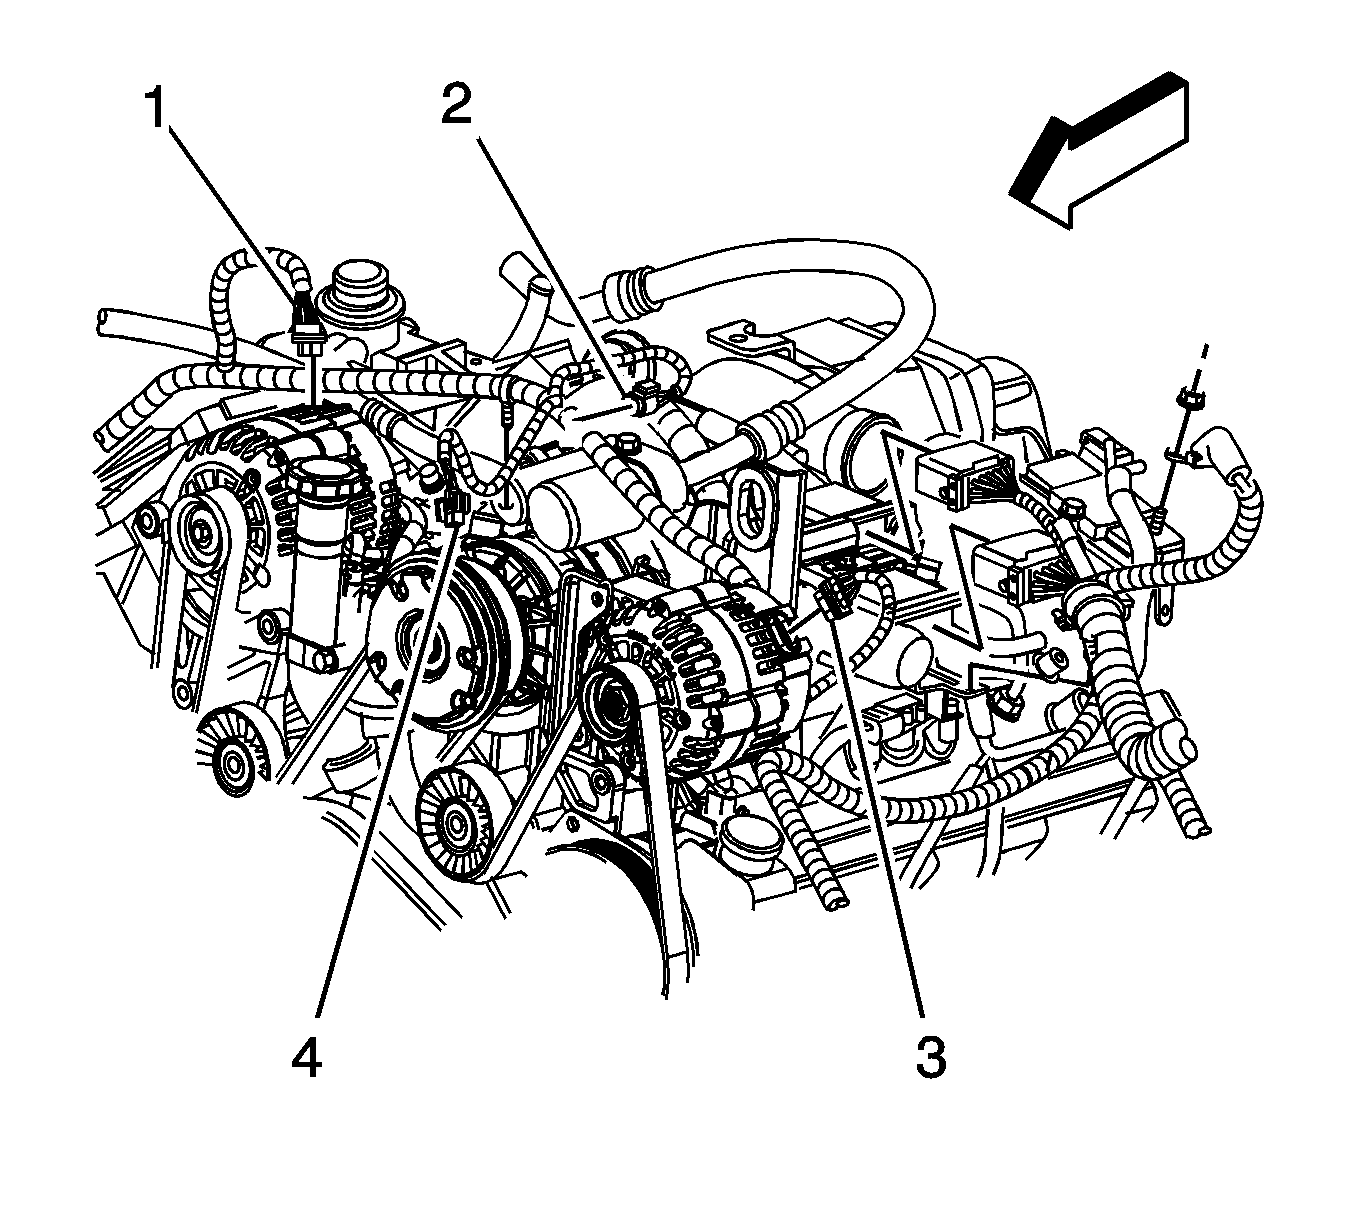
| • | Generator connector (1) |
| • | A/C refrigerant switch (2) |
| • | Dual generator harness connector (3), if equipped |
| • | A/C compressor clutch (4) |

The compressor end can remain on the compressor.
When the battery cables are removed from the engine the power steering pump can be removed further out of the way.


| • | Refer to Engine Flywheel Removal . |
| • | Refer to Exhaust Outlet Removal . |
| • | Refer to Upper Oil Pan Removal . |
| • | Refer to Engine Flywheel Housing Removal . |
| • | Refer to Engine Mounting to Stand . |
Installation Procedure
- Install the J 36857 (1) to the rear of the left cylinder head with a suitable bolt.
- Install the J 36857 (1) to the front of the right cylinder head with a suitable bolt.
- Install a suitable lifting device. The engine will have to be angled in order to install. Use a load positioning sling to assist in angling the engine.
- Remove the engine from the stand. Refer to Engine Removal from Stand .
- Install the following:
- Install the engine in the vehicle.
- Loosely install 2 transmission to engine bolts.
- Install the left and right side engine mount frame brackets, if equipped.
- Install the engine mount to frame bracket bolts (left side shown).
- Remove the J 36857 from the cylinder heads.
- Raise the vehicle.
- Install the transmission to engine bolts (automatic transmission shown).
- If equipped with an automatic transmission install the torque convertor bolts.
- If equipped with an automatic transmission, install the nuts retaining the transmission fluid fill tube bracket.
- If the vehicle is 4WD equipped, install the front differential carrier assembly. Refer to Differential Carrier Assembly Replacement .
- If equipped with an automatic transmission, install the nut retaining the transmission oil cooler line clip.
- Install the exhaust pipe to the exhaust outlet.
- Install the exhaust manifold pipe to the exhaust outlet clamp.
- Lower the vehicle to work through the front fender wheelhouse openings.
- Install the bolt retaining the battery negative cable and the engine wiring harness ground wire to the left side of the engine.
- Install the bolts holding the battery cable channel retainer to the lower crankcase.
- Install the bolts holding the auxiliary battery negative cable and the engine wiring harness ground wires to the right side of the engine.
- Install the nut holding the battery cable bracket to the right side of the lower crankcase.
- Install the starter. Refer to Starter Motor Replacement .
- Connect the cord for the engine coolant heater.
- Install the engine oil pan skid plate. Refer to Oil Pan Skid Plate Replacement .
- Install the engine shield. Refer to Engine Shield Replacement .
- Lower the vehicle.
- Install the bolt and the ground wires at the rear of the left cylinder head.
- Install the upper exhaust gas reciriulation cooling pipe. Refer to Exhaust Gas Recirculation Cooling Pipe Replacement - Upper .
- Install the generator bracket. Refer to Generator Bracket Replacement .
- Install the right idler pulley and bolt (1).
- Install the air conditioning compressor and the power steering pump mounting bracket. Refer to Air Conditioning (A/C) Compressor and Power Steering Pump Bracket Replacement .
- Install the A/C compressor. Refer to Air Conditioning Compressor Replacement .
- Position the engine wiring harness on the engine.
- Install the A/C suction hose to the accumulator.
- Install the drive belt. Refer to Drive Belt Replacement .
- Connect the fuel hoses at the engine.
- Install the nut and the fuel hose bracket to the valve rocker arm cover stud.
- Connect the main engine electrical harness connectors.
- Push down on the latches (1) in order to connect the connectors.
- Close the harness clip (2).
- Install the cable junction block and bolt (1) to the power steering pump.
- If equipped, install the battery cable to the auxiliary generator.
- Install the battery cable to the generator.
- Install the battery cable harness clip to the upper air intake tube.
- Connect the following electrical connectors:
- Install the harness clip to the oil fill pipe.
- Install the radiator support. Refer to Radiator Support Replacement .
- Install the radiator outlet hose. Refer to Radiator Outlet Hose Replacement .
- Install the lower fan shroud. Refer to Engine Coolant Fan Lower Shroud Replacement .
- Install the upper fan shroud. Refer to Engine Coolant Fan Upper Shroud Replacement .
- Connect the inlet heater hose (1) to the heater core inlet.
- Install the outlet heater hose to the outlet radiator hose.
- Install the bolt retaining the heater hose pipe to the bracket.
- Install the radiator inlet hose. Refer to Radiator Inlet Hose Replacement .
- Install the charged air cooler pipes and hoses to the turbocharger and the charged air cooler. Refer to Charge Air Cooler Inlet Pipe Replacement and Charge Air Cooler Outlet Pipe Replacement .
- Install both fender wheelhouse inner panels (1). Refer to Front Wheelhouse Liner Replacement - Right Side and Front Wheelhouse Liner Replacement - Left Side .
- Install both front tires and wheels. Refer to Tire and Wheel Removal and Installation .
- Install the surge tank. Refer to Radiator Surge Tank Replacement .
- Install the air cleaner. Refer to Air Cleaner Assembly Replacement .
- Connect the following engine wire harness connectors:
- Connect the batteries negative cables. Refer to Battery Negative Cable Disconnection and Connection .
- Fill the engine coolant. Refer to Cooling System Draining and Filling .
- Prelube the engine. Refer to Engine Prelubing .
- Operate the engine, inspect for coolant, oil, fuel, and exhaust leaks.
- Inspect for proper oil pressure.
- Inspect for proper engine operation.
- With the aid of the assistant raise the hood slightly until the hood hinge bolts can be removed from the service position notch (1).
- With the aid of an assistant lower the hood and install the hood hinge bolts (2) to the hood hinges.
- Install the air inlet grille end caps (1), push down the end cap in order to engage the retainers. (left side shown, right side similar).
- Install the ground strap to the hood stud.
- Install the ground strap nut at the hood stud.
- Close the hood.
- Road test the vehicle for normal operation.
- Inspect for coolant, oil, or exhaust leaks.
| • | Refer to Engine Flywheel Installation . |
| • | Refer to Exhaust Outlet Installation . |
| • | Refer to Upper Oil Pan Installation . |
| • | Refer to Engine Flywheel Housing Installation . |
Important: Do not draw the engine to the transmission using the transmission bolts. If everything is aligned properly the engine and transmission will come together easily.
Notice: Refer to Fastener Notice in the Preface section.
Tighten
Tighten the through-bolts to 75 N·m (55 lb ft).
Tighten
Tighten the bolts to 65 N·m (50 lb ft).
Tighten
Tighten the studs and bolts to 50 N·m (37 lb ft).
Tighten
Tighten the bolts to 60 N·m (44 lb ft).
Tighten
Tighten the nuts to 18 N·m (13 lb ft).
Tighten
Tighten the nut to 9 N·m (80 lb in).
Tighten
Tighten the clamp to 40 N·m (30 lb ft).
Tighten
Tighten the bolt to 34 N·m (25 lb ft).
Tighten
Tighten the bolts to 12 N·m (106 lb ft).
Tighten
Tighten the bolts to 34 N·m (25 lb ft).
Tighten
Tighten the nut to 8 N·m (71 lb in).
Tighten
Tighten the bolt to 34 N·m (25 lb ft).
Tighten
Tighten the bolt to 43 N·m (32 lb ft).
Tighten
Tighten the nut to 21 N·m (15 lb ft).
Tighten
Tighten the bolt to 9 N·m (80 lb in).
Tighten
Tighten the nut to 9 N·m (80 lb in).
| • | Generator connector (1) |
| • | A/C refrigerant switch (2) |
| • | Dual generator harness connector (3), if equipped |
| • | A/C compressor clutch (4) |
Firmly push to quick connector onto the heater core pipe until you hear an audible click.
Tighten
Tighten the bolt to 25 N·m (18 lb ft).
| • | Install the engine wire harness clips to the wheelhouse inner panel (3). |
| • | A/C pressure cycling switch (2) |
| • | Surge tank switch (1) |
Important: There is a positive stop which limits the hood from being opened too far.
Tighten
Tighten the bolts to 25 N·m (18 lb ft).
Tighten
Tighten the nut to 9 N·m (80 lb in).
