| Subject: | Loud Buzz Or Rattle From Right Front Fender |
| Models: | 2007-2008 Cadillac Escalade, ESV, EXT |
| 2007-2008 Chevrolet Avalanche, Silverado, Suburban, Tahoe |
| 2007-2008 GMC Sierra, Yukon, Yukon Denali, Yukon XL, Yukon Denali XL |
This PI was superseded to update Recommendation/Instructions. Please discard PIT4311A.
The following diagnosis might be helpful if the vehicle exhibits the symptom(s) described in this PI.
Condition/Concern:
Some customers may comment on a buzz or rattle type noise from the right front fender area on hard acceleration or when brake torquing. The noise is most noticeable at 1800 RPM. The noise can be heard with the radio on and you may think the air intake
box is vibrating. This noise may be caused by air turbulence through the fender (from the air cleaner) causing the fender to vibrate. This noise can be isolated by removing the air snorkel (with MAF sensor attached) from the air box and driving or brake torquing
the vehicle again.
Recommendation/Instructions:
If you experience this concern, please perform the following steps listed in part A below. If the concern is not resolved or the vehicle returns, please follow the steps in Part B.
Note: Also additional noises at 1800 RPM are covered in bulletin: 07-08-59-003
Part A
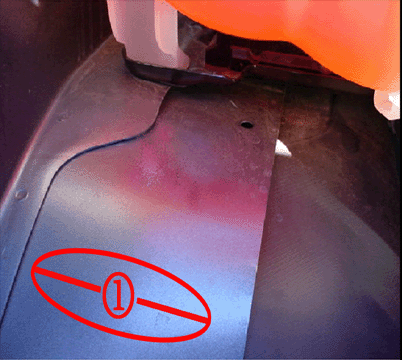
- ocate the inner fender flange that is below the coolant bottle by removing the air filter housing (shown below), locate area circled (1) to apply downward pressure on the inner fender flange.

- By applying downward pressure on the inner fender flange, it will create an indentation or crease in the sheet metal at the location designated by the perforated line(2) (shown below).

- Recheck for the noise,
| • | If noise is gone, return vehicle to the customer. |
| • | If noise is still there or returns, proceed to part B of PI. |
Part B
- Remove the air box and Battery per SI2000 Instruction. (The Coolant bottle can also be removed if additional room is needed)
- Obtain Sound Deadening material from Dynamat or an equivalent material. (The Dynamat sound deadening material can be obtained from the following web site:
http://www.dynamat.com/store/store-car.asp and obtain part number: 10435. This
kit P/N contains enough material to repair at least 10 vehicles.
- Cut out two pieces of the Dynamat material in the following dimensions: 12 X 8 and 12 X 3.
- Before installing the two pieces on the vehicle, lay the material in the sun or heat with a heat gun prior to installation onto the fender.
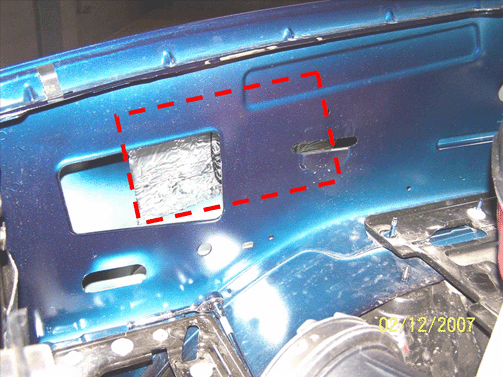
- Install the 8 X 12 piece of material at the airbox opening as shown below:

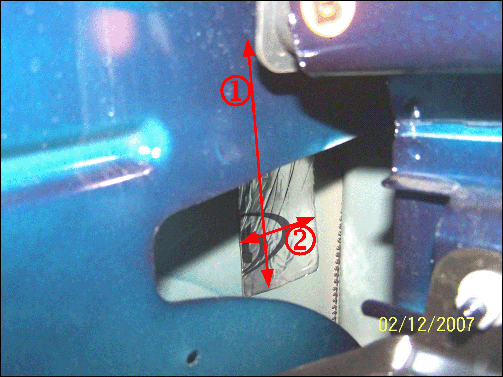
- Install the 3 X 12 piece of material through the hole near the battery tray as shown below:

| • | Vertical Measurement 12 Inches |
| • | Horizontal Measurement 3 Inches |
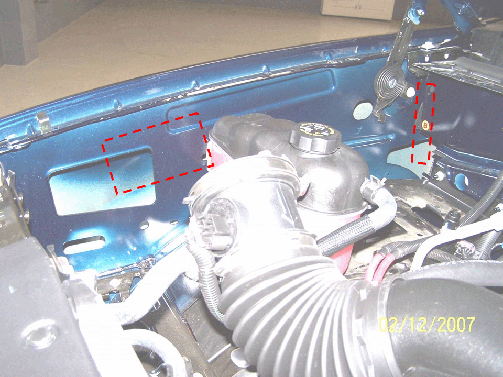
- The finished patches should be visible in highlighted boxes illustrated in the photo below

Please follow this diagnostic or repair process thoroughly and complete each step. If the condition exhibited is resolved without completing every step, the remaining steps do not need to be performed.


