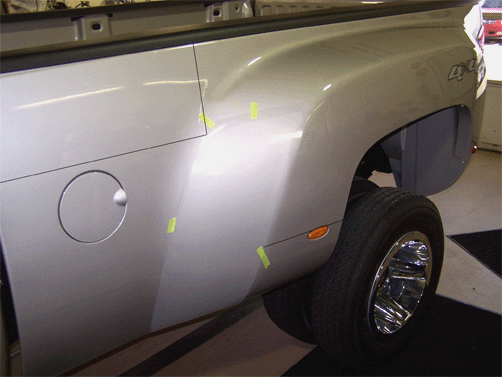
Paint Chipping on Fenders in Front of Rear Wheels (Refinish Damaged Area)

| Subject: | Paint Chipping on Fenders in Front of Rear Wheels (Refinish Damaged Area) |
| Models: | 2007-2009 Chevrolet Silverado 3500 Series |
| 2007-2009 GMC Sierra 3500 Series |
| with Dual Rear Wheels |
Condition
Some customers may comment that the paint is chipped on the fenders in front of the rear wheels.
Cause
The fenders may be damaged by road debris thrown up by the tires at highway speeds.
Correction
- Refinish the rear fender(s). For the proper refinish materials to use, refer to the 2008 GMWI5406 GM Globally Approved Refinish Materials information. The refinish materials information is now online at the GMGOODWRENCH WEB SITE*. Printed books have been discontinued. To access the site, follow these steps:
- Apply the protective film following this procedure.
- Mark the location where the protective film is going to be installed by measuring from the top of the box down 255 mm (10 in) and 620 mm (24 3/8 in) from the front of the box and place a piece of tape where they intersect. Now measure 290 mm (11 1/2 in) from the wheel well forward at the side marker lamp and place a piece of tape. This will give you a base for where to install the protective film. Adjust if necessary. Refer to the lines in the illustration.
- Wipe the vehicle surface with isopropyl alcohol or flash naptha at the application area.
- Dry the surface with a clean lint-free cloth.
- Create a mixture of 25 percent isopropyl alcohol and 75 percent water and two drops of baby shampoo per 16 oz of fluid mixture.
- Remove the backing liner from the protective film patch.
- Use the solution to liberally spray the adhesive side of the protective patch, the mounting location along with your hands.
- Spray the surface of the film with the alcohol, water and soap solution.
- Using a dampened squeegee, start at the center of the protective patch, working outward in order to remove the air and solution from under the protective patch.
- Release any air bubbles with a pin.
- Dry the surface with a clean, lint-free cotton cloth.
| • | Go to www.gmgoodwrench.com. |
| • | Click on For Body Shops & Services link at the bottom of the page. |
| • | Click on GM Technical Repair Information. |
| • | Click on Paint Shop tab. |
| *In Canada, the 2008 GM Approved Refinish Materials booklet is also available on the GM infoNET under the Service and Body tab. |

Important:
• The paint protective film and vehicle surface temperature should be 13-32°C (55-90°F) for best results. • Automatic car washes should be avoided for at least 24 hours after the paint protective film application.
Parts Information
Part Number | Description |
|---|---|
25923896 | Protector-RR Whl Opg Flare RH |
25923897 | Protector-RR Whl Opg Flare LH |
Warranty Information
For vehicles repaired under warranty, use:
Labor Operation | Description | Labor Time | Paint Code |
|---|---|---|---|
A2570 | Pickup Box Refinish/Clear Coat Exterior Right Side | 3.0 hr | GX |
A2571 | Pickup Box Refinish/Clear Coat Exterior Left Side | 3.0 hr | GX |
B9857* | Install Protector on both sides | 1.0 hr | -- |
*This labor operation number is for bulletin use only. This number will not be published in the Labor Time Guide. | |||
