Front Wheel Opening Flare Replacement XTREME
Tools Required
J 25070 Heat Gun
Removal Procedure

- Raise the vehicle. Refer to
Lifting and Jacking the Vehicle
in General Information.
- Remove the screws that retain the wheel flare to the vehicle.
- Use a heat gunJ 25070
in a circular motion for 30 seconds 152 mm (6 in) from the surface in order to heat the flare to 21-31° C (70-90° F).
- Use a plastic, flat-bladed tool to remove the flare from the surface.
- Remove the flare from the vehicle.
- Remove all adhesive from fender using 3M™ ScotchBrite molding adhesive remover disk 3M™ P/N 07501 or equivalent.
- Clean the fender using Varnish Makers and Painters (VMP) naphtha and allow to air dry.
Installation Procedure
- Use a heat gunJ 25070
in a circular motion for 30 seconds 152 mm (6 in) from the surface in order to heat the edge of the fender to 21-32°C (70-90°F).
Important: Do not touch the adhesive backing on the molding.
- Remove the protective liner from the back side of the wheel opening flare.
- Install the wheel flare to the vehicle fender.
Apply firm and even pressure in order to properly seat the adhesive.
Notice: Use the correct fastener in the correct location. Replacement fasteners
must be the correct part number for that application. Fasteners requiring
replacement or fasteners requiring the use of thread locking compound or sealant
are identified in the service procedure. Do not use paints, lubricants, or
corrosion inhibitors on fasteners or fastener joint surfaces unless specified.
These coatings affect fastener torque and joint clamping force and may damage
the fastener. Use the correct tightening sequence and specifications when
installing fasteners in order to avoid damage to parts and systems.
- Install the screws that retain wheel flare to the vehicle.
Tighten
Tighten the front wheel opening flare screws to 1.9 N·m (17 lb in).
- Lower the vehicle.
Front Wheel Opening Flare Replacement ZR5
Removal Procedure

- Remove 2 retainers securing the bumper
end cap to the front bumper assembly.
- Remove the bumper end cap.
| 2.1. | Heat the molding using aJ 25070
in special tools. Hold the heat gun approximately 52 mm (6 in)
from the surface. Apply heat using a circular motion for approximately 30 seconds. |
| | Important: Be careful not to scratch or chip the paint.
|
| 2.2. | Peel the bumper end cap from the front bumper assembly using a plastic flat
bladed tool. |
| 2.3. | Remove all adhesive from the front bumper assembly and back of the bumper
end cap using a 3M Scotch Brite Molding Adhesive remover disk 3M P N 07501
or equivalent. |
| 2.4. | Clean the front bumper. |
- Remove the fender. Refer to
Front Fender Replacement
in Body Front End.
- Remove the fender to flare retaining nuts inside of the fender from
the flare molding studs.
- Remove the flare to fender retaining screws around the wheel opening.
- Remove the flare from the fender.
Installation Procedure
- Install the flare molding to the fender.
- Install 1 screw through the flare to the center of the fender.
- Install the nuts to the flare molding studs inside the fender.
Do not tighten.
- Install the flare to fender retaining screws.
Do not tighten.
- Install the fender to the vehicle. Refer to
Front Fender Replacement
in Body Front End.
- Loosely install the retainers securing the bumper end cap to the front
bumper assemble.
- Rotate the tire to obtain minimum clearance between the tire and the
flare molding.
- Shift the bumper forward in the adjustment slots until a minimum of
4 mm is obtained between the rear edge of the flare molding and the front
of the tire.
- Press the bumper end cap in place to wet out tape.
Notice: Refer to Fastener Notice in the Preface section.
- Tighten all of the bumper fasteners.
Tighten
| • | Tighten the bumper bolts to 40 N·m (30 lb ft). |
| • | Tighten the flare to fender nuts to 1.6 N·m (14 lb in). |
| • | Tighten the lower flare to flare bolt. |
| • | Tighten the flare to bumper screws to 1.6 N·m (14 lb in). |
| • | Tighten the flare to the fender screws to 1.6 N·m (14 lb in). |
Front Wheel Opening Flare Replacement All Except Xtreme and ZR5
Removal Procedure
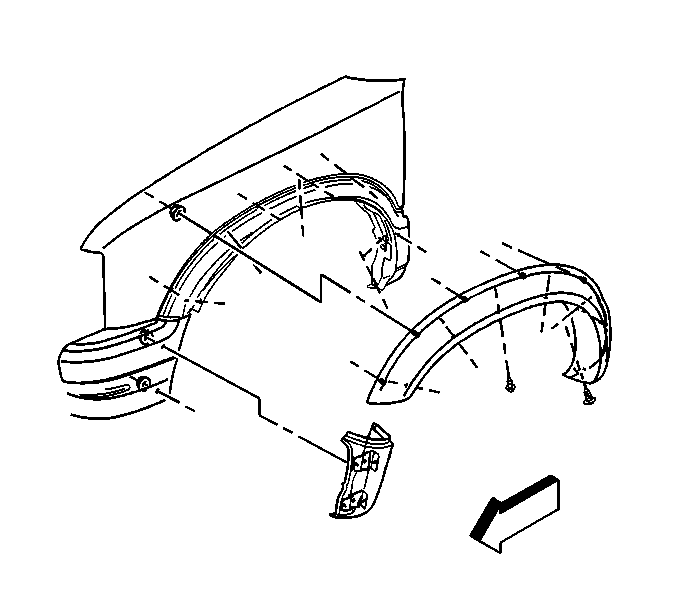
- Remove 2 nuts securing the lower flare molding to the front bumper assembly.
- Remove the fender. Refer to
Front Fender Replacement
in Body Front End.
- Remove the fender to flare retaining nuts inside of the fender from the flare molding studs.
- Remove the flare to fender retaining screws around the wheel opening.
- Remove the flare from the fender.
Installation Procedure
- Install the flare molding to the fender.
- Install 1 screw through the flare to the center of the fender.
- Install the nuts to the flare molding studs inside the fender.
Do not tighten.
- Install the flare to fender retaining screws.
Do not tighten.
- Install the fender to the vehicle. Refer to
Front Fender Replacement
in Body Front End.
- Loosely install the nuts securing the lower flare molding to the front bumper assemble.
- Rotate the tire to obtain minimum clearance between the tire and the flare molding.
- Shift the bumper forward in the adjustment slots until a minimum of 4 mm is obtained between the rear edge of the flare molding and the front of the tire.
Notice: Use the correct fastener in the correct location. Replacement fasteners
must be the correct part number for that application. Fasteners requiring
replacement or fasteners requiring the use of thread locking compound or sealant
are identified in the service procedure. Do not use paints, lubricants, or
corrosion inhibitors on fasteners or fastener joint surfaces unless specified.
These coatings affect fastener torque and joint clamping force and may damage
the fastener. Use the correct tightening sequence and specifications when
installing fasteners in order to avoid damage to parts and systems.
- Tighten all of the bumper fasteners.
Tighten
| • | Tighten the bumper bolts to 40 N·m (30 lb ft). |
| • | Tighten the flare to fender nuts to 1.6 N·m (14 lb in). |
| • | Tighten the flare to bumper nuts to 1.6 N·m (14 lb in). |
| • | Tighten the flare to the fender screws to 1.6 N·m (14 lb in). |
