GM Service Manual Online
For 1990-2009 cars only

The repair of waterleaks in the body requires proper testing and diagnosis. Repair waterleaks by adjusting the misaligned parts and using the proper repair materials. First, determine what conditions cause the leak. For example, the leak may occur only when the vehicle is parked on an incline, or water may appear only in the spare tire compartment. Second, test the area for the source of the leak using the following testing methods. If the general leak area is found, determine the exact entry point of the leak by using a water hose or an air hose. If the general leak area is not obvious, use the watertest stands to determine the area of the leak. It may be necessary to remove some interior trim panels or some parts in order to locate the leaks.

Important: It is necessary to find the origin of all the leaks before making any repairs. Random repairs may stop the leak only temporarily and may make future repairs more difficult. Continue localized testing in the general area in order to ensure that all leaks are found.

Generalized Testing

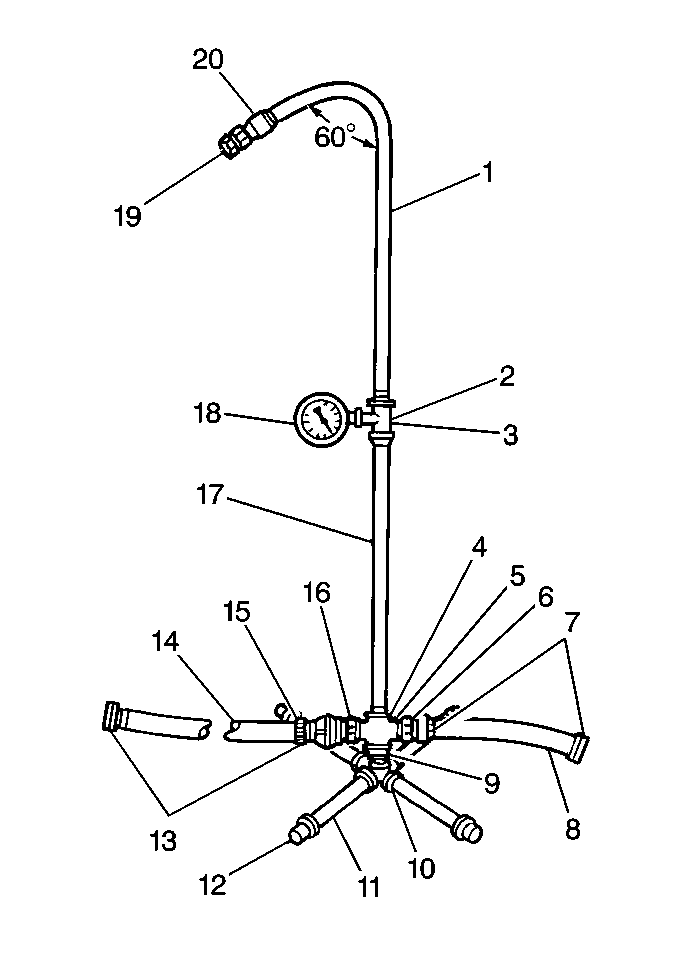
    Watertest Stand Assembly

    Object Number: 154169  Size: MH
    (1)Pipe (0.5 x 36 in)
    (2)Reducing Tee, Right Stand Only (0.5 x 0.5 x 0.25 in)
    (3)Coupling, Left Stand Only, (0.5 in)
    (4)Tee, Left Stand Only (0.5 in)
    (5)Cross, Right Stand Only (0.5 in)
    (6)Pipe to Hose Nipple, Right Stand Only (0.5 in)
    (7)Female Hose Coupling (5/8 in)
    (8)Input Hose, Right Stand Only (2.0 ft) (5/8 in diameter)
    (9)Close Nipple (0.5 in)
    (10)Cross (0.5 in) with Weld-On Cap (0.5 in)
    (11)Nipple (0.5 x 12 in)
    (12)Cap (0.5 in)
    (13)Female Hose Coupling (5/8 in)
    (14)Cross Hose (12 ft) (5/8 in diameter)
    (15)Hose Quick Connect
    (16)Pipe to Hose Nipple (0.5 in)
    (17)Pipe (0.5 x 60 in)
    (18)Water Pressure Gage, Right Stand Only
    (19)Full Jet Spray Nozzle, No. 1/2GG-25 or Equivalent
    (20)Coupling (0.5 in)
  1. Assemble the water test stands. Refer to Water Test Stand Specifications .

  2. Object Number: 311845  Size: SH
  3. Position the stands as shown.
  4. The water spray from the stands should overlap the vehicle as shown.

  5. Have an assistant inside of the vehicle during the test in order to locate any leaks.
  6. The water pressure at the nozzle should maintain a 155 kPa (22 psi), for at least 4 minutes.

  7. Object Number: 317526  Size: SH
  8. In order to check the windshield, aim the water spray 30 degrees down and 45 degrees toward the rear.
  9. Aim the water towards the corner of the windshield.

  10. In order to check the side windows for leaks, position the water stand towards the center of the rear quarter, aiming the water spray 30 degrees down and 45 degrees toward the rear.
  11. In order to check the back window, aim the water spray 30 degrees down and 30 degrees toward the front.