Water Pump Replacement L18
Removal Procedure
- Drain the cooling system. Refer to Cooling System Draining and Filling .
- Remove the drive belt. Refer to Drive Belt Replacement for the 8.1L engine.
- Remove the fan clutch. Refer to Fan Clutch Replacement .
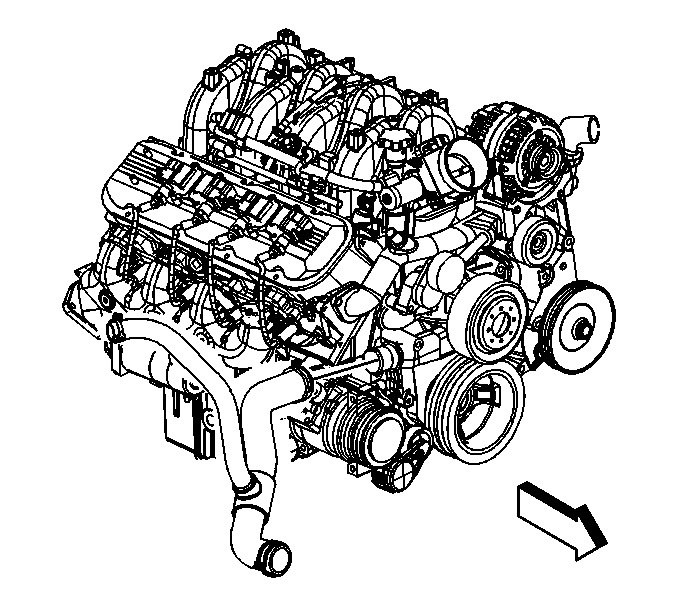
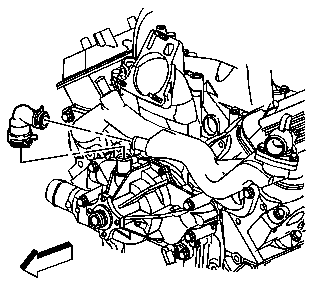
- Reposition the outlet hose clamp at the water pump.
- Remove the outlet hose from the water pump.
- Reposition the bypass hose clamps at the water pump and water crossover.
- Remove the bypass hose.
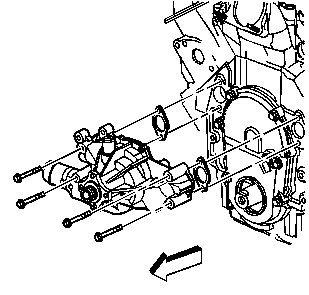
- Remove the water pump bolts.
- Remove the water pump.
- Remove and discard the water pump gaskets.
Installation Procedure
- Place NEW water pump gaskets into place.
- Install the water pump.
- Install the water pump bolts.
- Install the bypass hose.
- Position the bypass hose clamps at the water pump and water crossover.
- Install the outlet hose to the water pump.
- Position the outlet hose clamp at the water pump.
- Install the fan clutch. Refer to Fan Clutch Replacement .
- Install the drive belt. Refer to Drive Belt Replacement for the 8.1L engine.
- Fill the cooling system. Refer to Cooling System Draining and Filling .

Notice: Refer to Fastener Notice in the Preface section.
Tighten
Tighten the water pump bolts to 50 N·m (37 lb ft).


Water Pump Replacement Caterpillar
Refer to the Caterpillar® Service Manual.
Water Pump Replacement LB7
Removal Procedure
- Drain the engine coolant and the engine block. Refer to Cooling System Draining and Filling .
- Remove the thermostat housing crossover. Refer to Thermostat Housing Crossover Replacement .
- Remove the fan clutch. Refer to Fan Clutch Replacement .
- Remove the crankshaft balancer. Refer to Crankshaft Balancer Replacement in Engine Mechanical - 6.6L.
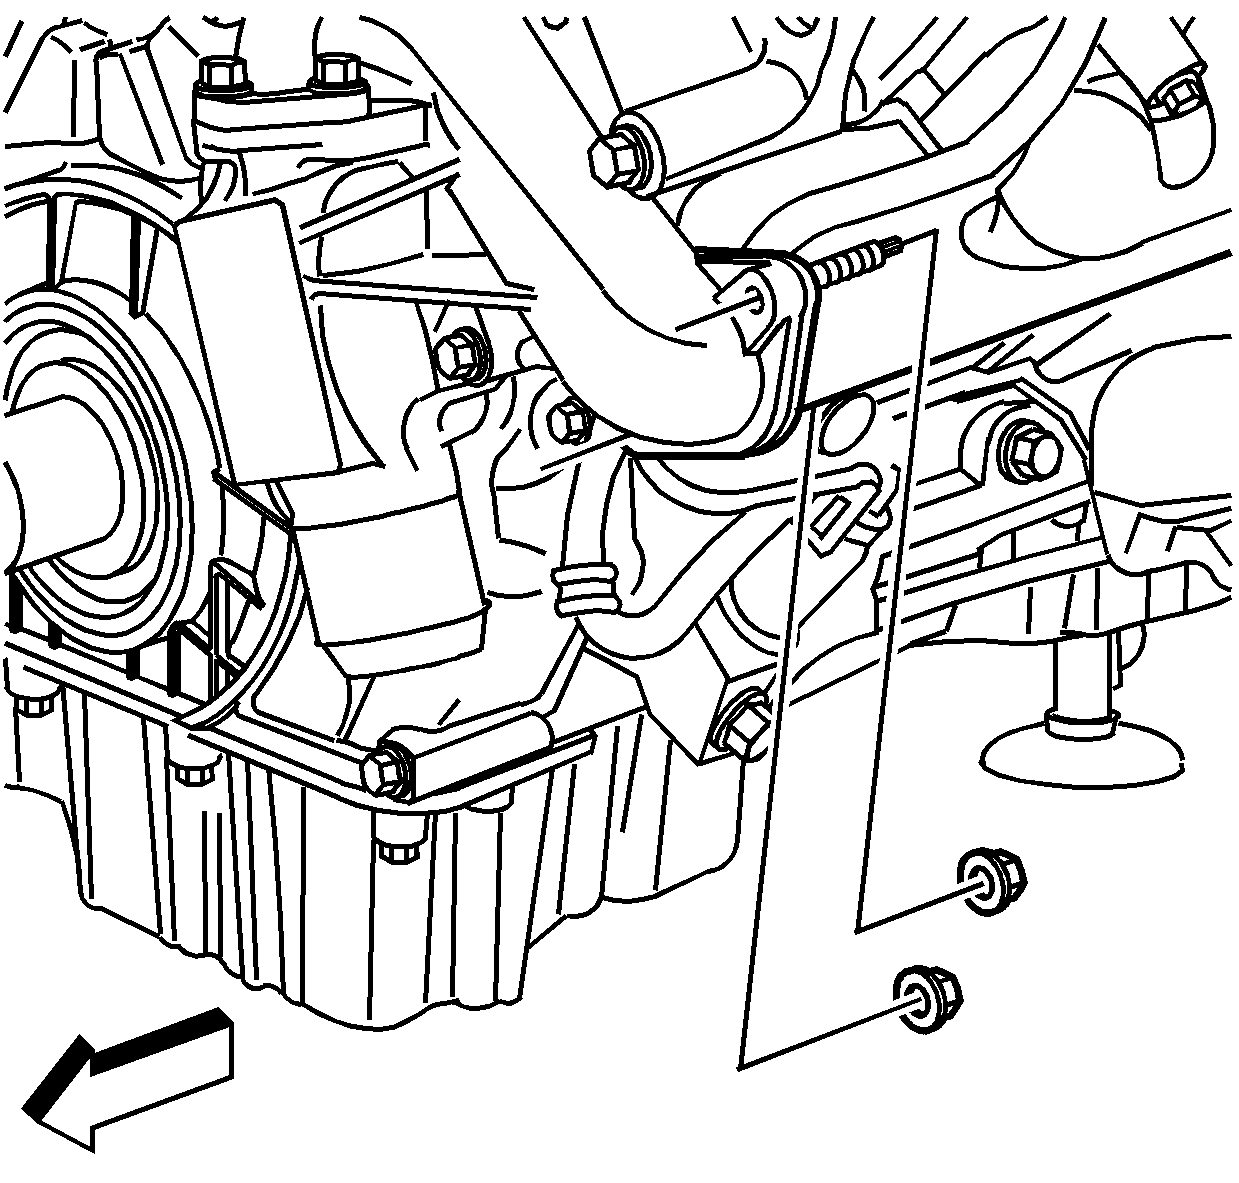
- Remove the water pump outlet pipe to water pump nuts.
- Remove the engine wiring harness retainer from the inner stud.
- Remove the water pump bolts. Note the location of the bolts. The bolts are 3 different lengths.
- Remove the water pump assembly.
- Remove the water pump outlet pipe gasket.
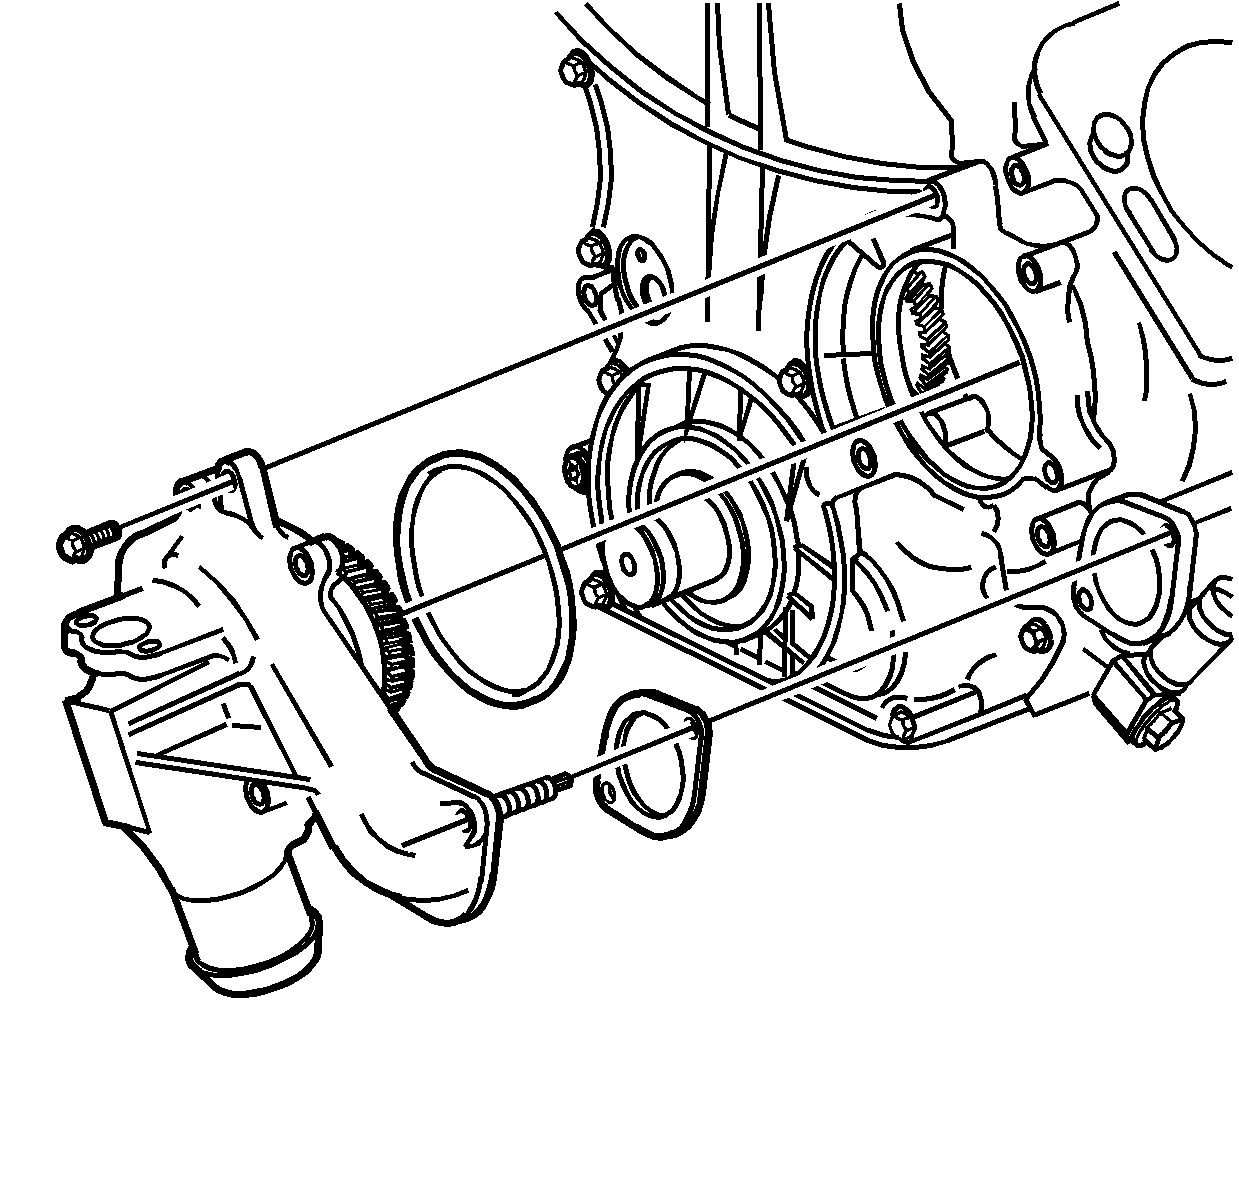
Inspection and Repair Procedure
- Remove the O-ring from the water pump.
- Remove the water pump to water pump housing bolts.
- Remove the water pump from the water pump housing.
- Remove the O-ring from the water pump housing.
- Clean the water pump assembly.
- Clean the water pump mating surfaces.
- Inspect the water pump gear for damage.
- Inspect the water pump mating surfaces for damage.
- Inspect the water pump shaft for looseness.
- Inspect the water pump assembly for damage.
- Replace the water pump if any damage is found.
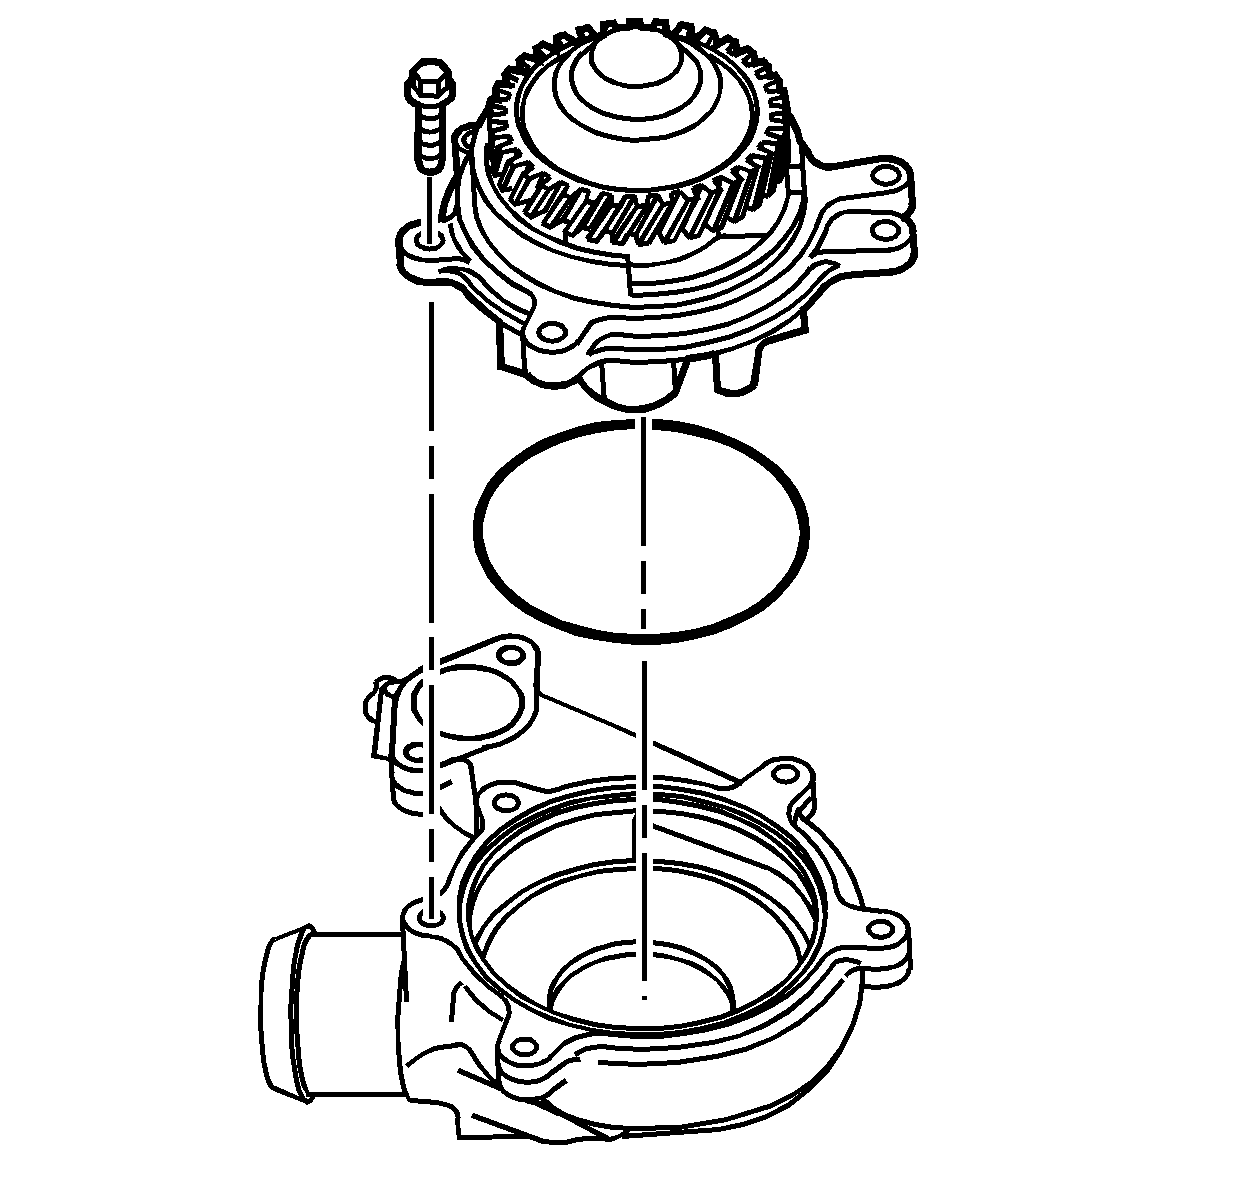
- Install a new O-ring to the water pump housing.
- Lubricate the O-ring with engine coolant.
- Install the water pump to the water pump housing.
- Install the water pump to water pump housing bolts.
- Install a new O-ring to the water pump.
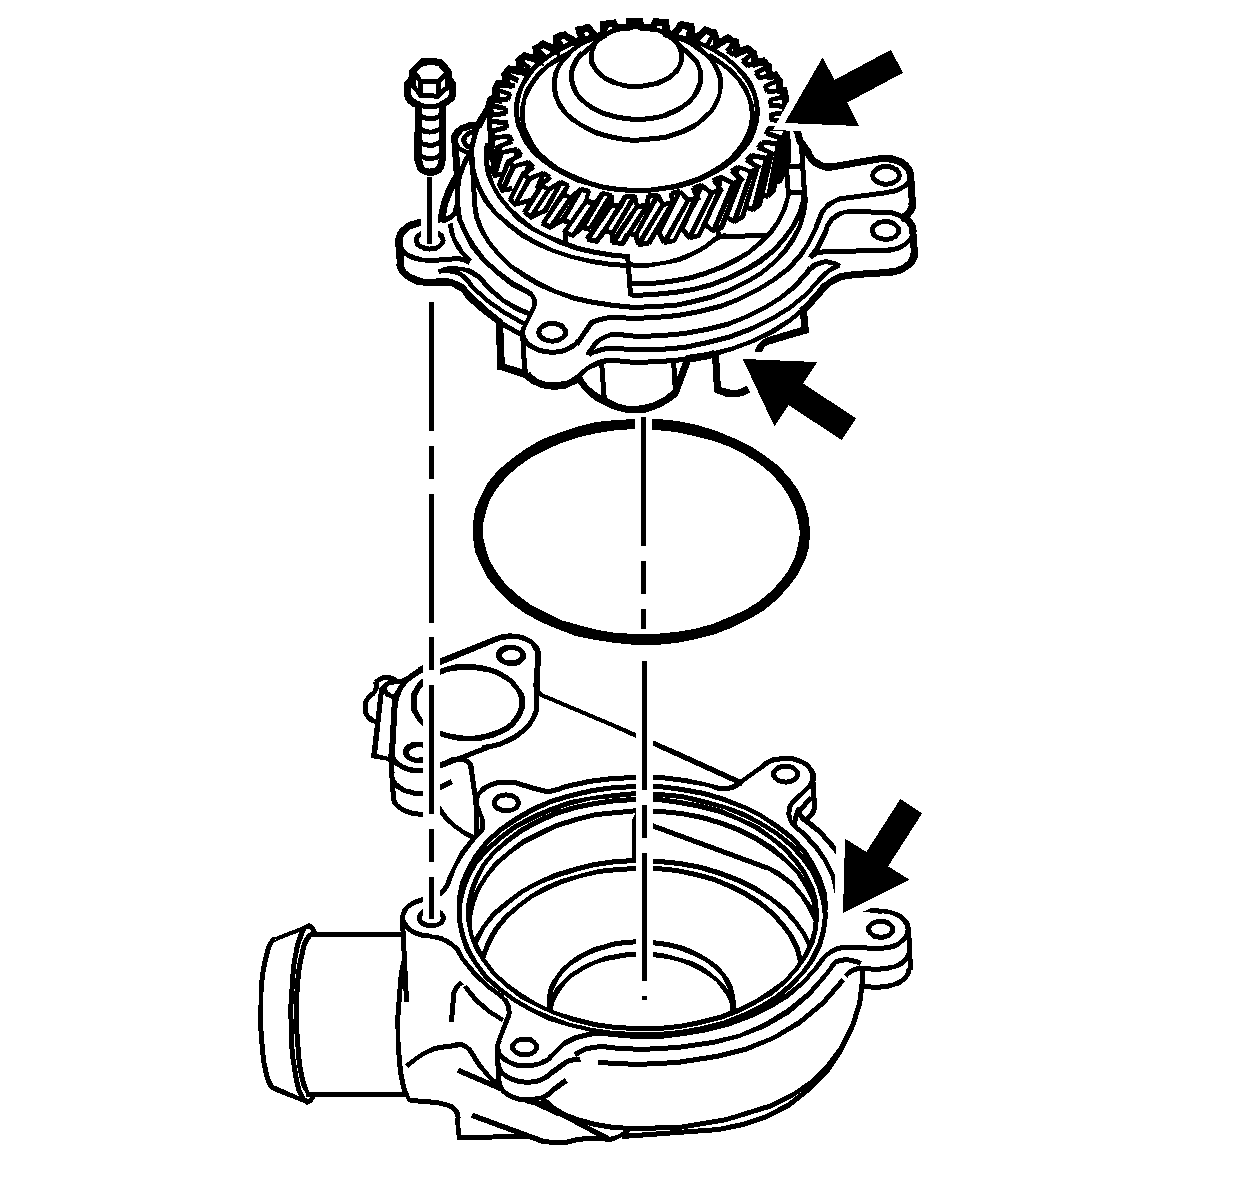

Notice: Use the correct fastener in the correct location. Replacement fasteners must be the correct part number for that application. Fasteners requiring replacement or fasteners requiring the use of thread locking compound or sealant are identified in the service procedure. Do not use paints, lubricants, or corrosion inhibitors on fasteners or fastener joint surfaces unless specified. These coatings affect fastener torque and joint clamping force and may damage the fastener. Use the correct tightening sequence and specifications when installing fasteners in order to avoid damage to parts and systems.
Tighten
Tighten the water pump to water pump housing bolts to 21 N·m
(15 lb ft).
Installation Procedure
- Lubricate the water pump O-ring with engine oil.
- Install the water pump.
- Install the water pump bolts. Ensure the correct length bolt is used in the proper location.
- Install the water pump to water pump outlet pipe gasket.
- Install the engine wiring harness retainer on the water pump outlet pipe inner stud.
- Install the water pump to water pump outlet pipe nuts.
- Install the thermostat housing crossover. Refer to Thermostat Housing Crossover Replacement .
- Install the crankshaft balancer. Refer to Crankshaft Balancer Replacement in Engine Mechanical - 6.6L.
- Install the fan clutch. Refer to Fan Clutch Replacement .
- Fill the engine with coolant. Refer to Cooling System Draining and Filling .

Notice: Use the correct fastener in the correct location. Replacement fasteners must be the correct part number for that application. Fasteners requiring replacement or fasteners requiring the use of thread locking compound or sealant are identified in the service procedure. Do not use paints, lubricants, or corrosion inhibitors on fasteners or fastener joint surfaces unless specified. These coatings affect fastener torque and joint clamping force and may damage the fastener. Use the correct tightening sequence and specifications when installing fasteners in order to avoid damage to parts and systems.
Tighten
Tighten the water pump bolts to 21 N·m (15 lb ft).

Tighten
Tighten the water pump to water pump outlet pipe nuts to 21 N·m
(1 lb ft).
Water Pump Replacement 6.6L
Removal Procedure
- Remove the thermostat housing crossover. Refer to Thermostat Housing Crossover Replacement .
- Remove the thermostat bypass pipe. Refer to Thermostat Bypass Pipes Replacement .
- Remove the crankshaft balancer. Refer to Crankshaft Balancer Replacement for the 6.6L (LLY) engine.
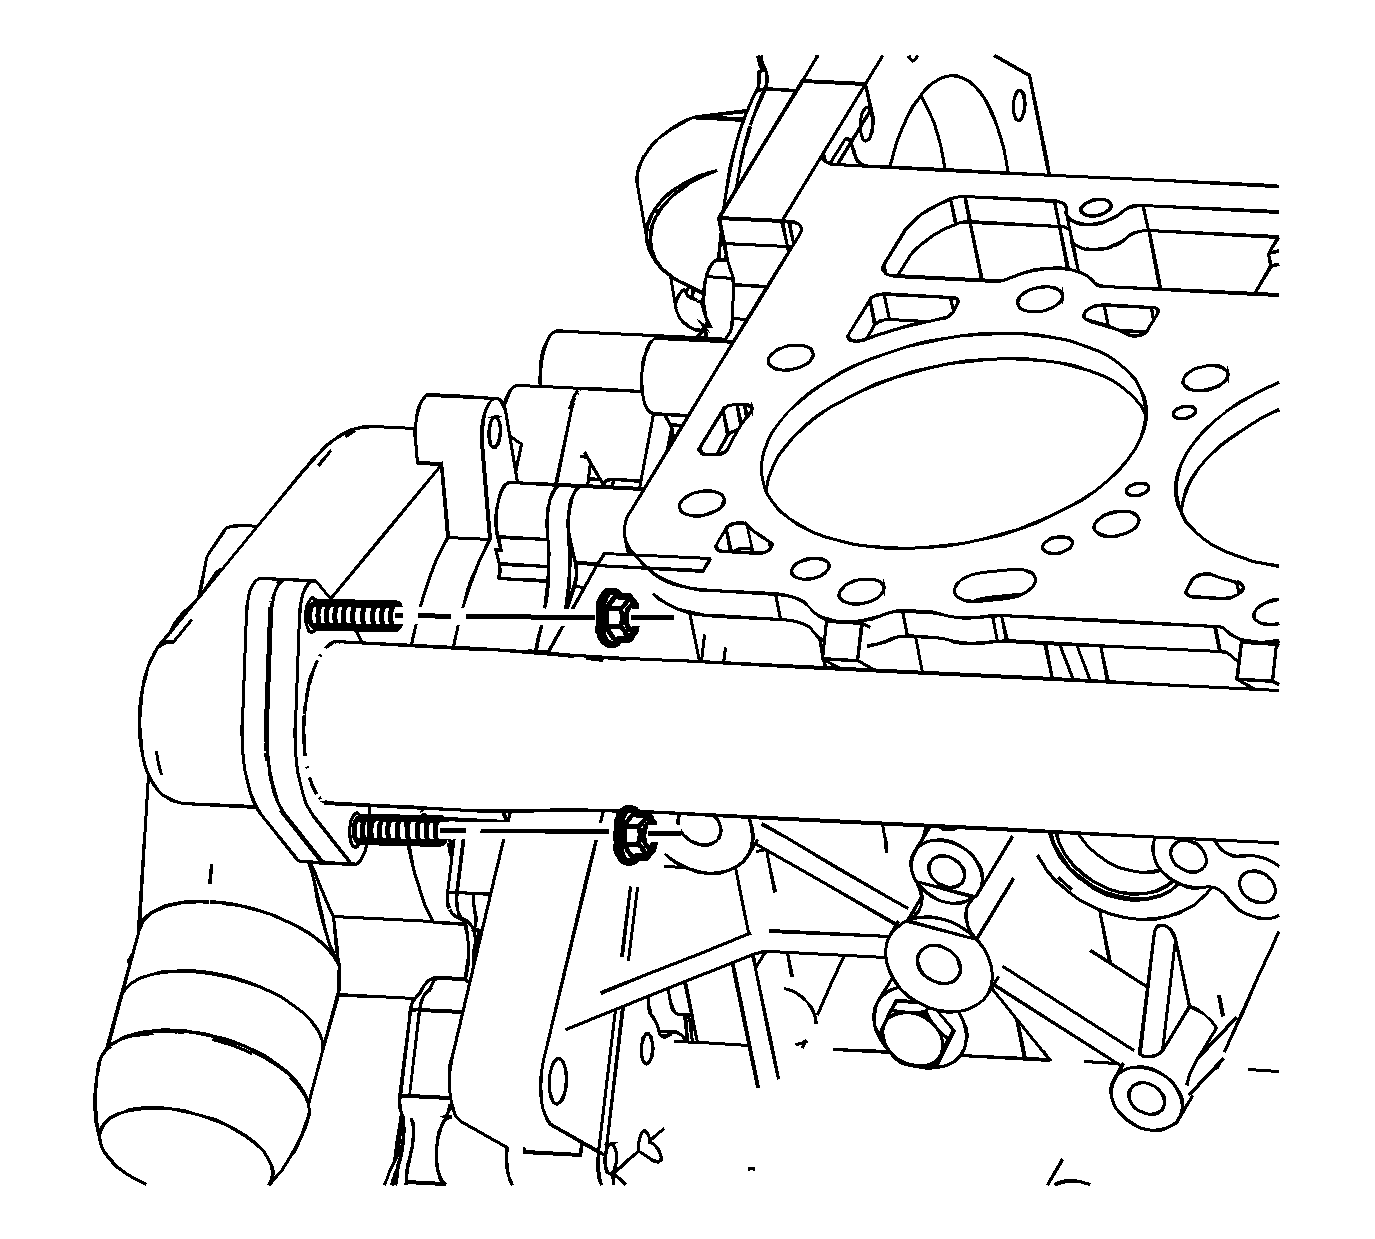
- Remove the water pump to engine coolant pipe nuts.
- Remove the engine wiring harness retainer from the inner stud.
- Remove the water pump bolts. Note the location of the bolts. The bolts are three different lengths.
- Remove the water pump.
- Remove and discard the water pump O-ring and coolant pipe gasket.
- If required, clean and inspect the water pump. Refer to Water Pump Cleaning and Inspection for the 6.6L (LLY) engine.
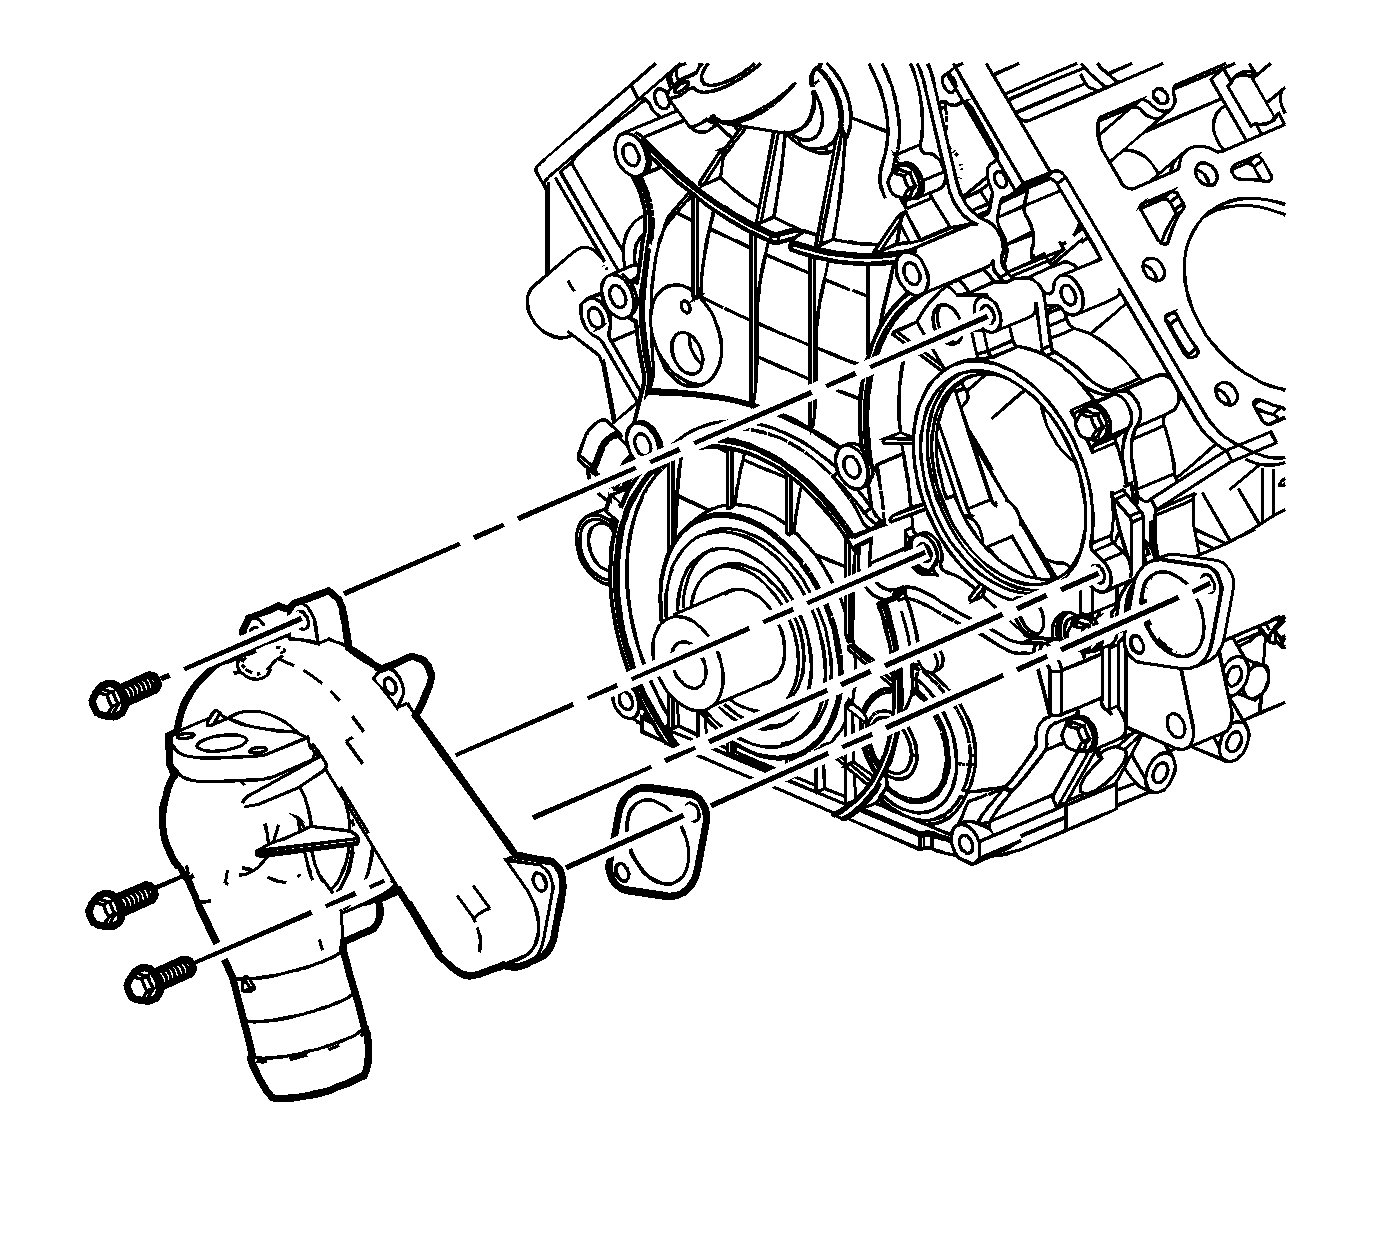
Installation Procedure
- Lubricate the water pump O-ring with engine oil.
- Install the engine coolant pipe gasket and water pump O-ring.
- Install the water pump.
- Install the water pump bolts. Ensure the correct length bolt is used in the proper location.
- Install the engine wiring harness retainer on the water pump outlet pipe inner stud.
- Install the water pump to engine coolant pipe nuts.
- Install the thermostat bypass pipe. Refer to Thermostat Bypass Pipes Replacement .
- Install the thermostat housing crossover. Refer to Thermostat Housing Crossover Replacement .
- Install the crankshaft balancer. Refer to Crankshaft Balancer Replacement for the 6.6L (LLY) engine.

Notice: Refer to Fastener Notice in the Preface section.
Tighten
Tighten the bolts to 21 N·m (15 lb ft).

Tighten
Tighten the nuts to 21 N·m (1 lb ft).
Water Pump Replacement 7.8L
Removal Procedure
- Drain the coolant. Refer to Cooling System Draining and Filling .
- Remove the drive belt from the water pump pulley. Refer to Drive Belt Replacement .
- Remove the fan clutch and adapter. Refer to Fan Clutch Replacement .
- Remove the following components from the water pump:
- Remove the bolts from the water duct.
- Remove the following components:
- Remove the water pump bolts.
- Remove the following components:
- Clean the following components:
- Inspect the following components for wear, deterioration or corrosion.
| • | The clamp |
| • | The heater hose |
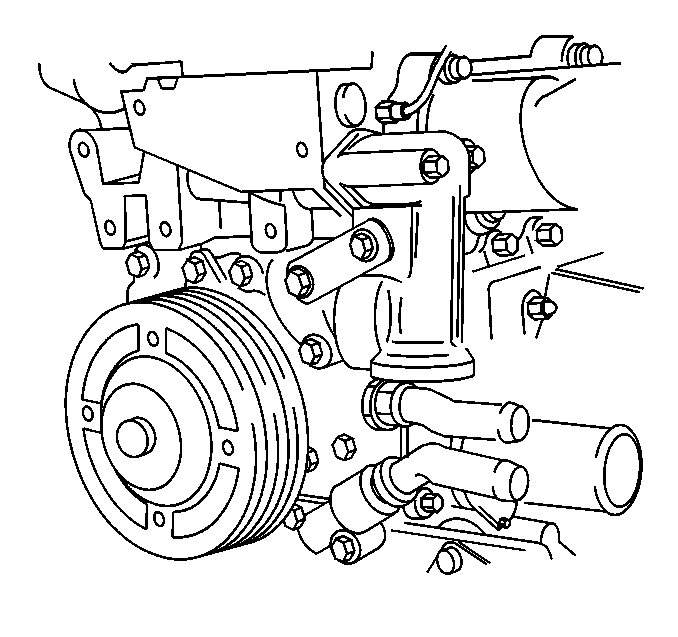
| • | The water duct |
| • | The O-ring |
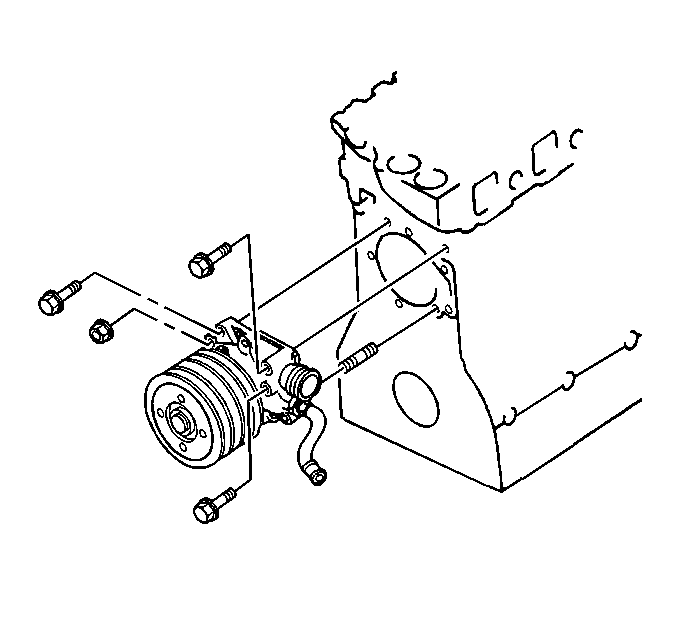
| • | The water pump |
| • | The gaskets |
| • | The surface of the water pump |
| • | The surface of the engine block |
| • | The bolt threads |
| • | The water duct sealing surfaces |
Replace the components as necessary:
| • | The clamps |
| • | The hoses |
| • | The water pump |
Installation Procedure
- Install new gaskets to the water pump.
- Install the water pump to the engine block.
- Install the water pump bolts.
- Lube the O-ring with soap suds.
- Install the following components:
- Install the water duct bolts.
- Tighten the M8 bolt to 19 N·m (14 lb ft).
- Tighten the M16 bolt to 125 N·m (92 lb ft).
- Install the following components to the water pump:
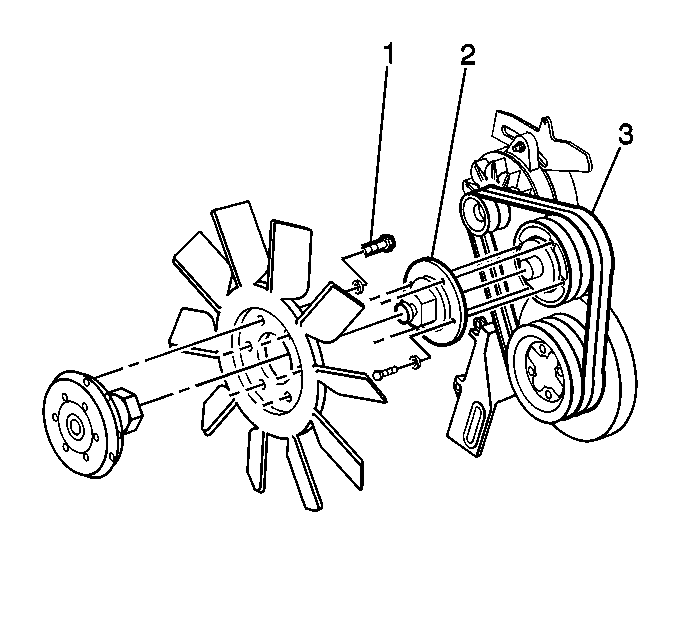
- Install the adapter (2) to the pump.
- Install the fan clutch. Refer to Fan Clutch Replacement .
- Install the drive belt. Refer to Drive Belt Replacement .
- Fill the cooling system. Refer to Cooling System Draining and Filling .
- Inspect the system for leaks.

Notice: Refer to Fastener Notice in the Preface section.
Tighten
Tighten the water pump bolts to 19 N·m (14 lb ft).

| • | The water duct |
| • | The O-ring |
Tighten
| • | The heater hose |
| • | The clamp |
Tighten
Tighten the clamp to 5 N·m (44 lb in).
Tighten
Tighten the adapter bolts to 68 N·m (50 lb ft).
