GM Service Manual Online
For 1990-2009 cars only

For time and/or mileage intervals of scheduled maintenance items, refer to Maintenance Schedule .

The following text and illustrations describe the details of the required scheduled maintenance services.

For information on the proper fluids and lubricants to use, refer to Fluid and Lubricant Recommendations .

Engine Oil and Filter Change

For the engine oil and filter changing procedure, refer to Engine Oil and Oil Filter Replacement in Engine Mechanical.

For information on the correct engine oil quality and viscosity, refer to Fluid and Lubricant Recommendations the following:

Gas Engine Oil Quality

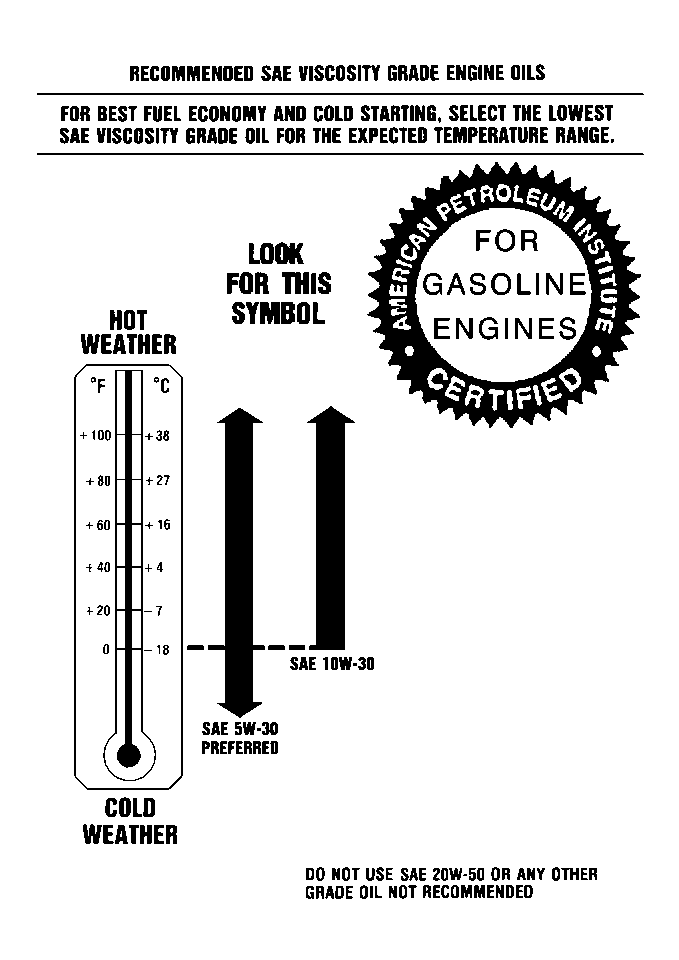
Oils of the proper quality for the vehicle can be identified by looking for the STARBURST symbol. The STARBURST symbol indicates that the oil has been certified by the American Petroleum Institute (API), and is preferred for use in gasoline engines.

Object Number: 65536  Size: MH

Engine Oil Viscosity

The recommended oil viscosity is SAE 5W-30.

Engine oil viscosity, or thickness, has an effect on the fuel economy and on the cold-weather operation, such as starting and oil flow. Lower viscosity engine oils can provide better fuel economy and cold-weather performance. However, higher temperature weather conditions require higher viscosity engine oils for satisfactory lubrication. When the temperature is consistently above -18°C (0°F), use SAE 10W-30. SAE 20W-50 or oils of other viscosity rating or quality designations are NOT recommended for use in any trucks at any time.

Diesel Engine Oil Quality

Object Number: 929256  Size: SH

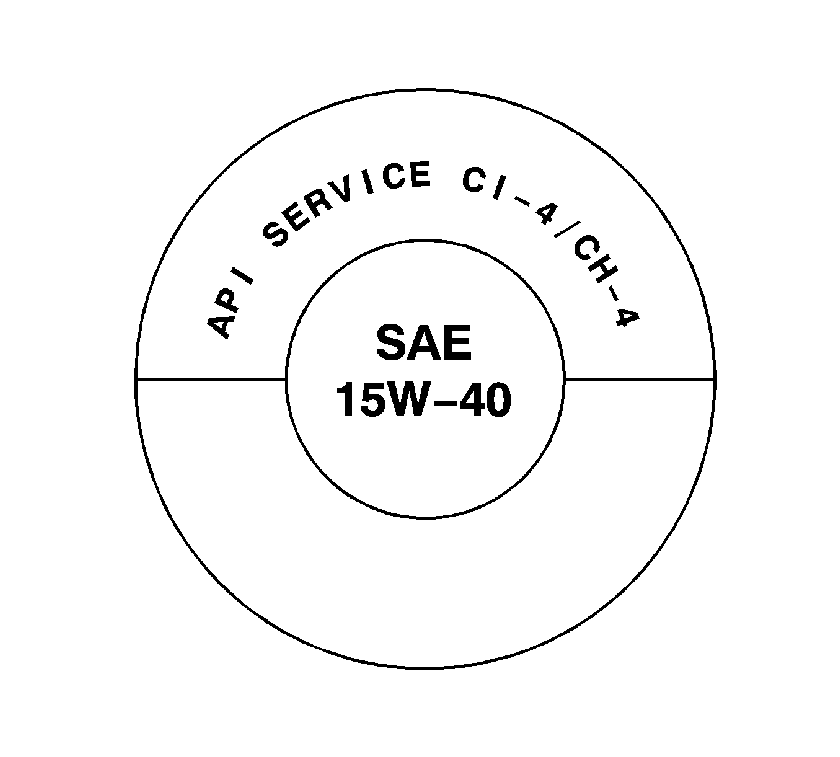
Important: Oils that do not have one of these designations CH-4 or CG-4, can cause engine damage which is not covered by the warranty.

This doughnut-shaped logo symbol is used on most oil containers to help you select the correct oil. It means that the oil has been certified by the American Petroleum Institute.

You should look for this on the oil container, and use only those oils that display the logo.

Oils designated as API CH-4 or CG-4 are best. The CH-4 or CG-4 designations may appear either alone, together or in combination with other API designations, such as API CH-4/SJ, CG-4/SH or CH-4/CG-4/SJ.

These letters show American Petroleum Institute (API) levels of quality.

Diesel Engine Oil Viscosity

Object Number: 561517  Size: SH

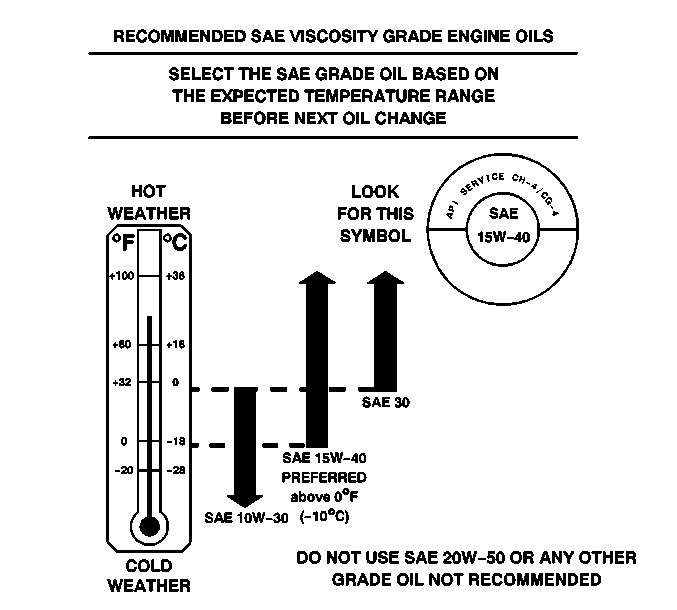
The recommended oil viscosity is SAE 15W-40.

Notice: Using oils of any viscosity other than those recommended could result in engine damage. When choosing an oil, consider the range of temperatures the vehicle will be operated in before the next oil change. Then, select the recommended oil viscosity.

Important:  However, you can use SAE 10W-30 if temperatures stay above -18°C (0°F) before your next oil change. When it is very cold, below -18°C (0°F), you should use SAE 5W-30 to improve cold starting and prevent engine damage.

These numbers on the oil container show its viscosity, or thickness. Do not use other viscosity oils such as SAE 10W-40 or SAE 20W-50.

Chassis Lubrication

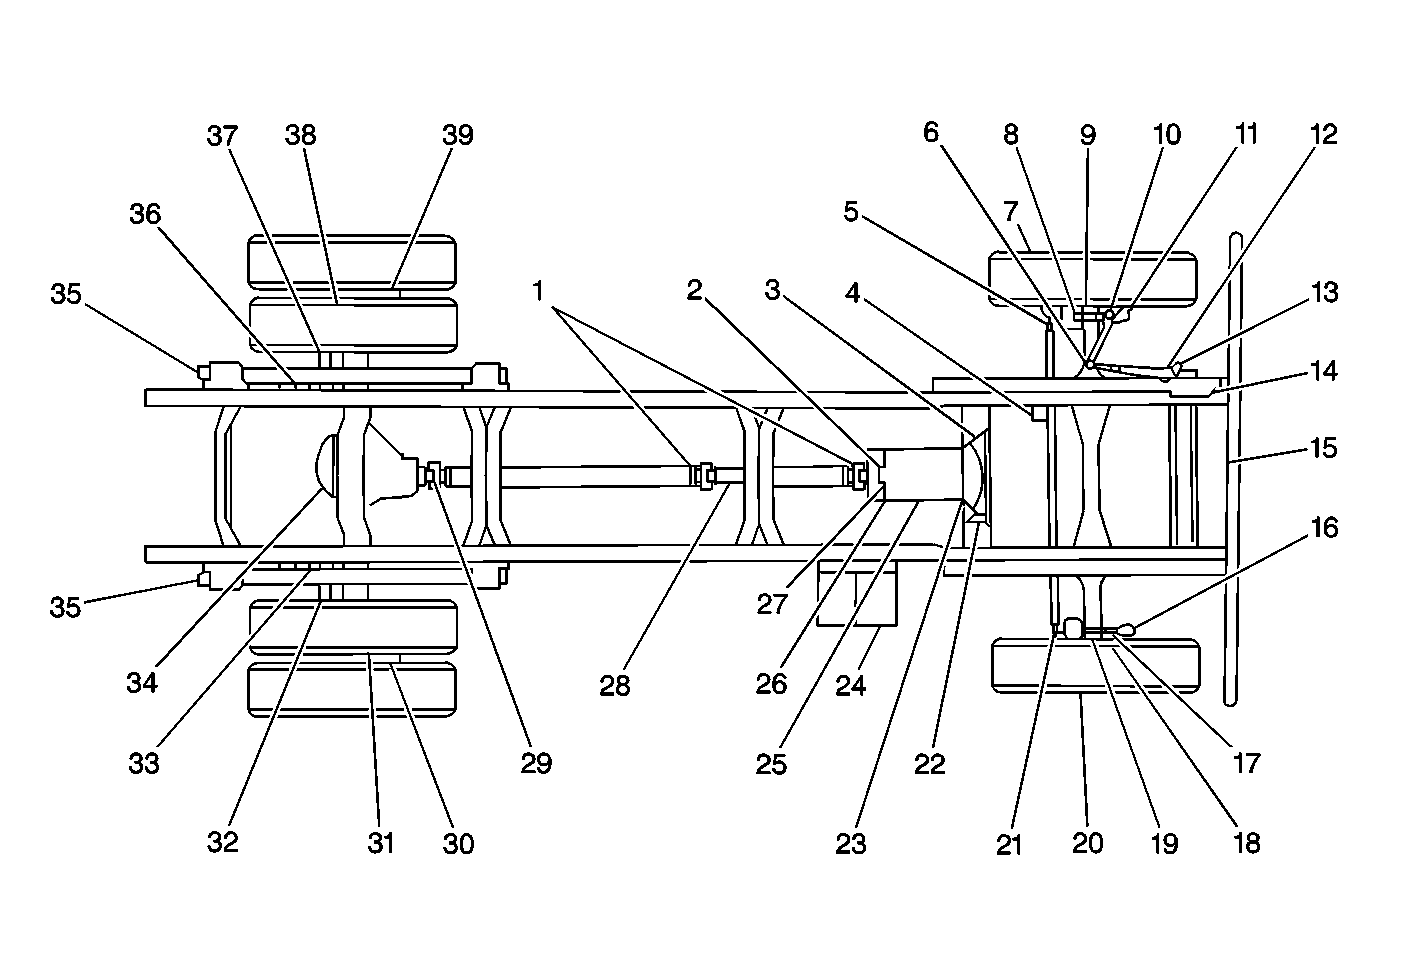
Refer to the illustration for the location of the lubrication points for the chassis. Lubricate the transmission shift linkage. Lubricate the park brake guides, the underbody contact points and the linkage.

Single Axle Models

Object Number: 290696  Size: MF
(1)Propshaft Slip Joint
(2)Parking Brake Clevis Pin (Hydraulic Brakes Only)
(3)Clutch Release Cross Shaft (If Equipped)
(4)Master Cylinder (Hydraulic Brakes Only)
(5)Steering Tie Rod Ends
(6)Steering Column U-Joints
(7)Front Wheel Bearings
(8)Front Steering Knuckles
(9)Brake Cam Roller Pins at Interface of Pin and Shoe (Air Brakes Only)
(10)Slack Adjuster (Air Brakes Only)
(11)Brake Camshaft Brake Caliper Rails (If Equipped)
(12)Steering Column Slip Joint
(13)Steering Drag Link Ends
(14)Pivot Points and Hinges
(15)Pivot Points and Hinges
(16)Brake Camshaft Brake Caliper Rails (If Equipped)
(17)Slack Adjuster (Air Brakes Only)
(18)Brake Cam Roller Pins at Interface of Pin and Shoe (Air Brakes Only)
(19)Front Steering Knuckles
(20)Front Wheel Bearings
(21)Steering Tie Rod Ends
(22)Clutch Release Cross Shaft (If Equipped)
(23)Clutch Release Bearing (If Equipped)
(24)Battery Terminal (Except ST type)
(25)Transmission
(26)Parking Brake Bell Crank (Hydraulic Brakes Only)
(27)Parking Brake Lever Pivot (Hydraulic Brakes Only)
(28)Propshaft Slip Joint
(29)Propshaft Slip Joint
(30)Rear Wheel Bearing
(31)Brake Cam Roller Pins at Interface of Pin and Shoe (Air Brakes Only)
(32)Brake Camshaft Brake Caliper Rails (If Equipped)
(33)Slack Adjuster (Air Brakes Only)
(34)Rear Axle
(35)Spring Slip Pads (If Equipped with Multi-Leaf)
(35)Spring Slip Pads (Multi-Leaf Spring Only)
(36)Slack Adjuster (Air Brakes Only)
(37)Brake Camshaft Brake Caliper Rails (If Equipped)
(38)Brake Cam Roller Pins at Interface of Pin and Shoe (Air Brakes Only)
(39)Rear Wheel Bearing

Tandem Axle Models


Object Number: 290706  Size: SH
(1)Propshaft U-Joint
(2)Brake Camshafts
(3)Brake Shoe Roller Pins
(4)Rear Spring Pin
(5)Wheel Bearing
(6)Rear Axles
(7)Propshaft Slip Joint
(8)Propshaft U-Joint
(9)Wheel Bearing
(10)Rear Spring Pin
(11)Brake Camshafts
(12)Rear Axle
(13)Brake Camshafts
(14)Brake Shoe Roller Pins
(15)Wheel Bearings
(16)Propshaft U-Joint
(17)Rear Spring Pin
(18)Wheel Bearing
(19)Brake Shoe Roller Pins
(20)Brake Camshafts

Lubricating Joints That Have Grease Fittings

Refer to the illustration for the location of the grease fittings.

Important: Wipe off all dirt from the grease fitting before lubricating the joint. Ball joints should not be lubricated unless the temperature of the ball joints is -12°C (10°F) or higher. During cold weather, allow the ball joint to warm up as necessary before being lubricated.

Use a low-pressure grease gun on all joints in order to prevent seal damage.

Apply grease slowly while watching the grease seal. Apply the grease until the grease is seen bleeding from the seal. If the seal expands but you do not see any grease, do not apply any more grease. Allow time for the grease to bleed from the seal.

Lubricate the steering linkage, the upper and the lower ball joint.

Footnotes

[Dagger] The U.S. Environmental Protection Agency or the California Air Resources Board has determined that the failure to perform this maintenance item will not nullify the emission warranty or limit recall liability prior to the completion of the vehicle's useful life. It is recommended that all maintenance services be performed at the indicated intervals and the maintenance be recorded.

  1. If your vehicle has an Allison automatic transmission your GM owner's manual is supplemented by an Allison Transmission Operator's Manual. Always refer to these manuals for related maintenance services.
  2. Refer to the Caterpillar Diesel Engine Operation and Maintenance Manual for oil recommendations and change intervals.
  3. An Emission Control Service.
  4. A Noise Emission Control Device.
  5. Applies only to vehicles sold in the United States.
  6. Check the fluid level in the following components:
  7. • The master cylinder
    • The power steering pump
    • The axle
    • The transmission and hydraulic spring parking brake pump (if equipped)
    • A low fluid level in the brake master cylinder can indicate worn brake linings and should be checked accordingly.
  8. Inspect the brake lines and hoses for the following:
  9. • Proper hook-up
    • Binding
    • Leaks
    • Cracks
    • Chafing and etc.
  10. Inspect the parking brake drum and linings for wear or cracks and check the linkage and adjustment.
  11. This vehicle has the GM Oil Life System. This system will show you when to change the engine oil and filter -- usually between 5 000 km (3,000 miles) and 12 000 km (7,500 miles) since your last oil change. Under severe conditions, the indicator may come on before 5 000 km (3,000 miles). Never drive your vehicle more than 12 000 km (7,500 miles) or 12 months without an oil and filter change.
  12. Remember to reset the Oil life System whenever the oil is changed. For more information, see "Change Oil Light" in the index.

  13. Inspect the rear axle air shift motor for fluid leaks. Remove the plug to check the fluid level. Inspect the air lines and hoses for proper hook-up, binding, leaks, etc. Inspect at 5 000 km (3,000 miles) thereafter.
  14. Chassis Lubrication Service: Lubricate all grease fittings in the front suspension, front axle and steering linkage. DO NOT lubricate the kingpin bushings with air pressure equipment; instead, use a hand grease gun to ensure complete purge and eliminate sealer cap distortion. Lubricate the transmission and shift linkage, hood latches and hood hinges, parking brake lever pivot, clevis pins and linkage, disc brake caliper rails, clutch linkage and release bearing (if equipped), bearing pads, propshaft universal joints, brake camshaft bracket, slack adjusters, pedal shaft, clutch cross shaft and clutch pedal springs. Lubricate the suspension, axle and steering linkage more often when operating under dusty or muddy conditions and in excessive off-road use.
  15. Check the steering system:
  16. • Look for damaged, loose or missing parts. Also look for parts showing signs of wear or lack of lubrication. Replace the parts as needed. Also check the steering gear mounting bolts, pitman arm nut, gear housing upper cover and side cover attaching bolts, steering column mounting bolts and cardan joint clamp bolts; tighten if necessary.
    • Inspect the power steering hoses, tubes and fittings for leaks. Hoses and lines must not be twisted, kinked or tightly bent. Make sure the clips, clamps, supporting tubes and hoses are in place and properly secured.
    • Check the steering gear for leakage around the pitman shaft and housing. If leakage is evident (lubricant oozing out, not just oily film), the leak should be corrected immediately.
  17. Check the front and rear suspension. Look for damaged, loose or missing parts or parts showing signs of wear or lack of lubrication. Replace the parts as needed.
  18. Adjust the tire pressures as indicated on the GVWR label for optimum tire life. Check the tires for excessive or abnormal wear or damage. Also check for damaged wheels. Replace the wheels and/or tires as needed.
  19. Check the spring-to-axle U-bolts and shackle bolts for proper torque. When parts are replaced, the torque must be checked and adjusted more often during the first 10 000 km (6,000 miles). Check the torque at 800 km (500 miles) and 3 000 km (2,000 miles) after first use of the parts.
  20. Check the complete exhaust system and cab areas near the exhaust system for broken, damaged, missing or out-of-position parts. Also inspect for open seams, holes, loose connections or other conditions which could let exhaust fumes seep into the driver compartment. Needed repairs should be made at once. To help maintain system integrity, replace the exhaust pipes whenever a new muffler is put on.
  21. Check all gasoline engine drive belts for cracks, fraying and wear. Replace as needed.
  22. With the engine OFF and below normal operating temperature, check to see that the thermostatically controlled engine cooling fan can be rotated by hand on viscous-operated drives. Replace as needed.
  23. Check the shields and underhood insulation for damage or looseness. Adjust or replace as needed.
  24. Wheel Bearing Service:
  25. • Grease type - Clean, inspect and lubricate with the proper wheel bearing grease at designated intervals or when the hubs are removed. Refer to Fluid and Lubricant Recommendations .
    • Oil-filled type - Some wheel bearings are lubricated by rear axle lubricant. When you have oil-filled hubs, use lubricant identical to that used in your rear axle. Lubricant change intervals are the same for front and rear axles. However, you must maintain oil level at the OIL LEVEL mark between change intervals. Refer to Fluid and Lubricant Recommendations .
  26. Check the air intake system installation to see that gaskets are seated properly and all hose connections, fasteners and other components are tight. Tighten the connections and fasteners or replace parts as required.
  27. Evaporative Control System Service (if equipped): Check all fuel and vapor lines and hoses for proper connections and correct routing (or every 24 months, whichever occurs first). Replace parts as needed.
  28. Replace the spark plugs. Inspect the wires for damage. Check the wire boot and boot heat shield fit at the spark plugs and the coil. Replace parts as needed.
  29. Check the fuel tank, fuel cap and fuel lines for damage which could cause leakage. Inspect the fuel cap for correct sealing ability and any indications of damage. Check the fuel cap gasket for even filler neck imprint. Replace parts as needed.
  30. Check the EGR system.
  31. Inspect the electronic vacuum regulator valve (EVRV) filter for excessive contamination or plugging. If needed, clean the filter with a solution of soap and water, let dry and install.
  32. Drain, flush and refill the cooling system. Refer to Fluid and Lubricant Recommendations for what to use. Inspect the hoses. Clean the radiator, condenser, pressure cap and neck. Pressure test the cooling system and pressure cap. For Caterpillar® diesel engines, always refer to the Caterpillar Diesel Engine Operation & Maintenance Manual for coolant recommendations and change intervals.
  33. Rear Axle Service: Change the lubricant. Refer to Fluid and Lubricant Recommendations .
  34. Front Axle Service: Pack the upper kingpin roller bearing.
  35. Air Brake Service:
  36. • Inspect the brake lines and hoses for proper hook-up, binding, leaks, cracks, chafing, etc. Inspect the drum brake linings for wear or cracks. Inspect the other brake parts at each wheel, including the drums, wheel cylinders and piston heat shields, boots and wheel speed sensor wiring. Check the brake pedal for excessive free play or travel (or every 6 months, whichever occurs first) and have serviced if needed. Check the brakes more often if driving habits and conditions result in frequent braking. Replace the air dryer cartridge only if excessive oil or moisture is present. A small amount of oil in the system is normal and should not be considered as a reason to replace the cartridge.
    • Test the air lines for leaks. Tighten as needed. Replace the compressor filter.
    • Inspect the air parking brake chamber for leaks and damage. Inspect the lines and hoses for leaks, cracks, chafing, etc. Also check all attachments for tightness, wear or damage. Note: The spring brake section of the rear brake diaphragms are non-serviceable.
    • Replace the air compressor filter element, mounted on the air compressor. For remote air compressor intake service.
    • Remove, disassemble, clean and inspect the safety valve, standard brake chamber, quick release valve, quick release/double check valve combination, parking brake control valve, double check valve, pressure protection valve and alcohol injector.
    • Remove, disassemble and clean the application valve. Replace the parts showing wear.
    • Remove, disassemble, clean and inspect the spring brake control valve. Replace rubber parts.
  37. Clean and lubricate the air brake automatic slack adjuster. Check the pushrod travel and auto adjustment operation. Have serviced if needed.
  38. Air Brake Chamber Service: Check the operation, mounting, clamps and air lines and check for leaks.
  39. Trailer Brake Hand Control Valve Service: Check the operation. Lubricate the cam and follower.
  40. Tighten the wheel stud nuts to the specified torque values at 160 km (100  miles) after each time the wheel is removed.