For 1990-2009 cars only
Air Conditioning (A/C) Coupling Assembly Replacement Low Pressure
Tools Required
J 39400-A Halogen Leak Detector
Removal Procedure
- Recover the refrigerant from the A/C system. Refer to Refrigerant Recovery and Recharging .
- Remove the air cleaner. Refer to the appropriate procedure:
- Remove the right wheelhouse panel. Refer to Wheelhouse Panel Replacement .
- Remove the evaporator outlet tube. Refer to Air Conditioning Evaporator Hose Assembly Replacement .
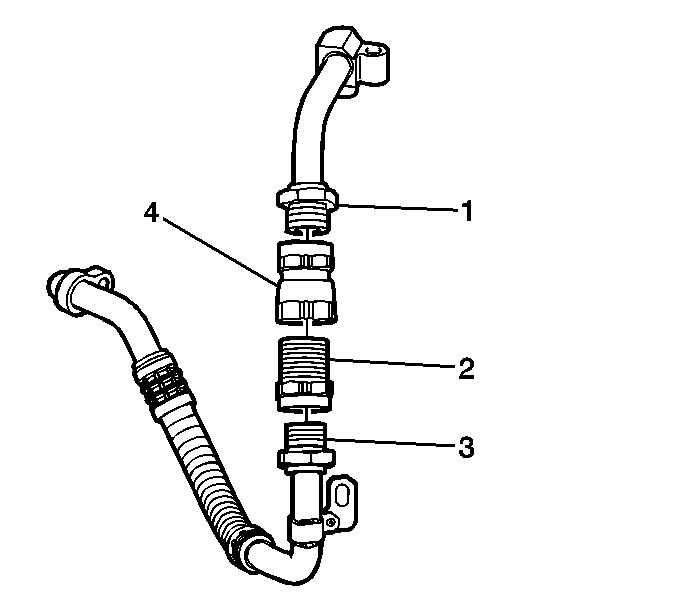
- Remove the A/C coupling (2, 4) from the evaporator tube (1, 3).
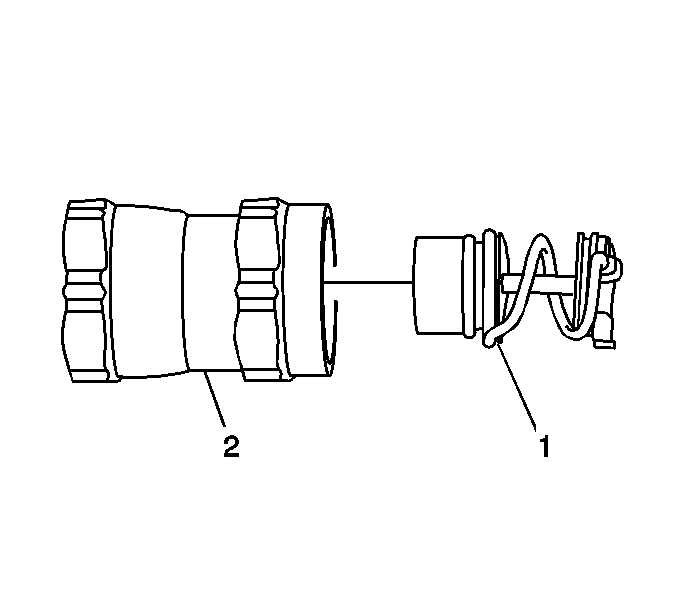
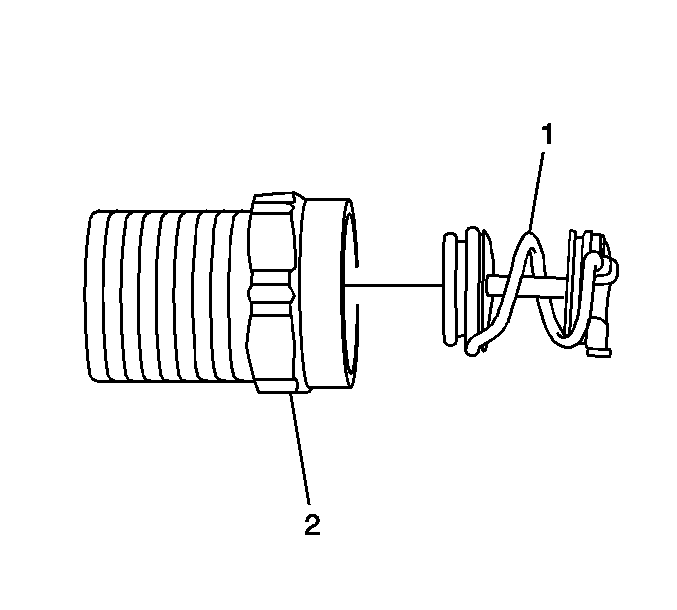
- Remove the sealing valve (1) from the A/C coupling (2).
- Remove the sealing valve (1) from the A/C coupling (2).
| • | Air Cleaner Replacement for the 6.6L (LBZ and LLY) engine |
| • | Air Cleaner Replacement for the 8.1L engine |
| • | Air Cleaner Replacement for the 7.8L engine |
| • | Air Cleaner Replacement for the 7.2L (Caterpillar) engine |


Installation Procedure
- Coat the new sealing valves with polyalkylene glycol (PAG) oil.
- Install the sealing valve (1) to the A/C coupling (2).
- Install the sealing valve (1) to the A/C coupling (2).
- Install the A/C coupling (2, 4) to the evaporator tube (1, 3).
- Install the evaporator outlet tube. Refer to Air Conditioning Evaporator Hose Assembly Replacement .
- Install the air cleaner. Refer to the appropriate procedure:
- Install the right wheelhouse panel. Refer to Wheelhouse Panel Replacement .
- Evacuate and recharge the A/C system. Refer to Refrigerant Recovery and Recharging .
- Leak test the fittings of the components using the J 39400-A .


Notice: Refer to Fastener Notice in the Preface section.

Tighten
Tighten the fittings to 45 N·m (33 lb ft).
| • | Air Cleaner Replacement for the 6.6L (LBZ and LLY) engine |
| • | Air Cleaner Replacement for the 8.1L engine |
| • | Air Cleaner Replacement for the 7.8L engine |
| • | Air Cleaner Replacement for the 7.2L (Caterpillar) engine |
Air Conditioning (A/C) Coupling Assembly Replacement High Pressure
Special Tools
J 39400-A Halogen Leak Detector
Removal Procedure
- Recover the refrigerant from the A/C system. Refer to Refrigerant Recovery and Recharging .
- Remove the right wheelhouse panel. Refer to Wheelhouse Panel Replacement .
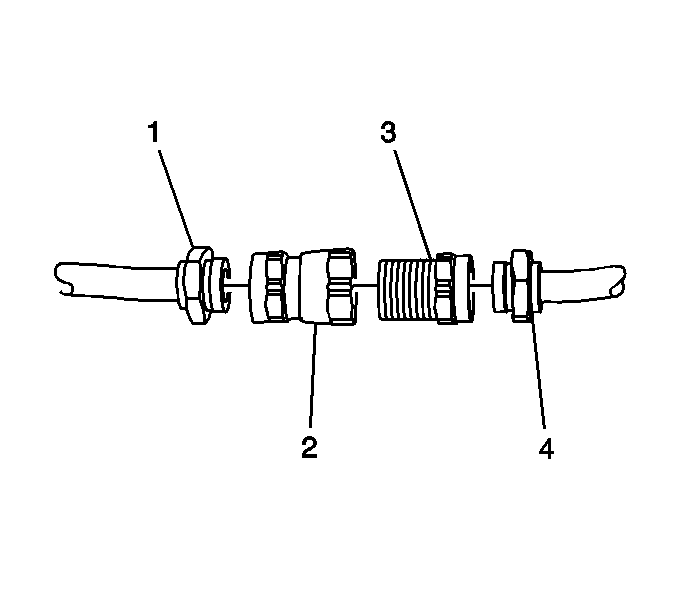
- Remove the A/C coupling (2, 3) from the evaporator hose (4).
- Remove the sealing valve (1) from the A/C coupling (2).
- Remove the sealing valve (1) from the A/C coupling (2).


Installation Procedure
- Coat the new sealing valves with PAG oil.
- Install the sealing valve (1) to the A/C coupling (2).
- Install the sealing valve (1) to the A/C coupling (2).
- Install the A/C coupling (2, 3) to the evaporator hose (4).
- Install the right wheelhouse panel. Refer to Wheelhouse Panel Replacement .
- Evacuate and recharge the A/C system. Refer to Refrigerant Recovery and Recharging .
- Leak test the fittings of the components using the J 39400-A .


Notice: Refer to Fastener Notice in the Preface section.

Tighten
Tighten the fittings to 35 N·m (26 lb ft).
