Differential Replacement Dana 286 Axle
Tools Required
Removal Procedure
- Raise the vehicle. Refer to
Lifting and Jacking the Vehicle
.
- Remove the axle shafts. Refer to
Rear Axle Shaft and/or Gasket Replacement
.
- Loosen the bearing cap bolts.
Do not remove the bearing cap bolts at this time.
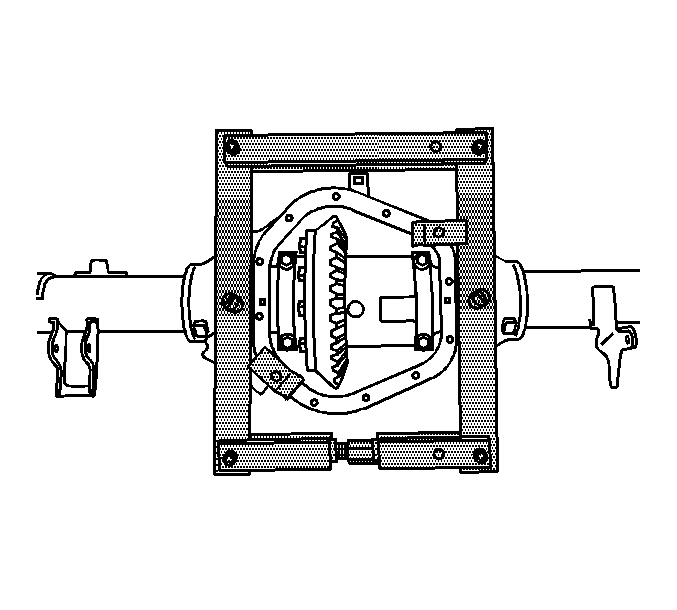
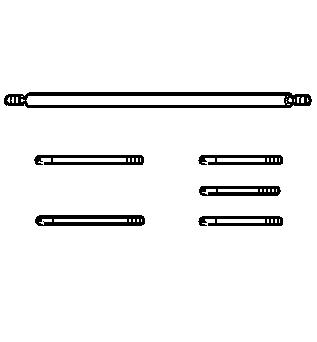
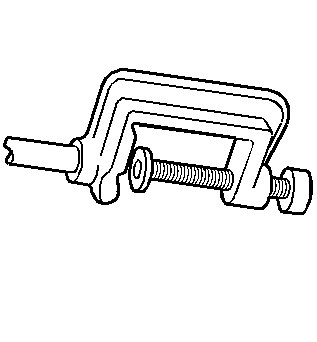
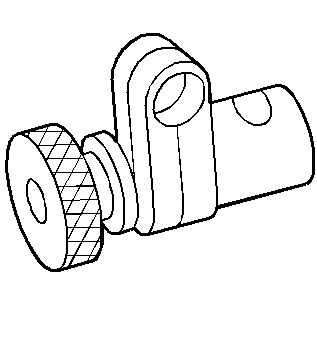
- Install the
J 24385-C
onto the axle housing as shown.
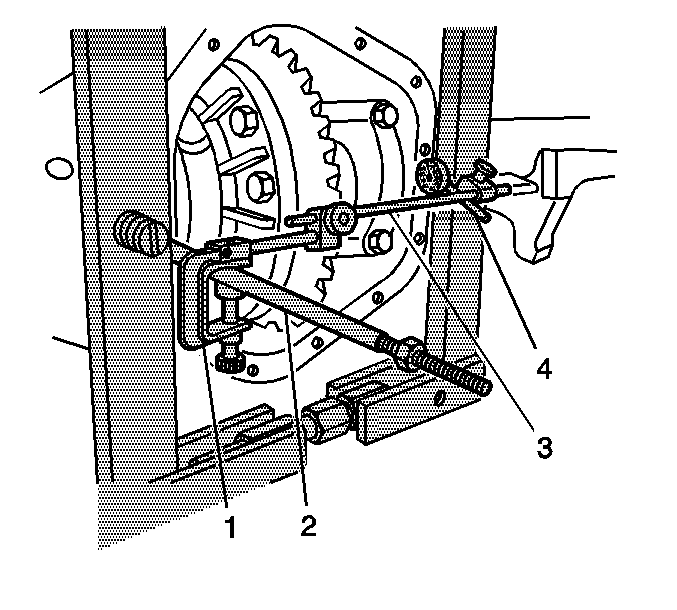
- Install the
J 25025
(2), the
J 8001-1
and the
J 8001-2
(1), the
J 34178
(3), and the
J 8001-3
and the
J 8001-4
(4) onto the axle housing as shown.
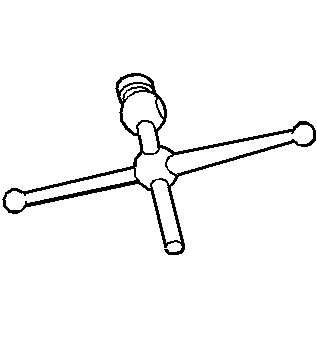
- Preload the dial of the
J 8001-3
by pushing the
J 8001-3
against the edge of the
J 24385-C
until the needle of the
J 8001-3
has moved approximately 3/4 of a turn clockwise.
- Rotate the indicator housing to align the indicator needle of the
J 8001-3
and the dial indicator face to ZERO.
Notice: Do not spread the axle housing more than 0.38 mm (0.015 inch).
Overspreading the housing may result in component damage.
- Spread the axle housing by turning the clevis screw of the
J 24385-C
clockwise while observing the
J 8001
.
Spread the housing
just enough to remove the differential assembly.
- Remove the
J 25025-B
, the
J 8001-1
, the
J 8001-2
, the
J 34178
, the
J 8001-3
and the
J 8001-4
from the axle housing.
- Remove the bearing cap bolts.
Caution: To prevent personal injury and/or component damage, support the differential
case when removing the case from the axle housing. If the case is not supported,
the differential case could fall and cause personal injury or damage to the
differential case.
Important: Corresponding letters are stamped on the bearing caps and axle housing. The bearing caps must be reassembled in the same position as removed.
- Remove the bearing caps.
- Remove the differential assembly.
- Remove the
J 24385-C
.
- Remove the ring gear. Refer to
Drive Pinion and Ring Gear Replacement
.
- Remove the differential side bearings, if necessary. Refer to
Differential Side Bearings Replacement
.
Installation Procedure
- Install the differential side bearings, if necessary. Refer to
Differential Side Bearings Replacement
.
- Install the ring gear. Refer to
Drive Pinion and Ring Gear Replacement
.
- Determine the differential side bearing shim pack size and side bearing preload for the differential assembly. Refer to
Differential Carrier Bearing Preload Adjustment
.
- Install the
J 24385-C
onto the axle housing.
- Install the
J 25025-B
(4), the
J 8001-1
and the
J 8001-2
(5, 1), the
J 34178
(2), and
the
J 8001-3
and the
J 8001-4
(3) onto the axle housing as shown.
- Preload the dial of the
J 8001-3
by pushing the
J 8001-3
against the edge of the
J 24385-C
until the needle of the
J 8001-3
has moved approximately 3/4 of a turn clockwise.
- Rotate the indicator housing to align the indicator needle of the
J 8001-3
and the dial indicator face to ZERO.
Notice: Do not spread the axle housing more than 0.38 mm (0.015 inch).
Overspreading the housing may result in component damage.
- Spread the axle housing by turning the clevis screw of the
J 24385-C
clockwise while observing the
J 8001
.
Spread the housing
just enough to install the differential assembly.
- Remove the
J 25025-B
, the
J 8001-1
, the
J 8001-2
, the
J 34178
, the
J 8001-3
and the
J 8001-4
from the axle housing.
- Install the differential assembly.
- Remove the
J 24385-C
.
Important: Corresponding letters are stamped on the bearing caps and axle housing. The bearing caps must be reassembled in the same position as removed.
- Install the bearing caps.
Notice: Use the correct fastener in the correct location. Replacement fasteners
must be the correct part number for that application. Fasteners requiring
replacement or fasteners requiring the use of thread locking compound or sealant
are identified in the service procedure. Do not use paints, lubricants, or
corrosion inhibitors on fasteners or fastener joint surfaces unless specified.
These coatings affect fastener torque and joint clamping force and may damage
the fastener. Use the correct tightening sequence and specifications when
installing fasteners in order to avoid damage to parts and systems.
- Install the bearing cap bolts.
Tighten
Tighten the bearing cap bolts to 108 N·m (80 lb ft).
- Install the axle shafts. Refer to
Rear Axle Shaft and/or Gasket Replacement
.
- Fill the axle with lubricant. Use the proper fluid. Refer to
Rear Axle Lubricant Replacement
.
- Lower the vehicle.
Differential Replacement Except Dana 286 Axle
Removal Procedure
- Clean the rear axle housing with steam.
Important: Shift the two speed rear axle into LOW range, if equipped.
- Block the wheels.
- Remove the rear axle housing drain plug.
- Remove the propeller shaft. Refer to the following list in order to select the correct procedure:
- Remove the axle shafts. Refer to
Rear Axle Shaft and/or Gasket Replacement
.
- Remove the shift motor assembly, if equipped. Refer to
Two Speed Rear Axle Shift Motor Replacement
.
- Remove the following components from the differential carrier assembly:
| • | The stud nuts, if equipped |
| • | Do not remove the top 2 fasteners. |
- Support and secure the differential carrier assembly to a floor jack.
| 8.1. | Remove the top 2 fasteners. |
| 8.2. | Remove the differential carrier assembly. |
- Clean the axle housing and the differential carrier assembly mating surfaces.
- Clean the axle housing bowl interior using Engine Degreaser GM P/N 1050436 (Canadian P/N 992878) or the equivalent. Dry the housing bowl immediately with clean rags and compressed air.
- Inspect the axle housing for the following conditions:
Installation Procedure
Important:
| • | Apply a diameter bead of silicone sealer completely around the rear axle housing differential carrier mating surface and around each threaded hole and stud. |
| • | Install the differential carrier and fasteners within 20 minutes (before the silicone sealer sets). |
- Install the Silicone Sealer (RTV) GM P/N 1052366 or equivalent on the
rear axle housing surface.
- Install the differential carrier assembly.
Notice: Refer to Fastener Notice in the Preface section.
Important:
| • | Ensure that the threads are clean and free of grease. |
| • | Apply 272 Threadlocker GM P/N 12345493 (Canadian P/N 10953488) or equivalent to the threads of each differential carrier bolt. |
- Install the following differential carrier components:
Tighten
Tighten the differential carrier bolts and nuts to the torques listed in
Fastener Tightening Specifications
.
- Install the rear axle shift motor assembly, if equipped. Refer to
Two Speed Rear Axle Shift Motor Replacement
.
- Install the rear axle shafts. Refer to
Rear Axle Shaft and/or Gasket Replacement
.
- Install the propeller shaft.
- Install the propeller shaft. Refer to the following list in order to select the correct procedure:
- Install the rear axle lubricant. Refer to
Rear Axle Lubricant Level Inspection
.
- Remove the wheel blocks.
