Product Safety - Bendix SR-7 Air Brake Park Control Valve Leak

| Subject: | 07164 -- Bendix SR-7 Air Brake Park Control Valve Leak |
| Models: | 2006-2007 Chevrolet Kodiak, T-Series |
| 2006-2007 GMC TopKick, T-Series |
| 7500/8500 Series |
| Straight Towing and Non-Towing Trucks (RPO RQ2 + JYV or RQ2 - JYV) Equipped With Air Brakes (RPO JE4) |
Condition
General Motors has decided that a defect, which relates to motor vehicle safety, exists in certain 2006-2007 Chevrolet Kodiak and T-Series; and GMC TopKick and T-Series 7500/8500 Series straight towing or non-towing (RPO RQ2 & JYV/RQ2-JYV) vehicles equipped with air brakes (RPO JE4). The air brake park control valve in some of these vehicles may develop either an internal air leak or an air restriction. With this condition, the park brake may not release or may release only partially. If a vehicle is on an uneven surface, the park brake may not hold the vehicle and could result in unintended vehicle movement and a vehicle crash. This condition does not affect normal service braking.
Correction
Dealers are to inspect and replace the external check valve on the air brake park control valve. If the inspection determines the external check valve is damaged, the air brake park control valve will be replaced. Most vehicles will also require the replacement of an internal check valve in the air brake park control valve.
Vehicles Involved
Involved are 2006-2007 Chevrolet Kodiak and T-Series; and GMC TopKick and T-Series 7500/8500 Series vehicles equipped with air brakes (RPO JE4) and straight towing and non-towing (RPO RQ2 & JYV/RQ2-JYV) and built within these VIN breakpoints:
Year | Division | Model | From | Through |
|---|---|---|---|---|
2006 | Chevrolet | Kodiak/T-Series | 6F400008 | 6F434896 |
2007 | Chevrolet | Kodiak/T-Series | 7F400032 | 7F900325 |
2006 | GMC | TopKick/T-Series | 6F400005 | 6F901658 |
2007 | GMC | TopKick/T-Series | 7F400000 | 7F902130 |
Important: Dealers are to confirm vehicle eligibility prior to beginning repairs by using the GM Vehicle Inquiry System (GMVIS) below. Not all vehicles within the above breakpoints may be involved.
For dealers with involved vehicles, a listing with involved vehicles containing the complete vehicle identification number, customer name, and address information has been prepared and will be provided through the applicable system listed below. Dealers will not have a report available if they have no involved vehicles currently assigned.
-- US dealers - GM DealerWorld Recall Information
-- Canadian dealers - GMinfoNet Recall Reports
-- Export dealers - sent directly to dealers
The listing may contain customer names and addresses obtained from Motor Vehicle Registration Records. The use of such motor vehicle registration data for any purpose other than follow-up necessary to complete this recall is a violation of law in several states/provinces/countries. Accordingly, you are urged to limit the use of this report to the follow-up necessary to complete this recall.
Parts Information
Parts required to complete this recall are to be obtained from General Motors Service and Parts Operations (GMSPO). Please refer to your "involved vehicles listing" before ordering parts. Normal orders should be placed on a DRO = Daily Replenishment Order. In an emergency situation, parts should be ordered on a CSO = Customer Special Order.
Part Number | Description | Qty/ Vehicle |
|---|---|---|
25913686 | Valve Kit - Spring Park Brk Mod Cont | 1 |
25913684 | Valve, Spring Park Brk Mod Cont (Single Axle with or without Air Suspension or Tandem Axle with Air Suspension) | 1 (If Req'd) |
25913685 | Valve, Spring Park Brk Mod Cont (Tandem Axle without Air Suspension) | 1 (If Req'd) |
Service Procedure
Inspection
- Identify and record the date of manufacture for the air brake park control valve. The date code is located on the top of the air brake park control valve.
- Remove the air brake park control valve nuts from the chassis mount and identify the casting as either "Bendix 1" or "Bendix 2". The casting information is located on the stud side of the air brake park control valve.
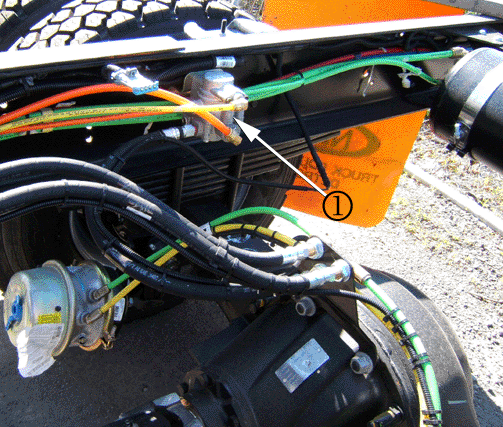
Important: Lift and support the vehicle to perform the inspection and service procedures in this bulletin. Refer to Lifting and Jacking the Vehicle in SI.
Important: The air brake park control valve (1) (also known as the SR-7 spring brake modulation valve) is located on the chassis, near the rear differential.
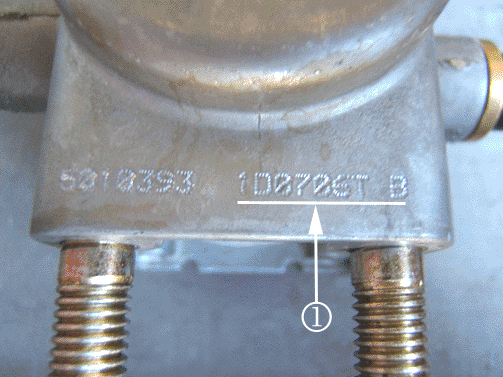
| • | If the date code (1) is within the range of D0106 and E2406, proceed to Step 2. |
| • | If the date code (1) is outside the range of D0106 and E2406, proceed to the External Check Valve Service Kit Procedure below. |
Important: Do not remove the air lines from the valve of the air brake park control valve.
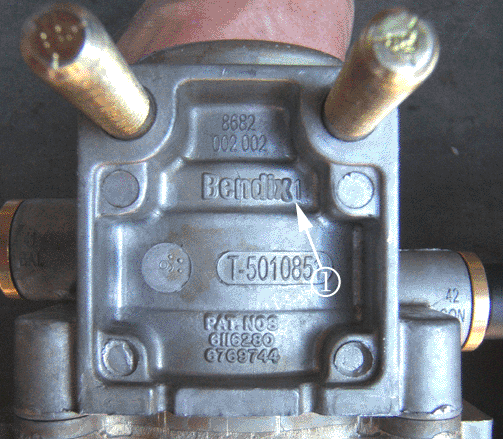
| • | If the casting has "Bendix 1" (1) on the stud side of the air brake park control valve, replace the air park brake control valve and the external check valve. Refer to the Chassis Mount Air Brake Park Control Valve Replacement procedure in SI. |
| Notice: Before performing the Chassis Mount Air Brake Park Control Valve Replacement procedure, read the following valve removal information: |
| Important: The external check valve that is threaded into the supply port of the valve MUST BE REPLACED. Do not transfer it to the new valve. |
| - | Compare the air brake park control valve that was removed, to the replacement air brake park control valve. If the valve that was removed contains fittings or pipe plugs that the new air brake park control valve does not have, note their orientation before removing them from the air brake park control valve. These fittings will be used on the replacement (new) air brake park control valve. DO NOT transfer the external check valve; it must be replaced. Order kit number 25913686, which contains the external check valve. Discard the internal check valve cartridge that is also contained in the kit. It is not required when the entire valve is replaced. |
| - | Apply pipe sealant to the fittings or pipe plugs that were removed from the old air brake park control valve before installing them onto the replacement (new) air brake park control valve. Teflon tape is not an acceptable substitute for pipe sealant. |
| - | Ensure that the orientations of the fittings are the same. |
| - | Install the fittings finger tight, and then tighten 1.5 to 2 turns. For shaped fittings, such as tees and elbows, tighten no more than one additional turn to the final position. |
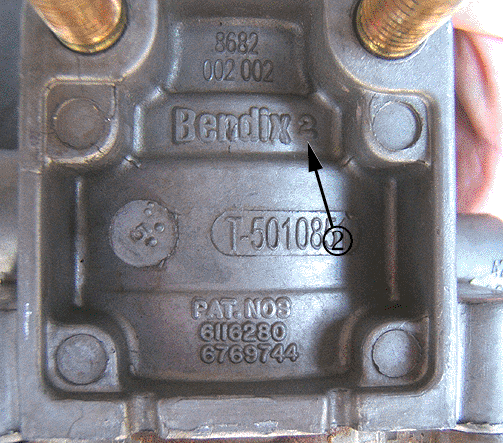
| • | If the casting has "Bendix 2" (2) on the stud side of the air brake park control valve, proceed to the External Check Valve Service Kit Procedure below. |
EXTERNAL CHECK VALVE SERVICE KIT PROCEDURE
- Drain all of the air reservoirs. Refer to Draining Reservoirs in Air Brakes in SI.
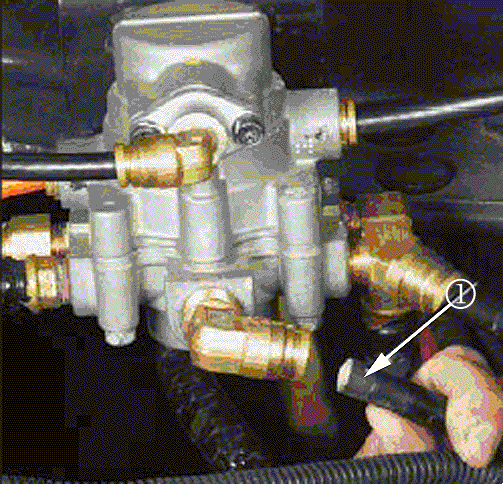
- Locate the external check valve installed in the supply port of the valve.
- Remove the 1/2" OD supply line (1) from the external check valve supply port.
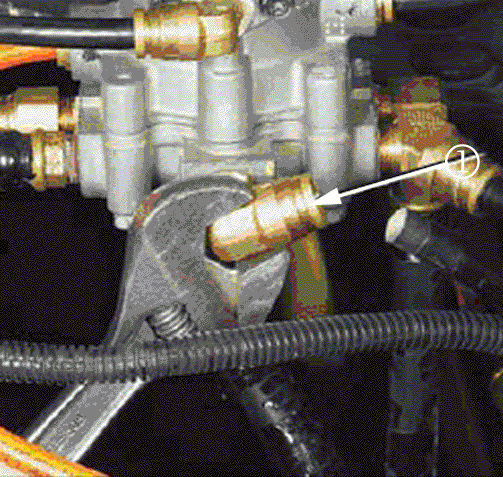
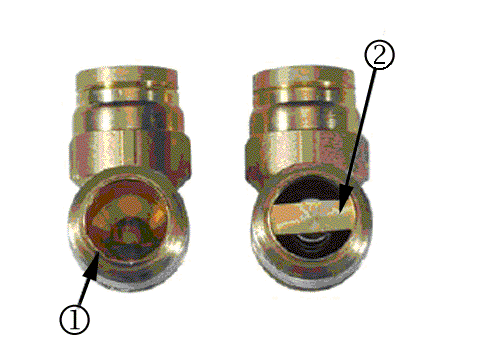
- Note the orientation of the external check valve (1). Some valve assemblies may have a fitting between the external check valve (1) and the air brake park control valve. Use a wrench to remove the external check valve (1).
Caution:
• Never connect or disconnect a hose or line containing air pressure. It may whip as air escapes. Never remove a component or a pipe plug unless you are certain all system air pressure has been exhausted. • Never exceed the recommended working air pressure and always wear safety glasses when working with air pressure. Never look directly into the component ports or direct a pressurized air flow at anyone. • Never attempt to disassemble a component until you have read and understood all recommended procedures. Some components contain powerful springs and injury can result if not properly disassembled. Use only proper tools and observe all precautions
pertaining to the use of those tools..
Important: Do not disconnect air lines and fittings unless specified. Installation of this kit does not require that the air brake park control valve be removed or that all the air lines be disconnected.
INTERNAL CHECK VALVE REMOVAL
- Using the date code recorded in Step 1 of the Inspection Procedure, determine if the internal check valve requires replacement.
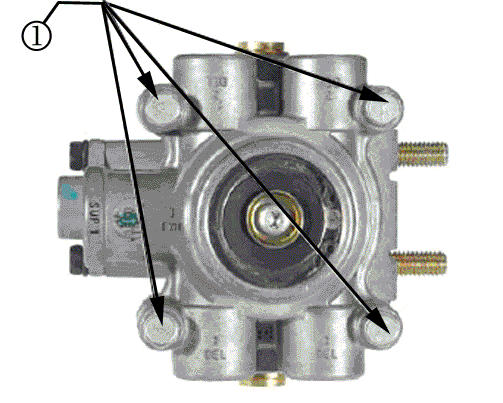
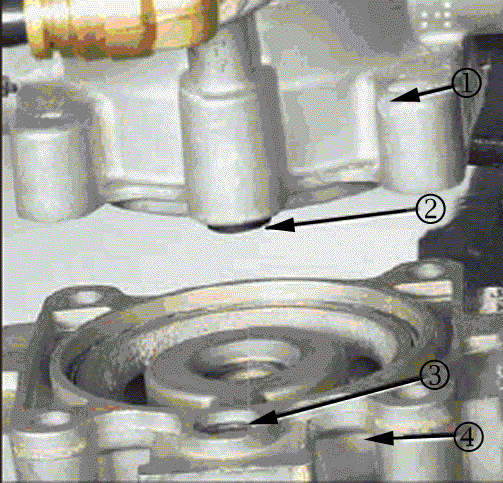
- Using a 7/16" wrench, remove the four screws (1) that secure the upper and lower bodies of the air brake park control valve.
- Locate the plastic guide (2) in the upper body (1) of the air brake park control valve, directly above the supply port. The O-ring seal (3) from the lower body (4) may stick to the plastic guide (2) when the bodies are separated. If so, remove it from the guide and place it back into the lower body (4). An extra O-ring has been included in this kit in the event that the O-ring is lost or damaged during servicing.
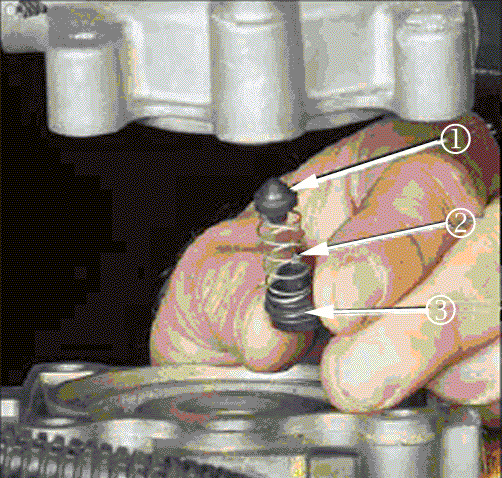
- Remove the plastic guide (3), spring (2) and internal check valve (1) from the valve bore and discard. The internal check valve (1) may stick to its seat in the upper body. Ensure that all of the components are removed before proceeding to the next step.
| • | If the date code is D1807 or greater, the internal check valve does NOT require replacement. No other repairs are required: |
| - | Lower the vehicle. |
| - | Start the engine and recharge the air brake system pressure. Refer to SI, if required. |
| - | Verify that the air brake system functions properly. Refer to SI, if required. |
| • | If the date code is less than D1807, the internal check valve requires replacement. Continue with this procedure. |
| • | Installation of this kit requires that the air brake park control valve (SR-7) be removed and that all the air lines be disconnected. |
Notice: Clamp the valve carefully in a vise while protecting the valve assembly from damage/deformation.
Cartridge Installation
- Remove the replacement cartridge from its shipping tube.
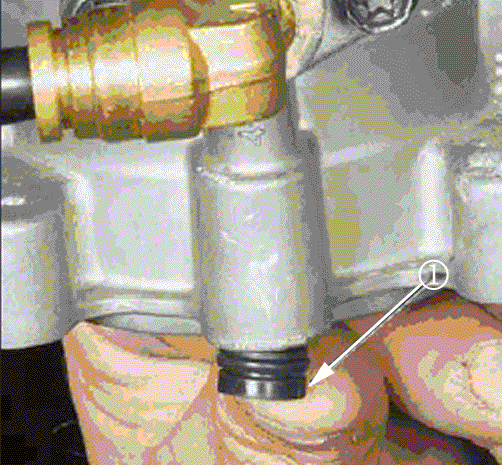
- Insert the replacement cartridge (1) in the bore where the check valve, spring, and plastic guide were removed. Push the cartridge into position until it stops as shown in illustration. A portion of the plastic guide in the cartridge will stick out. DO NOT FORCE THE CARTRIDGE FURTHER INTO THE BORE.
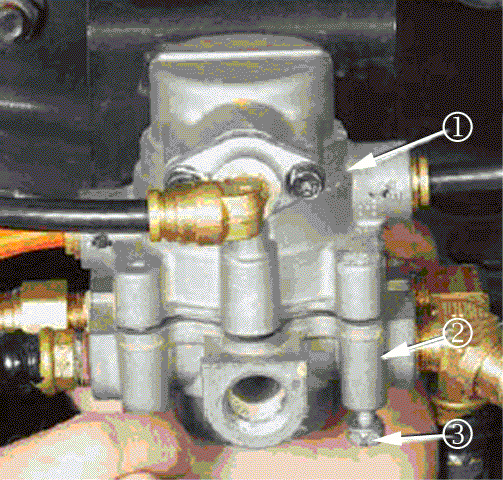
- Align the valve lower body with the upper body. Push the body halves together. Insert two of the four screws (finger tight) into the lower body mounting holes closest to the supply port first. This will help with alignment. One extra screw is included in this kit in the event one is lost during installation.
- Insert the remaining two screws (3) and tighten finger tight. Tighten all four screws to 10 N·m(90 lb in).
- Using pipe sealant, install the new external check valve and any fittings that were removed. Be sure that orientation of the fittings is the same. Install fittings finger tight, then tighten 1.5 - 2 turns. For shaped fittings, such as tees and elbows, tighten no more than one additional turn to the final position.
- Refer to the Chassis Mount Air Brake Park Control Valve Replacement procedure in SI and reinstall the air brake park control valve.
- Reconnect all air lines.
- Secure the enclosed tie wrap on the valve or fitting in a conspicuous location to identify the field repair has been performed.
- Lower the vehicle.

Important: Teflon tape is not an acceptable substitute for pipe sealant.
| - | Start the engine and recharge the air brake system pressure. Refer to SI, if required. |
| - | Verify that the air brake system functions properly. Refer to SI, if required. |
Claim Information
Submit a Product Recall Claim with the information indicated below:
Repair Performed | Part Count | Part No. | Parts Allow | CC-FC | Labor Op | Labor Hours |
|---|---|---|---|---|---|---|
Inspect Date Code & Cavity Number & Replace External Check Valve | 1 | -- | * | MA-96 | V1686 | 0.4 |
Inspect Date Code & Cavity Number & Replace Internal and External Check Valves | 1 | -- | * | MA-96 | V1687 | 0.6 |
Inspect Date Code & Cavity Number & Replace Air Brake Park Control Valve (inc. External Check Valve) | 2 | -- | ** | MA-96 | V1688 | 0.9 |
Add: Automatic Transmission | 0.3 | |||||
* The "Parts Allowance" should be the sum total of the current GMSPO Dealer net price plus applicable Mark-Up or Landed Cost Mark-Up (for Export) for valve kit needed to complete the repair. ** The "Parts Allowance" should be the sum total of the current GMSPO Dealer net price plus applicable Mark-Up or Landed Cost Mark-Up (for Export) for valve kit and air brake park control valve needed to complete the repair. | ||||||
Refer to the General Motors WINS Claims Processing Manual for details on Product Recall Claim Submission.
Customer Notification - For US and Canada
General Motors will notify customers of this recall on their vehicle (see copy of customer letter included with this bulletin).
Customer Notification - For Export
Letters will be sent to known owners of record located within areas covered by the US National Traffic and Motor Vehicle Safety Act. For owners outside these areas, dealers should notify customers using the attached sample letter.
Dealer Recall Responsibility - For US and Export (US States, Territories, and Possessions)
The US National Traffic and Motor Vehicle Safety Act provides that each vehicle that is subject to a recall of this type must be adequately repaired within a reasonable time after the customer has tendered it for repair. A failure to repair within sixty days after tender of a vehicle is prima facie evidence of failure to repair within a reasonable time. If the condition is not adequately repaired within a reasonable time, the customer may be entitled to an identical or reasonably equivalent vehicle at no charge or to a refund of the purchase price less a reasonable allowance for depreciation. To avoid having to provide these burdensome remedies, every effort must be made to promptly schedule an appointment with each customer and to repair their vehicle as soon as possible. In the recall notification letters, customers are told how to contact the US National Highway Traffic Safety Administration if the recall is not completed within a reasonable time.
Dealer Recall Responsibility - All
All unsold new vehicles in dealers' possession and subject to this recall must be held and inspected/repaired per the service procedure of this recall bulletin before customers take possession of these vehicles.
Dealers are to service all vehicles subject to this recall at no charge to customers, regardless of mileage, age of vehicle, or ownership, from this time forward.
Customers who have recently purchased vehicles sold from your vehicle inventory, and for which there is no customer information indicated on the dealer listing, are to be contacted by the dealer. Arrangements are to be made to make the required correction according to the instructions contained in this bulletin. A copy of the customer letter is provided in this bulletin for your use in contacting customers. Recall follow-up cards should not be used for this purpose, since the customer may not as yet have received the notification letter.
In summary, whenever a vehicle subject to this recall enters your vehicle inventory, or is in your dealership for service in the future, you must take the steps necessary to be sure the recall correction has been made before selling or releasing the vehicle.
October 2007Dear General Motors Customer:
This notice is sent to you in accordance with the requirements of the National Traffic and Motor Vehicle Safety Act.
General Motors has decided that a defect that relates to motor vehicle safety exists in certain 2006 and 2007 model year Chevrolet Kodiak and T-Series; and GMC TopKick and T-Series 7500/8500 Series straight towing and non-towing vehicles equipped with air brakes. As a result, GM is conducting a safety recall. We apologize for this inconvenience. However, we are concerned about your safety and continued satisfaction with our products.
Important:
• Your vehicle is involved in safety recall 07164. • Schedule an appointment with your GM dealer. • This service will be performed for you at no charge
.
Why is your vehicle being recalled?
The air brake park control valve in your vehicle may develop either an internal air leak or an air restriction. With this condition, the park brake may not release or may release only partially. If the vehicle is on an uneven surface, the park brake may not hold the vehicle and could result in unintended vehicle movement and a vehicle crash. This condition does not affect normal service braking.
What will we do?
Your GM dealer will inspect and replace the external check valve on the air brake park control valve. If the inspection determines the external check valve is damaged, the air brake park control valve will be replaced. Your vehicle may also require the replacement of an internal check valve in the air brake park control valve. This service will be performed for you at no charge.
Because of service scheduling requirements, it is likely that your dealer will need your vehicle longer than the actual inspection and service correction time of approximately 25 minutes to 1 hour and 15 minutes, depending on the service required.
What should you do?
You should contact your GM dealer to arrange a service appointment as soon as possible. Bring the enclosed customer reply form with you when you visit your dealer. The form identifies the repairs required. If you no longer own this vehicle, please let us know by completing the form and mailing it back to us.
Do you have questions?
If you have questions or concerns that your dealer is unable to resolve, please contact the Customer Assistance Center at1-800-862-4389.
If after contacting your dealer and the Customer Assistance Center, you are still not satisfied we have done our best to remedy this condition without charge and within a reasonable time, you may wish to write the Administrator, National Highway Traffic Safety Administration, 1200 New Jersey Avenue, SE, Washington DC 20590, or call the toll-free Vehicle Safety Hotline at 1.888.327.4236 (TTY 1.800.424.9153), or go to http://www.safercar.gov.
Federal regulation requires that any vehicle lessor receiving this recall notice must forward a copy of this notice to the lessee within ten days.
Scott Lawson
General Director,
Customer and Relationship Services
Enclosure
07164
