For 1990-2009 cars only
Removal Procedure
- Remove the front wheelhouse panel. Refer to Wheelhouse Panel Replacement.
- Remove the surge tank. Refer to Radiator Surge Tank Replacement.
- Remove the charged air cooler hoses from the charged air cooler. Refer to appropriate procedure:
- Remove the condenser. Refer to Air Conditioning Condenser Replacement.
- Remove the radiator support braces. Refer to Radiator Support Diagonal Brace Replacement.
- Remove the vacuum pump. Refer to Vacuum Pump Assembly Replacement.
- Remove the vacuum tank. Refer to Vacuum Tank Replacement.
- Remove the fan shroud. Refer to Engine Coolant Fan Shroud Replacement.
- Remove the upper radiator air baffle. Refer to Radiator Air Upper Baffle and Deflector Replacement.
- Remove the side radiator air baffles. Refer to Radiator Air Side Baffle and Deflector Replacement.
- Remove the lower radiator air baffle. Refer to Radiator Air Lower Baffle and Deflector Replacement.
- Remove the upper radiator support bracket bolts.
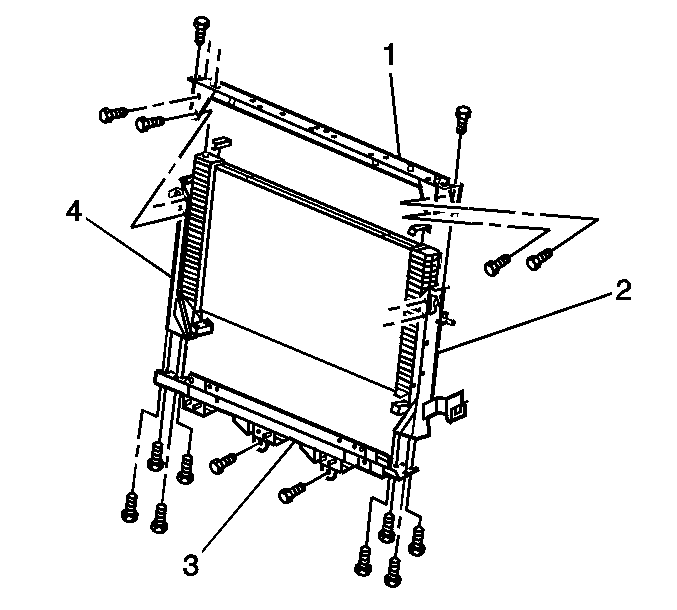
- Remove the upper radiator support (1).
- Remove the radiator. Refer to Radiator Replacement.
- Remove the lower radiator support bracket bolts.
- Remove the side radiator support brackets (2, 4).
- Remove the lower radiator support bracket (3).
| • | Charge Air Cooler Replacement for the 6.6L engine |
| • | Charge Air Cooler Replacement for the 7.2L (Caterpillar) engine |
| • | Charge Air Cooler Replacement for the 7.8L engine |

Installation Procedure
- Install the lower radiator support bracket (3).
- Install the side radiator support brackets (2, 4).
- Install the lower radiator support bracket bolts.
- Install the radiator. Refer to Radiator Replacement.
- Install the upper radiator support (1).
- Install the upper radiator support bracket bolts.
- Install the fan shroud. Refer to Engine Coolant Fan Shroud Replacement.
- Install the side radiator air baffles. Refer to Radiator Air Side Baffle and Deflector Replacement.
- Install the lower radiator air baffle. Refer to Radiator Air Lower Baffle and Deflector Replacement.
- Install the upper radiator air baffle. Refer to Radiator Air Upper Baffle and Deflector Replacement.
- Install the vacuum tank. Refer to Vacuum Tank Replacement.
- Install the vacuum pump. Refer to Vacuum Pump Assembly Replacement.
- Install the radiator support braces. Refer to Radiator Support Diagonal Brace Replacement.
- Install the condenser. Refer to Air Conditioning Condenser Replacement.
- Install the charged air cooler hoses from the charged air cooler. Refer to the appropriate procedure:
- Install the surge tank. Refer to Radiator Surge Tank Replacement.
- Install the front wheelhouse panel. Refer to Wheelhouse Panel Replacement.

Caution: Refer to Fastener Caution in the Preface section.
Tighten
Tighten the bolts to 25 N·m (18 lb ft).
Tighten
Tighten the bolts to 25 N·m (18 lb ft).
| • | Charge Air Cooler Replacement for the 6.6L engine |
| • | Charge Air Cooler Replacement for the 7.2L (Caterpillar) engine |
| • | Charge Air Cooler Replacement for the 7.8L engine |
