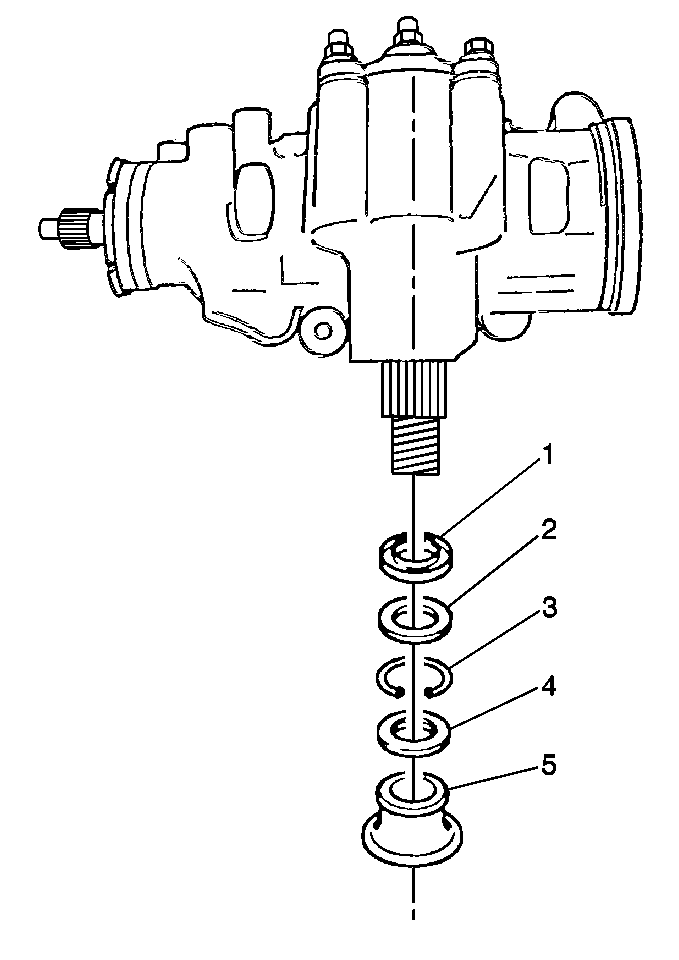
Steering Gear Pitman Shaft Seal Replacement RWD
Removal Procedure
Tools Required
J 4245 Internal Snap
Ring Pliers
- Mark the position of the pitman arm to the pitman shaft.

- Remove the pitman arm
from the pitman shaft. Refer to
Pitman Arm Replacement
in Steering Linkage.
- Remove the pitman shaft boot (5).
- Remove the dust seal (4).
- Remove the snap ring (3) using the J 4245
.
| 5.1. | Loosely install the pitman arm and the nut on the shaft. |
This is required in order to remove the seal.
| 5.2. | Position a drain pan under the steering gear. |
| 5.4. | Turn the steering wheel from stop to stop, bouncing the wheel
off the stops. |
- Remove the nut and the pitman arm.
- Remove the washer (2) and the seal (1).
- Inspect the pitman shaft seal surfaces for roughness or pitting.
If pitted, replace the shaft.
- Inspect the housing for burrs.
Remove the burrs before installing the new seals.
- Clean the pitman shaft and the seal areas using a crocus cloth.
Installation Procedure
Tools Required
J 6219 Seal Installer

- Lubricate the new seals
(1) with power steering fluid.
- Apply a single layer of tape to the pitman arm shaft in order
to avoid damaging the seals.
- Install the seal.
- Install the washer using the J 6219
in order to seat the seal.
The seal should be in far enough in order to install the snap ring.
- Install the snap ring (3).
- Center the steering wheel.
| • | Turn the wheel until the wheel stops. |
| • | Turn the wheel in the opposite direction until the wheel stops,
while counting the number of turns. |
| • | Turn the wheel back 1/2 the number of turns in the previous step. |
- Install the dust seal (4).
- Install the pitman shaft boot (5).
- Install the pitman arm. Refer to
Pitman Arm Replacement
.
- Bleed the system. Refer to
Power Steering System Bleeding
.
Steering Gear Pitman Shaft Seal Replacement S4WD
Removal Procedure
Tools Required
J 4245 Internal Snap
Ring Pliers
- Remove the power steering gear. Refer to
Steering Gear Replacement
.
- Mark the position of the pitman arm to the pitman shaft.

- Remove the pitman arm
from the pitman shaft. Refer to
Pitman Arm Replacement
in Steering Linkage.
- Remove the pitman shaft boot (5).
- Remove the dust seal (4).
- Remove the snap ring (3) using the J 4245
.
| 6.1. | Loosely install the pitman arm and the nut on the shaft. |
This is required in order to remove the seal.
| 6.2. | Position a drain pan under the steering gear. |
| 6.4. | Turn the steering wheel from stop to stop, bouncing the wheel
off the stops. |
- Remove the nut and the pitman arm.
- Remove the washer (2) and the seal (1).
- Inspect the pitman shaft seal surfaces for roughness or pitting.
If pitted, replace the shaft.
- Inspect the housing for burrs.
Remove the burrs before installing the new seals.
- Clean the pitman shaft and the seal areas using a crocus cloth.
Installation Procedure
Tools Required
J 6219 Pitman Shaft
Seal Installer

- Lubricate the new seals
(1) with power steering fluid.
- Apply a single layer of tape to the pitman arm shaft in order
to avoid damaging the seals.
- Install the seal.
- Install the washer using the J 6219
in order to seat the seal.
The seal should be in far enough in order to install the snap ring.
- Install the snap ring (3).
- Install the power steering gear. Refer to
Steering Gear Replacement
.
- Center the steering wheel.
| • | Turn the wheel until the wheel stops. |
| • | Turn the wheel in the opposite direction until the wheel stops,
while counting the number of turns. |
| • | Turn the wheel back 1/2 the number of turns in the previous step. |
- Install the dust seal (4).
- Install the pitman shaft boot (5).
- Install the pitman arm. Refer to
Pitman Arm Replacement
.
- Bleed the system. Refer to
Power Steering System Bleeding
.


