Driver or Passenger Seat Belt Buckle Replacement Crew Cab
Removal Procedure
Caution: To help avoid personal injury from unrepaired crash damage to a restraint system, perform the seat belt check for each seat belt system. Replace the seat belt system if there is any doubt about the condition of system components.
Notice: To prevent possible seat belt damage, refer to the following items before
servicing or replacing lap and shoulder belts, including single loop belt
systems:
• Lap and shoulder belts will be
serviced as follows: - Replace only the part in question. - Do not intermix standard and deluxe
belts on front or rear seats. - All attachment hardware
must be replaced, not reused. • Keep sharp edges and damaging objects away from belts. • Avoid bending or damaging any portion of the belt buckle
or latch plate. • Do not bleach or dye belt or strap
webbing. Clean with a mild soap solution and water. • When installing lap or shoulder belt anchor bolts, start the bolts by hand
to ensure that the bolts are threaded straight. • Do not attempt repairs on lap or shoulder belt retractor mechanisms to lap
belt retractor covers. Replace defective assemblies with new service replacement
parts. • Do not attempt to remove the seat belt retractor
cover. The cover and the long rivet securing the cover to the retractor are
not available as service replacement parts.
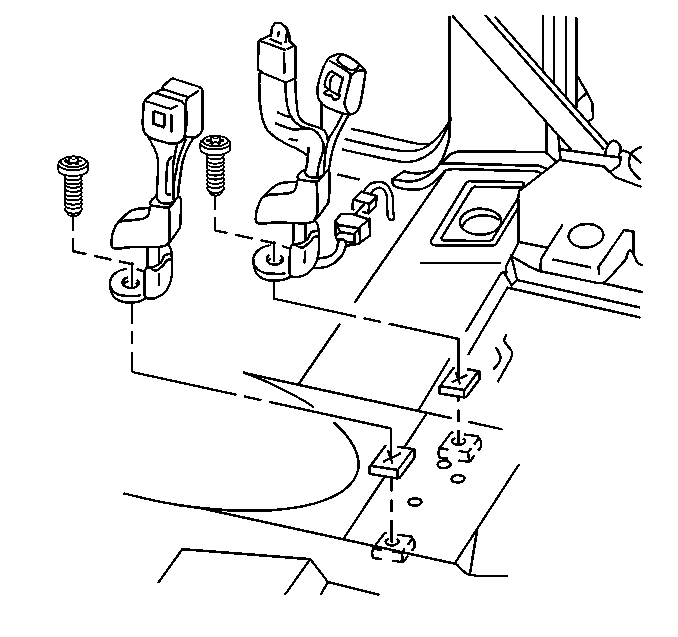
- Remove the cover from the buckle assembly which conceals the nut.
- Remove the nut from the buckle assembly to floor weld stud.
- Remove the seat belt warning wire from the buckle assembly on the driver's side only.
- Remove the buckle assembly from the vehicle.
Installation Procedure
- Install the buckle assembly to the floor panel.
- Install the seat belt warning wire to the buckle assembly on the driver's side only.
- Install the nut to the buckle assembly and onto the floor panel weld stud.
- Install the cover assembly over the nut.

Notice: Use the correct fastener in the correct location. Replacement fasteners must be the correct part number for that application. Fasteners requiring replacement or fasteners requiring the use of thread locking compound or sealant are identified in the service procedure. Do not use paints, lubricants, or corrosion inhibitors on fasteners or fastener joint surfaces unless specified. These coatings affect fastener torque and joint clamping force and may damage the fastener. Use the correct tightening sequence and specifications when installing fasteners in order to avoid damage to parts and systems.
Tighten
Tighten the nut to 42 N·m (31 lb ft).
Driver or Passenger Seat Belt Buckle Replacement Luxury
Removal Procedure
Caution: To help avoid personal injury from unrepaired crash damage to a restraint system, perform the seat belt check for each seat belt system. Replace the seat belt system if there is any doubt about the condition of system components.
Notice: To prevent possible seat belt damage, refer to the following items before
servicing or replacing lap and shoulder belts, including single loop belt
systems:
• Lap and shoulder belts will be
serviced as follows: - Replace only the part in question. - Do not intermix standard and deluxe
belts on front or rear seats. - All attachment hardware
must be replaced, not reused. • Keep sharp edges and damaging objects away from belts. • Avoid bending or damaging any portion of the belt buckle
or latch plate. • Do not bleach or dye belt or strap
webbing. Clean with a mild soap solution and water. • When installing lap or shoulder belt anchor bolts, start the bolts by hand
to ensure that the bolts are threaded straight. • Do not attempt repairs on lap or shoulder belt retractor mechanisms to lap
belt retractor covers. Replace defective assemblies with new service replacement
parts. • Do not attempt to remove the seat belt retractor
cover. The cover and the long rivet securing the cover to the retractor are
not available as service replacement parts.
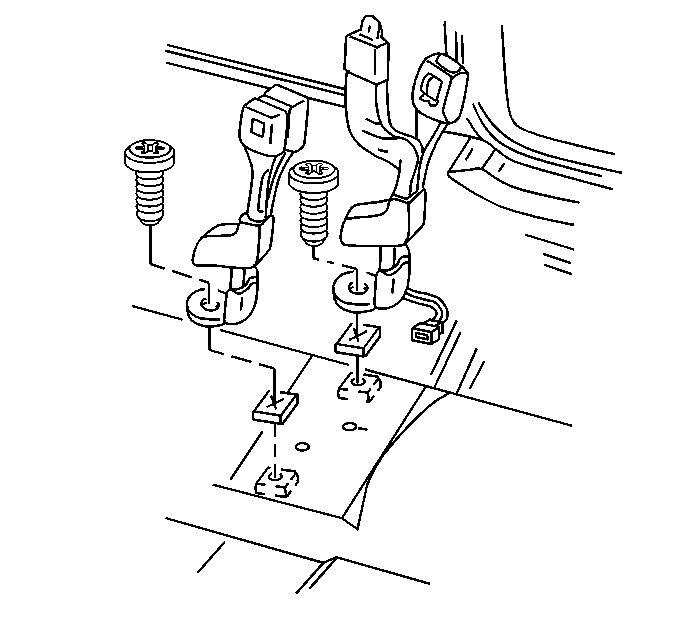
- Remove the cover from the buckle assembly which conceals the nut.
- Remove the nut from the buckle assembly to floor weld stud.
- Remove the seat belt warning wire from the buckle assembly on the driver's side only.
- Remove the buckle assembly from the vehicle.
Installation Procedure
- Install the buckle assembly to the floor panel.
- Install the seat belt warning wire to the buckle assembly on the driver's side only.
- Install the nut to the buckle assembly and onto the floor panel weld stud.
- Install the cover assembly over the nut.

Notice: Use the correct fastener in the correct location. Replacement fasteners must be the correct part number for that application. Fasteners requiring replacement or fasteners requiring the use of thread locking compound or sealant are identified in the service procedure. Do not use paints, lubricants, or corrosion inhibitors on fasteners or fastener joint surfaces unless specified. These coatings affect fastener torque and joint clamping force and may damage the fastener. Use the correct tightening sequence and specifications when installing fasteners in order to avoid damage to parts and systems.
Tighten
Tighten the nut to 42 N·m (31 lb ft).
Driver or Passenger Seat Belt Buckle Replacement Extended Cab With Bucket Seat
Removal Procedure
Caution: To help avoid personal injury from unrepaired crash damage to a restraint system, perform the seat belt check for each seat belt system. Replace the seat belt system if there is any doubt about the condition of system components.
Notice: To prevent possible seat belt damage, refer to the following items before
servicing or replacing lap and shoulder belts, including single loop belt
systems:
• Lap and shoulder belts will be
serviced as follows: - Replace only the part in question. - Do not intermix standard and deluxe
belts on front or rear seats. - All attachment hardware
must be replaced, not reused. • Keep sharp edges and damaging objects away from belts. • Avoid bending or damaging any portion of the belt buckle
or latch plate. • Do not bleach or dye belt or strap
webbing. Clean with a mild soap solution and water. • When installing lap or shoulder belt anchor bolts, start the bolts by hand
to ensure that the bolts are threaded straight. • Do not attempt repairs on lap or shoulder belt retractor mechanisms to lap
belt retractor covers. Replace defective assemblies with new service replacement
parts. • Do not attempt to remove the seat belt retractor
cover. The cover and the long rivet securing the cover to the retractor are
not available as service replacement parts.
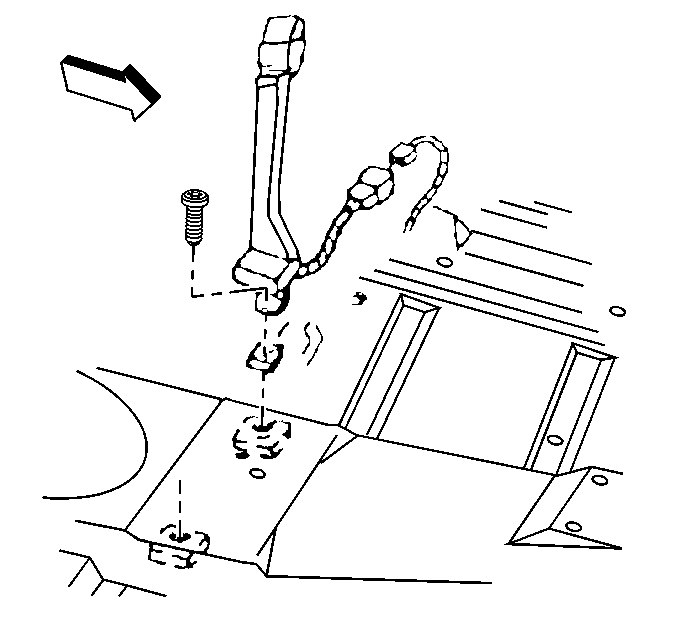
- Remove the cover from the buckle assembly which conceals the nut.
- Remove the nut from the buckle assembly to floor weld stud.
- Remove the seat belt warning wire from the buckle assembly on the driver's side only.
- Remove the buckle assembly from the vehicle.
Installation Procedure
- Install the buckle assembly to the floor panel.
- Install the seat belt warning wire to the buckle assembly on the driver's side only.
- Install the nut to the buckle assembly and onto the floor panel weld stud.
- Install the cover assembly over the nut.

Notice: Use the correct fastener in the correct location. Replacement fasteners must be the correct part number for that application. Fasteners requiring replacement or fasteners requiring the use of thread locking compound or sealant are identified in the service procedure. Do not use paints, lubricants, or corrosion inhibitors on fasteners or fastener joint surfaces unless specified. These coatings affect fastener torque and joint clamping force and may damage the fastener. Use the correct tightening sequence and specifications when installing fasteners in order to avoid damage to parts and systems.
Tighten
Tighten the nut to 42 N·m (31 lb ft).
Driver or Passenger Seat Belt Buckle Replacement Extended Cab With Bench Seat
Removal Procedure
Caution: To help avoid personal injury from unrepaired crash damage to a restraint system, perform the seat belt check for each seat belt system. Replace the seat belt system if there is any doubt about the condition of system components.
Notice: To prevent possible seat belt damage, refer to the following items before
servicing or replacing lap and shoulder belts, including single loop belt
systems:
• Lap and shoulder belts will be
serviced as follows: - Replace only the part in question. - Do not intermix standard and deluxe
belts on front or rear seats. - All attachment hardware
must be replaced, not reused. • Keep sharp edges and damaging objects away from belts. • Avoid bending or damaging any portion of the belt buckle
or latch plate. • Do not bleach or dye belt or strap
webbing. Clean with a mild soap solution and water. • When installing lap or shoulder belt anchor bolts, start the bolts by hand
to ensure that the bolts are threaded straight. • Do not attempt repairs on lap or shoulder belt retractor mechanisms to lap
belt retractor covers. Replace defective assemblies with new service replacement
parts. • Do not attempt to remove the seat belt retractor
cover. The cover and the long rivet securing the cover to the retractor are
not available as service replacement parts.
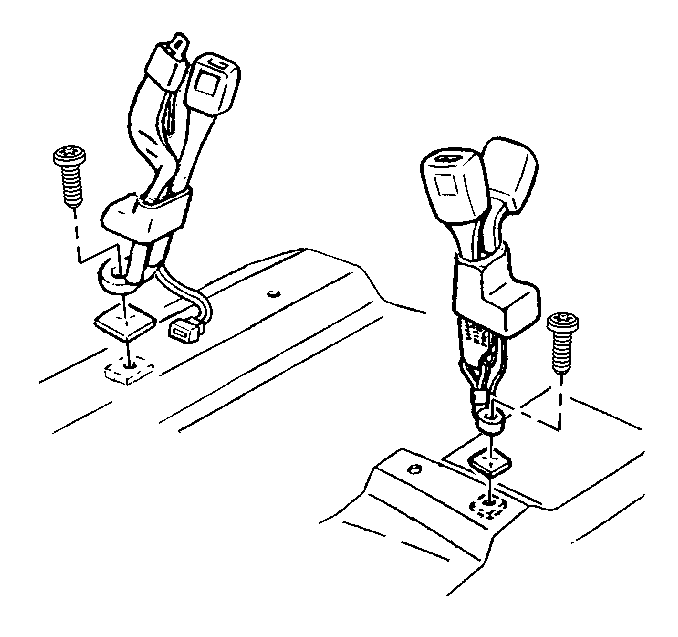
- Remove the cover from the buckle assembly which conceals the nut.
- Remove the nut from the buckle assembly to floor weld stud.
- Remove the seat belt warning wire from the buckle assembly on the driver's side only.
- Remove the buckle assembly from the vehicle.
Installation Procedure
- Install the buckle assembly to the floor panel.
- Install the seat belt warning wire to the buckle assembly on the driver's side only.
- Install the nut to the buckle assembly and onto the floor panel weld stud.
- Install the cover assembly over the nut.

Notice: Use the correct fastener in the correct location. Replacement fasteners must be the correct part number for that application. Fasteners requiring replacement or fasteners requiring the use of thread locking compound or sealant are identified in the service procedure. Do not use paints, lubricants, or corrosion inhibitors on fasteners or fastener joint surfaces unless specified. These coatings affect fastener torque and joint clamping force and may damage the fastener. Use the correct tightening sequence and specifications when installing fasteners in order to avoid damage to parts and systems.
Tighten
Tighten the nut to 42 N·m (31 lb ft).
Driver or Passenger Seat Belt Buckle Replacement Extended Cab With 3rd Door
Removal Procedure
Caution: To help avoid personal injury from unrepaired crash damage to a restraint system, perform the seat belt check for each seat belt system. Replace the seat belt system if there is any doubt about the condition of system components.
Notice: To prevent possible seat belt damage, refer to the following items before
servicing or replacing lap and shoulder belts, including single loop belt
systems:
• Lap and shoulder belts will be
serviced as follows: - Replace only the part in question. - Do not intermix standard and deluxe
belts on front or rear seats. - All attachment hardware
must be replaced, not reused. • Keep sharp edges and damaging objects away from belts. • Avoid bending or damaging any portion of the belt buckle
or latch plate. • Do not bleach or dye belt or strap
webbing. Clean with a mild soap solution and water. • When installing lap or shoulder belt anchor bolts, start the bolts by hand
to ensure that the bolts are threaded straight. • Do not attempt repairs on lap or shoulder belt retractor mechanisms to lap
belt retractor covers. Replace defective assemblies with new service replacement
parts. • Do not attempt to remove the seat belt retractor
cover. The cover and the long rivet securing the cover to the retractor are
not available as service replacement parts.
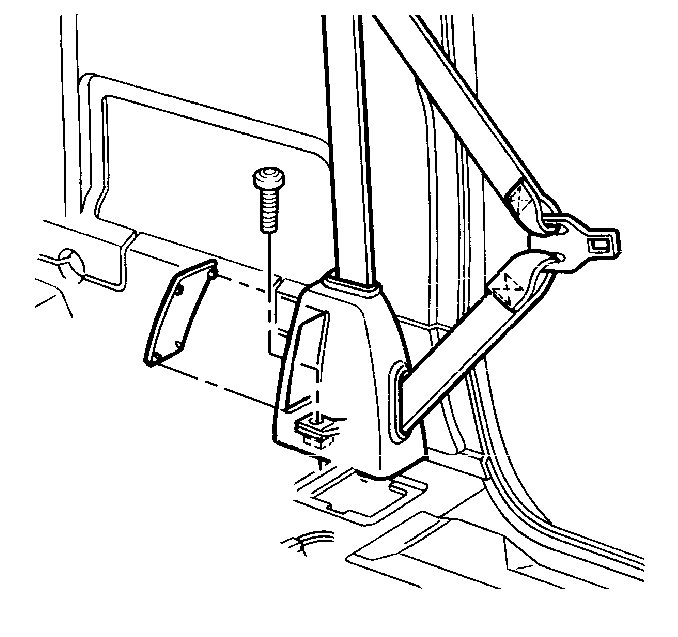
- Remove the cover from the buckle assembly which conceals the nut.
- Remove the nut from the buckle assembly to floor weld stud.
- Remove the seat belt warning wire from the buckle assembly on the driver's side only.
- Remove the buckle assembly from the vehicle.

Installation Procedure
- Install the buckle assembly to the floor panel.
- Install the seat belt warning wire to the buckle assembly on the driver's side only.
- Install the nut to the buckle assembly and onto the floor panel weld stud.
- Install the cover assembly over the nut.


Notice: Use the correct fastener in the correct location. Replacement fasteners must be the correct part number for that application. Fasteners requiring replacement or fasteners requiring the use of thread locking compound or sealant are identified in the service procedure. Do not use paints, lubricants, or corrosion inhibitors on fasteners or fastener joint surfaces unless specified. These coatings affect fastener torque and joint clamping force and may damage the fastener. Use the correct tightening sequence and specifications when installing fasteners in order to avoid damage to parts and systems.
Tighten
Tighten the nut to 42 N·m (31 lb ft).
Driver or Passenger Seat Belt Buckle Replacement Regular Cab With Bench Seat
Removal Procedure
Caution: To help avoid personal injury from unrepaired crash damage to a restraint system, perform the seat belt check for each seat belt system. Replace the seat belt system if there is any doubt about the condition of system components.
Notice: To prevent possible seat belt damage, refer to the following items before
servicing or replacing lap and shoulder belts, including single loop belt
systems:
• Lap and shoulder belts will be
serviced as follows: - Replace only the part in question. - Do not intermix standard and deluxe
belts on front or rear seats. - All attachment hardware
must be replaced, not reused. • Keep sharp edges and damaging objects away from belts. • Avoid bending or damaging any portion of the belt buckle
or latch plate. • Do not bleach or dye belt or strap
webbing. Clean with a mild soap solution and water. • When installing lap or shoulder belt anchor bolts, start the bolts by hand
to ensure that the bolts are threaded straight. • Do not attempt repairs on lap or shoulder belt retractor mechanisms to lap
belt retractor covers. Replace defective assemblies with new service replacement
parts. • Do not attempt to remove the seat belt retractor
cover. The cover and the long rivet securing the cover to the retractor are
not available as service replacement parts.
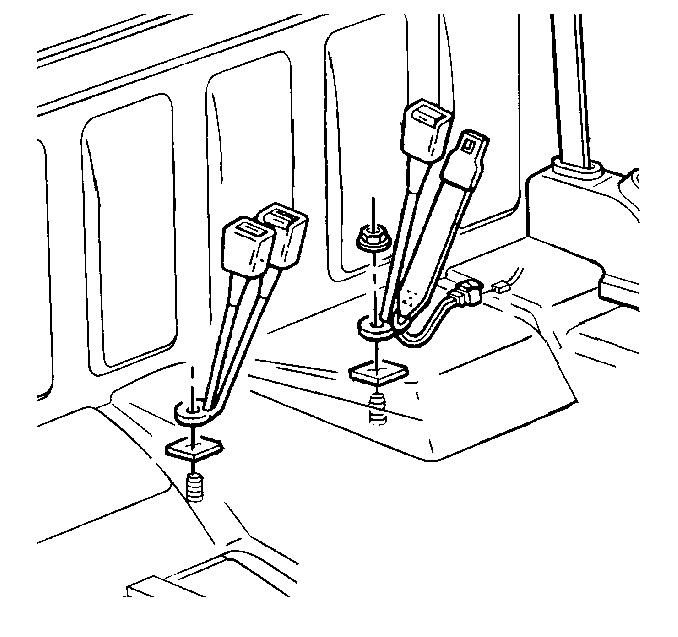
- Remove the cover from the buckle assembly which conceals the nut.
- Remove the nut from the buckle assembly to floor weld stud.
- Remove the seat belt warning wire from the buckle assembly on the driver's side only.
- Remove the buckle assembly from the vehicle.
Installation Procedure
- Install the buckle assembly to the floor panel.
- Install the seat belt warning wire to the buckle assembly on the driver's side only.
- Install the nut to the buckle assembly and onto the floor panel weld stud.
- Install the cover assembly over the nut.

Notice: Use the correct fastener in the correct location. Replacement fasteners must be the correct part number for that application. Fasteners requiring replacement or fasteners requiring the use of thread locking compound or sealant are identified in the service procedure. Do not use paints, lubricants, or corrosion inhibitors on fasteners or fastener joint surfaces unless specified. These coatings affect fastener torque and joint clamping force and may damage the fastener. Use the correct tightening sequence and specifications when installing fasteners in order to avoid damage to parts and systems.
Tighten
Tighten the nut to 42 N·m (31 lb ft).
Driver or Passenger Seat Belt Buckle Replacement Regular Cab With Bucket Seat
Removal Procedure
Caution: To help avoid personal injury from unrepaired crash damage to a restraint system, perform the seat belt check for each seat belt system. Replace the seat belt system if there is any doubt about the condition of system components.
Notice: To prevent possible seat belt damage, refer to the following items before
servicing or replacing lap and shoulder belts, including single loop belt
systems:
• Lap and shoulder belts will be
serviced as follows: - Replace only the part in question. - Do not intermix standard and deluxe
belts on front or rear seats. - All attachment hardware
must be replaced, not reused. • Keep sharp edges and damaging objects away from belts. • Avoid bending or damaging any portion of the belt buckle
or latch plate. • Do not bleach or dye belt or strap
webbing. Clean with a mild soap solution and water. • When installing lap or shoulder belt anchor bolts, start the bolts by hand
to ensure that the bolts are threaded straight. • Do not attempt repairs on lap or shoulder belt retractor mechanisms to lap
belt retractor covers. Replace defective assemblies with new service replacement
parts. • Do not attempt to remove the seat belt retractor
cover. The cover and the long rivet securing the cover to the retractor are
not available as service replacement parts.
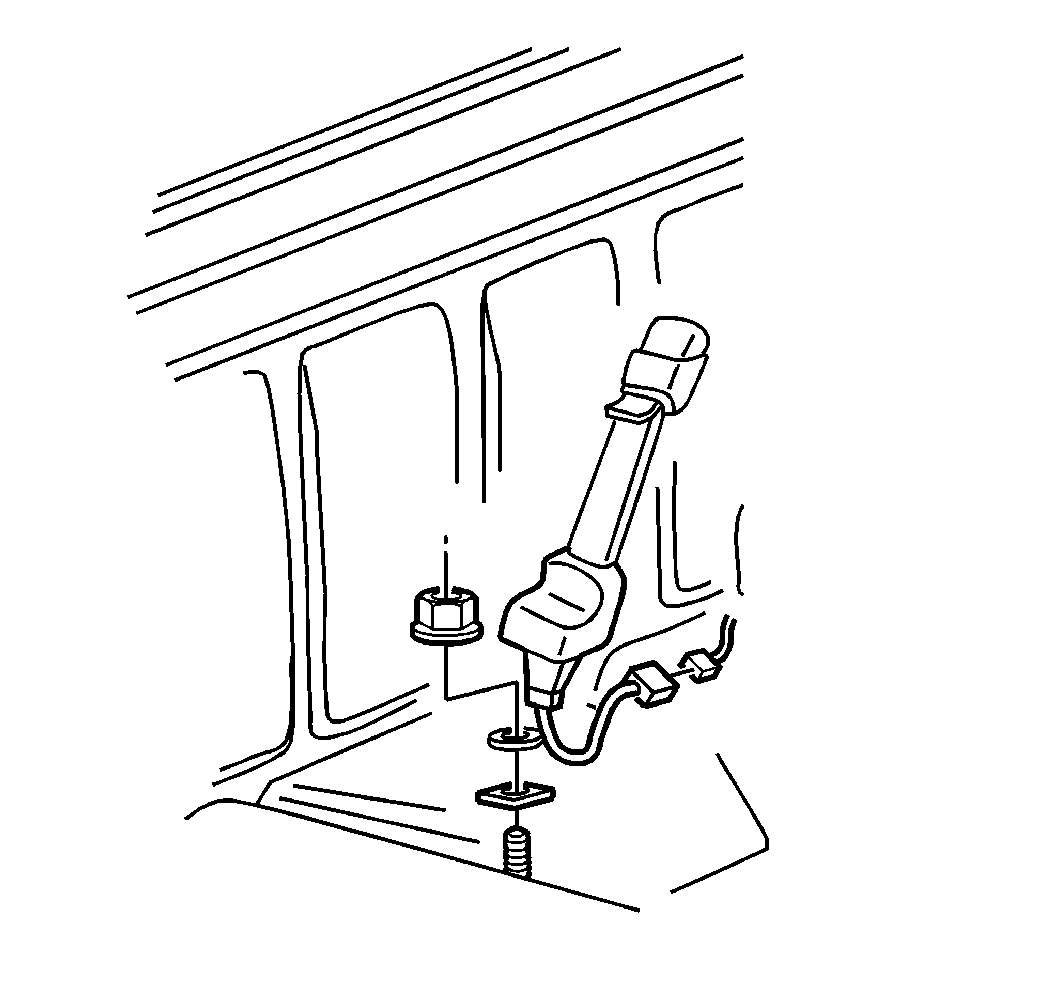
- Remove the cover from the buckle assembly which conceals the nut.
- Remove the nut from the buckle assembly to floor weld stud.
- Remove the seat belt warning wire from the buckle assembly on the driver's side only.
- Remove the buckle assembly from the vehicle.

Installation Procedure
- Install the buckle assembly to the floor panel.
- Install the seat belt warning wire to the buckle assembly on the driver's side only.
- Install the nut to the buckle assembly and onto the floor panel weld stud.
- Install the cover assembly over the nut.

Notice: Use the correct fastener in the correct location. Replacement fasteners must be the correct part number for that application. Fasteners requiring replacement or fasteners requiring the use of thread locking compound or sealant are identified in the service procedure. Do not use paints, lubricants, or corrosion inhibitors on fasteners or fastener joint surfaces unless specified. These coatings affect fastener torque and joint clamping force and may damage the fastener. Use the correct tightening sequence and specifications when installing fasteners in order to avoid damage to parts and systems.
Tighten
Tighten the nut to 42 N·m (31 lb ft).
