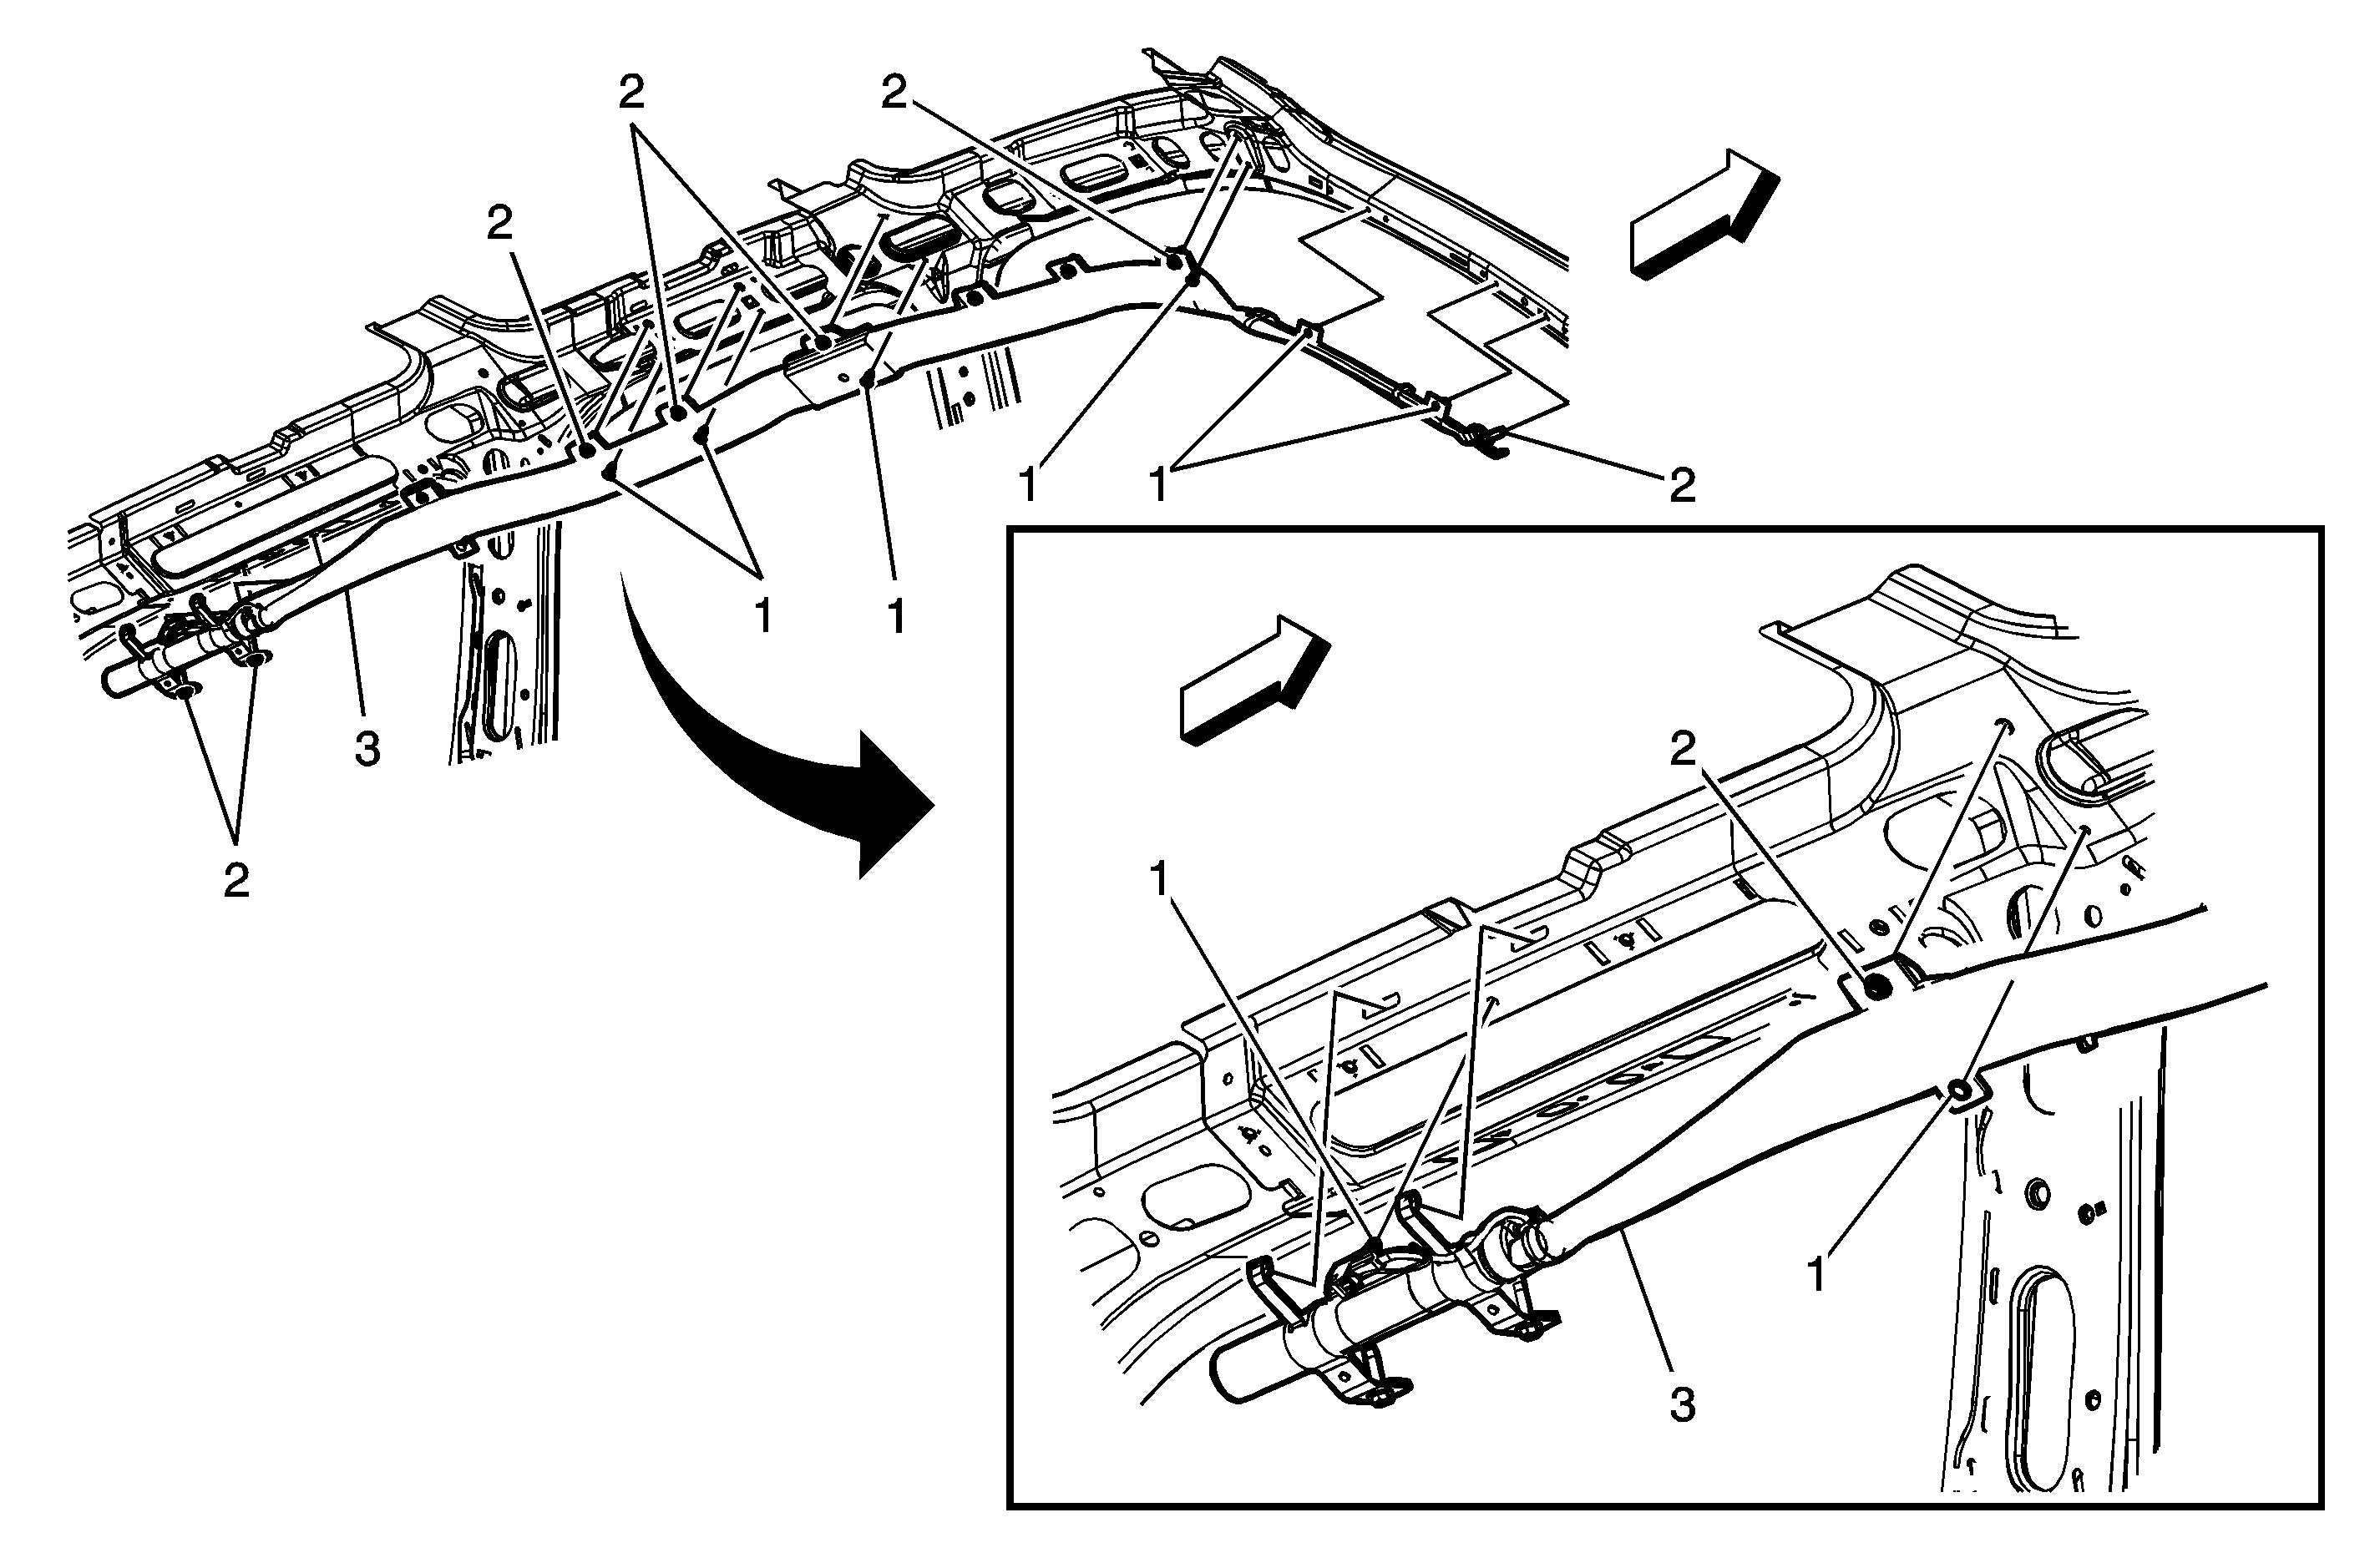
Callout
| Component Name
|
|
Warning: In order to prevent SIR deployment, personal injury, or unnecessary SIR system repairs, do not strike the door or the door pillar in the area of the side impact sensor (SIS). Turn OFF the ignition
and remove the key when performing service in the area of the SIS.
Warning: Refer to SIR Warning in the Preface section.
Warning: Refer to SIR Inflator Module Handling and Storage Warning in the Preface section.
Preliminary Procedures
- Disable the supplemental inflatable restraint (SIR) system. Refer to
SIR Disabling and Enabling.
- Remove windshield garnish molding. Refer to
Windshield Pillar Garnish Molding Replacement.
- Remove upper center pillar trim panel. Refer to
Center Pillar Upper Garnish Molding Replacement.
- Remove body lock pillar garnish molding. Refer to
Body Lock Pillar Garnish Molding Replacement.
- Remove roof rail rear assist handle. Refer to
Roof Rail Rear Assist Handle Replacement.
- Remove coat hooks. Refer to
Coat Hook Replacement.
- Lower side of headliner. Refer to
Headlining Trim Panel Replacement.
|
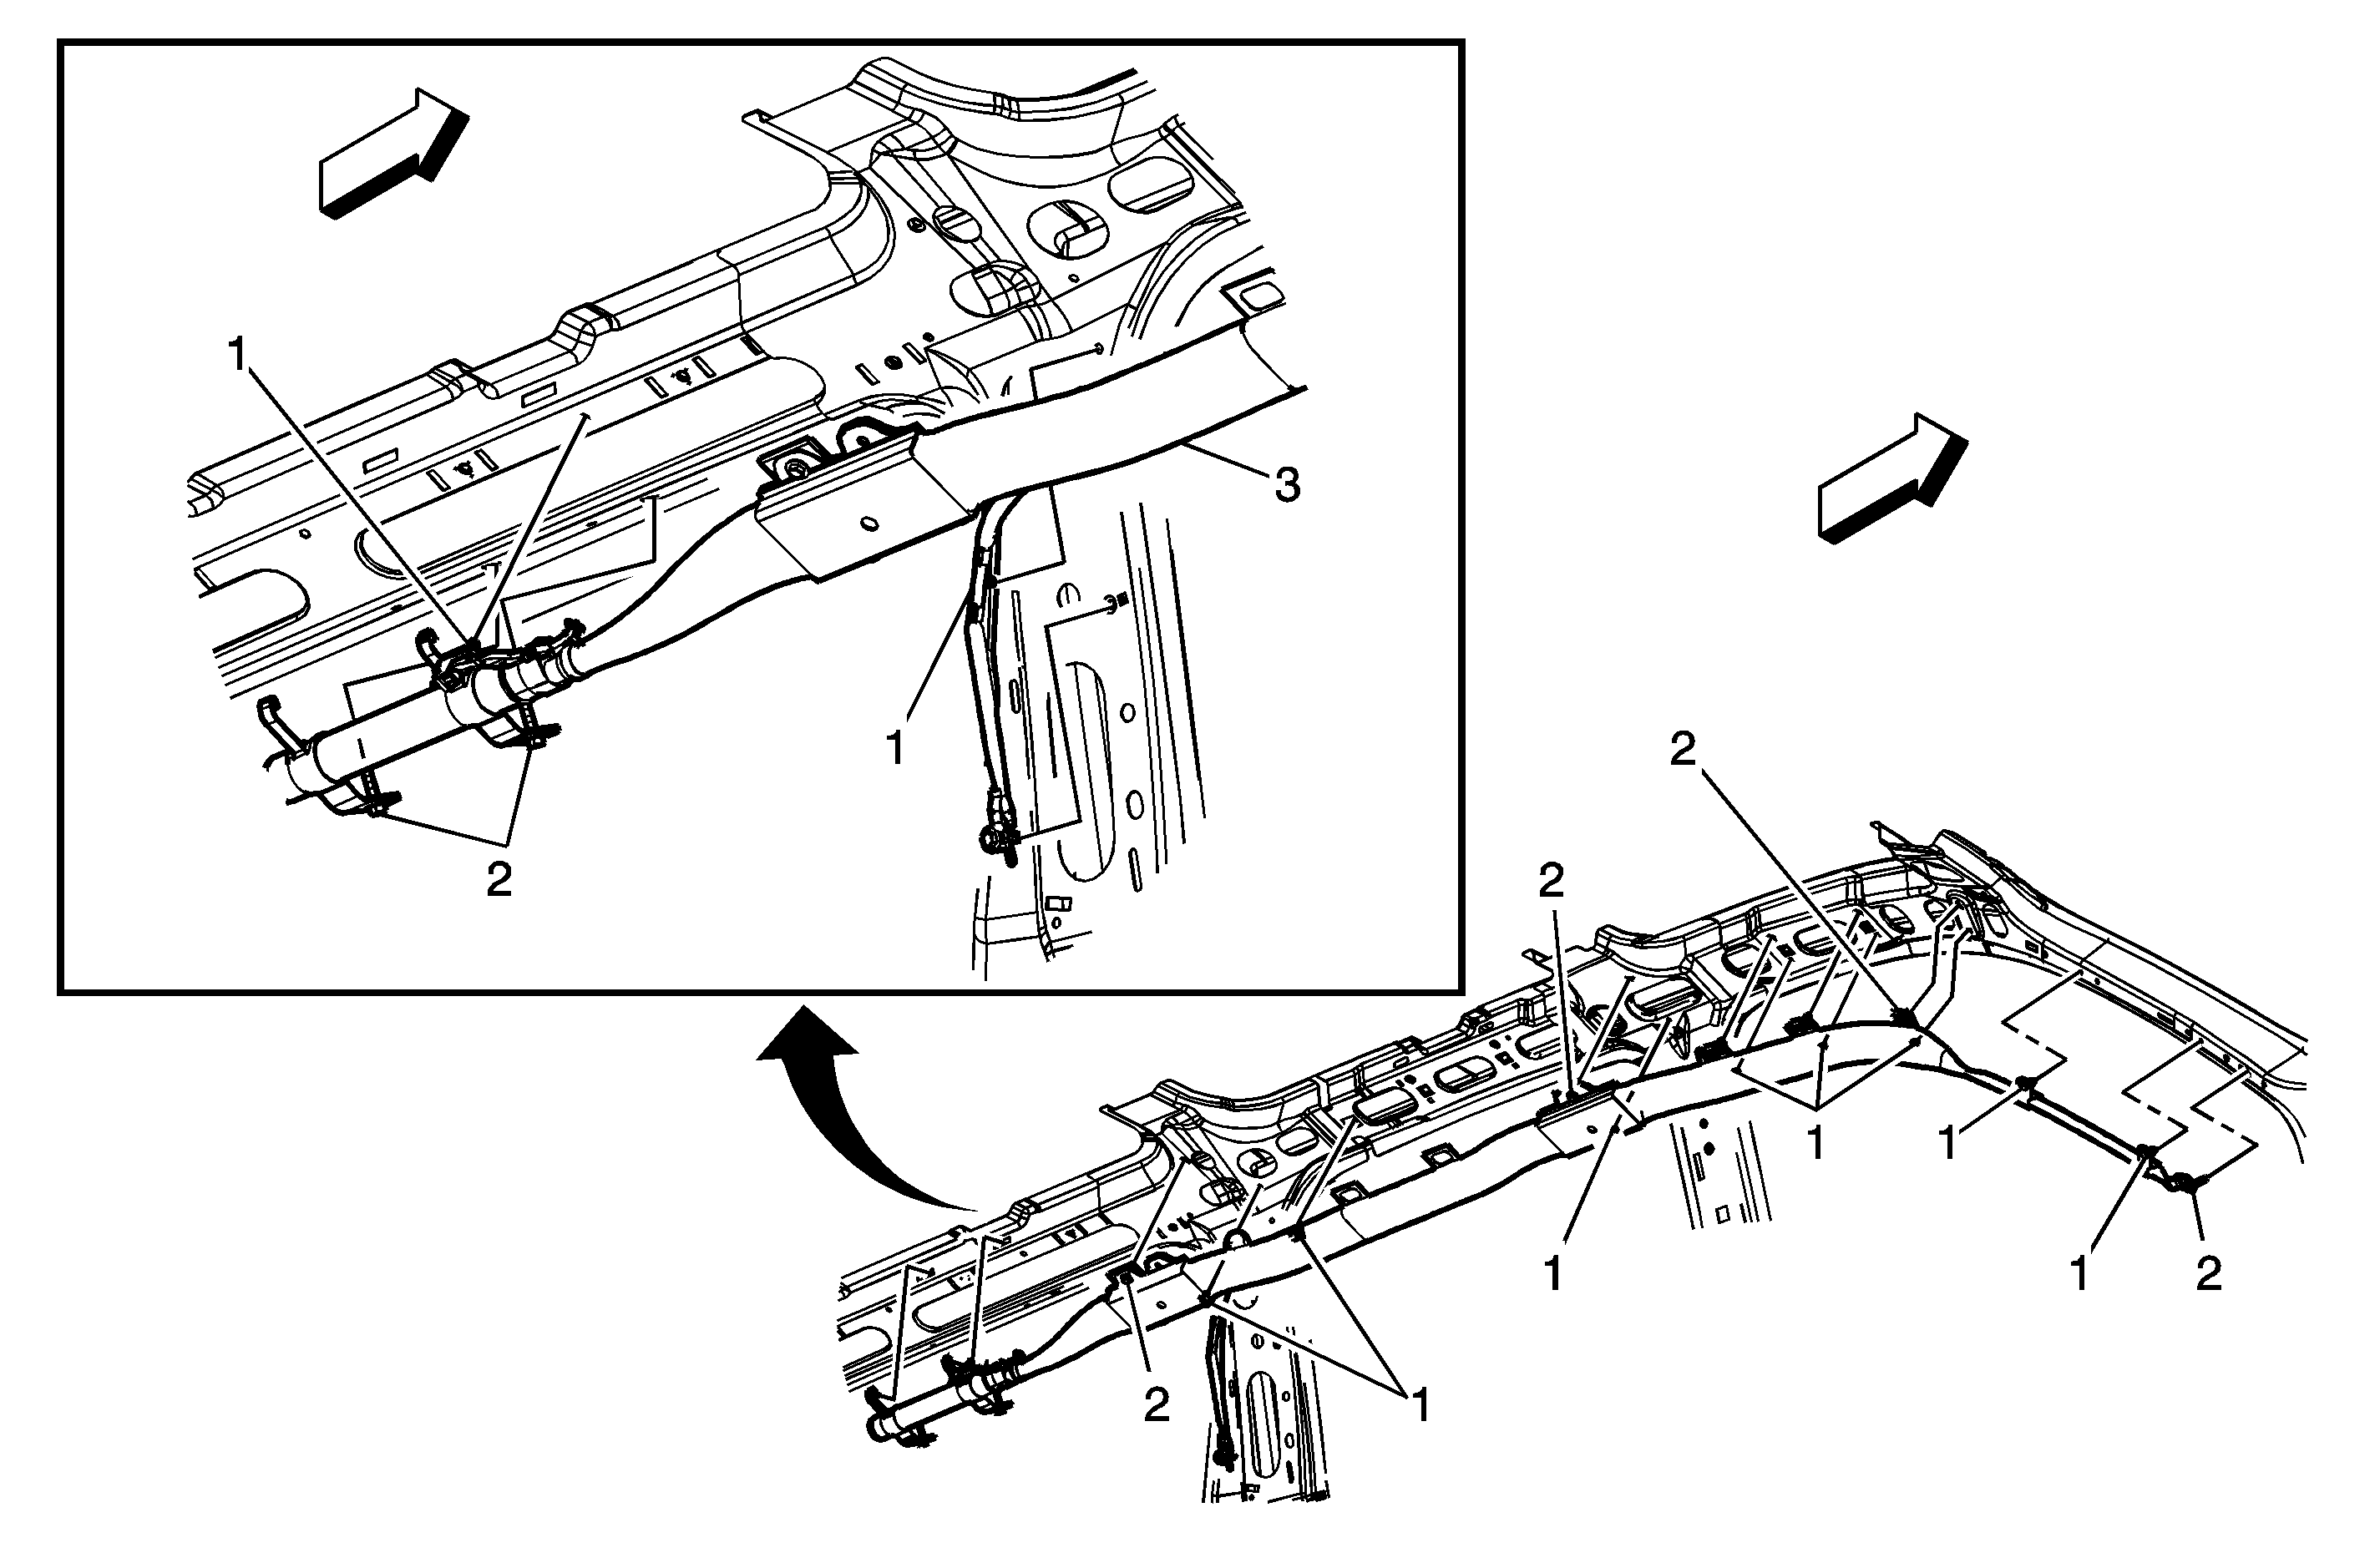
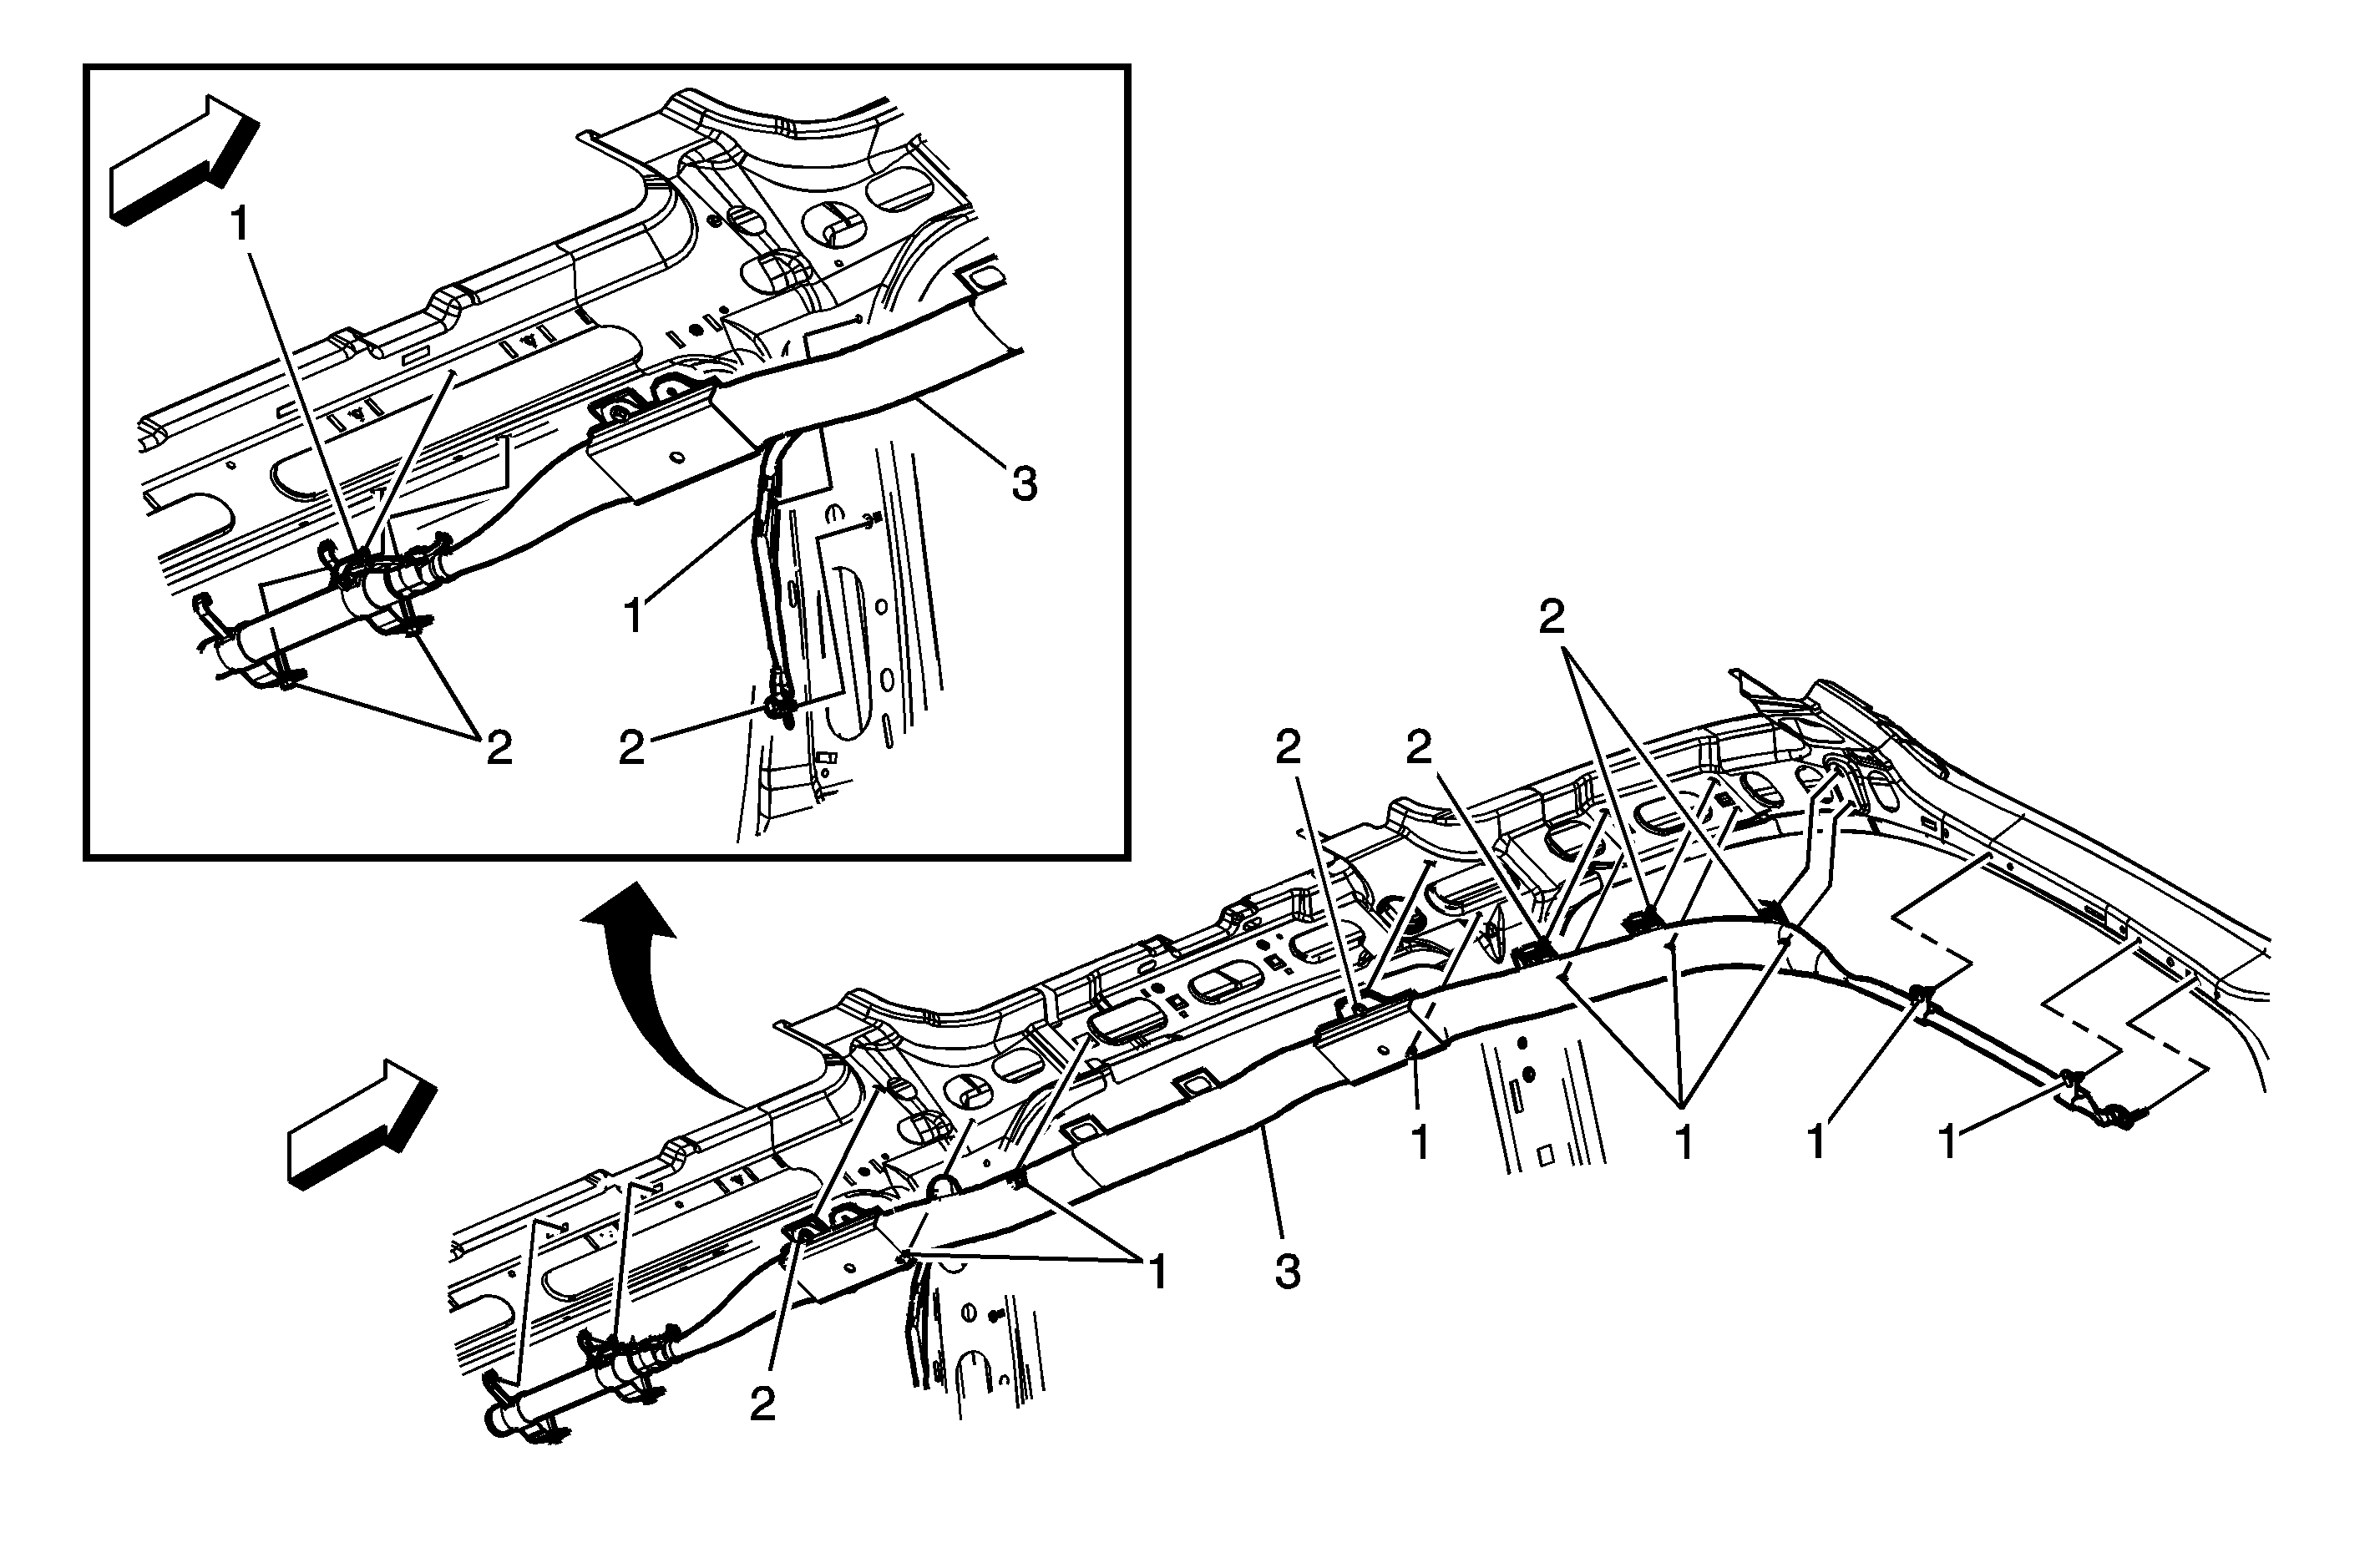
1
| Inflatable Restraint Roof Rail Retainer (Qty: 6)
|
2
| Inflatable Restraint Roof Rail Bolt (Qty: 6)
Caution: Refer to Fastener Caution in the Preface section.
Procedure
- The following repair procedure should be used if an inflatable restraint roof rail module M-6 nut is stripped:
| 1.1. | Remove the current M-6 bolt. |
| 1.2. | Retain the module out of the way if necessary. Ensure that the module does not get damaged. Remove any other module bolts if installed, to help retain the module out of the way if necessary. |
- If location is at second row roof rail assist handle bracket attachments:
| • | Remove the roof rail assist handle bracket if installed. |
| • | Drill out the slot at the location on roof rail assist handle bracket at the stripped weld-nut location to 8 mm (0.31 in) diameter. |
| • | Hand tap (thread) stripped weld-nut to M7 X 1.00 thread for M-7 replacement bolt. |
- If location is at second row roof rail assist handle bracket attachments, reinstall the roof rail assist handle bracket.
- If present, remove the M-6 bolt and plastic prefixation bracket from the module assembly.
- Reinstall the module. Ensure the module does not get damaged.
- Hand start the replacement M-7 bolt P/N 11609538. For cushion attachments, ensure the bolt goes through both layers of the attachment webbing.
- Hand start any other bolts that were removed.
- Tighten the bolts to original specification.
Tighten
9 N·m (80 lb in) |
3
| Inflatable Restraint Roof Rail Module Assembly
Procedure
- Release the connector position assurance (CPA) retainer.
- Disconnect the electrical connectors.
- Ensure roof rail inflator has been fully deployed before disposal. Refer to
Inflator Module Handling and Scrapping.
|
Callout
| Component Name
|
|
Warning: In order to prevent SIR deployment, personal injury, or unnecessary SIR system repairs, do not strike the door or the door pillar in the area of the side impact sensor (SIS). Turn OFF the ignition
and remove the key when performing service in the area of the SIS.
Warning: Refer to SIR Warning in the Preface section.
Warning: Refer to SIR Inflator Module Handling and Storage Warning in the Preface section.
Preliminary Procedures
- Disable the supplemental inflatable restraint (SIR) system. Refer to
SIR Disabling and Enabling.
- Remove the body lock pillar garnish molding. Refer to
Body Lock Pillar Garnish Molding Replacement.
- Remove the body rear corner upper garnish molding. Refer to
Body Rear Corner Garnish Molding Replacement - Right Side and
Body Rear Corner Garnish Molding Replacement - Left Side.
- Remove the coat hooks. Refer to
Coat Hook Replacement.
- Lower side of headliner. Refer to
Headlining Trim Panel Replacement.
|
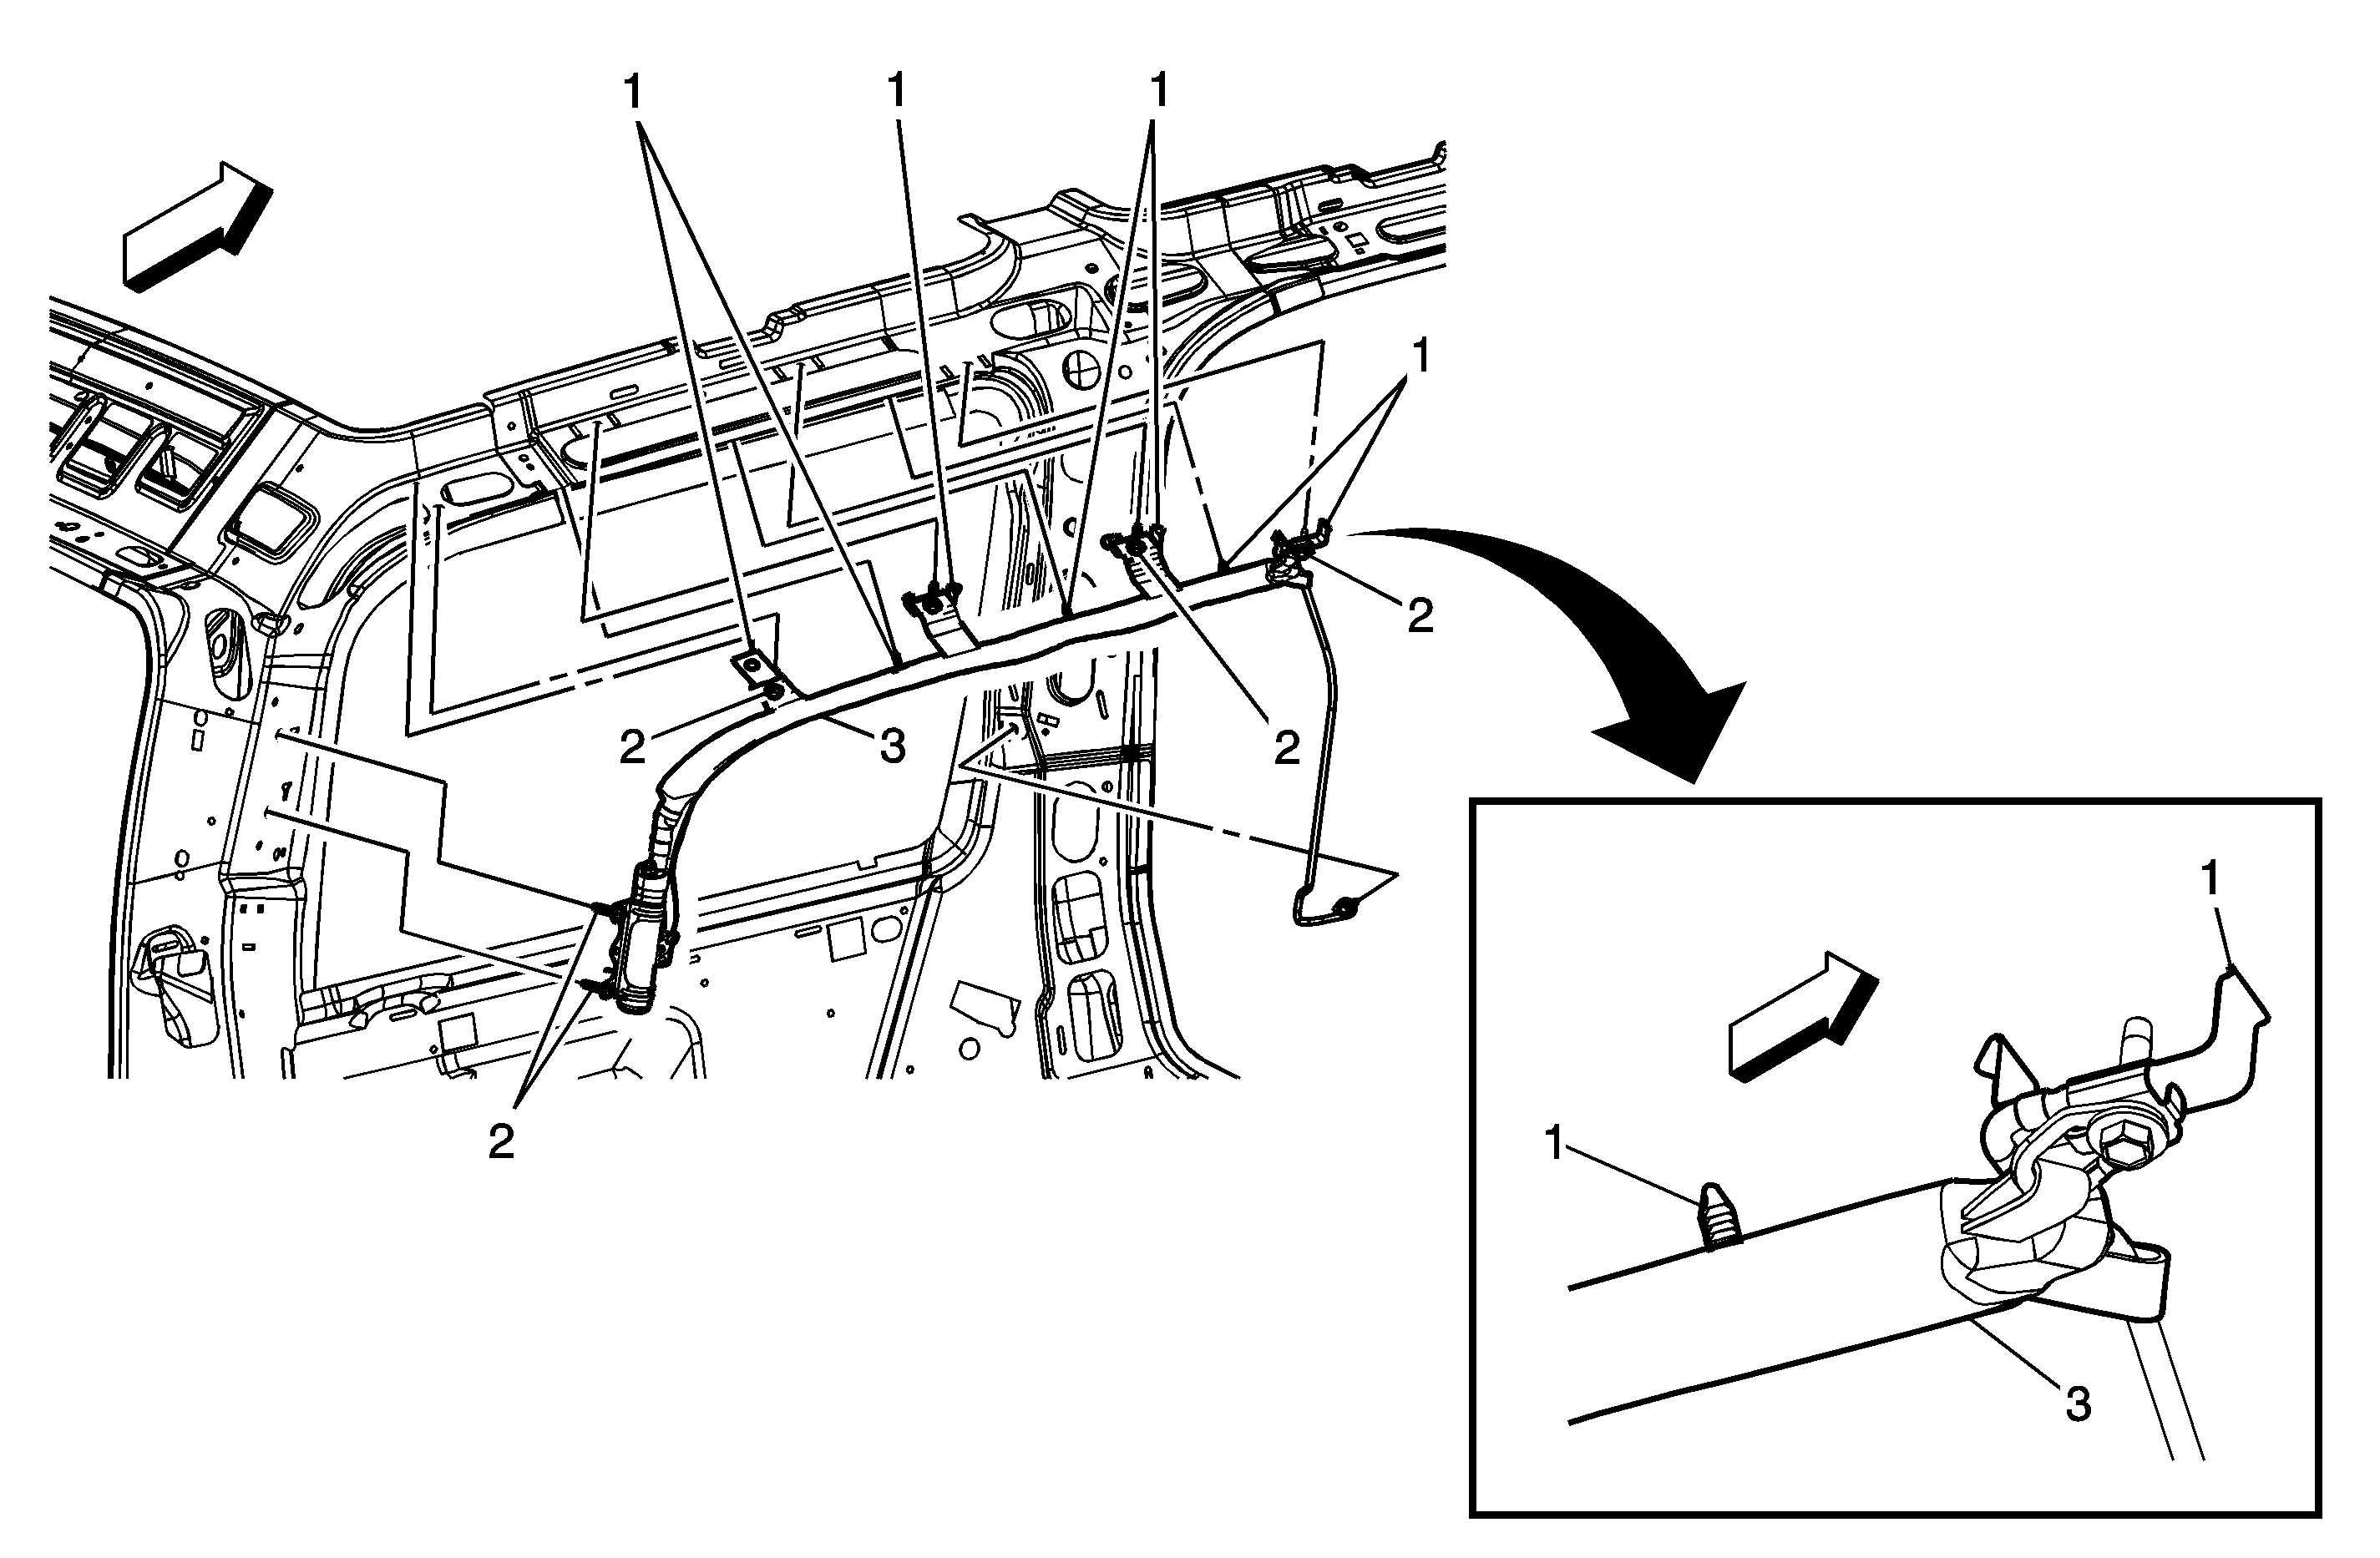
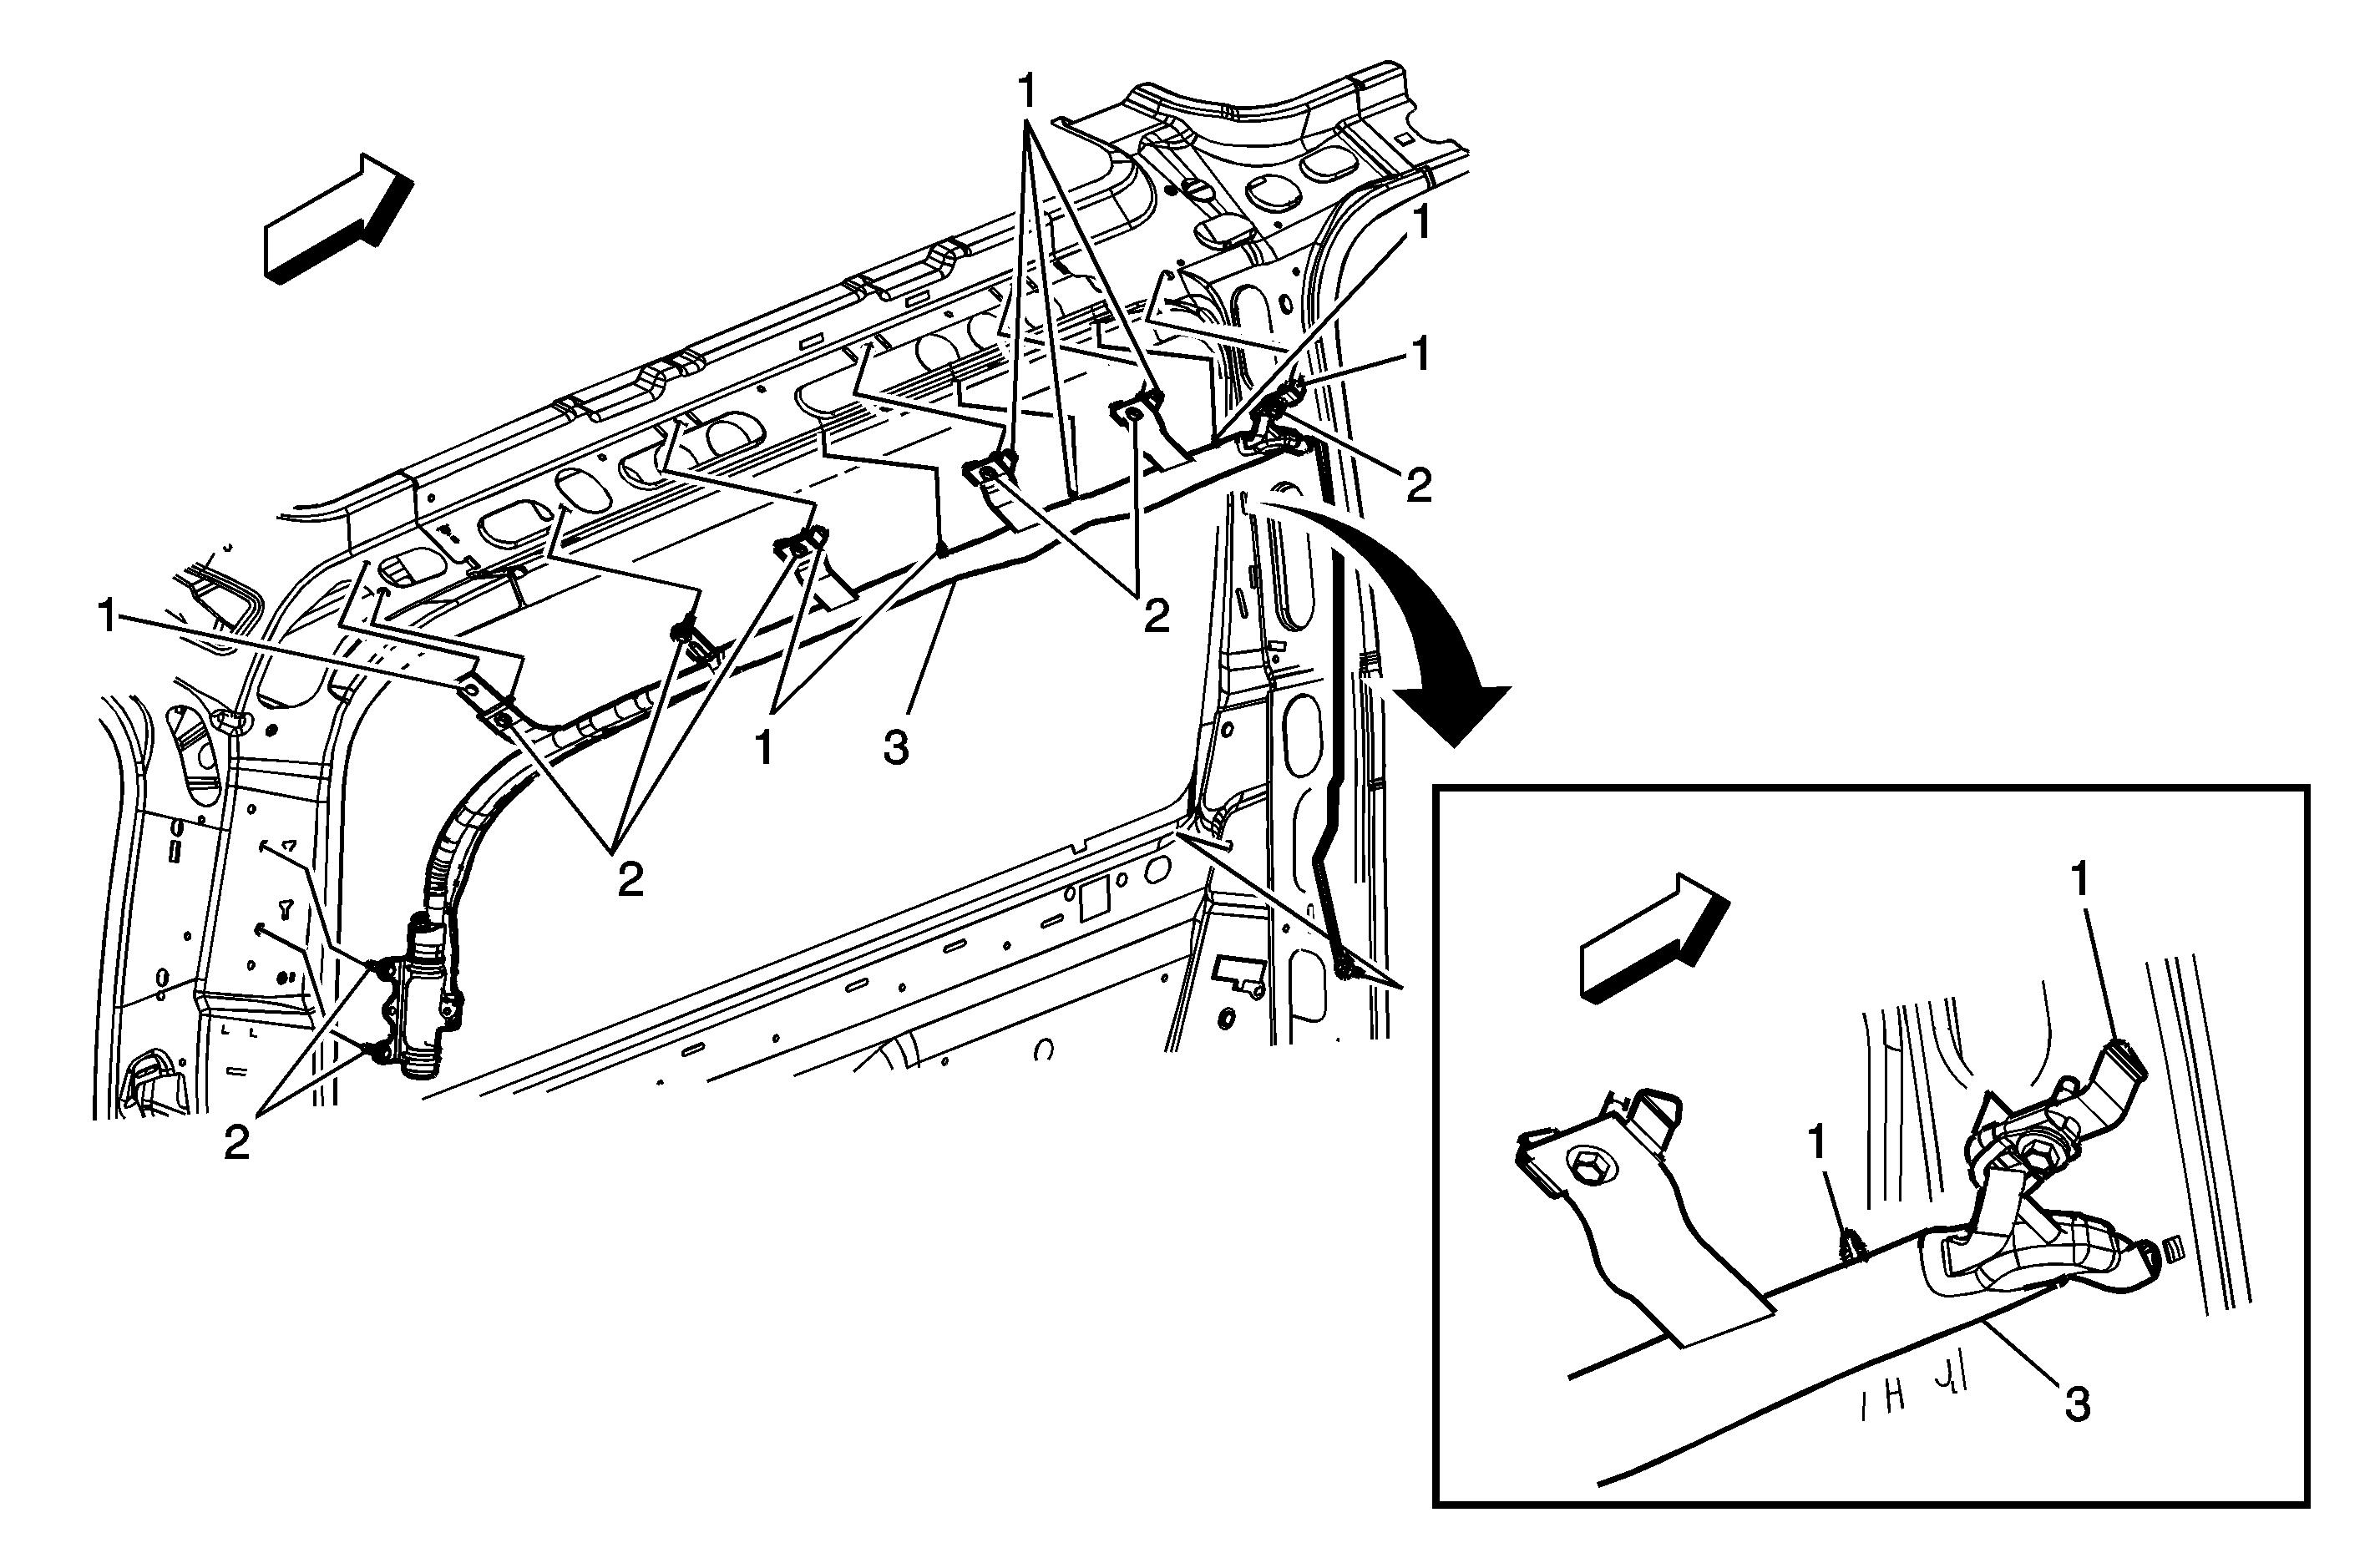
1
| Inflatable Restraint Roof Rail Retainer (Qty: 7)
|
2
| Inflatable Restraint Roof Rail Bolt (Qty: 7)
Caution: Refer to Fastener Caution in the Preface section.
Procedure
- The following repair procedure should be used if an inflatable restraint roof rail module M-6 nut is stripped:
| 1.1. | Remove the current M-6 bolt. |
| 1.2. | Retain the module out of the way if necessary. Ensure that the module does not get damaged. Remove any other module bolts if installed, to help retain the module out of the way if necessary. |
- If location is at second row roof rail assist handle bracket attachments:
| • | Remove the roof rail assist handle bracket if installed. |
| • | Drill out the slot at the location on roof rail assist handle bracket at the stripped weld-nut location to 8 mm (0.31 in) diameter. |
| • | Hand tap (thread) stripped weld-nut to M7 X 1.00 thread for M-7 replacement bolt. |
- If location is at second row roof rail assist handle bracket attachments, reinstall the roof rail assist handle bracket.
- If present, remove the M-6 bolt and plastic prefixation bracket from the module assembly.
- Reinstall the module. Ensure the module does not get damaged.
- Hand start the replacement M-7 bolt P/N 11609538. For cushion attachments, ensure the bolt goes through both layers of the attachment webbing.
- Hand start any other bolts that were removed.
- Tighten the bolts to original specification.
Tighten
9 N·m (80 lb in) |
3
| Inflatable Restraint Roof Rail Module Assembly
Procedure
- Release the connector position assurance (CPA) retainer.
- Disconnect the electrical connectors.
- Ensure roof rail inflator has been fully deployed before disposal. Refer to
Inflator Module Handling and Scrapping.
|
Callout
| Component Name
|
|
Warning: In order to prevent SIR deployment, personal injury, or unnecessary SIR system repairs, do not strike the door or the door pillar in the area of the side impact sensor (SIS). Turn OFF the ignition
and remove the key when performing service in the area of the SIS.
Warning: Refer to SIR Warning in the Preface section.
Warning: Refer to SIR Inflator Module Handling and Storage Warning in the Preface section.
Preliminary Procedures
- Disable the supplemental inflatable restraint (SIR) system. Refer to
SIR Disabling and Enabling.
- Remove the body lock pillar garnish molding. Refer to
Body Lock Pillar Garnish Molding Replacement.
- Remove the body rear corner upper garnish molding. Refer to
Body Rear Corner Garnish Molding Replacement - Right Side and
Body Rear Corner Garnish Molding Replacement - Left Side.
- Remove the coat hooks. Refer to
Coat Hook Replacement.
- Remove the body side right rear quarter trim panel. Refer to
Rear Quarter Trim Panel Replacement - Right Side.
- Lower side of headliner. Refer to
Headlining Trim Panel Replacement.
|
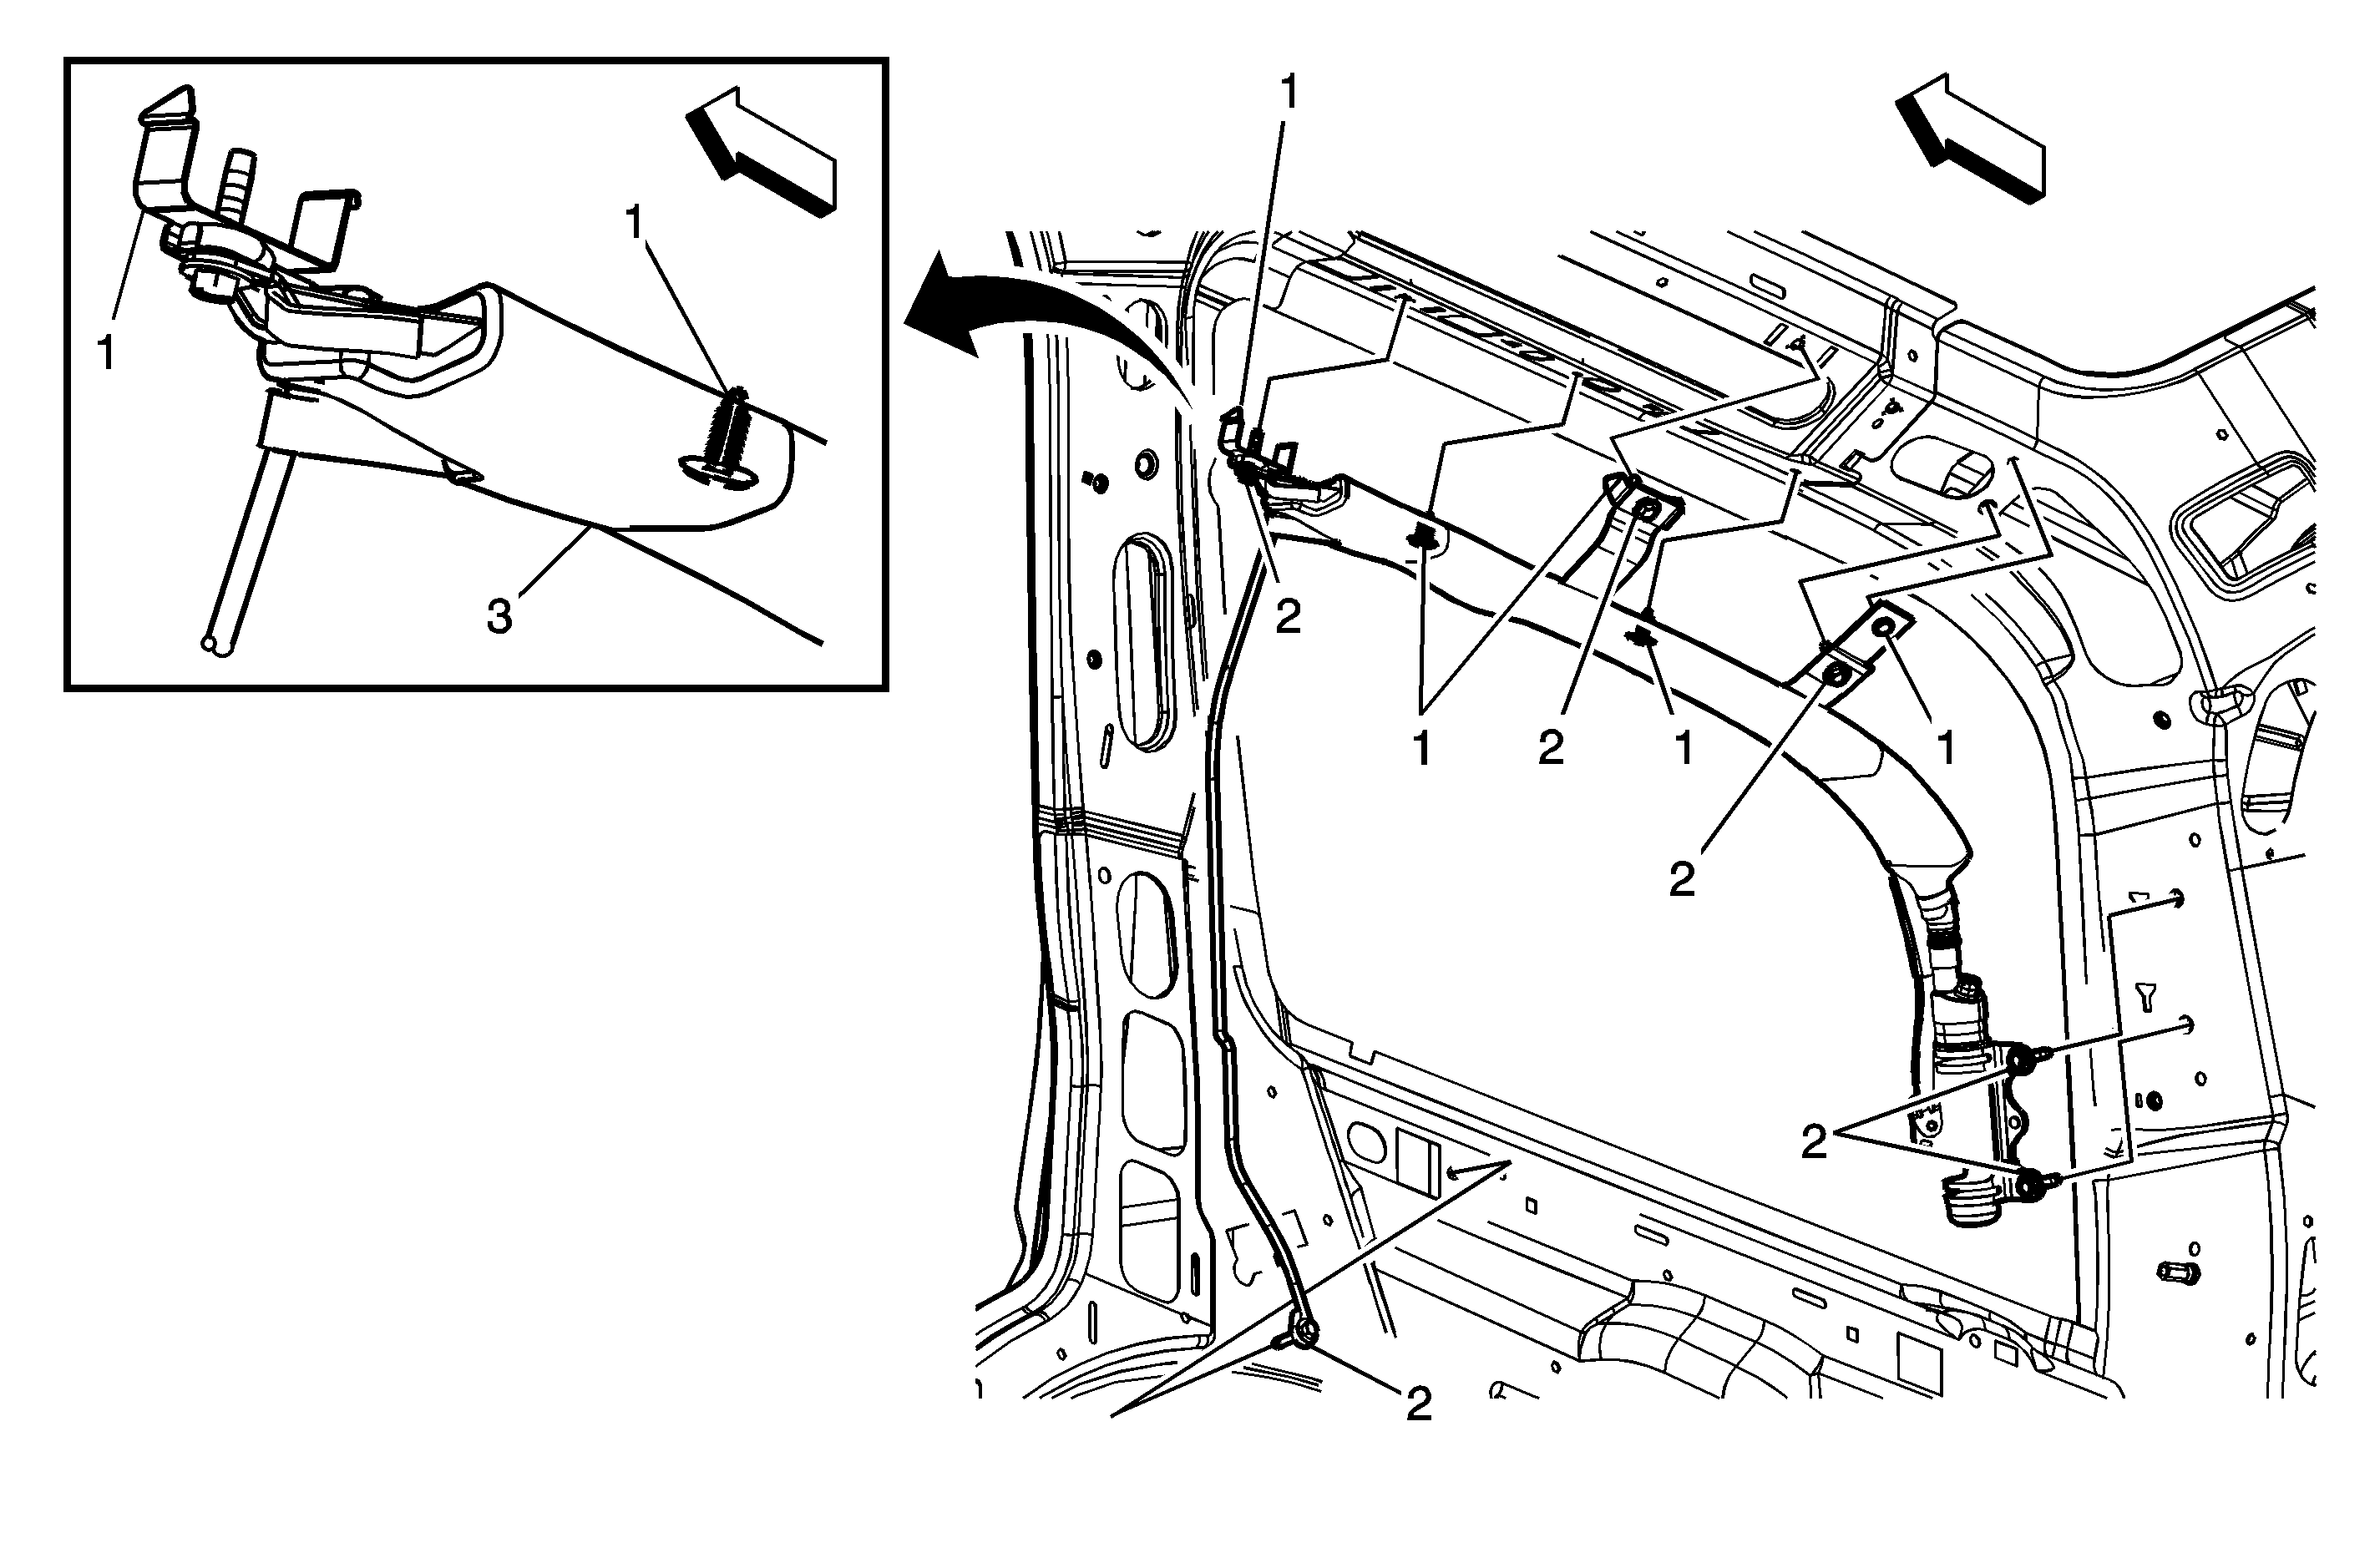
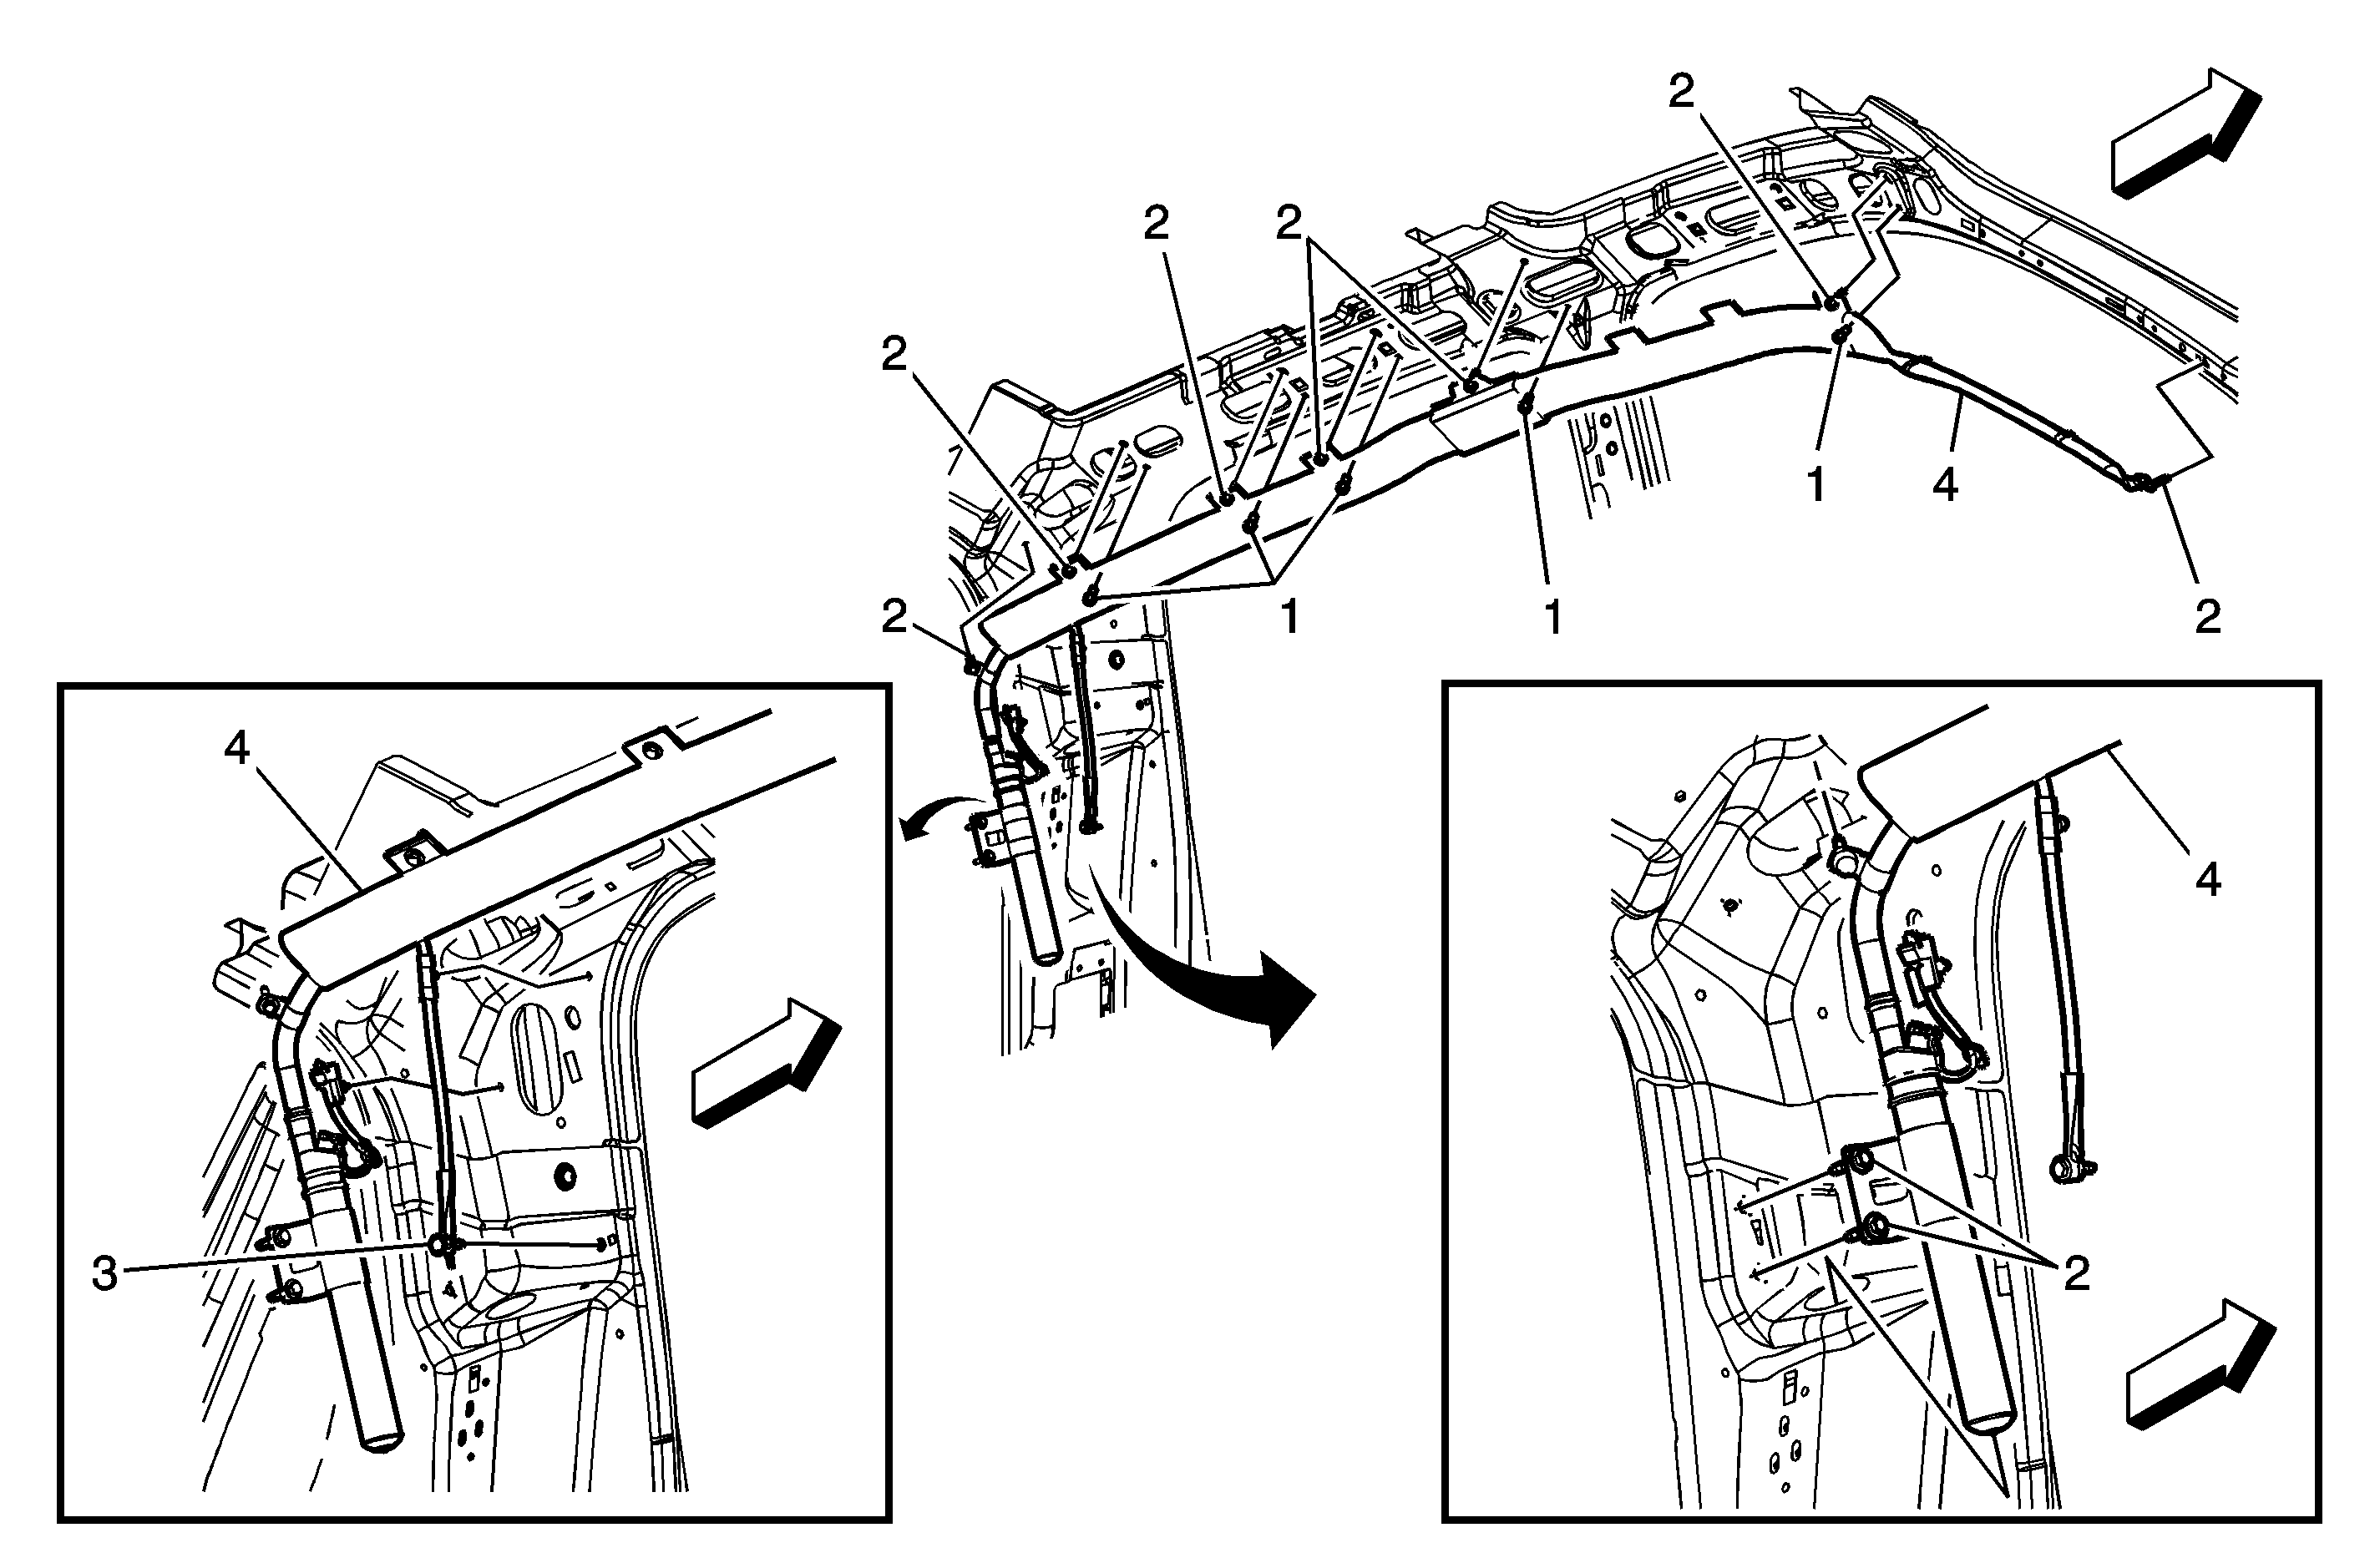
1
| Inflatable Restraint Roof Rail Retainer (Qty: 7)
|
2
| Inflatable Restraint Roof Rail Bolt (Qty: 7)
Caution: Refer to Fastener Caution in the Preface section.
Procedure
- The following repair procedure should be used if an inflatable restraint roof rail module M-6 nut is stripped:
| 1.1. | Remove the current M-6 bolt. |
| 1.2. | Retain the module out of the way if necessary. Ensure that the module does not get damaged. Remove any other module bolts if installed, to help retain the module out of the way if necessary. |
- If location is at second row roof rail assist handle bracket attachments:
| • | Remove the roof rail assist handle bracket if installed. |
| • | Drill out the slot at the location on roof rail assist handle bracket at the stripped weld-nut location to 8 mm (0.31 in) diameter. |
| • | Hand tap (thread) stripped weld-nut to M7 X 1.00 thread for M-7 replacement bolt. |
- If location is at second row roof rail assist handle bracket attachments, reinstall the roof rail assist handle bracket.
- If present, remove the M-6 bolt and plastic prefixation bracket from the module assembly.
- Reinstall the module. Ensure the module does not get damaged.
- Hand start the replacement M-7 bolt P/N 11609538. For cushion attachments, ensure the bolt goes through both layers of the attachment webbing.
- Hand start any other bolts that were removed.
- Tighten the bolts to original specification.
Tighten
9 N·m (80 lb in) |
3
| Inflatable Restraint Roof Rail Module Assembly
Procedure
- Release the connector position assurance (CPA) retainer.
- Disconnect the electrical connectors.
- Ensure roof rail inflator has been fully deployed before disposal. Refer to
Inflator Module Handling and Scrapping.
|
Callout
| Component Name
|
|
Warning: In order to prevent SIR deployment, personal injury, or unnecessary SIR system repairs, do not strike the door or the door pillar in the area of the side impact sensor (SIS). Turn OFF the ignition
and remove the key when performing service in the area of the SIS.
Warning: Refer to SIR Warning in the Preface section.
Warning: Refer to SIR Inflator Module Handling and Storage Warning in the Preface section.
Preliminary Procedures
- Disable the supplemental inflatable restraint (SIR) system. Refer to
SIR Disabling and Enabling.
- Remove windshield garnish molding. Refer to
Windshield Pillar Garnish Molding Replacement.
- Remove upper center pillar trim panel. Refer to
Center Pillar Upper Garnish Molding Replacement.
- Remove body lock pillar garnish molding. Refer to
Body Lock Pillar Garnish Molding Replacement.
- Remove roof rail rear assist handle. Refer to
Roof Rail Rear Assist Handle Replacement.
- Remove coat hooks. Refer to
Coat Hook Replacement.
- Lower side of headliner. Refer to
Headlining Trim Panel Replacement.
|
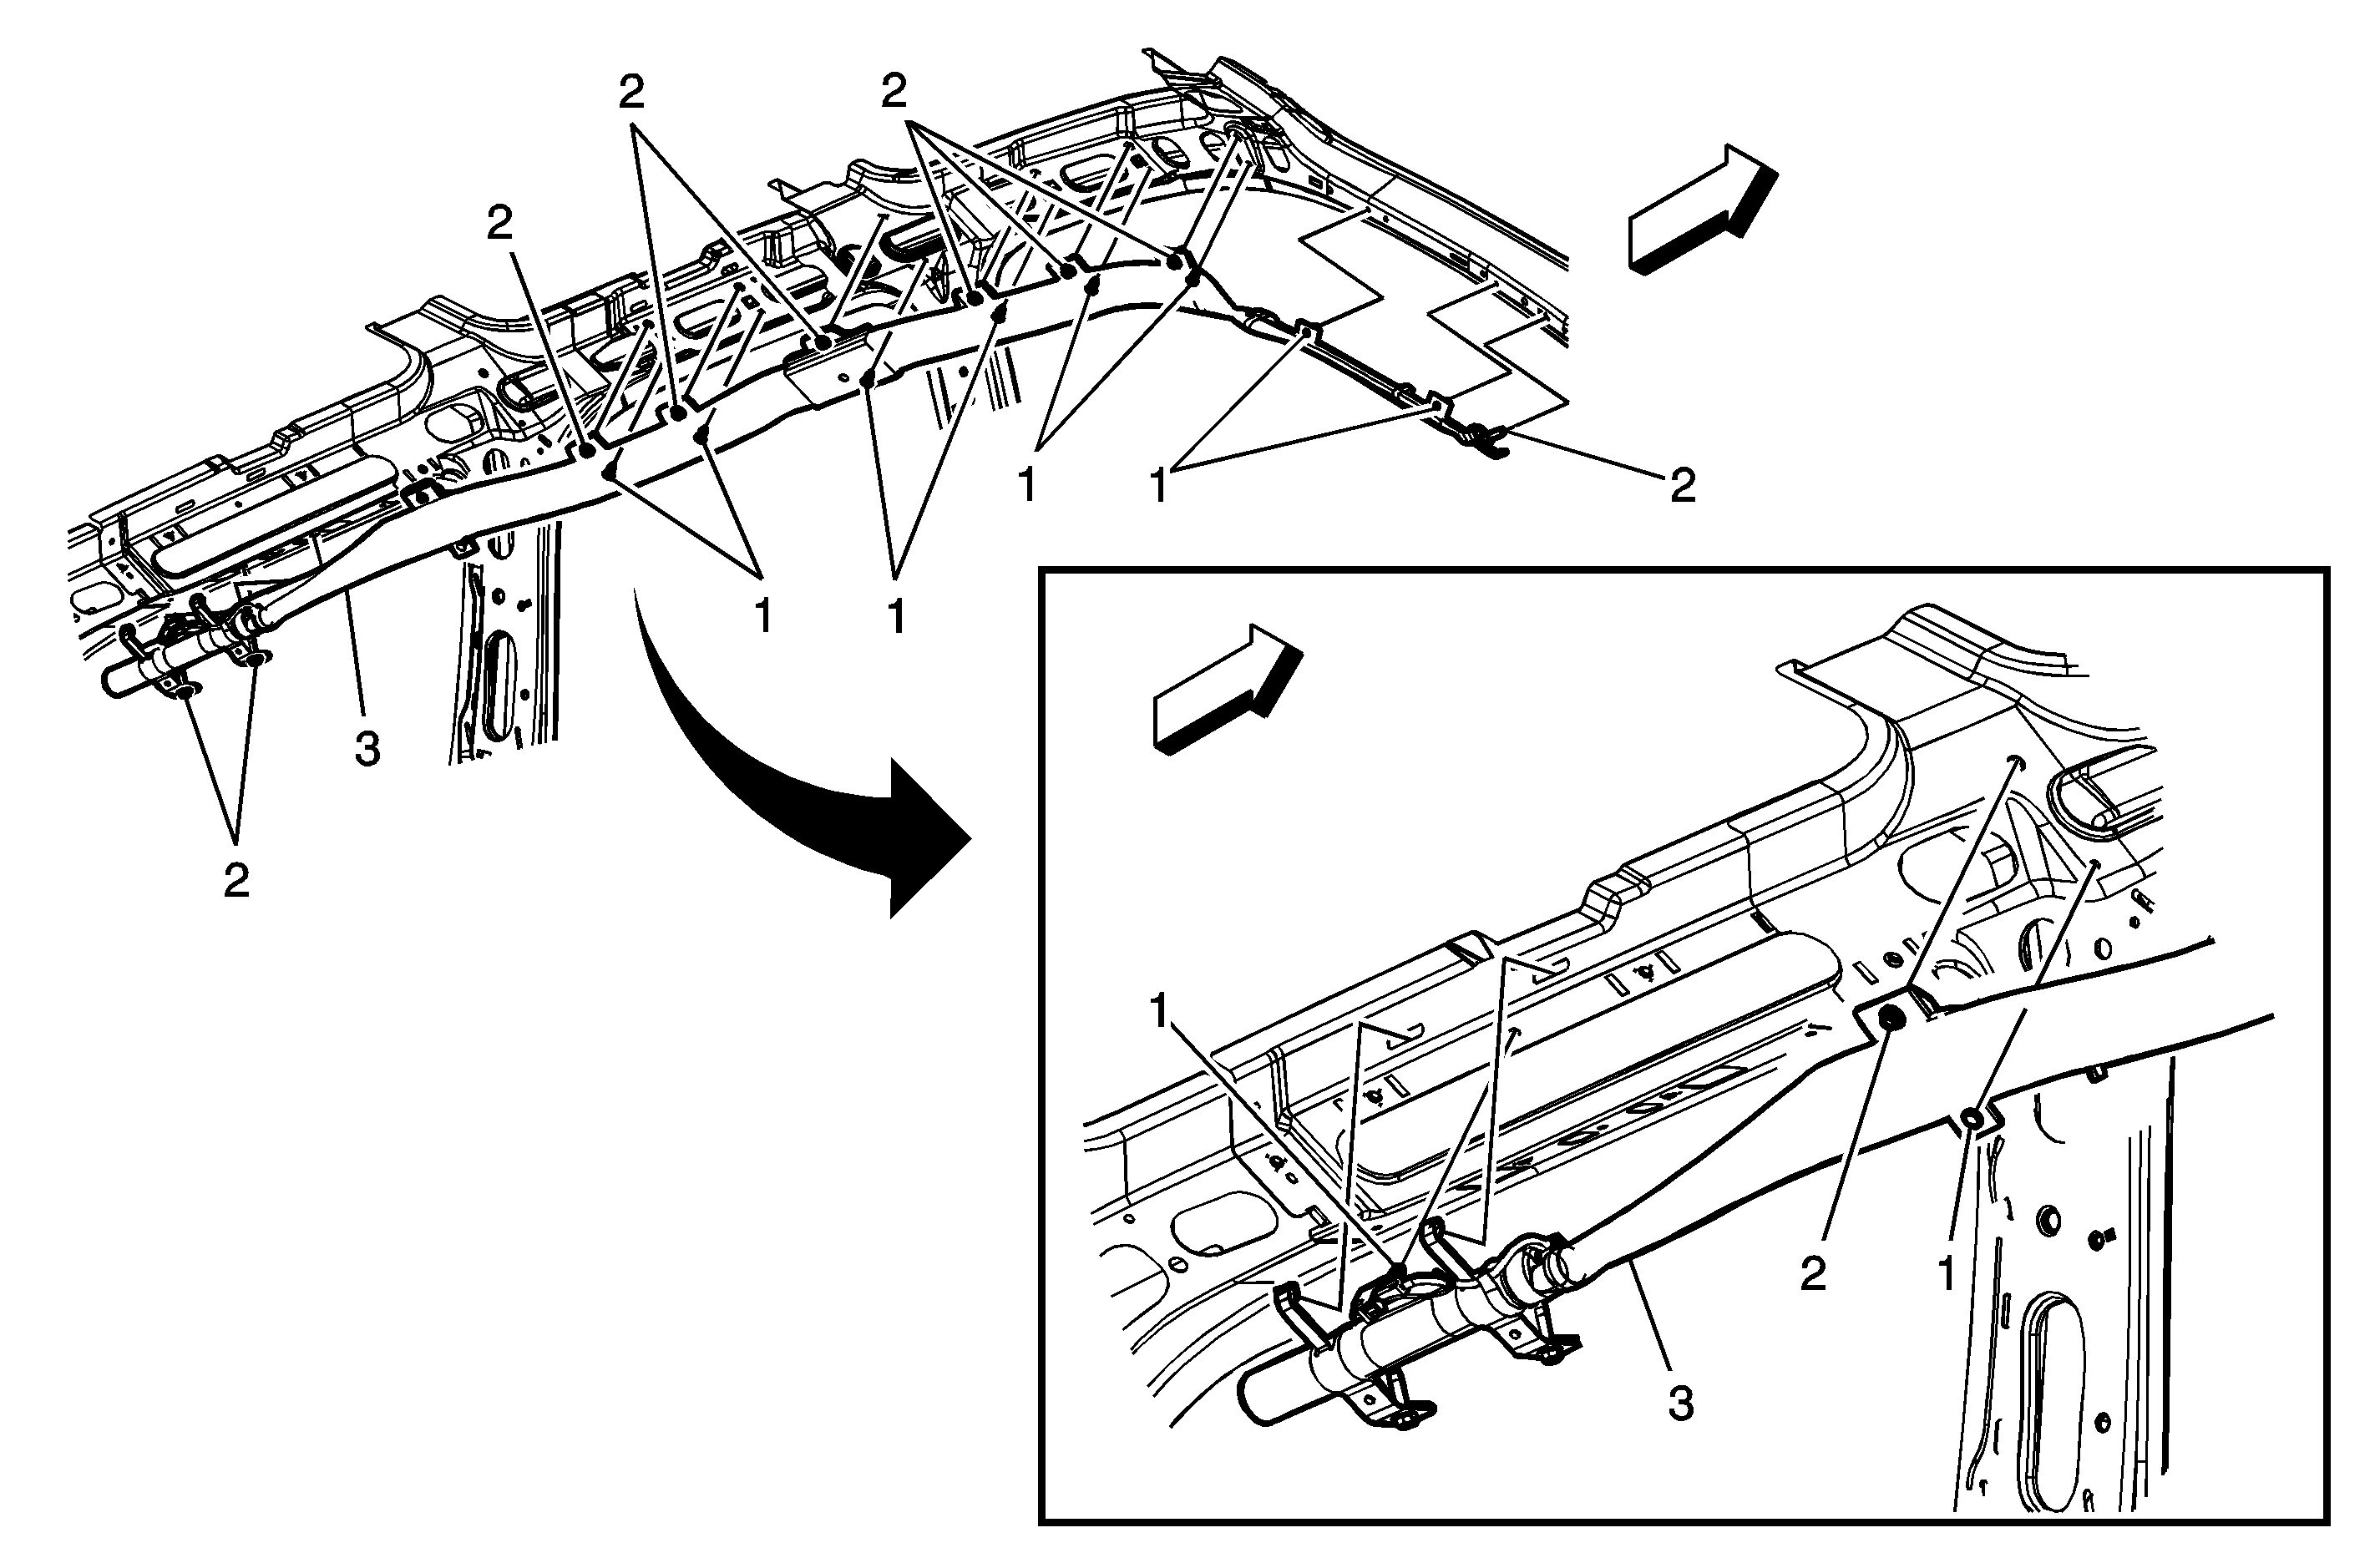
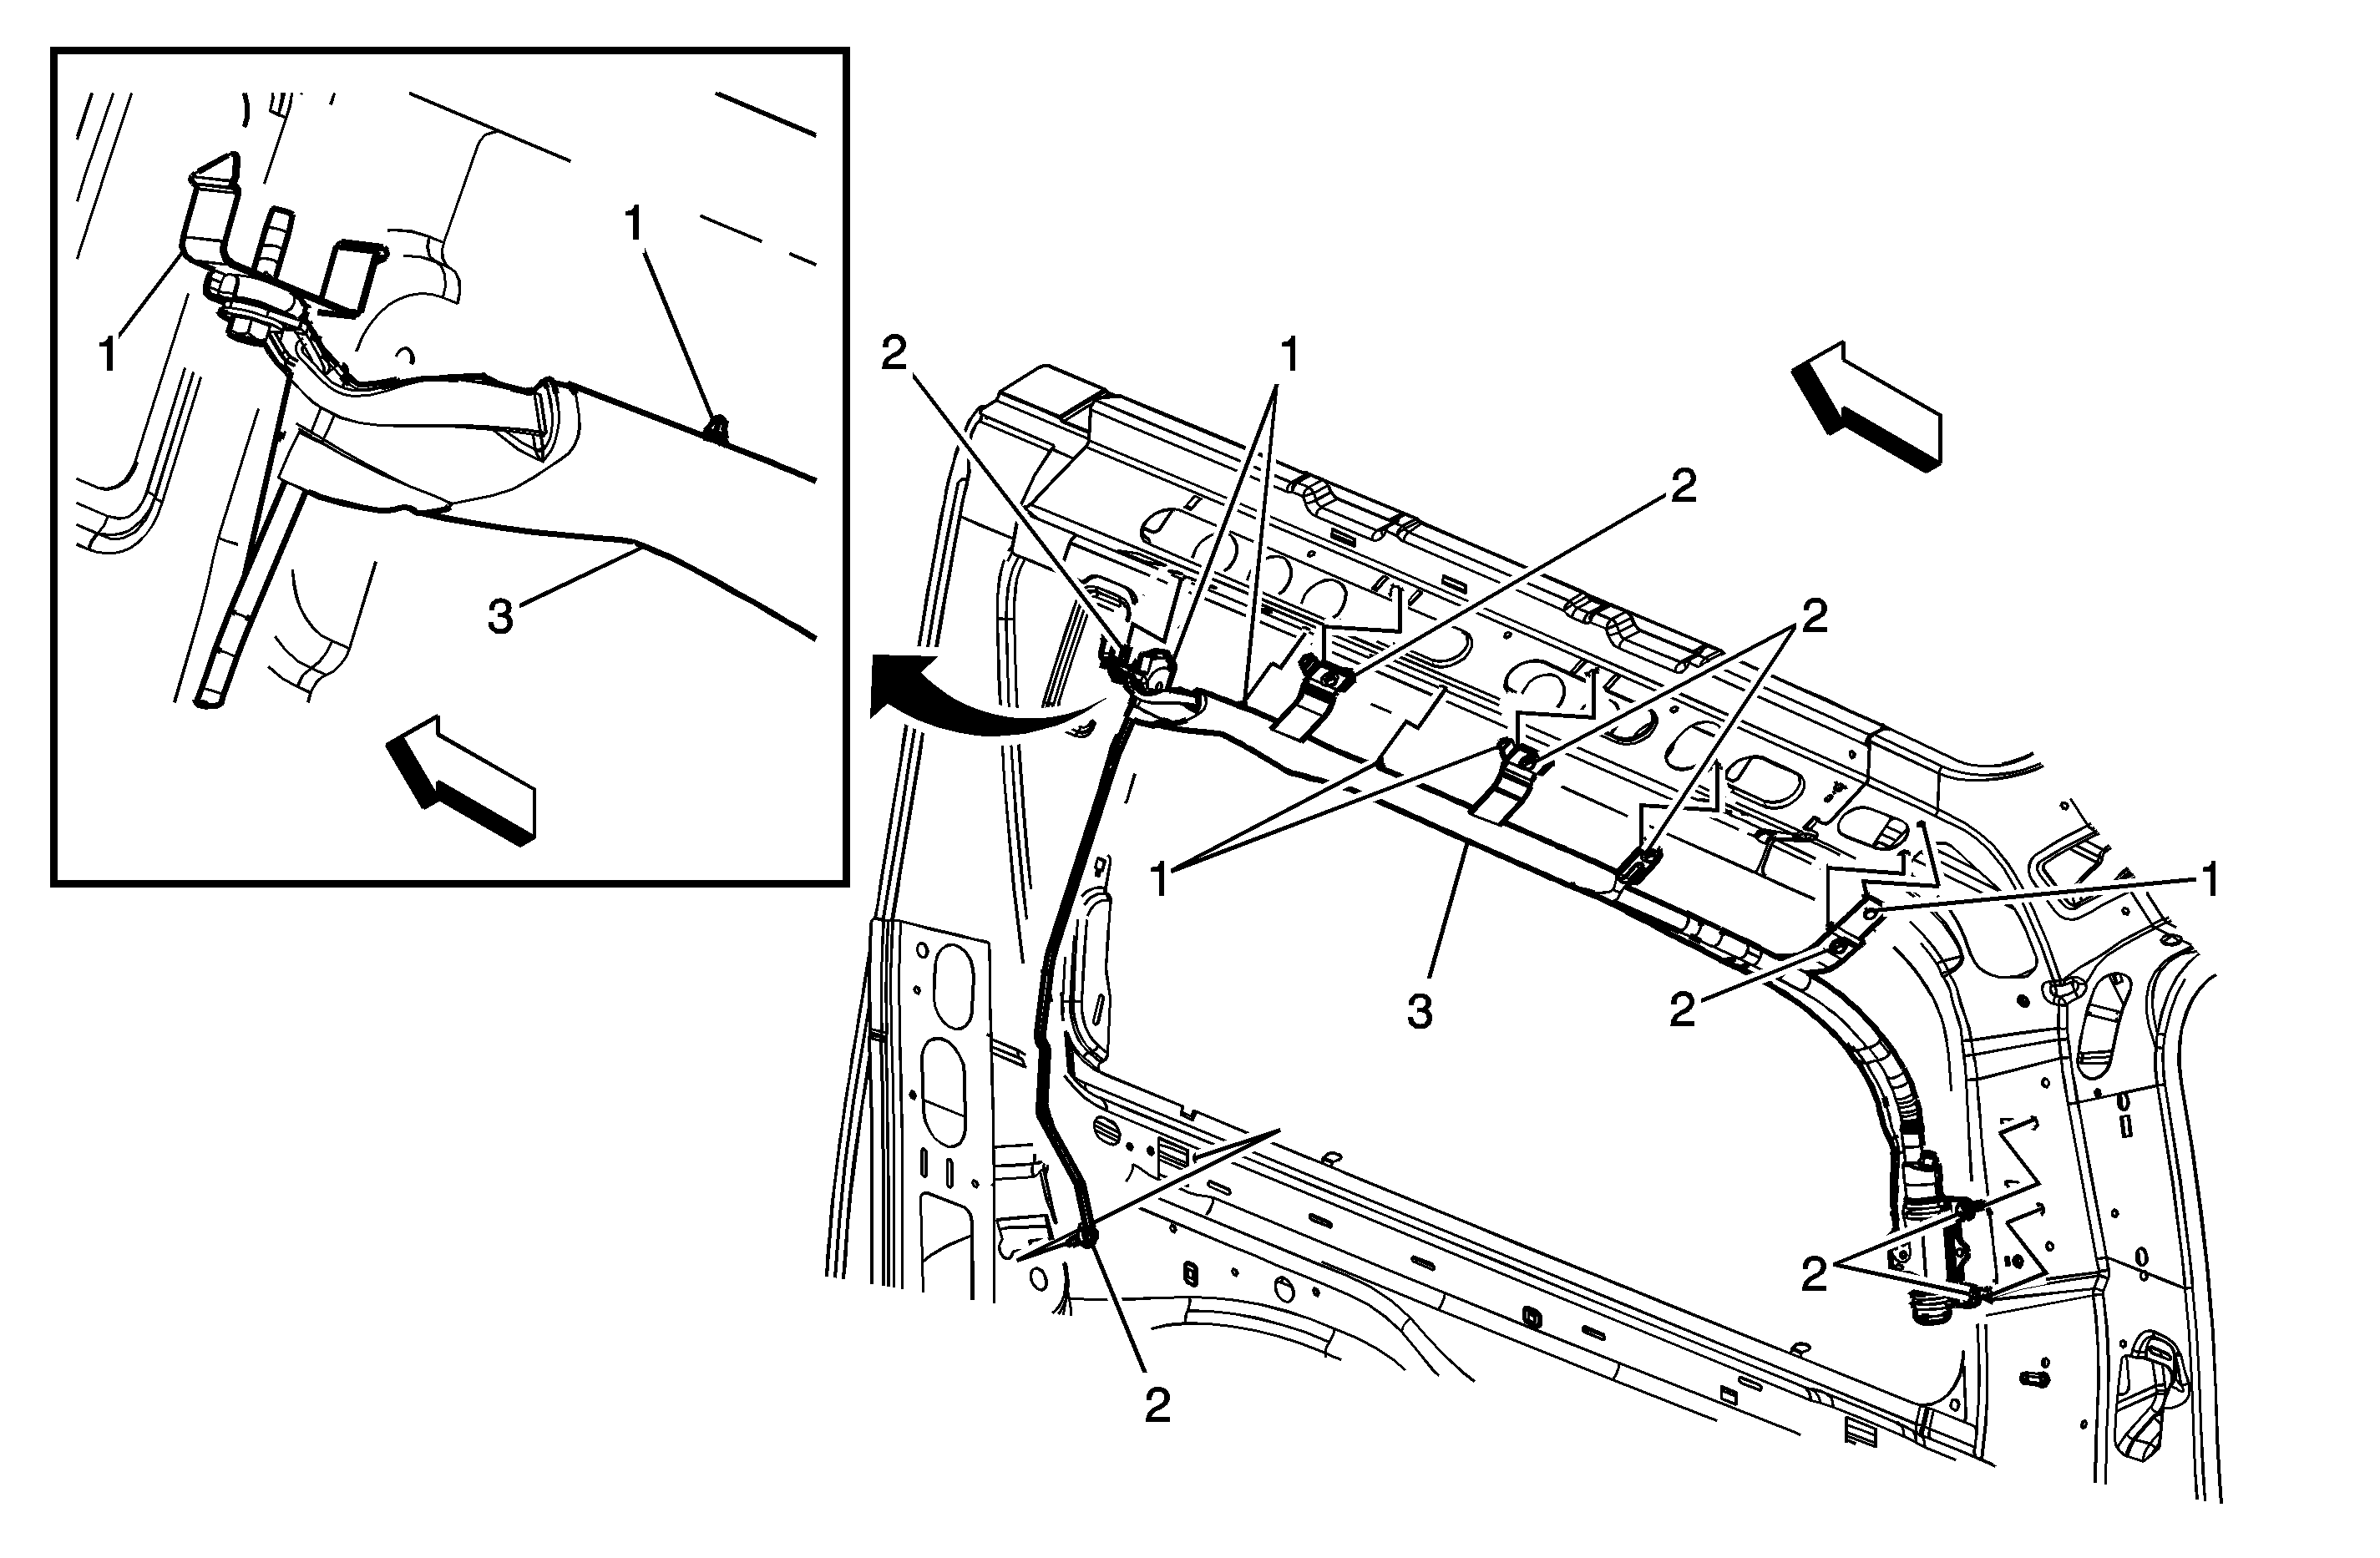
1
| Inflatable Restraint Roof Rail Retainer (Qty: 10)
|
2
| Inflatable Restraint Roof Rail Bolt (Qty: 10)
Caution: Refer to Fastener Caution in the Preface section.
Procedure
- The following repair procedure should be used if an inflatable restraint roof rail module M-6 nut is stripped:
| 1.1. | Remove the current M-6 bolt. |
| 1.2. | Retain the module out of the way if necessary. Ensure that the module does not get damaged. Remove any other module bolts if installed, to help retain the module out of the way if necessary. |
- If location is at second row roof rail assist handle bracket attachments:
| • | Remove the roof rail assist handle bracket if installed. |
| • | Drill out the slot at the location on roof rail assist handle bracket at the stripped weld-nut location to 8 mm (0.31 in) diameter. |
| • | Hand tap (thread) stripped weld-nut to M7 X 1.00 thread for M-7 replacement bolt. |
- If location is at second row roof rail assist handle bracket attachments, reinstall the roof rail assist handle bracket.
- If present, remove the M-6 bolt and plastic prefixation bracket from the module assembly.
- Reinstall the module. Ensure the module does not get damaged.
- Hand start the replacement M-7 bolt P/N 11609538. For cushion attachments, ensure the bolt goes through both layers of the attachment webbing.
- Hand start any other bolts that were removed.
- Tighten the bolts to original specification.
Tighten
9 N·m (80 lb in) |
3
| Inflatable Restraint Roof Rail Module Assembly
Procedure
- Release the connector position assurance (CPA) retainer.
- Disconnect the electrical connectors.
- Ensure roof rail inflator has been fully deployed before disposal. Refer to
Inflator Module Handling and Scrapping.
|
Callout
| Component Name
|
|
Warning: In order to prevent SIR deployment, personal injury, or unnecessary SIR system repairs, do not strike the door or the door pillar in the area of the side impact sensor (SIS). Turn OFF the ignition
and remove the key when performing service in the area of the SIS.
Warning: Refer to SIR Warning in the Preface section.
Warning: Refer to SIR Inflator Module Handling and Storage Warning in the Preface section.
Preliminary Procedures
- Disable the supplemental inflatable restraint (SIR) system. Refer to
SIR Disabling and Enabling.
- Remove windshield garnish molding. Refer to
Windshield Pillar Garnish Molding Replacement.
- Remove upper center pillar trim panel. Refer to
Center Pillar Upper Garnish Molding Replacement.
- Remove body lock pillar garnish molding. Refer to
Body Lock Pillar Garnish Molding Replacement.
- Remove roof rail rear assist handle. Refer to
Roof Rail Rear Assist Handle Replacement.
- Remove coat hooks. Refer to
Coat Hook Replacement.
- Lower side of headliner. Refer to
Headlining Trim Panel Replacement.
|
1
| Inflatable Restraint Roof Rail Retainer (Qty: 8)
|
2
| Inflatable Restraint Roof Rail Bolt (Qty: 8)
Caution: Refer to Fastener Caution in the Preface section.
Procedure
- The following repair procedure should be used if an inflatable restraint roof rail module M-6 nut is stripped:
| 1.1. | Remove the current M-6 bolt. |
| 1.2. | Retain the module out of the way if necessary. Ensure that the module does not get damaged. Remove any other module bolts if installed, to help retain the module out of the way if necessary. |
- If location is at second row roof rail assist handle bracket attachments:
| • | Remove the roof rail assist handle bracket if installed. |
| • | Drill out the slot at the location on roof rail assist handle bracket at the stripped weld-nut location to 8 mm (0.31 in) diameter. |
| • | Hand tap (thread) stripped weld-nut to M7 X 1.00 thread for M-7 replacement bolt. |
- If location is at second row roof rail assist handle bracket attachments, reinstall the roof rail assist handle bracket.
- If present, remove the M-6 bolt and plastic prefixation bracket from the module assembly.
- Reinstall the module. Ensure the module does not get damaged.
- Hand start the replacement M-7 bolt P/N 11609538. For cushion attachments, ensure the bolt goes through both layers of the attachment webbing.
- Hand start any other bolts that were removed.
- Tighten the bolts to original specification.
Tighten
9 N·m (80 lb in) |
3
| Inflatable Restraint Roof Rail Module Assembly
Procedure
- Release the connector position assurance (CPA) retainer.
- Disconnect the electrical connectors.
- Ensure roof rail inflator has been fully deployed before disposal. Refer to
Inflator Module Handling and Scrapping.
|
Callout
| Component Name
|
|
Warning: In order to prevent SIR deployment, personal injury, or unnecessary SIR system repairs, do not strike the door or the door pillar in the area of the side impact sensor (SIS). Turn OFF the ignition
and remove the key when performing service in the area of the SIS.
Warning: Refer to SIR Warning in the Preface section.
Warning: Refer to SIR Inflator Module Handling and Storage Warning in the Preface section.
Preliminary Procedures
- Disable the supplemental inflatable restraint (SIR) system. Refer to
SIR Disabling and Enabling.
- Remove the body lock pillar garnish molding. Refer to
Body Lock Pillar Garnish Molding Replacement.
- Remove the body rear corner upper garnish molding. Refer to
Body Rear Corner Garnish Molding Replacement - Right Side and
Body Rear Corner Garnish Molding Replacement - Left Side.
- Remove the coat hooks. Refer to
Coat Hook Replacement.
- Lower side of headliner. Refer to
Headlining Trim Panel Replacement.
|
1
| Inflatable Restraint Roof Rail Retainer (Qty: 8)
|
2
| Inflatable Restraint Roof Rail Bolt (Qty: 9)
Caution: Refer to Fastener Caution in the Preface section.
Procedure
- The following repair procedure should be used if an inflatable restraint roof rail module M-6 nut is stripped:
| 1.1. | Remove the current M-6 bolt. |
| 1.2. | Retain the module out of the way if necessary. Ensure that the module does not get damaged. Remove any other module bolts if installed, to help retain the module out of the way if necessary. |
- If location is at second row roof rail assist handle bracket attachments:
| • | Remove the roof rail assist handle bracket if installed. |
| • | Drill out the slot at the location on roof rail assist handle bracket at the stripped weld-nut location to 8 mm (0.31 in) diameter. |
| • | Hand tap (thread) stripped weld-nut to M7 X 1.00 thread for M-7 replacement bolt. |
- If location is at second row roof rail assist handle bracket attachments, reinstall the roof rail assist handle bracket.
- If present, remove the M-6 bolt and plastic prefixation bracket from the module assembly.
- Reinstall the module. Ensure the module does not get damaged.
- Hand start the replacement M-7 bolt P/N 11609538. For cushion attachments, ensure the bolt goes through both layers of the attachment webbing.
- Hand start any other bolts that were removed.
- Tighten the bolts to original specification.
Tighten
9 N·m (80 lb in) |
3
| Inflatable Restraint Roof Rail Module Assembly
Procedure
- Release the connector position assurance (CPA) retainer.
- Disconnect the electrical connectors.
- Ensure roof rail inflator has been fully deployed before disposal. Refer to
Inflator Module Handling and Scrapping.
|
Callout
| Component Name
|
|
Warning: In order to prevent SIR deployment, personal injury, or unnecessary SIR system repairs, do not strike the door or the door pillar in the area of the side impact sensor (SIS). Turn OFF the ignition
and remove the key when performing service in the area of the SIS.
Warning: Refer to SIR Warning in the Preface section.
Warning: Refer to SIR Inflator Module Handling and Storage Warning in the Preface section.
Preliminary Procedures
- Disable the supplemental inflatable restraint (SIR) system. Refer to
SIR Disabling and Enabling.
- Remove windshield garnish molding. Refer to
Windshield Pillar Garnish Molding Replacement.
- Remove upper center pillar trim panel. Refer to
Center Pillar Upper Garnish Molding Replacement.
- Remove body lock pillar garnish molding. Refer to
Body Lock Pillar Garnish Molding Replacement.
- Remove roof rail rear assist handle. Refer to
Roof Rail Rear Assist Handle Replacement.
- Remove coat hooks. Refer to
Coat Hook Replacement.
- Remove sunshades and sunshade anchors. Refer to
Sunshade Replacement.
- Lower side of headliner. Refer to
Headlining Trim Panel Replacement.
|
1
| Inflatable Restraint Roof Rail Retainer (Qty: 9)
|
2
| Inflatable Restraint Roof Rail Bolt (Qty: 10)
Caution: Refer to Fastener Caution in the Preface section.
Procedure
- The following repair procedure should be used if an inflatable restraint roof rail module M-6 nut is stripped:
| 1.1. | Remove the current M-6 bolt. |
| 1.2. | Retain the module out of the way if necessary. Ensure that the module does not get damaged. Remove any other module bolts if installed, to help retain the module out of the way if necessary. |
- If location is at second row roof rail assist handle bracket attachments:
| • | Remove the roof rail assist handle bracket if installed. |
| • | Drill out the slot at the location on roof rail assist handle bracket at the stripped weld-nut location to 8 mm (0.31 in) diameter. |
| • | Hand tap (thread) stripped weld-nut to M7 X 1.00 thread for M-7 replacement bolt. |
- If location is at second row roof rail assist handle bracket attachments, reinstall the roof rail assist handle bracket.
- If present, remove the M-6 bolt and plastic prefixation bracket from the module assembly.
- Reinstall the module. Ensure the module does not get damaged.
- Hand start the replacement M-7 bolt P/N 11609538. For cushion attachments, ensure the bolt goes through both layers of the attachment webbing.
- Hand start any other bolts that were removed.
- Tighten the bolts to original specification.
Tighten
9 N·m (80 lb ft) |
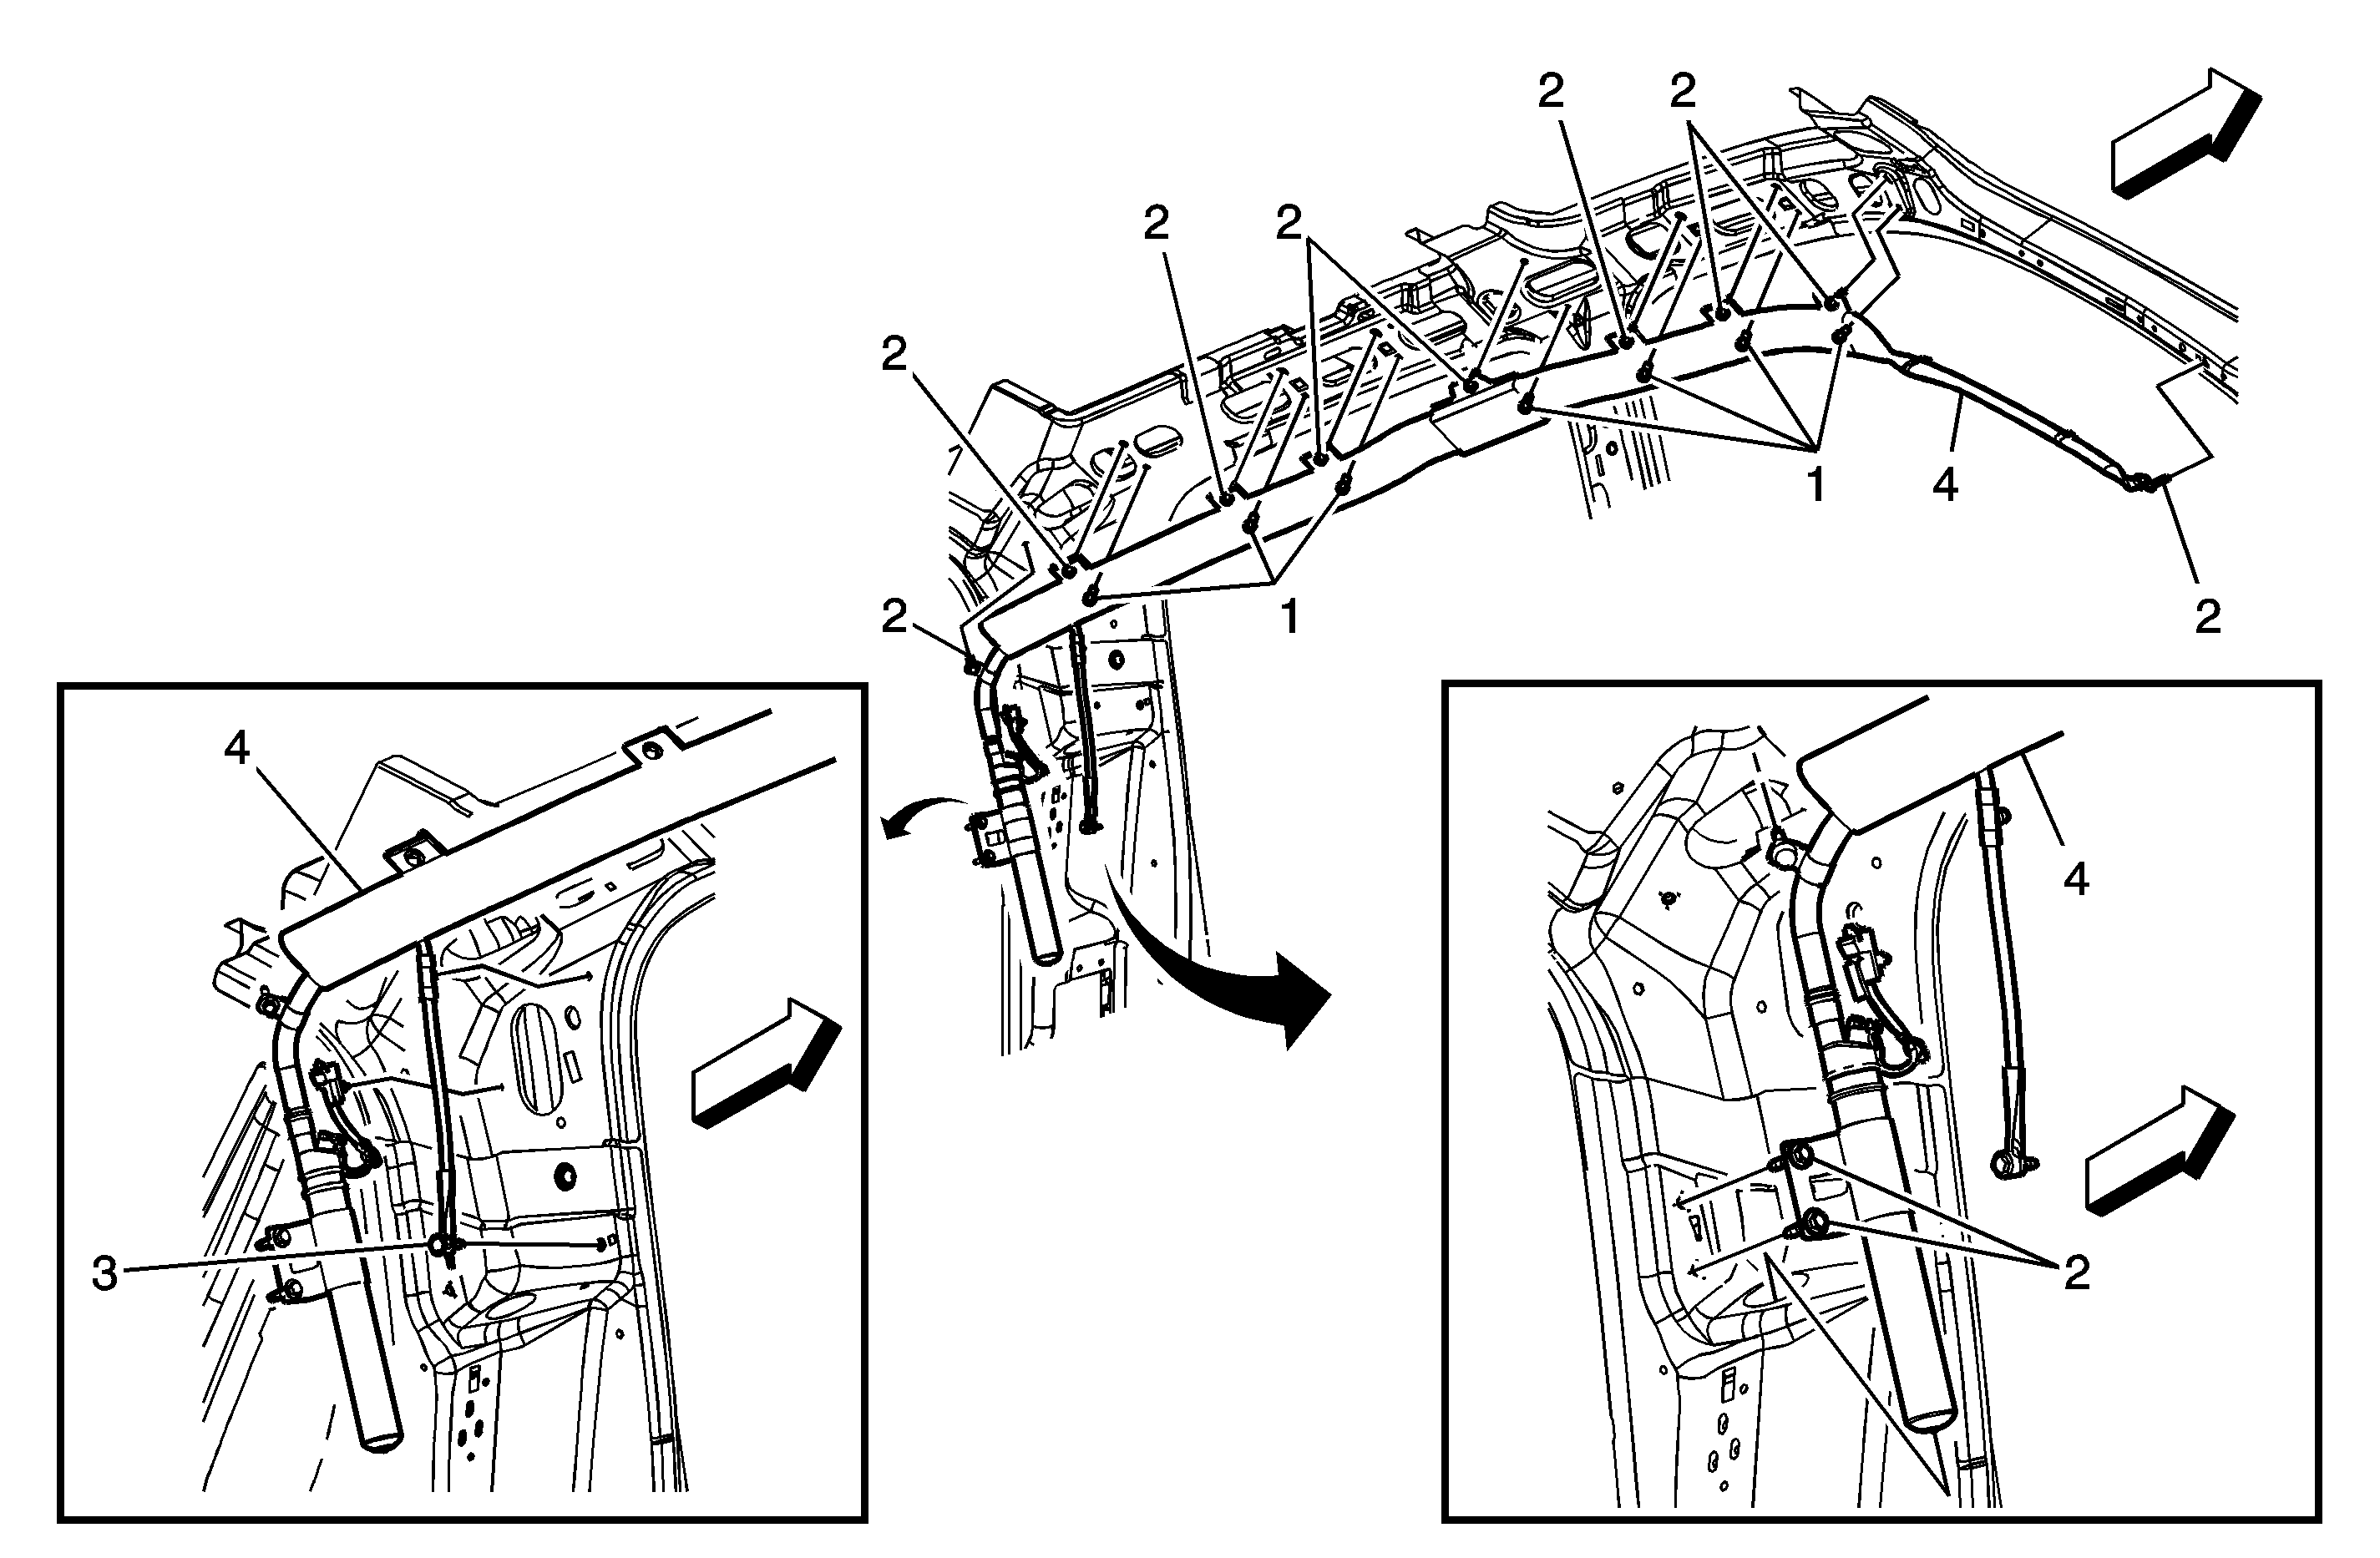
3
| Inflatable Restraint Roof Rail Screw
Tighten
2 N·m (18 lb in) |
4
| Inflatable Restraint Roof Rail Module Assembly
Procedure
- Release the connector position assurance (CPA) retainer.
- Disconnect the electrical connectors.
- Ensure roof rail inflator has been fully deployed before disposal. Refer to
Inflator Module Handling and Scrapping.
|
Callout
| Component Name
|
|
Warning: In order to prevent SIR deployment, personal injury, or unnecessary SIR system repairs, do not strike the door or the door pillar in the area of the side impact sensor (SIS). Turn OFF the ignition
and remove the key when performing service in the area of the SIS.
Warning: Refer to SIR Warning in the Preface section.
Warning: Refer to SIR Inflator Module Handling and Storage Warning in the Preface section.
Preliminary Procedures
- Disable the supplemental inflatable restraint (SIR) system. Refer to
SIR Disabling and Enabling.
- Remove the body lock pillar garnish molding. Refer to
Body Lock Pillar Garnish Molding Replacement.
- Remove the body rear corner upper garnish molding. Refer to
Body Rear Corner Garnish Molding Replacement - Right Side and
Body Rear Corner Garnish Molding Replacement - Left Side.
- Remove the coat hooks. Refer to
Coat Hook Replacement.
- Remove the body side right rear quarter trim panel. Refer to
Rear Quarter Trim Panel Replacement - Right Side.
- Lower side of headliner. Refer to
Headlining Trim Panel Replacement.
|
1
| Inflatable Restraint Roof Rail Retainer (Qty: 6)
|
2
| Inflatable Restraint Roof Rail Bolt (Qty: 8)
Caution: Refer to Fastener Caution in the Preface section.
Procedure
- The following repair procedure should be used if an inflatable restraint roof rail module M-6 nut is stripped:
| 1.1. | Remove the current M-6 bolt. |
| 1.2. | Retain the module out of the way if necessary. Ensure that the module does not get damaged. Remove any other module bolts if installed, to help retain the module out of the way if necessary. |
- If location is at second row roof rail assist handle bracket attachments:
| • | Remove the roof rail assist handle bracket if installed. |
| • | Drill out the slot at the location on roof rail assist handle bracket at the stripped weld-nut location to 8 mm (0.31 in) diameter. |
| • | Hand tap (thread) stripped weld-nut to M7 X 1.00 thread for M-7 replacement bolt. |
- If location is at second row roof rail assist handle bracket attachments, reinstall the roof rail assist handle bracket.
- If present, remove the M-6 bolt and plastic prefixation bracket from the module assembly.
- Reinstall the module. Ensure the module does not get damaged.
- Hand start the replacement M-7 bolt P/N 11609538. For cushion attachments, ensure the bolt goes through both layers of the attachment webbing.
- Hand start any other bolts that were removed.
- Tighten the bolts to original specification.
Tighten
9 N·m (80 lb in) |
3
| Inflatable Restraint Roof Rail Module Assembly
Procedure
- Release the connector position assurance (CPA) retainer.
- Disconnect the electrical connectors.
- Ensure roof rail inflator has been fully deployed before disposal. Refer to
Inflator Module Handling and Scrapping.
|
Callout
| Component Name
|
|
Warning: In order to prevent SIR deployment, personal injury, or unnecessary SIR system repairs, do not strike the door or the door pillar in the area of the side impact sensor (SIS). Turn OFF the ignition
and remove the key when performing service in the area of the SIS.
Warning: Refer to SIR Warning in the Preface section.
Warning: Refer to SIR Inflator Module Handling and Storage Warning in the Preface section.
Preliminary Procedures
- Disable the supplemental inflatable restraint (SIR) system. Refer to
SIR Disabling and Enabling.
- Remove windshield garnish molding. Refer to
Windshield Pillar Garnish Molding Replacement.
- Remove upper center pillar trim panel. Refer to
Center Pillar Upper Garnish Molding Replacement.
- Remove body lock pillar garnish molding. Refer to
Body Lock Pillar Garnish Molding Replacement.
- Remove roof rail rear assist handle. Refer to
Roof Rail Rear Assist Handle Replacement.
- Remove coat hooks. Refer to
Coat Hook Replacement.
- Lower side of headliner. Refer to
Headlining Trim Panel Replacement.
|
1
| Inflatable Restraint Roof Rail Retainer (Qty: 8)
|
2
| Inflatable Restraint Roof Rail Bolt (Qty: 8)
Caution: Refer to Fastener Caution in the Preface section.
Procedure
- The following repair procedure should be used if an inflatable restraint roof rail module M-6 nut is stripped:
| 1.1. | Remove the current M-6 bolt. |
| 1.2. | Retain the module out of the way if necessary. Ensure that the module does not get damaged. Remove any other module bolts if installed, to help retain the module out of the way if necessary. |
- If location is at second row roof rail assist handle bracket attachments:
| • | Remove the roof rail assist handle bracket if installed. |
| • | Drill out the slot at the location on roof rail assist handle bracket at the stripped weld-nut location to 8 mm (0.31 in) diameter. |
| • | Hand tap (thread) stripped weld-nut to M7 X 1.00 thread for M-7 replacement bolt. |
- If location is at second row roof rail assist handle bracket attachments, reinstall the roof rail assist handle bracket.
- If present, remove the M-6 bolt and plastic prefixation bracket from the module assembly.
- Reinstall the module. Ensure the module does not get damaged.
- Hand start the replacement M-7 bolt P/N 11609538. For cushion attachments, ensure the bolt goes through both layers of the attachment webbing.
- Hand start any other bolts that were removed.
- Tighten the bolts to original specification.
Tighten
9 N·m (80 lb in) |
3
| Inflatable Restraint Roof Rail Module Assembly
Procedure
- Release the connector position assurance (CPA) retainer.
- Disconnect the electrical connectors.
- Ensure roof rail inflator has been fully deployed before disposal. Refer to
Inflator Module Handling and Scrapping.
|
Callout
| Component Name
|
|
Warning: In order to prevent SIR deployment, personal injury, or unnecessary SIR system repairs, do not strike the door or the door pillar in the area of the side impact sensor (SIS). Turn OFF the ignition
and remove the key when performing service in the area of the SIS.
Warning: Refer to SIR Warning in the Preface section.
Warning: Refer to SIR Inflator Module Handling and Storage Warning in the Preface section.
Preliminary Procedures
- Disable the supplemental inflatable restraint (SIR) system. Refer to
SIR Disabling and Enabling.
- Remove windshield garnish molding. Refer to
Windshield Pillar Garnish Molding Replacement.
- Remove upper center pillar trim panel. Refer to
Center Pillar Upper Garnish Molding Replacement.
- Remove body lock pillar garnish molding. Refer to
Body Lock Pillar Garnish Molding Replacement.
- Remove roof rail rear assist handle. Refer to
Roof Rail Rear Assist Handle Replacement.
- Remove coat hooks. Refer to
Coat Hook Replacement.
- Remove sunshades and sunshade anchors. Refer to
Sunshade Replacement.
- Lower side of headliner. Refer to
Headlining Trim Panel Replacement.
|
1
| Inflatable Restraint Roof Rail Retainer (Qty: 9)
|
2
| Inflatable Restraint Roof Rail Bolt (Qty: 10)
Caution: Refer to Fastener Caution in the Preface section.
Procedure
- The following repair procedure should be used if an inflatable restraint roof rail module M-6 nut is stripped:
| 1.1. | Remove the current M-6 bolt. |
| 1.2. | Retain the module out of the way if necessary. Ensure that the module does not get damaged. Remove any other module bolts if installed, to help retain the module out of the way if necessary. |
- If location is at second row roof rail assist handle bracket attachments:
| • | Remove the roof rail assist handle bracket if installed. |
| • | Drill out the slot at the location on roof rail assist handle bracket at the stripped weld-nut location to 8 mm (0.31 in) diameter. |
| • | Hand tap (thread) stripped weld-nut to M7 X 1.00 thread for M-7 replacement bolt. |
- If location is at second row roof rail assist handle bracket attachments, reinstall the roof rail assist handle bracket.
- If present, remove the M-6 bolt and plastic prefixation bracket from the module assembly.
- Reinstall the module. Ensure the module does not get damaged.
- Hand start the replacement M-7 bolt P/N 11609538. For cushion attachments, ensure the bolt goes through both layers of the attachment webbing.
- Hand start any other bolts that were removed.
- Tighten the bolts to original specification.
Tighten
9 N·m (80 lb ft) |
3
| Inflatable Restraint Roof Rail Screw
Tighten
2 N·m (18 lb in) |
4
| Inflatable Restraint Roof Rail Module Assembly
Procedure
- Release the connector position assurance (CPA) retainer.
- Disconnect the electrical connectors.
- Ensure roof rail inflator has been fully deployed before disposal. Refer to
Inflator Module Handling and Scrapping.
|
