Fuel Tank Filler Pipe Replacement 1500 Series
Removal Procedure
Important: Clean the fuel connections and surrounding areas prior to disconnecting the lines in order to avoid possible contamination.
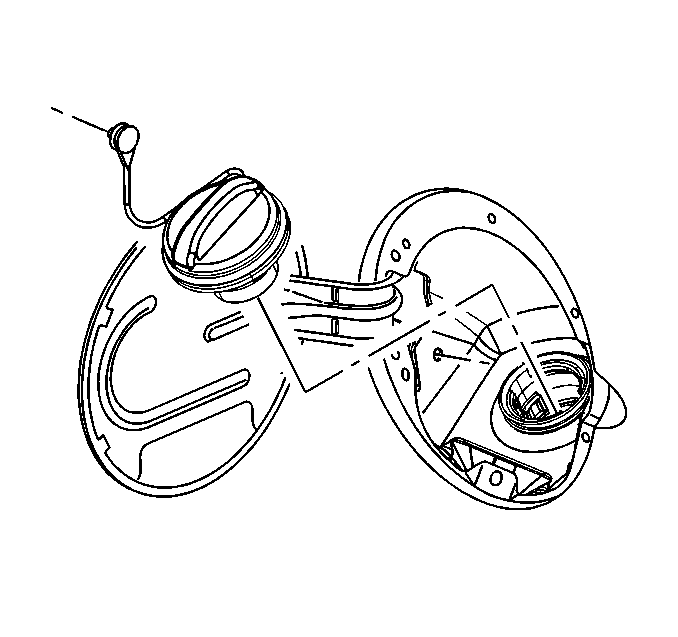
- Remove the fuel fill cap.
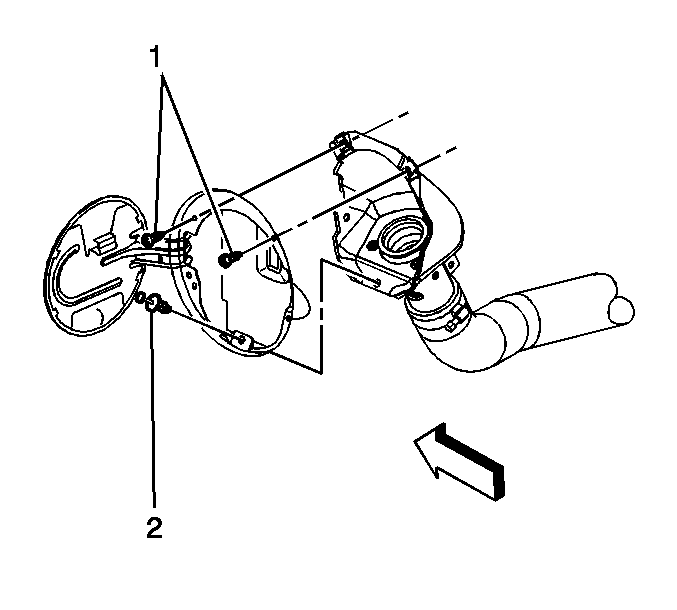
- Remove the fuel tank filler housing to body TORX® screws (1) and retainer (2).
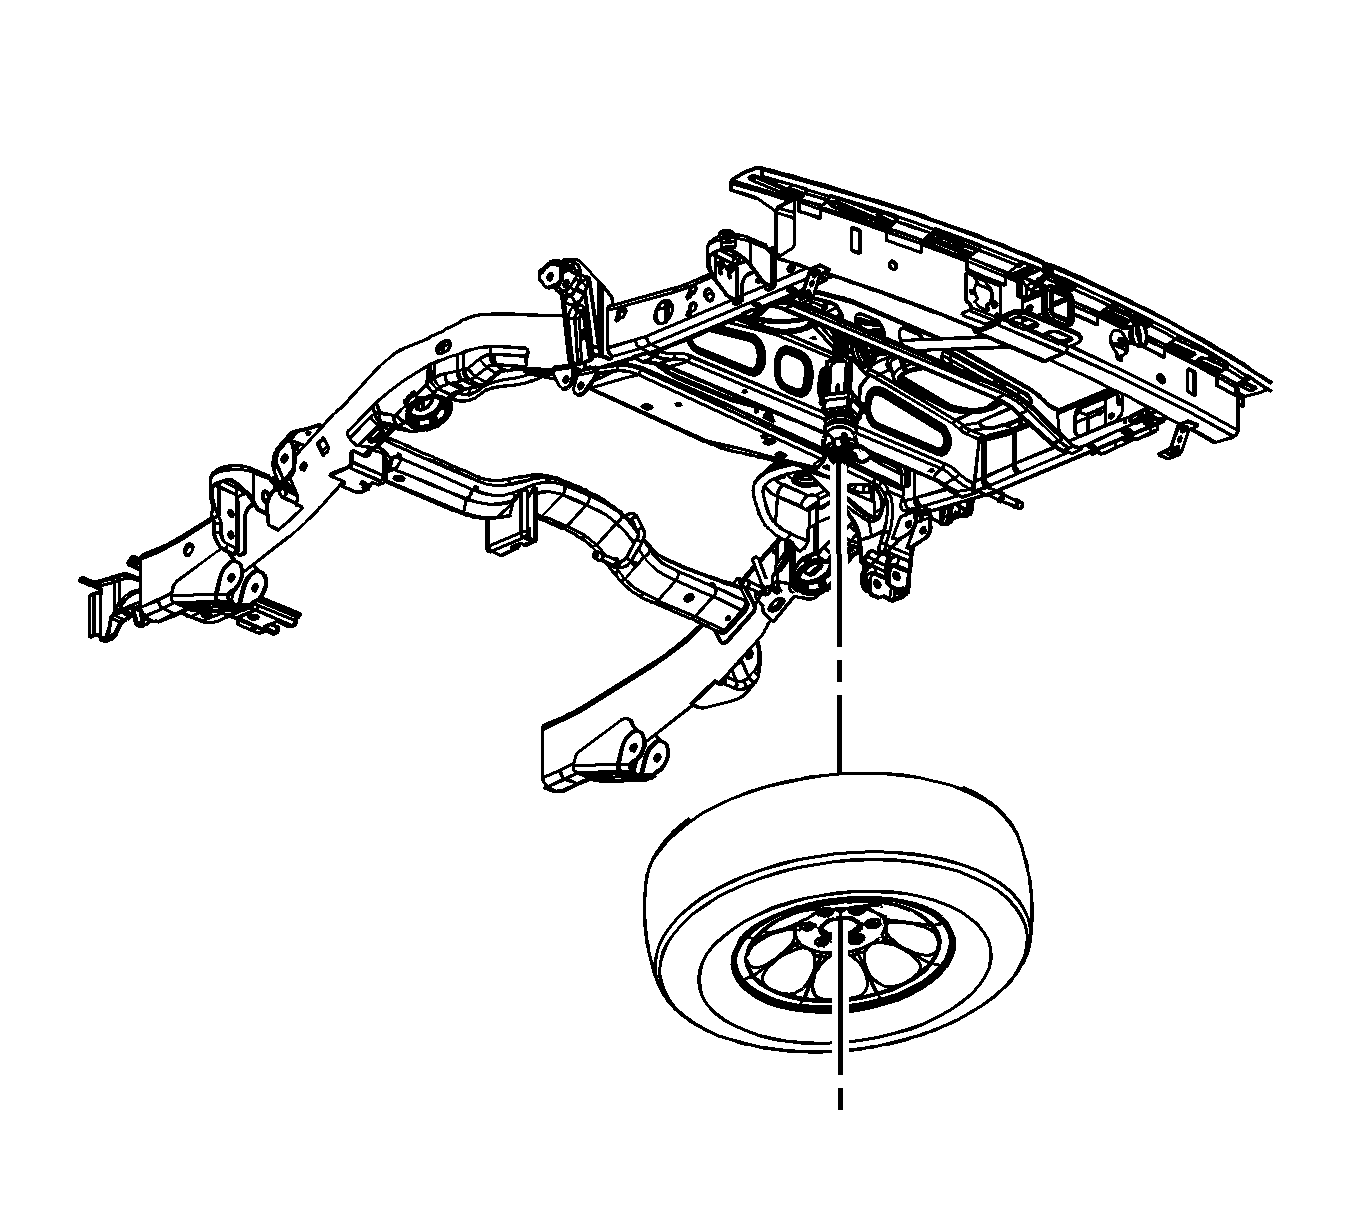
- Remove the spare tire stowage lock cylinder, if necessary.
- Remove the spare tire, if necessary.
- Raise and support the vehicle. Refer to
Lifting and Jacking the Vehicle
.
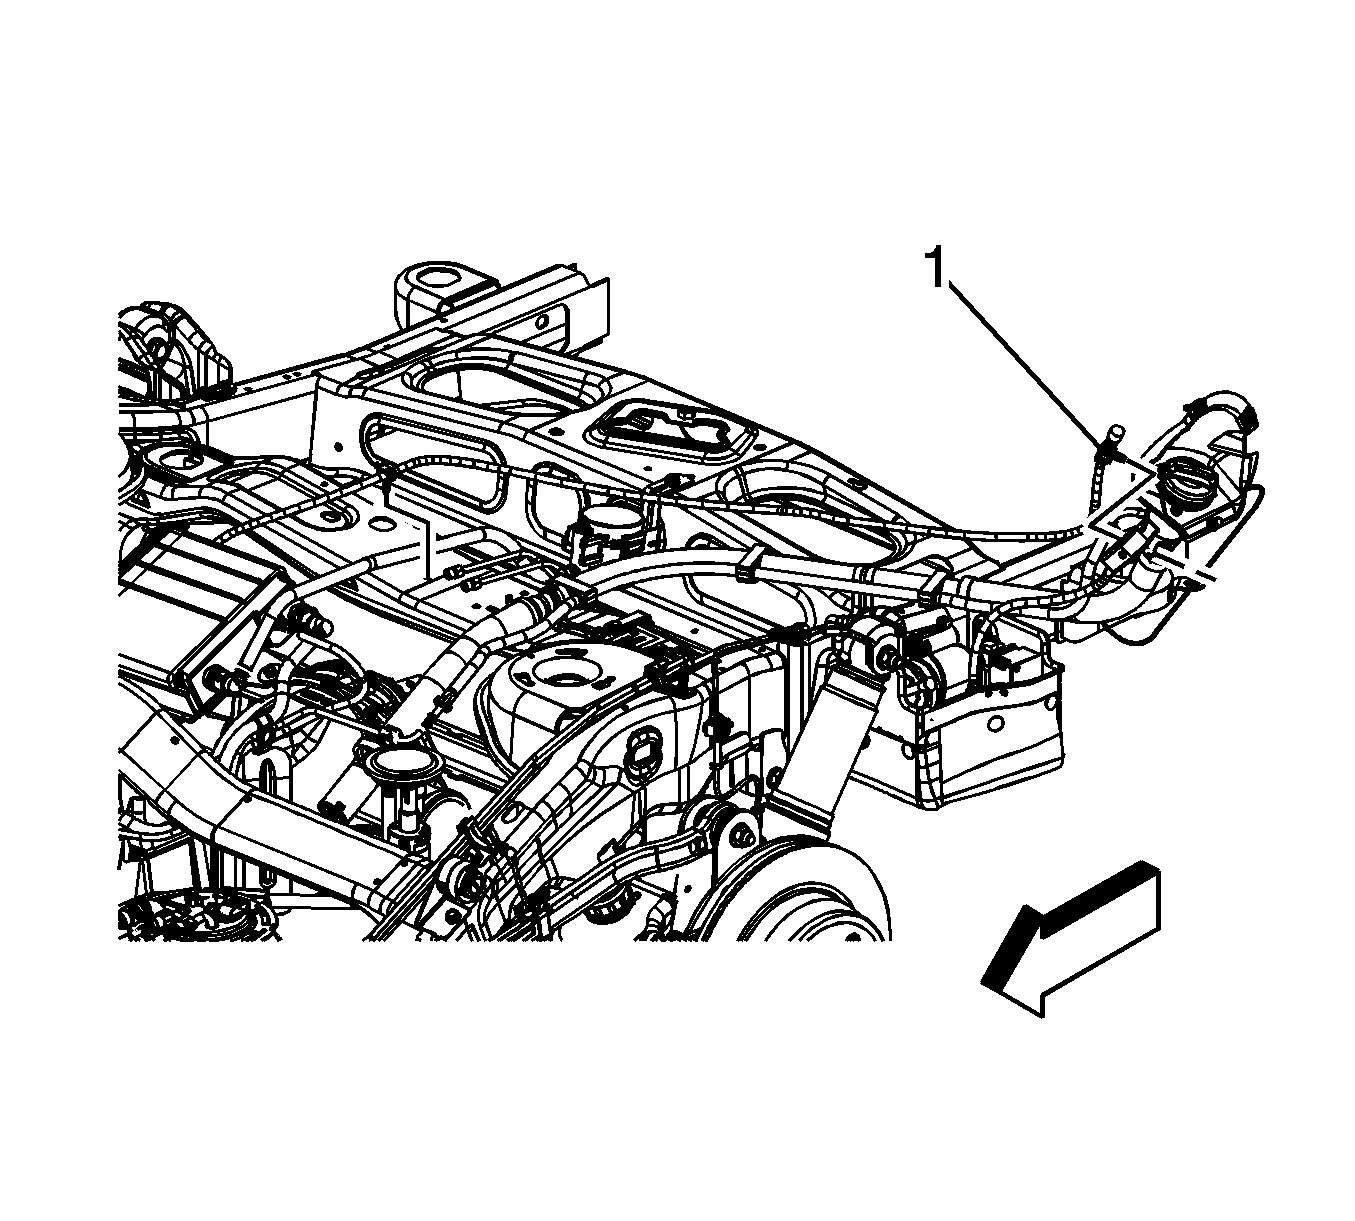
- Remove the rear axle vent hose clip (1) from the fill pipe.
- If necessary, remove the air suspension hose at the fill pipe.
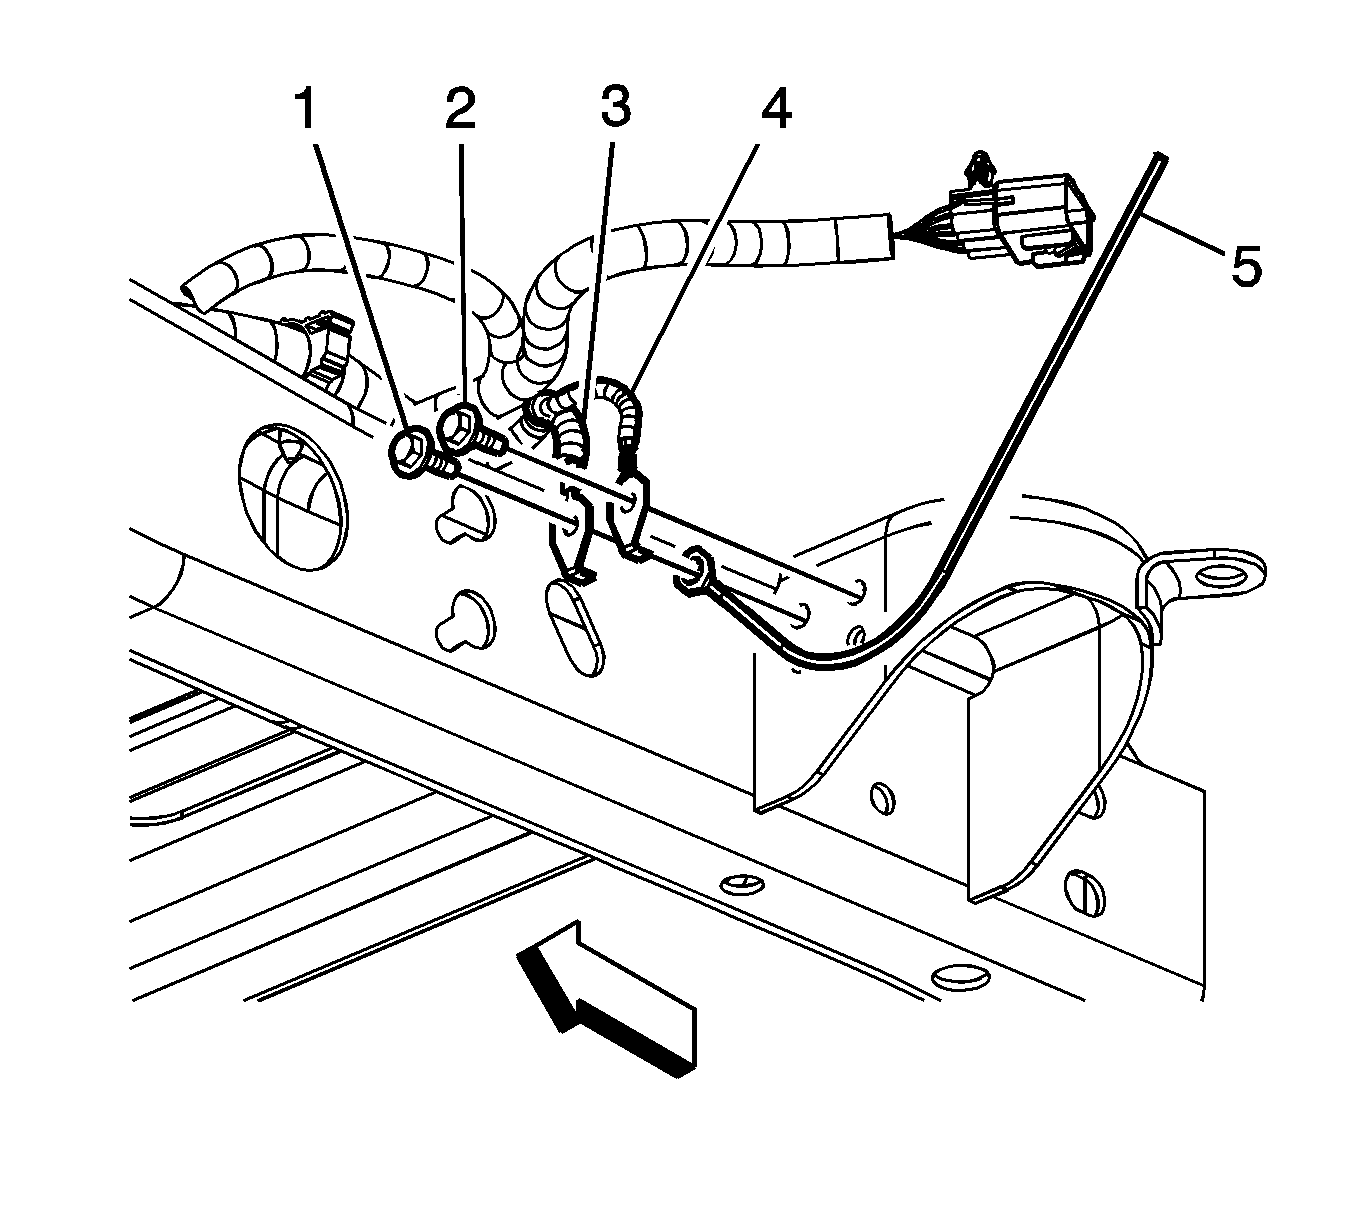
- Remove the chassis wiring harness ground bolt (2).
- Remove the left rear lamp ground wire (4) and fill pipe ground strap (5) from the frame.
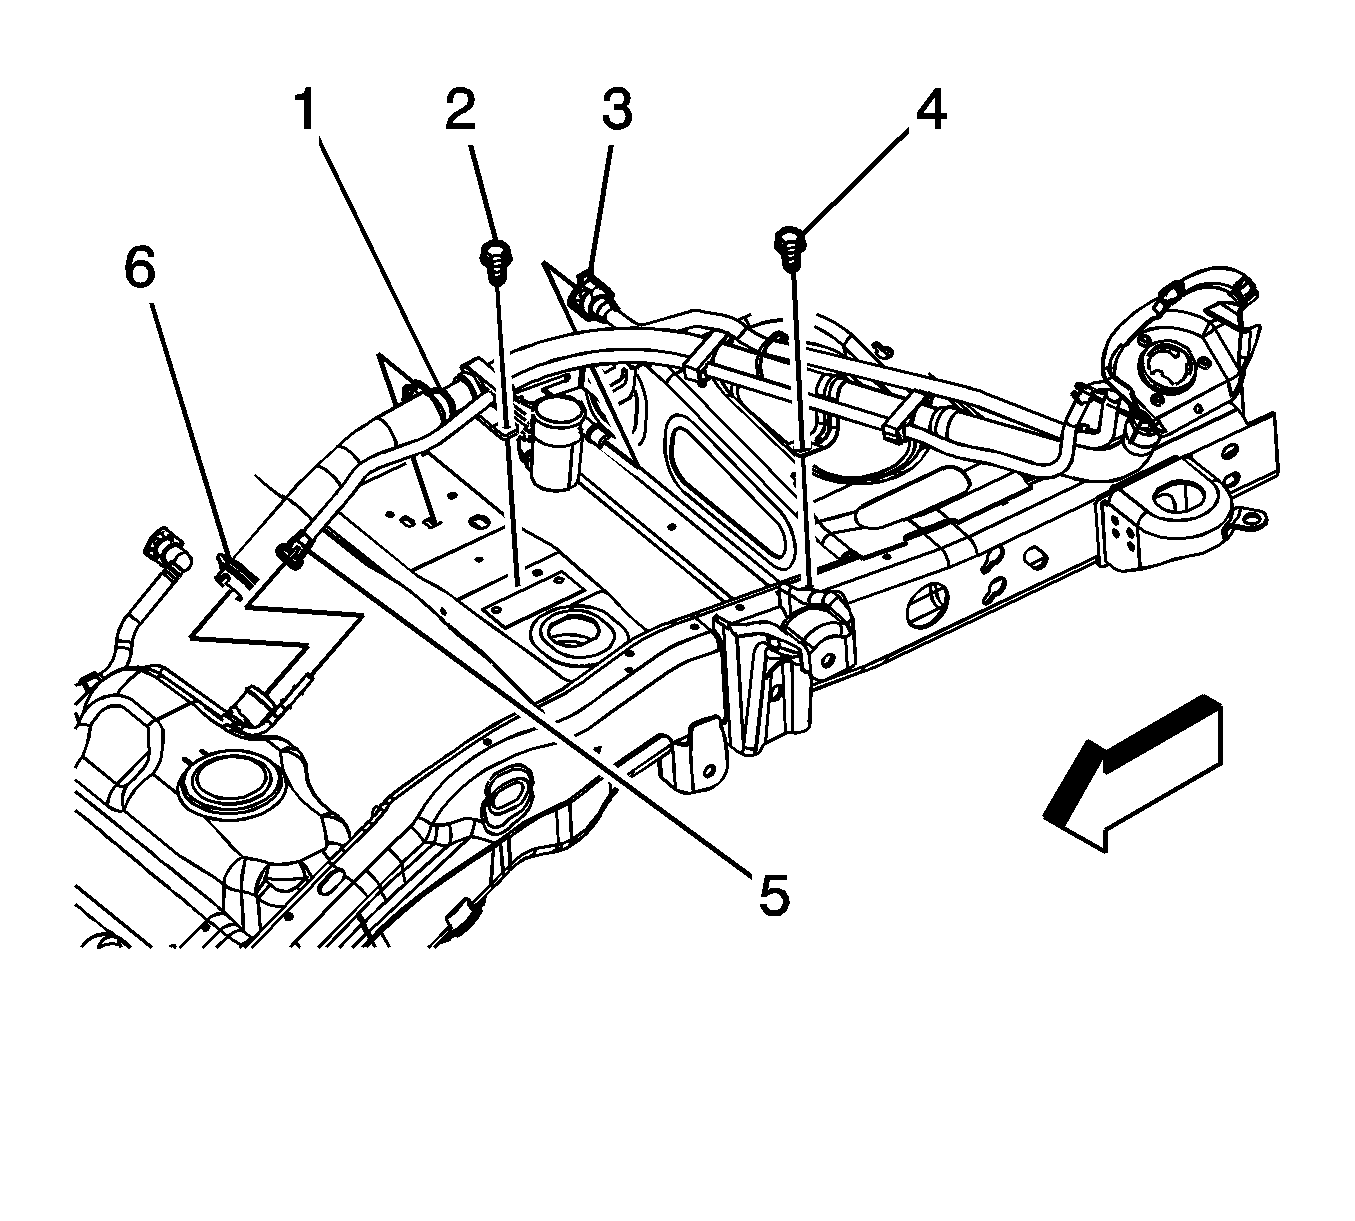
- Disconnect the fuel tank vent line quick connect fitting (5) from the fill pipe line. Refer to
Plastic Collar Quick Connect Fitting Service
.
- Disconnect the fuel fill hose vent line quick connect fitting (3) from the EVAP canister vent solenoid valve. Refer to
Plastic Collar Quick Connect Fitting Service
.
- Loosen the fuel fill hose clamp (6).
- Remove the fuel fill pipe bracket bolts (2, 4).
- Remove the fuel fill hose from the fuel tank.
- Cap the fuel tank opening and EVAP vent line in order to prevent fuel/EVAP system contamination.
- If replacing any serviceable part of the fill pipe assembly proceed to the disassemble procedure, otherwise proceed to the installation procedure.
Disassemble
| • |
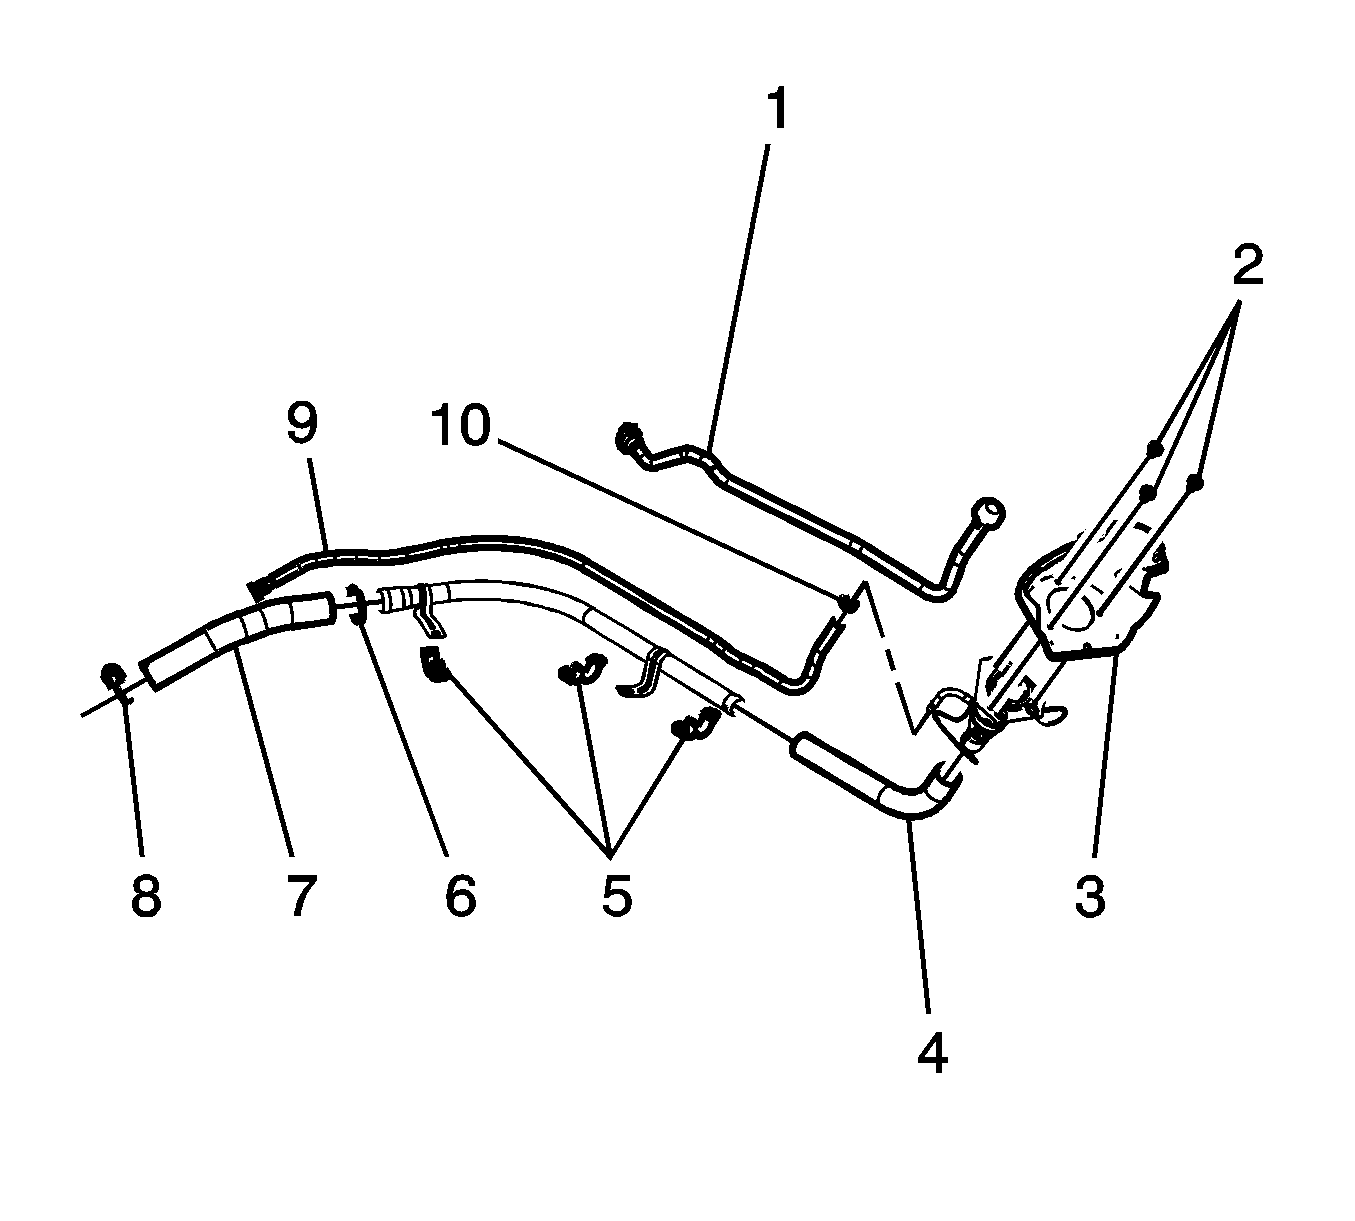
Fuel tank filler vent hose (1) |
| • | Fuel tank fill pipe housing bolts (2) |
| • | Fuel tank fill pipe housing (3) |
| • | Fuel tank fill hose (4) |
| • | Fuel tank fill pipe clip (5) |
| • | Fuel tank fill hose clamp (6) |
| • | Fuel tank fill hose (7) |
| • | Fuel tank fill hose clamp (8) |
| • | Evaporative emission hose (9) |
| • | Evaporative emission hose clamp (10) |
Assemble
| • |

Notice: Refer to Fastener Notice in the Preface section. Evaporative emission hose clamp (10)
Tighten
Tighten the clamp to 2.5 N·m (22 lb in).
|
| • | Evaporative emission hose (9) |
| • | Fuel tank fill hose clamp (8)
Tighten
Tighten the clamp to 2.5 N·m (22 lb in).
|
| • | Fuel tank fill hose (7) |
| • | Fuel tank fill hose clamp (6)
Tighten
Tighten the clamp to 2.5 N·m (22 lb in).
|
| • | Fuel tank fill pipe clip (5) |
| • | Fuel tank fill hose (4) |
| • | Fuel tank fill pipe housing (3) |
| • | Fuel tank fill pipe housing bolts (2)
Tighten
Tighten the bolts to 2.3 N·m (20 lb in).
|
| • | Fuel tank filler vent hose (1) |
Installation Procedure

- Remove the caps from the fuel tank opening and the EVAP vent line.
- Install the fuel fill hose to the fuel tank. Ensure that the notch in the hose is aligned with the notch on the fuel tank.
- Tighten the fuel fill hose clamp (6).
Tighten
Tighten the clamps to 2.5 N·m (22 lb in).
- Install the fuel fill pipe bracket bolts (2, 4).
Tighten
Tighten the bolt to 12 N·m (106 lb in).
- Connect the fuel fill hose vent line quick connect fitting (3) to the EVAP canister vent solenoid valve. Refer to
Plastic Collar Quick Connect Fitting Service
.
- Connect the fuel fill pipe vent line to the fuel tank quick connect fitting (5). Refer to
Plastic Collar Quick Connect Fitting Service
.

- Position the fill pipe ground strap (5) to the left rear lamp ground wire (4).
- Install the rear lamp ground wire (4) and ground strap (5) to the frame. Insert the lamp ground wire anti-rotation tab into the hole in the frame.
- Install the chassis wiring harness ground bolt.
Tighten
Tighten the bolt to 9 N·m (80 lb in).

- If necessary, install the air suspension hose at the fill pipe.
- Install the rear axle vent hose clip (1) to the fill pipe.
- Lower the vehicle.

- Install the fuel tank filler housing to body TORX® screws (1) and retainer (2).
Tighten
Tighten the screws to 2.3 N·m (20 lb in).

- Install the spare tire, if necessary.
- Install the spare tire stowage lock cylinder, if necessary.

- Install the fuel fill cap.
Fuel Tank Filler Pipe Replacement 2500 Series
Removal Procedure

- Remove the rear fuel tank. Refer to
Fuel Tank Replacement
.
- Remove the chassis wiring harness ground bolt (2).
- Remove the left rear lamp ground wire (4) and fill pipe ground strap (5) from the frame.
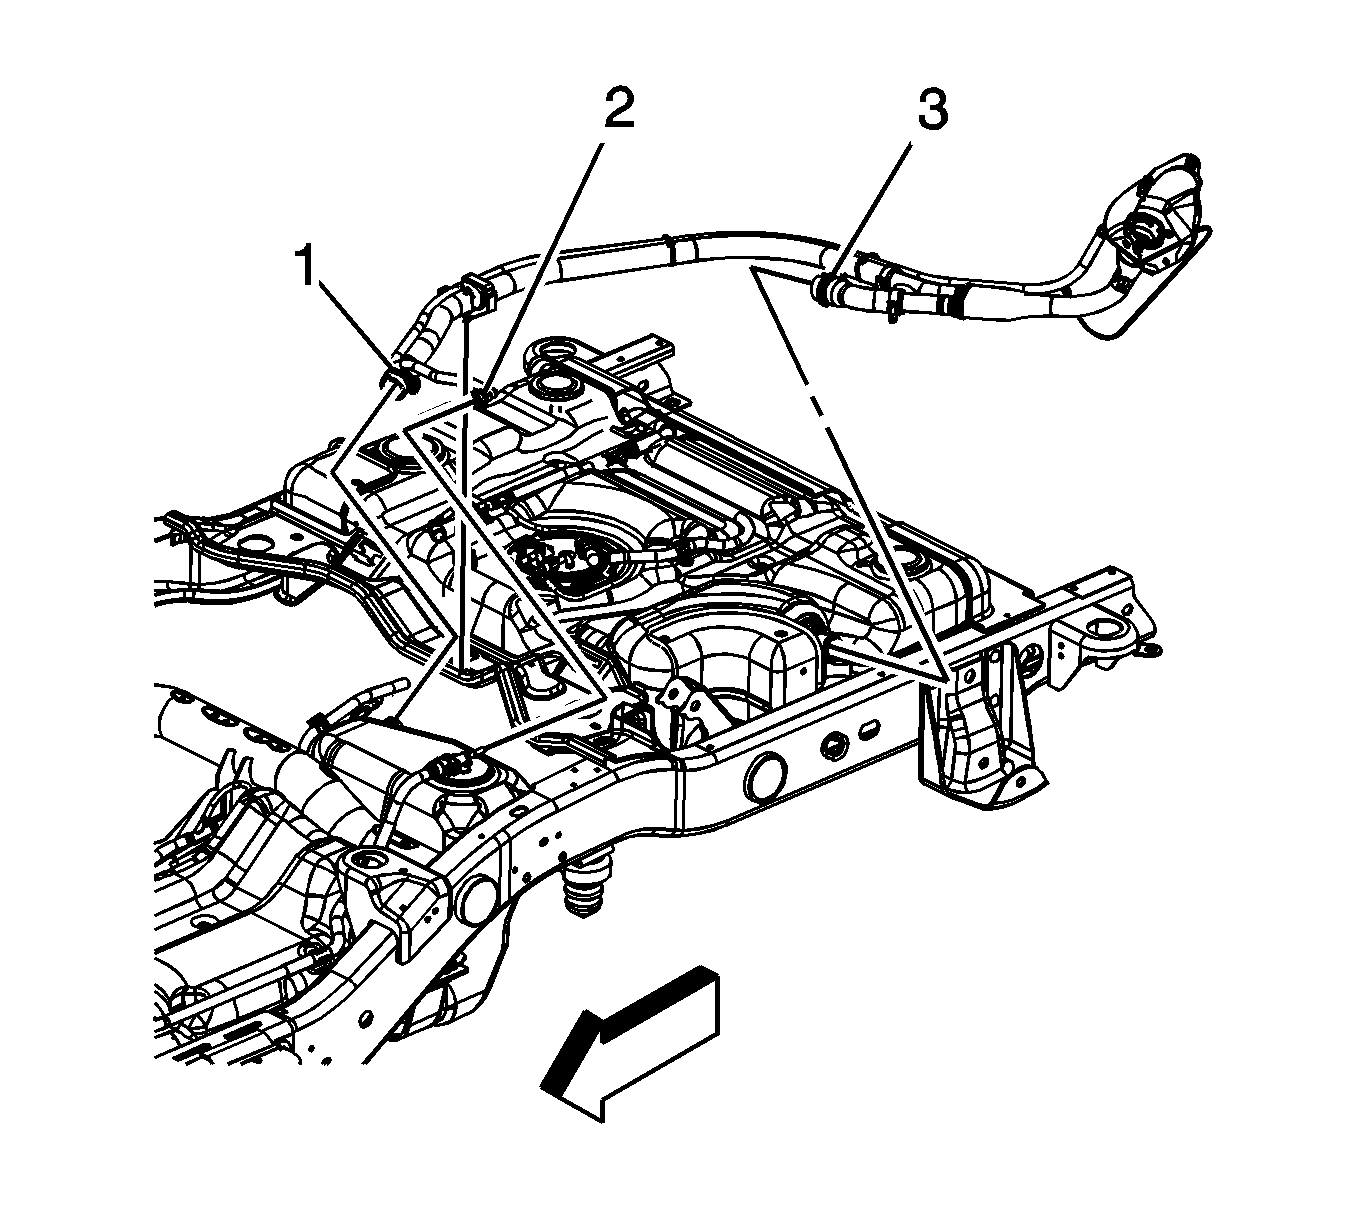
- Remove the rear axle vent hose clip from the fill pipe neck.
- Loosen the fuel tank fill hose clamp (1) at the front tank.
- Disconnect the fuel fill hose evaporative emission (EVAP) line quick connect fitting (2) from the fuel tank line. Refer to
Plastic Collar Quick Connect Fitting Service
.
- Remove the fuel fill hose from the front tank.
- Remove the fuel fill hose integral clamp from the crossmember.
- Remove the fuel fill hose/pipe assembly.
- Cap the open end of the fuel tank in order to prevent fuel system contamination.
- Cap the open ends of the fuel/EVAP lines in order to prevent fuel/EVAP system contamination.
- If replacing any serviceable part of the fill pipe assembly proceed to the disassemble procedure, otherwise proceed to the installation procedure.
Disassemble
| • |
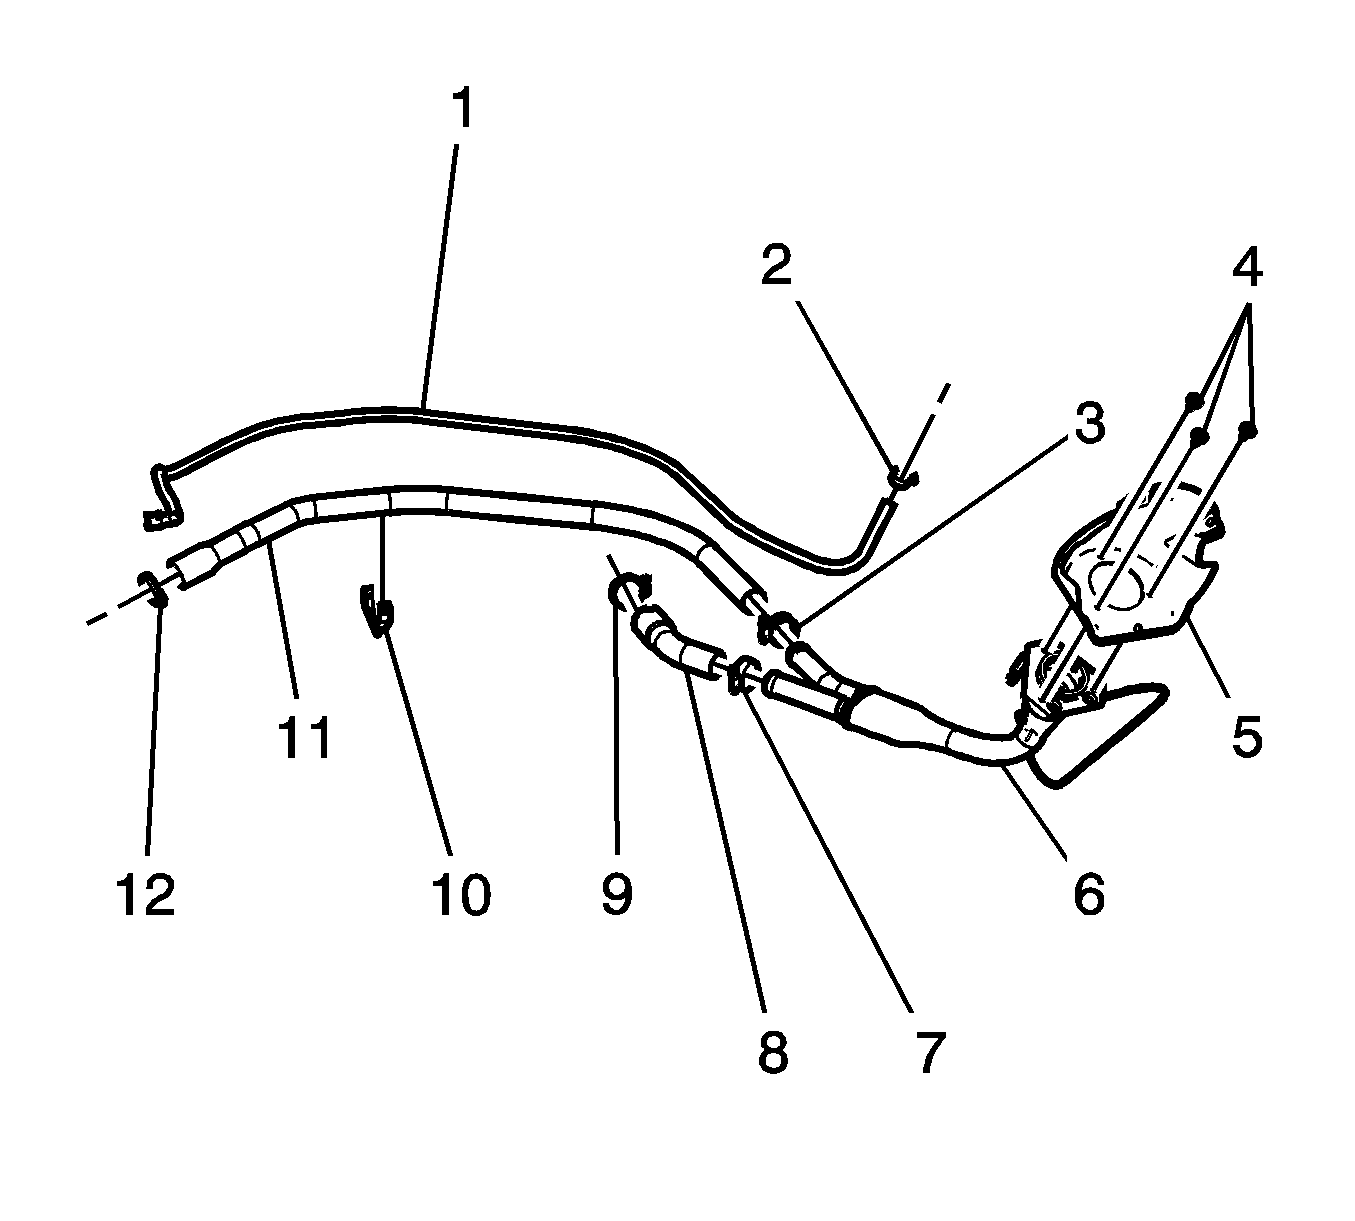
Evaporative emission canister hose (1) |
| • | Evaporative emission canister hose clamp (2) |
| • | Fuel tank fill pipe clamp (3) |
| • | Fuel tank fill pipe housing bolts (4) |
| • | Fuel tank fill pipe housing (5) |
| • | Fuel tank fill pipe restrictor (6) |
| • | Fuel tank fill pipe clamp (7) |
| • | Fuel tank vent hose (8) |
| • | Fuel tank fill hose clamp (9) |
| • | Evaporative emission canister hose clip (10) |
| • | Fuel tank fill pipe (11) |
| • | Fuel tank fill hose clamp (12) |
Assemble
| • |

Notice: Refer to Fastener Notice in the Preface section. Fuel tank fill hose clamp (12)
Tighten
Tighten the clamp to 2.5 N·m (22 lb in).
|
| • | Fuel tank fill pipe (11) |
| • | Evaporative emission canister hose clip (10) |
| • | Fuel tank fill hose clamp (9)
Tighten
Tighten the clamp to 2.5 N·m (22 lb in).
|
| • | Fuel tank vent hose (8) |
| • | Fuel tank fill pipe clamp (7)
Tighten
Tighten the clamp to 2.5 N·m (22 lb in).
|
| • | Fuel tank fill pipe restrictor (6) |
| • | Fuel tank fill pipe housing (5) |
| • | Fuel tank fill pipe housing bolts (4)
Tighten
Tighten the bolts to 2.3 N·m (20 lb in).
|
| • | Fuel tank fill pipe clamp (3)
Tighten
Tighten the clamp to 2.5 N·m (22 lb in).
|
| • | Evaporative emission canister hose clamp (2)
Tighten
Tighten the clamp to 2.5 N·m (22 lb in).
|
| • | Evaporative emission canister hose (1) |
Installation Procedure

- Remove the caps from the open end of the front fuel tank.
- Remove the caps from the fuel/EVAP lines.
- Install the fuel fill hose/pipe assembly.
- Install the fuel fill hose to the front tank.
- Connect the fuel fill hose EVAP line quick connect fitting (2) to the fuel tank line. Refer to
Plastic Collar Quick Connect Fitting Service
.
- Tighten the fuel tank fill hose clamp (1) at the front tank.
Tighten
Tighten the clamps to 2.5 N·m (22 lb in).
- Install the fuel fill hose integral clamp to the crossmember.
- Install the rear axle vent hose clip to the fill pipe neck.

- Position the fill pipe ground strap (5) to the left rear lamp ground wire (4).
- Install the rear lamp ground wire (4) and ground strap (5) to the frame. Insert the lamp ground wire anti-rotation tab into the hole in the frame.
- Insert the chassis wiring harness ground bolt.
Tighten
Tighten the bolt to 9 N·m (80 lb in).
- Install the rear fuel tank. Refer to
Fuel Tank Replacement
.


