Instrument Panel Service Positioning With SLT
Special Tools
J 42640 Steering Column Anti-Rotation Pin
Removal Procedure
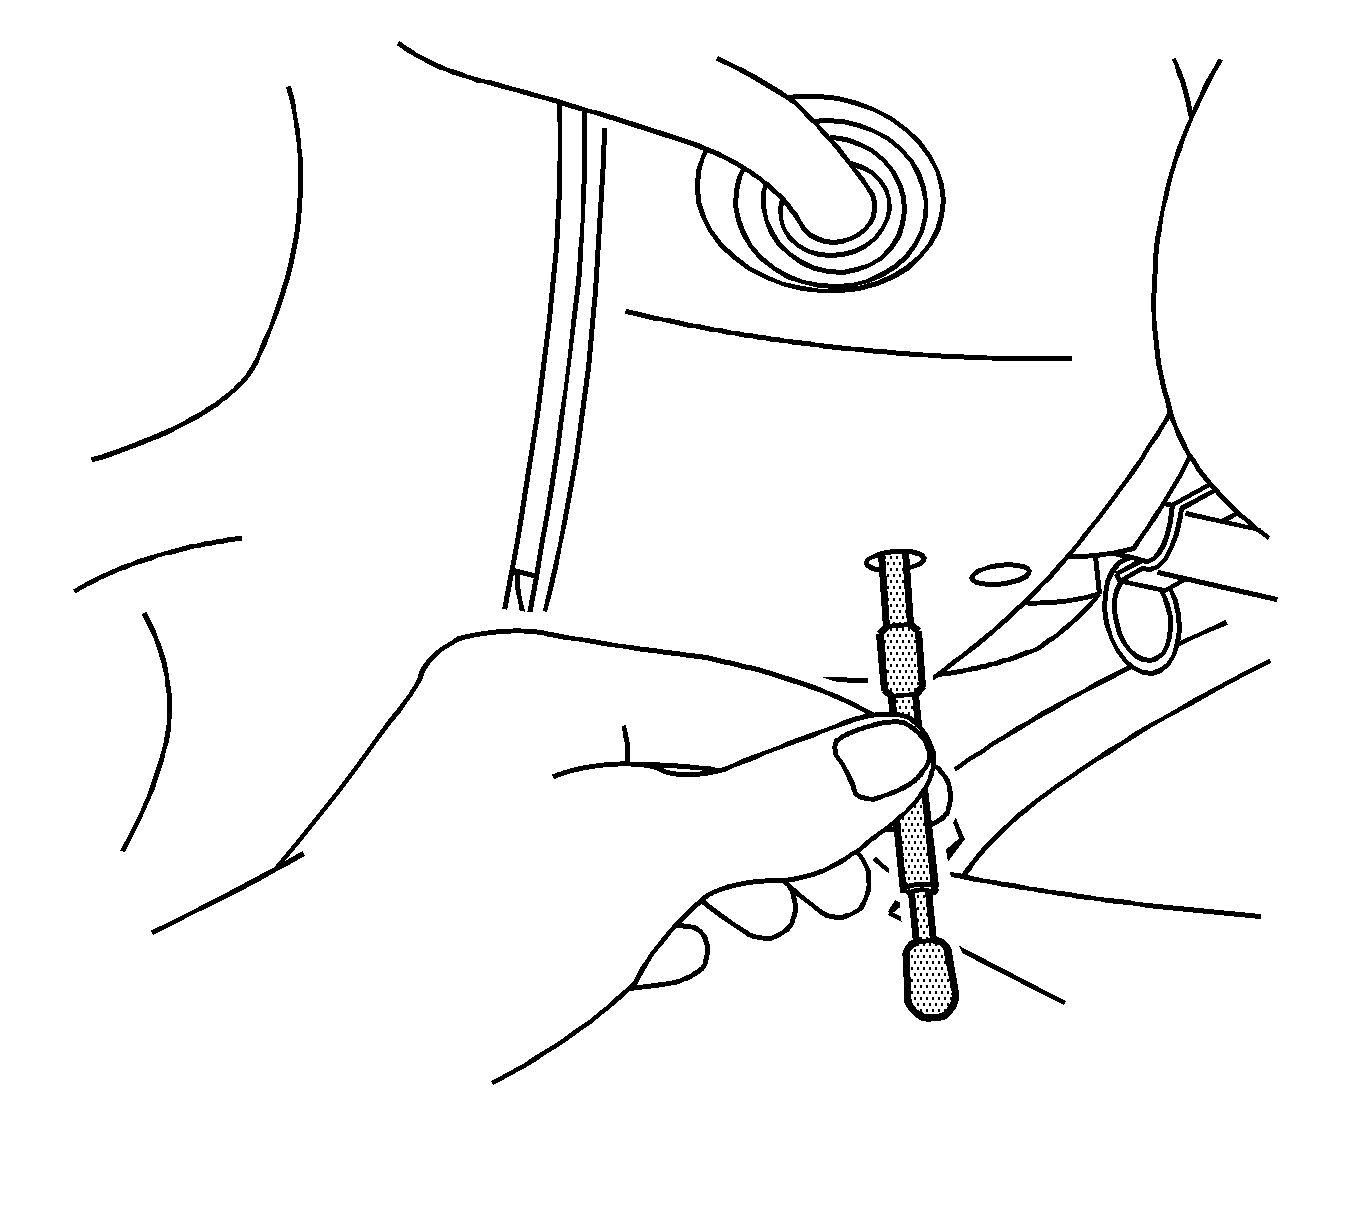
- Lock the steering column through the access hole in the steering column shroud using anti-rotation pin J 42640 .
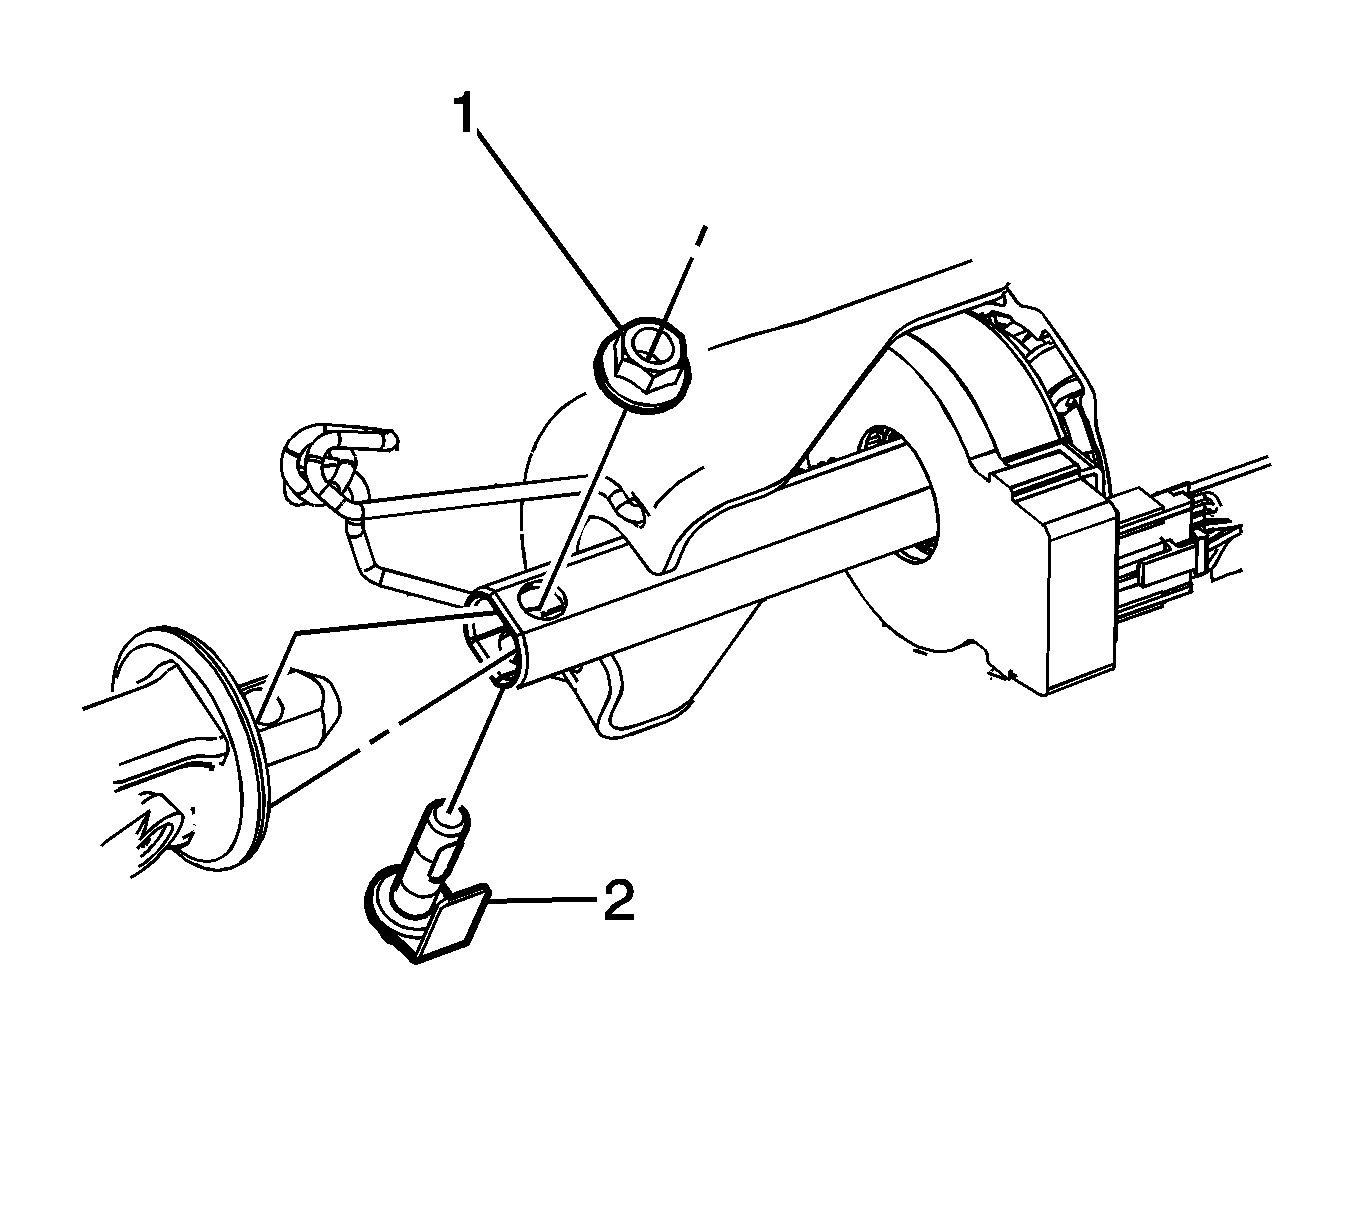
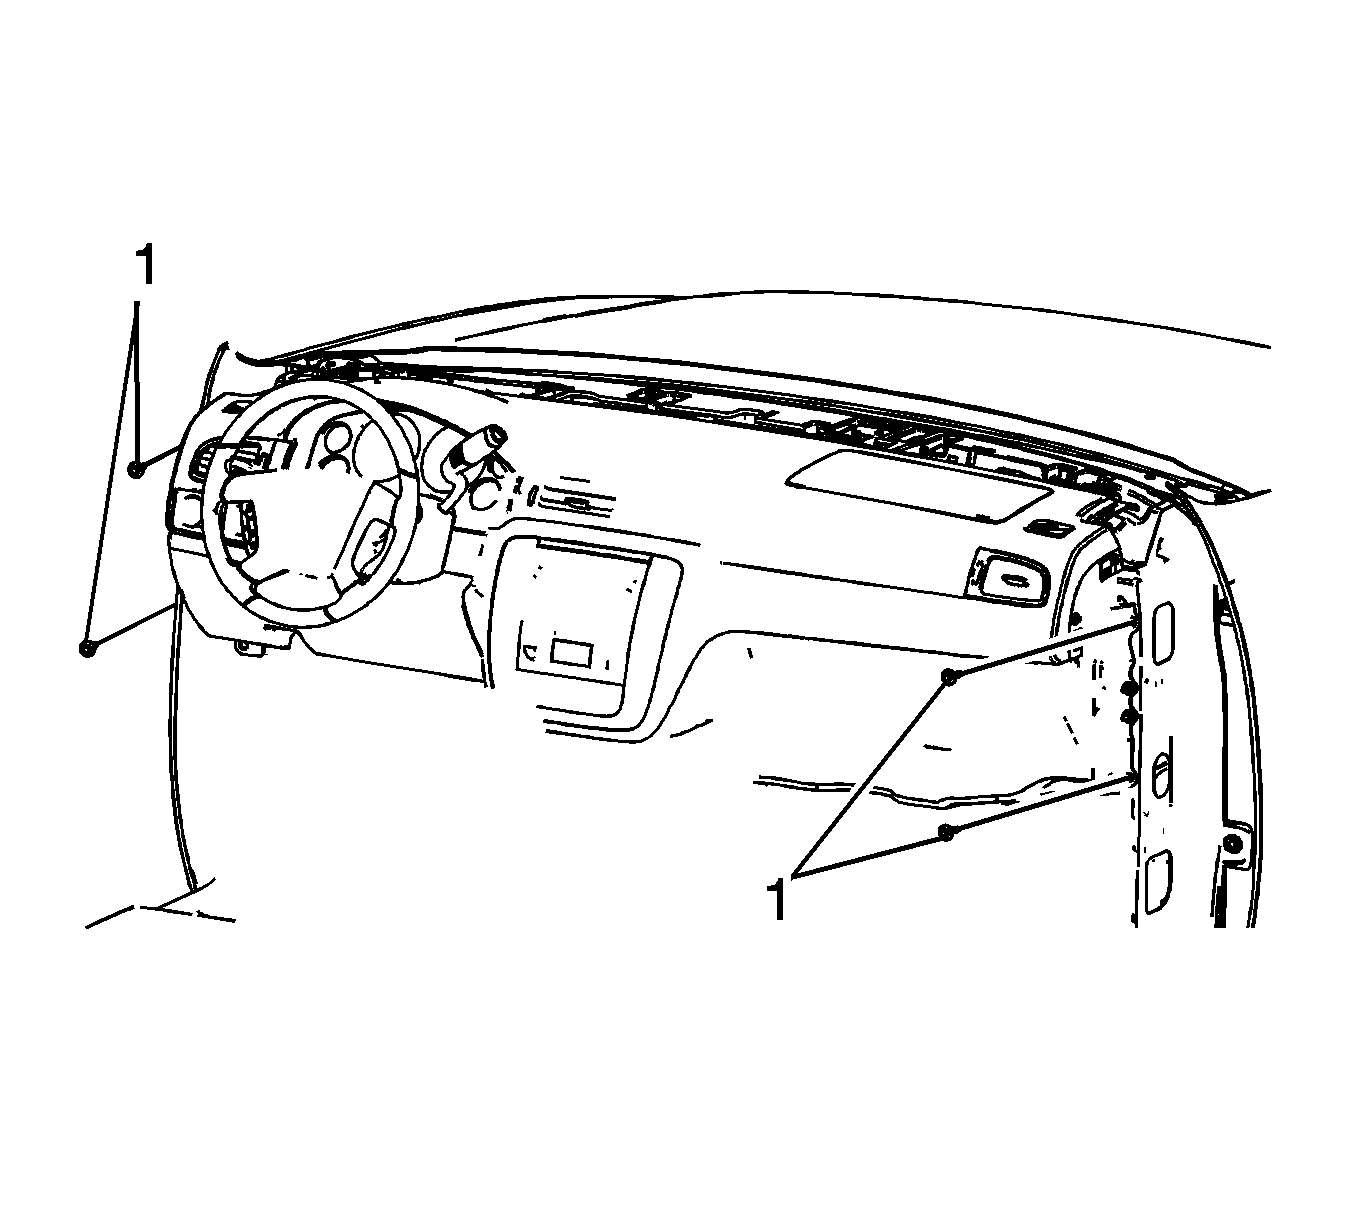
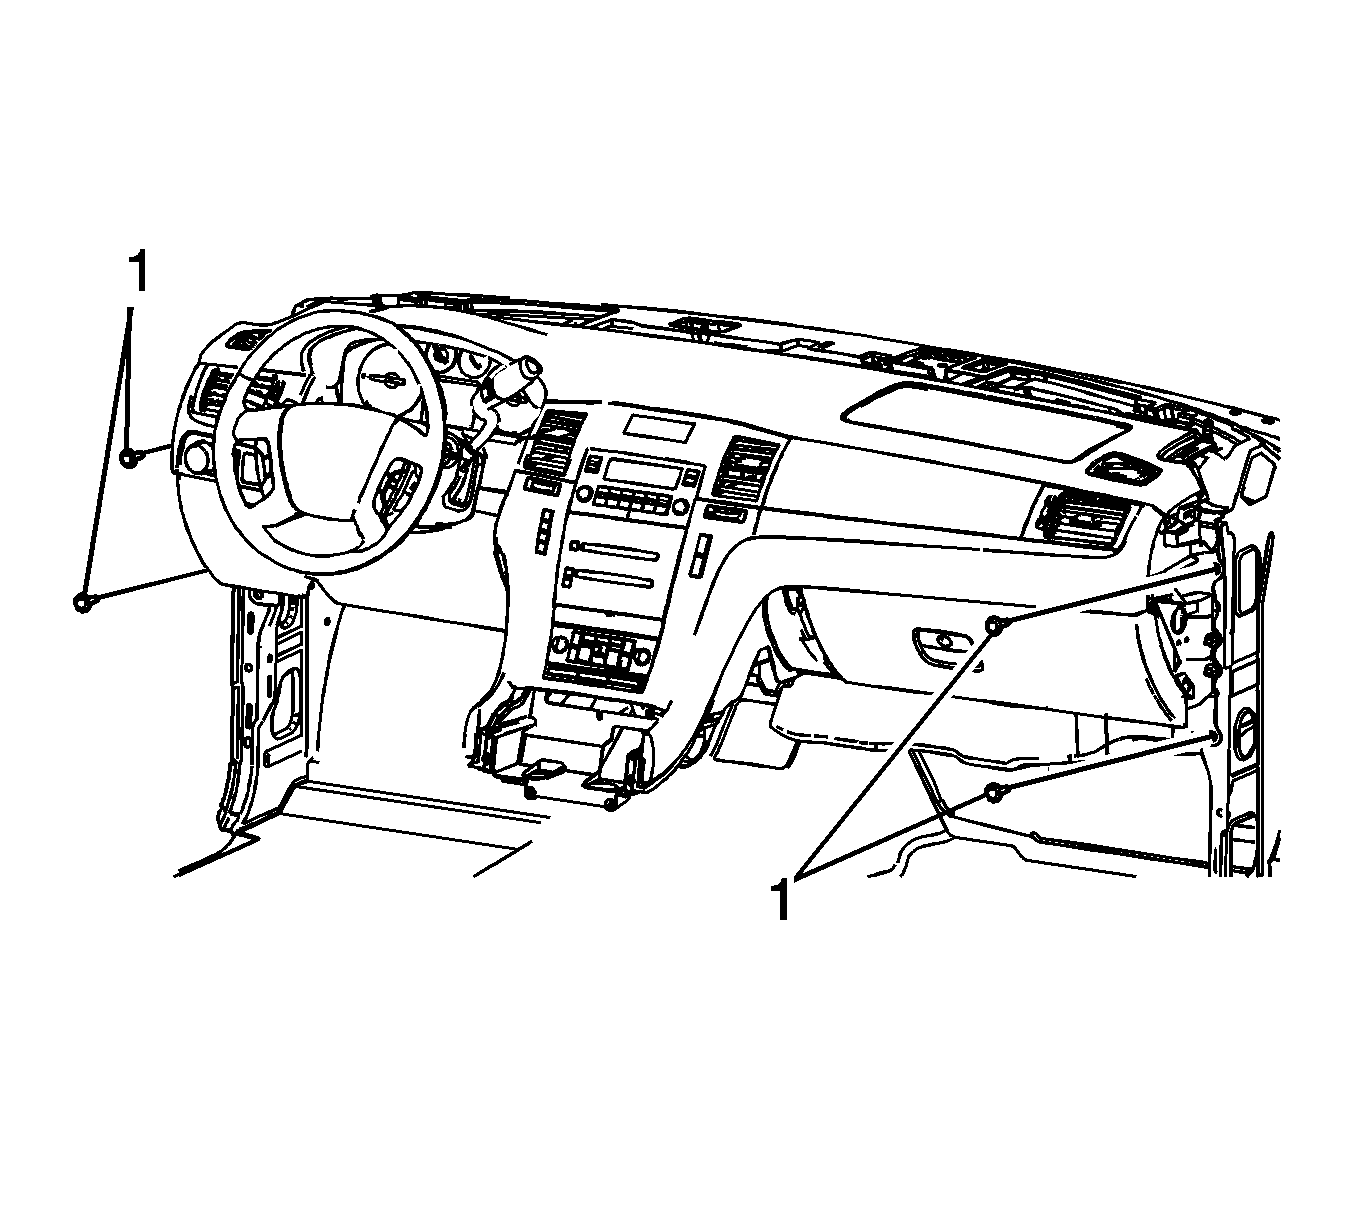
- Remove the steering shaft coupling nut (1) and bolt (2) at the steering column.
- Remove the front seats. Refer to Front Seat Replacement - Bucket .
- Disconnect the negative battery cable. Refer to Battery Negative Cable Disconnection and Connection .
- Remove the front floor console. Refer to Front Floor Console Replacement .
- Remove the instrument panel outer trim covers. Refer to Instrument Panel Outer Trim Cover Replacement .
- Remove the windshield pillar garnish moldings. Refer to Windshield Pillar Garnish Molding Replacement .
- Remove the instrument panel upper trim panel with windshield defroster nozzle grille. Refer to Instrument Panel Upper Trim Panel with Windshield Defroster Nozzle Grille Replacement .
- Tape the ambient light sensor to the instrument panel upper trim panel to ensure it does not fall behind the instrument panel assembly during reinstallation.
- Remove the right and left body hinge pillar trim panel. Refer to Body Hinge Pillar Trim Panel Replacement .
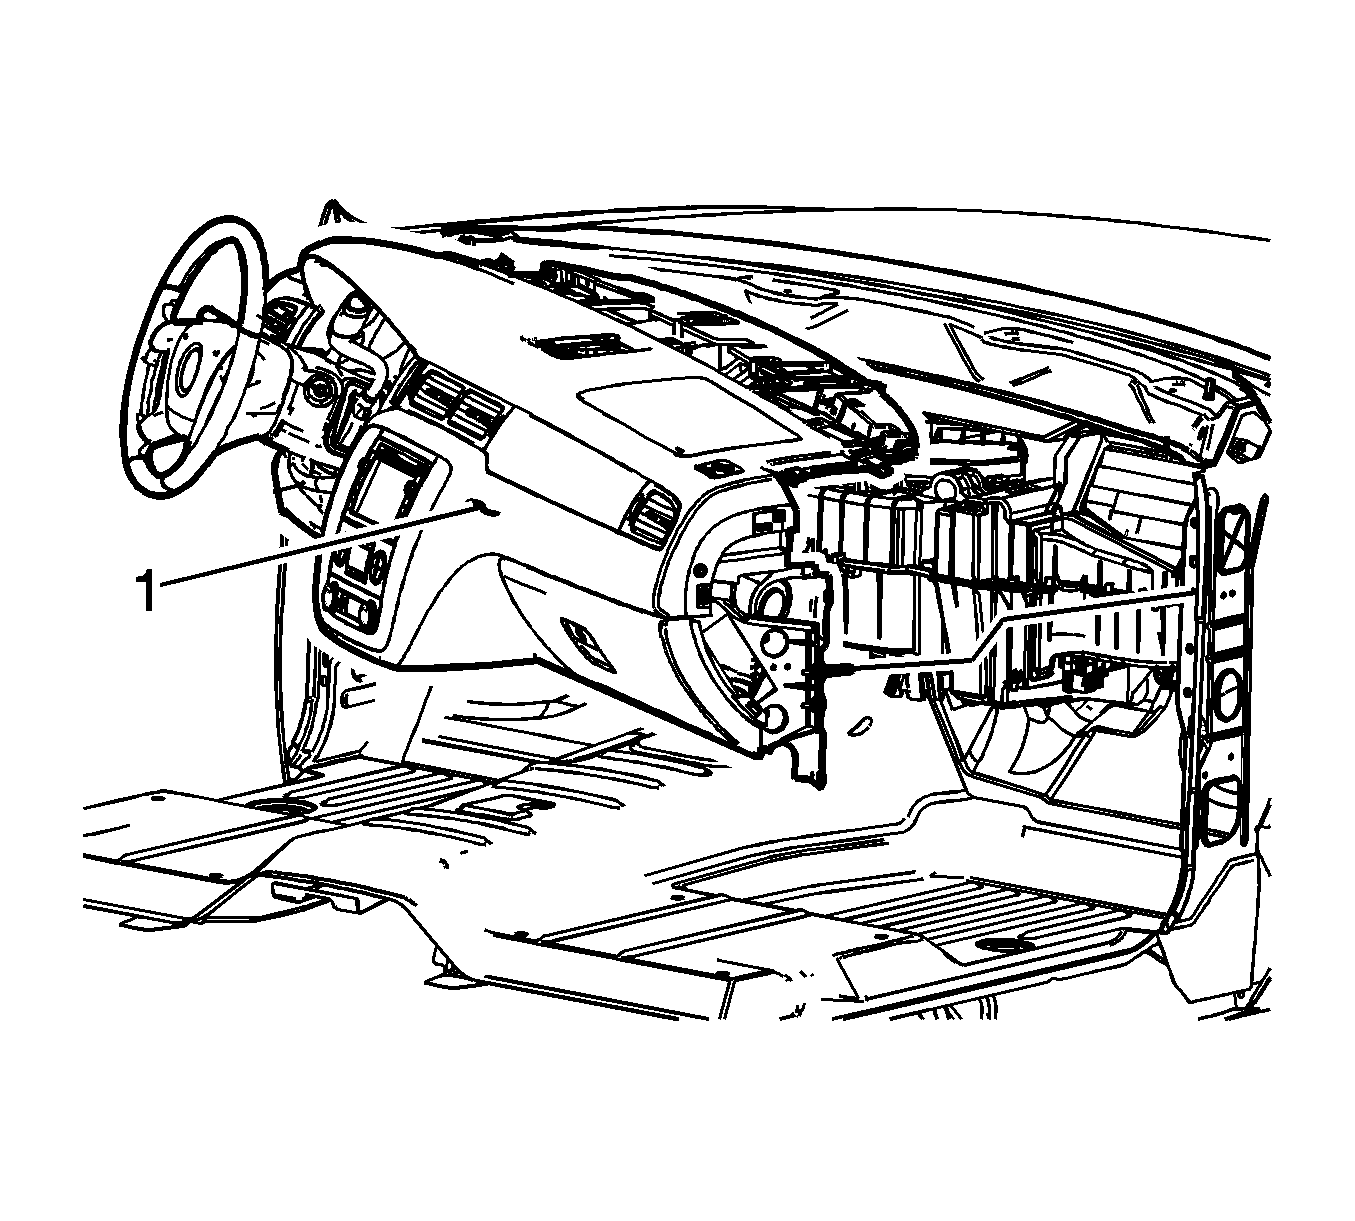
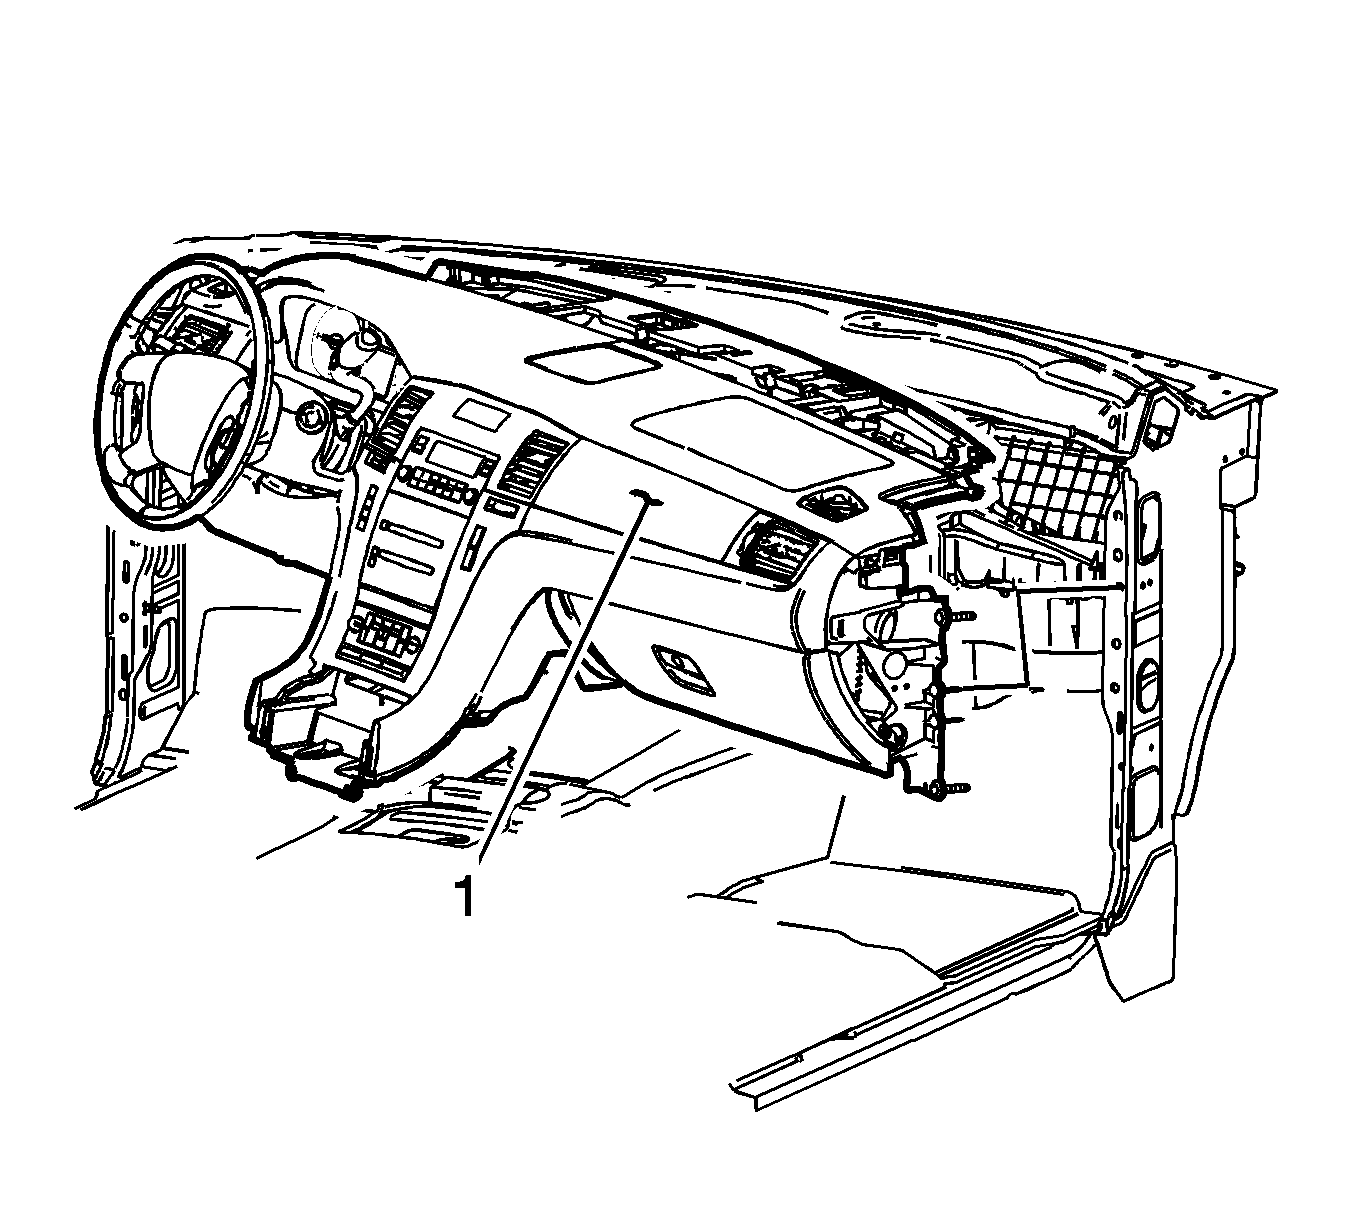
- Remove the instrument panel center support bracket.
- Note location and routing of the instrument panel wiring harness prior to removal in order to ensure proper installation.
- On the right side of the instrument panel perform the following procedures:
- On the left side of the instrument panel perform the following procedures:
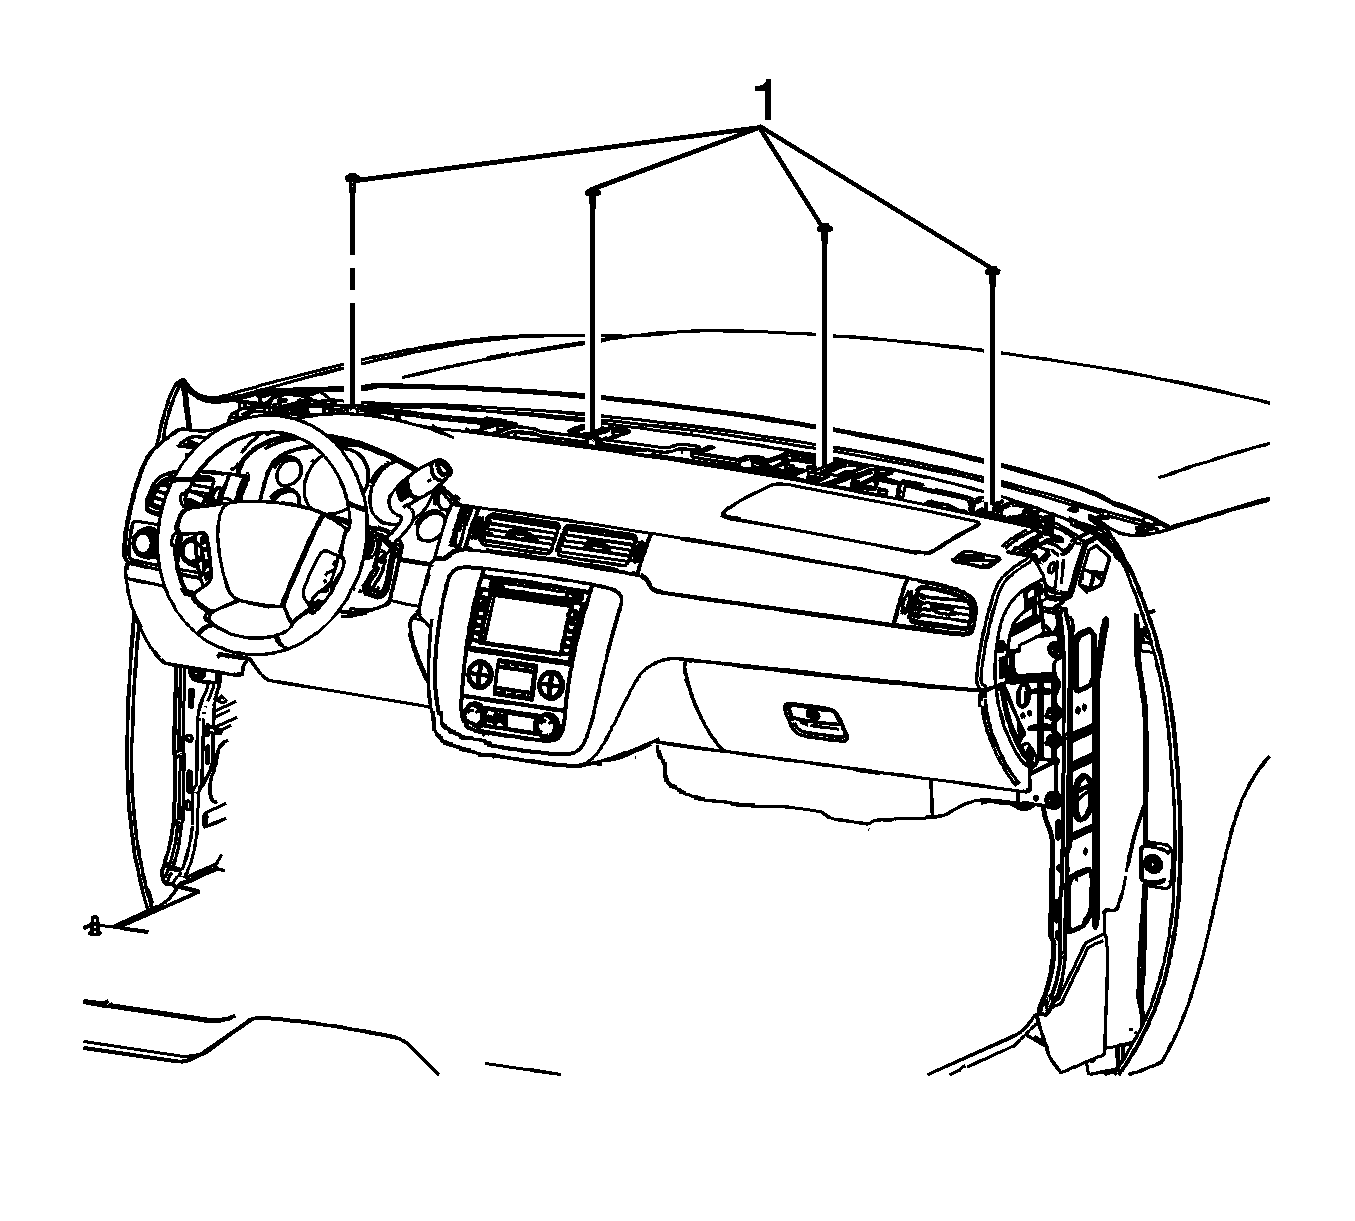
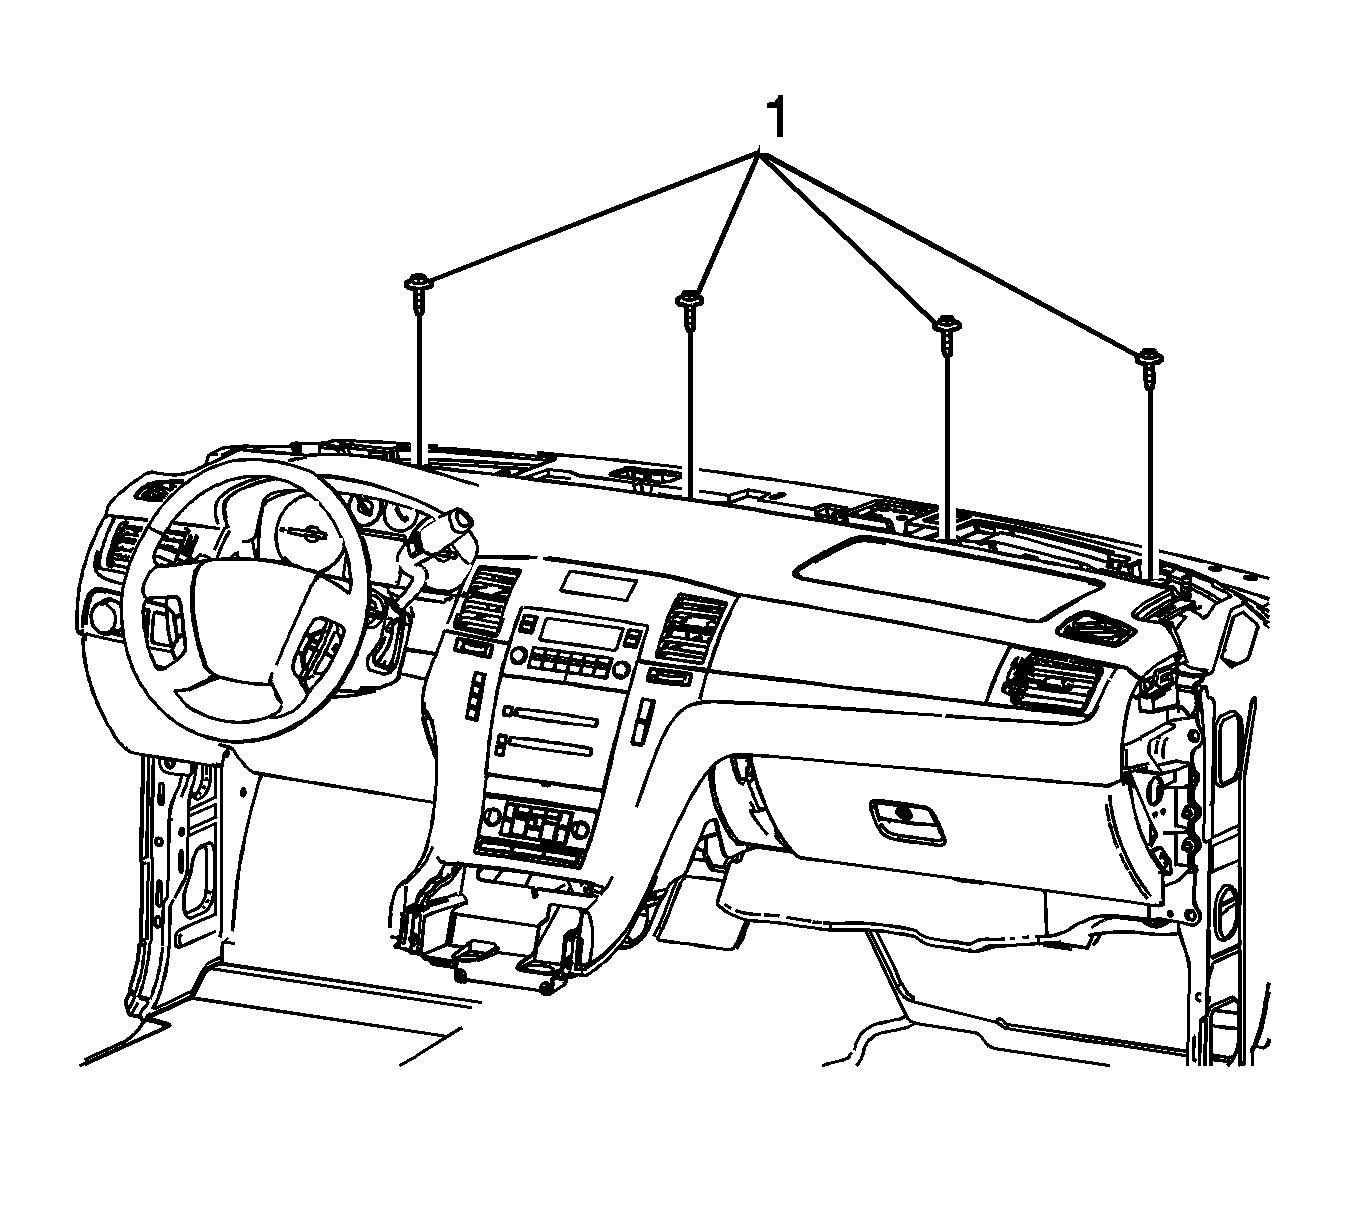
- Remove the 4 bolts (1) securing the instrument panel upper trim panel to the cowl.
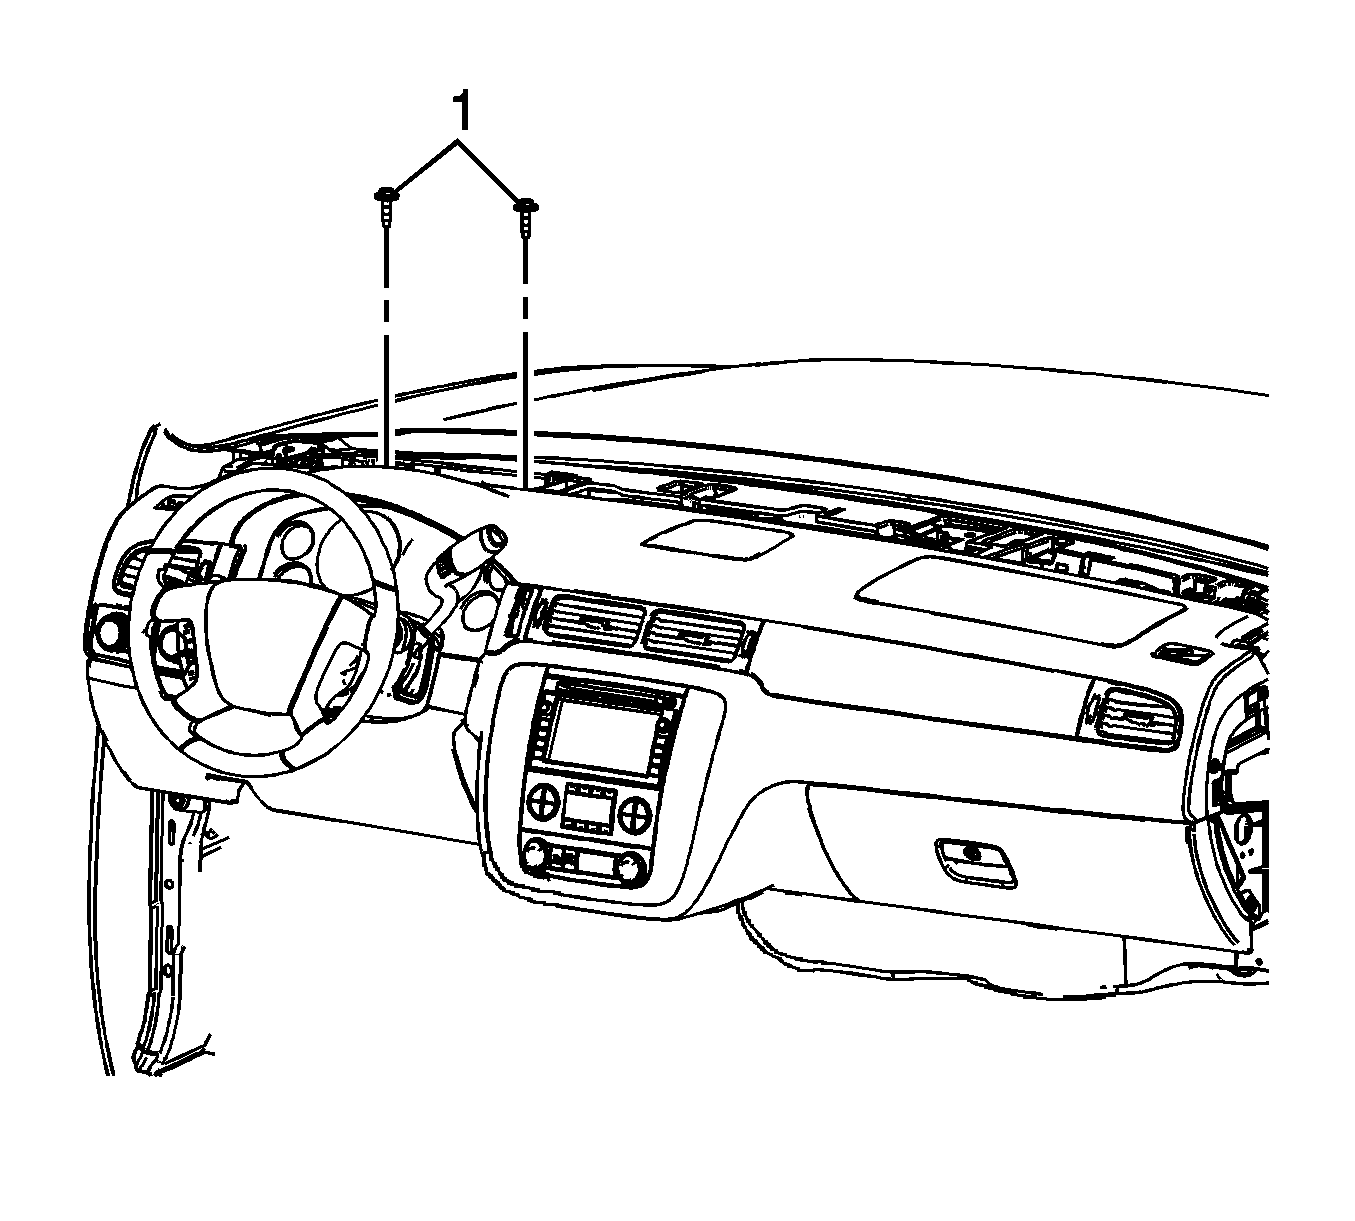
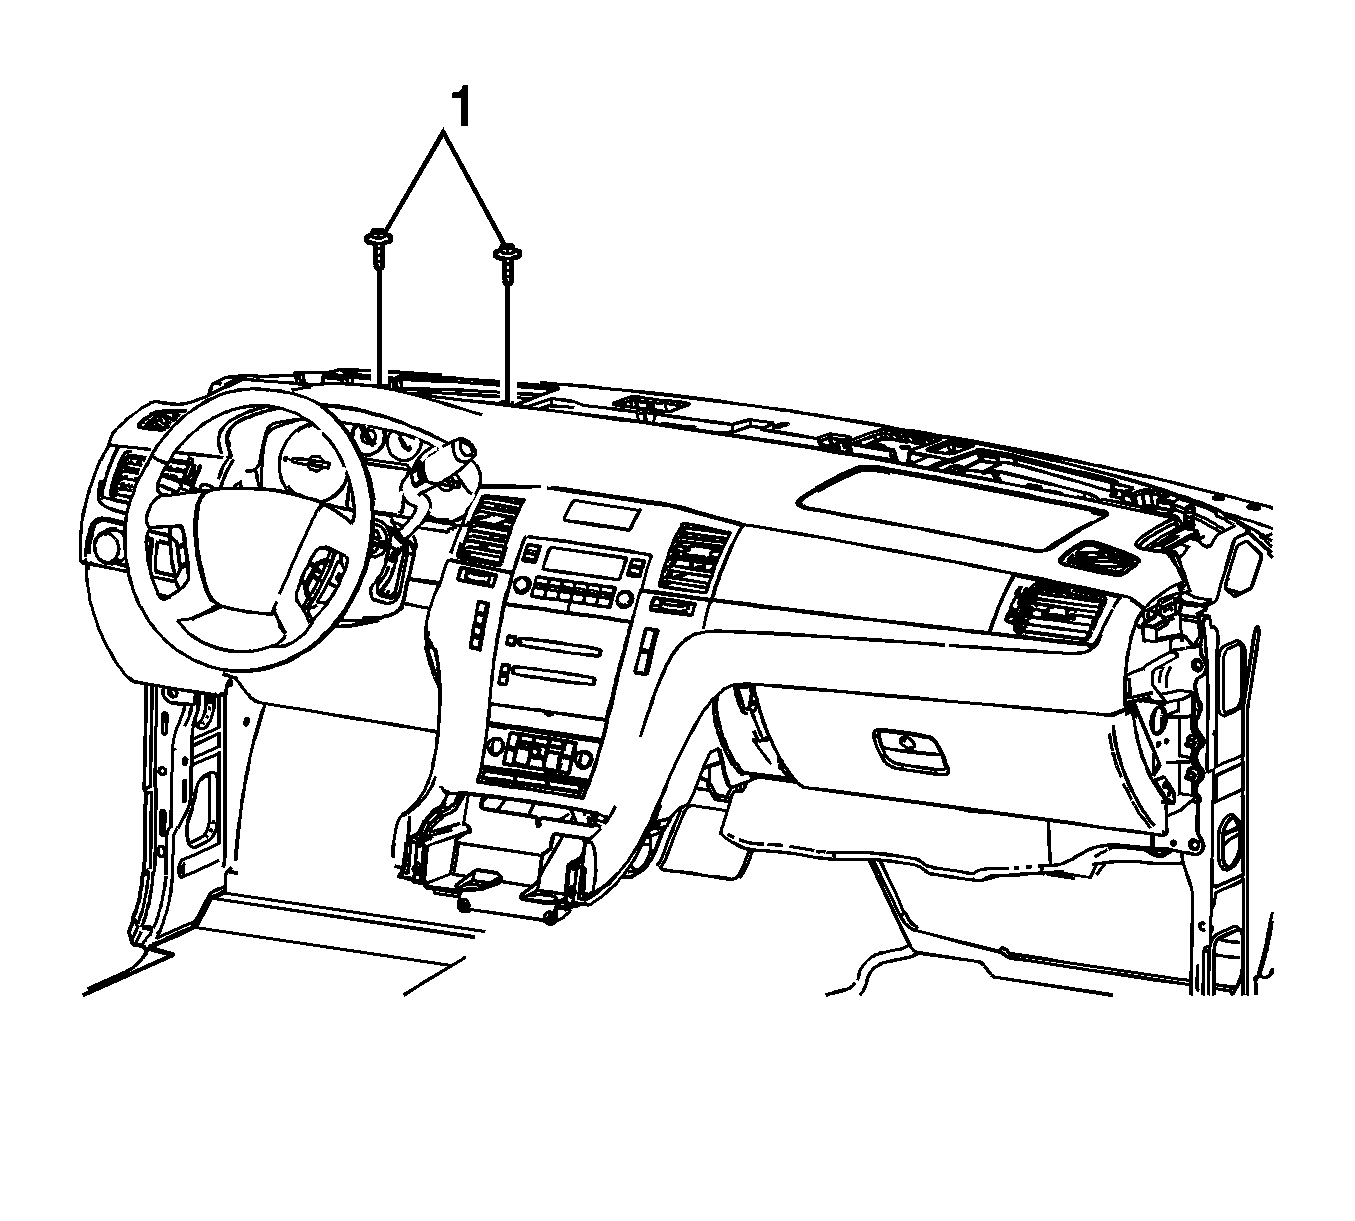
- Remove the 2 bolts (1) securing the instrument carrier support to the cowl.
- Remove the 4 bolts (1) releasing the instrument panel assembly from the vehicle.
- With the aid of an assistant pull the instrument panel assembly (1) rearward in the vehicle until the locator pin on each side clears the opening.
- The person on the right side of the instrument panel should pivot the instrument panel inward toward the center of the vehicle until enough clearance is gained to access the HVAC module.
- Set the instrument panel assembly down and adequately support it in order to prevent any damage.
Notice: Secure the steering wheel utilizing a strap to prevent rotation. Locking of the steering column will prevent damage and a possible malfunction of the SIR system. The steering wheel must be secured
in position before disconnecting the following components:
• The steering column • The intermediate shaft • The steering gear
| • | Disconnect the electrical connections to the instrument panel right electrical center. |
| • | Disconnect the electrical connection for the instrument panel inflatable restraint module. |
| • | Disconnect the radio antennas. |
| • | Release the wire looms securing the wiring harnesses to the right side of the instrument panel. |
| • | Disconnect the electrical connections to the instrument panel left electrical center. |
| • | Disconnect the ground wires from the upper left cowl panel. |
| • | Remove the body wiring harness junction block from its bracket to allow movement in the body harness. |
| • | Release the wire looms securing the wiring harnesses to the left side of the instrument panel. |
These bolts are located down inside the instrument panel and can be seen through the windshield.
Installation Procedure
- With the aid of an assistant perform the following procedures:
- Loosely install the 4 bolts (1) on the outer ends of the instrument panel.
- Loosely install the 2 bolts (1) securing the instrument panel carrier support to the cowl.
- Tighten the 6 bolts securing the instrument panel to the vehicle.
- Install the 4 bolts (1) securing the instrument panel upper trim panel to the cowl.
- On the left side of the instrument panel perform the following procedures:
- On the right side of the instrument panel perform the following procedures:
- Install the instrument panel center support bracket.
- Install the right and left body hinge pillar trim panel. Refer to Body Hinge Pillar Trim Panel Replacement .
- Remove the instrument panel upper trim panel with windshield defroster nozzle grille. Refer to Instrument Panel Upper Trim Panel with Windshield Defroster Nozzle Grille Replacement .
- Install the windshield pillar garnish moldings. Refer to Windshield Pillar Garnish Molding Replacement .
- Install the instrument panel outer trim covers. Refer to Instrument Panel Outer Trim Cover Replacement .
- Install the front floor console. Refer to Front Floor Console Replacement .
- Connect the negative battery cable. Refer to Battery Negative Cable Disconnection and Connection .
- Install the front seats. Refer to Front Seat Replacement - Bucket .
- Install the steering shaft coupling nut (1) and bolt (2) at the steering column.
- Remove the anti-rotation pin J 42640 from the steering column.
| • | Lift the instrument panel assembly (1) up and align the locator pins to the openings in the hinge pillars. |
| • | Push the instrument panel forward until the instrument panel is in vehicle position. |
Notice: Refer to Fastener Notice in the Preface section.
Tighten
Tighten the bolts to 22 N·m (16 lb ft).
Tighten
Tighten the bolts to 9 N·m (80 lb in).
| • | Connect the wire looms securing the wiring harnesses to the left side of the instrument panel. |
| • | Install the body wiring harness junction block into its bracket. |
| • | Connect the ground wires to the upper left cowl panel. |
Tighten
Tighten the nut to 9 N·m (80 lb in).
| • | Connect the electrical connections to the instrument panel left electrical center. |
| • | Connect the wire looms securing the wiring harnesses to the right side of the instrument panel. |
| • | Connect the radio antennas. |
| • | Connect the electrical connection for the instrument panel inflatable restraint module. |
| • | Connect the electrical connections to the instrument panel right electrical center. |
Tighten
Tighten the nut and bolt to 50 N·m (37 lb ft).
Instrument Panel Service Positioning Cadillac
Special Tools
J 42640 Steering Column Anti-Rotation Pin
Removal Procedure
- Lock the steering column through the access hole in the steering column shroud using anti-rotation pin J 42640 .
- Remove the steering shaft coupling nut (1) and bolt (2) at the steering column.
- Remove the front seats. Refer to Front Seat Replacement - Bucket .
- Disconnect the negative battery cable. Refer to Battery Negative Cable Disconnection and Connection .
- Remove the front floor console. Refer to Front Floor Console Replacement .
- Remove the instrument panel outer trim covers. Refer to Instrument Panel Outer Trim Cover Replacement .
- Remove the windshield pillar garnish moldings. Refer to Windshield Pillar Garnish Molding Replacement .
- Remove the instrument panel upper trim panel with windshield defroster nozzle grille. Refer to Instrument Panel Upper Trim Panel with Windshield Defroster Nozzle Grille Replacement .
- Tape the ambient light sensor to the instrument panel upper trim panel to ensure it does not fall behind the instrument panel assembly during reinstallation.
- Remove the right and left body hinge pillar trim panel. Refer to Body Hinge Pillar Trim Panel Replacement .
- Remove the instrument panel center support bracket.
- Note location and routing of the instrument panel wiring harness prior to removal in order to ensure proper installation.
- On the right side of the instrument panel perform the following procedures:
- On the left side of the instrument panel perform the following procedures:
- Remove the 4 bolts (1) securing the instrument panel upper trim panel to the cowl.
- Remove the 2 bolts (1) securing the instrument carrier support to the cowl.
- Remove the 4 bolts (1) releasing the instrument panel assembly from the vehicle.
- With the aid of an assistant pull the instrument panel assembly (1) rearward in the vehicle until the locator pin on each side clears the opening.
- The person on the right side of the instrument panel should pivot the instrument panel inward toward the center of the vehicle until enough clearance is gained to access the HVAC module.
- Set the instrument panel assembly down and adequately support it in order to prevent any damage.
Notice: Secure the steering wheel utilizing a strap to prevent rotation. Locking of the steering column will prevent damage and a possible malfunction of the SIR system. The steering wheel must be secured
in position before disconnecting the following components:
• The steering column • The intermediate shaft • The steering gear
| • | Disconnect the electrical connections to the instrument panel right electrical center. |
| • | Disconnect the electrical connectors on the right lower hinge pillar. |
| • | Disconnect the electrical connection for the instrument panel inflatable restraint module. |
| • | Disconnect the radio antennas. |
| • | Release the wire looms securing the wiring harnesses to the right side of the instrument panel. |
| • | Disconnect the electrical connections to the instrument panel left electrical center. |
| • | Disconnect the ground wires from the upper left cowl panel. |
| • | Remove the body wiring harness junction block from its bracket to allow movement in the body harness. |
| • | Release the wire looms securing the wiring harnesses to the left side of the instrument panel. |
These bolts are located down inside the instrument panel and can be seen through the windshield.
Installation Procedure
- With the aid of an assistant perform the following procedures:
- Loosely install the 4 bolts (1) on the outer ends of the instrument panel.
- Loosely install the 2 bolts (1) securing the instrument panel carrier support to the cowl.
- Tighten the 6 bolts securing the instrument panel to the vehicle.
- Install the 4 bolts (1) securing the instrument panel upper trim panel to the cowl.
- On the left side of the instrument panel perform the following procedures:
- On the right side of the instrument panel perform the following procedures:
- Install the instrument panel center support bracket.
- Install the right and left body hinge pillar trim panel. Refer to Body Hinge Pillar Trim Panel Replacement .
- Remove the instrument panel upper trim panel with windshield defroster nozzle grille. Refer to Instrument Panel Upper Trim Panel with Windshield Defroster Nozzle Grille Replacement .
- Install the windshield pillar garnish moldings. Refer to Windshield Pillar Garnish Molding Replacement .
- Install the instrument panel outer trim covers. Refer to Instrument Panel Outer Trim Cover Replacement .
- Install the front floor console. Refer to Front Floor Console Replacement .
- Connect the negative battery cable. Refer to Battery Negative Cable Disconnection and Connection .
- Install the front seats. Refer to Front Seat Replacement - Bucket .
- Install the steering shaft coupling nut (1) and bolt (2) at the steering column.
- Remove the anti-rotation pin J 42640 from the steering column.
| • | Lift the instrument panel assembly (1) up and align the locator pins to the openings in the hinge pillars. |
| • | Push the instrument panel forward until the instrument panel is in vehicle position. |
Notice: Refer to Fastener Notice in the Preface section.
Tighten
Tighten the bolts to 22 N·m (16 lb ft).
Tighten
Tighten the bolts to 9 N·m (80 lb in).
| • | Connect the wire looms securing the wiring harnesses to the left side of the instrument panel. |
| • | Install the body wiring harness junction block into its bracket. |
| • | Connect the ground wires to the upper left cowl panel. |
Tighten
Tighten the nut to 9 N·m (80 lb in).
| • | Connect the electrical connections to the instrument panel left electrical center. |
| • | Connect the wire looms securing the wiring harnesses to the right side of the instrument panel. |
| • | Connect the radio antennas. |
| • | Connect the electrical connection for the instrument panel inflatable restraint module. |
| • | Connect the electrical connectors on the right lower hinge pillar. |
| • | Connect the electrical connections to the instrument panel right electrical center. |
Tighten
Tighten the nut and bolt to 50 N·m (37 lb ft).
