SMU - Revised/Added Sunroof Specifications and Procedures

| Subject: | Revised/Added Sunroof Specifications and Procedures |
| Models: | 2000 Chevrolet and GMC C/K Utility Models |
| with Sunroof |
This Service Manual Update bulletin is being issued to revise and add sunroof specifications and procedures in the Roof subsection of the 2000 C/K Service Manual. Please replace the current information in the Service Manual with the following information.
Fastener Tightening Specifications
Application | Specification | |
|---|---|---|
Metric | English | |
Side rail attaching bolt | 4 N·m | 35 lb in |
Sunroof glass panel adjustment screw | 7 N·m | 62 lb in |
Sunroof module retaining screw | 9 N·m | 80 lb in |
Sunroof motor screw | 3 N·m | 27 lb in |
Sunroof Replacement
Removal Procedure
- Remove the sunroof finishing lace. Refer to the Finishing Lace Replacement procedure in the Service Manual.
- Remove the headliner. Refer to the Headliner Replacement procedure in the Interior Trim subsection of the Service Manual.
- Remove the drain hoses. Refer to the Sunroof Drain Hose Replacement -- Front and Sunroof Drain Hose Replacement -- Rear procedures in the Service Manual.
- Disconnect the electrical connectors.
- Remove the nine bolts retaining sunroof module.
- Remove the module from vehicle.
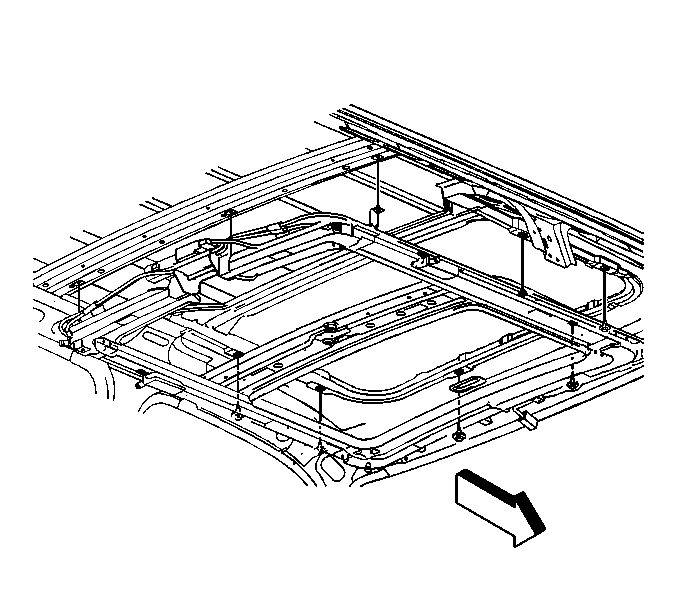
Installation Procedure
- Install the module to the vehicle.
- Loosely install the nine bolts retaining the module to the roof.
- Connect the electrical connectors.
- Install the drain hoses. Refer to the Sunroof Drain Hose Replacement -- Front and Sunroof Drain Hose Replacement -- Rear procedures in the Service Manual.
- Install the headliner. Refer to the Headliner Replacement procedure in the Interior Trim subsection of the Service Manual.
- Install the finishing lace. Refer to the Finishing Lace Replacement procedure in the Service Manual.
- Synchronize the sunroof motor if necessary. Refer to the Sunroof Motor Synchronization procedure in the Service Manual.

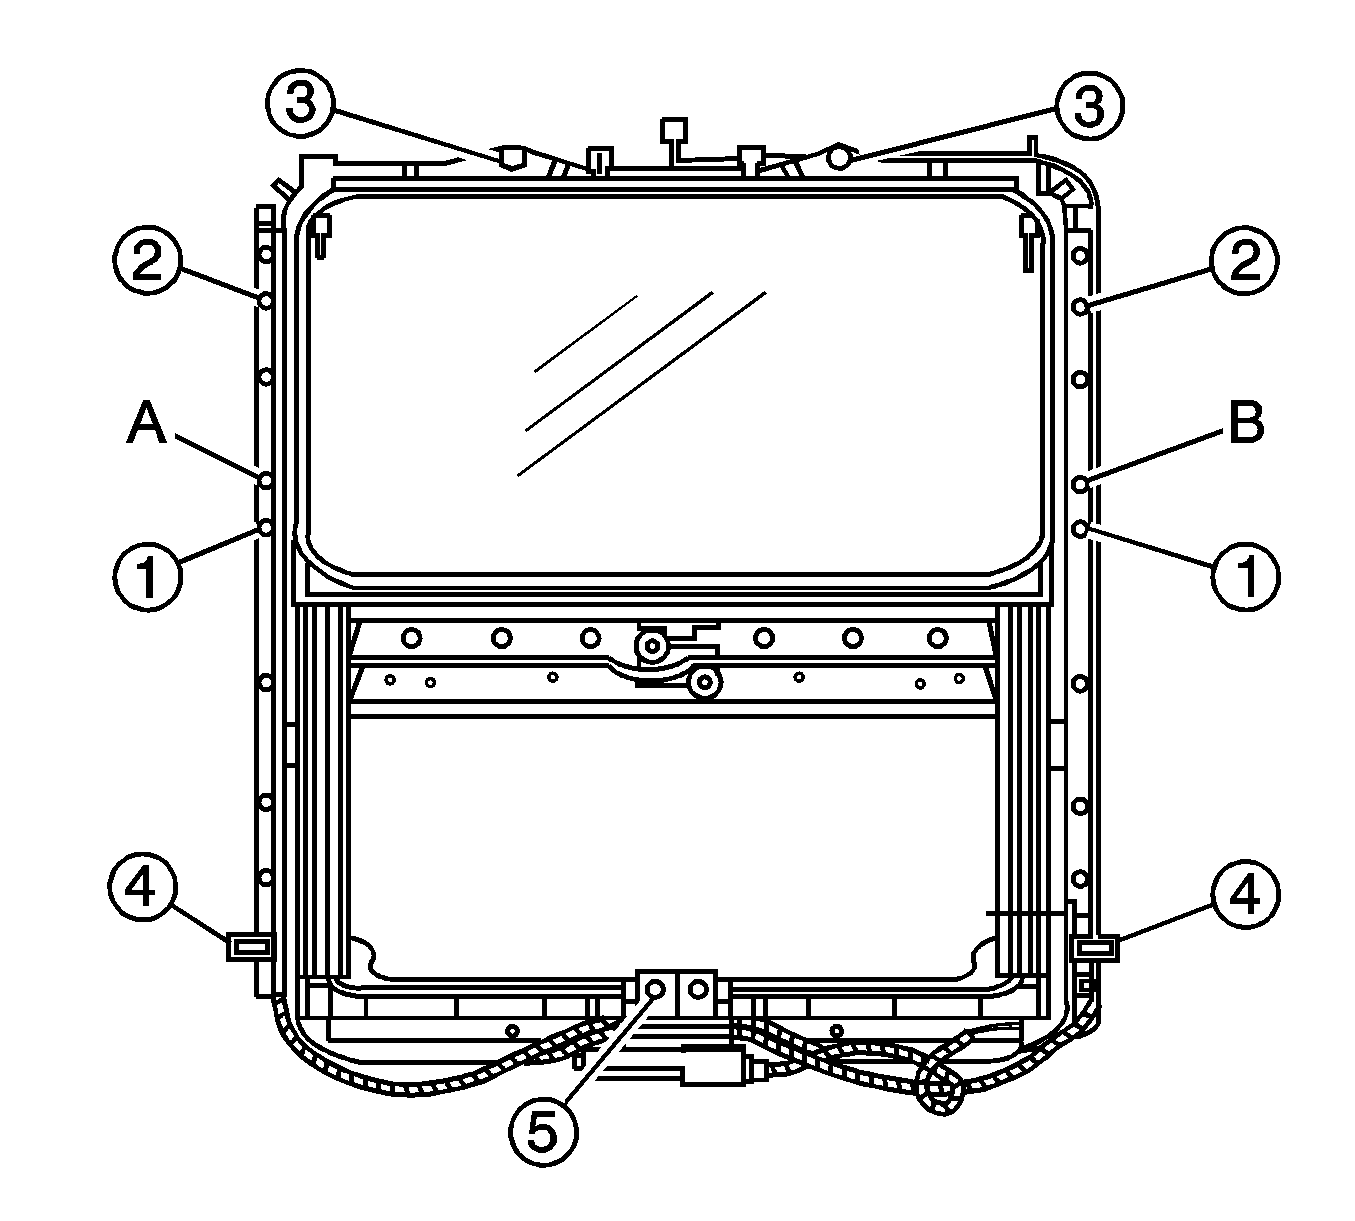
Notice: Refer to the Fastener Notice in the Cautions and Notices subsection of the Service Manual.
Use a drill bit to align the two holes A and B.
Tighten
Tighten the nine bolts in the sequence shown to 9 N·m (80 lb in).
Sunroof Glass Height and Opening Fit Adjustment
- In order to adjust the glass height, the sunroof glass must be in the zero (closed) position.
- Loosen the four adjustment screws.
- Adjust the rear glass panel (1) so that the panel is flush with the roof panel (A), (0 to 2.0 mm (0.079 in) above A).
- Tighten the rear screws.
- Adjust the front glass panel (2) so that the panel is flush with the roof panel (A), (0 to 2.0 mm (0.079 in) below A).
- Tighten the front screws.
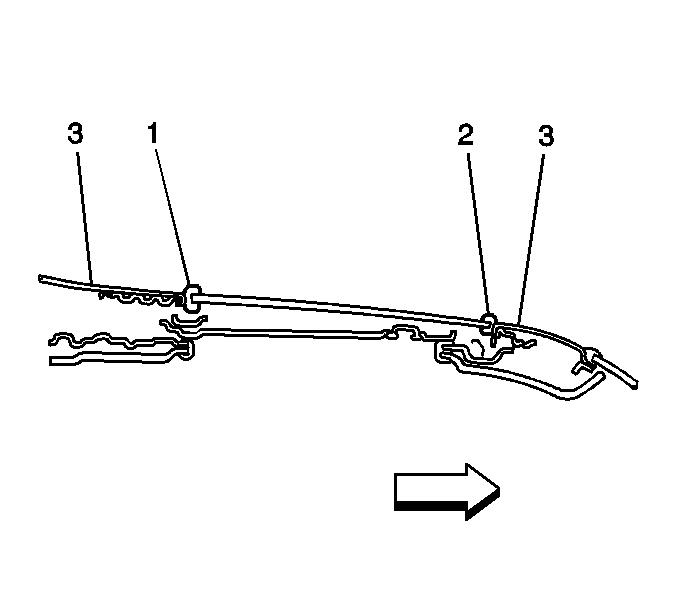
Important: Do not remove the screws from the sunroof mechanism.
Notice: Refer to the Fastener Notice in the Cautions and Notices subsection in the Service Manual.
Tighten
Tighten all four adjustment screws to 7 N·m (62 lb in).
Drain Channel Replacement
Removal Procedure
- Remove the sunroof glass panel. Refer to the Sunroof Glass Panel Replacement procedure in the Service Manual.
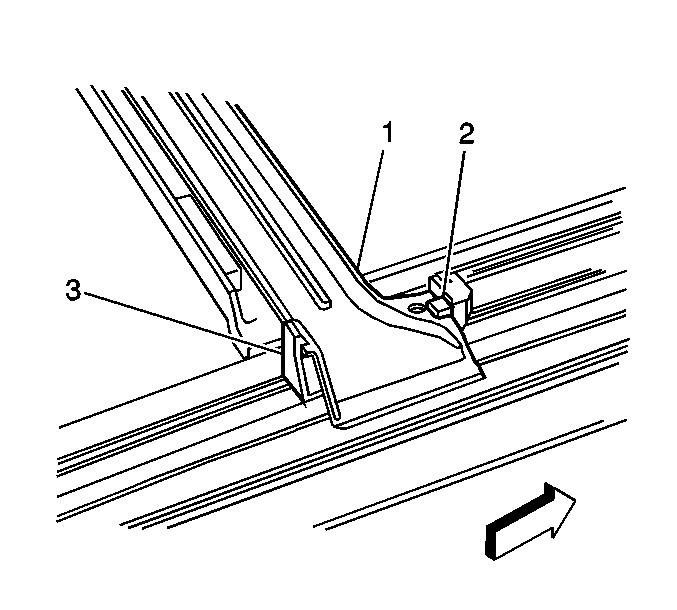
- On one side of the drain channel (1), push the tab (3) rearwards and lift up the drain channel. Do the same for the other side.
- Slide the drain channel from the guide (2).
Installation Procedure
- Slide the drain channel into the guide tab (2).
- Push on the drain channel (1) until the channel locks into place by the retainer (3). Do the same for the other side.
- Ensure both sides are properly seated in the guide.
- Install the sunroof glass panel. Refer to the Sunroof Glass Panel Replacement procedure in the Service Manual.

Finishing Lace Replacement
Removal Procedure
From inside the vehicle, grab on one end of the lace at the joint, pull gently until the lace is off the headliner and sunroof.
Installation Procedure
- Center one end of the lace to the rear of the sunroof.
- Push on the lace to the sunroof by working slowly around the opening.
- With the lace fully seated on the sunroof, start at the joint and gently pull the pull-cord away from the lace in order to wrap the flange over the headliner.
| • | Once the halfway point is reached, start the other end around the opening. |
| • | The headliner will overlap the lace at this point. |
Sunshade Panel Replacement
Removal Procedure
- Remove the glass panel. Refer to the Sunroof Glass Panel Replacement procedure in the Service Manual.
- Remove the drain channel. Refer to the Drain Channel Replacement procedure in the Service Manual.
- With the sunshade (1) in the closed position, push the front (either side) sunshade spring (glider) (2) inward and release the glider from the track.
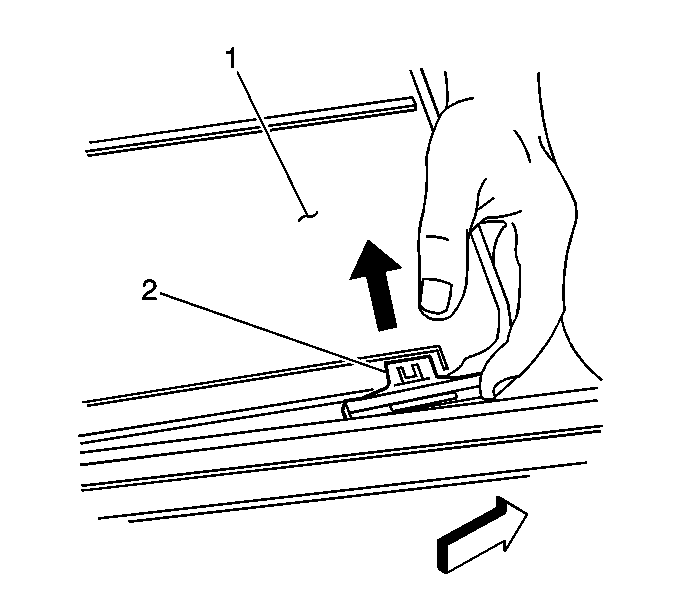
Gently pull same corner of the sunshade outward and wiggle the remaining gliders out of the track.
Installation Procedure
- Install the sunshade and place both gliders on one side into track. Compress one of the other gliders inward and slide into the track.
- With the sunshade in half open position, install the drain channel. Refer to the Drain Channel Replacement procedure in the Service Manual.
- Install the glass panel. Refer to the Sunroof Glass Panel Replacement procedure in the Service Manual.

Repeat this procedure for the last glider.
Sunroof Glass Panel Replacement
Removal Procedure
- Pull back the sunshade.
- Set the sunroof in the zero (closed) position.
- From inside of the vehicle, remove the four glass panel adjustment screws.
- From inside of the vehicle, push up on the sunroof glass panel so that the glass panel can be grabbed and lifted from the roof opening.
- Remove the glass panel from the roof opening.
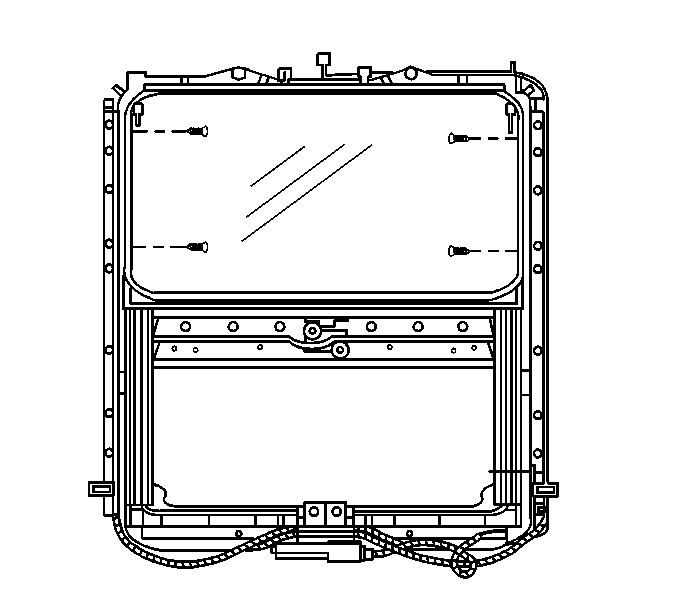
Installation Procedure
- Ensure that the glass panel mechanism is in the zero (closed) position.
- From outside the vehicle, carefully place the glass panel onto the mechanism.
- Loosely install the four adjustment screws.
- Align the glass panel. Refer to the Sunroof Glass Height and Opening Fit Adjustment procedure in the Service Manual.
- Inspect the operation of the sunroof.

Important: Required position of the glass panel is when the front and rear of the sunroof glass panel is flush with the roof panel.
Power Sunroof Motor Replacement
Removal Procedure
- Remove the headliner. Refer to the Headliner Replacement procedure in Interior Trim subsection of the Service Manual.
- Disconnect the wire harness from the sunroof motor.
- Remove the two screws retaining the motor.
- Pull the motor from the unit.
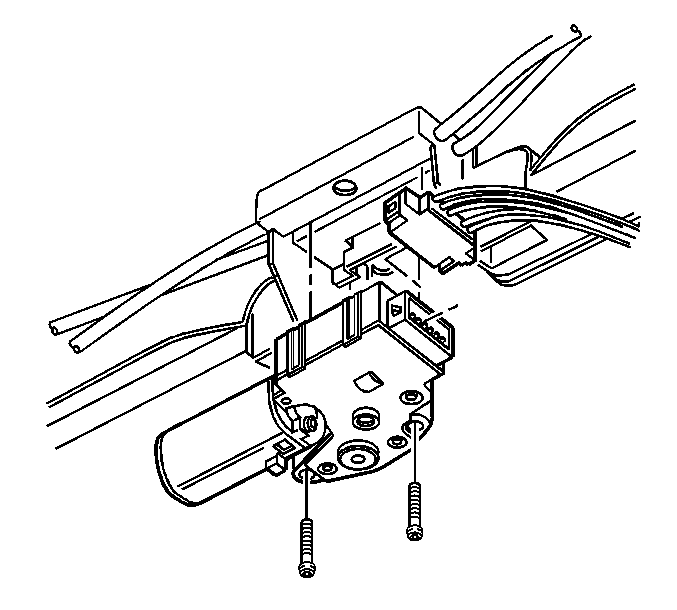
Some gentle back and forth rotation may be required in order to release the motor gear from drive cables.
Installation Procedure
- Install the sunroof motor.
- Install the two screws.
- Connect the wire harness to the sunroof motor.
- Install the headliner. Refer to the Headliner Replacement procedure in the Service Manual.
- Inspect the operation of the sunroof.

Notice: Refer to the Fastener Notice in the Cautions and Notices subsection of the Service Manual.
Tighten
Tighten the two screws to 3 N·m (27 lb in).
Power Sunroof Module Replacement
Removal Procedure
- The sunroof glass panel must be in the zero (closed) position.
- Remove the headliner. Refer to the Headliner Replacement procedure in Interior Trim subsection of the Service Manual.
- Remove the sunroof glass panel. Refer to the Sunroof Glass Replacement procedure in the Service Manual.
- Remove the drain channel. Refer to the Drain Channel Replacement procedure in the Service Manual.
- Remove the sunshade. Refer to the Sunshade Panel Replacement procedure in the Service Manual.
- Remove the nine bolts retaining the module to the roof.
- Remove the module from the vehicle.

Installation Procedure
- Install the module to the vehicle.
- Loosely install the nine bolts retaining the module to the roof.
- Install the sunshade. Refer to the Sunshade Panel Replacement procedure in the Service Manual.
- Install the drain channel. Refer to the Drain Channel Replacement procedure in the Service Manual.
- Install the sunroof glass panel. Refer to the Sunroof Glass Panel Replacement procedure in the Service Manual.
- Install the headliner. Refer to the Headliner Replacement procedure in the Interior Trim subsection of the Service Manual.
- Inspect the operation of the sunroof.


Notice: Refer to the Fastener Notice in the Cautions and Notices subsection of the Service Manual.
Use a drill bit to align the two holes A and B.
Tighten
Tighten the nine bolts in the sequence shown to 9 N·m (80 lb in).
Sunroof Wiring Harness Replacement
Removal Procedure
- Remove the headliner. Refer to the Headliner Replacement procedure in the Interior Trim subsection of the Service Manual.
- Disconnect the wire harness connectors (5) and (6).
- Remove the wire from the sunroof module.
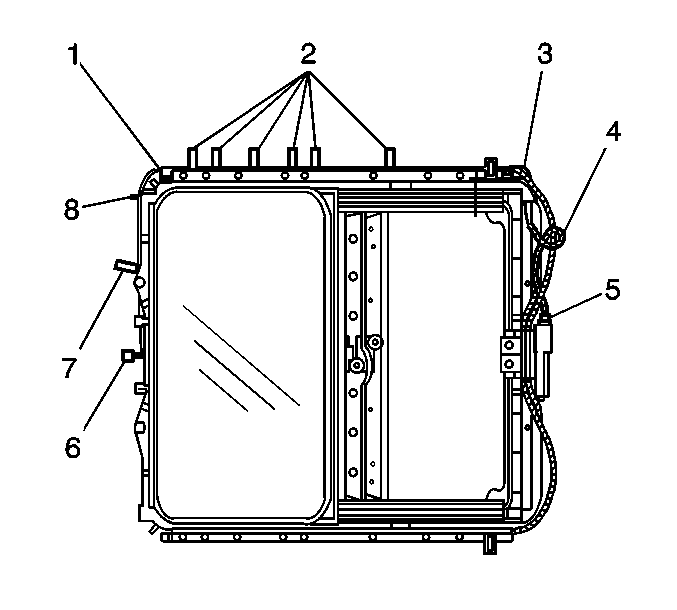
Important: Observe the routing of the wire harness. Failure to route the wire the same will result in the wire harness being pinched during sunroof operation.
Installation Procedure
- Connect the wire connector (6).
- Secure the wire harness along the outboard flange (7) and (2).
- Secure the clip (1) and the clip (3) to the sunroof module flange.
- Loop the wire harness around cable drive (4).
- Connect the wire harness (5) to the sunroof motor.
- Install the headliner. Refer to the Headliner Replacement procedure in the Interior Trim subsection of the Service Manual.
- Inspect the operation of the sunroof.

Important: Do not route the wire harness on the top or the bottom of the flange as it will get pinched during sunroof operation.
