Engine Oil Cooler Hose/Pipe Replacement 6.0 L Engine
Removal Procedure
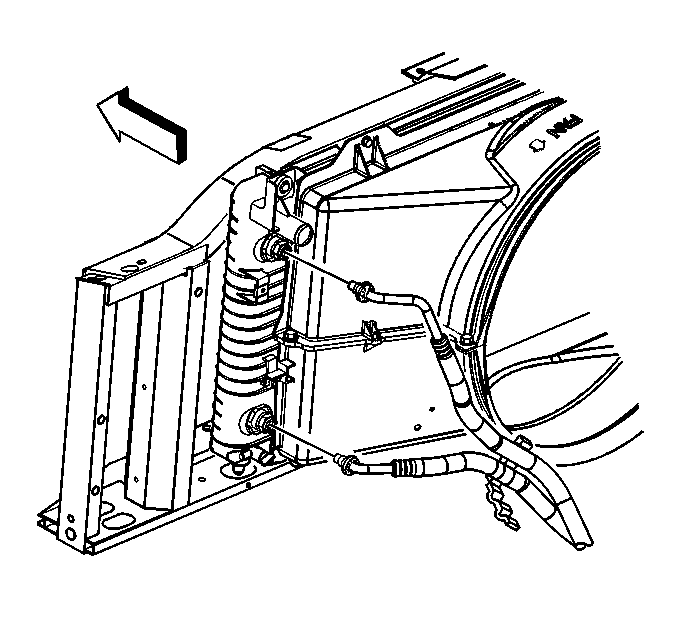
- Perform the following steps on both the upper and lower radiator quick connect fittings:
- Remove the oil cooler pipes from the retainer clip.
- Gently pull the oil cooler pipe fittings straight out from the radiator quick connect fittings.
- Raise and suitably support the vehicle with safety stands. Refer to Lifting and Jacking the Vehicle in General Information.
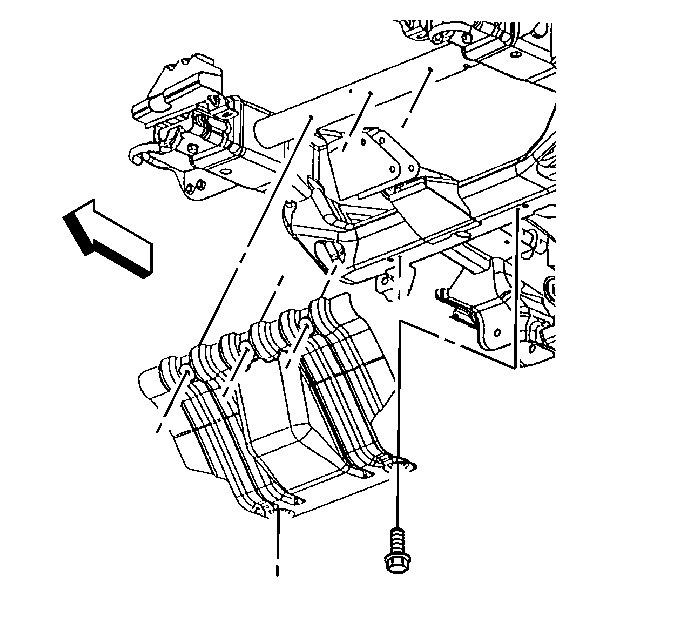
- Remove the engine shield bolts.
- Remove the engine shield.
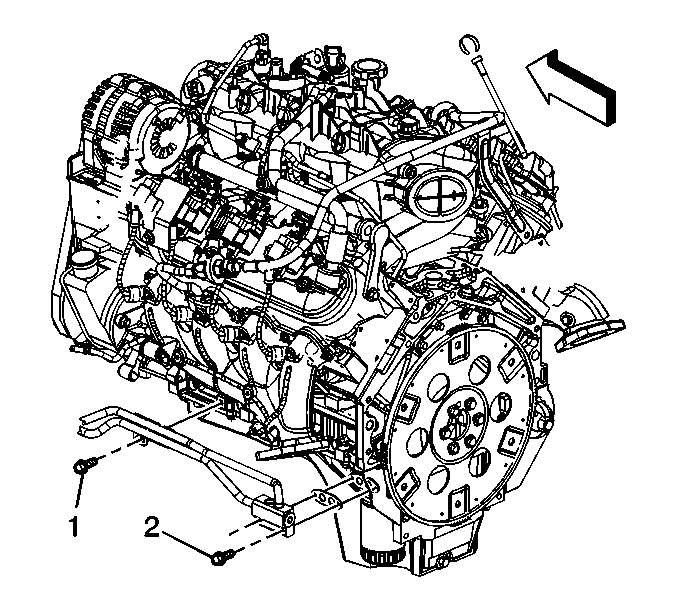
- Remove the oil cooler hose bracket bolt (1).
- Remove the oil cooler hose adapter bolts (2).
- Remove the oil cooler hose/pipe assembly and gasket. Discard the gasket.
- Inspect the fittings, connectors and cooler pipe for damage or distortion.
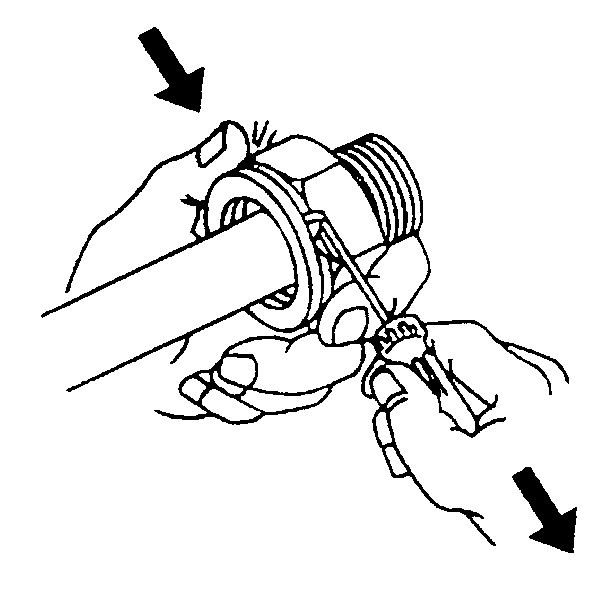
| 1.1. | Disengage the plastic caps from the quick connect fittings. Pull the caps back along the pipes. |
| 1.2. | Hold one leg of the retaining clip. |
| 1.3. | Using a small pick-type tool (or bent screwdriver) gently pry the other end of the retaining clip from the quick connect fitting. |
| 1.4. | Rotate the retaining clip out of the quick connect fitting. Remove the retaining clip completely. |
| 1.5. | Discard the OLD retaining clips. |
Installation Procedure
Important:
• Prior to the installation of the engine oil cooler hose/pipe assembly,
install NEW retaining clips to the quick connect fittings. • Ensure that the oil cooler hose/pie assembly being installed has
plastic caps on the ends of the pipes. If no plastic caps exist, or the plastic
cap is damaged, obtain a new cap. Install the cap on to the cooler line prior
to cooler line installation.
- Do not install the NEW retaining clips onto the fitting by pushing on the clip.
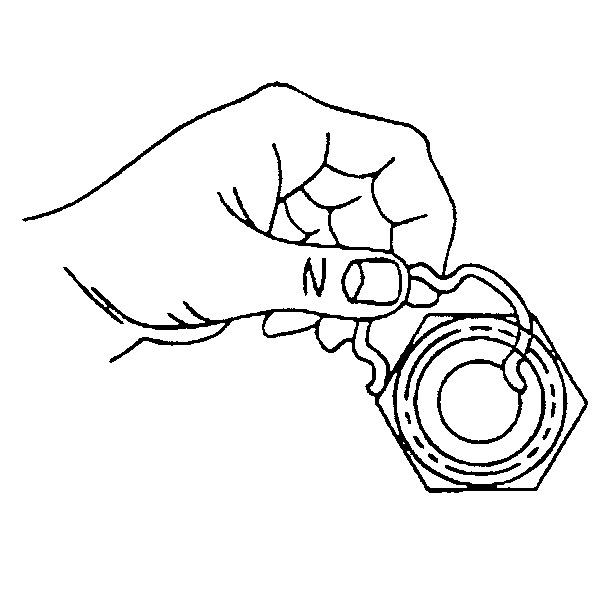
- Install the NEW retaining clip into the quick connect fitting by using your thumb and forefinger. Insert the new retaining clip into one of the three fitting recesses. Ensure that the retaining clip is engaged in all 3 slots.
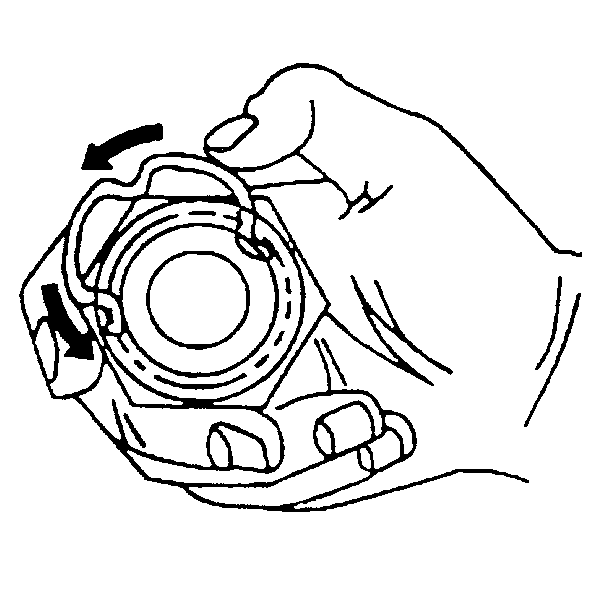
- With one end of the retaining clip engaged in the connector fitting slot, use your thumb in order to rotate the retaining clip around the connector fitting, until the retaining clip snaps into place.
- Ensure that the 3 retaining clips ears are seen from inside the fitting and that the retaining clip moves freely in the fitting slots.
- Install NEW retaining clips into the remaining quick connect fittings.
- Install the oil cooler hose/pipe assembly and a NEW gasket.
- Remove the oil cooler hose adapter bolts (2).
- Remove the oil cooler hose bracket bolt (1).
- Install the engine shield.
- Install the engine shield bolts.
- Lower the vehicle.
- Firmly push the oil cooler pipe fittings straight into the radiator quick connect fittings.
- Install the oil cooler pipes to the retaining clip.
- Install the plastic caps onto the quick connect fittings.
- Snap the plastic cap onto the quick connect fitting.
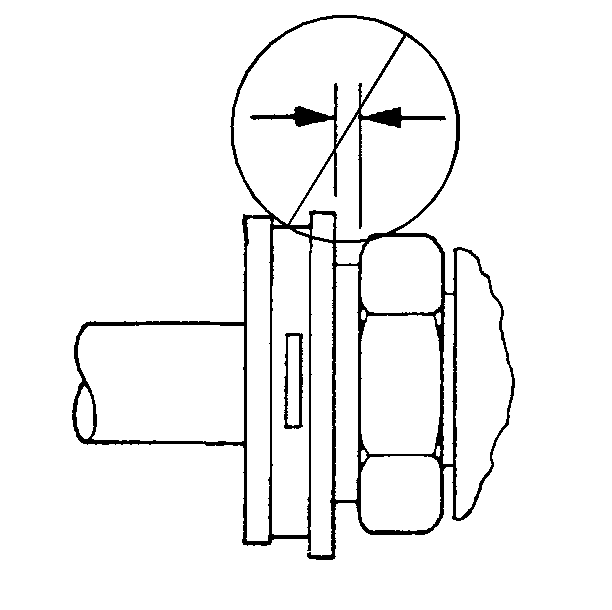
- Ensure that the plastic cap is fully seated against the fitting.
- Ensure that no gap is present between the cap and the fitting.
- Ensure that the yellow identification band on the pipe is hidden within the quick connect fitting. A hidden yellow identification band indicates proper joint seating.
- Run the engine. Inspect the engine oil cooling system for leaks.
- Inspect the engine oil level. Add oil if necessary.
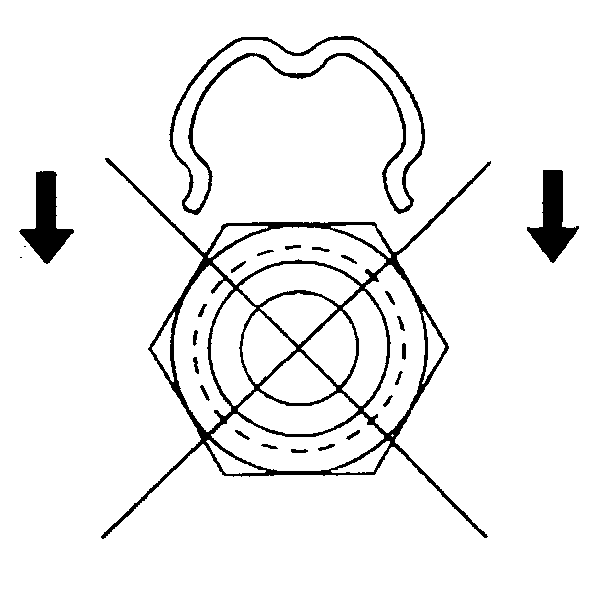
Important: Failure to properly install the retaining clip could cause the cooler line to come loose and cause damage to the engine.

Notice: Use the correct fastener in the correct location. Replacement fasteners must be the correct part number for that application. Fasteners requiring replacement or fasteners requiring the use of thread locking compound or sealant are identified in the service procedure. Do not use paints, lubricants, or corrosion inhibitors on fasteners or fastener joint surfaces unless specified. These coatings affect fastener torque and joint clamping force and may damage the fastener. Use the correct tightening sequence and specifications when installing fasteners in order to avoid damage to parts and systems.
Tighten
Tighten the oil cooler hose adapter bolts to 12 N·m (106 lb in).
Tighten
Tighten the oil cooler hose bracket bolt to 25 N·m (18 lb ft).

Tighten
Tighten the engine shield bolts to 20 N·m (15 lb ft).

Important: A distinct snap should be heard when assembling cooler pipe fittings to the quick connect fittings. To insure the pipe is fully inserted into the quick connect fitting, check by giving the pipe a forceful tug.
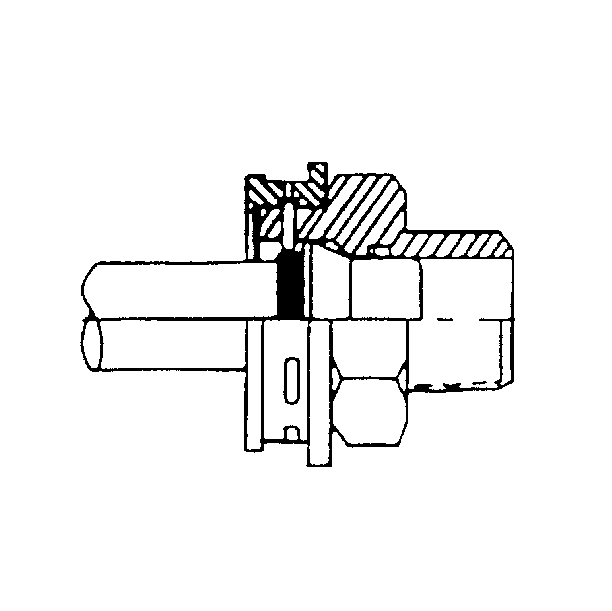
Important:
• Do not use the plastic cap in order to install the cooler line
into the fitting. • Do not manually depress the retaining clip when installing the
plastic cap.

Engine Oil Cooler Hose/Pipe Replacement 8.1 L Engine
Removal Procedure
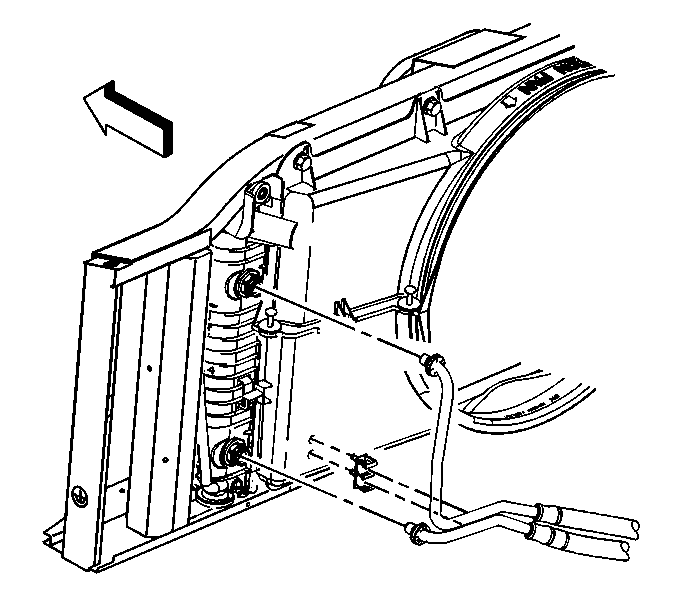
- Perform the following steps on both the upper and lower radiator quick connect fittings:
- Remove the oil cooler pipes from the retainer clip.
- Gently pull the oil cooler pipe fittings straight out from the radiator quick connect fittings.
- Raise and suitably support the vehicle with safety stands. Refer to Lifting and Jacking the Vehicle in General Information.
- Remove the engine shield bolts.
- Remove the engine shield.
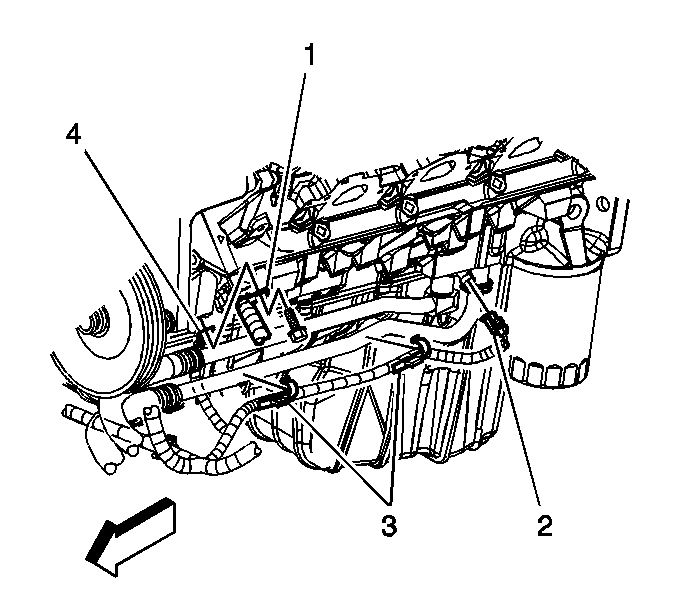
- Remove the engine harness clips (2) from the lower oil cooler pipe.
- Remove the oil cooler pipe clip bolt.
- Perform the following steps on both the engine block quick connect fittings:
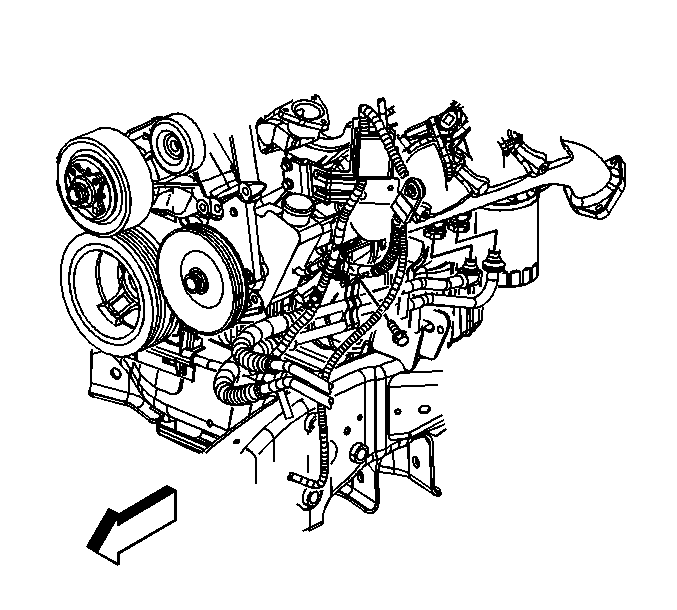
- Gently pull the oil cooler pipe fittings straight out from the engine block quick connect fittings.
- Remove the engine oil cooler hose/pipe assembly from the vehicle.

| 1.1. | Disengage the plastic caps from the quick connect fittings. Pull the caps back along the pipes. |
| 1.2. | Hold one leg of the retaining clip. |
| 1.3. | Using a small pick-type tool (or bent screwdriver) gently pry the other end of the retaining clip from the quick connect fitting. |
| 1.4. | Rotate the retaining clip out of the quick connect fitting. Remove the retaining clip completely. |
| 1.5. | Discard the OLD retaining clips. |

| 9.1. | Disengage the plastic caps from the quick connect fittings. Pull the caps back along the pipes. |
| 9.2. | Hold one leg of the retaining clip. |
| 9.3. | Using a small pick-type tool (or bent screwdriver) gently pry the other end of the retaining clip from the quick connect fitting. |
| 9.4. | Rotate the retaining clip out of the quick connect fitting. Remove the retaining clip completely. |
| 9.5. | Discard the OLD retaining clips. |
Installation Procedure
Important:
• Prior to the installation of the engine oil cooler hose/pipe assembly,
install NEW retaining clips to the quick connect fittings. • Ensure that the oil cooler hose/pie assembly being installed has
plastic caps on the ends of the pipes. If no plastic caps exist, or the plastic
cap is damaged, obtain a new cap. Install the cap on to the cooler line prior
to cooler line installation.
- Do not install the NEW retaining clips onto the fitting by pushing on the clip.
- Install the NEW retaining clip into the quick connect fitting by using your thumb and forefinger. Insert the new retaining clip into one of the three fitting recesses. Ensure that the retaining clip is engaged in all 3 slots.
- With one end of the retaining clip engaged in the connector fitting slot, use your thumb in order to rotate the retaining clip around the connector fitting, until the retaining clip snaps into place.
- Ensure that the 3 retaining clips ears are seen from inside the fitting and that the retaining clip moves freely in the fitting slots.
- Install NEW retaining clips into the remaining quick connect fittings.
- Install the engine oil cooler hose/pipe assembly to the vehicle.
- Firmly push the oil cooler pipe fittings straight into the engine block quick connect fittings.
- Install the oil cooler pipe clip bolt.
- Install the engine harness clips (2) to the lower pipe.
- Install the engine shield.
- Install the engine shield bolts.
- Lower the vehicle.
- Firmly push the oil cooler pipe fittings straight into the radiator quick connect fittings.
- Install the oil cooler pipes to the retaining clip.
- Install the plastic caps onto the quick connect fittings.
- Snap the plastic cap onto the quick connect fitting.
- Ensure that the plastic cap is fully seated against the fitting.
- Ensure that no gap is present between the cap and the fitting.
- Ensure that the yellow identification band on the pipe is hidden within the quick connect fitting. A hidden yellow identification band indicates proper joint seating.
- Run the engine. Inspect the engine oil cooling system for leaks.
- Inspect the engine oil level. Add oil if necessary.


Important: Failure to properly install the retaining clip could cause the cooler line to come loose and cause damage to the engine.


Important: A distinct snap should be heard when assembling cooler pipe fittings to the quick connect fittings. To insure the pipe is fully inserted into the quick connect fitting, check by giving the pipe a forceful tug.
Notice: Use the correct fastener in the correct location. Replacement fasteners must be the correct part number for that application. Fasteners requiring replacement or fasteners requiring the use of thread locking compound or sealant are identified in the service procedure. Do not use paints, lubricants, or corrosion inhibitors on fasteners or fastener joint surfaces unless specified. These coatings affect fastener torque and joint clamping force and may damage the fastener. Use the correct tightening sequence and specifications when installing fasteners in order to avoid damage to parts and systems.
Tighten
Tighten the oil cooler pipe clip bolt to 50 N·m (37 lb ft).


Tighten
Tighten the engine shield bolts to 20 N·m (15 lb ft).

Important: A distinct snap should be heard when assembling cooler pipe fittings to the quick connect fittings. To insure the pipe is fully inserted into the quick connect fitting, check by giving the pipe a forceful tug.

Important:
• Do not use the plastic cap in order to install the cooler line
into the fitting. • Do not manually depress the retaining clip when installing the
plastic cap.


