Slow, Difficult Fuel Fill, Short Fill, Fuel Gauge Inaccurate (Replace Fuel Tank Vent)

| Subject: | Slow, Difficult Fuel Fill, Short Fill, Fuel Gauge Inaccurate (Replace Fuel Tank Vent) |
| Models: | 2002 Chevrolet Avalanche, Suburban 2500 Series Models |
| 2002 GMC Yukon XL 2500 Series Models |
This bulletin is being revised to add parts and update the correction procedure. Please discard Corporate Bulletin Number 02-06-04-012 (Section 06 - Engine/Propulsion System).
Condition
Some customers may comment that the fuel tank is difficult to fill from approximately 3/4 to full. The automatic fuel fill nozzle keeps shutting off.
Cause
Inadequate venting of the fuel tank may cause the nozzles to shut off prematurely.
Correction
Caution: Gasoline or gasoline vapors are highly flammable. A fire could occur if an ignition source is present. Never drain or store gasoline or diesel fuel in an open container, due to the possibility of fire or explosion. Have a dry chemical (Class B) fire extinguisher nearby.
- Turn the key to the RUN position. Does the fuel gauge display a fuel level greater than 3/4 full? If YES, go to Step 2. If NO, go to step 3.
- Connect a Tech 2® to the vehicle ALDL connector. Observe the Fuel Level Rear on Data Stream 1. If the fuel level voltage display is less than 2.25 volts, proceed with step 3. If not, run/drive the vehicle engine until the Fuel Level Rear voltage display drops to approximately 2.25 volts. This would be something less than a completely full rear fuel tank.
- Disconnect the negative battery cable. Refer to the Battery Negative Cable Disconnect/Connect procedure.
- Loosen the fuel filler cap in order to relieve the fuel tank vapor pressure.
- Raise the vehicle. Refer to Lifting and Jacking the Vehicle in the General Information sub-section of the Service Information.
- Clean all the fuel pipe and hose connections and the surrounding areas before disconnecting in order to avoid possible contamination of the fuel system.
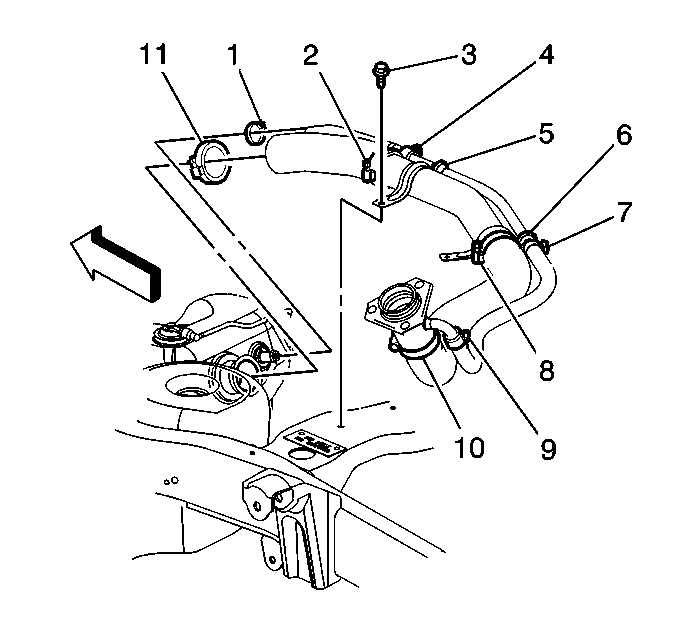
- Loosen the fuel fill hose clamp (10) at the fuel fill pipe.
- Disconnect the fuel fill hose and the hose clamps (10) from the fuel fill pipe.
- Loosen the fuel vapor hose clamp (9) at the fill pipe.
- Disconnect the fuel vapor hose and hose clamp (9) from the fuel fill pipe.
- Disconnect the rear axle vent hose retainer from the fuel fill pipe bracket.
- Remove the fuel filler neck to body ground strap bolt from the frame.
- Lower the vehicle enough to gain access to the fuel filler door area.
- Remove the fuel filler cap from the fuel fill tube.
- Remove the three 7 mm (0.28 in) screws that retain the fuel filler neck to the retaining pocket in the body panel.
- Remove the filler neck from the vehicle.
- Replace the fuel tank filler pipe assembly with P/N 15181810.
- Reinstall the fuel filler neck to the vehicle and secure with the 7 mm (0.28 in) screws.
- Reinstall the fuel cap to the filler neck.
- Reinstall the fuel filler neck ground strap to the frame bolt.
- Reinstall the rear axle vent tube retainer into its original location.
- Reinstall the fuel and vapor hoses to the fuel filler neck.
- Reconnect the negative battery cable.

Tighten
Tighten the screws to 2.3 N·m(20 lb in).
Tighten
Tighten the bolt to 9 N·m(80 lb in).
Tighten
Tighten the hose clamps to 2.5 N·m(22 lb in).
Tighten
Tighten the battery negative terminal bolt to 16 N·m
(12 lb ft).
Retest the vehicle. If there is still a difficult to fill condition, continue with the following procedure.
To perform this repair, you will need the following locally obtained items.
| • | A 152 mm (6 in) long, 3.175 mm (1/8 inch) drill bit. |
| • | A 609 mm (24 in) long piece of fuel hose, 9/32 or smaller, marked at 457.2 mm (18 in) and 482.6 mm (19 in) locations (Test hose) |
Caution: Gasoline or gasoline vapors are highly flammable. A fire could occur if an ignition source is present. Never drain or store gasoline or diesel fuel in an open container, due to the possibility of fire or explosion. Have a dry chemical (Class B) fire extinguisher nearby.
- Disconnect the negative battery cable. Refer to the Battery Negative Cable Disconnect/Connect procedure.
- Loosen the fuel filler cap in order to relieve the fuel tank vapor pressure.
- Raise the vehicle. Refer to Lifting and Jacking the Vehicle in the General Information sub-section of the Service Information.
- Clean all the fuel pipe and hose connections and the surrounding areas before disconnecting in order to avoid possible contamination of the fuel system.
- Loosen the fuel fill hose clamp (10) at the fuel fill pipe.
- Disconnect the fuel fill hose and the hose clamps (10) from the fuel fill pipe.
- Loosen the fuel vapor hose clamp (9) at the fill pipe.
- Disconnect the fuel vapor hose and hose clamp (9) from the fuel fill pipe.
- Disconnect the rear axle vent hose retainer from the fuel fill pipe bracket.
- Remove the fuel filler neck to body ground strap bolt from the frame.
- Lower the vehicle enough to gain access to the fuel filler door area.
- Remove the fuel filler cap from the fuel fill tube.
- Remove the three 7 mm (0.28 in) screws that retain the fuel filler neck to the retaining pocket in the body panel.
- Remove the filler neck from the vehicle.
- Place the tab on the filler neck, where the rear axle vent tube was fastened, firmly in the jaws of a vise.
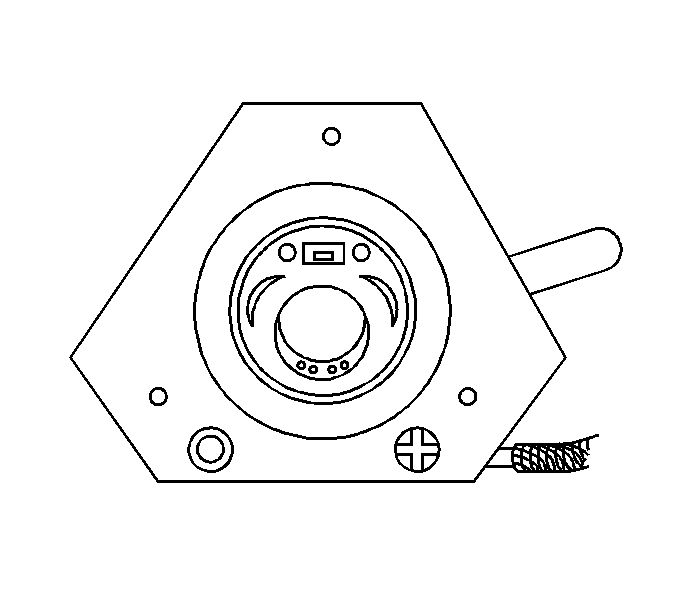
- Insert your finger into the filler neck opening. About 6.35 mm (0.25 in) below the spring door is a hump/bump, which extends all the way around the interior diameter of the fuel filler neck.
- Referencing the above art and using a punch, place four evenly spaced punch marks (drill pilots) on the ridge under the fuel filler neck flap.
- With the 152 mm (6 in) long, 3.175 mm (0.125 in) (1/8 in) drill bit, carefully drill four holes. These holes must not go through the outside of the fuel filler neck. As soon as you feel the drill break through the first level of metal, stop drilling.
- After all four holes have been drilled, feel into the opening for burrs from the drilling process. If burrs are felt, remove them with a suitable tool.
- Using compressed air, blow out all metal chips from the drilling process.
- Reinstall the fuel filler neck to the vehicle and secure with the 7 mm (0.28 in) screws.
- Reinstall the fuel cap to the filler neck.
- Raise the vehicle.
- Insert the test hose, long end first, into the fuel filler hose to within 50 mm (2 in) of the 1st marked location.
- Reinstall the fuel filler neck ground strap to the frame bolt.
- Reinstall the rear axle vent tube retainer into its original location.
- Reinstall the fuel and vapor hoses to the fuel filler neck.
- Reconnect the negative battery cable.


Important: Once the holes have been drilled, you should NOT be able to see the holes by simply removing the gas filler cap. The four holes should be located under the silver metallic flap on the flange inside the filler neck from the 10 o'clock position to the 2 o'clock position. If you CAN see the holes with the gas cap removed, the holes have been drilled in the wrong location.
Tighten
Tighten the screws to 2.3 N·m(20 lb in).
Slowly and carefully continue inserting the test hose into the filler hose. You may feel a resistance where the fuel filler hose joins the "T" on top of the tank. If so, turn the hose while inserting so that the hose slips over the end of the "T". About 12 mm (0.47 in) into the "T" is a valve (anti-splash back valve).
Continue to insert the test hose until you have reached the 2nd mark on the hose. If the test hose will not slide past the valve to the 2nd location, the rear auxiliary fuel tank must be replaced. Remove the test hose and continue with the next step.
Tighten
Tighten the bolt to 9 N·m(80 lb in).
Tighten
Tighten the hose clamps to 2.5 N·m(22 lb in).
Tighten
Tighten the battery negative terminal bolt to 16 N·m
(12 lb ft).
Parts Information
Part Number | Description | Qty |
|---|---|---|
15181810 | Pipe Assembly, Fuel Tank Filler | 1 |
Parts are currently available from GMSPO.
Warranty Information
For vehicles repaired under warranty, use:
Labor Operation | Description | Labor Time |
|---|---|---|
L1068 | Neck, Hose and/or Vent Hose, Fuel Tank Filler - Repair or Replace | Use Published Labor Operation Time |
