Rattle Noise from Wheel or Hub Cap While Driving, loose Wheel Nut Caps or Wheel Nut Caps May Not TIghten on Wheel Nuts (Inspect/Replace Wheel Nut Caps as Necessary)

| Subject: | Rattle Noise from Wheel or Hub Cap While Driving, Loose Wheel Nut Caps Or Wheel Nut Caps May Not Tighten on Wheel Nuts (Inspect/Replace Wheel Nut Caps As Necessary) |
| Models: | 2007-2008 Chevrolet Express, Silverado, Suburban (2500 & 3500 Series Only) |
| 2007-2008 GMC Savana, Sierra, Yukon XL (2500 & 3500 Series Only) |
| with 8 Lug Wheel Nut Center Caps |
| Attention: | Some wheel nut caps may not install or stay retained onto the threaded wheel nuts during the initial vehicle prep. The wheel nut caps should be inspected prior to installing the center wheel hub caps. |
Do This | Don't Do This |
|---|---|
Inspect the wheel nut caps and replace as necessary. | DO NOT replace the center wheel hub cap. |
Condition
Some customers may comment on a rattle noise from the wheel or hub cap while driving. Other customers may comment on loose wheel nut caps or caps that may not tighten on the wheel nuts.
Cause

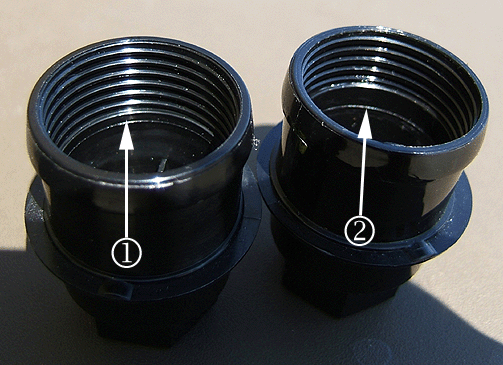
This condition may be caused by the lack of internal threads inside the wheel nut caps. The wheel nut cap (1) is correctly threaded. The wheel nut cap (2) shows the insufficient threads.
Inspect Wheel Nut Caps

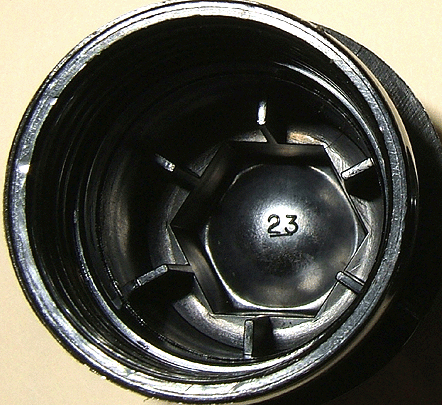
The suspect production wheel nut caps can be identified by the numbers 17-24 stamped inside the wheel nut cap as shown in the above illustration.

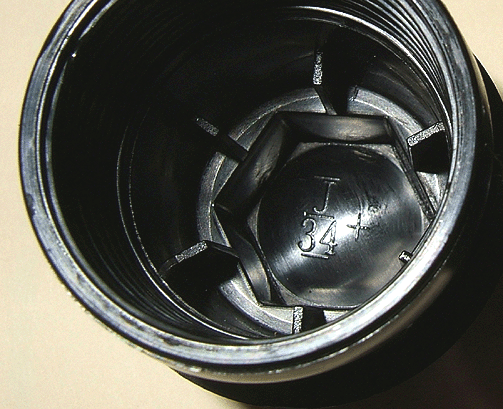
The known good production wheel nut caps can be identified by the letter 'J ' with a numeric number of 1-8 or 25-40 stamped inside the cap along with a plus (+) sign as shown in the above illustration.
Correction
Important: The wheel nut caps are serviced separately from the center wheel hub cap.
Inspect each wheel nut cap and replace as necessary using the steps below.
- Remove the wheel hub cap from the vehicle.
- Place the front of the wheel hub cap down on a protected clean work bench being careful not to scratch or damage the hub cap surface.
- Inspect all the wheel nut caps, marking any bad wheel nut caps.
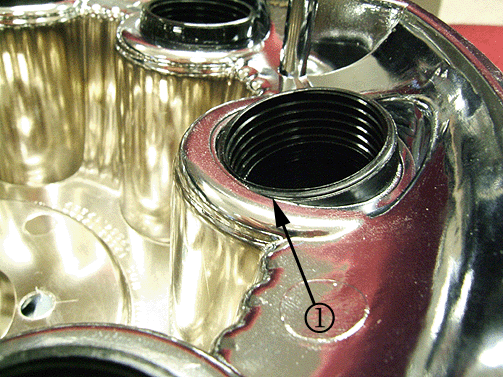
- From inside the hub cap, apply direct pressure to one side of the wheel nut cap rim (1). The wheel nut cap will tip down and pop out of the wheel hub cap hole when enough pressure is applied. Repeat this procedure for any additional wheel nut caps that need to be replaced.
- Flip the hub cap over on the work bench. The emblem side should be up.
- Install the new wheel nut cap into the existing hub cap hole by applying direct pressure to the front center of the wheel nut cap.
- Install the wheel hub cap onto the vehicle and tighten the wheel nut caps.
- Repeat this entire procedure for each additional hub cap.

Tip
The wheel nut cap can be removed by placing a drift or punch inside the center of the nut cap and using a hammer to tap the wheel nut cap out of the hub cap.
Tip
A 22 mm (7/8 in) socket placed over the wheel nut cap may be used along with a hammer to tap the new wheel nut cap back into the hub cap hole.
Parts Information
Some service replacement wheel nut caps may have the letter "M" stamped inside the cap along with a numerical number due to the fact the wheel nut caps are made by different suppliers.
Part Number | Description | Qty |
|---|---|---|
9597158 | Cap, Wheel Nut | As Necessary |
Warranty Information
For vehicles repaired under warranty, use:
Labor Operation | Description | Labor Time |
|---|---|---|
E9460* | Cap, Wheel Nuts - Replace-One Wheel Hub Cap | 0.3 hr |
Add | Cap, Wheel Nuts - Replace-Each Additional Wheel Hub Cap | 0.2 hr |
*This labor operation number is for bulletin use only. This number will not be published in the Labor Time Guide. | ||
