Water Intrusion Into Rear Compartment (Replace Weatherstrip/Adjust Doors)

| Subject: | Water Intrusion into Rear Compartment (Replace Primary Weatherstrip/Adjust Doors if Necessary) |
| Models: | 1999-2000 Cadillac Escalade |
| 1999-2000 Chevrolet and GMC C/K Utility Models (Tahoe Z71 and Limited, Yukon Denali) |
| 1999 Chevrolet and GMC C/K Utility Models (Tahoe, Suburban, Yukon) |
| With Cargo Doors or Endgate (RPOs ZW9, E55) |
| Built Prior to the following Production Dates: |
Make | Model | Plant | Built Prior To |
|---|---|---|---|
Chevrolet GMC | Tahoe Suburban Yukon | Janesville, WI | 9-14-99 |
Chevrolet GMC | Tahoe Suburban Yukon | Arlington, TX | 9-28-99 |
Chevrolet GMC | Tahoe Suburban Yukon | Silao, MEX | 10-26-99 |
Chevrolet GMC Cadillac | Tahoe Z71/Limited Yukon Denali Escalade | Arlington, TX | 9-28-99 |
Condition
Some owners of the above listed vehicles may comment on water entering into the rear compartment area.
Cause
Cargo Doors
The following conditions may cause water intrusion:
| • | The weatherstrip carrier may be allowing water to enter at the upper radius of the door opening, traveling down to the sill area into the rear compartment. |
| • | The rear door may be misaligned at the top, outer edge, causing "overcompression" of the primary and auxiliary seals at the left rear defogger (RPO C49) switch area. |
| • | The rear door may be misaligned side-to-side, causing poor contact to the auxiliary weatherstrip at the top of the door. |
| • | The left rear door vertical weatherstrip mucket (insulator) may not be horizontal on contact with the primary weatherstrip. |
Endgate
The current weatherstrip may allow water intrusion at the electrical contact on the left and right side of the rear compartment.
Correction
Cargo Doors
A new rear cargo door opening primary weatherstrip has been developed to correct this condition. This weatherstrip has a mastic (pastelike) sealer in the carrier that should address the water intrusion provided there are no other existing door conditions. Replace the primary weatherstrip on affected vehicles using the following procedure and the part number listed below. Some interior trim panels will need to be removed in order to replace the weatherstrip. Refer to the Interior Trim subsection of the Service Manual.
Cargo Door Inspection and Correction
Inspect the doors using the following steps and correct as necessary:
| • | Verify that the top outside corner of the doors are not tight to the body. Place a rubber mallet halfway between the upper hinge and the top of the door and attempt to close the door on the mallet. The gap between the body and the doors should be between 6-8 mm (0.24-0.32 in) at the top outboard corners. |
| Notice: Do not apply too much pressure. This may cause the window to break under severe stress. |
| • | If the doors are outboard, apply inward and downward pressure to the top inside edge of the door while in the open position. |
| • | Verify that the left rear door weatherstrip mucket (insulator) is horizontal when contacting the primary weatherstrip. Adjust the mucket (insulator) if necessary. |
Endgate
A new endgate opening primary weatherstrip has been developed to correct this condition. This weatherstrip has solid foam reinforcement inside the carrier on the left and right side, at the electrical contact area, that should prevent the weatherstrip from pulling away from the body. Replace the primary weatherstrip on affected vehicles using the following procedure and the part number listed below. Some interior trim panels will need to be removed in order to replace the weatherstrip. Refer to the Interior Trim subsection of the Service Manual.
Weatherstrip Replacement (Cargo Door Models)
Use the following steps to replace the cargo door opening primary weatherstrip:
- Open the back doors.
- Remove the spare tire. Refer to the Tires and Wheels subsection of the Service Manual.
- Remove the RH and the LH rear corner upper garnish moldings.
- Remove the RH and the LH rear corner lower garnish moldings and the rear sill trim as an assembly.
- Remove the rear upper body opening molding.
- Remove the back door opening surround weatherstrip from the pinchweld flange.
- Install the rear door opening primary weatherstrip using the following steps:
- Install the rear upper body opening molding.
- Install the RH and the LH rear corner lower garnish moldings and rear sill trim as an assembly.
- Install the RH and the LH rear corner upper garnish moldings.
- Install the spare tire. Refer to the Tires and Wheels subsection of the Service Manual.

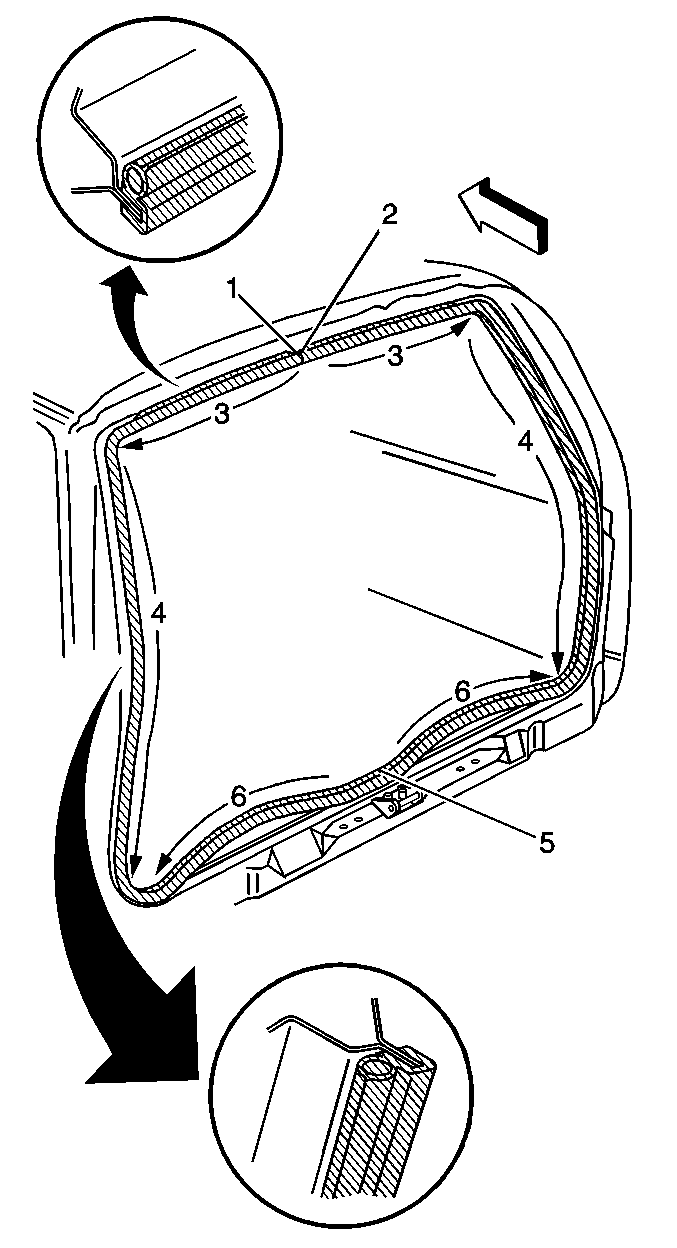
| 7.1. | Align the mark (2) on the weatherstrip to align with the center of the LH striker bolt hole (1). |
| 7.2. | Push the weatherstrip onto the flange working outward in both directions (3). Ensure that the weatherstrip is secure in both corners. |
| 7.3. | Push the weatherstrip down both sides of the outer flanges to the lower corners (4). |
| 7.4. | Install the weatherstrip to the center of the lower door opening flange (5). |
| 7.5. | Push the excess loops of the weatherstrip from the center, outward to corners (6). |
| 7.6. | Push the weatherstrip securely around the perimeter of the door opening flange. |
Weatherstrip Replacement (Endgate Models)
Use the following steps to install the endgate door opening primary weatherstrip:
- Remove the rear floor rear trim plate.
- Remove the LH and the RH rear corner upper garnish moldings.
- Remove the LH and the RH rear corner lower garnish moldings.
- Remove the rear window upper garnish molding.
- Remove the endgate opening weatherstrip from the pinchweld flange.
- Install the endgate opening primary weatherstrip using the following procedure:
- Install the rear window upper garnish molding.
- Install the LH and the RH rear corner lower garnish moldings.
- Install the LH and the RH rear corner upper garnish moldings.
- Install the rear floor rear trim plate.

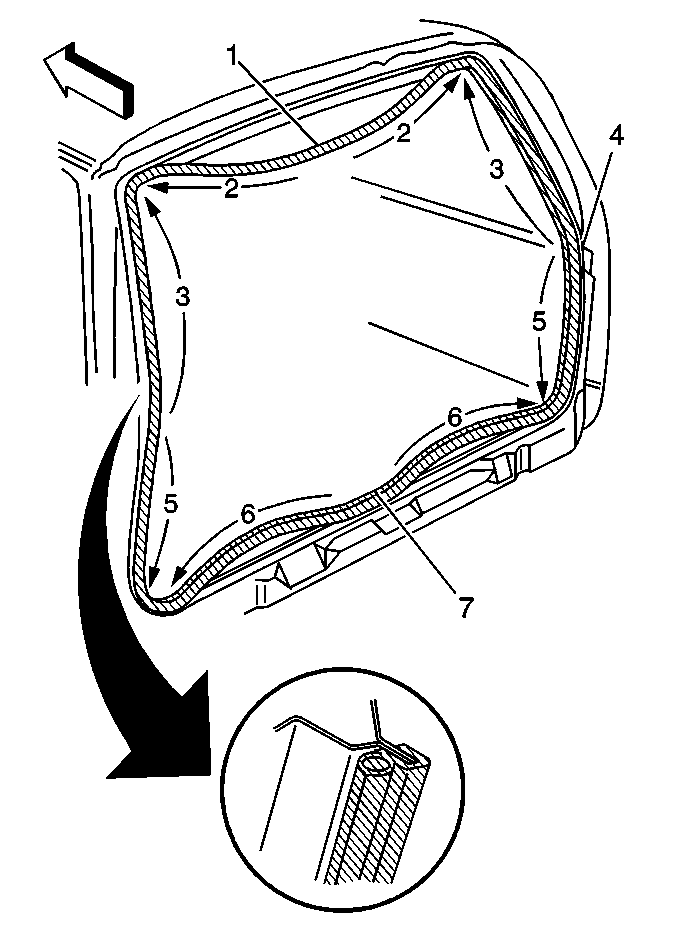
| • | Align the marks on the weatherstrip with the top trim edge of the door frame reinforcement (4). |
| • | Push the weatherstrip onto the LH and the RH flange working upward to upper corners (3). |
| • | Push the weatherstrip upward to the center of the upper flange (1). |
| • | Push the weatherstrip from the upper center flange to the outer upper corners (2). |
| • | Return to the weatherstrip marks as described in step 1. Push the weatherstrip downward on lower flange to the lower corners (5). Ensure that the weatherstrip is secure in the corners. |
| • | Install the weatherstrip to the center of the lower door opening flange (7). |
| • | Push the excess loops of the weatherstrip from the center of the lower flange outward to the lower corners (6). |
| • | Push the weatherstrip securely around the perimeter of the door opening flange. |
Parts Information
Part Number | Description |
|---|---|
15758706 | Weatherstrip Asm - Rear Door |
15758707 | Weatherstrip Asm - Endgate |
Parts are currently available from GMSPO.
Warranty Information
For vehicles repaired under warranty, use:
Labor Operation | Description | Labor Time |
|---|---|---|
C1345 | Weatherstrip, Back Door - Opening Surround - Replace | 0.7 hr* |
C1328 | Weatherstrip, Tailgate/Liftgate Opening - Replace | Use published labor operation time |
*This time is updated from the current Labor Time Guide. The next update of the Labor Time Guide will contain this change. | ||
In Other Labor Hours, add 0.2 hr for inspecting and aligning cargo door vehicles. Authorization is required. | ||
