| Subject: | Release of New Tool J 45380 -- Rear Output
Shaft Bushing Remover and Installer |
| Models: | 1998-2003 Light Duty Truck Models |
| with AWD or 4WD and any of the following Transfer Case Models: 126,
136, 149, 226, 233, 236, 246, 261 or 263 (Except 261 SHD or 263 SHD) |
A new tool, J 45380, has been released to remove and install
the rear output shaft bearing. The following procedures may be used.
Identification
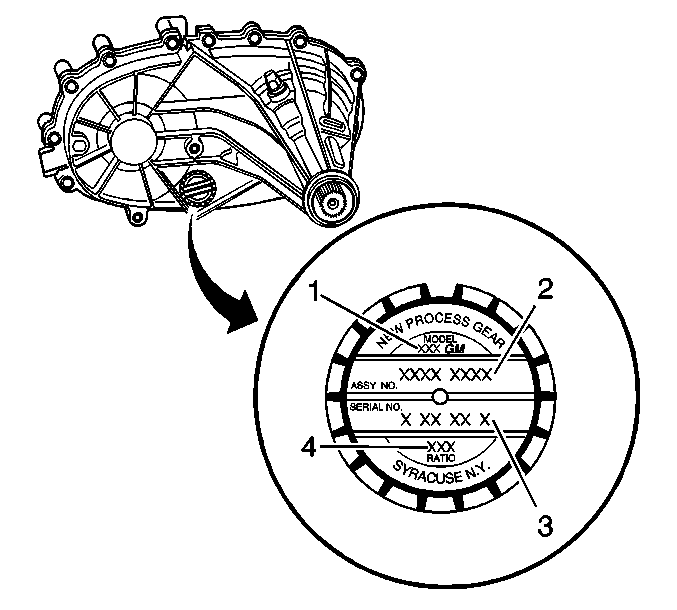
Identify the transfer case model as shown in the following figure.
Transfer Case identification Tag

| - | First Digit; 1 = Single Speed, 2 = Two Speed |
| - | Second Digit; 2 = T Utility, 3 = T Truck, L Van, 4 or 6 = K Truck
and Utility |
| - | Third Digit; 1 = Manual, 3 = Electric Shift, 6 = Automatic, 9
= All Wheel Drive |
| • | Serial Number (Date and Shift Code) (3) |
| • | Low Range Reduction Ratio (4) |
Removal Procedure
- Raise and suitably support the vehicle. Refer to Lifting and Jacking
the Vehicle in the General Information sub-section of the Service Information.
- Remove the transfer case shield, if equipped. Refer to Transfer
Case Shield Replacement in the Transfer Case sub-section of the Service Information.
- Remove the rear propeller shaft. Refer to Propeller Shaft Replacement
- Rear in the Propeller Shaft sub-section of the Service Information.
- Remove the rear output shaft seal.
- Inspect the rear output shaft bushing for scoring or wear.
- Remove the rear output shaft bushing using the J 45380.
| 6.1. | Install the finger section of the J 45380 in the front
of the bushing. |
| 6.2. | Install the tube and forcing screw to the finger section. Ensure
the forcing screw is backed out. |
| 6.3. | Using a wrench on the forcing screw, remove the rear output shaft
bushing. |
Installation Procedure
- Using the J 45380, install a NEW rear output shaft bushing.
| • | Install the bushing on the finger section of the J 45380. |
| • | Install the finger section of the J 45380. |
| • | Position the bushing and the tool to the case. |
| • | Using a hammer and J 45380, install the bushing. |
- Using the appropriate seal installer, install the rear output
shaft seal in the transfer case.
- Install the rear propeller shaft. Refer to Propeller Shaft Replacement
- Rear in the Propeller Shaft sub-section of the Service Information.
- Verify the fluid level. Refer to Transfer Case Fluid Replacement.
- Install the transfer case shield, if equipped. Refer to Transfer
Case Shield Replacement in the Transfer Case sub-section of the Service Information.
- Lower the vehicle.
Warranty Information
For vehicles repaired under warranty, use:
Labor Operation
| Description
| Labor Time
|
K4265
| Bushing, Transfer Case Output Shaft - Replace
| 0.4 hr
|


